1
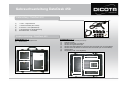
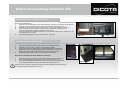
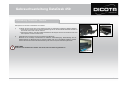
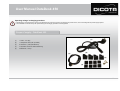
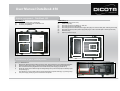
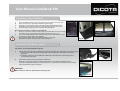
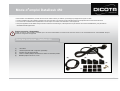
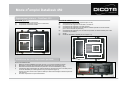
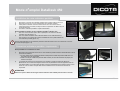
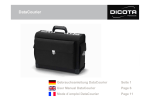
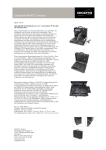
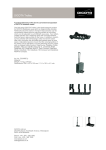
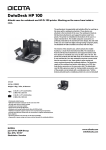
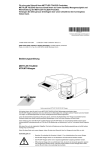
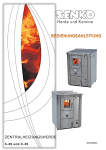
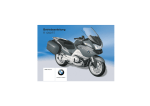
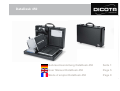
DataDesk 450
Gebrauchsanleitung DataDesk 450
Seite 1
User Manual DataDesk 450
Page 5
Mode d´emploi DataDesk 450
Page 9
Gebrauchsanleitung DataDesk 450
Sehr geehrte Kundin, sehr geehrter Kunde,
wir danken Ihnen, dass Sie sich für ein DICOTA - Produkt entschieden haben. Bevor Sie Ihre DataDesk 450 zum ersten Mal benutzen, lesen
Sie bitte die folgende Gebrauchsanweisung sorgfältig durch. Die DataDesk 450 ist für den momentan handelsüblichen HP DJ 450 Drucker
geeignet. Bitte informieren Sie sich bei Ihrem Fachhändler oder mit dem Produktdetektiv unter www.dicota.com, welche Notebooks geeignet
sind.
Inhaltsverzeichnis
Inhaltsverzeichnis
Allgemeine Hinweise
1
- Arbeitsumgebung
1
- Betriebsspannung
1
Innenausstattung
3
- Kofferdeckel
3
- Kofferboden
3
Installation Ihres mobilen Druckers
3
Installation Ihres Notebooks
4
Verbindung: Notebook – Drucker
4
User Manual (English)
5
Mode d’emploi (Français)
9
Allgemeine
Allgemeine Hinweise
Hinweise -- DataDesk
DataDesk 450
450
Arbeitsumgebung
Bitte achten Sie grundsätzlich darauf, dass Ihre DataDesk 450 auf einer stabilen, rutschfesten Arbeitsfläche zum Einsatz kommt. Vermeiden Sie insbesondere Arbeitsflächen
in staubiger oder feuchter Umgebung!
→ Bitte achten Sie beim Öffnen Ihres Attachékoffers DataDesk 450 immer darauf, dass die Kofferschale mit dem Koffergriff oben liegt!
→ Falls Sie Ihre DataDesk 450 ohne Kofferoberschale nutzen wollen, können Sie diese wie folgt entfernen. Öffnen Sie hierzu den Attachékoffer in einem Winkel von
ca. 60° - 70°. In diesem Winkel werden Sie einen leichten Widerstand verspüren und können den Kofferdeckel horizontal zur rechten Seite hin abziehen.
→ Vermeiden Sie den Einsatz Ihrer DataDesk 450 in der Nähe extremer äußerer Wärmeeinflüsse/-quellen (z.B. Heizkörper). Schützen Sie Ihre DataDesk 450 vor
direkter Sonneneinstrahlung!
→ Für genaue Angaben bezüglich der Temperatur der Betriebsumgebung lesen Sie bitte die Gebrauchsanleitung Ihres Notebook- bzw. Druckerherstellers.
→ Die Geräte sollten nur bei einem geöffneten Zustand des Koffers betrieben werden.
→ Nach längerem Betrieb der Geräte darf der Koffer nicht sofort geschlossen werden, um ein Abkühlen nach außen zu gewährleisten!
Betriebsspannung / Ladevorgang
→ Bitte beachten Sie beim Anschluss an die Betriebsspannung (Netz), dass Sie Ihr Netzkabel zuerst mit dem Koffer und anschließend mit der Spannungsquelle verbinden!
→ Der Ladevorgang Ihrer Geräte sollte grundsätzlich bei geöffnetem Zustand ihrer DataDesk 450 passieren!
1
Gebrauchsanleitung DateDesk 450
Lieferumfang
Lieferumfang -- DataDesk
DataDesk 450
450
(1)
(1)
1 x 220 V – Kaltgerätestecker
(2)
1 x USB Druckerkabel (360° drehbar)
(3)
8 x 3M Velcro – Pads (selbstklebend)
(4)
4 x Kunststoffecken zur Notebookfixierung
(5)
Abschließbare Box, 2 x Schlüssel
(4)
(2)
(5)
(3)
Innenausstattung
Innenausstattung -- DataDesk
DataDesk 450
450
Kofferdeckel (Abb. 1)
Kofferboden
(1)
(2)
(1)
(2)
(3)
(4)
(5)
(6)
(7)
(8)
Dokumenten- / Druckpapier-Fach
Zubehörfacher
(Abb. 2)
Passform für Ihren Drucker (HP DJ 450)
Kabelführungshilfe
Staufach für CD-ROM, 3,5“ FDD, etc.
Staufach für ausgedrucktes Papier
Staufach für Notebook-Netzteil zum Anschluss an Euro 8-Stecker (mit / ohne Schutzleiter)
Staufach für Drucker-Netzteil zum Anschluss an Euro 8-Stecker (mit / ohne Schutzleiter)
Notebook-Strap
Klappdeckel (in Abb. 2 nicht abgebildet)
(7)
(5)
(2)
(3)
(2)
(1)
(4)
(1)
Abb. 1
(6)
(2)
Abb. 2
(7)
2
Gebrauchsanleitung DataDesk 450
Installation
Installation Ihres
Ihres mobilen
mobilen Druckers
Druckers
Öffnen Sie Ihre DataDesk 450.
1)
Entnehmen Sie den Klappdeckel in der Kofferunterschale, welcher als Ihr Notebook-Arbeitsplatz dient.
2)
Legen Sie das Drucker-Netzteil in das vordere Fach der Kofferunterschale (Fach Nr. 6).
3)
Verbinden Sie nun den Euro 8 Stecker mit dem 220 V - Anschluss am Netzteil (in Fach Nr. 6).
4)
Führen Sie das Drucker-Stromkabel in der für das Kabel vorgesehenen Vertiefung durch
(unter dem Klappdeckel) und seitlich am Drucker vorbei (Abb. 3).
Achten Sie hierbei auf eine saubere Kabelführung, um eventuelle Schäden (durch Abklemmung, etc.)
am Druckerkabel zu vermeiden!
5)
Der Netzteilausgangsstecker wird nun mit dem Drucker verbunden.
Abb. 3
Installation
Installation Ihres
Ihres Notebooks
Notebooks
1)
2)
3)
4)
Legen Sie das Notebook-Netzteil in das hintere Fach der Kofferunterschale.
Verbinden Sie nun den 220 V - Stecker mit dem Notebook-Netzteil.
Führen Sie anschließend das Niedervolt – Netzteilausgangskabel unterhalb des
Klappdeckels in der für das Kabel vorgesehenen Vertiefung durch, so dass das
Kabel im geschlossen Zustand des Deckel keinen Schaden nehmen kann!
Der Netzteilausgangsstecker wird nun mit dem Notebook verbunden.
Nun haben Sie zwei Möglichkeiten Ihr Notebook zu befestigen:
1)
2)
Wahlweise nehmen Sie die vier im Lieferumfang enthaltenen Kunststoffecken und
fixieren diese mittels der selbstklebenden acht 3M Velcro-Pads (Abb. 1), oder
Sie nutzen die selbstklebenden 3M Velcro–Pads und kleben diese paarweise direkt
auf die Klappdeckeloberseite und der Unterseite Ihres Notebooks (Abb. 2).
Abb. 1
Abb. 3
Abb. 2
Fixieren Sie zum Transport Ihr Notebook grundsätzlich mit dem Klettband (Transportsicherung)
auf der Deckeloberseite des Klappdeckels (Abb. 3).
3
Gebrauchsanleitung DataDesk 450
Verbindung:
Verbindung: Notebook
Notebook -- Drucker
Drucker
Zwei Optionen um Drucker und Notebook zu verbinden:
1)
Verbinden Sie Ihren HP DJ 450 und Ihr Notebook mit dem im Lieferumfang enthaltenen USB-Druckerkabel.
→ Achten Sie auch hierbei auf eine saubere Kabelführung! Führen Sie das USB-Druckerkabel entweder um
den Drucker herum oder unter ihm hindurch.
→ Beachten Sie weiterhin, dass das USB-Druckerkabel den Druckpapier-Auswurf nicht behindert und somit
kein Papierstau verursacht werden kann!
2)
Datenübertragung zwischen Drucker und Notebook mit Bluetooth:
Bluetooth ist ein neuartiger Funkstandard zur kabellosen Datenübertragung. Notebookseitig wird die
Datenverbindung mit Bluetooth über ein internes Interface oder ein PC-Card-Modul aufgebaut. Seitens
des Druckes kann der Aufbau der Datenverbindung z.B. über ein Compact Flash-Modul geschehen.
ACHTUNG!
Achten Sie beim Schließen Ihres Koffers stets darauf, dass kein Kabel eingeklemmt ist!
Bsp.: Bluetooth
4
User Manual DataDesk 450
Dear Customers,
We would like to thank you that you bought a DICOTA product. Before you use your DataDesk 450 for the first time please read the following
user manual thoroughly. The DataDesk 450 is suitable for the currently available printer model HP DJ 450. Please consult your local dealer or
the product detective at www.dicota.com to find out which Notebooks are suitable.
Table
Table of
of contents
contents
General information
5
- Work enviroment
5
- Operating voltage
6
Combination lock / scope of supply
6
Interior equipment
7
- Case lid
7
- Case bottom
7
Installation of your printer
7
Installation of your Notebook
8
Connection: Notebook – printer
8
General
General information
information -- DataDesk
DataDesk 450
450
Work enviroment
Please make sure that your DataDesk 450 is always operated on a steady, non-skid surface. Especially avoid working surfaces in dusty or damp environments!
→ When opening your DataDesk 450 attaché case, please make sure that the case shell with the case handle is upside!
→ If you would like to use your DataDesk 450 without the upper case shell, you can remove it as follows: Open the attaché case at an angle of approx. 60° - 70°. At this angle
you feel a slight resistance and you can detach the case lid by pulling it horizontally to the right.
→ Avoid the use of your DataDesk 450 near extreme heat sources (e.g. heaters). Protect your DataDesk 450 from direct sun irradiation!
→ For exact information regarding the temperature of the work environment, please refer to the user’s guide of your Notebook or printer manufacturer.
→ The equipment should only be operated when the case is opened.
→ The case should not be immediately closed after the equipment has been used for a long period of time, so as to ensure a cooling-off period!
5
User Manual DataDesk 450
Operating voltage / recharging procedure
→ Please keep in mind that the line cord is to be attached to the case first, and then connected to the power source, when connecting with the power supply system!
→ The DataDesk 450 should always be opened during the recharging procedure of the equipment!
Scope
Scope of
of supply
supply -- DataDesk
DataDesk 450
450
(1)
(1)
1 x 220 V – IEC plug
(2)
1 x USB printer cable (360° pivotable)
(3)
8 x 3M Velcro – pads (self-adhesive)
(4)
4 x Synthetic corners for notebook fastening
(5)
Lockable box, 2 x keys
(4)
(2)
(5)
(3)
6
User Manual DataDesk 450
Interior
Interior equipment
equipment -- DataDesk
DataDesk 450
450
Case lid (Fig. 1)
Case lid
(1)
(2)
(3)
(1)
(2)
(3)
(4)
(5)
(6)
(7)
(8)
Document / printer paper compartment
Accessory compartment with combination lock
Accessory compartment
(Fig. 2)
Fit for your printer (HP DJ 450)
Cable routing help
Stow-away pocket for CD-ROM, 3,5“ FDD, etc.
Stow-away pocket for printed paper
Stow-away pocket for notebook power supply with plug for a Euro 8-socket (with / without ground wire)
Stow-away pocket for printer power supply with plug for a Euro 8-socket (with / without ground wire)
Notebook strap
Flap lid (not seen in Fig.2)
(7)
(5)
(2)
(3)
(2)
(1)
(4)
(1)
Fig. 1
(6)
(2)
Installation
Installation of
of your
your mobile
mobile printer
printer
(7)
Fig. 2
Open your DataDesk 450.
1)
Remove the flap lid from the bottom part of the case, which functions as your Notebook workspace.
2)
Place the printer power supply in the front pocket of the bottom part of the case (pocket No. 6).
3)
Now connect the Euro 8 plug with the 220 V socket of the power supply (in pocket No. 6).
4)
Route the printer power cable through the designated groove (under the flap lid) and sideways past
the printer (Fig. 3).
Pay attention to a clean cable routing to prevent damaging the printer cable (e.g. by pinching it off)!
5)
The power supply outlet plug is now connected to the printer.
Fig. 3
7
User Manual DataDesk 450
Installation
Installation of
of your
your Notebook
Notebook
1)
2)
3)
Place the Notebook power supply in the rear pocket of the bottom part of the case.
Now connect the 220 V plug with the Notebook’s power supply.
Route the low voltage power supply outlet cable beneath the flap lid through the
designated groove, so that the cable can not be damaged when the lid is closed!
The power supply outlet plug is now connected with the Notebook.
4)
Now you have two options of fastening your Notebook:
1)
Either you use the four synthetic corners which are provided within the scope of supply
and fasten them by using the eight self-adhesive 3M Velcro pads (Fig. 1) or
2)
you use the self-adhesive 3M Velcro pads and adhere these in pairs directly onto the
case lid and the bottom side of your Notebook.
→ During transport always fasten your Notebook with the Velcro strap
(transport protection) on the upper side of the flap lid (Fig. 3)
Fig. 1
Fig. 3
Fig. 2
Connection:
Connection: Notebook
Notebook -- printer
printer
Two options of connecting Notebook and printer:
1)
Connect your HP DJ 450 and your Notebook by using the USB cable which is provided in the scope of supply.
→ Ensure a clean cable routing here as well! Either route the USB printer cable around or underneath
the printer.
→ Furthermore, make sure that the USB printer cable does not interfere with the printer paper output,
thus preventing paper jams!
2)
Data transfer between printer and Notebook via Bluetooth:
Bluetooth is a new radio standard for cableless data transfer. The Notebook establishes the data
connection via Bluetooth through an internal interface or a PC card module. The printer can be connected
with a compact flash module, for example.
CAUTION !
Make sure that no cables are pinched when closing the case!
e.g.: Bluetooth
8
Mode d´emploi DataDesk 450
Cher/Chère client(e),
Nous vous remercions d’avoir choisi un produit DICOTA. Avant la première mise en service de votre DataDesk 450, veuillez lire attentivement
le présent mode d’emploi. DataDesk 450 est compatible avec l’imprimante HP DJ 450 actuellement disponible dans le commerce. Pour connaître
les ordinateurs portables compatibles, veuillez vous informer auprès de votre magasin spécialisé ou utiliser notre détective-produit sur Internet
www.dicota.com.
Sommaire
Sommaire
Informations générales
9
- Environnement de travail
9
- Tension en service
10
Serrure à combinaison / Détail des fournitures
10
Agencement intérieur
11
- Couvercle de la mallette
11
- Fond de la mallette
11
Installation de votre imprimante portable
11
Installation de votre ordinateur portable
12
Connexion: ordinateur portable – imprimante
12
Informations
Informations générales
générales –– DataDesk
DataDesk 450
450
Environnement de travail
Utilisez toujours votre DataDesk 450 sur une surface stable et non glissante, en prenant soin d’éviter les endroits poussiéreux ou humides.
→ Veillez à ce que la poignée d’ouverture de la coque se trouve sur le dessus de la mallette avant de l’ouvrir.
→ Si vous souhaitez utiliser votre DataDesk 450 sans la coque supérieure, vous pouvez la retirer en suivant les instructions ci-dessous. Soulevez la coque en créant un angle
d’ouverture de 60 à 70 degrés. Une légère résistance se fait sentir à ce stade. Faites glisser le couvercle horizontalement vers la droite.
9
Mode d´emploi DataDesk 450
→ Evitez d’utiliser votre DataDesk à proximité d’une source de chaleur intense (un radiateur, par exemple) et protégez-le des rayons du soleil!
→ La notice d’utilisation de votre ordinateur portable et de votre imprimante vous donnera plus de renseignements sur la température de l’environnement de travail.
→ Le couvercle de la mallette doit être impérativement ouvert lorsque vous utilisez votre ordinateur et votre imprimante.
→ Lorsque les appareils ont été utilisés de façon intensive et durant une durée longue, il est important de ne pas refermer le couvercle immédiatement, pour permettre un
refroidissement des équipements.
Tension en service / Chargement
Veuillez raccorder le câble secteur à la mallette, puis à la source d’alimentation au moment de la mise sous tension. Il est recommandé d’ouvrir votre DataDesk 450 pour
procéder au chargement des appareils!
Détail
Détail des
des fournitures
fournitures –– DataDesk
DataDesk 450
450
(1)
(1)
1 fiche 220 V
(2)
1 câble d’imprimante USB à angle 360° (orientable)
(3)
8 bandes velcro 3M (autocollantes)
(4)
4 cales en matière plastique nécessaires à la fixation du ordinateur portable
(5)
Mallette équipée d’une serrure, 2 clés
(4)
(2)
(5)
(3)
10
Mode d´emploi DataDesk 450
Agencement
Agencement intérieur
intérieur -- DataDesk
DataDesk 450
450
Couvercle (figure n°1)
Fond de la mallette (figure n°2)
(1)
(2)
(3)
(1)
(2)
(3)
(4)
(5)
Compartiment papier et documents
Compartiment accessoires avec serrure à combinaison
Compartiment accessoires mobiles
(6)
(7)
(8)
Emplacement dédié pour votre imprimante (HP DJ 450)
Accessoires de pose des câbles
Compartiment de rangement de CD-ROM, 3,5“ FDD, etc.
Compartiment de rangement pour papier imprimé
Compartiment de rangement pour connecteurs ordinateur portable aux fiches 8 EURO
(avec / sans conducteur de protection)
Compartiment de rangement pour connecteurs imprimante aux fiches 8 EURO (avec / sans
conducteur de protection)
Sangle
Couvercle rabattable (n’apparaît pas sur la figure n°2)
(3)
(7)
(5)
(2)
(1)
(3)
(4)
Fig. N°1
(1)
(6)
(2)
Installation
Installation de
de votre
votre imprimante
imprimante portable
portable
Fig. N°2
Ouvrez votre DataDesk 450.
1)
Retirez le couvercle rabattable du fond de la coque. Il vous servira d’espace de travail.
2)
Disposez le connecteur de l’imprimante dans la partie avant de la coque (figure n°6).
3)
Raccordez la fiche 8 EURO connectée à la prise 220 V au bloc d’alimentation. (cf N°6)
4)
Introduisez le câble d’alimentation de l’imprimante dans le renfoncement prévu à cet effet (sous le
couvercle rabattable) en le faisant glisser le long de l’imprimante (figure 3).
Assurez vous de la bonne mise en place du câble pour éviter d’endommager le câble d’imprimante
(par pression).
5)
Connecter l’imprimante à la prise d’alimentation.
(7)
Fig. N°3
11
Mode d´emploi DataDesk 450
Installation
Installation de
de votre
votre ordinateur
ordinateur portable
portable
1)
2)
3)
Disposez le connecteur de l’ordinateur portable dans la partie arrière de la coque.
Raccordez la fiche 220 V au bloc d’alimentation de l’ordinateur portable
Faites passer le câble de connection basse tension sous le couvercle dans le
renfoncement prévu à cet effet, de façon à assurer la protection du câble lorsque le
couvercle est fermé.
Connectez l’ ordinateur portable à la prise d’alimentation.
4)
Deux possibilités de fixation de votre ordinateur portable s’offrent à vous:
1)
Soit vous vous servez des quatre cales en plastique en les collant à l’aide des
8 bandes velcro 3M (figure n°1)
2)
Soit vous utilisez les bandes velcro 3M autocollantes en les collant directement,
deux par deux, sur le dessus du couvercle rabattable et sur les parties latérales de
votre ordinateur portable (figure n°2).
Fig. N°1
Fig. N°3
Fig. N°2
Arrimez systématiquement votre ordinateur portable à l’aide des bandes velcro sur le dessus du couvercle
en cas de transport (figure n°3)!
Connexion
Connexion ordinateur
ordinateur portable
portable -- imprimante
imprimante
Deux possibilités de connections au choix:
1)
Raccordez votre imprimante HP DJ 450 et votre ordinateur portable à l’aide du câble USB livré avec les
fournitures accessoires.
→ Ici aussi, veillez au bon passage des câbles. Faites passer le câble d’imprimante USB autour de
l’imprimante ou sous l’imprimante.
→ Faites en sorte que le câble d’imprimante USB n’entrave pas la sortie des feuilles de papier pour
éviter les bourrages!
2)
Le transfert des données entre l’imprimante et le ordinateur portable est réalisé par Bluetooth:
Bluetooth est une nouvelle technologie de réseau sans fil permettant de relier les appareils entre eux
sans liaison filiaire. La connexion des données se fait par l’intermédiaire d’une interface interne ou d’un
lecteur PC card. Un lecteur compact flash assure le traitement et la connexion des données de
imprimante.
ATTENTION!
Veillez à ce que les câbles soient rangés avant de refermer votre mallette pour éviter de les coincer!
Bluetooth
12