1
Dell™ OptiPlex™ SX Systems
Setup and Quick
Reference Guide
Guide de configuration et de référence rapide
Guía de instalación y de referencia rápida
Model DCT
w w w. d e l l . c o m | s u p p o r t . d e l l . c o m
Dell™ OptiPlex™ SX Systems
Setup and Quick
Reference Guide
Model DCT
w w w. d e l l . c o m | s u p p o r t . d e l l . c o m
Notes, Notices, and Cautions
NOTE: A NOTE indicates important information that helps you make better
use of your computer.
NOTICE: A NOTICE indicates either potential damage to hardware or loss of
data and tells you how to avoid the problem.
CAUTION: A CAUTION indicates a potential for property damage,
personal injury, or death.
Abbreviations and Acronyms
For a complete list of abbreviations and acronyms, see the “Glossary” in the
User’s Guide.
If you purchased a Dell™ n Series computer, any references in this
document to Microsoft® Windows® operating systems are not applicable.
____________________
Information in this document is subject to change without notice.
© 2002–2003 Dell Computer Corporation. All rights reserved.
Reproduction in any manner whatsoever without the written permission of Dell Computer
Corporation is strictly forbidden.
Trademarks used in this text: Dell, OptiPlex, and the DELL logo are trademarks of Dell Computer
Corporation; Microsoft and Windows are registered trademarks of Microsoft Corporation; Intel,
Pentium, and Celeron are registered trademarks of Intel Corporation.
Other trademarks and trade names may be used in this document to refer to either the entities claiming
the marks and names or their products. Dell Computer Corporation disclaims any proprietary interest
in trademarks and trade names other than its own.
July 2003
P/N 1U919
Rev. A03
Contents
About This Guide
Features .
. . . . . . . . . . . . . . . . . . . . . . . . . .
5
. . . . . . . . . . . . . . . . . . . . . . . . . . . . . .
5
CAUTION: Safety Instructions
General
. . . . . . . . . . . . . . . . . . .
7
. . . . . . . . . . . . . . . . . . . . . . . . . . . . .
7
When Using Your Computer
. . . . . . . . . . . . . . . . . . . .
When Working Inside Your Computer
. . . . . . . . . . . . . .
11
. . . . . . . . . . . . . . . . . . . . . . . .
11
Getting Started/Setup
. . . . . . . . . . . . . . . . . . . . . . .
Determine the Computer’s Placement and Orientation
Attaching the Stand
12
. . . . . .
12
. . . . . . . . . . . . . .
13
. . . . . . . . . . . . . . . . . . . . . . .
14
Installing a Device in the Module Bay
Connecting the AC Adapter
Connecting External Devices
Attaching the Cable Cover .
. . . . . . . . . . . . . . . . . . .
15
. . . . . . . . . . . . . . . . . .
16
. . . . . . . . . . . . . . . . . . .
17
. . . . . . . . . . .
19
. . . . . . . . . . . . . . . .
21
. . . . . . . . . . . . . . . . . . . . . . . . . .
22
Attaching the Stand to the Mounting Plate
Finding Information and Assistance
Solving Problems
10
. . . . . . . . . . .
Protecting Against Electrostatic Discharge
Battery Disposal
9
Troubleshooting Tools
. . . . . . . . . . . . . . . . . . . . . .
Running the Dell Diagnostics
23
. . . . . . . . . . . . .
23
. . . . . . . . . . . . . . . . . .
24
Using the Dell Drivers and Utilities CD
Running the Dell IDE Hard-Drive Diagnostics
. . . . . . . . . .
25
Contents
3
Regulatory Information
. . . . . . . . . . . . . . . . . . . . . .
Limited Warranties and Return Policy
. . . . . . . . . . . . . .
Limited Warranty for Dell-Branded Hardware Products
(U.S. Only) . . . . . . . . . . . . . . . . . . . . . . .
"Total Satisfaction" Return Policy (U.S. Only) .
. . . .
27
30
. . . . .
31
. . . . . . . .
33
. . . . . . . . .
34
. . . . . . . . . . .
35
"Total Satisfaction" Return Policy (Canada Only)
Dell Software and Peripherals (Canada Only) .
Intel® Warranty Statement for Pentium® and Celeron®
Processors Only (U.S. and Canada Only) . . . . . . . .
4
Contents
27
. . . . . . . . .
Limited Warranty Terms for Dell-Branded Hardware
Products (Canada Only) . . . . . . . . . . . . . . .
1-Year End-User Manufacturer Guarantee
(Latin America and the Caribbean Only) .
26
. . . .
36
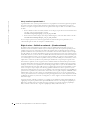
About This Guide
This document contains getting started/setup; solving problems; and safety, regulatory, and
warranty information about your Dell™ OptiPlex™ computer.
To obtain the latest versions of the documents on your hard drive, go to the Dell Support
website at support.dell.com.
Regulatory Model Number
and Chassis Type
DCT = Ultra small formfactor (USF) computer
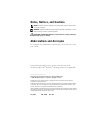
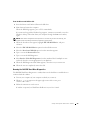
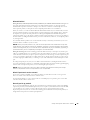
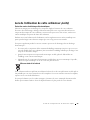
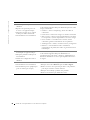
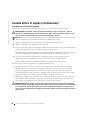
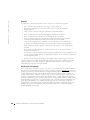
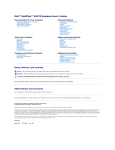
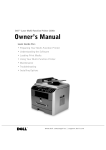
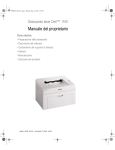
Features
Two USB slots, headphone
and microphone connectors
mounting slot
(insert stand for
vertical position)
mounting slot (insert
stand for hanging
horizontal position)
mounting slot (insert
stand for hanging
vertical position)
power button
diagnostic LEDs
module release
button
module bay
computer cover/hard-drive
cover release button
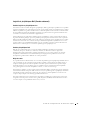
Setup and Quick Re ference Guide
5
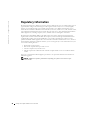
w w w. d e l l . c o m | s u p p o r t . d e l l . c o m
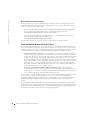
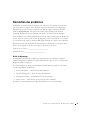
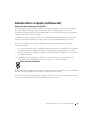
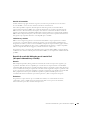
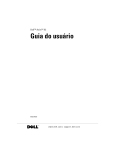
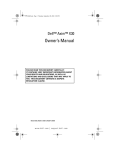
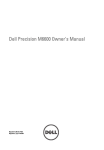
cable cover
hard-drive cover (open
cover to access module
device locking switch)
power adapter
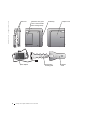
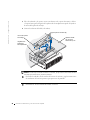
6
Setup and Quick Re ference Guide
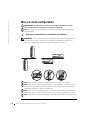
module bay
chassis-stand
mounting plate
computer cover
computer
stand
CAUTION: Safety Instructions
Use the following safety guidelines to help ensure your own personal safety and to help protect your
computer and working environment from potential damage.
General
•
Do not attempt to service the computer yourself unless you are a trained service technician. Always
follow installation instructions closely.
•
To help prevent electric shock, plug the computer and device power cables into properly grounded
electrical outlets. These cables are equipped with 3-prong plugs to help ensure proper grounding. Do
not use adapter plugs or remove the grounding prong from a cable. If you must use an extension
cable, use a 3-wire cable with properly grounded plugs.
•
To help avoid the potential hazard of electric shock, do not use your computer during an electrical
storm.
•
To help avoid the potential hazard of electric shock, do not connect or disconnect any cables or
perform maintenance or reconfiguration of this product during an electrical storm.
•
If your computer includes a modem, the cable used with the modem should be manufactured with a
minimum wire size of 26 American wire gauge (AWG) and an FCC-compliant RJ-11 modular plug.
•
Before you clean your computer, disconnect the computer from the electrical outlet. Clean your
computer with a soft cloth dampened with water. Do not use liquid or aerosol cleaners, which may
contain flammable substances.
•
To help avoid possible damage to the system board, wait 5 seconds after turning off the computer
before disconnecting a device from the computer.
•
To avoid shorting out your computer when disconnecting a network cable, first unplug the cable
from the network adapter on the back of your computer, and then from the network jack. When
reconnecting a network cable to your computer, first plug the cable into the network jack, and then
into the network adapter.
Setup and Quick Re ference Guide
7
w w w. d e l l . c o m | s u p p o r t . d e l l . c o m
CAUTION: Safety Instructions (continued)
•
To help protect your computer from sudden, transient increases and decreases in electrical power,
use a surge suppressor, line conditioner, or uninterruptible power supply (UPS).
•
Ensure that nothing rests on your computer’s cables and that the cables are not located where they
can be stepped on or tripped over.
•
Do not push any objects into the openings of your computer. Doing so can cause fire or electric
shock by shorting out interior components.
•
Keep your computer away from radiators and heat sources. Also, do not block cooling vents. Avoid
placing loose papers underneath your computer; do not place your computer in a closed-in wall unit
or on a bed, sofa, or rug.
•
Do not spill food or liquids on your computer.
•
Do not use your computer during an electrical storm unless the AC adapter cable has been
disconnected from the electrical outlet.
•
When you use the AC adapter to run the computer, place the AC adapter in a ventilated area, such
as a desk top or on the floor.
•
The AC adapter may become hot during normal operation of your computer. Use care when
handling the adapter during or immediately after operation.
8
Setup and Quick Re ference Guide
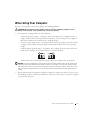
When Using Your Computer
As you use your computer, observe the following safe-handling guidelines.
CAUTION: Do not operate your computer with any cover(s) (including computer covers,
bezels, filler brackets, front-panel inserts, and so on) removed.
•
Your computer is equipped with one of the following:
–
A fixed-voltage power supply — Computers with a fixed-voltage power supply do not have a
voltage selection switch on the back panel and operate at only one voltage (see the regulatory
label on the outside of the computer for its operating voltage).
–
An auto-sensing voltage circuit — Computers with an auto-sensing voltage circuit do not have
a voltage selection switch on the back panel and automatically detect the correct operating
voltage.
–
A manual voltage selection switch — Computers with a voltage selection switch on the back
panel must be manually set to operate at the correct operating voltage.
Set the switch to the position that most closely matches the voltage used in your location.
NOTICE: To help avoid damaging a computer with a manual voltage selection switch, set the switch for the
voltage that most closely matches the AC power available in your location. For Japan, the voltage selection
switch must be set to the 115-V position even though the AC power available in Japan is 100 V. Also, ensure
that your monitor and attached devices are electrically rated to operate with the AC power available in your
location.
•
Before working inside the computer, unplug the computer to help prevent electric shock or system
board damage. Certain system board components continue to receive power any time the computer
is connected to AC power.
Setup and Quick Re ference Guide
9
w w w. d e l l . c o m | s u p p o r t . d e l l . c o m
When Using Your Computer (continued)
When Working Inside Your Computer
Before you open the computer cover, perform the following steps in the sequence indicated.
CAUTION: Do not attempt to service the computer yourself, except as explained in your
online Dell™ documentation or in instructions otherwise provided to you by Dell. Always
follow installation and service instructions closely.
NOTICE: To help avoid possible damage to the system board, wait 5 seconds after turning off the computer
before removing a component from the system board or disconnecting a device from the computer.
1
Perform an orderly computer shutdown using the operating system menu.
2
Turn off your computer and any devices connected to the computer.
3
Ground yourself by touching an unpainted metal surface on the chassis, such as the metal at the
back of the computer, before touching anything inside your computer.
While you work, periodically touch an unpainted metal surface on the computer chassis to dissipate
any static electricity that might harm internal components.
4
Disconnect your computer and devices, including the monitor, from their electrical outlets. Also,
disconnect any telephone or telecommunication lines from the computer.
Doing so reduces the potential for personal injury or shock.
In addition, take note of these safety guidelines when appropriate:
•
When you disconnect a cable, pull on its connector or on its strain-relief loop, not on the cable
itself. Some cables have a connector with locking tabs; if you are disconnecting this type of cable,
press in on the locking tabs before disconnecting the cable. As you pull connectors apart, keep them
evenly aligned to avoid bending any connector pins. Also, before you connect a cable, ensure that
both connectors are correctly oriented and aligned.
•
Handle components and cards with care. Do not touch the components or contacts on a card. Hold
a card by its edges or by its metal mounting bracket. Hold a component such as a microprocessor
chip by its edges, not by its pins.
CAUTION: There is a danger of a new battery exploding if it is incorrectly installed. Replace
the battery only with the same or equivalent type recommended by the manufacturer. Do not
dispose of the battery along with household waste. Contact your local waste disposal agency
for the address of the nearest battery deposit site.
10
Setup and Quick Re ference Guide
When Using Your Computer (continued)
Protecting Against Electrostatic Discharge
Static electricity can harm delicate components inside your computer. To prevent static damage,
discharge static electricity from your body before you touch any of your computer’s electronic
components, such as the microprocessor. You can do so by touching an unpainted metal surface on the
computer chassis.
As you continue to work inside the computer, periodically touch an unpainted metal surface to remove
any static charge your body may have accumulated.
You can also take the following steps to prevent damage from electrostatic discharge (ESD):
•
Do not remove components from their antistatic packing material until you are ready to install the
component in your computer. Just before unwrapping the antistatic packaging, discharge static
electricity from your body.
•
When transporting an electrostatic sensitive component, first place it in an antistatic container or
packaging.
•
Handle all electrostatic sensitive components in a static-safe area. If possible, use antistatic floor
pads and workbench pads.
Battery Disposal
Your computer uses a lithium coin-cell battery. The lithium coin-cell battery is a long-life battery, and it is
very possible that you will never need to replace it. However, should you need to replace it, see your User’s
Guide.
Do not dispose of the battery along with household waste. Contact your local waste disposal agency for
the address of the nearest battery deposit site.
Setup and Quick Re ference Guide
11
w w w. d e l l . c o m | s u p p o r t . d e l l . c o m
Getting Started/Setup
CAUTION: Before performing any of the procedures listed below, read and follow
the safety instructions on page 7.
NOTICE: Do not turn on your computer until all setup steps are completed.
1
Determine the Computer’s Placement and Orientation
NOTE: If you want to orient your computer vertically or horizontally under a desktop or
tabletop, see "Attaching the Stand" on page 14 and "Attaching the Stand to the Mounting Plate"
on page 19.
NOTICE: Do not place your monitor on the computer. Use a monitor stand.
NOTICE: In a high-vibration environment, when installing the computer under a desktop or
tabletop, use the optional wall-mount bracket instead of the chassis stand. To order this bracket,
contact Dell.
NOTICE: To ensure proper ventilation, do not place your computer vertically on a desktop
without using the computer stand (see "Attaching the Stand").
NOTICE: To ensure proper ventilation, do not block the cooling vents.
12
Setup and Quick Re ference Guide
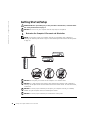
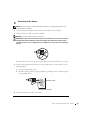
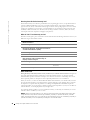
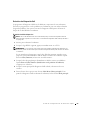
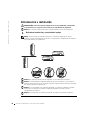
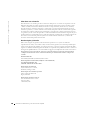
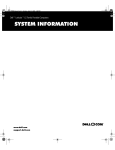
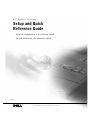
2
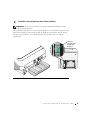
Installing a Device in the Module Bay
NOTE: To locate the module device locking switch, remove the hard-drive cover.
Your Dell computer ships with either a floppy drive or an airbay installed in the module bay.
To install a CD, DVD, or second hard drive in the module bay, first remove the airbay and
then install the device.
module device
locking switch
Setup and Quick Re ference Guide
13
w w w. d e l l . c o m | s u p p o r t . d e l l . c o m
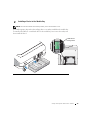
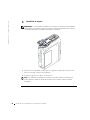
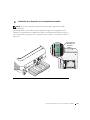
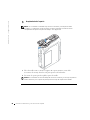
3
Attaching the Stand
NOTE: If you are installing the computer under a desktop or tabletop, first attach all cables,
and then attach the stand to the mounting plate (see "Attaching the Stand to the Mounting Plate"
on page 19).
1
Raise the captive screw and slide the chassis stand slat into one of three mounting slots
on the back of the computer.
2
When the stand is in place, tighten the screw.
NOTICE: If your computer is oriented under a desktop or tabletop and is in a high-vibration
environment, use the optional wall-mount bracket instead of the computer stand.
14
Setup and Quick Re ference Guide
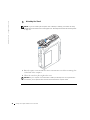
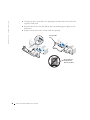
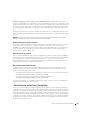
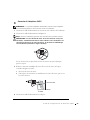
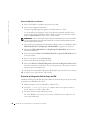
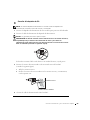
Connecting the AC Adapter
4
NOTE: The power adapter LED will light when the adapter is properly plugged into a wall
outlet and into the computer.
1
Connect the power adapter to the connector on the back of the computer.
2
Connect the power cable to the power adapter.
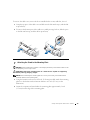
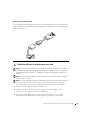
NOTICE: The following steps apply to Japan only.
CAUTION: If you decide to connect the green ground wire to an electrical outlet,
do not permit contact between the green ground wire and power leads because
electrical shock, fire, or damage to your computer can occur (see the following
figure).
If you decide not to connect the green ground wire to an electrical outlet, go to step 4.
3
Connect the metal ground connector to the grounding source on the outlet (see the
following figure):
a
Loosen the grounding source.
b
Slide the metal ground connector behind the grounding source, and then tighten
the grounding source.
grounding source
metal ground connector
4
Connect the AC power cable to the outlet.
Setup and Quick Re ference Guide
15
w w w. d e l l . c o m | s u p p o r t . d e l l . c o m
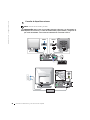
5
Connecting External Devices
NOTE: Connect only one keyboard and one mouse.
CAUTION: To help prevent electric shock, use only the power adapter and power
cable provided, and ensure that they are plugged into a properly grounded power
source.
SX260
16
Setup and Quick Re ference Guide
SX270
Connecting a VGA Monitor
If you have a VGA monitor and a DVI connector on the back of your computer, plug the
VGA-DVI adapter into the DVI connector and connect the monitor cable to the adapter as
shown.
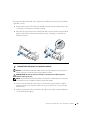
6
Attaching the Cable Cover
NOTICE: If you are installing the computer under a desktop or tabletop, do not attach the
cable cover until the computer is firmly attached to the mounting plate (see Step 7, "Attaching
the Stand to the Mounting Plate" on page 19).
NOTICE: If you use the stand on your computer, attach the stand before attaching the cable
cover.
NOTICE: When attaching the cable cover, do not place the computer face-down so that the
surface comes in contact with a hard surface. Doing so may press the power button and may
scratch the face of the computer.
1
Attach all of the cables to the back of the computer.
2
Hold the bottom piece of the cable cover and align the four tabs with the four slots on
the computer’s back panel.
3
Insert the tabs into the slots and slide the piece toward the diagnostic lights (see the
illustration) until it is securely positioned.
Setup and Quick Re ference Guide
17
w w w. d e l l . c o m | s u p p o r t . d e l l . c o m
4
Grasp the top piece of the cable cover and align the two tabs with the two slots in the
computer’s back panel.
5
Insert the tabs into the slots and slide the piece toward the diagnostic lights (see the
illustration).
6
Install a security device in the security cable slot (optional).
security cable
slot
Do not place the
computer facedown on the bezel
18
Setup and Quick Re ference Guide
To remove the cable cover, remove the device installed in the security cable slot, if used.
1
Grasp the top piece of the cable cover and slide it to the left until it stops, and then lift
it up and away.
2
To remove the bottom piece of the cable cover, while pressing the lever, slide the piece
to the left until it stops, and then lift it up and away.
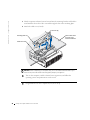
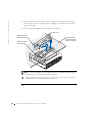
7
Attaching the Stand to the Mounting Plate
NOTICE: When installing the computer in the hanging orientation, avoid locations where it will
be bumped by a user’s legs or chair.
CAUTION: Attach the mounting plate to a solid surface capable of supporting
40 lbs (18.1 kg) hanging weight.
NOTE: Before attaching the mounting plate to a surface, first orient yourself with how the
stand will attach to the mounting plate.
1
Using the four #6 wood screws (0.625 inch; 15.88 mm) provided, attach the mounting
plate to a solid surface with a minimum thickness of 1 inch (2.5 cm) (see the
illustration).
2
Orient the computer and stand under the mounting plate approximately 1 inch
(2.5 cm) from the edge of the mounting plate.
Setup and Quick Re ference Guide
19
w w w. d e l l . c o m | s u p p o r t . d e l l . c o m
3
Lift the computer and stand, insert the stand into the mounting bracket, and slide the
stand until the release-lever tab is inserted through the slot in the mounting plate.
4
Attach the cable cover (if used).
screw holes (4)
mounting-plate slot
solid surface with a
1-inch (2.5 cm)
minimum thickness
release-lever tab
NOTICE: When completing your computer setup, secure all cables toward the back of your
work area to prevent the cables from being pulled, tangled, or stepped on.
20
8
Turn on the computer, read the software license agreement, and follow the
operating system setup instructions on the screen.
9
Congratulations! You have completed your system setup.
Setup and Quick Re ference Guide
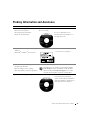
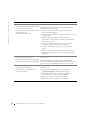
Finding Information and Assistance
What Are You Looking For?
Find it Here
•
•
•
•
Drivers and Utilities CD (also known as the
ResourceCD)
A diagnostic program for my computer
Drivers for my computer
My computer documentation
My device documentation
You can use this CD to access
documentation, reinstall drivers, or
run diagnostics tools.
• Express Service Code and Service Tag
Number
• Microsoft® Windows® License Label
Express Service Code and Product Key
•
•
•
•
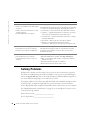
User’s Guide
How to remove and replace parts
Technical specifications
How to configure system settings
How to troubleshoot and solve problems
• How to reinstall my operating system
Located on your computer.
Depending on your operating system, double-click the
User’s Guides icon on your desktop or click the Start
button and then click Help and Support to access the
electronic documentation stored on your hard drive.
Operating System CD
If you reinstall your operating
system, use the Drivers and Utilities
CD to reinstall drivers for the devices
that came with your computer.
Setup and Quick Re ference Guide
21
w w w. d e l l . c o m | s u p p o r t . d e l l . c o m
What Are You Looking For?
Find it Here
• Latest drivers for my computer
• Answers to technical service and support
questions
• Online discussions with other users and
technical support
• Documentation for my computer
Dell Support website
• Service call status and support history
• Top technical issues for my computer
• Details on my computer configuration
Dell Premier Support website
• How to use Windows XP
• Documentation for my computer
• Documentation for devices (such as a
modem)
Windows XP Help and Support Center
1 Click the Start button, and then click Help and Support.
2 Type a word or phrase that describes your problem, and then
click the arrow icon.
3 Click the topic that describes your problem.
4 Follow the instructions shown on the screen.
The Dell Support website provides several online tools, including:
• Solutions — Troubleshooting tips, Knowledge Base articles
• Community — Online discussion with other Dell customers
• Upgrades — Upgrade information for components, operating
system, drivers, and information about online classes
• Customer Care — Contact information, order status, warranty,
and repair information
• Downloads — Drivers, patches, and software updates
• Reference — Computer documentation, product
specifications, white papers, and a glossary of computer terms
The Dell Premier Support website is customized for corporate,
government, and education customers. This site may not be
available in all regions.
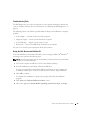
Solving Problems
Dell provides a number of tools to help you if your system does not perform as expected.
For the latest troubleshooting information available for your system, see the Dell Support
website at support.dell.com. You can also find descriptions of Dell troubleshooting tools in
the section titled "Getting Help" in your online User’s Guide.
If computer problems occur that require help from Dell, write a detailed description of the
error, beep codes, or diagnostics light patterns; record your Express Service Code and
Service Tag Number below; and then contact Dell from the same location as your computer.
See "Finding Information and Assistance" on page 21 for an example of the express service
code and service tag numbers.
Express Service Code:___________________________
Service Tag Number:___________________________
22
Setup and Quick Re ference Guide
Troubleshooting Tools
The Dell Diagnostics tests various components in your computer and helps to identify the
cause of computer problems. For more information, see "Running the Dell Diagnostics" on
page 24.
The following features can indicate a possible failure and help you troubleshoot a computer
problem:
•
System Lights — Located on the front of the computer.
•
Diagnostic Lights — Located on the back of the computer.
•
System Messages — Appear on your monitor screen.
•
Beep Codes — A series of audible beeps emitted by your computer.
See your User’s Guide for more information about these features.
Using the Dell Drivers and Utilities CD
To use the Dell Drivers and Utilities CD while you are running the Microsoft® Windows®
operating system, perform the following steps:
NOTE: To access device drivers and user documentation, you must use the Drivers and Utilities
CD while you are running Windows.
1
Turn on the computer and allow it to boot to the Windows desktop.
2
Insert the Dell Drivers and Utilities CD into the CD drive.
If you are using the Drivers and Utilities CD for the first time on this computer, the
installation window opens to inform you that the CD is about to begin installation.
3
Click OK to continue.
To complete the installation, respond to the prompts offered by the installation
program.
4
Click Next at the Welcome Dell System Owner screen.
5
Choose the appropriate System Model, Operating System, Device Type, and Topic.
Setup and Quick Re ference Guide
23
w w w. d e l l . c o m | s u p p o r t . d e l l . c o m
Drivers for Your Computer
To display a list of device drivers for your computer, perform the following steps:
1
Click My Drivers in the Topic pull-down menu.
The Drivers and Utilities CD scans your computer’s hardware and operating system,
and then a list of device drivers for your system configuration is displayed on the
screen.
2
Click the appropriate driver and follow the instructions to download the driver to your
computer.
To view all available drivers for your computer, click Drivers from the Topic pull-down
menu.
Running the Dell Diagnostics
The Dell Diagnostics is a program that tests various components in your computer. Run
this program whenever you have a computer problem to help you identify the source of the
problem. You can run the Dell Diagnostics from your hard drive or the Drivers and Utilities
CD.
From the Hard Drive:
NOTICE: If your hard drive fails, run the Dell IDE Hard-Drive Diagnostics (see "Running the
Dell IDE Hard-Drive Diagnostics" on page 25).
1
Shut down and restart the computer.
2
When the DELL™ logo appears, press <F12> immediately.
NOTE: If you receive a message stating that no Diagnostics utility partition has been found,
follow the instructions to run the Dell Diagnostics from your Drivers and Utilities CD.
If you wait too long and the Windows logo appears, continue to wait until you see the
Windows desktop. Then shut down your computer through the Start menu and try
again.
24
3
When the boot device list appears, highlight Boot to Utility Partition and press
<Enter>.
4
When the Dell Diagnostics Main Menu appears, select the test you want to run.
5
Close the test screen to return to the Main Menu screen. To exit the Dell Diagnostics
and restart the computer, close the Main Menu screen.
Setup and Quick Re ference Guide
From the Drivers and Utilities CD:
1
Insert the Drivers and Utilities CD into the CD drive.
2
Shut down and restart the computer.
When the DELL logo appears, press <F12> immediately.
If you wait too long and the Windows logo appears, continue to wait until you see the
Windows desktop. Then shut down your computer through the Start menu and try
again.
NOTE: This feature changes the boot sequence for one time only. On the next start-up, the
computer boots according to the devices specified in system setup.
3
When the boot device list appears, highlight IDE CD-ROM Device and press
<Enter>.
4
Select the IDE CD-ROM Device option from the CD boot menu.
5
Select the Boot from CD-ROM option from the menu that appears.
6
Type 1 to start the ResourceCD menu.
7
Type 2 to start the Dell Diagnostics.
8
Select Run the 32 Bit Dell Diagnostics from the numbered list. If multiple versions
are listed, select the version appropriate for your platform.
9
When the Dell Diagnostics Main Menu appears, select the test you want to run.
10
When the tests are completed, remove the CD.
Running the Dell IDE Hard-Drive Diagnostics
The Dell IDE Hard-Drive Diagnostics is a utility that tests the hard drive to troubleshoot or
confirm a hard-drive failure.
1
Turn on your computer (if your computer is already on, restart it).
2
When F2 = Setup appears in the upper-right corner of the screen, press
<Ctrl><Alt><D>.
3
Follow the instructions on the screen.
If a failure is reported, see "Hard Drive Problems" in your User’s Guide.
Setup and Quick Re ference Guide
25
w w w. d e l l . c o m | s u p p o r t . d e l l . c o m
Regulatory Information
Electromagnetic Interference (EMI) is any signal or emission, radiated in free space or conducted along power or
signal leads, that endangers the functioning of a radio navigation or other safety service or seriously degrades,
obstructs, or repeatedly interrupts a licensed radio communications service. Radio communications services
include but are not limited to AM/FM commercial broadcast, television, cellular services, radar, air-traffic control,
pager, and Personal Communication Services (PCS). These licensed services, along with unintentional radiators
such as digital devices, including computer systems, contribute to the electromagnetic environment.
Electromagnetic Compatibility (EMC) is the ability of items of electronic equipment to function properly
together in the electronic environment. While this computer system has been designed and determined to be
compliant with regulatory agency limits for EMI, there is no guarantee that interference will not occur in a
particular installation. If this equipment does cause interference with radio communications services, which can
be determined by turning the equipment off and on, you are encouraged to try to correct the interference by one
or more of the following measures:
•
•
•
•
Reorient the receiving antenna.
Relocate the computer with respect to the receiver.
Move the computer away from the receiver.
Plug the computer into a different outlet so that the computer and the receiver are on different branch
circuits.
If necessary, consult a Dell Technical Support representative or an experienced radio/television technician for
additional suggestions.
NOTE: Additional regulatory information regarding your system can be found in your
User’s Guide.
26
Setup and Quick Re ference Guide
Limited Warranties and Return Policy
Dell-branded hardware products purchased in the U.S. or Canada come with either a 90-day, 1-year, 2-year, 3-year,
or 4-year limited warranty. To determine which warranty came with your hardware product(s), see your packing slip
or invoice. The following sections describe the limited warranties and return policy for the U.S., the limited
warranties and return policy for Canada, the manufacturer guarantee for Latin America and the Caribbean, and
the Intel® Pentium® and Celeron® warranty for the U.S. and Canada.
Limited Warranty for Dell-Branded Hardware Products (U.S. Only)
What is covered by this limited warranty?
This limited warranty covers defects in materials and workmanship in your—our end-user customer's—Dellbranded hardware products, including Dell-branded peripheral products.
What is not covered by this limited warranty?
This limited warranty does not cover:
•
Software, including the operating system and software added to the Dell-branded hardware products
through our factory-integration system, third-party software, or the reloading of software
•
Non-Dell-branded and Solution Provider Direct products and accessories
•
Problems that result from:
–
External causes such as accident, abuse, misuse, or problems with electrical power
–
Servicing not authorized by Dell
–
Usage that is not in accordance with product instructions
–
Failure to follow the product instructions or failure to perform preventive maintenance
–
Problems caused by using accessories, parts, or components not supplied by Dell
•
Products with missing or altered Service Tags or serial numbers
•
Products for which Dell has not received payment
THIS WARRANTY GIVES YOU SPECIFIC LEGAL RIGHTS, AND YOU MAY ALSO HAVE OTHER
RIGHTS WHICH VARY FROM STATE TO STATE (OR JURISDICTION TO JURISDICTION). DELL'S
RESPONSIBILITY FOR MALFUNCTIONS AND DEFECTS IN HARDWARE IS LIMITED TO REPAIR
AND REPLACEMENT AS SET FORTH IN THIS WARRANTY STATEMENT. ALL EXPRESS AND
IMPLIED WARRANTIES FOR THE PRODUCT, INCLUDING BUT NOT LIMITED TO ANY IMPLIED
WARRANTIES AND CONDITIONS OF MERCHANTABILITY AND FITNESS FOR A PARTICULAR
PURPOSE, ARE LIMITED IN TIME TO THE TERM OF THE LIMITED WARRANTY PERIOD
REFLECTED ON YOUR PACKING SLIP OR INVOICE. NO WARRANTIES, WHETHER EXPRESS OR
IMPLIED, WILL APPLY AFTER THE LIMITED WARRANTY PERIOD HAS EXPIRED. SOME STATES
DO NOT ALLOW LIMITATIONS ON HOW LONG AN IMPLIED WARRANTY LASTS, SO THIS
LIMITATION MAY NOT APPLY TO YOU.
WE DO NOT ACCEPT LIABILITY BEYOND THE REMEDIES PROVIDED FOR IN THIS LIMITED
WARRANTY OR FOR CONSEQUENTIAL OR INCIDENTAL DAMAGES, INCLUDING, WITHOUT
LIMITATION, ANY LIABILITY FOR THIRD-PARTY CLAIMS AGAINST YOU FOR DAMAGES, FOR
PRODUCTS NOT BEING AVAILABLE FOR USE, OR FOR LOST DATA OR LOST SOFTWARE. OUR
LIABILITY WILL BE NO MORE THAN THE AMOUNT YOU PAID FOR THE PRODUCT THAT IS THE
SUBJECT OF A CLAIM. THIS IS THE MAXIMUM AMOUNT FOR WHICH WE ARE RESPONSIBLE.
Setup and Quick Re ference Guide
27
w w w. d e l l . c o m | s u p p o r t . d e l l . c o m
SOME STATES DO NOT ALLOW THE EXCLUSION OR LIMITATION OF INCIDENTAL OR
CONSEQUENTIAL DAMAGES, SO THE ABOVE LIMITATION OR EXCLUSION MAY NOT APPLY TO
YOU.
How long does this limited warranty last?
This limited warranty lasts for the time period indicated on your packing slip or invoice, except for the following
Dell-branded hardware:
•
Portable computer batteries carry a 1-year limited warranty.
•
Projector lamps carry a 90-day limited warranty.
•
Memory carries a lifetime limited warranty.
•
Monitors carry the longer of either a 3-year limited warranty or the remainder of the warranty for the Dell
computer to which the monitor will be connected.
•
Other add-on hardware carries the longer of either a 1-year limited warranty for new parts and a 90-day
limited warranty for reconditioned parts or, for both new and reconditioned parts, the reminder of the
warranty for the Dell computer on which such parts are installed.
The limited warranty on all Dell-branded products begins on the date of the packing slip or invoice. The warranty
period is not extended if we repair or replace a warranted product or any parts. Dell may change the availability of
limited warranties, at its discretion, but any changes will not be retroactive.
What do I do if I need warranty service?
Before the warranty expires, please call us at the relevant number listed in the following table. Please also have your
Dell Service Tag or order number available.
Individual Home Consumers:
U.S. Only
Technical Support
1-800-624-9896
Customer Service
1-800-624-9897
Individual Home Consumers who purchased through
an Employee Purchase Program:
Technical Support and Customer Service
1-800-822-8965
Home and Small Business Commercial Customers:
Technical Support and Customer Service
1-800-456-3355
Medium, Large, or Global Commercial Customers,
Healthcare Customers, and Value-Added Resellers
(VARs):
Technical Support and Customer Service
1-800-822-8965
Government and Education Customers:
28
Technical Support and Customer Service
1-800-234-1490
Dell-Branded Memory
1-888-363-5150
Setup and Quick Re ference Guide
What will Dell do?
During the 90 days of the 90-day limited warranty and the first year of all other limited warranties: During the 90
days of the 90-day limited warranty and the first year of all other limited warranties, we will repair any Dellbranded hardware products returned to us that prove to be defective in materials or workmanship. If we are not
able to repair the product, we will replace it with a comparable product that is new or refurbished.
When you contact us, we will issue a Return Material Authorization Number for you to include with your return.
You must return the products to us in their original or equivalent packaging, prepay shipping charges, and insure
the shipment or accept the risk if the product is lost or damaged in shipment. We will return the repaired or
replacement products to you. We will pay to ship the repaired or replaced products to you if you use an address in
the United States (excluding Puerto Rico and U.S. possessions and territories). Otherwise, we will ship the product
to you freight collect.
If we determine that the product is not covered under this warranty, we will notify you and inform you of service
alternatives that are available to you on a fee basis.
NOTE: Before you ship the product(s) to us, make sure to back up the data on the hard drive(s) and any other
storage device(s) in the product(s). Remove any confidential, proprietary, or personal information and removable
media such as floppy disks, CDs, or PC Cards. We are not responsible for any of your confidential, proprietary, or
personal information; lost or corrupted data; or damaged or lost removable media.
During the remaining years: For the remaining period of the limited warranty, we will replace any defective part
with new or refurbished parts, if we agree that it needs to be replaced. When you contact us, we will require a valid
credit card number at the time you request a replacement part, but we will not charge you for the replacement part
as long as you return the original part to us within 30 days after we ship the replacement part to you. If we do not
receive the original part within 30 days, we will charge to your credit card the then-current standard price for that
part.
We will pay to ship the part to you if you use an address in the United States (excluding Puerto Rico and U.S.
possessions and territories). Otherwise, we will ship the part freight collect. We will also include a prepaid shipping
container with each replacement part for your use in returning the replaced part to us.
NOTE: Before you replace parts, make sure to back up the data on the hard drive(s) and any other storage
device(s) in the product(s). We are not responsible for lost or corrupted data.
What if I purchased a service contract?
If your service contract is with Dell, service will be provided to you under the terms of the service agreement.
Please refer to that contract for details on how to obtain service.
If you purchased through us a service contract with one of our third-party service providers, please refer to that
contract for details on how to obtain service.
How will you fix my product?
We use new and refurbished parts made by various manufacturers in performing warranty repairs and in building
replacement parts and systems. Refurbished parts and systems are parts or systems that have been returned to Dell,
some of which were never used by a customer. All parts and systems are inspected and tested for quality.
Replacement parts and systems are covered for the remaining period of the limited warranty for the product you
bought. Dell owns all parts removed from repaired products.
Setup and Quick Re ference Guide
29
w w w. d e l l . c o m | s u p p o r t . d e l l . c o m
May I transfer the limited warranty?
Limited warranties on systems may be transferred if the current owner transfers ownership of the system and
records the transfer with us. The limited warranty on Dell-branded memory may not be transferred. You may
record your transfer by going to Dell's website:
•
If you are an Individual Home Consumer, go to www.dell.com/us/en/dhs/topics/sbtopic_015_ccare.htm
•
If you are a Home Office, Small, Medium, Large, or Global Commercial Customer, go to
www.dell.com/us/en/biz/topics/sbtopic_ccare_nav_015_ccare.htm
•
If you are a Government, Education, or Healthcare Customer, or an Individual Home Consumer who
purchased through an Employee Purchase Program, go to
www.dell.com/us/en/pub/topics/sbtopic_015_ccare.htm
If you do not have Internet access, call your customer care representative or call 1-800-624-9897.
"Total Satisfaction" Return Policy (U.S. Only)
We value our relationship with you and want to make sure that you're satisfied with your purchases. That's why we
offer a "Total Satisfaction" return policy for most products that you—the end-user customer—purchase directly
from Dell. Under this policy, you may return to Dell products that you purchased directly from Dell for a credit or
a refund of the purchase price paid, less shipping and handling and applicable restocking fees as follows:
•
New Hardware Products and Accessories — All new hardware, accessories, parts, and unopened software
still in its sealed package, excluding the products listed below, may be returned within 30 days from the date
on the packing slip or invoice. To return applications software or an operating system that has been installed
by Dell, you must return the entire computer. A different return policy applies to nondefective products
purchased through Dell's Software and Peripherals division by customers of our Small and Medium Business
divisions. Those products may be returned within 30 days from the date on the packing slip or invoice, but a
fifteen percent (15%) restocking fee will be deducted from any refund or credit. The "Total Satisfaction"
Return Policy and Software and Peripherals division return policy are not available for Dell | EMC storage
products, EMC-branded products, or enterprise software.
•
Reconditioned or Refurbished Dell-Branded Hardware Products and Parts — All reconditioned or
refurbished Dell-branded server and storage products may be returned within 30 days from the date on the
packing slip or invoice. All other reconditioned or refurbished Dell-branded hardware products and parts
may be returned within 14 days of the date on the packing slip or invoice.
To return products, e-mail or call Dell customer service to receive a Credit Return Authorization Number within
the return policy period applicable to the product you want to return. You must obtain a Credit Return
Authorization Number in order to return the product. See "Getting Help" in your customer documentation (or
www.dell.com/us/en/gen/contact.htm) to find the appropriate contact information for obtaining customer
assistance.
You must ship the products to Dell within 5 days of the date that Dell issues the Credit Return Authorization
Number. You must also return the products to Dell in their original packaging, in as-new condition along with any
media, documentation, and all other items that were included in the original shipment, prepay shipping charges,
and insure the shipment or accept the risk of loss or damage during shipment.
30
Setup and Quick Re ference Guide
Limited Warranty Terms for Dell-Branded Hardware Products (Canada Only)
What is covered by this limited warranty?
This limited warranty covers defects in materials and workmanship in your—our end-user customer's—Dellbranded hardware products, including Dell-branded peripheral products.
What is not covered by this limited warranty?
This limited warranty does not cover:
•
Software, including the operating system and software added to the Dell-branded hardware products
through our factory-integration system, or the reloading of the software
•
Non-Dell branded and Solution Provider Direct products and accessories
•
Problems that result from:
–
External causes such as accident, abuse, misuse, or problems with electrical power
–
Servicing not authorized by Dell
–
Usage that is not in accordance with product instructions
–
Failure to follow the product instructions or failure to perform preventive maintenance
–
Problems caused by using accessories, parts, or components not supplied by Dell
•
Products with missing or altered Service Tags or serial numbers
•
Products for which Dell has not received payment
THIS WARRANTY GIVES YOU SPECIFIC LEGAL RIGHTS, AND YOU MAY ALSO HAVE OTHER RIGHTS
WHICH VARY FROM PROVINCE TO PROVINCE. DELL'S RESPONSIBILITY FOR MALFUNCTIONS AND
DEFECTS IN PRODUCT IS LIMITED TO REPAIR AND REPLACEMENT AS SET FORTH IN THIS
WARRANTY STATEMENT, FOR THE TERM OF THE WARRANTY PERIOD REFLECTED ON YOUR
PACKING SLIP OR INVOICE. EXCEPT FOR THE EXPRESS WARRANTIES CONTAINED IN THIS
WARRANTY STATEMENT, DELL DISCLAIMS ALL OTHER WARRANTIES AND CONDITIONS, EXPRESS
OR IMPLIED, INCLUDING WITHOUT LIMITATION IMPLIED WARRANTIES AND CONDITIONS OF
MERCHANTABILITY AND FITNESS FOR A PARTICULAR PURPOSE, STATUTORY OR OTHERWISE.
SOME PROVINCES DO NOT ALLOW THE EXCLUSION OF CERTAIN IMPLIED WARRANTIES OR
CONDITIONS, OR LIMITATIONS ON HOW LONG AN IMPLIED WARRANTY OR CONDITION LASTS.
THEREFORE, THE FOREGOING EXCLUSIONS AND LIMITATIONS MAY NOT APPLY TO YOU.
WE DO NOT ACCEPT LIABILITY BEYOND THE REMEDIES PROVIDED FOR IN THIS WARRANTY
STATEMENT OR FOR SPECIAL, INDIRECT, CONSEQUENTIAL, OR INCIDENTAL DAMAGES,
INCLUDING, WITHOUT LIMITATION, ANY LIABILITY FOR THIRD-PARTY CLAIMS AGAINST YOU
FOR DAMAGES, FOR PRODUCTS NOT BEING AVAILABLE FOR USE, OR FOR LOST DATA OR LOST
SOFTWARE. OUR LIABILITY WILL BE NO MORE THAN THE AMOUNT YOU PAID FOR THE PRODUCT
THAT IS THE SUBJECT OF A CLAIM. THIS IS THE MAXIMUM AMOUNT FOR WHICH WE ARE
RESPONSIBLE.
SOME PROVINCES DO NOT ALLOW THE EXCLUSION OR LIMITATION OF SPECIAL, INDIRECT,
INCIDENTAL, OR CONSEQUENTIAL DAMAGES, SO THE ABOVE LIMITATION OR EXCLUSION MAY
NOT APPLY TO YOU.
Setup and Quick Re ference Guide
31
w w w. d e l l . c o m | s u p p o r t . d e l l . c o m
How long does this limited warranty last?
This limited warranty lasts for the time period indicated on your packing slip or invoice, except that the limited
warranty on Dell-branded batteries lasts only 1 year and the limited warranty on the lamps for Dell-branded
projectors lasts only 90 days. The limited warranty begins on the date of the packing slip or invoice. The warranty
period is not extended if we repair or replace a warranted product or any parts. Dell may change the terms and
availability of limited warranties, at its discretion, but any changes will not be retroactive (that is, the warranty
terms in place at the time of purchase will apply to your purchase).
What do I do if I need warranty service?
Before the warranty expires, please call us at the relevant number listed in the following table. Please also have your
Dell Service Tag or order number available.
Individual Home Consumers; Home Office and Small
Business Customers:
Canada Only
Technical Support and Customer Service
1-800-847-4096
Medium, Large, and Global Commercial Customers;
Government, Education, and Healthcare Customers;
and Value-Added Resellers (VARs):
Technical Support
1-800-387-5757
Customer Service
1-800-326-9463
Government or Education Customers, or Individual
Home Consumers who purchased through an
Employee Purchase Program:
Technical Support
1-800-387-5757
Customer Service
1-800-326-9463 (Extension 8221 for Individual
Consumers)
Dell-Branded Memory
1-888-363-5150
What will Dell do?
During the 90 days of the 90-day limited warranty and the first year of all other limited warranties: During the 90
days of the 90-day limited warranty and the first year of all other limited warranties, we will repair any Dellbranded hardware products returned to us that prove to be defective in materials or workmanship. If we are not
able to repair the product, we will replace it with a comparable product that is new or refurbished.
When you contact us, we will issue a Return Material Authorization Number for you to include with your return.
You must return the products to us in their original or equivalent packaging, prepay shipping charges, and insure
the shipment or accept the risk if the product is lost or damaged in shipment. We will return the repaired or
replacement products to you. We will pay to ship the repaired or replaced products to you if you use an address in
Canada. Otherwise, we will ship the product to you freight collect.
If we determine that the problem is not covered under this warranty, we will notify you and inform you of service
alternatives that are available to you on a fee basis.
NOTE: Before you ship the product(s) to us, make sure to back up the data on the hard drive(s) and any other
storage device(s) in the product(s). Remove any confidential, proprietary or personal information, removable
media, such as floppy disks, CDs, or PC Cards. We are not responsible for any of your confidential, proprietary or
personal information; lost or corrupted data; or damaged or lost removable media.
32
Setup and Quick Re ference Guide
During the remaining years following the first year of all limited warranties: We will replace any defective part
with new or refurbished parts, if we agree that it needs to be replaced. When you contact us, we will require a valid
credit card number at the time you request a replacement part, but we will not charge you for the replacement part
as long as you return the original part to us within 30 days after we ship the replacement part to you. If we do not
receive the original part within 30 days, we will charge to your credit card the then-current standard price for that
part.
We will pay to ship the part to you if you use an address in Canada. Otherwise, we will ship the part freight collect.
We will also include a prepaid shipping container with each replacement part for your use in returning the replaced
part to us.
NOTE: Before you replace parts, make sure to back up the data on the hard drive(s) and any other storage
device(s) in the product(s). We are not responsible for lost or corrupted data.
What if I purchased a service contract?
If your service contract is with Dell, service will be provided to you under the terms of the service contract. Please
refer to that contract for details on how to obtain service. Dell's service contracts can be found online at
www.dell.ca or by calling Customer Care at 1-800-847-4096. If you purchased through us a service contract with
one of our third-party service providers, please refer to that contract (mailed to you with your packing slip or
invoice) for details on how to obtain service.
How will you fix my product?
We use new and refurbished parts made by various manufacturers in performing warranty repairs and in building
replacement parts and systems. Refurbished parts and systems are parts or systems that have been returned to Dell,
some of which were never used by a customer. All parts and systems are inspected and tested for quality.
Replacement parts and systems are covered for the remaining period of the limited warranty for the product you
bought. Dell owns all parts removed from repaired products.
May I transfer the limited warranty?
Limited warranties on systems may be transferred if the current owner transfers ownership of the system and
records the transfer with us. The limited warranty on Dell-branded memory may not be transferred. You may
record your transfer by going to Dell’s website:
•
For Canada-purchased computers (in-country transfers) and to transfer from one customer to another, go to
www.dell.ca/ca/en/gen/topics/segtopic_ccare_nav_013_ccare.htm
•
For out-of-country transfers (outside of the original country of purchase), go to
www.dell.com/us/en/biz/topics/sbtopic_ccare_nav_016_ccare.htm
If you do not have Internet access, call Dell at 1-800-847-4096 (Home Consumer customers) or 1-800-326-9463
(Corporate Commercial or Government customers).
"Total Satisfaction" Return Policy (Canada Only)
If you are an end-user customer who bought new products directly from Dell, you may return them to Dell up to
30 days after you receive them for a refund or credit of the product purchase price. If you are an end-user customer
who bought reconditioned or refurbished products from Dell, you may return them to Dell within 14 days after the
date on the packing slip or invoice for a refund or credit of the product purchase price. In either case, the refund or
credit will not include any shipping and handling charges shown on your packing slip or invoice and will be subject
to a fifteen percent (15%) restocking fee, unless otherwise prohibited by law. If you are an organization that bought
the products under a written agreement with Dell, the agreement may contain different terms for the return of
products than specified by this policy.
Setup and Quick Re ference Guide
33
w w w. d e l l . c o m | s u p p o r t . d e l l . c o m
To return products, you must call Dell Customer Service at 1-800-847-4096 to receive a Credit Return
Authorization Number. To expedite the process of your refund or credit, Dell expects you to return the products to
Dell in their original packaging within 5 days of the date that Dell issues the Credit Return Authorization Number.
You must also prepay shipping charges and insure the shipment or accept the risk of loss or damage during
shipment. You may return software for a refund or credit only if the sealed package containing the floppy disk(s) or
CD(s) is unopened. Returned products must be in as-new condition, and all of the manuals, floppy disk(s), CD(s),
power cables, and other items included with a product must be returned with it. For customers who want to return,
for refund or credit only, either application or operating system software that has been installed by Dell, the whole
system must be returned, along with any media and documentation that may have been included in the original
shipment.
The "Total Satisfaction" Return Policy does not apply to Dell | EMC storage products. It also does not apply to
products purchased through Dell's Software and Peripherals division. For those products, please instead refer to
Dell's Software and Peripheral's then-current return policy (see the following section, "Dell Software and
Peripherals (Canada Only)").
Dell Software and Peripherals (Canada Only)
Third-Party Software and Peripherals Products
Similar to other resellers of software and peripherals, Dell does not warrant third-party products. Third-party
software and peripheral products are covered by the warranties provided by the original manufacturer or publisher
only. Third-party manufacturer warranties vary from product to product. Consult your product documentation for
specific warranty information. More information may also be available from the manufacturer or publisher.
While Dell offers a wide selection of software and peripheral products, we do not specifically test or guarantee that
all of the products we offer work with any or all of the various models of Dell computers, nor do we test or
guarantee all of the products we sell on the hundreds of different brands of computers available today. If you have
questions about compatibility, we recommend and encourage you to contact the third-party software and
peripheral product manufacturer or publisher directly.
Dell-Branded Peripheral Products
Dell does provide a limited warranty for new Dell-branded peripheral products (products for which Dell is listed as
the manufacturer) such as monitors, batteries, memory, docking stations, and projectors. To determine which
limited warranty applies to the product you purchased, see the Dell packing slip or invoice and/or the product
documentation that accompanied your product. Descriptions of Dell's limited warranties are described in
preceding sections.
Return Policy
If you are an end-user customer who bought Dell Software and Peripherals products directly from a Dell company,
you may return Dell Software and Peripherals products that are in as-new condition to Dell up to 30 days from the
date on the packing slip or invoice for a refund of the product purchase price if already paid. This refund will not
include any shipping and handling charges shown on your packing slip or invoice; you are responsible for those.
To return products, you must call Dell Customer Service at 1-800-387-5759 to receive a Credit Return
Authorization Number. You must ship the Dell Software and Peripherals products back to Dell in their original
manufacturer's packaging (which must be in as-new condition), prepay shipping charges, and insure the shipment
or accept the risk of loss or damage during shipment.
To qualify for refund or replacement, returned products must be in as-new condition, software products must be
unopened, and all of the manuals, floppy disk(s), CD(s), power cables, and other items included with a product
must be returned with it.
34
Setup and Quick Re ference Guide
1-Year End-User Manufacturer Guarantee
(Latin America and the Caribbean Only)
Guarantee
Dell Computer Corporation ("Dell") warrants to the end user in accordance with the following provisions that its
branded hardware products, purchased by the end user from a Dell company or an authorized Dell distributor in
Latin America or the Caribbean, will be free from defects in materials, workmanship, and design affecting normal
use, for a period of 1 year from the original purchase date. Products for which proper claims are made will, at Dell’s
option, be repaired or replaced at Dell’s expense. Dell owns all parts removed from repaired products. Dell uses
new and reconditioned parts made by various manufacturers in performing repairs and building replacement
products.
Exclusions
This Guarantee does not apply to defects resulting from: improper or inadequate installation, use, or maintenance;
actions or modifications by unauthorized third parties or the end user; accidental or willful damage; or normal wear
and tear.
Making a Claim
Claims must be made in Latin America or the Caribbean by contacting the Dell point of sale within the guarantee
period. The end user must always supply proof of purchase, indicating name and address of the seller, date of
purchase, model and serial number, name and address of the customer, and details of symptoms and configuration
at the time of malfunction, including peripherals and software used. Otherwise, Dell may refuse the guarantee
claim. Upon diagnosis of a warranted defect, Dell will make arrangements and pay for ground freight and insurance
to and from Dell’s repair/replacement center. The end user must ensure that the defective product is available for
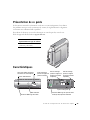
collection properly packed in original or equally protective packaging together with the details listed above and the
return number provided to the end user by Dell.
Limitation and Statutory Rights
Dell makes no other warranty, guarantee or like statement other than as explicitly stated above, and this Guarantee
is given in place of all other guarantees whatsoever, to the fullest extent permitted by law. In the absence of
applicable legislation, this Guarantee will be the end user’s sole and exclusive remedy against Dell or any of its
affiliates, and neither Dell nor any of its affiliates shall be liable for loss of profit or contracts, or any other indirect
or consequential loss arising from negligence, breach of contract, or howsoever.
This Guarantee does not impair or affect mandatory statutory rights of the end user against and/or any rights
resulting from other contracts concluded by the end user with Dell and/or any other seller.
Dell World Trade LP
One Dell Way, Round Rock, TX 78682, USA
Dell Computadores do Brasil Ltda (CNPJ No. 72.381.189/0001-10)
Avenida Industrial Belgraf, 400
92990-000 - Eldorado do Sul - RS - Brasil
Dell Computer de Chile Ltda
Coyancura 2283, Piso 3 - Of.302,
Providencia, Santiago - Chile
Dell Computer de Colombia Corporation
Carrera 7 #115-33 Oficina 603
Bogota, Colombia
Setup and Quick Re ference Guide
35
w w w. d e l l . c o m | s u p p o r t . d e l l . c o m
Dell Computer de Mexico SA de CV
Paseo de la Reforma 2620 - 11° Piso
Col. Lomas Altas
11950 México, D.F.
Intel® Warranty Statement for Pentium® and Celeron® Processors Only
(U.S. and Canada Only)
Intel’s Three Year Limited Warranty
Limited Warranty
Intel warrants that its family of Pentium® and Celeron® processors, if properly used and installed, will be free from defects in materials and workmanship and will substantially
conform to Intel’s publicly available specifications for a period of three (3) years after the date the Pentium or Celeron processor was purchased (whether purchased separately
or as part of a computer system).
If the Pentium or Celeron processor, which is the subject of this Limited Warranty, fails during the warranty period for reasons covered by this Limited Warranty, Intel, at its option, will:
• REPAIR the Pentium or Celeron processor by means of hardware and/or software; OR
• REPLACE the Pentium or Celeron processor with another Pentium or Celeron processor; OR
if Intel is unable to repair or replace the particular Pentium or Celeron processor,
• REFUND the then-current value of the Pentium or Celeron processor.
THIS LIMITED WARRANTY, AND ANY IMPLIED WARRANTIES THAT MAY EXIST UNDER STATE LAW, APPLY ONLY TO THE ORIGINAL PURCHASER OF THE
PENTIUM OR CELERON PROCESSOR, OR PENTIUM OR CELERON PROCESSOR-BASED COMPUTER AND LAST ONLY FOR AS LONG AS SUCH PURCHASER
CONTINUES TO OWN THE PROCESSOR.
Extent of Limited Warranty
Intel does not warrant that your Pentium or Celeron processor will be free from design defects or errors known as "errata." Current characterized errata are available upon request.
This limited warranty is for purchasers in the United States and Canada only. The limited warranty does not cover any costs relating to removal or replacement of any Pentium or
Celeron processors that are soldered or otherwise permanently affixed to your system’s motherboard.
This limited warranty does not cover damages due to external causes, including accident, problems with electrical power, usage not in accordance with product instructions,
misuse, neglect, alteration, repair, improper installation, or improper testing.
How to Obtain Warranty Service
To obtain warranty service for your Pentium or Celeron processor, you may contact your computer system manufacturer in accordance with its instructions, or you may contact Intel.
To request warranty service from Intel, you should call Intel at 1-800-628-8686 during the warranty period during normal business hours (Pacific Time), excluding holidays. Please
be prepared to provide:
(1) your name, address, and telephone numbers;
(2) proof of purchase;
(3) this Intel warranty card;
(4) a description of the computer system including the brand and model; and
(5) an explanation of the problem.
[Note: The Customer Service Representative may need additional information from you depending on the nature of the problem.]
The replacement processor is warranted under this written warranty and is subject to the same limitations and exclusions for the remainder of the original warranty period or one
(1) year, whichever is longer.
WARRANTY LIMITATIONS AND EXCLUSIONS
THESE WARRANTIES REPLACE ALL OTHER WARRANTIES, EXPRESS OR IMPLIED INCLUDING, BUT NOT LIMITED TO, THE IMPLIED WARRANTIES OF
MERCHANTABILITY AND FITNESS FOR A PARTICULAR PURPOSE. INTEL MAKES NO EXPRESS WARRANTIES BEYOND THOSE STATED HERE. INTEL
DISCLAIMS ALL OTHER WARRANTIES, EXPRESS OR IMPLIED, INCLUDING, WITHOUT LIMITATION, IMPLIED WARRANTIES OF MERCHANTABILITY
AND FITNESS FOR A PARTICULAR PURPOSE.
SOME LAWS DO NOT ALLOW THE EXCLUSION OF IMPLIED WARRANTIES SO THIS LIMITATION MAY NOT APPLY TO YOU. IF THESE LAWS APPLY, THEN ALL
EXPRESS AND IMPLIED WARRANTIES ARE LIMITED IN DURATION TO THE LIMITED WARRANTY PERIOD. NO WARRANTIES APPLY AFTER THAT PERIOD.
SOME LAWS DO NOT ALLOW LIMITATIONS ON HOW LONG AN IMPLIED WARRANTY LASTS, SO THIS LIMITATION MAY NOT APPLY TO YOU.
LIMITATIONS OF LIABILITY
INTEL’S RESPONSIBILITY UNDER THIS, OR ANY OTHER WARRANTY, IMPLIED OR EXPRESS, IS LIMITED TO REPAIR, REPLACEMENT OR REFUND, AS SET
FORTH ABOVE. THESE REMEDIES ARE THE SOLE AND EXCLUSIVE REMEDIES FOR ANY BREACH OF WARRANTY. INTEL IS NOT RESPONSIBLE FOR INDIRECT,
SPECIAL, INCIDENTAL, OR CONSEQUENTIAL DAMAGES RESULTING FROM ANY BREACH OF WARRANTY OR UNDER ANY OTHER LEGAL THEORY
INCLUDING, BUT NOT LIMITED TO, LOST PROFITS, DOWNTIME, GOODWILL, DAMAGE TO OR REPLACEMENT OF EQUIPMENT AND PROPERTY, AND ANY
COSTS OF RECOVERING, REPROGRAMMING, OR REPRODUCING ANY PROGRAM OR DATA STORED IN OR USED WITH A SYSTEM CONTAINING YOUR
PENTIUM PROCESSOR. SOME JURISDICTIONS DO NOT ALLOW THE EXCLUSION OR LIMITATION OF INCIDENTAL OR CONSEQUENTIAL DAMAGES, SO THE
ABOVE LIMITATIONS OR EXCLUSIONS MAY NOT APPLY TO YOU.
THE LIMITED WARRANTY GIVES YOU SPECIFIC LEGAL RIGHTS, AND YOU MAY ALSO HAVE OTHER RIGHTS THAT VARY FROM JURISDICTION TO JURISDICTION.
36
Setup and Quick Re ference Guide
Intel Pentium® and Celeron® Processors are backed by a three-year limited warranty.
Please refer to the reverse side of this card for complete warranty details.
Intel’s Commitment to Quality
Intel is committed to producing the highest quality processors available. That’s why we have hundreds of people dedicated to continuously improve our design, manufacturing,
and testing technology.
We put every one of our Pentium® and Celeron® processors through a rigorous battery of tests during the design and manufacturing processes.
To verify that the new chip will correctly run the software written for Intel Architecture processors, a team of Intel engineers is dedicated to compatibility testing. In a state-of-art lab,
this group runs an extensive set of operating systems, applications, network tests and stress tests repeatedly to ensure that the processor is compatible with representative software.
Just as importantly, we work with hardware and software companies in the computer industry to ensure that our processors are compatible with their products.
Additionally, a sampling of Intel processors are subjected to a rigorous "burn-in" test whereby the chip is operated at higher-than-normal temperatures and voltages. During this
burn-in period, the processor experiences the equivalent of weeks of normal usage. These units are monitored for failures as part of our ongoing quality assurance process.
As a result, today’s microprocessors from Intel are among the most reliable components in computers.
What are "Errata"?
Exhaustive product testing can highlight differences between the actual behavior of the microprocessor and its specifications. Sometimes the discrepancies are caused by a design
defect or error, which we call errata. Rigorous validation identifies most errata during the development of the processor, but we do detect additional errata during the life cycle of
a microprocessor.
When an erratum is identified, our engineers work to characterize it and find a solution. We work with system designers and software developers to ensure that the discrepancy does
not affect their products. If necessary, special software or hardware solutions (sometimes known as "work arounds") are implemented in the system design to prevent computer
users from encountering the problem. Errata may then be corrected in future revisions of the microprocessor.
No microprocessor is perfect, and Intel recognizes that some consumers want to know about any errata, whether or not the errata affect them. Intel makes documentation of all
characterized Pentium and Celeron processor errata publicly available through our Technical Documentation Service.
At Intel, our goal is to make every computer user satisfied with his or her Pentium or Celeron processor. Should you have any questions, comments or concerns about your Intel
microprocessor, please call us at 1-800-628-8686.
©1997, 1998 Intel Corporation. All rights reserved.
Setup and Quick Re ference Guide
37
38
Setup and Quick Re ference Guide
w w w. d e l l . c o m | s u p p o r t . d e l l . c o m
Systèmes Dell™ OptiPlex™ SX
Guide de configuration
et de référence rapide
Modèle DCT
w w w. d e l l . c o m | s u p p o r t . d e l l . c o m
Remarques, avis et précautions
REMARQUE : Une REMARQUE indique des informations importantes qui
vous aident à mieux utiliser votre ordinateur.
AVIS : Un AVIS vous avertit d'un risque de dommage matériel ou de perte
de données et vous indique comment éviter le problème.
PRÉCAUTION : Une PRÉCAUTION indique un risque potentiel
d'endommagement du matériel, de blessure corporelle ou de mort.
Abréviations et acronymes
Pour obtenir une liste complète des abréviations et des acronymes,
reportez-vous au « glossaire » du Guide d'utilisation.
Si vous avez acheté un ordinateur Dell™ série n, aucune des
références faites dans ce document aux systèmes d'exploitation
Microsoft® Windows® n'est applicable.
____________________
Les informations de ce document sont sujettes à modifications sans préavis.
© 2002 – 2003 Dell Computer Corporation. Tous droits réservés.
Toute reproduction sans l'autorisation écrite de Dell Computer Corporation est strictement interdite.
Marques utilisées dans ce document : Dell, OptiPlex et le logo DELL sont des
marques de Dell Computer Corporation ; Microsoft et Windows sont des marques déposées de
Microsoft Corporation ; Intel, Pentium et Celeron sont des marques déposées de Intel Corporation.
D'autres marques et noms commerciaux peuvent être utilisés dans ce document pour
faire référence aux entités se réclamant de ces marques et de ces noms ou à leurs produits.
Dell Computer Corporation dénie tout intérêt propriétaire aux marques et aux noms commerciaux
autres que les siens.
Juillet 2003
Réf. 1U919
Rév. A03
Sommaire
Présentation de ce guide
Caractéristiques
. . . . . . . . . . . . . . . . . . . . . .
43
. . . . . . . . . . . . . . . . . . . . . . . . . .
43
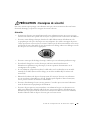
PRÉCAUTION : Consignes de sécurité
Généralités
. . . . . . . . . . . . . . .
45
. . . . . . . . . . . . . . . . . . . . . . . . . . .
45
Lors de l'utilisation de votre ordinateur
. . . . . . . . . . . . . .
Intervention à l'intérieur de votre ordinateur
. . . . . . . . . .
49
. . . . . . . . . . . . . . . . . . .
49
. . . . . . . . . . . . . . . . . . . .
50
Mise au rebut de la batterie
Déterminez l'emplacement et l'orientation de l'ordinateur
. . . .
50
. . . . . .
51
. . . . . . . . . . . . . . . . . . . . .
52
Installation d'un périphérique dans la baie modulaire
Installation du support
48
. . . . . . . . .
Protection contre les décharges électrostatiques
Mise en route/configuration
47
Connexion de l'adaptateur CA/CC
. . . . . . . . . . . . . . . .
Connexion de périphériques externes
. . . . . . . . . . . . . .
53
54
Installation du capot de l'emplacement pour câble
. . . . . . . .
55
Installation du support sur la plaque de montage
. . . . . . . .
57
. . . . . . . . . . . . .
59
. . . . . . . . . . . . . . . . . . . . .
61
. . . . . . . . . . . . . . . . . . . . . . .
61
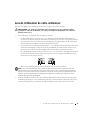
Recherche d'informations et d'assistance
Résolution des problèmes
Outils de dépannage
. . . . . . . . . . .
62
. . . . . . . . . . . . . . . . .
63
Utilisation du CD Pilotes et utilitaires Dell
Exécution des Diagnostics Dell
Exécution des Diagnostics Dell de disque dur IDE
. . . . . . . .
64
Sommaire
41
Informations de réglementation .
. . . . . . . . . . . . . . . . .
Garantie limitée et règle de retour
. . . . . . . . . . . . . . . .
Conditions de garantie limitée pour les produits
matériels Dell (Canada seulement) . . . . . . .
Règle de retour « Satisfait ou remboursé »
(Canada seulement) . . . . . . . . . . .
67
. . . . . . . . . . .
70
. . . . . . .
Déclaration de garantie Intel® pour les processeurs Pentium®
et Celeron® seulement (États-Unis et Canada seulement) . . .
Sommaire
67
. . . . . . . .
Logiciels et périphériques Dell (Canada seulement)
42
65
.
71
72
Présentation de ce guide
Ce document contient des informations sur la mise en route/configuration, la résolution
des problèmes ainsi que sur les instructions de sécurité, les réglementations et la garantie
concernant votre ordinateur Dell™ OptiPlex™.
Pour obtenir les dernières versions des documents sur votre disque dur, visitez le site
Web de support de Dell à l'adresse support.dell.com.
Numéro de modèle de
réglementation et type de châssis
DCT = Ultra small form-factor (USF)
(ordinateur petit format)
Caractéristiques
deux prises USB, connecteurs
d'écouteurs et de microphone
bouton d'alimentation
fente de montage
fente de montage
(insérez le support en (insérez le support en
position horizontale
position verticale)
suspendue)
fente de montage
(insérez le support
en position verticale
suspendue)
voyants de diagnostic
baie modulaire
bouton de déblocage du module
bouton de déblocage du capot de l'unité
de disque dur/capot de l'ordinateur
G u i d e d e c o n f i g u r a t i o n e t de r éf é r e nc e r apide
43
w w w. d e l l . c o m | s u p p o r t . d e l l . c o m
capot de
l'emplacement
pour câble
capot de l'unité de disque dur
(ouvrez le capot pour accéder
au loquet de verrouillage du
périphérique modulaire)
adaptateur de courant
44
baie modulaire
plaque de montage du
support de châssis
Guide de configuration et d e r é f é r e n c e r a p i d e
capot de
l'ordinateur
support de
l'ordinateur
PRÉCAUTION : Consignes de sécurité
Pour votre sécurité et pour protéger votre ordinateur ainsi que votre environnement de travail contre
d'éventuels dommages, respectez les consignes de sécurité ci-dessous.
Généralités
•
Ne tentez pas d'assurer vous-même l'entretien de votre ordinateur à moins que vous ne soyez un
technicien de maintenance qualifié. Suivez toujours scrupuleusement les instructions d'installation.
•
Pour éviter toute décharge électrique, branchez les câbles d'alimentation de l'ordinateur et de
ses périphériques à des prises électriques avec terre adéquates. Ces câbles sont équipés de prises à
3 fiches pour assurer une mise à la terre correcte. N'utilisez pas les fiches intermédiaires ou ne retirez
pas la broche de masse d'un câble. Si vous devez utiliser une rallonge, utilisez une rallonge à trois fils
avec des prises avec mise à la terre appropriées.
•
Pour éviter tout risque de décharge électrique, n'utilisez pas votre ordinateur pendant un orage.
•
Pour réduire le danger lié à un choc électrique, n'effectuez aucun branchement ou
débranchement pendant un orage électrique, ni aucune opération de maintenance ou de
reconfiguration de ce produit.
•
Si votre ordinateur comprend un modem, le câble utilisé avec le modem doit avoir une taille
minimale de 26 AWG (American Wire Gauge) et une fiche modulaire RJ-11 conforme à la
norme FCC.
•
Débranchez l'ordinateur de la prise électrique avant de le nettoyer. Nettoyez votre ordinateur
avec un tissu doux et humidifié avec de l'eau. N'utilisez pas de liquide ni d'aérosol nettoyants,
ceux-ci peuvent contenir des substances inflammables.
•
Pour éviter d'endommager la carte système, patientez 5 secondes après avoir éteint l'ordinateur
avant de déconnecter un périphérique de l'ordinateur.
•
Pour éviter de provoquer un court-circuit dans votre ordinateur lorsque vous déconnectez un
câble réseau, débranchez d'abord le câble de la carte réseau situé à l'arrière de l'ordinateur, puis
débranchez-le de la prise murale du réseau. Pour reconnecter un câble réseau à votre ordinateur,
branchez d'abord le câble sur la prise du réseau, puis sur la carte réseau.
G u i d e d e c o n f i g u r a t i o n e t de r éf é r e nc e r apide
45
w w w. d e l l . c o m | s u p p o r t . d e l l . c o m
PRÉCAUTION : Consignes de sécurité (suite)
•
Pour aider à protéger votre ordinateur contre des augmentations et des diminutions soudaines
et passagères de l'alimentation électrique, utilisez un protecteur de surtension, un élément de
conditionnement de ligne ou un onduleur (UPS).
•
Assurez-vous qu'aucun élément ne repose sur les câbles de votre ordinateur et que les câbles ne
sont pas placés à un endroit où l'on pourrait marcher ou trébucher dessus.
•
N'insérez pas d'objets dans les ouvertures de votre ordinateur. Cela risquerait de provoquer un
incendie ou un choc électrique dû à un court-circuit des composants internes.
•
Conservez votre ordinateur à distance des radiateurs et sources de chaleur. Veillez à ne pas bloquer
les grilles d'aération. Évitez de placer des papiers volants sous votre ordinateur ; ne placez pas votre
ordinateur dans une unité murale fermée ou sur un lit, un canapé ou un tapis.
•
Ne renversez ni nourriture ni liquide sur votre ordinateur.
•
N'utilisez pas votre ordinateur pendant un orage sauf si l'adaptateur CA/CC est débranché de la
prise électrique.
•
Lorsque l'adaptateur CA/CC est utilisé pour alimenter l'ordinateur, placez-le dans une zone aérée,
comme sur un bureau ou sur le sol.
•
L'adaptateur CA/CC risque de chauffer lorsque vous utilisez votre ordinateur. Faites donc très
attention lorsque vous manipulez l'adaptateur pendant ou après son fonctionnement.
46
Guide de configuration et d e r é f é r e n c e r a p i d e
Lors de l'utilisation de votre ordinateur
Lorsque vous utilisez votre ordinateur, observez les consignes de sécurité suivantes :
PRÉCAUTION : Ne faites pas fonctionner votre ordinateur avec le(s) capot(s) retiré(s)
(y compris le capot de l'ordinateur, les cadres, les languettes métalliques, les inserts du
panneau avant, etc.).
•
Votre ordinateur est équipé de l'un des éléments suivants :
–
Un bloc d'alimentation à tension fixe — Les ordinateurs dotés d'un bloc d'alimentation à
tension fixe ne disposent pas de commutateur de sélection de la tension sur le panneau arrière
et fonctionnent avec une seule tension (voir l'étiquette de réglementation située à l'extérieur
de l'ordinateur pour connaître sa tension de fonctionnement).
–
Un circuit de tension à détection automatique — Les ordinateurs dotés d'un circuit de tension
à détection automatique ne disposent pas de commutateur de sélection de la tension sur le
panneau arrière et détectent automatiquement la tension de fonctionnement correcte.
–
Un commutateur manuel de sélection de la tension — Les ordinateurs dotés d'un commutateur
de sélection de la tension sur le panneau arrière doivent être configurés manuellement pour
fonctionner avec la tension correcte.
Placez le commutateur dans la position la plus proche de la tension utilisée.
AVIS : Pour éviter d'endommager votre ordinateur, réglez le sélecteur de tension manuel de sorte qu'il
corresponde bien au courant alternatif (CA) de votre pays. Pour le Japon, le sélecteur de tension doit être
réglé sur 115 V, même si dans ce pays la puissance en CA est de 100 V. Assurez-vous également que votre
moniteur et tous ses périphériques sont électriquement réglés pour fonctionner avec la puissance en CA
disponible dans votre zone géographique.
•
Avant de travailler à l'intérieur de votre ordinateur, débranchez celui-ci pour prévenir tour risque
de décharge électrique et éviter d'endommager la carte système. Certains composants de la carte
système sont alimentés en permanence lorsque l'ordinateur est branché à une source de CA.
G u i d e d e c o n f i g u r a t i o n e t de r éf é r e nc e r apide
47
w w w. d e l l . c o m | s u p p o r t . d e l l . c o m
Lors de l'utilisation de votre ordinateur (suite)
Intervention à l'intérieur de votre ordinateur
Avant de retirer le capot de l'ordinateur, effectuez les étapes suivantes dans l'ordre indiqué.
PRÉCAUTION : Ne tentez pas d'assurer vous-même l'entretien de l'ordinateur, sauf comme
expliqué dans la Dell™ documentation Dell™ en ligne ou dans les in instructions fournies par
Dell. Suivez toujours de près les instructions d'installation et d'entretien.
AVIS : Pour éviter d'endommager la carte système, patientez 5 secondes après avoir éteint l'ordinateur avant
de retirer un composant de la carte système ou de déconnecter un périphérique de l'ordinateur.
1
Arrêtez correctement votre ordinateur à l'aide du menu du système d'exploitation.
2
Éteignez l'ordinateur et tous les périphériques connectés à celui-ci.
3
Mettez-vous à la terre en touchant une surface métallique non peinte sur le châssis, telle que la
partie métallique située à l'arrière de l'ordinateur, avant de toucher un élément à l'intérieur de
votre ordinateur.
Pendant votre travail à l'intérieur de l'ordinateur, touchez régulièrement une surface métallique non
peinte sur le châssis de l'ordinateur pour dissiper toute électricité statique qui pourrait endommager
les composants internes.
4
Déconnectez votre ordinateur et ses périphériques, ainsi que le moniteur, de leurs prises électriques.
Déconnectez également les lignes téléphoniques ou de télécommunication de l'ordinateur.
Vous réduirez ainsi le risque de blessure ou de décharge électrique.
En outre, gardez ces consignes de sécurité en mémoire, le cas échéant :
•
Lorsque vous débranchez un câble, tirez sur le connecteur ou sur la boucle prévue à cet effet,
mais jamais sur le câble lui-même. Certains câbles ont des connecteurs avec des onglets de blocage ;
pour déconnecter ce type de câble, appuyez sur les onglets de blocage avant de déconnecter le câble.
Quand vous séparez des connecteurs, conservez-les alignés de manière égale afin d'éviter de tordre
leurs broches. De même, lorsque vous connectez un câble, vérifiez que les connecteurs sont bien
orientés et alignés.
•
Manipulez les composants et les cartes avec précaution. Ne touchez pas les composants ou
les contacts d'une carte. Tenez une carte par ses bords ou par son support de montage métallique.
Prenez un composant (comme la puce d'un microprocesseur) par ses bords, et non par ses broches.
PRÉCAUTION : Une nouvelle batterie mal installée risque d'exploser. Remplacez la batterie
uniquement par une batterie de type identique ou équivalent à celui recommandé par le
fabricant. Ne jetez pas la batterie avec les ordures ménagères. Contactez le service municipal
de traitement des déchets pour connaître l'adresse du site de dépôt de batteries le plus
proche de votre domicile.
48
Guide de configuration et d e r é f é r e n c e r a p i d e
Lors de l'utilisation de votre ordinateur (suite)
Protection contre les décharges électrostatiques
L'électricité statique peut endommager les composants fragiles à l'intérieur de votre ordinateur.
Pour éviter de tels dommages, déchargez l'électricité statique de votre corps avant de toucher tout
composant électronique de votre ordinateur, comme un microprocesseur. Pour ce faire, touchez une
surface métallique non peinte du châssis de l'ordinateur.
Pendant votre travail à l'intérieur de l'ordinateur, touchez régulièrement une surface métallique non
peinte pour décharger toute électricité statique que votre corps peut avoir accumulée.
Vous pouvez également prendre les mesures suivantes pour éviter les dommages dus aux décharges
électrostatiques :
•
Ne retirez pas les composants de leur matériau d'emballage antistatique jusqu'à ce que vous soyez
prêt à les installer dans votre ordinateur. Juste avant d'ôter l'emballage antistatique, déchargez votre
corps de son électricité statique.
•
Quand vous transportez un composant électrostatique sensible, placez-le d'abord dans un
emballage ou un conteneur antistatique.
•
Manipulez tous les composants électrostatiques sensibles dans une zone antistatique. Si possible,
utilisez des tapis antistatiques sur le sol et sur votre plan de travail.
Mise au rebut de la batterie
Votre ordinateur utilise une pile bouton au lithium. La durée de vie de cette pile bouton est telle qu'il est
fort probable que vous n'ayez jamais besoin de la remplacer. Si vous êtes toutefois amené à la remplacer,
reportez-vous à votre Guide d'utilisation.
Ne jetez pas la batterie avec les ordures ménagères. Contactez le service municipal de traitement des
déchets pour connaître l'adresse du site de dépôt de batteries le plus proche de votre domicile.
G u i d e d e c o n f i g u r a t i o n e t de r éf é r e nc e r apide
49
w w w. d e l l . c o m | s u p p o r t . d e l l . c o m
Mise en route/configuration
PRÉCAUTION : Avant d'effectuer l'une des procédures énumérées ci-après,
lisez attentivement les consignes de sécurité de la page 45.
AVIS : Ne mettez pas votre ordinateur sous tension tant que la procédure de configuration
n'est pas terminée.
1
Déterminez l'emplacement et l'orientation de l'ordinateur
REMARQUE : Si vous souhaitez placer votre ordinateur verticalement ou horizontalement,
sous un bureau ou une table, reportez-vous aux chapitres « Installation du support » à la
page 52 et « Installation du support sur la plaque de montage » à la page 57.
AVIS : Ne placez pas le moniteur sur l'ordinateur. Utilisez un support de moniteur.
AVIS : Dans un environnement à fortes vibrations, lors de l'installation de l'ordinateur sous un
bureau ou une table, utilisez le support de montage mural en option à la place du support de
châssis. Pour commander ce support, contactez Dell.
AVIS : Pour assurer une ventilation correcte, ne placez pas votre ordinateur verticalement sur un
bureau sans utiliser le support d'ordinateur (reportez-vous à la section « Installation du support »).
AVIS : Afin d'assurer une ventilation appropriée, ne bloquez pas les ventilateurs de refroidissement.
50
Guide de configuration et d e r é f é r e n c e r a p i d e
2
Installation d'un périphérique dans la baie modulaire
REMARQUE : Pour trouver le loquet de verrouillage du périphérique modulaire, retirez le
capot de l'unité de disque dur.
Votre ordinateur Dell est livré avec un lecteur de disquette ou un emplacement prédécoupé
dans la baie modulaire. Pour installer un CD, un DVD ou une deuxième unité de disque
dur dans la baie modulaire, retirez d'abord l'emplacement prédécoupé et installez le
périphérique.
Loquet de
verrouillage du
périphérique
modulaire
G u i d e d e c o n f i g u r a t i o n e t de r éf é r e nc e r apide
51
w w w. d e l l . c o m | s u p p o r t . d e l l . c o m
3
Installation du support
REMARQUE : Si vous installez l'ordinateur sous un bureau ou une table, connectez d'abord
tous les câbles, puis installez le support sur la plaque de montage (reportez-vous à la section
« Installation du support sur la plaque de montage » à la page 57).
1
Soulevez la vis imperdable et faites glisser le support de châssis dans l'une des trois
fentes de montage à l'arrière de l'ordinateur.
2
Lorsque le support est en place, resserrez la vis.
AVIS : Si l'ordinateur est installé sous un bureau ou une table et dans un environnement
à fortes vibrations, utilisez le support de montage mural en option à la place du support
d'ordinateur.
52
Guide de configuration et d e r é f é r e n c e r a p i d e
Connexion de l'adaptateur CA/CC
4
REMARQUE : Le voyant de l'adaptateur d'alimentation s'allume lorsque l'adaptateur
est correctement branché à la fois à une prise murale et à l'ordinateur.
1
Connectez le câble d'alimentation au connecteur situé à l'arrière de l'ordinateur.
2
Connectez le câble d'alimentation à l'adaptateur.
AVIS : Seules les installations japonaises sont concernées par la procédure suivante.
PRÉCAUTION : Si vous décidez de relier le fil vert de masse à une prise
électrique, n'autorisez aucun contact entre la masse et les conducteurs car
cela pourrait provoquer un choc électrique, un incendie ou endommager
votre ordinateur (consultez la figure suivante).
Si vous choisissez de ne pas relier le fil vert de masse à une prise électrique,
passez à étape 4.
3
Reliez le connecteur métallique de masse à la source de masse sur la prise
(consultez la figure suivante) :
a
Desserrez la source de masse.
b
Faites glisser le connecteur en métal derrière la source de masse, puis vissez
la source de masse.
source de masse
connecteur métallique
de masse
4
Connectez le câble d'alimentation CA à la prise.
G u i d e d e c o n f i g u r a t i o n e t de r éf é r e nc e r apide
53
w w w. d e l l . c o m | s u p p o r t . d e l l . c o m
5
Connexion de périphériques externes
REMARQUE : Connectez seulement un clavier et une souris.
PRÉCAUTION : Pour prévenir tout risque d'électrocution, n'utilisez que
l'adaptateur et le câble d'alimentation fournis et vérifiez qu'ils sont branchés
sur une source d'alimentation électrique correctement reliée à la terre.
SX260
54
Guide de configuration et d e r é f é r e n c e r a p i d e
SX270
Connexion d'un moniteur VGA
Si vous disposez d'un moniteur VGA et d'un connecteur DVI à l'arrière de votre ordinateur,
branchez l'adaptateur VGA-DVI au connecteur DVI et le câble du moniteur à l'adaptateur
de la façon indiquée.
6
Installation du capot de l'emplacement pour câble
AVIS : Si vous installez l'ordinateur sous un bureau ou une table, ne refermez pas le capot
de l'emplacement pour câble tant que l'ordinateur n'est pas correctement fixé sur la plaque de
montage (reportez-vous à l'étape 7, « Installation du support sur la plaque de montage » à la
page 57).
AVIS : Si vous utilisez le support sur votre ordinateur, fixez-le avant de refermer le capot de
l'emplacement pour câble.
AVIS : Lors de l'installation du capot de l'emplacement pour câble, ne placez pas l'ordinateur
face en bas pour éviter que la surface de celui-ci ne soit en contact avec une surface dure.
Vous risquez d'appuyer sur le bouton d'alimentation et de rayer la surface de l'ordinateur.
1
Branchez tous les câbles à l'arrière de l'ordinateur.
2
Maintenez la partie inférieure du capot et alignez les quatre onglets avec les
quatre fentes sur le panneau arrière de l'ordinateur.
3
Insérez les onglets dans les fentes et faites glisser cette partie vers les voyants
de diagnostic (voir illustration) jusqu'à ce qu'elle se positionne correctement.
G u i d e d e c o n f i g u r a t i o n e t de r éf é r e nc e r apide
55
w w w. d e l l . c o m | s u p p o r t . d e l l . c o m
4
Saisissez la partie supérieure du capot et alignez les deux onglets avec les deux
fentes sur le panneau arrière de l'ordinateur.
5
Insérez les onglets dans les fentes et faites glisser cette partie vers les voyants
de diagnostic (voir illustration) jusqu'à ce qu'elle se positionne correctement.
6
Installez un appareil de sécurité dans le capot de la fente pour câble de sécurité
(en option).
emplacement pour
câble de sécurité
Ne placez pas
l'ordinateur face
en bas sur le cadre
56
Guide de configuration et d e r é f é r e n c e r a p i d e
Pour retirer le capot, enlevez l'appareil installé dans la fente pour câble de sécurité
(le cas échéant).
1
Saisissez la partie supérieure du capot de l'emplacement pour câble et faites-la
glisser sur la gauche jusqu'à ce qu'elle s'arrête, puis soulevez-la pour la retirer.
2
Pour retirer la partie inférieure du capot de l'emplacement pour câble, tout en
appuyant sur le levier, faites glisser la pièce sur la gauche jusqu'à ce qu'elle s'arrête,
puis soulevez-la pour la retirer.
7
Installation du support sur la plaque de montage
AVIS : Lorsque vous installez l'ordinateur en position suspendue, évitez de le placer à des
endroits où il risque d'être bousculé (par une chaise, par exemple).
PRÉCAUTION : Fixez la plaque de montage sur une surface fixe capable de
supporter un poids de 18,1 kg (40 livres) en suspension.
REMARQUE : Avant de fixer la plaque de montage sur une surface, vérifiez la manière
dont le support sera fixé à la plaque de montage.
1
À l'aide des quatre vis à bois #6 (15,88 mm ; 0,625 pouces) fournies, fixez la plaque
de montage sur une surface fixe d'une épaisseur minimum de 2,5 cm (1 pouce)
(voir illustration).
2
Orientez l'ordinateur et le support sous la plaque de montage à environ 2,5 cm
(1 pouce) du bord de la plaque.
G u i d e d e c o n f i g u r a t i o n e t de r éf é r e nc e r apide
57
w w w. d e l l . c o m | s u p p o r t . d e l l . c o m
3
Soulevez l'ordinateur et le support, insérez le support dans le support de montage et
faites-le glisser jusqu'à ce que l'onglet de verrouillage soit inséré dans la fente sur la
plaque de montage.
4
Fixez le capot de l'emplacement pour câble (le cas échéant).
trous de vis (4)
emplacement de la
plaque de montage
languette du levier
de verrouillage
surface fixe d'une
épaisseur minimum
de 2,5 cm (1 pouce)
AVIS : Lors de la configuration de votre ordinateur, fixez tous les câbles à l'arrière de la zone
de travail afin qu'ils ne soient pas tirés, emmêlés ou piétinés.
58
8
Allumez l'ordinateur, lisez l'accord de licence du logiciel et suivez les instructions
d'installation du système d'exploitation à l'écran.
9
Félicitations ! Vous avez terminé la configuration du système.
Guide de configuration et d e r é f é r e n c e r a p i d e
Recherche d'informations et d'assistance
Que recherchez-vous ?
Retrouvez les éléments ici
• Programme de diagnostics pour
mon ordinateur
• Pilotes pour mon ordinateur
• La documentation de mon ordinateur
• Documentation concernant mon
périphérique
CD Pilotes et utilitaires (appelé aussi
ResourceCD)
• Code de service express et numéro
de service
• Étiquette de licence Microsoft®
Windows®
Code de ser vice express et clé du produit
• Comment retirer et remplacer des
composants
• Caractéristiques techniques
• Comment configurer les paramètres
système
• Comment dépanner et résoudre les
problèmes
Guide d'utilisation
• Comment réinstaller mon système
d'exploitation
CD -ROM du système d'exploitation
Vous pouvez utiliser ce CD
pour accéder à la documentation,
réinstaller des pilotes ou exécuter
les outils de diagnostic.
Située sur votre ordinateur.
En fonction du système d'exploitation installé sur
votre ordinateur, double-cliquez sur l'icône User's Guides
(Guides d'utilisation) située sur le bureau, ou cliquez sur
le bouton Start (Démarrer), puis sur Help and Support
(Aide et support) pour accéder à la documentation
électronique stockée sur l'unité de disque dur.
Si vous réinstallez le système
d'exploitation, utilisez le CD Pilotes
et utilitaires pour réinstaller les
pilotes des périphériques fournis
avec votre ordinateur.
G u i d e d e c o n f i g u r a t i o n e t de r éf é r e nc e r apide
59
w w w. d e l l . c o m | s u p p o r t . d e l l . c o m
60
Que recherchez-vous ?
Retrouvez les éléments ici
• Pilotes les plus récents pour mon
ordinateur
• Réponses aux questions posées sur
le service et le support technique
• Discussions en ligne avec le support
technique et d'autres utilisateurs
• Documentation sur mon ordinateur
Site Web de support technique de Dell
• État des appels de demande d'assistance
et historique de support technique
• Principaux problèmes techniques de
mon ordinateur
• Détails sur la configuration de mon
ordinateur
Site Web de support technique de Dell Premier
• Comment utiliser Windows XP
• Documentation sur mon ordinateur
• Documentation pour les périphériques
(pour un modem, par exemple)
Centre d'aide et de support Windows XP
1 Cliquez sur le bouton Démarrer, puis sur Aide et support.
2 Entrez un mot ou une expression qui décrive votre problème,
puis cliquez sur l'icône en forme de flèche.
3 Cliquez sur la rubrique qui décrit votre problème.
4 Suivez les instructions qui s'affichent à l'écran.
Le site Web de support technique de Dell fournit plusieurs outils
en ligne, notamment :
• Solutions — Astuces de dépannage, articles de la Base de
connaissance
• Forum clients — Discussion en ligne avec d'autres clients Dell
• Mises à niveau — Mises à niveau des informations concernant
les composants, le système d'exploitation et les classes en ligne
• Service clientèle — Coordonnées des contacts, état des
commandes, garantie et informations sur les réparations
• Téléchargements — Pilotes, correctifs et mises à jour logicielles
• Référence — Documentation relative à l'ordinateur,
caractéristiques du produit, livres blancs et glossaire des termes
informatiques
Le site Web de support technique de Dell Premier est
personnalisé par type de clients : entreprises, administrations et
domaine de l'éducation. Ce site n'est pas disponible dans toutes
les régions.
Guide de configuration et d e r é f é r e n c e r a p i d e
Résolution des problèmes
Dell fournit un certain nombre d'outils qui vous aideront si votre système ne fonctionne
pas de la manière escomptée. Pour obtenir les dernières informations sur le dépannage
disponibles pour votre système, consultez le site Web du support technique de Dell à
l'adresse support.dell.com. Vous pouvez aussi trouver une description des outils de
dépannage Dell dans la section « Obtention de l'aide » du Guide d'utilisationen ligne.
Si des problèmes nécessitant l'aide de Dell surviennent, rédigez une description détaillée de
l'erreur, des codes sonores ou des voyants de diagnostics, notez votre Code de service express
et votre Numéro de service et contactez Dell depuis l'endroit où se trouve votre ordinateur.
Reportez-vous à la section « Recherche d'informations et d'assistance » à la page 59 pour
obtenir un exemple de code de service express et de numéros de service.
Code de service express :___________________________
Numéro de service :___________________________
Outils de dépannage
Les Diagnostics Dell testent les différents composants de votre ordinateur et aident à
identifier l'origine des problèmes. Pour plus d'informations, reportez-vous à « Exécution des
Diagnostics Dell » à la page 63.
Les caractéristiques suivantes peuvent indiquer la possibilité d'une panne et vous aider à
résoudre un problème d'ordinateur :
•
Voyants du système — Situés à l'avant de l'ordinateur.
•
Voyants de diagnostic — Situés à l'arrière de l'ordinateur.
•
Messages du système — S'affichent sur l'écran du moniteur..
•
Codes sonores — Série de bips sonores émis par votre ordinateur..
Consultez le Guide d'utilisation pour plus d'informations sur ces caractéristiques.
G u i d e d e c o n f i g u r a t i o n e t de r éf é r e nc e r apide
61
w w w. d e l l . c o m | s u p p o r t . d e l l . c o m
Utilisation du CD Pilotes et utilitaires Dell
Pour utiliser le CD Pilotes et utilitaires Dell pendant l'exécution du système d'exploitation
Microsoft® Windows®, procédez comme suit :
REMARQUE : Pour accéder aux pilotes de périphériques et à la documentation utilisateur,
vous devez utiliser le CD Pilotes et utilitaires pendant l'exécution de Windows.
1
Allumez l'ordinateur et démarrez-le à partir du bureau Windows.
2
Insérez le CD Pilotes et utilitaires Dell dans le lecteur de CD.
Si vous utilisez le CD Pilotes et utilitaires pour la première fois sur cet ordinateur, la
fenêtre d'installation s'ouvre et vous indique que le CD va commencer l'installation.
3
Cliquez sur OK pour continuer.
Pour terminer l'installation, suivez les invites du programme d'installation.
4
Cliquez sur Next (Suivant) dans l'écran Welcome Dell System Owner (Bienvenue au
propriétaire du système Dell).
5
Sélectionnez la liste appropriée System Model (Modèle de système), Operating
System (Système d'exploitation), Device Type (Type de périphérique) ou Topic
(Rubrique).
Des pilotes pour votre ordinateur
Pour afficher la liste de tous les pilotes de périphériques pour votre ordinateur, procédez
comme suit :
1
Cliquez sur My Drivers (Mes pilotes) dans le menu déroulant Topic (Rubrique).
Le CD Pilotes et utilitaires analyse le système d'exploitation et les éléments matériels
de votre ordinateur, puis une liste de pilotes de périphériques pour la configuration de
votre système s'affiche.
2
Cliquez sur le pilote approprié, puis suivez les instructions pour télécharger le pilote
sur votre ordinateur.
Pour afficher la liste de tous les pilotes disponibles pour votre ordinateur, cliquez sur Pilotes
dans le menu Rubrique.
62
Guide de configuration et d e r é f é r e n c e r a p i d e
Exécution des Diagnostics Dell
Le programme de Diagnostics Dell teste les différents composants de votre ordinateur.
Exécutez ce programme en cas de problème avec l'ordinateur pour vous aider à identifier
l'origine du problème. Vous pouvez exécuter les Diagnostics Dell à partir de l'unité de
disque dur ou du CD Pilotes et utilitaires.
À partir de l'unité de disque dur :
AVIS : En cas de défaillance de votre unité de disque dur, exécutez les Diagnostics Dell de
disque dur IDE (reportez-vous à la section « Exécution des Diagnostics Dell de disque dur IDE »
à la page 64).
1
Arrêtez, puis redémarrez l'ordinateur.
2
Lorsque le logo DELL™ apparaît, appuyez immédiatement sur <F12>.
REMARQUE : Si un message vous informe qu'aucune partition d'utilitaire de diagnostics n'a
été trouvée, suivez les instructions pour exécuter les Diagnostics Dell à partir de votre CD Pilotes
et utilitaires.
Si vous attendez trop longtemps et que le logo Windows apparaît, attendez encore
jusqu'à ce que le bureau Windows s'affiche. Arrêtez ensuite votre ordinateur à partir
du menu Start (Démarrer) et faites une nouvelle tentative.
3
Lorsque la liste des périphériques d'initialisation s'affiche, mettez en surbrillance
l'option Boot to Utility Partition (Initialisation sur la partition de l'utilitaire)
et appuyez sur <Entrée>.
4
Lorsque le menu principal des Diagnostics Dell s'affiche, sélectionnez le test à
exécuter.
5
Fermez l'écran de test pour revenir à l'écran Main Menu (Menu principal). Pour
quitter les Diagnostics Dell et redémarrer l'ordinateur, fermez l'écran Menu principal.
G u i d e d e c o n f i g u r a t i o n e t de r éf é r e nc e r apide
63
w w w. d e l l . c o m | s u p p o r t . d e l l . c o m
À partir du CD Pilotes et utilitaires :
1
Insérez le CD Pilotes et utilitaires dans le lecteur de CD.
2
Arrêtez, puis redémarrez l'ordinateur.
Lorsque le logo DELL apparaît, appuyez immédiatement sur <F12>.
Si vous attendez trop longtemps et que le logo Windows apparaît, attendez encore
jusqu'à ce que le bureau Windows s'affiche. Arrêtez ensuite votre ordinateur à partir
du menu Start (Démarrer) et faites une nouvelle tentative.
REMARQUE : Cette fonctionnalité change la séquence d'initialisation pour une fois seulement.
Lors du prochain démarrage, l'ordinateur s'initialisera en fonction des périphériques spécifiés
dans la configuration du système.
3
Lorsque la liste des périphériques d'initialisation s'affiche, mettez en surbrillance l'option
IDE CD-ROM Device (Périphérique CD-ROM IDE) et appuyez sur <Entrée>.
4
Sélectionnez IDE CD-ROM Device (Périphérique CD-ROM IDE) dans le menu
d'initialisation du CD.
5
Sélectionnez l'option Boot from CD-ROM (Initialiser à partir du CD-ROM) dans le
menu qui s'affiche.
6
Entrez 1 pour lancer le menu ResourceCD.
7
Entrez 2 pour démarrer les Diagnostics Dell.
8
Sélectionnez Run the 32-Bit Dell Diagnostics (Exécuter les Diagnostics Dell 32 bits)
dans la liste numérotée. Si plusieurs versions sont répertoriées, sélectionnez la version
appropriée pour votre plate-forme.
9
Lorsque le menu principal des Diagnostics Dell s'affiche, sélectionnez le test à exécuter.
10
Lorsque les tests sont terminés, retirez le CD.
Exécution des Diagnostics Dell de disque dur IDE
L'utilitaire de Diagnostics Dell de disque dur IDE teste l'unité de disque dur pour résoudre
ou confirmer une défaillance de celle-ci.
1
Allumez l'ordinateur (s'il est déjà allumé, redémarrez-le).
2
Lorsque F2 = Setup (Configuration) s'affiche dans le coin supérieur droit de
l'écran, appuyez sur <Ctrl><Alt><D>.
3
Suivez les instructions qui s'affichent à l'écran.
En cas de défaillance, reportez-vous à la section « Problèmes liés au disque dur » de
votre Guide d'utilisation.
64
Guide de configuration et d e r é f é r e n c e r a p i d e
Informations de réglementation
Une interférence électromagnétique (EMI, Electromagnetic Interference) est un signal ou une émission,
véhiculé(e) dans l'espace libre ou par des conducteurs électriques ou de signaux, qui peut mettre en danger le
fonctionnement d'une radionavigation ou d'un autre service de sécurité ou encore sérieusement dégrader, obstruer
ou interrompre de manière répétée un service de communications radio autorisé. Les services de communications
radio incluent, de manière non limitative, les services de radiodiffusion commerciale AM/FM, la télévision, les
services de téléphonie cellulaire, la radiodétection, le contrôle de la circulation aérienne, les récepteurs de radio
messagerie et les systèmes GSM. Ces services autorisés, ainsi que les éléments rayonnants parasites involontaires
tels que les dispositifs numériques, y compris les systèmes informatiques, contribuent à l'environnement
électromagnétique.
La compatibilité électromagnétique (EMC) est la capacité des éléments d'un équipement électronique à interagir
correctement dans l'environnement électronique. Bien que ce système informatique ait été conçu dans le respect
de cette compatibilité et soit conforme aux seuils fixés en matière d'interférences électromagnétiques par
l'organisme de réglementation, il n'y a aucune garantie concernant les interférences susceptibles de se produire
sur une installation particulière. Si cet équipement entraîne des interférences avec des services de communications
radio, ce qui peut être vérifié en allumant et en éteignant cet équipement, vous êtes encouragé à essayer de corriger
les interférences en prenant une ou plusieurs des mesures suivantes :
•
Changez l'orientation de l'antenne de réception.
•
Repositionnez l'ordinateur en fonction du récepteur.
•
Éloignez l'ordinateur du récepteur.
•
Branchez l'ordinateur sur une autre prise de sorte que celui-ci et le récepteur soient sur des circuits
de branchement différents.
Si nécessaire, consultez un représentant du support technique de Dell ou un technicien radio/télévision
expérimenté pour des suggestions supplémentaires.
REMARQUE : Pour des informations complémentaires sur votre système en matière
de réglementation, consultez le Guide d'utilisation.
G u i d e d e c o n f i g u r a t i o n e t de r éf é r e nc e r apide
65
w w w. d e l l . c o m | s u p p o r t . d e l l . c o m
66
Guide de configuration et d e r é f é r e n c e r a p i d e
Garantie limitée et règle de retour
Les produits matériels de marque Dell achetés au Canada sont assortis d'une garantie limitée de 90 jours
(disponible pour les lampes destinées aux projecteurs de marque Dell uniquement), d'un an, de deux ans, de trois
ans ou de quatre ans. Pour connaître la garantie dont vous avez fait l'acquisition, consultez la facture fournie avec
votre matériel. Les sections suivantes décrivent la garantie limitée et la règle de retour applicables au Canada.
Conditions de garantie limitée pour les produits matériels Dell
(Canada seulement)
Que couvre cette garantie limitée ?
Cette garantie limitée couvre les défauts matériels et de fabrication que vous, client utilisateur final,
rencontrez avec vos produits matériels Dell, y compris les périphériques de la marque Dell.
Qu'est-ce qui n'est pas couvert par cette garantie limitée ?
Cette garantie limitée ne couvre pas les éléments suivants :
•
Les logiciels, y compris le système d'exploitation et les logiciels ajoutés aux produits matériels
Dell par notre système d'intégration d'entreprise ou le rechargement de logiciels.
•
Les produits et accessoires d'une marque autre que Dell et Provider Direct.
•
Les problèmes résultant de ce qui suit :
–
Causes externes, telles que les accidents, l'usage abusif ou à mauvais escient, les problèmes
d'alimentation électrique.
–
Interventions non autorisées par Dell.
–
Utilisation non conforme aux instructions du produit.
–
Non-respect des instructions du produit ou non-exécution de l'entretien préventif exigé.
–
Problèmes dus à l'utilisation d'accessoires, de pièces et de composants non fournis par Dell.
•
Produits dont les numéros de service ou les numéros de série sont manquants ou incorrects.
•
Produits qui n'ont pas été payés.
CETTE GARANTIE VOUS DONNE DES DROITS LÉGAUX SPÉCIFIQUES, AUXQUELS PEUVENT
S'AJOUTER D'AUTRES DROITS, QUI VARIENT AU CAS PAR CAS (OU SELON LA PROVINCE). LA
RESPONSABILITÉ DE DELL POUR LE FONCTIONNEMENT DÉFECTUEUX ET LES DÉFAUTS DU
PRODUIT EST LIMITÉE À LA RÉPARATION OU AU REMPLACEMENT COMME INDIQUÉ DANS CE
CONTRAT DE GARANTIE, SELON LES CONDITIONS DE LA PÉRIODE DE GARANTIE APPARAISSANT
SUR VOTRE FICHE D'EXPÉDITION OU FACTURE. À L'EXCEPTION DES GARANTIES EXPRESSES
FIGURANT DANS LE PRÉSENT CONTRAT DE GARANTIE, DELL DÉCLINE TOUTE AUTRE GARANTIE
OU CONDITION EXPRESSE OU IMPLICITE, INCLUANT SANS RESTRICTION LES GARANTIES ET
CONDITIONS IMPLICITES DE QUALITÉ OU D'ADAPTABILITÉ À UN USAGE PARTICULIER,
STATUTAIRE OU AUTRE. CERTAINES PROVINCES NE RECONNAISSENT PAS D'EXCLUSION SUR DES
GARANTIES OU CONDITIONS IMPLICITES, OU DE RESTRICTION EN CE QUI CONCERNE LA DURÉE
D'UNE GARANTIE OU CONDITION IMPLICITE. AUQUEL CAS, LES EXCLUSIONS ET RESTRICTIONS
PRÉCÉDENTES PEUVENT NE PAS S'APPLIQUER.
G u i d e d e c o n f i g u r a t i o n e t de r éf é r e nc e r apide
67
w w w. d e l l . c o m | s u p p o r t . d e l l . c o m
NOUS DÉCLINONS TOUTE RESPONSABILITÉ, AU-DELÀ DES RECOURS INDIQUÉS DANS CETTE
GARANTIE LIMITÉE OU POUR LES DOMMAGES PARTICULIERS, INDIRECTS, ACCIDENTELS OU
INDUITS, Y COMPRIS POUR LA RESPONSABILITÉ DE RÉCLAMATIONS DE DOMMAGES D'UNE
TIERCE PARTIE À VOTRE ENCONTRE, POUR LA NON-DISPONIBILITÉ D'UN PRODUIT OU POUR
LA PERTE DE DONNÉES OU DE LOGICIEL, ET CE SANS RESTRICTION. NOTRE RESPONSABILITÉ
SE LIMITE AU MONTANT QUE VOUS AVEZ PAYÉ POUR LE PRODUIT FAISANT L'OBJET D'UNE
RÉCLAMATION. IL S'AGIT DU MONTANT MAXIMAL SOUMIS À LA RESPONSABILITÉ DE DELL.
CERTAINES PROVINCES NE RECONNAISSENT PAS D'EXCLUSION OU DE RESTRICTION SUR LES
DOMMAGES PARTICULIERS, INDIRECTS, SECONDAIRES OU INDUITS, AUQUEL CAS L'EXCLUSION
OU LA RESTRICTION PRÉCÉDENTE PEUT NE PAS S'APPLIQUER.
Quelle est la durée de cette garantie limitée ?
Cette garantie limitée s'applique pendant la période indiquée sur votre fiche d'expédition ou facture, à l'exception
de la garantie limitée des batteries Dell qui est valable un an seulement et de la garantie limitée des lampes de
projecteurs Dell qui est réduite à 90 jours uniquement. La garantie limitée prend effet à la date inscrite sur la fiche
d'expédition ou la facture. La période de garantie n'est pas étendue en cas de réparation ou de remplacement d'un
produit ou de composants sous garantie. Dell peut modifier en toute discrétion les conditions et la disponibilité
des garanties limitées, mais ces changements ne sont pas rétroactifs (c'est-à-dire que les conditions de la garantie
en vigueur au moment de l'achat continueront de s'appliquer à votre achat).
Que dois-je faire si j'ai besoin d'un service de garantie ?
Avant que la garantie n'expire, appelez-nous au numéro correspondant à votre situation, comme indiqué dans
le tableau ci-dessous. En outre, ayez à portée de main votre numéro de service ou numéro de commande Dell.
Utilisateurs particuliers, utilisateurs travaillant
à domicile et petites entreprises :
Canada seulement
Support technique et service clientèle
1-800-847-4096
Clients d'entreprises de taille moyenne, grands
comptes, clients de l'administration, clients
des domaines de l'éducation et de la santé,
et revendeurs de valeur ajoutée :
Support technique
1-800-387-5757
Service clientèle
1-800-326-9463
Clients de l'administration ou du domaine de
l'éducation, ou encore particuliers ayant acheté
ce produit par le biais d'un programme d'achat
pour salariés :
68
Support technique
1-800-387-5757
Service clientèle
1-800-326-9463
(poste 8221 pour les particuliers)
Mémoire Dell
1-888-363-5150
Guide de configuration et d e r é f é r e n c e r a p i d e
Quelles actions Dell met-il en œuvre ?
Pendant toute la durée de la garantie limitée de 90 jours et pendant la première année de toutes les autres
garanties limitées : Pendant toute la durée de la garantie limitée de 90 jours et pendant la première année de
toutes les autres garanties limitées, nous réparons tous les produits matériels Dell retournés qui s'avèrent présenter
un défaut de matériel ou de fabrication. Si nous ne parvenons pas à réparer le produit, nous le remplaçons par un
produit comparable, neuf ou recyclé.
Lorsque vous nous contactez, nous vous donnons un numéro d'autorisation de retour de matériel que vous devez
joindre à votre retour. Vous devez nous retourner les produits dans leur emballage d'origine ou un équivalent, payer
d'avance les frais d'expédition et assurer l'envoi des produits ou accepter les risques de perte ou de dommage
pendant l'acheminement. Nous nous chargeons de vous retourner les produits réparés ou remplacés. Nous prenons
à notre charge l'expédition des produits réparés ou remplacés si vous avez une adresse au Canada. Sinon, nous vous
renvoyons le produit contre paiement à réception.
Si nous déterminons que le problème n'est pas couvert par la garantie, nous vous en avertissons et vous indiquons
les solutions alternatives de service qui vous sont proposées moyennant des frais.
REMARQUE : Avant de nous expédier le ou les produits, veillez à sauvegarder les données du ou des disques
durs et de tout autre périphérique de stockage des produits. Supprimez toutes les informations confidentielles,
propriétaires ou personnelles et retirez tous les supports amovibles, tels que les disquettes, CD-ROM ou cartes PC.
Nous déclinons toute responsabilité en ce qui concerne vos informations confidentielles, propriétaires ou
personnelles, et en cas de perte ou d'endommagement des données ou des supports amovibles.
Après la première année des garanties limitées : Nous remplaçons tous les composants défectueux par des
composants neufs ou recyclés si nous considérons que le remplacement est justifié. Lorsque vous nous contactez,
nous vous demandons de nous fournir un numéro de carte de crédit valide au moment où vous demandez le
remplacement d'un composant, mais nous ne vous facturons pas le remplacement si vous nous retournez le
composant d'origine dans les 30 jours qui suivent l'expédition. Si nous ne recevons pas le composant d'origine
dans les 30 jours, nous porterons au débit de votre carte de crédit le prix standard actuel du composant.
Nous prenons à notre charge l'expédition du composant si vous avez une adresse au Canada. Sinon, nous
vous renvoyons le composant contre paiement à réception. Dell inclut également un emballage d'expédition
préaffranchi avec chaque composant de rechange afin que vous renvoyiez le composant remplacé à Dell.
REMARQUE : Avant de remplacer des pièces, veillez à sauvegarder les données du ou des disques durs
et de tout autre périphérique de stockage des produits. Nous déclinons toute responsabilité en cas de perte
ou d'endommagement des données.
Que se passe-t-il si j'ai souscrit un contrat de service ?
Si votre contrat de service a été passé avec Dell, le service vous sera proposé selon les conditions du contrat de
service. Reportez-vous à ce contrat pour plus d'informations sur la façon de bénéficier du service. Les contrats de
service Dell sont disponibles en ligne sur le site www.dell.ca ou en appelant le service clientèle au 1-800-847-4096.
Si vous avez souscrit par notre intermédiaire un contrat de service avec l'un de nos fournisseurs de service tiers,
reportez-vous à ce contrat (qui vous a été envoyé avec votre fiche d'expédition ou facture) pour plus d'informations
sur la façon de bénéficier du service.
Comment allez-vous réparer mon produit ?
Dell utilise des composants neufs ou remis en état provenant de différents fabricants pour les réparations sous
garantie et pour la fabrication de composants et de systèmes de remplacement. Les composants et systèmes
recyclés sont des composants ou des systèmes qui ont été retournés à Dell et dont certains n'ont jamais été utilisés
par le client. La qualité de tous les composants et systèmes est contrôlée et testée. Les composants et systèmes de
remplacement fournis sont couverts par la garantie pour la période restante de la garantie limitée du produit que
vous avez acheté. Dell est propriétaire de tous les composants retirés des produits réparés.
G u i d e d e c o n f i g u r a t i o n e t de r éf é r e nc e r apide
69
w w w. d e l l . c o m | s u p p o r t . d e l l . c o m
Puis-je transférer la garantie limitée ?
La garantie limitée sur les systèmes peut être transférée si son propriétaire actuel transfère également la propriété
du système et enregistre le transfert auprès de Dell. La garantie limitée sur la mémoire Dell ne peut pas être
transférée. Vous pouvez enregistrer le transfert de votre garantie limitée auprès de Dell en vous rendant sur notre
site Web :
•
Pour les ordinateurs achetés au Canada (transferts au sein du pays) et pour effectuer le transfert d'un client
à un autre, visitez le site Web à l'adresse suivante :
www.dell.ca/ca/en/gen/topics/segtopic_ccare_nav_013_ccare.htm
•
Pour les transferts en dehors du pays (hors du pays d'achat d'origine), visitez le site Web à l'adresse suivante :
www.dell.com/us/en/biz/topics/sbtopic_ccare_nav_016_ccare.htm
Si vous ne disposez pas d'un accès à Internet, appelez Dell au 1-800-847-4096 (pour les particuliers) ou au
1-800-326-9463 (pour les clients des entreprises et administrations).
Règle de retour « Satisfait ou remboursé » (Canada seulement)
En qualité de client et utilisateur final ayant acheté de nouveaux produits directement à Dell, vous êtes en
droit de les retourner à Dell dans un délai de 30 jours maximum après la date de réception des produits pour un
remboursement ou un avoir équivalent au prix d'achat. En qualité de client et utilisateur final ayant acheté des
produits reconditionnés ou recyclés à Dell, vous êtes en droit de les retourner dans un délai de 14 jours à compter
de la date indiquée sur votre fiche d'expédition ou facture pour un remboursement ou un avoir équivalent au prix
d'achat. Dans les deux cas, une taxe de 15 % sera déduite du montant du remboursement ou de l'avoir indiqué sur
votre fiche d'expédition ou facture, qui correspond aux frais d'expédition, de gestion et de retour applicables, sauf
avis contraire légal. Si vous avez acheté nos produits en tant que société liée à Dell par un contrat écrit, les termes
stipulés dans ce contrat au sujet du retour des produits peuvent différer de ceux spécifiés par la règle de retour.
Pour retourner les produits, vous devez appeler le Service Clientèle de Dell au 1-800-847-4096 qui vous fournira
un numéro d'autorisation de retour pour crédit. Afin d'accélérer la procédure de remboursement ou d'avoir, Dell
attend que vous lui renvoyiez les produits dans leur emballage d'origine dans les 5 jours suivant l'attribution d'un
numéro d'autorisation de retour pour crédit. Vous devez également payer d'avance les frais d'expédition et assurer
l'envoi ou accepter les risques de perte ou de dommage pendant l'acheminement. Vous ne pouvez renvoyer un
logiciel pour un remboursement ou un avoir que si l'emballage scellé contenant les disquettes ou les CD-ROM n'a
pas été ouvert. Les produits renvoyés doivent être comme neufs, et tous les guides, disquettes, CD-ROM, cordons
d'alimentation et autres accessoires compris avec le produit doivent être renvoyés avec lui. Les clients désirant
renvoyer, pour remboursement ou avoir uniquement, un logiciel d'application ou de système d'exploitation installé
par Dell doivent retourner le système dans son intégralité, avec tous les supports et la documentation inclus dans
la livraison d'origine.
Cette règle de retour « Satisfait ou remboursé » ne s'applique pas aux produits de stockage Dell | EMC. Elle ne
s'applique pas non plus aux produits achetés par l'intermédiaire du service de vente de logiciels et périphériques
Dell. Pour ces produits, reportez-vous plutôt à la règle de retour alors en vigueur des logiciels et périphériques
Dell (consultez la section suivante, « Logiciels et périphériques Dell (Canada seulement) »).
70
Guide de configuration et d e r é f é r e n c e r a p i d e
Logiciels et périphériques Dell (Canada seulement)
Produits logiciels et périphériques tiers
Tout comme les autres revendeurs de logiciels et périphériques, Dell ne garantit pas les produits tiers. Les produits
logiciels et périphériques tiers sont uniquement couverts par les garanties offertes par le fabricant ou le revendeur
initial de ces produits. Les garanties de fabricants tiers varient d'un produit à l'autre. Consultez la documentation
de votre produit pour obtenir des informations spécifiques à la garantie. Contactez également le fabricant ou le
revendeur si vous souhaitez des informations supplémentaires.
Comme Dell propose un grand choix de produits logiciels et périphériques, il nous est impossible de vérifier et
de garantir de manière spécifique que tous les produits que nous proposons fonctionnent avec tout ou partie des
différents modèles d'ordinateurs Dell, mais aussi de vérifier et de garantir que tous les produits que nous vendons
fonctionnent correctement sur les centaines de marques d'ordinateurs disponibles aujourd'hui. Si vous avez des
questions relatives à la compatibilité d'un produit, nous vous conseillons vivement de contacter directement le
fabricant ou le revendeur à qui vous avez acheté le produit logiciel ou périphérique tiers.
Produits périphériques Dell
Dell offre une garantie limitée pour ses nouveaux produits périphériques (produits pour lesquels Dell
est fabricant), tels que les moniteurs, les batteries, la mémoire, les stations d'accueil et les projecteurs.
Pour déterminer quelle garantie limitée s'applique au produit que vous avez acheté, reportez-vous à la fiche
d'expédition ou facture Dell et/ou à la documentation qui accompagnait votre produit. Vous trouverez des
descriptions des garanties limitées Dell dans les sections précédentes.
Règle de retour
Si, en qualité de client et utilisateur final, vous avez acheté des produits logiciels et périphériques Dell directement
à une société Dell, vous êtes en droit de retourner à Dell ces produits, à l'état neuf, dans un délai de 30 jours à
compter de la date figurant sur la fiche d'expédition ou la facture pour un remboursement équivalent au prix
d'achat des produits si ceux-ci ont déjà été payés. Ce remboursement ne comprend aucun frais d'expédition
et de gestion figurant sur votre fiche d'expédition ou facture ; ces frais sont à votre charge.
Pour retourner les produits, vous devez appeler le Service Clientèle de Dell au 1-800-387-5759 qui vous fournira un
numéro d'autorisation de retour pour crédit. Vous devez renvoyer les produits logiciels et périphériques à Dell dans
leur emballage d'origine (qui doit être comme neuf), payer d'avance les frais d'expédition et assurer l'envoi ou
accepter les risques de perte ou de dommage pendant l'acheminement.
Pour qu'un remboursement ou un remplacement soit possible, les produits renvoyés doivent être comme neufs,
les logiciels ne doivent pas être ouverts et tous les guides, disquettes, CD-ROM, câbles d'alimentation et autres
accessoires compris avec le produit doivent être renvoyés avec lui.
G u i d e d e c o n f i g u r a t i o n e t de r éf é r e nc e r apide
71
w w w. d e l l . c o m | s u p p o r t . d e l l . c o m
Déclaration de garantie Intel® pour les processeurs Pentium®
et Celeron® seulement (États-Unis et Canada seulement)
Intel’s Three Year Limited Warranty
Limited Warranty
Intel warrants that its family of Pentium® and Celeron® processors, if properly used and installed, will be free from defects in materials and workmanship and will substantially
conform to Intel’s publicly available specifications for a period of three (3) years after the date the Pentium or Celeron processor was purchased (whether purchased separately
or as part of a computer system).
If the Pentium or Celeron processor, which is the subject of this Limited Warranty, fails during the warranty period for reasons covered by this Limited Warranty, Intel, at its option, will:
• REPAIR the Pentium or Celeron processor by means of hardware and/or software; OR
• REPLACE the Pentium or Celeron processor with another Pentium or Celeron processor; OR
if Intel is unable to repair or replace the particular Pentium or Celeron processor,
• REFUND the then-current value of the Pentium or Celeron processor.
THIS LIMITED WARRANTY, AND ANY IMPLIED WARRANTIES THAT MAY EXIST UNDER STATE LAW, APPLY ONLY TO THE ORIGINAL PURCHASER OF THE
PENTIUM OR CELERON PROCESSOR, OR PENTIUM OR CELERON PROCESSOR-BASED COMPUTER AND LAST ONLY FOR AS LONG AS SUCH PURCHASER
CONTINUES TO OWN THE PROCESSOR.
Extent of Limited Warranty
Intel does not warrant that your Pentium or Celeron processor will be free from design defects or errors known as "errata." Current characterized errata are available upon request.
This limited warranty is for purchasers in the United States and Canada only. The limited warranty does not cover any costs relating to removal or replacement of any Pentium or
Celeron processors that are soldered or otherwise permanently affixed to your system’s motherboard.
This limited warranty does not cover damages due to external causes, including accident, problems with electrical power, usage not in accordance with product instructions,
misuse, neglect, alteration, repair, improper installation, or improper testing.
How to Obtain Warranty Service
To obtain warranty service for your Pentium or Celeron processor, you may contact your computer system manufacturer in accordance with its instructions, or you may contact Intel.
To request warranty service from Intel, you should call Intel at 1-800-628-8686 during the warranty period during normal business hours (Pacific Time), excluding holidays. Please
be prepared to provide:
(1) your name, address, and telephone numbers;
(2) proof of purchase;
(3) this Intel warranty card;
(4) a description of the computer system including the brand and model; and
(5) an explanation of the problem.
[Note: The Customer Service Representative may need additional information from you depending on the nature of the problem.]
The replacement processor is warranted under this written warranty and is subject to the same limitations and exclusions for the remainder of the original warranty period or one
(1) year, whichever is longer.
WARRANTY LIMITATIONS AND EXCLUSIONS
THESE WARRANTIES REPLACE ALL OTHER WARRANTIES, EXPRESS OR IMPLIED INCLUDING, BUT NOT LIMITED TO, THE IMPLIED WARRANTIES OF
MERCHANTABILITY AND FITNESS FOR A PARTICULAR PURPOSE. INTEL MAKES NO EXPRESS WARRANTIES BEYOND THOSE STATED HERE. INTEL
DISCLAIMS ALL OTHER WARRANTIES, EXPRESS OR IMPLIED, INCLUDING, WITHOUT LIMITATION, IMPLIED WARRANTIES OF MERCHANTABILITY
AND FITNESS FOR A PARTICULAR PURPOSE.
SOME LAWS DO NOT ALLOW THE EXCLUSION OF IMPLIED WARRANTIES SO THIS LIMITATION MAY NOT APPLY TO YOU. IF THESE LAWS APPLY, THEN ALL
EXPRESS AND IMPLIED WARRANTIES ARE LIMITED IN DURATION TO THE LIMITED WARRANTY PERIOD. NO WARRANTIES APPLY AFTER THAT PERIOD.
SOME LAWS DO NOT ALLOW LIMITATIONS ON HOW LONG AN IMPLIED WARRANTY LASTS, SO THIS LIMITATION MAY NOT APPLY TO YOU.
LIMITATIONS OF LIABILITY
INTEL’S RESPONSIBILITY UNDER THIS, OR ANY OTHER WARRANTY, IMPLIED OR EXPRESS, IS LIMITED TO REPAIR, REPLACEMENT OR REFUND, AS SET
FORTH ABOVE. THESE REMEDIES ARE THE SOLE AND EXCLUSIVE REMEDIES FOR ANY BREACH OF WARRANTY. INTEL IS NOT RESPONSIBLE FOR INDIRECT,
SPECIAL, INCIDENTAL, OR CONSEQUENTIAL DAMAGES RESULTING FROM ANY BREACH OF WARRANTY OR UNDER ANY OTHER LEGAL THEORY
INCLUDING, BUT NOT LIMITED TO, LOST PROFITS, DOWNTIME, GOODWILL, DAMAGE TO OR REPLACEMENT OF EQUIPMENT AND PROPERTY, AND ANY
COSTS OF RECOVERING, REPROGRAMMING, OR REPRODUCING ANY PROGRAM OR DATA STORED IN OR USED WITH A SYSTEM CONTAINING YOUR
PENTIUM PROCESSOR. SOME JURISDICTIONS DO NOT ALLOW THE EXCLUSION OR LIMITATION OF INCIDENTAL OR CONSEQUENTIAL DAMAGES, SO THE
ABOVE LIMITATIONS OR EXCLUSIONS MAY NOT APPLY TO YOU.
THE LIMITED WARRANTY GIVES YOU SPECIFIC LEGAL RIGHTS, AND YOU MAY ALSO HAVE OTHER RIGHTS THAT VARY FROM JURISDICTION TO JURISDICTION.
72
Guide de configuration et d e r é f é r e n c e r a p i d e
Intel Pentium® and Celeron® Processors are backed by a three-year limited warranty.
Please refer to the reverse side of this card for complete warranty details.
Intel’s Commitment to Quality
Intel is committed to producing the highest quality processors available. That’s why we have hundreds of people dedicated to continuously improve our design, manufacturing,
and testing technology.
We put every one of our Pentium® and Celeron® processors through a rigorous battery of tests during the design and manufacturing processes.
To verify that the new chip will correctly run the software written for Intel Architecture processors, a team of Intel engineers is dedicated to compatibility testing. In a state-of-art lab,
this group runs an extensive set of operating systems, applications, network tests and stress tests repeatedly to ensure that the processor is compatible with representative software.
Just as importantly, we work with hardware and software companies in the computer industry to ensure that our processors are compatible with their products.
Additionally, a sampling of Intel processors are subjected to a rigorous "burn-in" test whereby the chip is operated at higher-than-normal temperatures and voltages. During this
burn-in period, the processor experiences the equivalent of weeks of normal usage. These units are monitored for failures as part of our ongoing quality assurance process.
As a result, today’s microprocessors from Intel are among the most reliable components in computers.
What are "Errata"?
Exhaustive product testing can highlight differences between the actual behavior of the microprocessor and its specifications. Sometimes the discrepancies are caused by a design
defect or error, which we call errata. Rigorous validation identifies most errata during the development of the processor, but we do detect additional errata during the life cycle of
a microprocessor.
When an erratum is identified, our engineers work to characterize it and find a solution. We work with system designers and software developers to ensure that the discrepancy does
not affect their products. If necessary, special software or hardware solutions (sometimes known as "work arounds") are implemented in the system design to prevent computer
users from encountering the problem. Errata may then be corrected in future revisions of the microprocessor.
No microprocessor is perfect, and Intel recognizes that some consumers want to know about any errata, whether or not the errata affect them. Intel makes documentation of all
characterized Pentium and Celeron processor errata publicly available through our Technical Documentation Service.
At Intel, our goal is to make every computer user satisfied with his or her Pentium or Celeron processor. Should you have any questions, comments or concerns about your Intel
microprocessor, please call us at 1-800-628-8686.
©1997, 1998 Intel Corporation. All rights reserved.
G u i d e d e c o n f i g u r a t i o n e t de r éf é r e nc e r apide
73
w w w. d e l l . c o m | s u p p o r t . d e l l . c o m
74
Guide de configuration et d e r é f é r e n c e r a p i d e
Sistemas Optiplex™ SX de Dell™
Guía de instalación y
de referencia rápida
DCT del modelo
w w w. d e l l . c o m | s u p p o r t . d e l l . c o m
Notas, avisos y precauciones
NOTA: Una NOTA proporciona información importante que le ayuda a
utilizar su equipo de la mejor manera posible.
AVISO: Un AVISO indica un posible daño en el hardware o la pérdida
de datos y le explica cómo evitar el problema.
PRECAUCIÓN: una PRECAUCIÓN indica un posible daño
material, lesión corporal o muerte.
Abreviaturas y acrónimos
Para obtener una lista completa de abreviaturas y acrónimos, consulte
el “Glosario” de la Guía del usuario.
Si ha adquirido un equipo Dell™ de la serie n, las referencias al sistema
operativo Microsoft® Windows® que aparezcan en este documento no
tendrán aplicación.
____________________
La información contenida en este documento puede modificarse sin aviso previo.
© 2002-2003 Dell Computer Corporation. Reservados todos los derechos.
Queda estrictamente prohibida la reproducción de este documento de cualquier manera sin la
autorización por escrito de Dell Computer Corporation.
Marcas comerciales utilizadas en este texto: Dell, OptiPlex y el logotipo de DELL son marcas
comerciales de Dell Computer Corporation; Microsoft y Windows son marcas registradas de
Microsoft Corporation; Intel, Pentium y Celeron son marcas registradas de Intel Corporation.
Este documento puede incluir otras comerciales y nombres comerciales para referirse a las entidades
que son propietarias de los mismos o a sus productos. Dell Computer Corporation renuncia a
cualquier interés sobre la propiedad de marcas y nombres comerciales que no sean los suyos.
Julio de 2003
P/N 1U919
Rev. A03
Contenido
Acerca de esta guía
Características
. . . . . . . . . . . . . . . . . . . . . . . . .
79
. . . . . . . . . . . . . . . . . . . . . . . . . . .
79
PRECAUCIÓN: Instrucciones de seguridad
General
. . . . . . . . . . . .
81
. . . . . . . . . . . . . . . . . . . . . . . . . . . . .
81
Cuando utilice el equipo
. . . . . . . . . . . . . . . . . . . . . .
Al trabajar en el interior de su equipo
. . . . . . . . . . . . . .
85
. . . . . . . . . . . . . . . . . . .
85
. . . . . . . . . . . . . . . . . . . . .
86
Cómo desechar las baterías
Determinar la ubicación y orientación del equipo
. . . . . . . .
Acoplamiento del soporte
86
. . .
87
. . . . . . . . . . . . . . . . . . . .
88
Instalación de un dispositivo en el compartimiento modular
Conexión del adaptador de CA
. . . . . . . . . . . . . . . . .
Conexión de dispositivos externos
. . . . . . . . . . . . . . . .
Acoplamiento de la cubierta del cable
. . . . . . . . . . . . . .
89
90
91
. . . . . . . . .
93
. . . . . . . . . . . . . . . .
95
. . . . . . . . . . . . . . . . . . . . . . .
97
Acoplamiento del soporte a la placa de montaje
Localización de información y ayuda
Solución de problemas
84
. . . . . . . . . . .
Protección contra descargas electrostáticas
Introducción e instalación
83
Herramientas de solución de problemas
. . . . . . . . . . . . .
97
Utilización del CD Drivers and Utilities
(Controladores y utilidades) de Dell . .
. . . . . . . . . . . . .
98
Cómo ejecutar los Diagnósticos Dell
. . . . . . . . . . . . . . .
Ejecución de los Diagnósticos de disco duro IDE de Dell
. . . .
99
100
Contenido
77
Información sobre normativas .
. . . . . . . . . . . . . . . . . .
Información de la NOM (sólo para México)
Garantía limitada y política de devoluciones
. . . . . . . . . .
101
. . . . . . . . . . .
103
Termo de Garantia Contratual – Brasil –
Garantia Oferecida pela Dell ao Usuário Final – 1º ano .
Términos contractuales - Argentina Garantía ofrecida por DELL al usuario final - 1º. Año
Garantía de un año del fabricante para el usuario final
(sólo para Latinoamérica y el Caribe) . . . . . . . .
®
. . . .
103
. . . . .
105
. . . . .
®
107
.
109
Declaración de garantía de Intel para procesadores Pentium
y Celeron® únicamente (sólo para EE.UU. y Canadá) . . . .
78
Contenido
100
Acerca de esta guía
Este documento contiene una introducción, así como información sobre configuración,
solución de problemas, seguridad, regulaciones y condiciones de la garantía de su ordenador
OptiPlex™ de Dell™.
Para obtener la versión más actualizada de los documentos en la unidad de disco duro,
vaya al sitio Web de Dell | Support en support.dell.com.
Número de modelo
reglamentario y tipo
de chasis
DCT = ordenador de factor
de forma ultra pequeño (USF,
ultra small form-factor)
Características
Dos ranuras USB, conectores
de auriculares y micrófono
botón de encendido
ranura de montaje
(insertar el soporte
para colocar en
posición vertical)
ranura de montaje
(insertar el soporte para
colocar en posición
horizontal)
ranura de montaje
(insertar el soporte para
colocar en posición
vertical)
LEDs de diagnóstico
botón de liberación compartimiento modular
del módulo
botón de liberación de la cubierta del
ordenador o de la unidad de disco duro
G u í a d e i n s t a l a c i ó n y de referencia rápida
79
w w w. d e l l . c o m | s u p p o r t . d e l l . c o m
cubierta de
los cables
cubierta de la unidad de disco
duro (abrir para acceder al
interruptor de bloqueo del
dispositivo modular)
adaptador de corriente
80
Guía de instalación y de referencia rápida
compartimiento
modular
placa de montaje del
soporte del chasis
cubierta del
ordenador
base del
equipo
PRECAUCIÓN: Instrucciones
de seguridad
Utilice las siguientes pautas de seguridad para garantizar su propia seguridad personal así como
la protección de su equipo y del entorno de trabajo ante posibles daños.
General
•
No intente reparar el equipo usted mismo a menos que sea un técnico de mantenimiento
cualificado. Siga fielmente las instrucciones de instalación en todo momento.
•
Para prevenir una descarga eléctrica, enchufe el equipo y los cables de alimentación de los
dispositivos a fuentes de alimentación con toma de tierra. Estos cables están equipados con
enchufes de tres -bornes para garantizar la toma de tierra. No utilice adaptadores ni retire el borne de
toma de tierra del enchufe. Si debe utilizar un alargador, utilice un cable de 3 hilos con enchufe con
toma de tierra.
•
Para evitar el peligro potencial de descargas eléctricas, no use el equipo durante las tormentas
eléctricas.
•
Para evitar el peligro potencial de sufrir una descarga eléctrica, no conecte ni desconecte ningún
cable ni realice el mantenimiento o la reconfiguración de este producto en el transcurso de una
tormenta eléctrica.
•
Si el equipo incluye un módem, el cable utilizado con el módem debe poseer un grosor mínimo de
26 AWG (American Wire Gauge, Calibre de cable americano) y un enchufe modular RJ-11 que cumpla
el estándar FCC (Federal Communications Commission, comisión federal de comunicaciones).
•
Antes de limpiar el equipo, desconéctelo del enchufe eléctrico. Limpie el equipo con un paño suave
humedecido en agua. No utilice ningún líquido limpiador o aerosol que pudiera contener sustancias
inflamables.
•
Para evitar un posible daño en la placa base, una vez apagado el sistema, espere 5 segundos antes de
desconectar los dispositivos del equipo.
•
Para evitar posibles descargas eléctricas al desconectar un cable de red, desconecte primero el cable
del adaptador de red de la parte posterior del ordenador y, a continuación, de la conexión de red.
Cuando vuelva conectar un cable de red al ordenador, primero conecte dicho cable a la conexión de
red de la pared y después al adaptador de red
G u í a d e i n s t a l a c i ó n y de referencia rápida
81
w w w. d e l l . c o m | s u p p o r t . d e l l . c o m
PRECAUCIÓN: Instrucciones
de seguridad (continuación)
•
Para proteger el equipo contra las subidas y bajadas de tensión transitorias, utilice un supresor
de sobrevoltajes, un acondicionador de línea o un sistema de energía ininterrumpida (UPS).
•
Asegúrese de que no haya nada sobre los cables del equipo y que éstos no estén situados donde
se puedan pisar o sea fácil tropezar con ellos.
•
No inserte ningún objeto en los orificios del equipo. Si lo hace y hubiera un cortocircuito en los
componentes internos, se podría ocasionar un incendio o una descarga eléctrica.
•
Mantenga alejado el equipo de radiadores u otras fuentes de calor. Asimismo, no bloquee las rejillas
de ventilación. Evite poner papeles bajo el equipo; no lo coloque en una unidad encastrada en la
pared ni sobre una cama, un sofá o una alfombra.
•
No derrame alimentos o líquidos sobre el equipo.
•
No utilice el ordenador durante una tormenta eléctrica sin desenchufar el cable del adaptador de CA
de la toma de corriente.
•
Cuando utilice el adaptador de CA para suministrar alimentación al ordenador, colóquelo en un área
ventilada, como puede ser un escritorio o en el suelo.
•
Es posible que el adaptador de CA se caliente durante el funcionamiento normal del equipo.
Tenga cuidado al tocar el adaptador mientras esté funcionando o inmediatamente después de
que haya acabado de funcionar.
82
Guía de instalación y de referencia rápida
Cuando utilice el equipo
Cuando utilice el equipo, observe las siguientes pautas de seguridad.
PRECAUCIÓN: no ponga en funcionamiento el sistema sin las cubiertas (incluidas las
cubiertas del ordenador, los biseles, los cubrerranuras, los protectores del panel frontal, etc.).
•
El sistema viene equipado con lo siguiente:
–
Un suministro de energía de voltaje fijo. Los equipos con un suministro de energía de voltaje
fijo no disponen de un interruptor de selección de voltaje en el panel posterior y funcionan a un
único voltaje (consulte la etiqueta de regulación de la parte exterior del equipo para conocer su
voltaje de funcionamiento).
–
Un circuito de voltaje de detección automática. Los equipos con un circuito de voltaje de
detección automática no disponen de un interruptor de selección de voltaje en el panel
posterior y detectan automáticamente el voltaje de funcionamiento correcto.
–
Un interruptor de selección de voltaje manual. Los equipos con un interruptor de selección
en el panel posterior se deben configurar manualmente para que trabajen con voltaje de
funcionamiento correcto.
Coloque el interruptor en la posición que mejor se adapte al voltaje usado en su región.
AVISO: Para evitar que se dañe un equipo con un interruptor de selección de voltaje manual, ajuste el
interruptor al voltaje que más se aproxime al de la alimentación de CA disponible en el lugar en el que se
encuentre. Para Japón, el interruptor de selección de voltaje se debe ajustar a la posición 115 V aunque la
alimentación de CA usada en Japón sea de 100 V. Además, asegúrese de que la clasificación eléctrica del
monitor y los dispositivos conectados es correcta para la alimentación de CA usada en su región.
•
Antes de trabajar en el interior del equipo, desenchúfelo para evitar una descarga eléctrica o que se
dañe la placa base. Algunos componentes de la placa base continúan recibiendo alimentación si el
equipo está conectado a la fuente de alimentación de CA.
G u í a d e i n s t a l a c i ó n y de referencia rápida
83
w w w. d e l l . c o m | s u p p o r t . d e l l . c o m
Cuando utilice el equipo (continuación)
Al trabajar en el interior de su equipo
Antes de abrir la cubierta del ordenador, siga estos pasos en el mismo orden en que se indican.
PRECAUCIÓN: No intente reparar el equipo usted mismo, salvo si lo hace tal y como se
explica en la documentación o las instrucciones de Dell™ proporcionadas en línea o en otro
soporte. Siga exactamente las instrucciones de instalación y servicio.
AVISO: Para evitar un posible daño en la placa base, una vez apagado el equipo, espere 5 segundos antes de
quitar un componente de la placa base o de desconectar un dispositivo del equipo.
1
Apague el equipo de manera correcta, a través del menú del sistema operativo.
2
Apague el ordenador y los dispositivos conectados a él.
3
Conéctese a tierra tocando una superficie metálica sin pintar del chasis, como por ejemplo la parte
posterior del equipo, antes de tocar ningún componente de su interior.
Mientras trabaja, toque periódicamente una superficie metálica no pintada del chasis del ordenador
para disipar cualquier electricidad estática que pudiera dañar los componentes internos.
4
Desconecte el ordenador y los dispositivos, incluido el monitor, de las tomas de corriente.
Además, desconecte cualquier línea telefónica o de telecomunicación del ordenador.
De este modo se reducirá la posibilidad de daños personales o de descarga eléctrica.
Además, tenga en cuenta estas pautas de seguridad cuando proceda:
•
Cuando desconecte un cable, tire del conector o del protector, no tire directamente del cable.
Algunos cables tienen un conector con lengüetas de bloqueo; si desconecta este tipo de cable,
presione las lengüetas de bloqueo antes de desconectarlo. Cuando desconecte los conectores,
manténgalos alineados para evitar que se doblen las patas. Asimismo, antes de conectar un cable,
asegúrese de que los dos conectores estén orientados y alineados correctamente.
•
Manipule los componentes y las tarjetas con cuidado. No toque los componentes ni los contactos
de una tarjeta. Sujete la tarjeta por los bordes o por el soporte metálico. Sujete un componente
(por ejemplo, un chip del microprocesador) por los bordes no por las patas.
PRECAUCIÓN: Existe peligro de explosión si una batería nueva se instala incorrectamente.
Sustituya la batería únicamente por una del mismo tipo o de un tipo equivalente recomendado
por el fabricante. No tire las baterías con la basura doméstica. Póngase en contacto con el
servicio local de eliminación de residuos para obtener la dirección del contenedor de baterías
más cercano.
84
Guía de instalación y de referencia rápida
Cuando utilice el equipo (continuación)
Protección contra descargas electrostáticas
La electricidad estática puede dañar los delicados componentes que hay en el interior del ordenador.
Para evitar el daño por descargas electrostáticas, antes de tocar cualquiera de los componentes
electrónicos del equipo, descargue la electricidad estática de su cuerpo. Para ello, toque una superficie
metálica no pintada en el chasis del equipo.
A medida que continúe trabajando en el interior del ordenador, periódicamente toque una superficie
metálica no pintada para descargar la energía estática que se haya podido acumular en su cuerpo.
Asimismo, puede observar las siguientes medidas para prevenir los posibles daños por descargas
electrostáticas (ESD):
•
No saque los componentes de su embalaje antiestático hasta que vaya a instalarlos en el ordenador.
Justo antes de abrir los embalajes antiestáticos, descargue la electricidad estática de su cuerpo.
•
Cuando transporte un componente sensible a la electricidad estática, colóquelo en un contenedor
o embalaje antiestático.
•
Manipule todos los componentes sensibles a la electricidad estática en un área libre de ésta.
Si es posible, utilice alfombrillas antiestáticas en el suelo y en el banco de trabajo.
Cómo desechar las baterías
El ordenador utiliza una batería de litio tipo botón. Esta batería es de larga duración y es muy posible que
nunca necesite reemplazarla. En caso contrario, consulte la Guía del usuario.
No tire las baterías con la basura doméstica. Póngase en contacto con el servicio local de eliminación de
residuos para obtener la dirección del contenedor de baterías más cercano.
G u í a d e i n s t a l a c i ó n y de referencia rápida
85
w w w. d e l l . c o m | s u p p o r t . d e l l . c o m
Introducción e instalación
PRECAUCIÓN: antes de realizar cualquiera de los procedimientos enumerados
a continuación, lea y siga las instrucciones de seguridad de la página 81.
AVISO: No encienda el equipo hasta haber completado todos los pasos de configuración.
1
Determinar la ubicación y orientación del equipo
NOTA: Si desea colocar el ordenador horizontal o verticalmente debajo de una mesa o
escritorio, consulte “Acoplamiento del soporte” en la página 88 y “Acoplamiento del soporte a
la placa de montaje” en la página 93.
AVISO: No coloque el monitor sobre el ordenador. Use un soporte para el monitor.
AVISO: Si está instalando el ordenador debajo de una mesa o escritorio y en ese entorno se
producen fuertes vibraciones, use un soporte de pared en lugar del soporte del chasis. Para pedir
este soporte, póngase en contacto Dell.
AVISO: A fin de garantizar una ventilación apropiada, no coloque el ordenador en posición
vertical sobre un escritorio sin utilizar el soporte del ordenador (consulte la sección
“Acoplamiento del soporte”).
AVISO: Para garantizar una ventilación adecuada, no bloquee las rejillas de ventilación.
86
Guía de instalación y de referencia rápida
2
Instalación de un dispositivo en el compartimiento modular
NOTA: Para buscar el interruptor de bloqueo del módulo, quite la cubierta de la unidad
de disco duro.
El ordenador Dell se comercializa con una unidad de disquete o un compartimiento de
unidad en el compartimiento modular. Para instalar una unidad de CD, DVD u otro tipo en
este compartimento, quite primero el compartimento de unidad y, a continuación, instale el
dispositivo.
interruptor de
desbloqueo del
dispositivo
modular
G u í a d e i n s t a l a c i ó n y de referencia rápida
87
w w w. d e l l . c o m | s u p p o r t . d e l l . c o m
3
Acoplamiento del soporte
NOTA: Si va a instalar el ordenador bajo una mesa o escritorio, conecte primero todos
los cables y., a continuación, acople el soporte a la placa de montaje (consulte la sección
“Acoplamiento del soporte a la placa de montaje” en la página 93).
1
Eleve el tornillo cautivo y deslice la regleta del soporte del chasis a una de las
tres ranuras de montaje situadas en la parte posterior del ordenador.
2
En cuanto el soporte quede acoplado, apriete el tornillo.
AVISO: Si el ordenador se encuentra debajo de una mesa o escritorio y en ese lugar se producen
fuertes vibraciones, use el soporte de pared opcional en lugar del soporte del ordenador.
88
Guía de instalación y de referencia rápida
Conexión del adaptador de CA
4
NOTA: El LED del adaptador de alimentación se enciende cuando el adaptador está
correctamente conectado a la toma de corriente y al ordenador.
1
Conecte el adaptador de alimentación al conector de la parte posterior del ordenador.
2
Conecte el cable de alimentación al adaptador de alimentación.
AVISO: Los siguientes pasos sólo se aplican a Japón.
PRECAUCIÓN: Si decide conectar el hilo verde de tierra a un enchufe eléctrico,
no permita que haya contacto entre dicho hilo de tierra y los cables de
alimentación. Esto podría provocar una descarga eléctrica o un incendio o causar
daño al ordenador (consulte la siguiente figura).
Si decide no conectar el hilo verde de tierra a un enchufe eléctrico, vaya al paso 4.
3
Conecte el conector de tierra metálico a la conexión de tierra del enchufe
(consulte la siguiente figura):
a
Afloje la conexión a tierra.
b
Deslice el conector de tierra metálico tras la conexión a tierra y, a continuación,
vuelva a apretar ésta.
conexión a tierra
conector de tierra metálico
4
Conecte el cable de alimentación de CA al enchufe.
G u í a d e i n s t a l a c i ó n y de referencia rápida
89
w w w. d e l l . c o m | s u p p o r t . d e l l . c o m
5
Conexión de dispositivos externos
NOTA: Conecte sólo un teclado y un ratón.
PRECAUCIÓN: Para evitar en lo posible descargas eléctricas, use únicamente el
adaptador de corriente y el cable de alimentación proporcionados y asegúrese de
que están enchufados a una fuente de alimentación conectada a tierra.
SX260
90
Guía de instalación y de referencia rápida
SX270
Conexión del monitor VGA
Si tiene un monitor VGA y un conector DVI en la parte posterior del ordenador, conecte el
adaptador VGA-DVI al conector DVI y conecte el cable del monitor al adaptador, tal como
se muestra.
6
Acoplamiento de la cubierta del cable
AVISO: Si va a instalar el ordenador debajo de un escritorio o una mesa, no conecte el cable
hasta que el ordenador esté conectado firmemente a la placa de montaje (consulte el paso 7,
“Acoplamiento del soporte a la placa de montaje” en la página 93).
AVISO: Si utiliza el soporte en el ordenador, acople el soporte antes de conectar la cubierta
del cable.
AVISO: Cuando conecte la cubierta del cable, no coloque el ordenador boca a abajo de manera
que entre en contacto con una superficie dura. De lo contrario podría presionar el botón de
encendido y rayar el frontal del ordenador.
1
Conecte todos los cables a la parte posterior del ordenador.
2
Sostenga la pieza inferior de la cubierta del cable y alinee las cuatro lengüetas
con las cuatro ranuras de la parte posterior del ordenador.
3
Inserte las lengüetas en las ranuras y deslice la pieza hacia los indicadores de
diagnóstico (consulte la ilustración) hasta que quede bien sujeta.
G u í a d e i n s t a l a c i ó n y de referencia rápida
91
w w w. d e l l . c o m | s u p p o r t . d e l l . c o m
4
Agarre la pieza superior de la cubierta del cable y alinee las dos lengüetas con las
dos ranuras del panel posterior del equipo.
5
Inserte las lengüetas en las ranuras y deslice la pieza hacia los indicadores de
diagnóstico (consulte la ilustración).
6
Instale un dispositivo de seguridad en la ranura del cable de seguridad (opcional).
ranura para cable
de seguridad
No coloque el
ordenador boca
abajo sobre el bisel
92
Guía de instalación y de referencia rápida
Para retirar la cubierta del cable, retire el dispositivo instalado en la ranura para el cable de
seguridad, si lo hay.
1
Sujete la pieza superior de la cubierta del cable, deslícela hacia la izquierda hasta que
se detenga y, a continuación, levántela y retírela.
2
Para extraer la pieza inferior de la cubierta del cable, mientras mantiene presionada la
palanca, deslice la pieza hacia la izquierda hasta que se detenga y, a continuación,
levántela y retírela.
7
Acoplamiento del soporte a la placa de montaje
AVISO: En instalaciones realizadas debajo de una mesa u otra superficie, evite las zonas en
las que las piernas o la silla del usuario puedan golpear el equipo.
PRECAUCIÓN: Acople la placa de montaje a una superficie sólida capaz de
soportar 18,1 kg de peso.
NOTA: Antes de acoplar la placa de montaje a una superficie, oriéntese primero con respecto
a la posición en la que se acoplará el soporte a la placa de montaje.
1
Con los cuatro tornillos de madera del nº 6 (15,88 mm) proporcionados, acople la
placa de montaje a una superficie sólida con un grosor mínimo de 2,5 cm (consulte
la ilustración).
2
Coloque el ordenador y el soporte debajo de la placa de montaje a aproximadamente
2,5 cm del borde de la placa.
G u í a d e i n s t a l a c i ó n y de referencia rápida
93
w w w. d e l l . c o m | s u p p o r t . d e l l . c o m
3
Eleve el ordenador y el soporte, inserte este último en el soporte de montaje y deslice
el soporte hasta que la lengüeta de la palanca de desacoplamiento quede encajada en
la ranura de la placa de montaje.
4
Conecte la cubierta del cable (si la utiliza).
agujeros para los tornillos (4)
ranura de la placa
de montaje
lengüeta de la
palanca de
desacoplamiento
superficie sólida
con un grosor
mínimo de 2,5 cm
AVISO: Cuando haya terminado de instalar el ordenador, ponga todos los cables detrás del área
de trabajo para evitar tirones, enredos o pisotones.
94
8
Encienda el ordenador, lea el contrato de licencia de software y siga las instrucciones
de instalación del sistema operativo que aparecen en la pantalla.
9
Enhorabuena. Ya ha terminado de instalar el sistema.
Guía de instalación y de referencia rápida
Localización de información y ayuda
Si busca
•
•
•
•
Un programa de diagnóstico para el equipo E l C D D r i v e r s a n d U t i l i t i e s ( C o n t r o l a d o r e s y
utilidades), también conocido como el CD
Controladores para el equipo
de recursos
La documentación del ordenador
Puede utilizar este CD para acceder
La documentación del dispositivo
a la documentación, volver a instalar
los controladores o ejecutar las
herramientas de diagnóstico.
• Código de servicio rápido y número de
etiqueta de servicio
• Etiqueta de licencia de Microsoft®
Windows®
•
•
•
•
Aquí lo encontrará
Código de servicio rápido y clave del producto
Guía
Cómo quitar y sustituir componentes
Especificaciones técnicas
Cómo configurar los valores del sistema
Cómo diagnosticar y solucionar problemas
Se encuentran en el equipo.
del usuario
Según el sistema operativo, pulse dos veces sobre el icono
User's Guides (Guías del usuario) del escritorio o bien
sobre el botón Start (Inicio) y, después, pulse sobre Help
and Support (Ayuda y soporte técnico) para acceder a la
documentación almacenada en la unidad de disco duro.
• Cómo volver a instalar el sistema operativo C D O p e r a t i n g S y s t e m ( S i s t e m a o p e r a t i v o )
Si vuelve a instalar el sistema
operativo, utilice el CD Drivers and
Utilities (Controladores y utilidades)
para volver a instalar los
controladores de los dispositivos
incluidos en el equipo en el
momento de su compra.
G u í a d e i n s t a l a c i ó n y de referencia rápida
95
w w w. d e l l . c o m | s u p p o r t . d e l l . c o m
Si busca
Aquí lo encontrará
• Controladores actualizados para el equipo
• Respuesta a preguntas relacionadas con la
asistencia y el servicio técnico
• Conversaciones en línea con otros usuarios
y asistencia técnica
• Documentación del equipo
Sitio Web de asistencia técnica de Dell
• Estado de la llamada de reparación e
historial de asistencia técnica
• Principales problemas técnicos del equipo
• Detalles sobre la configuración del equipo
Sitio Web Dell Premier Support (asistencia
preferente)
El sitio Web de asistencia técnica de Dell proporciona varias
herramientas en línea, incluidas:
• Soluciones: sugerencias para la solución de problemas,
artículos de Knowledge Base
• Community (Comunidad): conversaciones en línea con otros
clientes de Dell
• Actualizaciones: actualización de información para
componentes, sistema operativo, dispositivos e información
sobre las clases en línea
• Atención al cliente: información de contacto, estado de
los pedidos, garantía e información de reparación
• Descargas: controladores, revisiones y actualizaciones de
software
• Referencia: documentación del ordenador, especificaciones
del producto, documentos oficiales y un glosario de términos
informáticos
El sitio Web Dell Premier Support está personalizado para
empresas e instituciones gubernamentales y educativas. Es posible
que este sitio no esté disponible en todos los países o regiones.
• Procedimientos para utilizar Windows XP C e n t r o d e a y u d a y s o p o r t e t é c n i c o d e
Windows XP
• Documentación del equipo
1 Pulse sobre el botón Start (Inicio) y, a continuación,
• Documentación de dispositivos (por
sobre Help and Support (Ayuda y soporte técnico).
ejemplo un módem)
2 Escriba una palabra o frase que describa el problema y,
a continuación, pulse sobre el icono de la flecha.
3 Haga clic en el tema que describa el problema.
4 Siga las instrucciones que aparecen en pantalla.
96
Guía de instalación y de referencia rápida
Solución de problemas
Dell proporciona una serie de herramientas para ayudarle en el caso de que el ordenador no
funcione como es de esperar. Para obtener la información más actualizada sobre solución de
problemas de su ordenador, consulte el sitio Web de asistencia técnica de Dell en
support.dell.com. También encontrará descripciones de las herramientas de solución de
problemas de Dell en la sección “Obtención de ayuda” de la Guía del usuario en línea.
Si se produce algún problema en el ordenador que necesite la ayuda de Dell, escriba una
descripción detallada del error, los códigos de sonido o los patrones de los indicadores de
diagnóstico, introduzca el código de servicio rápido y el número de etiqueta de servicio que
aparece a continuación y póngase en contacto con Dell desde la misma ubicación que el
ordenador.
Consulte “Localización de información y ayuda” en la página 95 para obtener un ejemplo
del código de servicio rápido y de los números de etiqueta de servicio.
Código de servicio rápido:___________________________
Número de la etiqueta de servicio:___________________________
Herramientas de solución de problemas
Diagnósticos Dell prueba varios componentes del ordenador y ayuda a identificar la causa
de los problemas de éste. Para obtener más información, consulte “Cómo ejecutar los
Diagnósticos Dell” en la página 99.
Las funciones siguientes pueden indicar un posible error y ayudarle a solucionar un
problema con el equipo:
•
Luces del sistema: ubicadas en la parte frontal del equipo.
•
Luces de diagnóstico: ubicadas en la parte trasera del equipo.
•
Mensajes del sistema: se muestran en la pantalla del monitor.
•
Códigos de sonido: una serie de pitidos audibles que emite el ordenador.
Consulte la Guía del usuario para obtener más información sobre estas funciones.
G u í a d e i n s t a l a c i ó n y de referencia rápida
97
w w w. d e l l . c o m | s u p p o r t . d e l l . c o m
Utilización del CD Drivers and Utilities (Controladores y utilidades) de Dell
Para utilizar el CD Drivers and Utilities (Controladores y utilidades) de Dell mientras
trabaja con el sistema operativo Microsoft® Windows®, lleve a cabo estos pasos:
NOTA: Para acceder a los controladores del dispositivo y a la documentación del usuario, debe
utilizar el CD Drivers and Utilities (Controladores y utilidades) mientras ejecuta Windows.
1
Encienda el ordenador y permita que se inicie en el escritorio de Windows.
2
Inserte el CD Drivers and Utilities (Controladores y utilidades) de Dell en la unidad
de CD-ROM.
Si utiliza el CD Drivers and Utilities (Controladores y utilidades) por primera vez en
este ordenador, la ventana de instalación le informará de que el CD va a comenzar la
instalación.
3
Haga clic en OK (Aceptar) para continuar.
Para finalizar la instalación, responda a los mensajes mostrados por el programa.
4
En la pantalla Welcome Dell System Owner (Bienvenida al propietario del sistema
Dell), haga clic en Next (Siguiente).
5
Seleccione el System Model (Modelo del sistema), Operating System (Sistema
operativo), Device Type (Tipo de dispositivo) y Topic (Tema) adecuado.
Controladores para el ordenador
Para mostrar una lista de los controladores de dispositivos para el ordenador, lleve a cabo
estos pasos:
1
Haga clic en My Drivers (Mis controladores) en el menú desplegable Topic (Tema).
El CD Drivers and Utilities (Controladores y utilidades) examina el hardware y el
sistema operativo del ordenador y, a continuación, muestra una lista de controladores
de dispositivos para la configuración del sistema en la pantalla.
2
Pulse sobre el controlador adecuado y siga las instrucciones para descargarlo al ordenador.
Para ver todos los controladores disponibles para el ordenador, pulse sobre Drivers
(Controladores) en el menú desplegable Topic (Tema).
98
Guía de instalación y de referencia rápida
Cómo ejecutar los Diagnósticos Dell
Diagnósticos Dell es un programa que prueba varios componentes del ordenador. Ejecute
este programa siempre que tenga un problema con el ordenador para ayudarle a identificar
el origen del problema. Diagnósticos Dell se puede ejecutar desde la unidad de disco duro o
desde el CD Drivers and Utilities (Controladores y utilidades).
Desde la unidad de disco duro:
AVISO: Si el disco duro falla, ejecute los Diagnósticos de disco duro IDE de Dell
(consulte “Ejecución de los Diagnósticos de disco duro IDE de Dell” en la página 100).
1
Apague y reinicie el equipo.
2
Cuando aparezca el logotipo de DELL™, presione <F12> inmediatamente.
NOTA: Si recibe un mensaje indicando que no se ha encontrado ninguna partición para la
utilidad de diagnóstico, siga las instrucciones para ejecutar los Diagnósticos Dell del CD
Drivers and Utilities (Controladores y utilidades).
Si espera demasiado y aparece el logotipo de Windows, siga esperando hasta que
aparezca el escritorio de Windows. A continuación, cierre el equipo mediante el
menú Start (Inicio) e inténtelo de nuevo.
3
Cuando aparezca la lista de dispositivos de inicio, resalte Boot to Utility Partition
(Iniciar en la partición de la utilidad) y presione <Intro>.
4
Cuando aparezca la opción Main Menu (Menú principal) de los Diagnósticos Dell,
seleccione la prueba que desea ejecutar.
5
Cierre la pantalla de la prueba para volver a la pantalla Main Menu (Menú principal).
Para salir de los Diagnósticos Dell y reiniciar el equipo, cierre la pantalla Main Menu
(Menú principal).
Desde el CD Drivers and Utilities (Controladores y utilidades):
1
Inserte el CD Drivers and Utilities (Controladores y utilidades) en la unidad de
CD-ROM.
2
Apague y reinicie el equipo.
Cuando aparezca el logotipo de DELL, presione <F12> inmediatamente.
Si espera demasiado y aparece el logotipo de Windows, siga esperando hasta que vea
el escritorio de Windows. A continuación, cierre el equipo mediante el menú Start
(Inicio) e inténtelo de nuevo.
NOTA: Esta característica cambia la secuencia de inicio sólo una vez. La próxima vez que se
encienda el equipo, se iniciará según los dispositivos especificados en el programa Configuración
del sistema.
G u í a d e i n s t a l a c i ó n y de referencia rápida
99
w w w. d e l l . c o m | s u p p o r t . d e l l . c o m
3
Cuando aparezca la lista de dispositivos de inicio, seleccione IDE CD-ROM Device
(Dispositivo CD-ROM IDE) y presione <Intro>.
4
Seleccione la opción IDE CD-ROM Device (Dispositivo CD-ROM IDE) en el menú
de inicio del CD.
5
Seleccione la opción Boot from CD-ROM (Iniciar desde el CD-ROM) en el menú
que aparece.
6
Escriba 1 para abrir el menú ResourceCD (CD de recursos).
7
Escriba 2 para iniciar los Diagnósticos Dell.
8
Seleccione Run the 32 Bit Dell Diagnostics (Ejecutar los Diagnósticos Dell de
32 bits) en la lista numerada. Si aparecen varias versiones, seleccione la versión
apropiada para su plataforma.
9
Cuando aparezca la opción Main Menu (Menú principal) de los Diagnósticos Dell,
seleccione la prueba que desea ejecutar.
10
Una vez finalizadas las pruebas, extraiga el CD.
Ejecución de los Diagnósticos de disco duro IDE de Dell
Se trata de un programa que prueba la unidad de disco duro para solucionar problemas o
confirmar la existencia de fallos en ésta.
1
Encienda el ordenador (si ya está encendido, reinícielo).
2
Cuando aparezca F2 = Setup (F2 = Configuración) en la esquina superior derecha
de la pantalla, pulse <Ctrl><Alt><D>.
3
Siga las instrucciones que aparecen en pantalla.
Si se informa de un fallo, consulte “Problemas con la unidad de disco duro” en la
Guía del usuario.
Información sobre normativas
Una interferencia electromagnética (EMI, Electromagnetic Interference) es cualquier señal o emisión, radiada en
el espacio o conducida a través de un cable de alimentación o señal, que pone en peligro el funcionamiento de la
navegación por radio u otro servicio de seguridad, o degrada seriamente, obstruye o interrumpe de forma repetida
un servicio de comunicaciones por radio autorizado. Los servicios de radiocomunicaciones incluyen, entre otros,
emisoras comerciales de AM/FM, televisión, servicios de telefonía móvil, radar, control de tráfico aéreo,
buscapersonas y servicios de comunicación personal (PCS, Personal Communication Services). Estos servicios
autorizados, junto con emisores no intencionados como los dispositivos digitales, incluidos los sistemas
informáticos, contribuyen a crear un entorno electromagnético.
100
Guía de instalación y de referencia rápida
La compatibilidad electromagnética (EMC, Electromagnetic Compatibility) es la capacidad de los componentes
del equipo electrónico de funcionar correctamente juntos en el entorno electrónico. Aunque este sistema se ha
diseñado y ajustado para cumplir con los límites de emisión electromagnética establecidos por la agencia
reguladora, no hay ninguna garantía de que no se produzcan interferencias en una instalación concreta. Si este
equipo provoca interferencias con servicios de comunicaciones por radio, lo que se puede determinar apagando y
encendiendo el equipo, intente corregir dichas interferencias adoptando una o varias de las siguientes medidas:
•
•
•
Cambie la orientación de la antena de recepción.
Vuelva a ubicar el equipo con respecto al receptor.
Separe el equipo del receptor.
•
Conecte el equipo a un enchufe diferente de forma que el equipo y el receptor se encuentren en ramas
distintas del circuito.
Si es necesario, consulte a un representante del servicio de asistencia técnica de Dell o a un técnico experimentado
de radio o televisión para obtener consejos adicionales.
Información de la NOM (sólo para México)
La información siguiente se proporciona en el dispositivo o dispositivos descritos en este documento, en
cumplimiento con los requisitos de la Norma Oficial Mexicana (NOM)
Exportador:
Dell Computer Corporation
One Dell Way
Round Rock, TX 78682
Número de
modelo:
DCT
Importador:
Dell Computer de México, S.A. de C.V.
Paseo de la Reforma 2620 - 11° Piso
Col. Lomas Altas
11950 México, D.F.
Voltaje de entrada
de alimentación:
12 V de CC
Enviar a:
Dell Computer de México, S.A. de C.V.
al Cuidado de Kuehne & Nagel de México S. de R.L.
Avenida Soles nº 55
Col. Peñón de los Baños
15520 México, D.F.
Consumo
eléctrico de
entrada:
12 A
NOTA: Puede encontrar información reglamentaria relativa al equipo en la Guía del usuario.
G u í a d e i n s t a l a c i ó n y de referencia rápida
101
102
Guía de instalación y de referencia rápida
w w w. d e l l . c o m | s u p p o r t . d e l l . c o m
Garantía limitada y política de devoluciones
Termo de Garantia Contratual – Brasil –
Garantia Oferecida pela Dell ao Usuário Final – 1º ano
Garantia
A DELL* garante ao usuário final, em conformidade com as disposições abaixo, que os produtos de hardware
com a sua marca, adquiridos pelo usuário final de uma empresa do grupo DELL ou de um distribuidor autorizado
DELL situado na América Latina e Caribe, estão livres de defeitos em seus componentes eletrônicos, mecânicos
e de montagem, pelo prazo de 1 (um) ano contado da data de aquisição do Produto indicada na Nota Fiscal de
Compra, uma vez respeitadas as condições normais de instalação e uso, exceto no que tange aos itens relacionados
dentre as excessões adiante indicadas. Já se encontra incluso nesse prazo o período de garantia legal.
Produtos contra os quais sejam apresentadas reclamações justas serão, a critério da DELL, consertados ou
substituídos às expensas da DELL. Todas as peças removidas dos produtos consertados serão de propriedade da
DELL. A DELL utiliza peças novas e recondicionadas de vários fabricantes na execução dos serviços de reparo
e na fabricação de produtos de reposição, de qualidade e tecnologia equivalente ou superior, respeitadas as
especificações originais dos produtos.
Responsabilidades do Cliente
Notificar de imediato a Dell sobre o mau funcionamento de seus equipamentos (0-800-903355). Fornecer ao
pessoal técnico da Dell acesso total e incondicional à totalidade dos equipamentos e softwares. Caso existam
restrições de segurança que se apliquem a alguns ou a todos os sistemas do Cliente que necessitem receber
assistência técnica em virtude desta Garantia Contratual, é possível que seja solicitado ao Cliente que este
assuma responsabilidades adicionais para a manutenção do equipamento e/ou software. Notificar a Dell sobre
qualquer perigo potencial quanto à segurança ou à saúde que possa existir nas instalações do Cliente, assim
como proporcionar e/ou recomendar os procedimentos de segurança que devem ser seguidos, caso sejam aplicáveis.
Proporcionar, caso seja necessário e sem nenhum encargo para a Dell, um espaço de trabalho adequado e acesso a
meios de comunicação que se sejam requeridos à execução dos serviços.
Manter atualizada uma cópia de segurança do sistema operacional e de outros programas de software pertinentes,
assim como seus dados.
Garantir a presença de uma pessoa responsável ou de um funcionário durante a execução do serviço.
Fornecer, sem ônus para a Dell, meios de gravação e armazenamento, incluindo fitas e discos magnéticos
necessários à execução dos serviços, bem como aparelhos de comunicação de dados (modems) e linhas
telefônicas e/ou conexões de rede quando requeridos para execução de serviços à distância por via eletrônica
(acessos eletrônicos remotos).
G u í a d e i n s t a l a c i ó n y de referencia rápida
103
w w w. d e l l . c o m | s u p p o r t . d e l l . c o m
Exclusões
Os seguintes itens, entre outros compatíveis com o ora exposto, não estão cobertos pela garantia:
•
Partes consumíveis, tais como baterias não-recarregáveis, bolsas, maletas, etc;
•
Programas de computador, exceto no tocante a termos e prazos especificados na legislação
brasileira aplicável;
•
Limpeza, reparos cosméticos ou desgaste resultante do uso normal dos produtos;
•
Danos causados por mau uso, abuso, queda, negligência, imprudência ou imperícia;
•
Danos causados por armazenamento ou uso em condições fora das especificações;
•
Danos causados por equipamentos que produzam ou induzam interferências eletromagnéticas
ou ainda por problemas de instalação elétrica em desacordo com as normas ABNT;
•
Danos causados por programas de computador, acessórios ou produtos de terceiros adicionados a
um produto comercializado pela Dell após este ter sido enviado ao usuário final pela própria Dell;
•
Danos causados por violação do produto, tentativa de reparo ou ajuste por terceiros não autorizados
pela Dell;
•
Danos causados por agentes da natureza como descargas elétricas (raios), inundações, incêndios,
desabamentos, terremotos, etc;
•
Perdas e danos causados pelo produto ou por desempenho do produto, inclusive, mas não limitado a, lucros
cessantes, perdas financeiras e limitações de produtividade, resultantes dos atos relacionados a hipóteses de
não cobertura desta garantia; e,
•
Perda total ou parcial de quaisquer programas de computador, dados ou meios magnéticos removíveis.
A garantia também não será válida caso a Nota Fiscal de Compra apresente rasuras e/ou alterações ou, ainda,
campos incompletos nos itens Data de Aquisição e Número de Série do produto, e/ou que não esteja em
conformidade com a legislação fiscal vigente no Brasil.
Atendimento ao Consumidor
Caso você tenha algum comentário ou sugestões, estas devem ser apresentadas na América Latina e Caribe por
meio do ponto de venda da DELL ou através de mensagem eletrônica via Internet (www.dell.com). No caso de
reclamação, esta poderá ser encaminhada durante o prazo de validade da garantia e o usuário final deverá fornecer
sempre o comprovante de compra, representado pela Nota Fiscal original, indicando o nome e endereço do
vendedor, a data da compra, o modelo e o número de série, o nome e o endereço do cliente e informações sobre
os sintomas e configuração no momento do defeito, incluindo periféricos e software utilizados. Na falta dessas
informações a Dell poderá negar-se a atender a solicitação. Uma vez diagnosticado o problema, a DELL tomará as
devidas providências e pagará o frete e o seguro de transporte para a central de conserto/reposição DELL, caso o
defeito apresentado qualifique-se para atendimento dentro da garantia. O usuário final deve garantir que o
produto defeituoso estará disponível para ser apanhado, devidamente embalado na embalagem original ou em
embalagem que ofereça grau equivalente de proteção, incluindo os dados acima e o número de devolução
fornecido pela DELL ao usuário final.
104
Guía de instalación y de referencia rápida
Limitações e Direitos
A DELL não oferece nenhuma outra garantia, aval ou declaração similar, exceto conforme expressamente
declarado acima, e esta Garantia substitui quaisquer outras garantias, na extensão máxima permitida por lei.
Esta Garantia será o único e exclusivo recurso contra a DELL ou qualquer outra empresa do mesmo grupo
econômico, não podendo estas serem responsabilizadas por lucros cessantes ou perdas derivadas de contratos,
ou qualquer outra perda indireta ou imprevista decorrente de negligência, violação contratual ou outrosde
Esta Garantia não exclui ou afeta os direitos garantidos por lei ao usuário final contra a DELL e/ou quaisquer
direitos resultantes de outros contratos celebrados pelo usuário final com a DELL e/ou qualquer outro vendedor
autorizado pela Dell.
Dell World Trade LP
One Dell Way, Round Rock, TX 78682, USA
Dell Computadores do Brasil Ltda (CNPJ No. 72.381.189/0001-10)
Avenida Industrial Belgraf, 400
92990-000 - Eldorado do Sul - RS - Brasil
Dell Computer de Chile Ltda
Coyancura 2283, Piso 3 - Of. 302,
Providencia, Santiago - Chile
Dell Computer de Colombia Corporation
Carrera 7 #115-33 Oficina 603
Bogota, Colombia
Dell Computer de Mexico SA de CV
Paseo de la Reforma 2620 - 11° Piso
Col. Lomas Altas
11950 México, D.F.
Términos contractuales - Argentina Garantía ofrecida por DELL al usuario final - 1º. Año
Garantía
Dell garantiza al usuario final, de conformidad con las disposiciones abajo indicadas, que los productos
de hardware con su marca, adquiridos por el usuario final a una empresa del grupo Dell o a un distribuidor
autorizado, en América Latina y el Caribe, estarán libres de defectos en sus componentes electrónicos, mecánicos y
de ensamblado y montaje, por el plazo de 1(un) año contado desde la fecha de adquisición del producto indicada
en la factura de compra, siempre y cuando se respeten las condiciones de instalación y uso, excepto en lo que atañe
a los ítems relacionados con las excepciones indicadas expresamente en el presente, y que se encuentre dentro de
ese plazo o en el período de garantía legal.
Los productos sobre los que sean presentados reclamos justificados serán, a criterio de DELL, reparados o
reemplazados a costo de DELL. Todas las piezas removidas de los productos reparados pasarán a ser propiedad de
DELL. DELL podrá utilizar partes nuevas o reacondicionadas, de prestaciones, calidad y tecnología equivalente
o superior a la reemplazada, respetando las especificaciones originales de los productos.
G u í a d e i n s t a l a c i ó n y de referencia rápida
105
w w w. d e l l . c o m | s u p p o r t . d e l l . c o m
Responsabilidad del cliente
Notificar de inmediato a DELL sobre el mal funcionamiento de sus equipos al Servicio Técnico de DELL.
Proporcionar al personal técnico de DELL acceso total e incondicional a la totalidad de los equipos y software.
En caso de que existan restricciones de seguridad que se apliquen a alguno o a todos los sistemas del cliente que
necesiten recibir asistencia técnica en virtud de esta garantía contractual, es posible que sea solicitado al cliente
que este asuma responsabilidades adicionales para el mantenimiento del equipo y/o del software. Notificar a
DELL sobre cualquier peligro potencial relativo a la seguridad o salud que pueda existir en las instalaciones del
Cliente, así como proporcionar y/o recomendar procedimientos de seguridad a seguir, en caso en que estos fueran
aplicables. Proporcionar, en caso que sea necesario y sin ningún cargo para DELL, un lugar de trabajo adecuado y
acceso a los medios de comunicación que sean necesarios para la ejecución del servicio. Mantener actualizada una
copia de seguridad del sistema operativo y de los programas de software pertinentes, así como de los datos en ellos
contenidos. Garantizar la presencia de una persona responsable durante la ejecución del servicio. Proveer, sin
costo para DELL, los medios de grabación y almacenaje, incluyendo cintas y discos magnéticos necesarios para
la ejecución de los servicios, así como aparatos de comunicación de datos (modems) y líneas telefónicas y/o
conexiones de red cuando fueran necesarias para la ejecución del servicio a distancia por vía electrónica
(accesos electrónicos remotos).
Exclusiones
Los siguientes ítems, no están cubiertos por la garantía:
•
Partes consumibles, tales como baterías no recargables, bolsas, maletines, etc.;·
•
Programas de computación (software) y su reinstalación;
•
Limpieza y reparaciones cosméticas o de desgaste resultante del uso normal de los productos;
•
Daños causados por el mal uso, caídas, golpes, abuso, negligencia, impericia, imprudencia o vandalismo;
•
Daños causados por almacenamiento o uso en condiciones distintas a las contenidas en las especificaciones;
•
Daños causados por equipos que produzcan o induzcan interferencias electromagnéticas o por problemas en
la instalación eléctrica en desacuerdo con las normas de seguridad eléctrica.
•
Daños causados por programas de computación (software), accesorios o productos de terceros adicionados
a un producto comercializado por DELL después de haber sido enviado al usuario final, directamente
de DELL;
•
Daños causados por violación del producto, intento de reparación o ajuste por terceros no autorizados
por DELL;
•
Daños causados por agentes de la naturaleza, como descargas eléctricas (rayos), inundaciones, incendios,
derrumbes, terremotos, etc.;
•
Pérdidas y daños causados por el producto o por el desempeño del producto, incluyendo, pero no limitando
al lucro cesante, pérdidas financieras y limitaciones o reducciones de productividad, resultantes de actos
relacionados a las hipótesis no cubiertas por la garantía; y,
•
Pérdida total o parcial de cualquier programa de computación (software), datos o medios magnéticos
removibles.
La garantía tampoco será válida en caso de que la Factura de Compra presente raspaduras y/o alteraciones , tenga
campos incompletos o vacíos en los items correspondientes a Fecha de compra y número de Orden o de serie del
producto, y/o que no este confeccionada de acuerdo a la legislación fiscal vigente en la República Argentina.
106
Guía de instalación y de referencia rápida
Atención al Consumidor
Cuando el Cliente tenga algún comentario o sugerencia, estos deben ser presentados a través de las oficinas
de ventas de DELL o a través de correo electrónico vía Internet a www.dell.com.ar.
Para realizar un pedido de reparación, dentro del plazo de validez de la garantía, el usuario final deberá
contactar al Servicio Técnico de DELL y proveer todas las informaciones que le solicite el personal técnico de
DELL referentes a: datos del Cliente, de la maquina y de los síntomas en el momento del defecto. La falta de
alguna de estas informaciones imposibilitará a DELL poder registrar el pedido. Una vez diagnosticado el problema,
DELL realizara el despacho de la parte y/o de uno técnico necesarios para efectuar la reparación. El usuario final
debe garantizar que el producto defectuoso estará disponible para ser atendido.
Limitaciones y derechos
DELL no ofrece ninguna otra garantía, aval o declaración similar, distinta a lo que expresamente se establece
en el presente, y esta garantía substituye cualquier otra garantía, en la extensión máxima permitida por la ley.
Esta garantía será el único y exclusivo recurso contra DELL o cualquier otra empresa del mismo grupo económico,
no pudiendo ser responsabilizadas por lucro cesante, o pérdidas derivadas de contratos, o cualquier otra pérdida
indirecta o imprevista derivada de la negligencia, violación contractual o cualquier otra.
Esta garantía no excluye o afecta derechos garantizados por la ley al usuario final de DELL y/o cualquier derecho
resultante de otros contratos celebrados por el usuario final con DELL y/o con cualquier otro vendedor autorizado
por DELL.
Garantía de un año del fabricante para el usuario final
(sólo para Latinoamérica y el Caribe)
Garantía
Dell Computer Corporation (“Dell”) garantiza al usuario final, de acuerdo con las provisiones siguientes, que
los productos de hardware de marca, adquiridos por el usuario final a una empresa de Dell o a un distribuidor
autorizado de Dell en Latinoamérica o el Caribe están libres de defectos en materiales, mano de obra y diseño que
afecten a su utilización normal, por un período de un año desde la fecha original de la compra. Los productos sobre
los que se presenten las reclamaciones apropiadas se repararán o reemplazarán a cargo de Dell si así lo decide Dell.
Dell es propietaria de todas las piezas extraídas de los productos reparados. Dell utiliza piezas nuevas y
reacondicionadas de diversos fabricantes para efectuar reparaciones y fabricar componentes de repuesto.
Exclusiones
Esta garantía no se aplica a defectos que son resultado de: instalación, uso o mantenimiento incorrectos
o inadecuados; acciones o modificaciones por parte del usuario final o terceras personas no autorizadas;
daños accidentales o provocados; o deterioro normal por el uso.
G u í a d e i n s t a l a c i ó n y de referencia rápida
107
w w w. d e l l . c o m | s u p p o r t . d e l l . c o m
Cómo hacer una reclamación
En Latinoamérica o en el Caribe, para hacer reclamaciones debe ponerse en contacto con un punto de venta de
Dell dentro del período que cubra la garantía. El usuario final debe proporcionar siempre la prueba de compra
e indicar el nombre y dirección del vendedor, la fecha de la compra, el modelo y número de serie, el nombre y
dirección del cliente y los detalles de síntomas y configuración en el momento del funcionamiento incorrecto,
incluidos los periféricos y el software utilizados. De lo contrario, Dell puede rehusar la reclamación de la garantía.
Si se diagnostica un defecto cubierto por la garantía, Dell se encargará de ello y abonará el transporte por tierra y
el seguro hacia y desde el centro de reparaciones o sustitución de Dell. El usuario final deberá asegurarse de que el
producto defectuoso esté disponible para su recogida, adecuadamente acondicionado en el embalaje original u otro
de las mismas características de protección junto con los detalles indicados anteriormente y el número de
devolución suministrado por Dell al usuario final.
Derechos legales y limitación
Dell no ofrece ninguna otra garantía ni realiza declaración equivalente si no se ajusta a lo establecido
explícitamente más arriba y esta Garantía sustituye a todas las demás garantías, hasta el máximo permitido por la
ley. En ausencia de legislación aplicable, esta garantía será el único y exclusivo recurso del usuario final ante Dell o
alguno de sus afiliados; ni Dell ni ninguno de sus afiliados será responsable de la pérdida de beneficios o contratos ni
de ninguna otra pérdida indirecta o consecuente debida a negligencia, incumplimiento de contrato u otros motivos.
Esta garantía no supone menoscabo de, ni afecta a, los derechos legales preceptivos del usuario final frente
a cualquier derecho derivado de otros contratos formalizados por el usuario final con Dell o cualquier otro
vendedor.
Dell World Trade LP
One Dell Way, Round Rock, TX 78682, Estados Unidos
Dell Computadores do Brasil Ltda (CNPJ No. 72.381.189/0001-10)
Avenida Industrial Belgraf, 400
92990-000 - Eldorado do Sul - RS - Brasil
Dell Computer de Chile Ltda
Coyancura 2283, Piso 3 - Of. 302,
Providencia, Santiago - Chile
Dell Computer de Colombia Corporation
Carrera 7 #115-33 Oficina 603
Bogotá, Colombia
Dell Computer de Mexico SA de CV
Paseo de la Reforma 2620 - 11° Piso
Col. Lomas Altas
11950 México, D.F.
108
Guía de instalación y de referencia rápida
Declaración de garantía de Intel® para procesadores Pentium®
y Celeron® únicamente (sólo para EE.UU. y Canadá)
Intel’s Three Year Limited Warranty
Limited Warranty
Intel warrants that its family of Pentium® and Celeron® processors, if properly used and installed, will be free from defects in materials and workmanship and will substantially
conform to Intel’s publicly available specifications for a period of three (3) years after the date the Pentium or Celeron processor was purchased (whether purchased separately
or as part of a computer system).
If the Pentium or Celeron processor, which is the subject of this Limited Warranty, fails during the warranty period for reasons covered by this Limited Warranty, Intel, at its option, will:
• REPAIR the Pentium or Celeron processor by means of hardware and/or software; OR
• REPLACE the Pentium or Celeron processor with another Pentium or Celeron processor; OR
if Intel is unable to repair or replace the particular Pentium or Celeron processor,
• REFUND the then-current value of the Pentium or Celeron processor.
THIS LIMITED WARRANTY, AND ANY IMPLIED WARRANTIES THAT MAY EXIST UNDER STATE LAW, APPLY ONLY TO THE ORIGINAL PURCHASER OF THE
PENTIUM OR CELERON PROCESSOR, OR PENTIUM OR CELERON PROCESSOR-BASED COMPUTER AND LAST ONLY FOR AS LONG AS SUCH PURCHASER
CONTINUES TO OWN THE PROCESSOR.
Extent of Limited Warranty
Intel does not warrant that your Pentium or Celeron processor will be free from design defects or errors known as "errata." Current characterized errata are available upon request.
This limited warranty is for purchasers in the United States and Canada only. The limited warranty does not cover any costs relating to removal or replacement of any Pentium or
Celeron processors that are soldered or otherwise permanently affixed to your system’s motherboard.
This limited warranty does not cover damages due to external causes, including accident, problems with electrical power, usage not in accordance with product instructions,
misuse, neglect, alteration, repair, improper installation, or improper testing.
How to Obtain Warranty Service
To obtain warranty service for your Pentium or Celeron processor, you may contact your computer system manufacturer in accordance with its instructions, or you may contact Intel.
To request warranty service from Intel, you should call Intel at 1-800-628-8686 during the warranty period during normal business hours (Pacific Time), excluding holidays. Please
be prepared to provide:
(1) your name, address, and telephone numbers;
(2) proof of purchase;
(3) this Intel warranty card;
(4) a description of the computer system including the brand and model; and
(5) an explanation of the problem.
[Note: The Customer Service Representative may need additional information from you depending on the nature of the problem.]
The replacement processor is warranted under this written warranty and is subject to the same limitations and exclusions for the remainder of the original warranty period or one
(1) year, whichever is longer.
WARRANTY LIMITATIONS AND EXCLUSIONS
THESE WARRANTIES REPLACE ALL OTHER WARRANTIES, EXPRESS OR IMPLIED INCLUDING, BUT NOT LIMITED TO, THE IMPLIED WARRANTIES OF
MERCHANTABILITY AND FITNESS FOR A PARTICULAR PURPOSE. INTEL MAKES NO EXPRESS WARRANTIES BEYOND THOSE STATED HERE. INTEL
DISCLAIMS ALL OTHER WARRANTIES, EXPRESS OR IMPLIED, INCLUDING, WITHOUT LIMITATION, IMPLIED WARRANTIES OF MERCHANTABILITY
AND FITNESS FOR A PARTICULAR PURPOSE.
SOME LAWS DO NOT ALLOW THE EXCLUSION OF IMPLIED WARRANTIES SO THIS LIMITATION MAY NOT APPLY TO YOU. IF THESE LAWS APPLY, THEN ALL
EXPRESS AND IMPLIED WARRANTIES ARE LIMITED IN DURATION TO THE LIMITED WARRANTY PERIOD. NO WARRANTIES APPLY AFTER THAT PERIOD.
SOME LAWS DO NOT ALLOW LIMITATIONS ON HOW LONG AN IMPLIED WARRANTY LASTS, SO THIS LIMITATION MAY NOT APPLY TO YOU.
LIMITATIONS OF LIABILITY
INTEL’S RESPONSIBILITY UNDER THIS, OR ANY OTHER WARRANTY, IMPLIED OR EXPRESS, IS LIMITED TO REPAIR, REPLACEMENT OR REFUND, AS SET
FORTH ABOVE. THESE REMEDIES ARE THE SOLE AND EXCLUSIVE REMEDIES FOR ANY BREACH OF WARRANTY. INTEL IS NOT RESPONSIBLE FOR INDIRECT,
SPECIAL, INCIDENTAL, OR CONSEQUENTIAL DAMAGES RESULTING FROM ANY BREACH OF WARRANTY OR UNDER ANY OTHER LEGAL THEORY
INCLUDING, BUT NOT LIMITED TO, LOST PROFITS, DOWNTIME, GOODWILL, DAMAGE TO OR REPLACEMENT OF EQUIPMENT AND PROPERTY, AND ANY
COSTS OF RECOVERING, REPROGRAMMING, OR REPRODUCING ANY PROGRAM OR DATA STORED IN OR USED WITH A SYSTEM CONTAINING YOUR
PENTIUM PROCESSOR. SOME JURISDICTIONS DO NOT ALLOW THE EXCLUSION OR LIMITATION OF INCIDENTAL OR CONSEQUENTIAL DAMAGES, SO THE
ABOVE LIMITATIONS OR EXCLUSIONS MAY NOT APPLY TO YOU.
THE LIMITED WARRANTY GIVES YOU SPECIFIC LEGAL RIGHTS, AND YOU MAY ALSO HAVE OTHER RIGHTS THAT VARY FROM JURISDICTION TO JURISDICTION.
G u í a d e i n s t a l a c i ó n y de referencia rápida
109
w w w. d e l l . c o m | s u p p o r t . d e l l . c o m
Intel Pentium® and Celeron® Processors are backed by a three-year limited warranty.
Please refer to the reverse side of this card for complete warranty details.
Intel’s Commitment to Quality
Intel is committed to producing the highest quality processors available. That’s why we have hundreds of people dedicated to continuously improve our design, manufacturing,
and testing technology.
We put every one of our Pentium® and Celeron® processors through a rigorous battery of tests during the design and manufacturing processes.
To verify that the new chip will correctly run the software written for Intel Architecture processors, a team of Intel engineers is dedicated to compatibility testing. In a state-of-art lab,
this group runs an extensive set of operating systems, applications, network tests and stress tests repeatedly to ensure that the processor is compatible with representative software.
Just as importantly, we work with hardware and software companies in the computer industry to ensure that our processors are compatible with their products.
Additionally, a sampling of Intel processors are subjected to a rigorous "burn-in" test whereby the chip is operated at higher-than-normal temperatures and voltages. During this
burn-in period, the processor experiences the equivalent of weeks of normal usage. These units are monitored for failures as part of our ongoing quality assurance process.
As a result, today’s microprocessors from Intel are among the most reliable components in computers.
What are ’Errata’?
Exhaustive product testing can highlight differences between the actual behavior of the microprocessor and its specifications. Sometimes the discrepancies are caused by a design
defect or error, which we call errata. Rigorous validation identifies most errata during the development of the processor, but we do detect additional errata during the life cycle of
a microprocessor.
When an erratum is identified, our engineers work to characterize it and find a solution. We work with system designers and software developers to ensure that the discrepancy does
not affect their products. If necessary, special software or hardware solutions (sometimes known as "work arounds") are implemented in the system design to prevent computer
users from encountering the problem. Errata may then be corrected in future revisions of the microprocessor.
No microprocessor is perfect, and Intel recognizes that some consumers want to know about any errata, whether or not the errata affect them. Intel makes documentation of all
characterized Pentium and Celeron processor errata publicly available through our Technical Documentation Service.
At Intel, our goal is to make every computer user satisfied with his or her Pentium or Celeron processor. Should you have any questions, comments or concerns about your Intel
microprocessor, please call us at 1-800-628-8686.
©1997, 1998 Intel Corporation. All rights reserved.
110
Guía de instalación y de referencia rápida