1
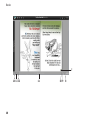
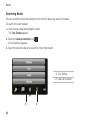
Tablet User’s Guide Regulatory model: P08T Regulatory type: P08T001 Notes, Cautions, and Warnings NOTE: A NOTE indicates important information that helps you make better use of your tablet. CAUTION: A CAUTION indicates either potential damage to hardware or loss of data and tells you how to avoid the problem. WARNING: A WARNING indicates a potential for property damage, personal injury, or death. __________________ Information in this document is subject to change without notice. © 2010 Dell Inc. All rights reserved. Reproduction of these materials in any manner whatsoever without the written permission of Dell Inc. is strictly forbidden. Trademarks used in this text: Dell™, the DELL logo, and Inspiron™ are trademarks of Dell Inc.; Microsoft®, Windows®, and the Windows start button logo are either trademarks or registered trademarks of Microsoft Corporation in the United States and/or other countries. Other trademarks and trade names may be used in this document to refer to either the entities claiming the marks and names or their products. Dell Inc. disclaims any proprietary interest in trademarks and trade names other than its own. December 2010 Rev. A00 Contents Contents About Your Tablet �������������������������������������������������������������������������������������������������������� 5 Set Up the Tablet Mode������������������������������������������������������������������������������������������������ 6 Using Your Tablet���������������������������������������������������������������������������������������������������������� 9 Using the Touch Screen ����������������������������������������������������������������������������������������������������������� 9 Screen Orientation ������������������������������������������������������������������������������������������������������������������ 12 On-Screen Keyboard���������������������������������������������������������������������������������������������������������������� 13 duo Stage Interface���������������������������������������������������������������������������������������������������� 14 Applications in duo Stage Interface����������������������������������������������������������������������������������������16 Music . . . . . . . . . . . . . . . . . . . . . . . . . . . . . . . . . . . . . . . . . . . . . . . . . . . . . . . . . . . . . . . . . . . . 18 Photo . . . . . . . . . . . . . . . . . . . . . . . . . . . . . . . . . . . . . . . . . . . . . . . . . . . . . . . . . . . . . . . . . . . . 23 Video . . . . . . . . . . . . . . . . . . . . . . . . . . . . . . . . . . . . . . . . . . . . . . . . . . . . . . . . . . . . . . . . . . . . 33 Books . . . . . . . . . . . . . . . . . . . . . . . . . . . . . . . . . . . . . . . . . . . . . . . . . . . . . . . . . . . . . . . . . . . . 36 Paint . . . . . . . . . . . . . . . . . . . . . . . . . . . . . . . . . . . . . . . . . . . . . . . . . . . . . . . . . . . . . . . . . . . . . 45 Games . . . . . . . . . . . . . . . . . . . . . . . . . . . . . . . . . . . . . . . . . . . . . . . . . . . . . . . . . . . . . . . . . . . 48 Internet . . . . . . . . . . . . . . . . . . . . . . . . . . . . . . . . . . . . . . . . . . . . . . . . . . . . . . . . . . . . . . . . . . 49 3 Contents Solving Problems�������������������������������������������������������������������������������������������������������� 50 Touch Screen Problems ��������������������������������������������������������������������������������������������������������� 50 Power Problems ��������������������������������������������������������������������������������������������������������������������� 52 Wireless Network Problems��������������������������������������������������������������������������������������������������� 54 duo Stage Problems ����������������������������������������������������������������������������������������������������������������55 4 About Your Tablet Your Inspiron duo notebook can also be used as a tablet. In the Tablet mode, you can access the duo Stage interface to: •listen to music, watch movies and videos •view photos on your tablet and upload your photos on your Facebook, Flickr, or Shutterfly accounts •read e-books •play touch-enabled games along with the default operating system games •stay connected to the Internet and browse the web 5 Set Up the Tablet Mode Set Up the Tablet Mode 1. Open the display. 6 Set Up the Tablet Mode 2. Push the display panel from the top and rotate it 180 degrees clockwise. 7 Set Up the Tablet Mode 3. Close the display. The duo Stage interface is activated automatically in Tablet Mode. 8 Using Your Tablet Using Your Tablet Using the Touch Screen The touch screen feature on your tablet allows you to interact with the tablet without the use of additional devices such as a mouse or keyboard. Opening Applications Touch the application tile to open the applications. For more information on the different applications, see “Applications in the duo Stage Interface” on page 14. 9 Using Your Tablet Touch Screen Gestures The multi-touch screen on your tablet allows you to use your finger to move the screen content, scroll through menus, view photos, and so on. Zoom Dwell Allows you to increase or decrease the magnification of the screen content. Allows you to access additional information by simulating a right-click. Press and hold a finger on the touch screen, to open context-sensitive menus. Pinch — Allows you to zoom in or zoom out by moving two fingers apart or bringing them closer together on the screen. To zoom in: Move two fingers apart to enlarge the view of the active window. To zoom out: Move two fingers close together to reduce the view of the active window. 10 Flick Allows you to flip content forward or backward based on the direction of the flick. Move a finger quickly in the desired direction to flip through content in the active window like pages in a book. Flick also works vertically when navigating content such as images or songs in a playlist. Scroll Allows you to scroll through content. The scroll features include: Pan — Allows you to move the focus on the selected object when the entire object is not visible. Move two fingers in the desired direction to pan scroll the selected object. Using Your Tablet Scroll Horizontal — Allows you to scroll left or right on the active window. Move a finger to the left or right to activate horizontal scrolling. Rotate Allows you to rotate the active content on the screen. Scroll Vertical — Allows you to scroll up or scroll down on the active window. Move a finger up or down to activate vertical scrolling. Twist — Allows you to rotate the active content using two fingers. Keeping a finger or thumb in place, move the other finger in an arced direction right or left. You can also rotate the active content by moving both the fingers in a circular motion. 11 Using Your Tablet Screen Orientation The orientation on your tablet changes depending on the way you hold the tablet. Rotate the tablet sideways to change the orientation of the screen from portrait to landscape mode, and vice versa. In landscape mode, the screen content expands to fit the screen and is suitable for viewing pages on your web browser. 12 Using Your Tablet On-Screen Keyboard You can type text using the on-screen keyboard. The on-screen keyboard appears when you touch anywhere on the screen. The keyboard automatically changes to either the portrait or landscape mode based on the orientation of your tablet. To use the on-screen keyboard 1. Touch anywhere on the screen. A portion of the on-screen keyboard appears on the top left of the screen. 2. Touch and drag the portion of the keyboard that appears to view the entire keyboard. 3. Touch the key(s) on the keyboard to start typing. To close the keyboard Touch on the top right corner of the keyboard. 13 duo Stage Interface duo Stage Interface The duo Stage interface launches as soon as you set your laptop to tablet mode. This interface provides access to your favorite media and multi-touch applications. 14 duo Stage Interface If you do not want the duo Stage interface to launch every time you set your laptop to Tablet mode, touch the settings icon and clear the Show duo Stage when entering tablet mode check box. The Windows 7 desktop will display as soon as you close the duo Stage interface. To manually launch the duo Stage interface, click Start Stage. → All Programs→ Dell Stage→ duo 15 duo Stage Interface Applications in duo Stage Interface This section gives an introduction about the different tiles available in the duo Stage interface. NOTE: The default tiles are pre-installed on your computer. You can download the latest duo Stage software from support.dell.com. Listen to music or radio stations from across the globe. You can also browse through your music files by album, artist, or song title. The optional Napster application allows you to download songs when connected to the Internet. 16 View, organize, or edit your photos. You can create slide shows and albums to upload them to Facebook, Flickr, or Shutterfly when connected to the Internet. You can also zoom-in or zoom-out on a photo using the touch screen gestures. duo Stage Interface Play movies, videos, or watch TV shows using the Internet. You can use the optional CinemaNow application to purchase or rent movies and TV shows using the Internet. Browse the web, send e-mail, download music and books. Play touch-enabled games. Read e-books available on your tablet. You can download books using the Internet. Draw and edit photos. 17 Music Music Touch the Music tile to: •view and listen to the recently played music available in your tablet •view and browse your music collection in your library by album, artists, or genres •download songs using Napster •listen to the radio using RadioTime 18 Music Playing Recently Added Songs 1. Touch the Music tile to view the MusicStage home page. 2. On the MusicStage page, touch the desired thumbnail to play the song. Playing Songs Available on Your Tablet 1. Touch the Music tile to view the MusicStage home page. 2. Touch the Library tab and browse the songs by albums, artists, or genres. ALBUMS — Touch to view and play a song from the albums available on your tablet. The ALBUMS tab is selected by default. NOTE: The recently viewed albums appear in the MusicStage tab. ARTISTS — Touch to view and play the songs listed by the name of the artists. GENRES — Touch to view and play the songs listed by genres. 19 Music Controlling Music Playback 1 2 3 4 5 1 Touch to play the previous song. This option is enabled only if there is more than one song in the selected album. 2 Touch to pause playback; touch to resume playback. 3 Touch to play the next song. This option is enabled only if there is more than one song in the selected album. 4 Touch the playback control to jump to any part of the song. 5 Touch the volume control to increase, decrease, or mute the volume. 20 Music Downloading Music Using Napster Napster is an online music application that allows you to choose and download songs that are categorized by top songs, artists, or genres. To download music: 1. Ensure that you are connected to the Internet. 2. Touch the Music tile to view the MusicStage home page. 3. Touch the Napster tab and view the songs listed by top songs, artists, or genre. 4. Touch the desired song to download to your tablet. 21 Music Listening to Songs Using Online Radio The RadioTime application allows you to listen to songs on the radio from different regions across the globe. To listen to radio: 1. Ensure that you are connected to the Internet. 2. Touch the Music tile to view the MusicStage home page. 3. Touch the RadioTime tab. 4. Choose the radio location. Touch BROWSE BY LOCATION or touch the locations highlighted on the globe. 5. Touch the play button to start listening to radio of the selected region. Changing the Music Tile Settings Touch the Music tile and touch the settings icon . You can change the following settings: General — Lists the location of various music libraries available in your computer. You can set the default location for music downloads. Account — Allows you to sign in to your Napster account. Network — Allows you to configure your network settings by enabling proxy server. About — Displays the v ersion information of the Dell MusicStage application. 22 Photo Photo Touch the Photo tile to: •view, edit, and print photos •import photos from external storage devices such as a USB drive or digital camera •organize photos by date or albums •upload photos to websites such as Facebook, Flickr, or Shutterfly 23 Photo Viewing Recently Added Photos 1. Touch the Photos tile to view the PhotoStage home page. 2. On the PhotoStage page, touch the desired thumbnail to view the photo. Viewing Photos Available on Your Tablet 1. Touch the Photos tile to view the PhotoStage home page. 2. Touch the Library tab to view all photos listed in the library. You can: •touch the desired thumbnail to view the photos saved in your tablet •view photos sorted by date captured •add new albums to your tablet •browse through different locations in your tablet and add photos to the PhotoStage page •import photos from an external storage device such as a USB drive or digital camera Viewing Photos in a Slide Show 1. Touch the Photos tile to view the PhotoStage home page. 2. Touch the 24 icon to start viewing photos in a slide show. Photo Uploading Photos on Facebook, Flickr, or Shutterfly 1. Touch the Photos tile to view the PhotoStage home page. 2. Touch the desired photo. The following options appear: — Touch to upload photos to your Facebook account. — Touch to upload photos to your Flickr account. — Touch to upload photos to your Shutterfly account. NOTE: You can also upload your photos to Facebook and Flickr accounts by accessing the Facebook and Flickr tabs respectively. Viewing Photo Information 1. Touch the Photos tile to view the PhotoStage home page. 2. Touch the photo for which you want to view information. 3. Touch the information icon to know more about the photo such as date taken and location where the photo is saved on your tablet. 25 Photo Editing Photos 1. Touch the Photos tile to view the PhotoStage home page. 2. Touch the thumbnail of the desired photo to edit. NOTE: To view all the photos on the tablet, touch the Library tab and touch the desired photo thumbnail. 3. Touch the Edit icon to view the editing options. The editing options available are: Rotate Crop — Touch to rotate the photo by 90, 180, or 270 degrees. — Touch to crop a desired portion of the photo. Straighten — Touch and drag the pointer on the slider bar in the desired direction to straighten the photo. Red-Eye — Touch to correct a red eye in a photo. If there is no red-eye found in the photo, a message No red eye is found in this photo is displayed. Auto-Fix — Analyzes the photo and corrects issues caused by contrast, color balance, or poor exposure. 26 Photo Importing Photos 1. Touch the Photos tile to view the PhotoStage home page. 2. Touch the Library tab. 3. Touch IMPORT. In the window that appears, add the photos from an external device such as a USB drive or digital camera. 27 Photo 1 9 2 3 4 5 28 6 7 8 Photo 1 Touch to go back to PhotoStage home page. 2 Touch to view the previous photo. 3 Touch to connect to your Facebook account and upload your photos. 4 Touch to connect to your Flickr account and upload your photos. 5 Touch to connect to your Shutterfly account and upload your photos. 6 Touch to view information about a photo such as date taken and location where the photo is saved on your tablet. 7 Touch to edit the photo. For more information on the editing options, see page 26. 8 Touch to start a slide show. 9 Touch to view the next photo. 29 Photo Scanning and Organizing Digital Photos 1. Touch Photos tile to view the PhotoStage home page. 2. Touch the Apps tab and touch Open to launch Windows Live Photo Gallery. With Windows Live Photo Gallery you can: •view all the photos saved in different locations in your tablet •add descriptive tags to your photos •run a slide show of your photos •tag people present in the photos 30 Photo 31 Photo Changing the Photo Tile Settings Touch the Photo tile and touch the settings icon . You can change the following settings: Slide show — The following options are available in this tab: •Transition — Touch to select an animation effect for the slide show. The options available are Pan/Zoom, Cross fade, and Alpha Artist. The default option is Pan/Zoom. •Duration — Touch to select the time interval in second(s) for a photo to appear during the slide show. The options available are 1, 2, 3, 4, 5, and 10 seconds. The default option is 1 second. •Add Music — Allows you to add background music for your slide show. To select music, double-tap the Browse for music to add... option and choose the desired music file from a location on your tablet. Facebook — Allows you to connect to your Facebook account to upload your photos. Flickr — Allows you to connect to your Flickr account to upload your photos. Shutterfly — Allows you to connect to your Shutterfly account to upload your photos. ABOUT — Displays the version information of the Dell PhotoStage application. If your computer is connected to the Internet, touch Check for updates to download and install any available updates for this application. 32 Video Video Touch the Video tile to: •view recently added videos and movies •organize the videos by name or date •view or rent online movies using CinemaNow 33 Video Viewing Recently Added Videos 1. Touch the Videos tile to launch the VideoStage home page. 2. Touch the thumbnail of the recently added video to start playing. You can: •touch the icon to play the movie from the beginning. •touch the icon to resume the movie. Viewing Videos Available on Your Tablet 1. Touch the Videos tile to launch the VideoStage home page. 2. Touch the Library tab to see all the videos saved on your tablet. 3. Touch a video to start playing. You can: •search for a video in the library •sort the list of videos by name or by date 34 Video Viewing Online Videos 1. Touch the Videos tile to launch the VideoStage home page. 2. Touch the CinamaNow tab to connect to the online CinemaNow application. It hosts movies, music concerts, and television shows. You can: •become a member and browse movies and TV shows by genres. •view, buy, and rent movies online. Changing the Video Tile Settings Touch the Video tile and touch the settings icon . You can change the following settings: DISPLAY + AUDIO — The options available under this tab allow you to change the display and audio settings. TrueTheater —TrueTheater technology allows you to upgrade the media experience on your tablet. Select the Enable TrueTheater Effect check box and the adjust the available TrueTheater settings. VIDEO FOLDERS — Allows you to set the default folder location for storing videos. You can also set the default import folder. VideoStage will periodically check this folder and place the videos automatically in the VideoStage Library. ABOUT — Displays the version information of the Dell VideoStage application. 35 Books Books Touch the Books tile to launch the Welcome the BookStage eReader window. On this window that appears you can: •read book available in the library available on your tablet •search and download books for free •create a BookStage account to buy books from the online store NOTE: Select Hide this welcome screen at startup to hide the welcome window. 36 Books Reading Books 1. Touch the Books tile to launch the My Library home. 2. Touch the desired book twice to open the book. 37 Books 1 2 3 4 38 5 6 Books 1 Touch to open different options for using BookStage application. The options available are: Open — Touch to open an existing book on your tablet. Print — Touch to print a book. Password — Touch to create or change password for your BookStage account. Account — Touch to manage your account information such as contact information, regional data, and credit card information. Settings — Touch to manage change the settings for BookStage application. For more information on settings, see page 44. Help — Touch to see help options use this application. About — Touch to view information such as version number, Copyright, Terms of Use, and Privacy Statement. 2 Touch to view the BookStage home page. 3 Touch to view the Free Books page. 4 Touch to view the Store page. 5 6 Denotes if your tablet is connected to the Internet. A blue X on the icon indicates that your tablet is not connected to the Internet. Touch to sign-in to your BookStage account. 39 Books 7 14 13 12 40 11 10 9 8 Books 7 Drag the page to the left to view the next page. 8 Touch to see the different options to view and zoom a book. 9 Touch to zoom in the text on the pages. 10 Touch to zoom out the text on the pages. 11 Touch the horizontal scroll bar to scroll through the pages quickly. 12 13 14 Allows you to create bookmarks in a book. Drag and highlight one or more words. The Text Toolbar appears. Touch the on the Text Toolbar to save it as a bookmark. Touch to view table of contents in a book. Touch to start reading the book aloud. As each word is spoken, it is highlighted as an aid to reading. 41 Books Searching Books You can search for more information on the Internet about any word in the book. To launch the search option: 1. Open a book, drag and highlight a word. The Text Toolbar appears. 2.Touch the Look up selection icon A list of websites appears. . 3.Touch the desired website to search for more information. 1 Text Toolbar 2 Look up selection 1 42 2 Books Downloading Free Books 1. Touch the Books tile to view the BookStage home page. 2. Touch the Free Books tab. 3. You can search for books using any one of the following options: General — Touch to search all the free books available. Author — Touch to search books written by an author. Subject — Touch to search books based on a subject. Title — Touch to search books by a title. Purchasing Books 1. Touch the Books tile to view the BookStage home page. 2. Touch the Store tab and browse through the available books. 3. Touch the desired book to place an online order. 43 Books Changing the Books Tile Settings Open the BookStage application and touch → Settings. You can change the following settings: General Settings — The options under this tab allow you to change the General and User Interface Settings. Profile — Allows you to update your profile on BookStage. Speech — The options under this tab allow you to change the speech and reading playback settings. References — Provides a list of websites that may be used as references to look for more information about a word in a book. You may add or remove references from the list. Advanced Settings — Allows you to change user interface language, store currency, parental controls, and other options. For more information on BookStage, touch 44 → Settings→ Help. Paint Paint Touch the Paint tile to create paintings or drawings using tools such as a chalk, pencil, marker, or crayon. 45 Paint 1 2 3 7 4 6 46 5 Paint 1 Touch to open different options available within this application such as Save As..., Set as Wallpaper, Print, Update, Settings, and Help. 2 Touch to redo an action performed. 3 Touch to undo an action performed. 4 Touch the white board to draw and paint photos. 5 Touch to select the drawing tools such as a chalk, pencil, marker, crayon, and eraser. 6 Touch to see the options available under each stamp category. These options will change dynamically based on the stamp you choose. 7 Touch the desired stamp and tap the white board to place the desired stamp. Changing the YouPaint Settings Touch the icon and select Settings to open the YouPaint settings. It allows you to set your default printer and adjust the volume level. 47 Games Games Touch the Games tile to view the games available on your tablet. To play games: 1. Touch the Games tile. 2. Touch the icon of the desired game to start playing the game. 48 Internet Internet Touch the Internet tile to: •search for information •send and receive e-mails and stay connected with your family and friends •bookmark frequently visited website(s) as favorites for quick access •have multiple pages open at once, each one being displayed on a separate tab 49 Internet Solving Problems This section provides troubleshooting information for your tablet. Touch Screen Problems Some or all multi-touch features are not working — •Certain touch and multi-touch features may be disabled. To enable them, double-click the Flicks icon in the notification area of your desktop. In the Pen and Touch window, select the Touch tab and ensure that Use your finger as an input device and Enable multi-touch gestures and inking options are selected. •The multi-touch feature may not be supported by the application. •The touch screen is calibrated at the factory, and does not require re-calibration. If you choose to calibrate the touch screen, click Start → Control Panel→ Hardware and Sound→Tablet PC Settings→ Calibrate... NOTE: Improper calibration may lead to inaccurate touch sensitivity. 50 Internet If the touch screen starts losing its sensitivity — The touch screen may have foreign particles (such as sticky notes) that are blocking the touch sensors. To remove these particles: a. Turn off the computer. b.Disconnect the AC adapter cable from the wall outlet. CAUTION: Do not use water or a cleaning liquid to wipe the touch screen. c. Use a clean, lint-free cloth (you may spray mild, non abrasive cleaner or water on the cloth if needed, but not on the screen) and wipe the surface and sides of the touch screen to remove any dirt or fingerprints. 51 Internet Power Problems If the power light is off — The computer is either turned off, in hibernate mode, or is not receiving power. •Press the power button. The computer resumes normal operation if it is off or in hibernate mode. •Reseat the AC adapter cable into the power connector on the computer, into the AC adapter, and to the electrical outlet. •If the AC adapter cable is plugged into a power strip, ensure that the power strip is plugged into an electrical outlet and that the power strip is turned on. Also bypass power protection devices, power strips, and power extension cables to verify that the computer turns on properly. •Ensure that the electrical outlet is working by testing it with another device, such as a lamp. •Check the AC adapter cable connections. If the AC adapter has a light, ensure that the light on the AC adapter is on. If the power light is solid white and the computer is not responding — The display may not be responding. •Press the power button until the computer turns off and then turn it back on. •If the problem persists, contact Dell technical support. 52 Internet If the power light is breathing white — The computer is in standby mode or the display may not be responding. •Press a key on the keyboard, move the connected mouse or a finger on the touch pad, or press the power button to resume normal operation. •If the display is not responding, press the power button until the computer turns off and then turn it back on. •If the problem persists, contact Dell technical support. If you encounter interference that hinders reception on your computer — An unwanted signal is creating interference by interrupting or blocking other signals. Some possible causes of interference are: •Power, keyboard, and mouse extension cables. •Too many devices connected to a power strip. •Multiple power strips connected to the same electrical outlet. 53 Internet Wireless Network Problems If the wireless network connection is lost — The wireless router is offline or wireless has been disabled on the computer. •Check your wireless router to ensure it is powered on and connected to your data source (cable modem or network hub). •Check if wireless is enabled on the your tablet. •Re-establish your connection to the wireless router (for more information, see the Inspiron duo Setup Guide at support.dell.com/manuals). •Interference may be blocking or interrupting your wireless connection. Try moving the computer closer to your wireless router. •Ensure that the wireless antennas are not blocked. For more information on the location of the wireless antennas, see the Inspiron duo Setup Guide at support.dell.com/manuals. 54 Internet duo Stage Problems If the duo Stage interface does not launch as soon as you set your notebook as a tablet — The duo Stage interface is corrupt or has some files missing. •Try launching the application manually. Click Start duo Stage. → All Programs→ Dell Stage→ •Reinstall the duo Stage interface. To reinstall, download the duo Stage application file from support.dell.com or from My Dell Downloads at DownloadStore.dell.com. 55