1
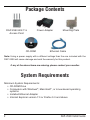
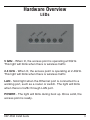
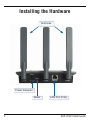
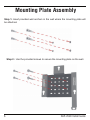
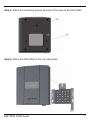
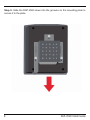
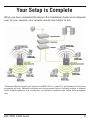
Package Contents
DAP-2590 802.11n
Access Point
CD-ROM
Power Adapter
Mounting Plate
Ethernet Cable
Note: Using a power supply with a different voltage than the one included with the
DAP-2590 will cause damage and void the warranty for this product.
If any of the above items are missing, please contact your reseller.
System Requirements
Minimum System Requirements:
• CD-ROM Drive
• Computers with Windows®, Macintosh®, or Linux-based operating
systems
• Installed Ethernet Adapter
• Internet Explorer version 7.0 or Firefox 3.0 and above
DAP-2590 Install Guide
Hardware Overview
LEDs
5 GHz - When lit, the access point is operating at 5GHz.
This light will blink when there is wireless traffic.
2.4 GHz - When lit, the access point is operating at 2.4GHz.
This light will blink when there is wireless traffic.
LAN - Solid light when the Ethernet port is connected to a
working port, such as a router or switch. The light will blink
when there is traffic through LAN port.
POWER - The light will blink during boot up. Once solid, the
access point is ready.
DAP-2590 Install Guide
Installing the Hardware
Antennas
Power Receptor
Reset
LAN Port (PoE)
DAP-2590 Install Guide
To power the access point, you can use one of the following methods:
1. Use the supplied power adapter
2. Connect one end of your Ethernet cable into the LAN (PoE) port on the
DAP-2590 and the other end into one port on a PoE switch.
To setup and manage the DAP-2590 from a computer, use one of the
following methods:
1. Connect a straight through Ethernet cable between the access point
and your computer.
2. Connect the access point to a switch or router and use a computer from
a computer that is also connected to that switch or router.
3. Please start your web browser program,
type the IP address of the device (http://
192.168.0.50) and press Enter. Make sure
that the IP addresses of the device and your
computer are in the same subnet. Then, refer
to the Manual for configuration.
DAP-2590 Install Guide
Mounting Plate Assembly
Step 1: Insert provided wall anchors in the wall where the mounting plate will
be attached.
Step 2: Use the provided screws to secure the mounting plate on the wall.
DAP-2590 Install Guide
Step 3: Attach the remaining screws securely to the back of the DAP-2590.
Step 4: Attach the DAP-2590 to the mounting plate.
DAP-2590 Install Guide
Step 5: Slide the DAP-2590 down into the grooves on the mounting plate to
secure it to the plate.
DAP-2590 Install Guide
Your Setup is Complete
When you have completed the steps in this Installation Guide and configured
your for your network, your network should look similar to this:
* Maximum Wireless signal rate derived from IEEE 802.11n (draft 2.0) specifications. Actual data
throughput will vary. Network conditions and environmental factors, including volume of network
traffic, building materials and construction, and network overhead lower actual data throughput
rate.
DAP-2590 Install Guide
Notes
10
DAP-2590 Install Guide
Notes
DAP-2590 Install Guide
11
Technical Support
D-Link’s website contains the latest user documentation and
software updates for D-Link products.
U.S. and Canadian customers can contact D-Link Technical
Support through our website or by phone.
United States
Telephone
(877) 354-6555
World Wide Web
http://support.dlink.com
Canada
Telephone
(877) 354-6560
World Wide Web
http://support.dlink.com
Version 1.1
August 18, 2008
6DAP2590Q.B2G
Copyright ©2008 D-Link Corporation/D-Link Systems, Inc. All rights reserved. D-Link, the D-Link logo, and AirPremier are
trademarks or registered trademarks of D-Link Corporation or its subsidiaries in the United States and other countries. Other
trademarks are the property of their respective owners. All references to speed are for comparison purposes only. Product
specifications, size, and shape are subject to change without notice, and actual product appearance may differ from that
depicted herein. Visit www.dlink.com for more details.