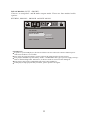
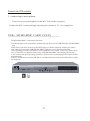
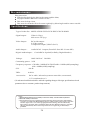
1
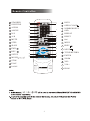
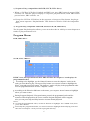
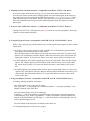
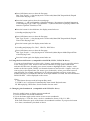
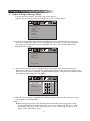
DVD PLAYER USER MANUAL
DVD 1084
DVD1084 DVD/VCD/CD PLAYER
POWER
SD Card/Memory Stick
Multi Media Card
USB Socket
Please read this user manual carefully to ensure proper use of this
product and keep this manual for further reference
* Important Safety Instruction
CAUTION
RISK OF ELECTRIC SHOCK
DO NOT OPEN
WARNING:To reduce thr risk of the
fire or electric shock.DO NOT expose
this product to rain or moisture.
The lightning flash with arrowhead symbol within a triangle, alerts the user to [dangerous voltage ]
which could cause electric shock .
The exclamation point within a triangle indicates to the user to read important operating and maintenance
instructions in the manual.
IMPORTANT FOR LASER PRODUCTS
1.CLASS 1 LASER PRODUCT
1)Read these instructions.
2. DANGER:Visible laser radiation when open and interlock
2)Keep these instructions.
failed or defeated.Avoid direct exposure to beam.
3.CAUTION:Do not open the top cover.
3)Heed all warnings.
There are no user service-able parts inside the unit.
4)Follow all instructions.
Leave all servicing to qualified service personnel.
5)Do not use this apparatus near water.
6)Clean only with dry cloth.
7)Do not block any ventilation openings. Install in accordance with the manufacturer's instructions.
8)Do not install near any heat sources such as radiators, heat registers, stoves or other apparatus
(including amplifiers) that produce heat.
9)Do not defeat the safety purpose of the polarized or grounding-type plug. A polarized plug has two
blades with one wider than the other.A grounding type plug has two blades and a third grounding
prong.The wide blade or the third prong are provided for your safety.If the provided prong does not
fit into your outlet,consult an electrician for replacement of the obsolete outlet.
10)Protect the power cord from being walked on or pinched particularly at plugs, convenience
receptacles, and the point where they exit from the apparatus.
11)Only use attachments/accessories specified by the manufacturer.
12)Use only with the cart,stand,tripod,bracket,or table specified by the manufacturer,or sold with
the apparatus.When a cart is used,use caution when moving the cart/apparatus combination to
avoid injury from tip-over
13)Unplug this apparatus during lightening storms or when unused for long periods of time.
14)Refer all servicing to qualified service personnel. Servicing is required when the apparatus has
been damaged in any way, such as power-supply cord or plug is damaged,liquid has been spilled
or objects have fallen into the apparatus,the apparatus has been exposed to rain or moisture, does
not operate normally or has been dropped.
15)Apparatus shall not be exposed to dripping or splashing and no object filled with liquids such
as vases shall be placed on the apparatus.
Table of Contents
Types of Discs Your DVD player will play
Supporting function of disc
Remote Controller
Systems connection (Stereo and 5.1)
Chapter 1 Basic Operation
1. Turn On the TV and your DVD player
2. Insert a disc
3. Play
Chapter 2 Additional Operation
1. Selecting Tracks (compatible with DVD, SVCD, VCD, CD,
JPEG discs)
2. Skipping Tracks (compatible with DVD, SVCD, VCD, CD,
JPEG discs)
3. Multispeed Fast Motion Playback (compatible with DVD, SVCD, VCD, CD,
discs)
4. Multispeed Slow motion playback (compatible with DVD, SVCD, VCD
discs)
5. Freeze Frame and Frame Advance (compatible with DVD, SVCD, VCD
discs)
6. Using the Repeat Feature (compatible with DVD, SVCD, VCD, CD,
2
2
3
4
5
5
5
5
7
7
7
7
8
8
JPEG discs)
7. Using the Display Feature (compatible with DVD, SVCD, VCD, CD,
8
JPEG discs)
8. Using the Search Feature (compatible with DVD, SVCD, VCD, CD,
8
discs)
9 . Changing the Soundtrack (compatible with SVCD, VCD, CD
9
10.
11.
12.
13.
discs)
Changing the Audio Language (compatible with DVD, SVCD discs)
Subtitles (compatible with DVD, SVCD discs)
Changing the Camera Angle (compatible with DVD discs)
Changing the TV System (compatible with DVD, SVCD, VCD, CD,
9
9
10
10
JPEG discs)
14. Mute the Audio Output (compatible with DVD, SVCD, VCD, CD
10
discs)
15. Zoom In the Video Image (compatible with DVD, SVCD, VCD,
11
JPEG discs)
16. Repeat a Specific Segment on the Disc that You Define (compatible with
DVD, SVCD, VCD, CD discs)
17. Volume control (compatible with DVD, SVCD, VCD, CD
discs)
17. Reset function
11
Chapter 3 Playing MPEG 4/JPEG discs
Chapter 4 The Setup Menu System
Function of karaoke
USB,SD/MS/MMC card`s play
Disc maintenance
Specifications
11
11
11
12
13
23
23
24
24
1
Types of Discs Your DVD Player Will Play
Types of
Discs
Diameter
12cm
DVD
8cm
SVCD
Data Format
Playback Time
Remark
1 layer: 120min
DVD Format Disc:
2 layers: 240min Compressed Digital
Audio Compressed Digital
1 layer: 80min
2 layers: 180min
Video
Moving picture
MPEG2
Include:
Compressed Digital Audio
Compressed Digital Video SVCD CVD
Moving picture
12cm
45min
12cm
74min
8cm
20min
MPEG1
Compressed Digital Audio
Compressed Digital Video
Moving picture
CD
12cm
8cm
74min
20min
CD-DA:
Digital Audio
JPEG
12cm
600min
Compressed Digital Audio
MPEG 4
12cm
VCD
Include:
VCD2.0
VCD1.1
VCD1.0
DVCD
Audio digital compressed+
Video digital compressed
Note: DVD-R, CD-R, CD-RW discs can be played in this DVD player.
Supporting function of disc
DVD disc can support many functions, different makers, and different function support.
Prevalent marks of a few functions as follows:
2
PAL/NTSC zone code & TV system
DOLBY digital surround sound
Numbers of sound language
2
Numbers of subtitle language
2
R
RESTRICTED
4
CC
Parental lock
View angle
Close caption
(Only NTSC)
Mpeg 4 files on discs
Remote Controller:
STANDBY
SUBTITLE
16
17
1
2
STANDBY
PROG
GOTO
SUBTITLE
1
2
3
AUDIO
4
5
6
ANGLE
7
8
9
N/P
10
10+
OSD
19
ANGLE
NUMBER KEYS
3
OSD
20
N/P
21
22
23
A-B
MUTE
24
25
STEP
MUTE
A-B
REPEAT
RESET
5
6
SLOW
STEP
PBC
MENU
7
8
9
10
TITLE/RETURN
SETUP
11
28
FWD
12
29
REV
ZOOM
13
30
)
31
32
RESET
PBC
MENU
PREV
NEXT
ENTER
STOP
SETUP
REPEAT
4
26
27
SLOW
MOVE(
OPEN/CLOSE
18
AUDIO
GOTO
PAUSE
VOL
PLAY
DVD1084
STOP
14
15
TITLE/RETURN
ENTER
ZOOM
VOL-
PLAY
VOL+
PAUSE
PROG
3
systems connection (Stereo and 5.1)
1) Before connecting, make sure to turn off power of all apparatus.
2) After finishing connection, turn on the power again.
AV cable (accessory) should be connected by color .
Yellow plug-------- video terminal (yellow)
White plug--------- left audio terminal (white)
Red plug----------- right audio terminal (red)
Must connect properly, especially the plug should be inserted to the bottom.
INPUT
A
S-VIDEO
B
COMPONENT
Y VIDEO INPUT
VIDEO
L
Cb/Pb
R
Cr/Pr
5.1 channel
amplifier
SUB
CENTER WOOFER
SURROUND
COAXIAL OPTICAL
FRONT
R
DIGITAL AUDIO INPUT
L
5.1 CHANNEL INPUT
4
Chapter 1 Basic Operation
1.Turn On the TV and Your DVD Player
Press the Power or Standby button on the player or the remote controller, and Read appears
on the TV screen. If there is not a disc in the DVD player, No disc will be displayed on both
the screen and the VFD.
2.Insert a Disc
Press the Open / Close button on the remote controller or the front of the DVD player, and
Open appears on the screen. Then place a disc gently into the tray with the disc's label
facing up (double-sided discs have content on both sides, so you can place either side up),
and press the Open / Close button again to close the disc tray, Close appears and the player
starts to read. Then the disc starts playing automatically. (Note: Of certain type discs,
after reading out the type, the Play or Enter button should be pressed to start playing.)
3. Play
The contents of each disc menu vary according to how the disc was authored and what
features are included. The disc menu will be turned on for you to select, when Menu button
pressed. Also play and pause can be switched with the Pause button on the remote.
a) Menu Play (compatible with DVD, SVCD, VCD2.0 discs)
I. Press Menu ,PBC button
TV screen displays the DVD Root Menu when a DVD disc is loaded.
When a SVCD or VCD 2.0 disc is loaded, SVCD or VCD 2.0 menu will be displayed on the
screen.
When PBC is off, At this moment, press PBC button once to display current PBC state.
PBC is initialized on when a SVCD or VCD2.0 disc is loaded.
MENU is initialized on when a DVD disc is loaded.
II. When a DVD disc is loaded, you can press Arrow buttons to highlight the menu item you
want to choose; As SVCD or VCD2.0, you can press Numeric buttons to select a track to
play.
III. Press Enter button, you can begin play with the highlighted.
IV. Return when playing: When a DVD disc is playing, press Menu button, and you can
return to Root Menu; As SVCD, VCD2.0, and PBC is on, press Tittle/Return button,
you can return to the menu.
V. Stop
1) When you press Stop button for the first time, the player turns into quasi stop state. At
the same time the OSD appears Quasi Stop . To begin the title over, press Stop button twice.
2) In quasi stop state, the player remembers where you stopped, when you start playing the
disc again, the DVD player picked up where you left off.
3) In stop state, when you press Play button, the player enters sequence playback mode.
For the disc protection, before you press Open / Close button to eject the disc tray when
playing, please press Stop button first. After taking out the disc, press Open / Close
again to close the tray.
If you're not going to use the DVD player for a long time, be sure unplug.
b) Title Play (compatible with DVD discs only)
I. During DVD playback, press Title/Return button to display the DVD title content.
II. Press the Arrow buttons to highlight the title you want to choose, and press Enter button; Also
you can press Numeric buttons to choose.
III. The DVD player begins with chapter 1 of the chosen title.
.
5
c) Sequence Play (compatible with DVD, SVCD, VCD discs)
I. When a SVCD or VCD disc is loaded and PBC is on, once PBC button is pressed, PBC
switches off. Then the player can play in sequence playback mode; when PBC button
pressed twice, PBC switches on.
II. Except for SVCD or VCD discs, in the stop state, when press Play button, the player
then enters sequence. Playback mode. This feature is effective to all the compatible
discs.
d) Program Play (compatible with DVD, SVCD, VCD, CD, JPEG discs)
The Program Playback option allows you to enter the order in which you want chapters or
tracks to play, maximum to 16.
Program Menu:
DVD, JPEG discs:
1
5
9
13
2
6
10
14
3
7
11
15
4
8
12
16
SVCD, VCD, CD discs:
If PBC is on, this operation will turn PBC off while the chapters / tracks plays in
programmed order.
According to the highlight, use the Numeric buttons to enter the chapters / tracks in the
order you want them to play. Then press Play button or use Arrow buttons to highlight the
PLAY item and press Enter button. The chapters / tracks will play in the programmed order.
You can program maximum 16 titles / chapters / tracks.
According to the Direction Indicator on the menu, you can press Arrow buttons to highlight
where you want to enter.
During Program Playback, if Program button pressed, the programmed order and the
contents will be displayed on the screen, and the Program Playback will be stopped;
Also you can press Stop and Play button to resume normal playback.
Notes:
To clear the programmed order, use Arrow buttons to highlight the CLEAR item, then
press Enter button.
To modify the programmed order, use Arrow buttons to highlight the modifying item and
enter the new chapter / track you want to program directly.
6
Chapter 2 Additional Operation
1. Selecting Tracks (compatible with DVD, SVCD, VCD, CD, JPEG discs)
a) When playing a DVD disc, press Numeric buttons on the menu or title page to select tracks;
During DVD playback, you can input desired title number directly.
b) As a SVCD or VCD disc, during sequence playback, press Numeric buttons to select tracks.
(During Program Playback and PBC is on, you can only press Prev / Next button to select)
c) As for CD discs, press Numeric buttons directly to select tracks.
d) when playing jpeg discs, press Numeric buttons to select different tracks on current track
list.
Notes: To select tracks from 1 to 10, press corresponding Numeric buttons (1-9, 10)
To select tracks above 10, press 10+ button. For example, to select the track 15, press
10+ and 5 button. If the selected track is not available, the input would be invalid.
2. Skipping Tracks (compatible with DVD, SVCD, VCD, CD, JPEG discs)
a) To skip forward to the beginning of the next title / chapter / track on a disc, press
button on
the remote or the front of the player.
b) To skip backward to the beginning of the preceding title / chapter / track on a disc, press
button on the remote or the front of the player.
When playing the last chapter / track on a SVCD or VCD disc with PBC off, pressing Next
button will stop the playback; When playing the first chapter / track., pressing Prev button
will stop the playback; When stop, pressing Next / Prev button will be invalid.
If a DVD disc is loaded, it varies according to how the disc was configured.
3. Multispeed Fast Motion Playback (compatible with DVD, SVCD, VCD, CD discs)
You can search in forward or reverse mode during playback.
a) Press the button on the remote during playback to search through a disc. Press the
button again on the remote to search at the next speed. Fast Forward Playback has four
speeds: 2, 4, 8, 20. With each consecutive press of the button, the search
speed increases. If you press the button five times, Fast Forward Playback cycles back
to normal playback. During DVD playback, when Fast Forward Playback gets to the
beginning of the next title / chapter, it resumes normal playback; During SVCD or VCD
playback with PBC on, when Fast Forward Playback gets to the beginning of the next
track, it resumes normal playback.
Press Play button to resume normal playback.
b) Press the
button on the remote during playback to search through a disc. Press the button
again on the remote to search at the next speed. Fast Reverse Playback has four speeds: 2,
4, 8, 20. With each consecutive press of the button, the search speed increases. If
you press the button five times, Fast Reverse Playback cycles back to normal playback.
During DVD playback, when Fast Reverse Playback gets to the beginning of the playing title
/ chapter, it resumes normal playback; During SVCD or VCD playback with PBC on, when
Fast Reverse Playback gets to the beginning of the playing track, it resumes normal playback.
Press Play button to resume normal playback.
7
4. Multispeed Slow Motion Playback (compatible with DVD, SVCD, VCD discs)
Press Slow button when pictures moving, you can enter Slow Motion Playback mode.
Press the Slow button on the remote during playback. Press the button again on the remote to
play at the next speed. Slow Motion Playback has six speeds: 1/2, 1/3, 1/4, 1/5, 1/6, 1/7. With
each consecutive press of the button, the play speed decreases. If you press the button seven
times, Slow Motion Playback cycles back to normal playback.Press Play button to resume
normal play.
5. Freeze Frame and Frame Advance (compatible with DVD, SVCD, VCD discs).
During DVD, SVCD or VCD playback, press Step button once to freeze playback; Press Play
button to resume normal playback.
6. Using the Repeat Feature (compatible with DVD, SVCD, VCD,CD,JPEG discs)
While a disc is playing, press Repeat button once, and the repeat banner appears to show current
repeat mode.
a) In SVCD, VCD sequence playback mode with PBC off or CD Sequence playback mode,
press Repeat button again to turn on repeat mode.
Press the button again on the remote to turn to the next repeat mode. There are three repeat
options: Off, Track Repeat, and Disc Repeat. With each consecutive press of the button, the
repeat mode switches. If you press the button four times, repeat mode cycles back to Off.
b) In DVD playback, press Repeat button again to turn on repeat mode. There are three repeat
options: Off, Chapter Repeat, and Title Repeat. With each consecutive press of the button,
the repeat mode switches. If you press the button four times, repeat mode cycles back to
Off.
c) In JPEG playback, press Repeat button again to turn on repeat mode. There are four repeat
options: Off, Track Repeat, Directory Repeat, and Disc Repeat.With each consecutive press
of the button, the repeat mode switches. If you press the button five times, repeat mode
cycles back to Off.
7. Using the Display Feature (compatible with DVD, SVCD, VCD,CD,JPEG discs)
a) Loading and playing DVDs (two pages)
Press OSD button once to show the first page:
Disc Type,Title * / * (the playing title / total titles),Chapter * / * (the playing chapter / total
chapters),Elapsed Time of the Disc.
Press the button again to show the second page:
Language * / * (the serial number of playing language / the amount of optional languages)
or Off,Language Type, Audio Type,Subtitle * / * (the serial number of playing subtitle / the
amount of optional subtitles) or Off,Angle * / * (the serial number of playing angle / the amount of optional angles) or Off.
Press the button for the third time, the display menu fades out.
b) Loading and playing SVCD discs (two pages)
8
Press OSD button once to show the first page:
Disc Type,Track * / * (the playing track / total tracks),Mute,PBC,Repeat Mode,Elapsed
Time of the Playing Track .
Press the button again to show the second page:
Language * / * (the serial number of playing language / the amount of optional languages)
or Off,Language Type Audio Type,Subtitle * / * (the serial number of playing subtitle / the
amount of optional subtitles) or Off .
Press the button for the third time, the display menu fades out.
c) Loading and playing VCDs
Press OSD button once to show the first page:
Disc Type,Track * / * (the playing track / total tracks),Mute,PBC,Repeat Mode,Elapsed
Time of the Playing Track .
Press the button again, the display menu fades out.
d) Loading and playing CD, CD-G, HD-CD, JPEG discs
Press OSD button once to show the first page:
Disc Type,Track * / * (the playing track / total tracks),Mute,Repeat Mode,Elapsed Time
of the Playing Track .
Press the button again, the display menu fades out.
8. Using the Search Feature (compatible with DVD, SVCD, VCD,CD discs)
You can use Search feature to select a title / chapter / track number or go to a specific point in
a title. Firstly, press Goto button on the remote controller to bring up the search menu
and enter the edit state; Secondly, press Arrow buttons to highlight the title / chapter / track
number or the time option; Thirdly, use Numeric buttons to enter the title / chapter / track you
want to play or the elapsed time you want to go to in that title; At last, press Enter button to
start playback. For example, entering 01:23:56 will start playback one hour, twenty-three
minutes and fifty-six seconds into the title. If the input number is invalid, the error information
INVALID KEY will be displayed on the screen.
Notes
I. This feature does not work in Program Play mode.
II. If PBC is on, it will turn off automatically when Search Playback starts.
III. When playing JPEG discs, Search Feature does not work.
9. Changing the Soundtrack (compatible with VCD,CD discs)
Press the Audio button to display current soundtrack.
a) Press the button can switch soundtracks.
b) Press the button again on the remote to turn to next soundtrack.
I. When playing a VCD disc, there are three soundtracks: Stereo (L/R), L/L, R/R .
With each consecutive press of the button, the soundtrack switches. If you press the button
four times, soundtrack cycles back to Stereo.
9
Notes:
When playing a dual-language VCD movie disc, press the Audio button to select the
desired language.
10. Changing the Audio Language (compatible with DVD, SVCD discs)
During disc playback, press Audio button on the remote once, and the audio language info banner
appears. When a DVD or SVCD is recorded with multiple soundtracks, you can use the Language feature to temporarily change the audio language (the language of the soundtrack) There
are 8 supported languages: Chinese, English, Japanese, French, Spanish, Portuguese, German
and Latin(Italian). With each consecutive press of the Language button, the audio language
switches and the corresponding serial number appears on the screen. For example, Language
Icon: [1 English 6CH] or [Off] (the availability of the languages are disc-dependent).
11. Subtitles (compatible with DVD, SVCD discs)
Press the Subtitle button on the remote once, and the subtitle info banner appears. When a
DVD or SVCD is recorded with subtitles, you can use the Subtitle feature to view the subtitles on screen. By default, subtitles are off. The info banner will display Subtitle Off. To
display subtitles, press the Subtitle button again. The default language with its corresponding serial number will be displayed in the info banner and subtitles will be displayed in that
language. There are 8 supported subtitles: Chinese, English, Japanese, French, Spanish,
Portuguese, German and Off. With each consecutive press of the Subtitle button, the
subtitle switches. For example, Language Icon:
[1 English 6CH] or [Off] (the availability of the subtitles are disc-dependent). To turn
subtitles off, press the Subtitle button until Subtitle Off is displayed.
12. Changing the Camera Angle (compatible with DVD discs)
During disc playback, press Angle button on the remote once, and the angel icon appears.
Some DVDs contain multiple angles of a particular scene or sequence, so you can use the
Angle feature to view.Press the Angle button again to go to the next camera angle. If multiple
camera angles are available, the Angle icon displays the current angle number and the
number of angles available. For example: Angle Icon: [* / *] or [Off] ; 1 / 4 indicates that
angle one is being displayed, and there are four different angles available. (This feature is
disc-dependent. If no additional camera angles are available, the Invalid Key will be
displayed.)
13. Changing the TV System (compatible with DVD, SVCD, VCD, CD, JPEG discs)
Press N/P button on the remote to display current TV system. Press the N/P button again to
change to the next TV system. There offers four systems: NTSC, PAL, PAL60, and AUTO.
With each consecutive press of the N/P button, the TV system switches. If you press the
button five times, the TV system cycles back.
Notes:
If AUTO TV system selected, it can auto reach the highest definition depends on the disc.
If it isn't full screen state (note: Wide Screen program would never reach full screen state)
or in black and white, press the N/P button to adapt TV System to the TV set of NTSC or PAL.
When playing in different TV system, some discs may not have their features entirely fulfilled
in certain standard.
Auto System of TV set is recommended.
10
14. Mute the Audio Output (compatible with DVD, SVCD, VCD, CD discs)
Pressing the Mute button allows you to reduce sound to an inaudible level, and MUTE will be
displayed on screen. Press the button again or press the Vol +/- button to return to the normal
condition.
Notes:
When mute, the microphone also has no audio output.
If the player playback disc without sound, please try to press Mute button to resume.
15. Zoom In the Video Image (compatible with DVD, SVCD, VCD, JPEG discs)
a) The Zoom Function allows you to enlarge or zoom out the video image and to pan though the
image. Press Zoom button repeatedly to activate the function and choose the required zoom factor:
Zoom 2, Zoom 3, Zoom 4, Zoom 1/2, Zoom 1/3, Zoom 1/4, Zoom Off.
Notes:
This feature does not work when the Disc Menu appears.
b) Use the Arrow buttons to pan across the screen when the zoom factor is 2, 3 or 4.
16. Repeat a Specific Segment on the Disc that You Define (compatible with DVD, SVCD,
VCD, CD discs)
a) During the normal or fast motion playback, press the A-B button once, and REPEAT Awill appears on the screen. This indicates the start of the loop to be repeated.
b) During the normal of fast motion playback, press A-B button again, and REPEAT A-B
will appears on the screen. It indicates the end of the loop.
Looping will run from set point A to set point B until you turn off Repeat.
C) Press A-B button again to cancel A-B loop mode.
When playing a SVCD, VCD, or CD disc, you can repeat a specific segment only in one
track. When the next track begins, A-B repeat turns off automatically.
When playing a DVD disc, you can repeat a specific segment only in one title / chapter.
17. Volume control (compatible with DVD, SVCD, VCD, CD discs)
You can press the Volume button on the front of TV set or the amplifier to control the
sound level.
Pressing the Vol+ button on the remote allow you to amplify the sound level; Pressing
Vol- will reduce the sound level.
Notes:
During DVD PCM output playback, this feature does not work.
18.Reset button
Press Reset button on the remote control,this option will resume the original settings
of this machine.
11
Chapter 3 Playing MPEG 4/JPEG discs
3
Arrow button
Enter button
Arrow button
12
Chapter 4 The Setup Menu System
1. General Steps of Setup Menu
a) Press the Setup button, the main setup menu appears.
When the main menu displayed, the DVD system will auto pause.
SYSTEM SETUP
TV SYSTEM
SCREEN SAVER
VIDEO
TV TYPE
PASSWORD
RATING
DEFAULT
EXIT SETUP
b) Press the Left and Right arrow buttons to highlight the icon of the desired page, then press
the Down or Right arrow button to activate that page; For example, if you want to setup the
video page, press Right arrow button to highlight the video icon, the video page will be
displayed on the screen.
VIDEO SETUP
BRIGHTNESS
CONTRAST
HUE
SATURATION
EXIT SETUP
c ) Press the Down arrow button to highlight the desired option. Press Enter button or press
Right arrow button to select, the choices of that option appear on the right; For example, press
the Down arrow button to highlight the BRIGHTNESS option, then press Enter button to select,
the brightness choices appear on the right.
VIDEO SETUP
12
10
8
6
4
2
0
BRIGHTNESS
CONTRAST
HUE
SATURATION
EXIT SETUP
d) Press the Arrow buttons to highlight the Exit Setup option, then press Enter button or Setup
button again to exit Setup Menu.
Notes:
When setup, the pressing of the following buttons will turn off the setup menu, while
the choices that have been changed will be saved: N / P, Subtitle, F.F, F.R, Vol +/-, PBC,
Title/Return, Play, Stop, Pause , Step, Next, Prev, Zoom, Goto, Program, Repeat, A-B,
Angle, Audio, OSD, Mute, Setup.
13
2. Setup Items Introduction
a) SYSTEM SETUP
The system setup options are illustrated below:
TV SYSTEM
According to the Color System of the TV, you can choose the TV System.
AUTO: Choose this settings if your DVD player is connected to a multi-system TV.
NTSC: Choose this settings if your DVD player is connected to a NTSC TV.
PAL: Choose this settings if your DVD player is connected to a PAL TV.
PAL60: Choose this settings if your DVD player is connected to a PAL60 TV.
SYSTEM SETUP
NTSC
PAL 60
PAL
AUTO
TV SYSTEM
SCREEN SAVER
VIDEO
TV TYPE
PASSWORD
RATING
DEFAULT
EXIT SETUP
SCREEN SAVER
If the screen saver is on, when your DVD player is in Stop, Open, or No Disc state, or there
is a frame frozen for more than 180sec, the screen saver will be displayed. This feature can
protect the screen from damage.
ON: Choose this setting to activate the screen saver.
OFF: Choose this setting to cancel the screen saver
SYSTEM SETUP
TV SYSTEM
SCREEN SAVER
VIDEO
TV TYPE
PASSWORD
RATING
DEFAULT
ON
OFF
EXIT SETUP
VIDEO
P-SCAN YPBPR: Choose this setting if your DVD player is connected to a progressive scan TV
with Y, Pb, Pr video cables.
Interlace-YUV: Choose this setting if your DVD player is connected to a TV with Y, Cb, Cr
video cables.
S-VIDEO: Choose this setting if your DVD player is connected to the TV with S-VIDEO cable
14
SYSTEM SETUP
TV SYSTEM
SCREEN SAVER
VIDEO
TV TYPE
PASSWORD
RATING
DEFAULT
S-VIDEO
INTERLACE-YUV
P-SCAN YPBPR
EXIT SETUP
TV TYPE
16 : 9 (Wide Screen): Choose this setting if your DVD player is connected to a wide screen TV. If
you choose this setting and you don't have a wide screen TV, the images on the screen may appear
distorted due to vertical compression.
4 : 3 LB (Letter Box): Choosing this setting if your DVD player is connected to a normal ratio TV
connector. You'll see the movies in their original aspect ratio (height-to-width ratio). You'll see the
entire frame of the movie, but it will take up a smaller portion of the screen vertically.
The movie might appear with black bars at the top and bottom of the screen.
4 : 3 PS (Pan & Scan): Choosing this setting if your DVD player is connected to a normal ratio TV.
You can fill the movie to the entire screen of your TV. This might mean that parts of the picture (the
left and right edges) won't be seen.
Notes:
The image display ratio is related to the recorded disc format. Some disc can not display images in
the aspect ratio you choose.
If you play a disc recorded in 4:3 format on a wide screen TV, black bars will appear on the left and
right side of the screen.
You must adjust the screen setting depending on the type of the television you have.
SYSTEM SETUP
TV SYSTEM
SCREEN SAVER
VIDEO
TV TYPE
PASSWORD
RATING
DEFAULT
4:3PS
4:3LB
16:9
EXIT SETUP
PASSWORD
The password option is initially locked, and you cannot set the ratings limit or change the password.
In order for the Ratings feature work, the password mode must be turned on. If you want to set the
ratings limit, you will need to enter the default password, which is 8888, then press Enter button to
confirm. To change the password, you will be prompted for the old password, then be prompted for
a new. Enter a 4-digit number (this is your password).
SYSTEM SETUP
TV SYSTEM
SCREEN SAVER
VIDEO
TV TYPE
PASSWORD
RATING
DEFAULT
EXIT SETUP
15
RATING
The Rating feature is a rating limit system, like movie ratings. It works with DVD discs that
have been assigned a rating. This helps you control the types of DVDs that your family watches.
Notes:
If the password option is locked, you cannot set the ratings limit; the rating limit does not
work when the password option unlocked.
SYSTEM SETUP
TV SYSTEM
SCREEN SAVER
VIDEO
TV TYPE
PASSWORD
RATING
DEFAULT
1 KID SAFE
2G
3 PG
4 PG13
5 PG-R
6R
7 NC-17
8 ADULT
EXIT SETUP
DEFAULT
you can choose RESTORE in DEFAULT menu.
RESTORE: Restores the original factory settings.
SYSTEM SETUP
TV SYSTEM
SCREEN SAVER
VIDEO
TV TYPE
PASSWORD
RATING
DEFAULT
RESTORE
EXIT SETUP
b) LANGUAGE SETUP
The language setup options are illustrated below:
OSD LANGUAGE
Highlight the OSD LANGUAGE option, and press the Arrow buttons to choose the OSD
language you prefer. Press Enter button to confirm, and it will display OSD in that language.
LANGUAGE SETUP
OSD LANGUAGE
AUDIO LANG
SUBTITLE LANG
MENU LANG
ENGLISH
FRENCH
EXIT SETUP
16
AUDIO LANGUAGE
Highlight the AUDIO LANG option, and press the Arrow buttons to choose the audio
language you prefer. Press Enter button to confirm. If the disc you are playing has that language
available, it will output audio in that language.
LANGUAGE SETUP
OSD LANGUAGE
AUDIO LANG
SUBTITLE LANG
MENU LANG
EXIT SETUP
CHINESE
ENGLISH
JAPAN
FRENCH
SPANISH
PORTUGUESE
LATIN
GERMAN
SUBTITLE LANGUAGE
Highlight the SUBTITLE LANG option, and press the Arrow buttons to choose the subtitle
language you prefer. Press Enterbutton to confirm. If the disc you are playing has that language
available, it will displays subtitles in that language
LANGUAGE SETUP
OSD LANGUAGE
AUDIO LANG
SUBTITLE LANG
MENU LANG
EXIT SETUP
CHINESE
ENGLISH
JAPAN
FRENCH
SPANISH
PORTUGUESE
GERMAN
OFF
MENU LANGUAGE
Highlight the MENU LANG option, and press the Arrow buttons to choose the menu language you prefer. Press Enter button to confirm. If the disc you are playing has that language available,
it will displays menu in that language; There are 8 optional menu languages.
Notes:
If your preferred language isn't available, the disc's default language will be played.
LANGUAGE SETUP
OSD LANGUAGE
AUDIO LANG
SUBTITLE LANG
MENU LANG
EXIT SETUP
CHINESE
ENGLISH
JAPAN
FRENCH
SPANISH
PORTUGUESE
GERMAN
LATIN
17
c) AUDIO SETUP
The audio setup options are illustrated below:
AUDIO OUT
Highlight the AUDIO OUT option, and press the Arrow buttons to choose the audio output
mode you prefer. Press Enter button to confirm; There are 3 optional audio output modes:
SPDIF/OFF, SPDIF / RAW, and SPDIF/ PCM.
SPDIF/ RAW: Choose this setting if your DVD player is connected to a power amplifier
with a coaxial cable or an optical cable; When playing a disc recorded with Dolby Digital,
and MPEG audio formats, the corresponding digital signals will be output from the
Coaxial Output jack or Optical Output jack. This player's digital output jacks are designed
for a connection to a Dolby Digital, or MPEG receiver or decoder. For the CD there
is no RAW output only PCMoutput
SPDIF / PCM: Choose this setting if your DVD player is connected to a 2-channel digital
stereo amplifier; When playing a disc recorded with Dolby Digital and MPEG audio formats,
audio signals will be modulated into a 2-channel PCM signal, and it will be output from the
Coaxial Output jack or Optical Output jack.
AUDIO SETUP
AUDIO OUT
SPDIF/OFF
SPDIF/RAW
SPDIF/PCM
EXIT SETUP
d) VIDEO SETUP
The video setup options are illustrated below:
BRIGHTNESS
Use the Up and Down arrow button to move the scroll and adjust the brightness.
VIDEO SETUP
12
10
8
6
4
2
0
BRIGHTNESS
CONTRAST
HUE
SATURATION
EXIT SETUP
CONTRAST
Use the Up and Down arrow button to move the scroll and adjust the contrast.
VIDEO SETUP
12
10
8
6
4
2
0
BRIGHTNESS
CONTRAST
HUE
SATURATION
EXIT SETUP
18
HUE
Use the Up and Down arrow button to move the scroll and adjust the hue.
VIDEO SETUP
+6
+4
+2
0
-2
-4
-6
BRIGHTNESS
CONTRAST
HUE
SATURATION
EXIT SETUP
SATURATION
Use the Up and Down arrow button to move the scroll and adjust the saturation.
VIDEO SETUP
12
10
8
6
4
2
0
BRIGHTNESS
CONTRAST
HUE
SATURATION
EXIT SETUP
e) SPEAKER SETUP
The speaker setup options are illustrated below:
DOWNMIX
Use the Up and Down arrow button to move the scroll and adjust the saturation.
LT / RT: Choose this setting, it will be sound like in a movie theatre if the original movie
the disc was recorded from was encoded in the Pro Logic Dolby Digital format.
STEREO: Choose this setting, when 5.1-channel sound playing, two channels of signals
will be output from the left and right soundtrack; when 2-channel sound playing, stereo
signal will be output.
VSS: Choose this setting, when a disc recorded with 5.1-channel sound format playing,
the fictitious surround soundtracks effect will be heard from the main soundtrack.
5.1 CH: Choose this setting to output the 5.1-channel sound.
SPEAKER SETUP
DOWNMIX
SUBWOOFER
CENTER DELAY
REAR DELAY
BASS MODE
LT/RT
STEREO
VSS
5.1 CH
EXIT SETUP
19
SUBWOOFER
There are two settings in this option: OFF / ON. When ON is chosen, the player will auto
detect the subwoofer input then output it. When OFF is chosen and the subwoofer input
will not be output. In PLG (Pro Logic) mode, the subwoofer will not be output.
SPEAKER SETUP
DOWNMIX
SUBWOOFER
BASS MODE
CENTER DELAY
REAR DELAY
OFF
ON
EXIT SETUP
BASS MODE
There are two settings in this option: ON, OFF
SPEAKER SETUP
DOWNMIX
SUBWOOFER
BASS MODE
CENTER DELAY
REAR DELAY
ON
OFF
EXIT SETUP
CENTER DELAY
You can adjust center delay in this option.
SPEAKER SETUP
DOWNMIX
SUBWOOFER
BASS MODE
CENTER DELAY
REAR DELAY
EXIT SETUP
20
+
4MS
2MS
0MS
REAR DELAY
You can adjust rear delay in this option.
SPEAKER SETUP
DOWNMIX
SUBWOOFER
BASS MODE
CENTER DELAY
REAR DELAY
+
12MS
6MS
0MS
EXIT SETUP
f) DIGITAL SETUP
The audio setup options are illustrated below:
OP MODE
LINE OUT: Choose this setting to line out the input signal. It will be more suitable for playing
in the night time, for the output volume is low.
RF REMOD: It will be more suitable to choose this setting for playing in the day time, for the
output volume is high.
DIGITAL SETUP
OP MODE
DYNAMIC RANGE
DUAL MONO
LINE OUT
RF REMOD
EXIT SETUP
DYNAMIC RANGE:
When LINE OUT is selected, choose this setting to adjust the line out ratio and get
different effect. If adjusting to FULL, the audio signal peak value will be the minimum;
while adjusting to OFF, maximum.
NOTE:
This option will be validated when the DOWNMIX OFF.
DIGITAL SETUP
OP MODE
DYNAMIC RANGE
DUAL MONO
FULL
6/8
4/8
2/8
OFF
EXIT SETUP
21
DUAL MONO (LEFT + RIGHT)
Choose to setup the L and R mono output mode. There are four modes in this
option:
STEREO, MONO L, MONO R and MIX MONO.
DIGITAL SETUP
OP MODE
DYNAMIC RANGE
DUAL MONO
EXIT SETUP
STEREO
MONO L
MONO R
MIX MONO
REFERENCE:
To protect your DVD player, the interval between two consecutive Power button operations must be above 30 seconds.
Not using for a period of time, please pull out the plug from the electric outlet.
The player should be operated only on the condition that the type of power supply corresponds to the marking label. Otherwise, it doesn't work or could even be damaged.
The player may not be compatible with some encrypted discs.
If the player stops playback by accident, please power it on again.
22
Function of Karaoke
1. connecting to microphone
Please insert your microphone to the MIC Jack on the rear panel .
2.Adjust the MIC volume through adjusting the volume of TV set or amplifier.
USB
SD/MS/MMC CARD `S PLAY
USB SD/MS/MMC card socket function:
This DVD player can compatible with the playing function of USB flash disc,SD/MS/MMC
card.
When there is no disc in the tray,this DVD player will auto identify and play the audio
and video files stored in USB,SD/MS/MMC card when you connect them to the
corresponding port.The DVD player will remind the user to play selectively if there have
one or more title or chapter to play in the USB,SD/MS/MMC card.Its playing format
is the same as the disc`s playing operation .(Please refer to playing operation parts in this
manual book.)
The file format stored in the USB,SD etc card should be the same as the DVD disc for this
DVD player.
DVD1084 DVD/VCD/CD PLAYER
POWER
SD Card/Memory Stick
Multi Media Card
SD/MS/MMC
USB Socket
USB
23
Disc maintenance
Disc protection:
Take the disc both by the hole in the center and the brim;
No paper shall be adhered to surface of disc ;
Disc must be kept clean;
Disc must be cleaned with soft cotton regularly by directing from disc center outside.
Specifications:
Type of video disc: MPEG 4/DVD/SVCD/VCD/JPEG/CD/CD-R/MP3
Signal output:
Video:1.0Vp-p
Mix stereo 1.8 Vp-p.
Video Output :
RCA videooutput
S-Video output
Component output (Y,Pb/Cb,Pr/Cr)
Audio Output :
Audio RCA 5.1 output (Front R/L-Surr R/L-Center-SW)
Digital Audio Output :
Voltage:
Coaxial RCA-Optical(for Dolby Digital decoder)
100V-240V AC 50/60Hz
Consuming power: 25W
Frequency response: CD *4Hz--20KHz(EIAT) DVD:4Hz--22KHz(48K)(sampling)
4Hz--44KHz(96K)(sampling)
S/N:
>90 db
THD:
0.003%
Accessories:
RCA cable, infrared ray remote controller, user manual,
1.5V AAA batteries x 2.
(No advanced notification shall be advised regarding changes of design, specifications & tech
parameters due to constant product improvement)
Notice:
1. Manufactured under license from Dolby Laboratories. Dolby and the double-D symbol are
trademarks of Dolby Laboratories.
2. This Product incorporates copyright protection technology that is protected by method claims
of certain U.S. Patents and other intellectual property rights owned by Macrovision Corporation
and other rights owners. Use of this copyright protection technology must be authorized by
Macrovision Corporation, and is intended for home and other limited viewing uses only unless
otherwise authorized by Macrovision Corporation. Reverse engineering or disassembly is
prohibited.
24