1
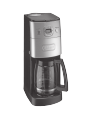
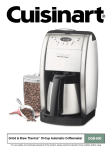
Grind & Brew Automatic DGB625BCU Congratulations on your purchase of the Cuisinart Grind & Brew Automatic. For over 30 years Cuisinart’s aim has been to produce the very finest kitchen equipment so that cooks at home as well as professional chefs have the tools to express their creativity. All Cuisinart products are engineered for exceptionally long life, and designed to be easy to use as well as to give excellent performance day after day. That is why they have come to be regarded as the defining machines in their field by chefs across the world. To learn more about new products we are launching, register for our free Cuisinart newsletter, simply visit our website www.cuisinart.co.uk and refer to the club section. Cuisinart, technology with taste. 3 Contents Product Description Safety Cautions . . . . . . . . . . . . . . . . . . . . . . . . . . . . . . . . . . . . . . . . . . . . . . . . . . . . . . . . . . . . . . . . . . . . . . . . . . . . . . . . . . . . . . . . Unpacking Instructions . . . . . . . . . . . . . . . . . . . . . . . . . . . . . . . . . . . . . . . . 5 6 8 Instructions for Use . . . . . . . . . . . . . . . . . . . . . . . . . . . . . . . . . . . . . . . . . . 8 A Setting the Clock . . . . . . . . . . . . . . . . . . . . . . . . . . . . . . . . . . . . . . . . . . . . . . 8 B Setting the Programme Time . . . . . . . . . . . . . . . . . . . . . . . . . . . . . . . . . . . . . 9 C Inserting Charcoal Water Filter . . . . . . . . . . . . . . . . . . . . . . . . . . . . . . . . . . . 10 D Preparing to Brew . . . . . . . . . . . . . . . . . . . . . . . . . . . . . . . . . . . . . . . . . . . . . 11 E Grinding & Brewing the Coffee . . . . . . . . . . . . . . . . . . . . . . . . . . . . . . . . . . . 14 F Brewing 1-4 Cups . . . . . . . . . . . . . . . . . . . . . . . . . . . . . . . . . . . . . . . . . . . . . 16 G Brewing Coffee with Pre-ground Beans . . . . . . . . . . . . . . . . . . . . . . . . . . . . . 16 Cleaning & Maintenance UK Guarantee . . . . . . . . . . . . . . . . . . . . . . . . . . . . . . . . . . . . . . . . . . . . . . . 19 UK After Sales Service 4 . . . . . . . . . . . . . . . . . . . . . . . . . . . . . . . . . . . . . . . 17 . . . . . . . . . . . . . . . . . . . . . . . . . . . . . . . . . . . . . . . . 20 Product Description Grind Chamber Reservoir Cover with Release Button Control Panel Filter Compartment Filter Compartment Release Button (not shown) Water Reservoir with Water Level Indicator Glass Carafe Warming Plate 5 Safety Cautions Read all the instructions before using the appliance and keep in a safe place for future reference. Always follow these safety cautions when using this appliance to avoid personal injury or damage to the appliance. This appliance should be used only as described within this instruction book. Do not immerse the housing unit in water or any other liquid or put it in a dishwasher. Never pull the plug out of the mains socket by the lead. Do not allow the lead to overhang the edge of the table or work surface. Do not allow lead to touch hot surfaces. This appliance should not be used by adults or children whose lack of experience, product knowledge or disability might cause a hazard, unless they have been correctly instructed and are adequately supervised. Children should always be supervised to ensure that they do not play with this product. Do not use this appliance if the lead is damaged. In the event of damage the lead must be replaced by a specialist lead available from the manufacturer or its service agent (see “UK After Sales Service” section). Do not use the appliance if it has fallen or shows signs of damage. Discontinue use immediately (see “UK After Sales Service” section). No repair can be carried out by the user. Return the appliance to the ‘Cuisinart Service Centre’ for inspection and repair or replacement (see “UK After Sales Service” section). 6 Use this appliance for grinding coffee beans as described within the instructions for use which accompany it. Please retain these for future reference. For indoor use only. For domestic use only. Always ensure that your hands are dry before removing the plug from the mains outlet. This appliance complies with the basic requirements of Directives 04/108/EEC (Electromagnetic Compatibility) and 06/95/EEC (Safety of domestic electrical appliances). Do not use any attachments other than those recommended or sold by Cuisinart. WARNING: A cut off plug inserted into a 13 amp outlet is a serious safety (shock) hazard. Ensure the cut off plug is disposed of safely. WARNING: Polythene bags over the product or packaging may be dangerous. To avoid danger of suffocation, keep away from babies and children. These bags are not toys. The symbol on the product or on its packaging indicates that this product may not be treated as household waste. Instead it should be handed over to an appropriate collection point for the recycling of electrical and electronic equipment. By ensuring this product is disposed of correctly, you will help prevent potential negative consequences for the environment and human health, which could otherwise be caused by inappropriate waste handling of this product. For more detailed information about the recycling of this product, please contact your local council office or your household waste disposal service. 7 Unpacking Instructions Place the box on a large, sturdy flat surface. Remove the instruction booklet and any other literature. Turn the box so that the back of the coffeemaker is down and slide the coffeemaker from the box. Remove scoop and charcoal water filters located in front of the unit. After the coffeemaker has been removed, place the box out of the way and lift off the left and right polyfoam inserts. Grasp the carafe by its handle, remove it from the warming plate and remove the polybag. Remove the polybag covering the coffeemaker. Save all packing materials in case you have to ship the machine in the future. KEEP ALL PLASTICS BAGS AWAY FROM CHILDEN. Instructions for use A Setting the Clock N.B. When the coffeemaker is plugged in, 12:00 will appear until you set the time. Entering the Time Set Mode Hold down the “Hours” or “Minutes” button until the clock begins flashing. Press either button to select the desired time. Hold buttons down to scroll through the digits or press and release to advance one digit at a time. 8 N.B. When scrolling, the numbers will advance slowly and then speed up. When the number displayed approaches the desired time, press and release to advance one digit at a time. N.B. Be sure the PM indicator is on if a PM time is desired. Exiting the Time Set Mode Press any function button besides “Hours” or “Minutes” to exit mode. If you do nothing for a period of five seconds the mode will be exited. B Setting the Programme Time N.B. When you press the programme button, it displays a previously auto-on time, or default time (12:00pm). Entering Set Programme Time Mode Press and hold the “Programme Set” button until the green light and LCD display begin to flash. You are now in Set Programme Time Mode. Set the time you want coffee to begin brewing by following the instructions in “Entering Time Set Mode”. The coffeemaker will start to brew at the programmed time. N.B. The programme mode cannot be entered if the coffeemaker is in its brew cycle. 9 Exiting Set Programme Time Mode Press and release “Programme Set” button. Press any function besides “Hours” or “Minutes” to exit mode and activate the selection function. N.B. If you do nothing for a period of five seconds the mode will be excited. C Inserting Charcoal Water Filter .B. Your appliance comes with two charcoal water filters that eliminates chlorine, bad tastes N and odours from tap water. It is recommended that you change your water filter every 90 days or after 90 uses and more often if you have hard water. Replacement filters can be purchased directly from the manufacturer, (see “UK After Sales Service” section). Remove the filter from its packaging and soak it, fully immersed, in cold tap water for 15 minutes. 10 Lift the water filter holder out of the water reservoir. Press down on the filter compartment and pull toward you to open. Place filter into the holder and snap it closed. N.B. Caution must be used when inserting the charcoal filter. Improper placement can tear the filter skin. Flush filter by running cold tap water through holes in bottom of compartment for 10 seconds. Allow the filter to drain completely. Slide the water filter holder back into the channel in the water reservoir, pushing it down to the base of the unit. D Preparing to Brew N.B. Before making coffee for the first time, we recommend operating the appliance once, using only water, to remove any dust or residue that may remain in the system from the manufacturing process. Adding the Water and Coffee Beans Open the reservoir cover and pour in water using the water level window indicator to measure the number of cups desired. N.B. Do not exceed the 12 cup line. Doing so could cause the carafe to overflow. 11 Lift the grinder basket lid using the recess on either side. Fill the basket with the desired quantity of beans. Grinder basket lid Reservoir cover Grinder basket Water filter holder Water reservoir N.B. Use 1 level scoop of whole beans per cup. For 1 to 4 cups, use 1½ level scoops per cup. Do not add more than 14 scoops. This could cause the grinder to malfunction and/or the coffeemaker to overflow. Press down reservoir cover to lock. N.B. The appliance is equipped with a safety interlock system, which prevents the unit from operating if the cover is open or the grinder cover is left out. If you try to turn the unit on with the cover open, the unit will beep continuously until the missing parts are installed and you close the lid. If you open the cover during the grinding process, it will beep, the grinder will stop grinding and if brewing, the brewing will stop. Once the missing parts are in place and the cover is closed, the beeping stops. The brewing process can be restarted by pressing the “On/Off” button. 12 Restarting the process will not affect coffee results. If you do not want the grinder to come on again, press the “Grind Off ” button before pressing the “On/Off” button. Inserting the Coffee Filter Press the filter basket door release button to open door. Place the Gold Tone Filter into the filter basket. N.B. Ensure that the filter handle is facing away from the grinder basket, so it does not interfere with the flow of ground coffee into the filter basket. Put filter basket lid in place and close the filter door. Filter basket lid Gold tone filter Filter basket 13 The Glass Carafe To position the lid before brewing, insert the front tabs of the lid towards the pouring spout and push down at the rear until it clicks into place. Place the glass carafe with its lid on, onto the warming plate, you are now ready to brew. To remove the lid, un-clip the lid from the back and lift off. E Grinding & Brewing the Coffee Now the coffee machine is ready to grind and brew. Immediate Brewing To start the appliance immediately, press “On/Off” button. The Red LED will illuminate and brewing will begin. Programmed Brewing To set the appliance to start at a programmed time, refer to “Set Programme Time” in section B. 14 Brewed Coffee When the brewing cycle has completed, 5 beeps will sound and the unit will automatically shut itself off. Coffee will continue to stream from the filter for several seconds. The brew-through, pour through lid allows coffee to drip from the appliance through the closed lid. When brewing is complete, the lid seals itself with a valve so air stays out and coffee freshness and temperature are maintained. There is no need to turn or adjust the lid before pouring. The Coffee will be kept warm for up to 2 hours, after 2 hours, the unit will automatically shut itself off. Caution: the glass carafe will be hot, take care when pouring hot coffee The “Brew Pause” feature interrupts the flow of coffee from the basket to let you pour your first cup mid-brew. .B. Whilst we offer this feature for your convenience, we do not recommend that you pour N coffee before the cycle has reached completion, since the coffee brewed at the beginning of the cycle has a very different flavour profile to that made at the end of the cycle. Removing a cup during the cycle will alter the flavour of the finished pot. WARNING: Removing the carafe for more than 20 seconds may cause the filter basket to overflow. 15 F Brewing 1-4 Cups This function brews the coffee at a slower rate to extract maximum flavour from the coffee for a more rounded flavour in just 1-4 cups. Add 1½ scoops of coffee beans per cup to the grinder basket and fit the grinder lid. Pour 1-4 cups of water into the reservoir and close the lid. Press the 1-4 cups button, followed by the “On/Off” button and brewing will begin. G Brewing Coffee with Pre-ground Beans This appliance can also brew coffee using pre-ground beans. We recommend using 1 level scoop of ground coffee per cup. N.B.The maximum capacity for ground coffee is 16 scoops. Exceeding this may cause the appliance to overflow. Scoop the ground coffee into the gold tone filter. Place the filter basket lid in place and close the filter compartment door. Add the water as described in section D “Preparing to Brew”. Prepare the carafe as previously described in section D “Preparing the Carafe”. Plug the appliance into a suitable mains socket. For instant brewing press On/Off, for programme brewing set the timer as described in section B “Setting the Programme Time”. Turn off the grinding function, by pressing the “Grind Off” button, an amber light will illuminate, then press the “On/Off” button and brewing will begin. 16 Cleaning & Maintenance Always clean and dry all parts after every use. Always turn the appliance off and remove the plug from the mains outlet before cleaning. Open the reservoir lid. Remove the grinder basket lid by using the recessed area on each side of the lid. Then remove the grinder basket. Open filter basket door and remove filter basket cover, gold tone filter and filter basket holder. The grinder basket, grinder basket lid, gold tone filter, filter basket and filter basket lid can be washed in warm soapy water and rinsed thoroughly or cleaned in the upper rack of the dishwasher. Dry all parts after every use. The reservoir lid can also be removed for easy cleaning. Open the lid 60° and gently pull toward you. To replace, reverse steps. Do not put any water in the unit once the grinder basket has been removed. Wipe the area under the grinder basket with a damp cloth. If water gets into the grinder motor, the motor may become damaged and may malfunction. Once clean and dry, replace all the parts. Remove the carafe from the resting plate. Discard any remaining coffee. The carafe and lid can be washed in warm soapy water and rinsed thoroughly, or placed in a dishwasher, on the upper rack only. Do not use scouring agents or harsh cleaning agents on any part of the appliance. Never immerse the main housing unit in water or other liquid. To clean the base, simply wipe with a clean damp cloth and dry before storing. Wipe the resting plate with a clean, damp cloth. Never use rough, abrasive material or 17 harsh cleaning agents to clean the resting plate. Do not dry the inside of the water reservoir with a cloth as lint may remain. De-scaling Always use the charcoal water filters provided and replace on a regular basis (i.e. every 90 days or after 90 uses). It is strongly recommended that you de-scale the appliance from time to time. The frequency depends upon the hardness of your tap water and how often you use the appliance. To De-scale Fill the water reservoir completely with a mixture of 1/3 white vinegar and 2/3 water and switch the appliance on. One cycle should be sufficient to descale the appliance. Once the cycle has been completed and 5 beeps sound, switch the appliance off. Repeat the cycle once more using cold tap water. 18 UK Guarantee This Cuisinart appliance is guaranteed for domestic consumer use for 3 years. The guarantee covers defects under normal use from date of purchase and ceases to be valid in the event of alteration or repair by unauthorised persons. If the appliance does not perform satisfactorily due to defects of material or manufacture, it will be repaired or replaced by the manufacturer (see “UK After Sales Service” for details). This guarantee is only valid in the United Kingdom and Eire (includes Channel Islands and Isle of Man). No responsibility will be accepted for any damage caused in transit. A charge may be made if goods are returned outside the relevant guarantee period or if the product is returned unnecessarily. The manufacturer reserves the right to amend terms and specifications without prior notice. This guarantee in no way affects your statutory rights. 19 UK After Sales Service For further advice on using your Cuisinart Grind & Brew Automatic and other products in the Cuisinart range, contact the Cuisinart Customer Care Line on 0870 240 6902 (09:00 to 17:00 hrs Monday to Friday) or alternatively, email your enquiry to [email protected]. In Guarantee Firstly, please call the Cuisinart Helpline 0870 240 6902. Return the product to the Cuisinart Service Centre at the following address: Cuisinart Service Centre P.O. Box 506 WIGAN WN1 9AA Enclose your name and address, together with proof of purchase and details of the fault. Cuisinart will either repair or replace the product, as appropriate. Out of Guarantee Contact the Cuisinart Customer Care Line on 0870 240 6902 (09:00 to 17:00 hrs Monday to Friday) or, alternatively, email your enquiry to [email protected] for details of the 20 standard repair or replacement charge. If you wish to proceed with the repair or replacement, return the product to the Cuisinart Service Centre at the following address: Cuisinart Service Centre P.O. Box 506 WIGAN WN1 9AA Enclose your name, address and contact number along with details of the fault. 21 22 23 www.cuisinart.co.uk IB-10/089A