1
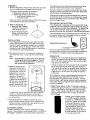
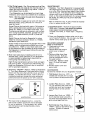
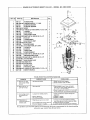
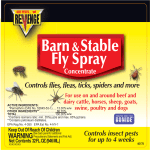
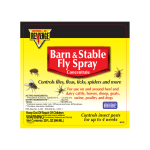
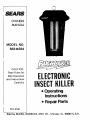
S _A/RS
OWNERS
MANUAL
MODEL NO.
833.14334
CAUTION:
Read Rules for
Safe Operation
and Instructions
Carefully
ELECTRONIC
INSECT
KILLER
• Operating
Instructions
• Repair Parts
i
557-5199
Sold by SEARS, ROEBUCK
AND
CO., Chicago, I L. _60684
U.S.A.
For Best Results, Read This Manual
Before Installing Your New Sears Bugwacker
Full One Year Warranty
If, within one year from the date of purchase, this electronic
workmanship, Sears will repair it free of charge.
insect killer fails due to a defect in materials or
Warranty service is available by simply returning your unit to the nearest Sears store or Service (_enter throughout the United States. This warranty gives you specific legal rights, and you may also have other rights which
vary from state to state.
Sears, Roebuck and Co.
Department 698/731A
Sears Tower, Chicago, IL 60684
RULES FOR SAFE USE OF BUGWACKER ®
Install the unit 6 to 8 feet above the ground to prevent children,.
pets and wildlife from coming in contact with it.
2
_
Use grounded 115/120 volt AC outlet and 3-wire grounded
extensioncord. For permanent installation check local codes
and consultan electrician or authoritative instruction book
b ef ore i nstaIli ng.
3. Never place fingersor hands,or insert any objects into the
unit while it is connected to electrical outlet.
Always disconnect the unit before servicing, handlingor
disassembling unit.
@
5. Clean dead insects from bottom of unit frequently to reduce
risk of fire.
Connect unit to properly
grounded outlet only.
Keep extension cord connections dry and off the ground.
t
Don't abuse power cord. Never carry unit by cord or yank
it to disconnect from receptacle.
Keep power cord from heat, oil and sharp edges.
_
_
ASSEMBLY
1. Remove Bugwacker from carton and check to make
sure no transportation damages have occurred.
The carton should contain the following:
1 - Bugwacker electronic bug killer
2 - Plastic bag containing the following:
1 - gold colored hanging ring
1 - threaded fitting
Save your carton and the cardboard fillers for storing
your Bugwacker during the off-season.
2. Refer to Illustration A.
A. Assemble the threaded
fitting (2) into gold colored hanging ring (1).
I
Appropriate extension cords and devices for retaining
an extension cord connection to the Bugwacker power
cord are available at your local Sears store. Replace or
repair damaged cords.
Your Bugwacker has a grounding plug that looks like the
plug shown below and is intended for use on a circuit
that has an outlet as shown below.
INSTALLATION
1. Your Bugwacker should be hung or post mounted
from a pole, bracket or post mounted from a pole,
bracket or post (available as accessories)at a height
of 6 to 8 feet above the ground. This is the flying
altitude for many types of light-sensitive insects and
will increase the unit's effectiveness.
2. Plug electrical cord into a three-wire grounded outdoor extension cord. Lamp will emit a soft bluish
glow.
A momentary arc may occur across the high
voltage grids when first plugged in. This-is
due to the surge of electricity.
It will stop
and resume normal operation.
3. Refer to Illustration B.
Placement of the unit is
essential to its maximum
effectiveness. Since the
Bugwacker is a luring
device, it should not be
located in the area intended for human activity.
It should be placed 25 to
50 feet away, and between
the source of insects (i.e.
woods, lowlands, etc.) arid
the areas to be protected.
Use only three-wire extension cords which have threeprong grounding type plugs and three-pole receptacles
which accept the products plug.
GROUNDING
INSTRUCTIONS
Your Bugwacker is equipped with an appropriate threeconductor cord and three-prong grounding type plug to
fit the proper grounding type receptacle. To reduce the
risk of electrical shock, plug must be plugged into an
appropriate outlet that is properly installed and grounded
B. Screw hanging ring and
fitting into hole in hood
and tighten until snug.
Note:
The electrical rating of the extension cord must be as
great as the electrical rating of your Bugwacker.
0 o
O
0
0 °
ARE,
O
INSECT
0
o
t
25-50
INSECT
KILLER
FT
1
ILLUSTRATION
B
If additional light is required in the area of human
activity, it should be provided by yellow light.
Studies have shown that insects are less attractive
to yellow light.
4. Sears Bugwackers are ideal for backyards, pools,
patios, summer homes, trailer homes, campgrounds,
marinas, outdoor recreational areas, gardens or anywhere flying insects are a problem.
EXTENSION CORDS
Outdoor extension cords must be used with this Bugwacker. Use extension cords marked SJW-A, or SJTW-A
and tagged "suitable for use with outdoor appliances".
Consult a qualified electrician or serviceman if the
grounding instructions are not completely understood,
or if doubt as to whether proper grounding exists.
OPERATION
1. General: Your new Sears Bugwacker is designed to
attract light-sensitive flying insects with black light,
and to kill them cleanly without the use of poisons,
fogs, sprays or chemicals.
Insects are drawn to the fluorescent bulb, and killed
by an electrostatic grid when they pass through it.
Thd insects do not have to actually touch the grid to
be killed. The moisture in their bodies is enough to
trigger the arc, so that even the tiniest of bugs are
eliminated.
The handsome, lantern-styled Bugwacker sheds a soft,
glowing decorative light which is harmless to your
eyes and costs only pennies a day to enjoy. The 70
watts of Black Light energy make this unit a powerful
insect killer that is ecologically safe, effective and economical to operate.
2. Night Flying Insects: Night flying insects such as
mosquitoes, gnats, moths, etc., respond to the black
light rays emitted by the Bugwacker's ultra-violet
bulbs. These insects are sensitive to light, and take
cover during the heat of day in grass,shrubs and
other foliage.
Skeeter Lure accessory Stock
no. 14305 manually operated
or Stock no. 14306 fully automatic with photo cell included.
4 times as effective in luring
and killing biting mosquitoes
than Bugwacker alone. Emits
moisture, heat and carbon
dioxide, which makes the mosquitoes respond to the light as
if a human were there.
3. Day Flying Insects: Day flying insects such as flies,
hornets, beetles and wasps do not respond mainly to
black light rays as do night flying insects, These insects respond more to odor.
Your Bugwacker can be equipped to attract these
insects by use of a bait tray available as an accessory.
Note:
Bait tray cannot be used when Bugwacker
I post mounted.
is
MAINTENANCE
1. Cleaning: Your Sears Bugwacker is equipped with
self-cleaning grids, and requires no special maintenance other than cleaning insect debris from the bottom of the unit. This should be done frequently
using a small brush or blower such as portable hair
dryer, or the exhaust attachment of a vacuum cleaner.
BE SURE TO UNPLUG THE UNIT BEFORE
CLEANING.
Hornets, beetles or wasps can be lured with bait consisting of honey, syrup, perfume or a mixture of
sugar and water
House Flies can be lured with meat or fish scraps or
with a special pheromone available as an accessory,
(Stock no. 14322), at your Sears retail store. This
fly pheromone acts as a sex attractant, and is effective in luring houseflies, blowflies, garbage flies and
many other types commonly found in yards and
barns.
Stable Flies can be lured to Bugwacker by using
stable fly attractant accessory (Stock no. 14323),
available at your Sears store.
Gypsy moths can be lured during daylight hours with
a gypsy moth sex pheromone available as an accessory (Stock no. 14321) at your Sears retail store. Use
of this pheromona also increases the effectiveness of
the Bugwacker in attracting and killing this pest during evening hours.
4. Most insect pests have a breeding cycle of ten to
fourteen days. Daily operation of your Bugwacker
is recommended to reduce insect population by
interrupting this breeding cycle.
Night flying insects become active at dusk and again
just prior to dawn. For maximum effectiveness, operate _/our Bugwacker 24 hours a day or use photocell for automatic operation.
5. Automatic "ON/OFF"
Feature: Refer to Illustration
C. Your Sears Bugwacker is equipped with a photoelectric cell that turns the butbON at dusk and OFF
at dawn. To activate this control, insert a pencil or
insulated screwdriver through the outer protected
screen and move the switch to the "ON" position.
@ ON
Photocell
Bait or collection trays, if used, should 'be emptied
often to reduce the risk of fire.
.
Bulb Replacement:
Bulb life is approximately
4500 hours. However, bulb should be replaced
every season to ensure maximum output
invisible ultra-violet, or "black light", frequency
range.
3. Store your Bugwacker indoors when not in use out of reach of children. Do not clean your Bugwacker with a water spray or the like.
BULB REPLACEMENT
Refer to Illustration D.
1. Disconnect unit from
electric source.
2. Depress latch and remove
plastic cover at base of
unit.
3. Remove rubber boot from
bottom of bulb. Bulb can
now be pulled down out of
the upper socket.
4. Insert bulb. Replace rubber
boot. Fit bulb into upper
socket.
5. Replace plastic cover and
secure latch.
ILLUSTRATION
ACCESSORI ES
Accessories available for your Bugwacker
1. Wall Bracket, Stock no. 1473 - a
welded steel bracket with a unique
locking feature to help prevent theft.
2. Lantern Pole, Stock no. 14301 - a
11/4inch diameter steel tube with a
welded steel scroll and a unique
locking feature to help prevent
theft.
,,,,,,, (__ 0FF
.
ILLUSTRATION
6. The insect
year-round
by rain or
sive arcing
disconnect
C
killer is designed and U.L. Listed for
outdoor use and will not be damaged
moisture. If, during heavy rain, excesoccurs and is objectionable, simply
unit.
,
Lantern Post, Stock no. 14302 - a
3-inch diameter steel tube with a
universal mounting adapter and a
gold colored eagle top trim.
Bait/Collection
Tray, Stock no.
14304 - snaps on and off for easy
removal. Durable all-weather
construction.
include:
D
SEARSELECTRONICINSECT
REF. NO.
1
2
3
4
5
6
7
8
9
10
11
12
13
14
15
16
17
18
19
20
21
22
23
24
25
26
27
28
29
30
31
PART NO.
KILLER
DESCRIPTION
554 722
HANGING
QTY.
1
RING
5
1
596 1565 P02 THREADED NIPPLE, 1" LONG
NEOPRENE WASHER
567 420
596 784
REDUCING BUSHING
555 5314 SR HOOD
245 6260 P27 THREAD CUTTING SCREW, F, 8-32 x 3/8
596 785
544 5288
- MODEL NO. 833.14334
1
1
I
4
1
5
2
LOCKNUT
GRID SPACER
544 3750
SPACER INSULATOR
245 6245 P28 SHEET METAL SCREW_ NO. 8 x 1/2
532 30O6
BALLAST
9
2
576 4890
505 3370
TRANSFORMER
BULB SOCKET ASSY
1
2
552 3369 P03
555 3534
512 392 P26
552 5202
531 2034
512 5140
571 5170
245 6236 Pll
544 3749
245 6245 P12
512 404 P02
530 2815 S
553 2846 P01
553 2847 P01
505 3377
5O54031
245 6260 P25
557 5199
REFLECTOR
BULB RETAINER
BULB BOOT WIRE, 26'; LONG
2
1
2
1
TOP PLATE
2
STARTER
POWER CORD
26
1
2
STARTER SOCKET
3
3
SHEET METAL SCREW, NO. 6 x 3/8
MOUNTING INSULATOR
SHEET METAL SCREW, NO. 6 x 1/2
3
2
2
HV GRID WIRE
BULB, BLACK LIGHT
INNER GRID
OUTER GRID
1
1
BASKET ASSY
1
PHOTOCELL ASSY
1
2
THREAD CUTTING SCREW, F, 8-32 x 1/4
OWNER'S MANUAL
1
15
TROUBLESHOOTING
AND
REPAIR
POSSIBLE CAUSE
PROBLEM
ANALYSIS
CORRECTION
A. Bulbs do not light
and no high voltage
on grid.
I. No electrical power.
1. Check fuse or circuit breaker.
2. Check extension cord, (If used,)
B.
1. Shorted
1. Examine grids to see if inner and outer
grids are free from foreign material, dirt
or a build-up of dead insects.
2. Check to make sure inner grid _nd outer grid
are not touching.
Use insulated screwdriver.
Bulbs
grid
light
high
but
no
C. Grid voltage present
but bulbs do not
Intermittent
or
continuous
between
1, Lamp(s)
not
seated properly.
2. Starter defective.
3. Burned-out bulb(s).
light.
O.
grids.
voltage.
1. Gap between
grids is too small.
sparking
grids.
Any problems
2. Grid clogged with foreign material.
3. Grid not seated in insulaitor.
you encounter
1. Check all sockets for proper
alignment.
2. Replace if needed.
3. Replace if needed.
seating and
,,
,'
1. Unplug unit and adjust grids by bending
back into alignment
using screwdriver
blade.
2. Clean grid using an air blower.
3. Look for proper grid seating at all insulators,
that are not corrected
by the action recommended
referred to your nearest Sears Service Center.
in this chart
should
be
OWNERS
MANUAL
ELECTRONIC
INSECT
KILLER
MODEL NO.
833.14334
The Model Number will be found on label attached to the upper
section of the unit. Always mention the Model Number when
requesting service or repair parts for your ELECTRONIC
INSECT
KILLER.
All parts listed herein may be ordered from any Sears Service Center
and most Sears stores.
HOW TO ORDER
REPAIR PARTS
WHEN
GIVE
ORDERING
THE
REPAIR
FOLLOWING
1. PART NUMBER
PARTS,
ALWAYS
INFORMATION:
3. MODEL
NUMBER
833.14334
2. PART DESCRIPTION
4. NAME
OF ITEM
ELECTRONIC
INSECT
KILLER
If the parts you need are not stocked locally, your order will be
electronically
transmitted to a Sears Repair Parts Distribution
Center for "expedited handling".
Sold by SEARS,
557 5199
ROEBUCK
AND
CO., Chicago,
I L. 60684
U.S.A.
Printed
in U.S,A.