1
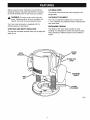
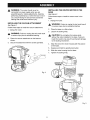
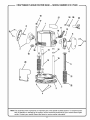
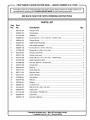
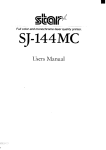
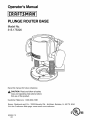
Operator's Manual
ICRRFTSMRN'I
PLUNGE ROUTER BASE
Model No.
315.175320
Save this manual for future reference
_,
CAUTION:
Read and follow all safety
rules and operating instructions before
first use of this product.
Customer
Help Line: 1-800-932-3188
Sears, Roebuck and Co., 3333 Beverly Rd., Hoffman
Visit the Craftsman Web page: www.sears.com/craftsman
Estates,
IL 60179
USA
CQUS
983000-175
1-03
•
•
•
•
•
•
•
Introduction
.................................................................................................................................................
2
SafetyRules...............................................................................................................................................
3
Unpacking
..................................................................................................................................................
3
Features....................................................................................................................................................
4
Assembly
...................................................................................................................................................
5
Exploded
ViewandPartsList.........................................................................................................................
6-7
CustomerServiceInformation
.........................................................................................................................
8
Yourrouteraccessory
hasmanyfeaturesformaking
routingoperations
morepleasantandenjoyable.Safety,
performance
anddependability
havebeengiventop
priorityinthedesignofthisproduct,makingit easyto
maintainandoperate.
_,
,_
Look for this symbol to point
Your safety is involved.
out important
,t_ WARNING:Donotattempttousethisproduct
untilyouthoroughlyreadandcompletely
understand
theoperator'smanual.Payclose
attentionto thesafetyrules,includingDangers,
Warnings,
andCautions.If youusethisproduct
properlyandonlyas intended,youwillenjoyyears
ofsafe,reliableservice.
safety
precautions.
It means
attention!H
WARNING:
The operation of any tool can result in foreign objects being thrown into your eyes, which
can result in severe eye damage. Before beginning operation, always wear safety goggles
or safety glasses with side shields and a full face shield when needed. We recommend Wide
Vision Safety Mask for use over eyeglasses or standard safety glasses with side shields.
Always wear eye protection which is marked to comply with ANSI Z87.1.
2
READ ALL INSTRUCTIONS
•
•
Disconnect the plug from power source before
making any adjustments, changing accessories,
or storing the tool. Such preventive safety measures reduce the risk of starting the tool accidentally.
•
Do not use this product with other equipment or
for other purposes.
•
Save these instructions.
Refer to them frequently
and use them to instruct other users. If you loan
someone this product, also loan these instructions.
Read these instructions and the instructions for
the router motor thoroughly before using this
accessory.
•
Know your power tool. Read the operator's manual
for the router motor carefully. Learn the router's
applications and limitations as well as the specific
potential hazards related to this tool.
•
Keep the work area clean and well lit. Cluttered
benches and dark areas invite accidents.
•
Always wear safety glasses with side shields.
Everyday eyeglasses have only h-npact-resistant
lenses; they are NOT safety glasses.
The purpose of safety symbols is to attract your attention to possible dangers. The safety symbols, and the
explanations with them, deserve your careful attention and understanding.
The safety warnings do not by themselves
eliminate any danger. The instructions or warnings they give are not substitutes for proper accident prevention
measures.
SYMBOL
,_
MEANING
DANGER: Indicates an imminently hazardous situation, which, if not avoided, will result in death or
serious injury.
WARNING: Indicates a potentially hazardous situation, which, if not avoided, could result in serious injury.
CAUTION:
Indicates
potentially
situation,
which,
if notthat
avoided,
may property
result in damage.
minor or
moderate injury.
It maya also
be usedhazardous
to alert against
unsafe
practices
may cause
Important: Advises you of important information or instructions vital to the operation or maintenance of
the equipment.
Note: Advises you of additional information concerning the operation or maintenance of the equipment.
INSTRUCTIONS
PACKING
LIST
•
Carefully remove the accessory from the box.
•
Make sure that all items listed in the packing list are
included.
Plunge Base
Vacuum Attachment
•
Inspect the accessory carefully to be sure no breakage or damage occurred during shipping.
Operator's
•
Do not discard the packing material until you have
carefully inspected and satisfactorily operated the
tool with the accessory.
•
If any parts are damaged or missing, please call
1-800-932-3188 for assistance.
,_IL WARNING:
If any parts are missing, do not
operate your tool until the missing parts are
replaced. Failure to do so could result in serious
personal injury.
Screws (2)
3
Manual
LOCKING
Before using the router, familiarize yourself with all
operating features and safety requirements. However,
do not let familiarity with the tool make you careless.
_IL
The locking knob secures the motor housing for the
plunge base.
VACUUM
WARNING:
Exercise caution when using the
router. Careless actions, for even a fraction of a
second, can result in serious personal injury.
BAR AND DEPTH
ATTACHMENT
The vacuum attachment allows you to connect to a
1-1/4 in. diameter dust collection hose to help keep the
work area clean.
Your new router accessory is equipped with the
following features. See Figure 1.
STOP
KNOB
ERGONOMIC
INDICATOR
DESIGN
The design of the router base provides for easy
handling. It is designed for comfort and ease of grasp
when operating in different positions and at different
angles.
The stop bar and depth indicator allow you to adjust the
depth of cut.
LOCKING
KNOB
DEPTH
INDICATOR
PLUNGELOCK
LEVER
ERGONOMIC
HANDLE
BAR
VACUUM
ATTACHMENT
Fig. 1
4
INSTALLING
BASE
_1= WARNING:Theroutershouldneverbe
connected
to a powersupplywhenyouare
assembling
parts,makingadjustments,
cleaning,
performing
maintenance,
or whenthetoolis notin
use.Disconnecting
thetoolpreventsaccidental
startingthatcouldcauseseriousinjury.
INSTALLING
THE VACUUM
THE ROUTER
MOTOR
IN THE
See Figure 3.
Follow these steps to install the router motor in the
base.
1. Unplug the router.
ATTACHMENT
WARNING:. Failure to unplug the tool could result
in serious injury due to accidental starting.
See Figure 2.
Follow these steps to install the vacuum attachment.
1. Unplug the router.
,_
WARNING:
Failure to unplug the tool could result
in serious injury due to accidental starting.
2.
Place the vacuum attachment on the base as
shown.
3.
Secure the attachment with the screws provided.
2.
Place the base on a flat surface.
3.
Loosen the locking knob.
A
CAUTION:
Do not tighten the locking knob
without the motor installed in the base. Failure to
heed this caution may result in permanant damage
to the locking mechanism.
4.
Align the slot on the motor housing with the groove
on the base.
5.
Depress and hold the spindle lock button.
6.
Slide the motor housing into the base.
7.
Tighten the locking knob.
Fig. 2
LOCKING
KNOB
Fig. 3
5
CRAFTSMAN
PLUNGE
ROUTER
BASE-
MODEL
NUMBER
315.175320
19
27
24 20
23
17
1
8
11
7
25
12
6
18
15
20
5
21
2
22
3
4
Note: The assembly shown represents an important part of the double insulated system. To avoid the possibility of alteration or damage to the system, service should be performed by your nearest Sears repair
center. Contact your nearest Sears retail store for service center information.
6
CRAFTSMAN
PLUNGE
ROUTER
BASE-
MODEL
NUMBER
315.175320
The rnodelnurnberis on a plate attached to the motor housing. Always mention the model nurnberin
correspondence regarding your PLUNGE ROUTER BASE or when ordering repair parts.
SEE BACK PAGE FOR PARTS
ORDERING
all
II
INSTRUCTIONS
PARTS LIST
Key
No.
Pad
No.
Description
1
984173-001
Plunge Frame ........................................................................................................
1
2
983249-201
Plunge Base ..........................................................................................................
1
3
612191-004
Subbase ................................................................................................................
1
4
998586-001
* Screw (#10-32 x 1/4 in. Pan Hd.) **STD511102 ...................................................
3
5
983244-001
Plunge Spring ........................................................................................................
2
6
984232-001
Right Handle Assembly .........................................................................................
1
7
982991-001
Left Handle Assembly ...........................................................................................
1
8
983699-128
* Screw (#10-24 x 9/16 in. Pan Hd.) ........................................................................
2
9
617966-030
* Screw (#8-10 x 5/8 in. Pan. Hd.) ...........................................................................
4
10
982702-001
Plunge Lock Screw ................................................................................................
1
11
982701-003
Plunge Lock Lever ................................................................................................
1
12
643115-004
* Screw (#6-32 x 1/4 in. Pan. Hd.) **STD510602 ....................................................
1
13
970732-005
Depth Adjustment Rod ..........................................................................................
1
14
607406-005
* Hex Nut (#3/8-16) **STD541037 ...........................................................................
3
15
982707-002
Plunge Rod ............................................................................................................
2
16
982720-001
Bearing ..................................................................................................................
2
17
982710-001
Depth Stop Bar ......................................................................................................
1
18
982711-001
Stop Bar Knob .......................................................................................................
1
19
982712-001
Depth Indicator ......................................................................................................
1
20
972265-001
Chip Shield ............................................................................................................
1
21
982706-002
Bellows ..................................................................................................................
2
22
983339-001
Washer ..................................................................................................................
4
23
999603-001
Locking Knob ........................................................................................................
1
24
623166-007
* Bolt (#1/4-20 x 3/8 in. Sq. Hd.) ..............................................................................
1
25
983679-001
Scale Label ............................................................................................................
1
26
931744-059
Flat Washer **STD551012 ....................................................................................
1
27
983448-001
Data Plate ..............................................................................................................
1
983000-175
Operator's Manual .................................................................................................
1
Qty.
m
* Standard Hardware Item -- May Be Purchased Locally
** Available from Div. 98 -- Source 980.00
7
Your
Home
For repair-in
your home-of all major brand appliances,
lawn and garden equipment, or heating and cooling systems,
no matter who made it, no matter who sold it!
For the replacement parts, accessories and
owner's manuals that you need to do-it-yourself.
For Sears professional installation of home appliances
and items like garage door openers and water heaters.
1-800-4-MY-HOME
Call anytime,
® (1-800-469-4663)
day or night (U.S.A. and Canada)
www.sears.com
www.sears.ca
Our Home
For repair of carry-in items like vacuums, lawn equipment,
and electronics, call or go on-line for the location of your nearest
Sears Parts & Repair Center.
1-800-488-1222
Call anytime,
day or night (U.S.A. only)
www.sears.com
To purchase a protection agreement (U.S.A.)
or maintenance agreement (Canada) on a product serviced by Sears:
1-800-827-6655
Para pedir servicio
a domicilio,
(U.S.A.)
de reparaci6n
y para ordenar
1-888-SU-HOGAR
(1-888-784-6427)
piezas:
sM
1-800-361-6665
(Canada)
Au Canada pour service
en fran_:ais:
1-800-LE-FOYER Mc
(1-800-533-6937)
www.sears.ca
® Registered Trademark / TM Trademark / SM Service Mark of Sears, Roebuck and Co.
TM
SM
® Marca Registrada /
Marca de F_brica /
Marca de Servicio de Sears, Roebuck and Co.
MC
MD
Marque de commerce /
Marque d_pos6e de Sears, Roebuck and Co.
@ Sears, Roebuck and Co.