1
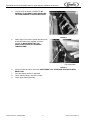
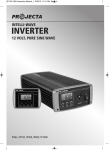
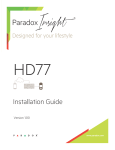
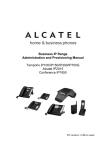
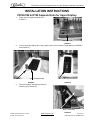
PR150/300 and IP150 Separate Drain for Upper Driptray Installation Instructions
INSTALLATION INSTRUCTIONS
PR150/300 & IP150 Separate Drain for Upper Driptray
1.
Raise and lock driptray assembly (see
FIGURE 1).
Driptray Assembly
FIGURE 1
2.
Clean out and dry driptray with a rag or paper towel, remove strainer if applicable (see FIGURE 2
and FIGURE 3).
Strainer
Upper Driptray Assembly
FIGURE 3
FIGURE 2
3.
Clean and Wipe Dry Inside Driptray
Remove insulation from driptray drain line
assembly (see FIGURE 4).
Remove Insulation from Driptray
Drain Line Assembly
FIGURE 4
Release Date: December 10, 2004
© 2004, IMI Cornelius Inc.
www.cornelius.com
-1-
Revision: B
Publication Number: 629088497INS
PR150/300 and IP150 Separate Drain for Upper Driptray Installation Instructions
4.
Cut PVC drain as shown in FIGURE 5. BE
CAREFUL TO SECURELY HOLD DRAIN LINE
TO AVOID DAMAGE TO UPPER DRIPTRAY!!!
Cut PVC Drain
FIGURE 5
5.
Deburr edge of PVC and re-plumb and clamp with
new flexible tube/clamp supplied in kit (see
FIGURE 6). MAKE SURE THAT THE
INSULATION COVERS ALL EXPOSED
TUBING/CLAMP!
Clamp Drain Line
Re-plumb with New Drain
Line and Insulation
FIGURE 6
6.
7.
8.
9.
Re-route new drain tube to floor drain. MAKE SURE THAT THERE ARE NO KINKS IN NEW
DRAIN LINE!
Re-install driptray strainer if applicable.
Check driptray, fittings, and lines for leaks.
Lower upper driptray assembly.
Publication Number: 629088497INS
-2-
© 2004, IMI Cornelius Inc.