1
Nikon
DIGITAL CAMERA
COOLP,X
$3000
User's Manual
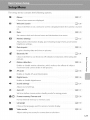
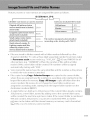
The following
options
are available
in the playback
menu.
r_, _ Quick retouch
_
Easily create retouched
_t_
100
copies in which contrast and saturation have been enhanced.
D-Lighting
_
101
_
102
Enhances brightness and contrast in dark portions of pictures.
Skin softening
The camera detects faces and creates a copy of the picture with softer skin tones in
the faces of portrait subjects.
_,
Print set
_
87
_
91
Select pictures to print and the number of copies for each,
Slide show
View pictures stored in the internal memory or on a memory card in an automatic
slide show,
1_
o
Delete
_
32
_
34
_
9_
_
]04
_
9.5
_
37
Delete _ or seJec_eoolc_ure_
o
011
Protect
Protect seJec_eo Dic_ures from accloema
_L_
deletion.
Rotate image
Change me onenta_lor of olc_ures.
[]
Small aicture
Create
I_
a sma][
copy
or _ne
curren[
OlCiure,
Voice memo
Record voice memos fol alc[ures.
P._
Copy
Copy files between memory card and internal memory.
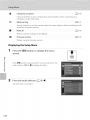
Displaying
the Playback
Press the []
button to enter playback mode ([_[_ 28).
Menu
Press the MENU
button to display the playback menu.
÷
86
...............
•
Use the multi
•
Press ti]e MENUbutton
selector
to choose
and apply
to exit ti]e playback
settings
menu.
([_
%.
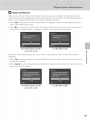
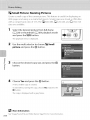
Print Set (Creating
a DPOF Print Order)
mode) -)' MENU(Playback menu) --) _3, Print set
When
printing
methods,
orders"
•
for printing
Inserting
• Taking
•
pictures
the Print
tile
on the memory
card
in the playback
menu
on DPOF compatible
memory
tile memory
Connecting
print
stored
set option
is used to create
photo
tile camera to a PictBridge
card is removed
from
digital
"print
devices.
card into a DPOF compatible
card to a digital
order can also be created
memory
using any of the following
([_
compatible
for pictures
166) printer's
card slot
lab
stored
([_
in tile
1(56) printer
internal
([_
memory
119). A
if tile
iil:
tile camera.
,Press
the
ME,U
button
,n
p,ayback
mode
o_
The playback menu is displayed.
o
2
Use the
multi
and press
the
selector
_)
to choose
_:_ Print
set
button.
Proceed to step 4 when playing back in favorite pictures
mode, auto sort mode, or Wistby date mode.
3
Choose
Select
images
and
press
the
_)
button.
87
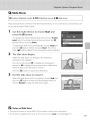
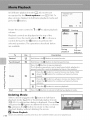
4
Choose
copies
pictures
(up
(up to nine)
to 99) and the
numberof
of each.
Press the multi selector • or • to select pictures, and
press • or • to specify the number of copies to be
printed.
Picture selected for printing can be recognized by the
check mark (_') icon and the numeral indicating the
number of copies to be printed. If no copies have been specified for pictures, the
selection is canceled.
Rotate the zoom control to T (% to switch to full-frame playback.
Rotate the zoom control to W (_;;_) to switch back to 12 thumbnail
display.
Press the _) button when setting is complete.
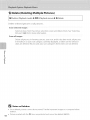
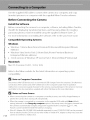
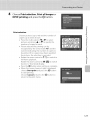
.5
Choose
whether
and photo
or not to print
shooting
date
information.
o
o
Choose Date and press the _) button to print the
shooting date on all pictures in the print order.
Choose Info and press the _) button to print shutter
speed and aperture information
print order.
on all pictures in the
Choose Done and press the _) button to complete
Pictures selected for printing are recognized by the
icon displayed with playback.
88
the print order and exit.
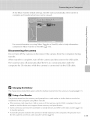
Notes
on Print
When a print order
screen shown
Set
is created
below
taken on the selected
shooting
• Select Yes to add pictures
date, to the existing
pictures
if pictures
date, have
other
mode,
auto sort mode or list by date
than those
been marked
in the selected
album
print
in the selected
mode,
the selected
the
category,
or
_r printing,
or category,
marking
album
from
previously
or category,
or taken on the selected
marked
of the pictu res in a print
pictures
or taken on the selected
Favorite pictures mode/
auto sort mode
If the total number
in the album,
shooting
print order.
• Select No to remove
pictures
in _vorite
is displayed
and restrict
shooting
the print
order to
date,
List by date mode
o_
order exceeds
9g, the screen shown
below will be
displayed,
o
]
• Select Yes to remove
pictures
previously
added
from
the print order
and restrict the print
order to
just marked.
• Select Cancel
pictures
pictures
to remove
previously
the pictu res just added
from the print order
and restrict
the print order
to
g-
marked.
Favorite pictures mode/
auto sort mode
List by date mode
89
_1_
Notes
on Printing
When the Date
information
printing
are printed
of shooting
menu
[]
on the
button
[]
r_
to remove
Date
date and photo
which
supports
is used.
the camera
is connected
directly
to a printer,
via the
124).
are reset when
Print
the
print set option
is displayed,
was taken,
in the setup
Order
print
marking
Set (Creating
from all pictures
of recording
pictures
are imprinted
are recorded
they are taken, Pictures with
that do not support
printing
a DPOF Print Order)" (_
and cancel
87) and press the
the print order.
set date option
on pictures
with
shooting
the date imprinted
using the
Date
date and time
on them
imprint
imprinted
can be printed
option
on the
from
printers
of the date on pictures,
Only the date and time imprinted
9O
shooting
166) printer
Imprint
when
the Print
(_
set in step 3 of"Print
133) in setup menu,
picture
when
(_
has been taken has no affect on the date
Existing
print
When date and time
(_
settings
Information
a DPOF compatible
information
be printed
Photo
picture.
Canceling
Select Delete
o
and Info
and
in the print set option,
printed is that recorded when the picture
the camera's date using the Date option
after a picture
printed
when
USB cable, for DPOF printing
• Note that Date
• The date
Changing
on pictures
cannot
Date
are enabled
date and photo
• Photo information
supplied
Shooting
and Info options
on pictures
is enabled,
with
the date imprint
option
will be printed,
even
if
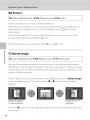
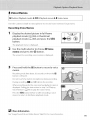
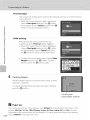
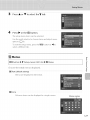
Slide Show
mode) -) MENU(Playback menu) -.) _
Slide show
Play back pictures stored in the internal memory or on a memory card one by one
in an automated "slide show."
I
Use the
press
the
multi
_)
selector
to choose
Start and
button.
To change the interval between pictures, choose Frame
intvl, select the desired interval time, and press the _)
button before choosing Start.
To repeat the slide show automatically, choose Loop and
press the _) button before choosing Start. The check
mark (ql_) will be added to the loop option when enabled.
o
2
The
slide
show
begins.
o
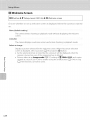
While the slide show is in progress, the following
operations are available:
Press the multi selector • to display the subsequent
R-
picture or 4 to display the previous picture. Hold down
either button to fast forward or rewind.
Press the _) button to pause the slide show.
When the slide show ends or is paused, choose End and
press the _) button to return to the playback menu, or
choose Restart to play the slide show again.
_1_ Notes on Slide Show
• Only the first frame of movies (_
11O)included in a slide show is displayed,
• The maximum playback time is up to 30 minutes even if Loop is enabled (_
137),
91
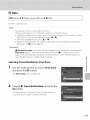
Delete
(Deleting
Multiple
mode)
Delete
selected
pictures
-_
Pictures)
MENU
(Playback
menu)
-_ _
Delete
or all pictures.
Erase Selected images
Select pictures from the picture selection screen and delete them. See "Selecting
Pictures" (_[_ 93) for more information.
Erase all images
Delete
all pictures.
in tile album
In favorite
or auto
date, are deleted.
pictures,
sort category
Albums
and
auto
auto
currently
sort, and list by date
displayed,
sort categories
or taken
themselves
mode,
all pictures
on the
selected
are not
deleted.
o
Notes
on Deletion
• Once deleted,
deletion.
92
Pictures marked
pictures
with
cannot
the _
be recovered,
Transfer
icon are protected
important
and cannot
images to a computer
be deleted
(_
94).
before
Selecting
Pictures
Tile picture
displayed
•
selection
with
Playback
(_
menu:
Print
87), Delete>Erase
Protect
(_
Setup
set>Select
Welcome
is
images
selected
image
images
menu:
at right
menu selections:
94), Rotate
Copy>Selected
•
screen like that shown
tile following
(_
images
(_
(_
92),
94), and
97)
screen>Select
an image
(_ 12s)
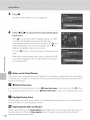
Follow the procedures described below to choose the pictures.
1
2
Press the
multi
selector
_ or i_ to choose
the
desired
picture,
Only one picture can be selected at a time for Rotate
image and Welcome screen. Proceed to step 3.
o_
g
o
Rotate the zoom control to T (q) to switch to full-frame
playback or W ([]) to switch back to 12-thumbnail
display,
g-
Press •
specify
or •
the
to select
number
or deselect
(or to
of copies).
When a picture is selected, a check mark (_) is displayed
with the picture. Repeat steps 1 and 2 to select additional
pictures.
3
Press the _)
button
to finalize
selection.
When Erase selected images is selected, a confirmation
instructions displayed in the monitor.
dialog is displayed. Follow the
93
O_
Protect
mode) -_ MENU
(Playback menu) -_ @,nProtect
Protect selected pictures from accidental deletion.
Select pictures to protect or cancel protection for previously protected pictures
from the picture selection screen. See "Selecting Pictures" ([_
information.
93) for more
Note that formatting the camera's internal memory or the memory card will
permanently delete protected files ([_ 138).
Protected pictures are recognized by the @_ icon ([_
7, 70).
o
o
ec_ Rotate
Image
mode) -_ MENU
(Playback menu) -_ _L_Rotate image
n
Specify the orientation in which recorded pictures are displayed with playback.
Still pictures can be rotated 90 degrees clockwise or 90 degrees counterclockwise.
Pictures that were recorded in portrait ("tall") orientation can be rotated up to 180
degrees in either direction.
Select a picture in the picture selection screen ([_[_ g3). When the Rotate image
screen is displayed, press the multi selector 4 or i_ to rotate the picture 9(}
degrees.
Rotate 90 degrees
counterclockwise
Rotate 90 degrees
clockwise
Press the _) button to finalize display orientation, and save orientation data with
the picture.
94
I_ Voice Memos
mode) -_ MENU(Playback menu) -_ 1_Voice memo
Use the camera's built in microphone to record voice memos for pictures.
Recording
Voice Memos
,D,sp,ayt,edes
frame
playback
mode
([_[_] 28) or thumbnail
playback
button.
mode
([_[_] 69) and
press
the
MENU
The playback menu is displayed.
2
Use the
memo
multi
selector
and press
to choose
the _)
_ Voice
button.
The screen for recording voice memos is displayed.
3
Press and
hold
the _)
button
to record
a voice
memo.
Recording ends after about 20 seconds or when the _)
button is released.
Do not touch the built in microphone
During recording, _
during recording.
and _ blink in the monitor.
When recording ends, the voice memo playback screen is
displayed. Follow the instructions in step 3 of "Playing
Voice Memos" ([_ 96) to play the voice memo.
Press the MENUbutton before or after recording a voice
memo to return to full-frame playback mode.
[]
More Information
See"image/Sound File and Folder Names" (_
151) for more information.
P5
Playing
Voice Memos
Pictures for which voice memos have been recorded are indicated by ]_] in full
frame playback mode.
1
Select the desired picture in fullframe playback mode ([_ 28) or
_s,®_,s_,®_s_o,
r---JIIL--h
I
_t'
I
thumbnail
playback mode ([_[_] 69)
and press the MENUbutton.
The playbackmenu is displayed.
2
Use the multi selector
to choose _ Voice
memo and press the _) button.
The voice memo playbackscreenis displayed.
o
o
n
3
Press the _) button
to play the voice memo.
Pressthe 0000°°_)
button again to stop playback.
Rotatethe zoom control to T or W during playbackto
adjust playbackvolume.
Pressthe MENU
button before or after playing a voice
memo to return to fulPframe playbackmode.
Deleting
Voice Memos
Select a picture with a voice memo and press the "_
button. Use the multi selector to choose [,l_]and press
the _) button. Only the voice rr_erno will be deleted.
,@,
Notes on Voice Memos
96
•
When a picture with avoicememoattachedis deleted, both the picture andits voicememoare
deleted,
•
Ifa voicememo already existsfor the current
can be recorded.
•
TheCOOLPIX
$3000is notable to recorda voicememofor pictures takenwith anothermakeor
modelof digital camera,
picture,
itmust bedeletedbeforeanew voicememo
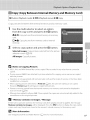
E'3Copy (Copy Between Internal Memory and Memory Card)
[]
button
(Playback
mode)
")
M[NU (Playback
menu)
-)
C_ Copy
Copy pictures between the internal memory and a memory card.
1
Use the multi selector
to select an option
from the copy screen and press the _) button.
I_1 •
1_1:Copy
pictures
from
internal
memory
1_1:Copy
pictures
from
memory
to memory
card.
•
card to internal
memory.
2
Select a copy option
Selected
images:
selection
screen
All images:
Copy
([_)
Copy
and press the _) button.
pictures
selected
from
the
o_
picture
93).
o
all pictures.
?_1_
Notes
on Copying
Pictures
JPEG, AVI, and WAV format
files can be copied.
Files recorded
in any other
_rmat
cannot
be
copied.
If voice memos
with
the
Operation
95) are attached
is not guaranteed
modified
When
(_
copying
pictures
Protect
(_
pictures
same albums
added
taken with
contains
for copying,
voice
memos
are copied
another
make of camera
or that have been
More
stored
pictures
are copied
(_
87), the print set marking
with
is not copied.
pictures.
memory
or a memory
74) are copied,
the copies
card cannot
be displayed
are not automatically
added
in
to the
pictures.
no images."
Message
on the memory
card when
no images,
screen, and copy the
for a Print set (_
from the internal
to albums
contains
If there are no pictures
[]
pictures
selected
as the original
"Memory
Memory
with
94) settings
Pictures or movies copied
auto sort mode (_
80).
[]
selected
on a computer.
However,
When
to pictures
pictures.
will
stored
be displayed.
playback
Press the
in the camera's
internal
mode
MENUbutton
memory
is applied,
to display
to the
the message
the copy option
memory
card.
Information
See "image/Sound
File and Folder Names"
(_
151) for more irfformation.
97
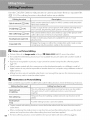
Use the COOLPIX $3000 to edit pictures in camera and store them as separate files
([Z] 151). The editing functions described below are available.
Editing
function
Description
Quick retouch (_
D:Lighting
(_
(_
a copy
softer
!04)
Create a small
attachments.
_
Enlarge
the
on Picture
functions
$3000 editing
• Edited copies
digital
camera.
digital
camera.
• Editing
created
with
copy
faces
or refine
a copy
suitable
visible
of the
picture
with
subjects.
for use as e mail
the composition
the portion
brightness
of the picture.
of portrait
of pictures
and saturation
enhanced
portions
faces and creates
image
setting
of _
3968x2232
are not available
in a picture,
with
a copy cannot
this camera
in the
(_
and create
a copy
monitor.
37) cannot
for pictures
functions
are not available
when
on Picture
be edited.
taken with
another
model
of
function
there is not enough
with another
Tile skin softening,
The quick
together.
retouch
function,
Editing
function
small picture
Small
Crop
Another
• When
picture
with
combining
editin_
• The skin softening
function
editing
functions
the small picture
and crop functions
using
model
a different
cannot
or crop
after other
function
of
model
memory
of
or
function
editing
can be added
functions
to the picture
cannot
car/be
added.
be used
can be
be added,
edited
and another
functions
restrictions.
to add
small picture, and crop function
cannot
be further
check the _llowing
and crop functions
and D Lighting
The quick retouch, D Lighting,
added.
• Copies created
create them,
on a different
free space in the internal
editing
Skin softening
Pictu[e
properly
them to a computer
option
copies.
Used _'_
retouch
using the skin softening
Editing
When an edited copy is further modified
Editing
to transfer
card to store the edited
Restrictions
be created
may not be displayed
It may also be impossible
on the memory
98
picture
dark
contrast
cameras.
• if no face is recognized
(_
m2).
Quick
in which
Editing
mode
[]
current
in the
only
• The COOLPIX
s
detects
skin tones
105)containing
copies
brightening
The camera
• Pictures taken at an Image
digital
of the
and contrast,
" ........
(_
Notes
_Q
Create
!02)
(_
-°r_'i'_E
Crop
100)
i0!)
_,,_o_,_,_,,,_,_
Skin softening
Sma! I picture
Easily create retouched
have been enhanced.
with
the same function
editing
function,
used to
use the small
have been applied.
taken with
skin softening
(_
64).
[]
Original
• Copies
original
and
created
with
pictures
Edited
editing
Pictures
_nctions
are not deleted
• Edited copies
are stored
• Print marking
(_
with
are not deleted
if copies
created
the same recording
87) and protect
settings
(_
with
if the original
editing
pictures
functions
are deleted.
The
are deleted.
date and time as the original.
94) do not remain
effective
in edited
copies.
t_
PP
r.__Quick Retouch:
Qclick retouch
Enhancing
Contrast
carl be used to easily create
retouched
and Saturation
copies
in which
contrast
and
saturation havebeen enhanced.New copies are storedasseparatefiles.
,se.ectthedes,
p,cturef.mf
frame
([_[_] 28) or thumbnail
and press
the
([_[_] 69) playback
mode
MENU button.
The playback menu is displayed.
2
Use the
retouch
multi
selector
and press
the
to choose
_)
r..._,-Quick
button.
The original version is displayed on the left and the edited
version is displayed on the right.
m
3
Press the multi selector •
degree of enhancement
the _) button.
or •
to choose the
performed
and press
A new copy is created.
To exit without saving the copy, pressthe MENU
button.
Copies created with the quick retouch option can be
recognized by the _ icon displayed during playback.
[]
100
More Information
See"image/Sound File and FokJer Names" (_
151) for more information,
_D D-Lighting:
Enhancing
Brightness
and
Contrast
D Lighting car] be usect to create copies with enhancect brightness ant1 contrast,
brightening
dark portions of a picture. New copies are stored as separate files.
,se,ectt,edes,r
p,cturefrom
frame
([]_[]] 28) or thumbnail
and press
the
([]_[]] 69) playback
mode
MENU button.
The playback menu is displayed.
2
Use the
multi
and press
the
selector
......
to choose
[Inl D-Lighting
_]_ button,
The original version is displayed on the left and the edited
version is displayed on the right.
3
Choose
OK and
press
the
_
button,
2_
A new copy with enhanced brightness and contrast is
created.
To exit without saving the copy, choose Cancel and
press the _) button.
D-Lighting copies can be recognized
displayed during playback.
[]
by the _
icon
More Information
See"image/Sound File and Folder Names" (_
151) for more information,
101
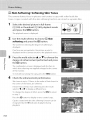
_
Skin Softening: Softening Skin Tones
The camera
tones.
detects
Copies created
faces in pictures
with
and creates
the skin softening
a copy
function
with
softer facial skin
are stored
as separate
files.
,se,ect,,edes,r
p,c,ure,nfu
frame
([]:[::] 28) or thumbnail
and press
the
([]:[::] 69) playback
mode
MENU button.
The playback menu is displayed.
2
Usethe multi selector to choose _ Skin
softening
and
press
the _
button.
Tile screen for selecting tile degree of softening is
displayed.
if no faces are recognized
in the picture, an alert is
displayed and the camera returns to the playback menu.
3
Press the multi
degree
the _
n
selector
of enhancement
•
or •
to choose
performed
and
the
press
button.
The confirmation screen is displayed with the face to
which skin softening was applied enlarged at the center
of the monitor.
To exit without saving the copy, press the MENUbutton.
4
Checkthe
enhancement
performance.
Skin tones in up to 12 faces, in the order of that closest to
tile center of the frame, are softened.
If more than one face was softened, press the multi
selector _ or • to display a different face.
To change the degree of effect, press tile MENUto return
to step 3.
Press tile _) button to display a new, created copy.
Copies created with tile skin softening function can be
recognized by the t_ indicator displayed during
playback.
102
_1_
Noteon
Depending
Skin
Softening
upon the direction
be unable to accurately
[]
More
in which
recognize
faces are looking,
or the brightness
faces, or the skin softening
function
of _ces,
the camera
may not perform
may
as expected.
Information
See "image/Sound
File and Fok]er Names"
(_
151) for more information,
t_
103
[]
Small Picture:
Resizing
Pictures
Createa smallcopy of the current picture.This feature is usefulfor displayingon
Web pagesand using ase mail attachments. Smallcopies are storedasJPEGfiles
with a compressionratioof 1:16.The [] 640×480,[_g320×240,and [] 160xl 20
sizesare available.
1
Select the desired
picture
from full-frame
([_[_] 28) or thumbnail
([_[_] 69) playback
and press the MENUbutton.
[ _JlT)
mode
The playbackmenu is displayed.
2
Use the multi selector
to choose []
!
Small
picture and press the _) button.
3
Choose the desired
button.
4
Choose Yes and press the _) button,
_
copy size and press the _)
i_
A new, smallercopy is created.
To exit without savingthe copy,choose Noand pressthe
@ button.
The copy is displayed with a gray frame.
[]
More Information
See"image/Sound File and FokJer Names" (_
104
151) for more irfformatior_,
Crop:
Creating
a Cropped
Copy
Create a copy containing only the portion visible in the monitor when _
__ is
displayed with playback zoom (l_[_ 72) enabled. Cropped copies are stored as
sepa rate files.
1
Rotate
the zoom
playback
mode
control
to zoom
to
T (q)
in full-frame
f.._
_.
)
in on the image.
To crop a picture displayed in "tall" (portrait) orientation,
zoom in on the picture until the black bars displayed on
the both sides of the monitor disappear. The cropped
_
_
J
picture will be displayed in landscape orientation.
To crop the picture in its current "tall" (portrait)
orientation, first use the Rotate image option ([]_Q 94) to rotate the picture so that it is
displayed in landscape orientation. Next, enlarge the picture for cropping, crop the
picture, and then rotate the cropped picture back to "tall" (portrait) orientation.
2
Refine
copy
composition.
Rotate the zoom control to T (O0 or W (_;_) to adjust the
zoom ratio.
Press the multi selector A, V, _ or i_ to scroll the
picture until only the portion you want to copy is visible
in the monitor.
t_
s
3
Press the
MENUbutton.
4
Use the multi selector to choose Yes and
press the @ button.
A cropped copy is created.
To exit without
_) button.
[]
Image
saving the copy, choose No and press the
Size
As the area to be saved is reduced, the image size (pixels) of the cropped copy is also reduced.
When the size of the cropped copy is 320 × 240 or 160 x 120,a gray frame is displayed around the
picture during playback, and the small picture icon _ or _ is displayed at the left of the monitor in
full frame playback mode.
[]
More Information
See"image/Sound File and FokJer Names" (_
151) for more information.
105
To shoot movies with sound recorded via the built in microphone, enter shooting
mode and follow the steps below.
'PresstheO
___
mode
to display
the shooting
menu
and
the
•
or •
the _)
press
to select
multi
_,
mode
selector
and then
press
button.
The maximum movie length that can be
recorded is displayed in the monitor
(_ 108). The maximum recording time for a single movie is 29 minutes. The maximum
file size for a single movie is 2 GB, even when there is sufficient free space on the
memory card for a larger movie file.
2
Press the shutter-release
the way
down
to start
button
all
recording.
The camera focuses on the subject at the
center of the frame.
A progress bar at the bottom of the monitor
shows the amount of recording time
remaining.
o
To end recording, press the shutter release button all the way down a second time.
Recording stops automatically
m
o
O-
n
106
when the maximum
movie length has been recorded.
_1_
Recording
• Optical
before
being
Movies
zoom
cannot
be adjusted
movie recording
begins,
once
movie
However,
recording
digital
begins, Digital
zoom can be applied
zoom
cannot
be applied
(up to 2x) while
movies
are
recorded.
• There may be some degradation
• The angle
of view (recordable
in image
area) with
quality
movie
when
digital zoom
recording
is narrower
is used.
than with
shooting
of still
pictures,
• Smear (_
148) visible
in the
Avoiding
bright objects
movies is recommended.
_1_
Note
on Saving
After a movie
monitor
returns
before
with
movie
it is not fully
to the shooting
movies
have been fully
result in loss of data or in damage
on Autofocus
Single
AF (default
when
the shutter
[]
Functions
• Macro
(_
mode
Available
(_
30), self timer
mode,
with
(_
Movie
Confirm
32) and exposure
to display
with
movies.
lights when
recording
VR
memory
or memory
card until
the battery-chamber/memory
the memory
for Autofocus
(_
card while
card
movies
are being
or card,
mode
in movie
menu,
focus
locks
109),
Recording
settings
before starting
compensation
the NJ_(movie)
and Electronic
open
to the camera
is selected
is pressed
33) is available,
• Press the MENUbutton
Autofocus
setting)
release button
saved to the internal
saved, Removing
_1_
When _
will be recorded
of the sun, and electric
d isplay. Do not
saved could
Note
recording
Movies
has been recorded,
display
sletcever
monitor
such as the sun, reflections
menu
(_
(_
movie
34) cannot
recording,
The flash
be used,
108) and adjust
Movie
options,
S
E
D_
g-
107
The Movie
The
movie
Menu
menu
mode
(_
Select
_ (Movie)
display
the
carl
be
10%, and
from
movie
used
to
Electronic
the
menu
movie
and
adjust
VR
Movie
(_
mode,
use the
options
(_
108),
Autofocus
109) settings.
then
multi
press
selector
(_
] O) to
the
MENU button
(_
9) to modify and apply
settings.
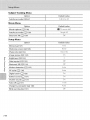
Movie Options
The movie menu offers the options shown below.
_%
m
o
o_
[]
Movie
_°'_'_
Options
and
....... '_'_
.....
Option
_
TV movie
_
Srnall size 320
Maximum
_"_"w_7
W
Movie
,ntemaJ
Length
memory
640
_°_7
°'
_
_
_
Memory
card
,_
:4.................................................
£,,,,L,I
............................
tL,,,,m,,,
n.........
All figures
The maximum
movie
708
recording
is 2 GB, even when
The maximum
[]
_o
are approximate.
movie
] minSSs
The maximum
time for a single
there
length
recording
movie
is sufficient
_
is 29 minutes.
for a single movie
rain
card,
file size for a single
card for a larger movie
is displayed
More Information
See"Image/Sound Fileand Folder Names" (_
make of memory
The maximum
free space on the memory
that can be recorded
2 h4S
time may vary with
151) for more information,
during
file.
recording.
_) Autofocus Mode
(Movie) -_ MENU
(Movie menu)
-_ I_ Autofocus mode
Choose how the camera focuses in movie mode.
_
Electronic VR
Choose wheq_er to use electronic VR (vibration reduction) when shooting movies.
i .....i O_ion i
De_.ption..........
............................
!_On :: :
_
i_
Off (default Setting)
Reduce the effects of camerashake,n ali mov,e modes.
_ Disableelectronic VR
o
_"
S
_
At setting other than Off, the icon for the current setting is displayed in the
monitor ([_
6).
,_
g-
109
In full frame playback mode ([_
28), movies are
recog nized by the Movie options icon (l_[_ 108). To
play a movie, display it in full frame playback mode and
press the _) button.
Rotate the zoom control to T or W to adjust playback
volume.
Pausing
Playback controls are displayed at the top of the
monitor. Press the multi selector _ or i_ to choose a
control, then press the _) button to perform the
selected operation. The operations described below
are available.
During
playback
'_' Us_ ......
_o_,u,,_o_,_
Volume
indicator
Description
....
Rewind
[]
Hold down the _) button to rewind movie.
Fast-forwa rd
[]
Hold down the _) button to fast forward movie.
Press the _) button to pause playback.
The following operations can be performed while playback is
paused using the controls displayed at top in the monitor.
o
8
Pause
[]
_
clown the _) button for continuous frame-by frame
rewind.
ress the _) button to rewind movie one frame. Hold
Press the _) button to advance movie one frame. Hold
O-
:u]_j _ advance.
down the _) button for continuous frame-by frame
_
n
End
Deleting
[]
Press the _) button to resume playback.
Press the _) button to return to full-frame playback mode.
Movie
_
Select a movie and press the "_ button
in full frame
playback mode (l_[_ 28) or thumbnail
playback mode
(l_[_ 6cP).A confirmation
and press the _) button
dialog is displayed. Choose Yes
to delete the movie, or choose
No and press the _) button to return to the normal
playback display without
deleting the movie.
_1_ Movie
1 10
Playback
Movies recorded by a camera other than the COOLPIX$3000 cannot be played back.
Connect the camera to a television using the supplied audio/video
back pictures on a television.
1
cable to play
Turn off the camera.
9
d_
_I
Connect the camera to the TV using the supplied
Connect
the TV.
the yellow
plug
to the video
in jack
and the white
audio/video
pWug to the
5"
_0
cable.
audioqn
jack
on
....,,
3
4
Tune the television
to the video channel.
See the
provided
Hold
documentation
down
the[]
button
with
your
to turn
television
O_
5"
for details.
on the
camera.
The camera enters pWaybackmode and pictures are
displayed on the tdevision.
While connected
remain off.
_1_ Connecting
When connecting
the Audio/Video
the audio/video
not use force when
audio/video
_1_
Video
connecting
cable, do not
(_
mode
12S).
Cable
cable, be sure that the camera connector
the audio/video
pull the connector
cable
is properly
oriented.
to the camera. When disconnecting
Do
the
at an angle.
Mode
Be sure that the camera's
video
/
to the TV, the camera monitor will
setting
video
is specified
mode
setting
from
the Videe
con_rms
mode
to the standard
(_
139) option
used
by your
television.
The
in the Set up menu
111
Use the supplied USBcable to connect the camera to a computer, and copy
(transfer) pictures to a computer with the supplied Nikon Transfer software.
Before Connecting
the Camera
Install the Software
o_
5"
_Q
Before connecting
For more information on installing the software, refer to the Quick S_d_r_
QJidft
Compatible
o
o_
tile camera to a computer, software, including Nikon Transfer,
ViewNX for displaying transferred pictures, and Panorama Maker for creating
panorama photos, must be installed using the supplied Software Suite CD.
Operating
Systems
Windows
• VVindows 7 (Home Basic/Home Premium/Professional/Enterprise/Ultimate
editions)
• Windows Vista Service Pack 2 (Home Basic/Home Premium/Business/
o_
Enterprise/Ultimate editions)
• 32 bit versions of Windows XP Service Pack 3 (Home Edition/Professional)
Macintosh
Mac OSX(version10.4.11,10.5.8,lO.d)
Refer to the Nikon website
for the latest information
on operating
system
compatibility.
_1_
Note
on Computer
Disconnect
other
connection
of the camera
malfunction
or excessive
Connection
USB devices
such as commercial
and other
supply
of power
card, Refer to the documentation
_1_
Notes
• When
prevent
• When
setting)
on Power
connecting
with
from
other
the computer,
could
causing
damage
USB devices
Simultaneous
result in operation
to the camera
or memory
for more information,
Source
to a computer
from turning
to transfer
is connected
to a computer
for the Charge
by computer
is automatically
Pictures can be transferred
charged
while
EH 62D (_
pictures,
use a fully charged
battery
to
off unexpectedly,
selected
• if the AC Adapter
USB chargers
to the computer
to the camera,
the camera
the camera
112
supplied
the camera
the camera
USB devices
using
via the supplied
option
power
supplied
the battery
is charging.
149) (available
separately)
USB cable with
in the setup
menu, the
by the computer
Auto
battery
(_
is used, COOLPIX 53000
from a n electrical outlet, Do not use any other make or model
camera to overheat or malfunction,
of AC adapter
(default
inserted
into
117, 140),
can be powered
as they may cause the
Transferring
Pictures from the Camera
1
Start the computer
to which
_I
Be sure that the camera is off.
3
Connect the camera to the computer
to a Computer
Nikon Transfer was installed.
using the supplied
USB cable.
o ......:f: ........
5"
B
o_
The camera automatically turns on and the power-on
lamp will light. The camera monitor will remain off.
_l_
Connecting
the
• Be sure that connectors
USB
and do not use force when
• The connection
Cable
are properly
oriented.
connecting
may not be recognized
Do not attempt
or disconnecting
if the camera
to insert connectors
at an angle,
the USB cable,
is connected
to the computer
via a USB hub,
113
4
Start
Nikon
Transfer
installed
on the
computer.
• Windows 7
When tile Devices and Printers
II_ $3000 screen is displayed, clkk Change
program under Import pictures and videos. Select Copy pictures to a folder on
my computer in tile Change program dialog and click OK.
Double dick Copy pictures to a folder on my computer
Printers b" $3000 screen
n
__.
on tile Devices and
• Windows Vista
_o
When tile AutoPlay dialog is displayed, Hick Copy pictures to a folder on my
computer
using Nikon Transfer.
• Windows XP
When tile action selection dialog is displayed, select Nikon Transfer Copy pictures
to a folder on my computer and click OK.
-_
o
• Mac OS X
Nikon Transfer will start automatically when tile camera is connected to tile computer
if Yes was selected in tile AutoLaunch setting dialog when Nikon Transfer was first
installed
g
o_
• If charge for the battery inserted into the camera is low, the computer may not
recognize the camera If the camera is not recognized, pictures will not be transferred
When battery charging starts automatically using power supplied by the computer
wait until battery charge has reached a sufficient level to begin transfer
• If there are a large number of images on the memory card, it may take some time for
Nikon Transfer to start
5
Confirm
that
Source
panel
the
source
and click
device
Start
is displayed
in the transfer
options
Transfer.
@%__ '{'_#iii'#iii!i!ii_
iiiiiiiiiiiiiii'
i','iiiiiiiiii
iii/iiiiiiiiii{iiiiiiiiiiiiiiiiiii
iiiiiiii/iii/_:_
Source
device
Start Transfer
button
At the Nikon Transfer default settings all pictures are transferred to the computer
114
AttheNikon
Transfer
default
settings,
ViewNX
starts
automatically
when
transfer
is
complete
and
transferred
)ictures
can
beviewed.
o_
r_
5"
For
more
information
onusing
Nikon
Transfer
orViewNX,
refer
tohelp
information
contained
inNikon
Transfer
orViewNX
([]_]116).
o_
B
Disconnecting
the camera
Do not turn offthe camera or disconnect tile camera from tile computer during
transfer.
D_
When transfer is complete, turn offthe camera and disconnect the USBcable.
Tile camera turns off automatically if there is no communication with tile
computer for 30 minutes while tile camera is connected via tile USBcable.
_1_
Charging
The charge
[]
Using
The pictures
transferred
• if the
the
Battery
lamp slowly
a Card
stored
blinks green
memory
• insert a memory
using
card capacity
device
inserted
card inserted
Nikon
pictures,
• To transfer
pictures
into the camera
is charging
(_
117),
into a card reader or similar device
is 2 GB or more, or if the memory
must support
stored
to a memory
these memory
in the camera's
card using
can also be
Transfer.
internal
the camera
card is SDHC compliant,
the card
card specification,
ca rd into the card reader or simila r device,
to transfer
first be copied
the battery
Reader
on the memory
to the computer
reader or similar
while
and refer to the steps 4 and 5 (_
memory
(_
97),
to the computer,
the pictures
114)
must
115
[]
Starting
Nikon
Transfer
or ViewNX
Manually
Windows
Choose
Start
menu>All
Programs>Nikon
Transfer>Nikon
Transfer
(or All
Programs>ViewNX>ViewNX).
Double
clicking
the Nikon
Transfer
or ViewNX
shortcut
icon on the desktop
will also start Nikon
Transfer or ViewNX,
o_
m
5"
_Q
Macintosh
Open Applications
Nikon
Clicking
[]
o
Software
and double
the
Nikon Transfer
Viewing
Nikon
For more information
select Nikon
B
Help
from
or ViewNX
Software>Nikon
Transfer
icon on the Dock will
and
on Nikon Transfer
ViewNX, start Nikon
o_
click Nikon
Transfer>Nikon
Transfer
(or
>ViewNX>ViewNX),
Transfer
Transfer
the Help
Help
or ViewNX,
Information
or
or ViewNX
Help
ViewNX
also start Nikon Transfer
and
or ViewNX
menu.
D_
Panorama
Creation
• Use a series of pictures
panorama
photo
• Panorama
Maker
• After installation
with
with
taken
Panorama
can be installed
is complete,
Panorama
in Panorama
Maker
assist scene mode
(_
59/to
create a single
Maker,
on a computer
follow
using
the procedure
the supplied
described
Software
below
Suite CD.
to start Panorama
Maker.
Windows
Choose
Start menu>All
Programs>ArcSoft
Panorama
Maker
5>Panorama
Maker
5.
Macintosh
Open
Applications
• For more information
information
contained
[]
Image
and double
click the Panorama
File Names
and Folder
5 icon,
Names
See"image/Sound File and Folder Names" (_
116
Maker
on using Panorama Maker, refer to the on screen instructions
in Panorama Maker.
151) for more information,
and help
Charging
While Connecting
VVhen connecting
Auto
(default
the setup
using
power
Camera
setting)
menu,
See "Before
tile camera
is selected
the battery
inserted
supplied
by tile computer.
tile Camera"
([_
via tile supplied
for the Charge
Connecting
to a Computer"
to a Computer
to a computer
by computer
into
the camera
([_
112) and "Transferring
113) for more
information
USB cable
while
option (I]_
is automatically
Pictures
on connecting
140)in
charged
from
tile
tile camera
to a computer.
o_
t_
5"
_o
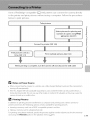
Charge Lamp
The following chart explains charge lamp status when the camera is connected to
a computer.
Charge lamp
Slow blinking
(green)
Description
B
Battery char9ing.
Off
Not char9in 9,
fthe char9e lamp chan9es from slow blinking (green) to off
unue me sower on lamp is lit, charging is complete.
Fast b,inking
• Operating temperature range exceeded. Charge the
battery indoors with an ambient temperature of 5 °C to
35 °C (41 °F to 95 °F) before use.
• A USB cable is not correctly connected or the battery is
faulty. Reconnect the USB cable correctly or replace the
battery.
• Computer is in sleep mode and does not supply power.
Reboot a computer.
• The battery cannot be charged as computer's
specifications or setting does not support power supply
to the camera.
(green)
o_
o_
117
_1_
Notes
on Charging
• The battery
computer
(_
before
Adapter
rD
2.
S'
the camera's
EH 68P (_
is turned
• Ifa computer
enters
to
a Computer
with
connection
must
the camera
and then
is connected
18). If the camera's
be reset before
to a computer.
the battery
off, charging
when
and time have been set (_
the battery
to a
clock battery
can be charged
In this case, use the Charging
set the camera's
AC
date and time.
will also stop.
sleep mode while
charging,
charging
will stop and the camera
may be turned
off.
• When disconnecting
USB ca ble.
the Charging
o
battery
• When
the camera
from
a computer,
to charge the battery
AC Adapter
turn the camera
with connection
EH 68P. Charging
off and then
to a computer
time increases
when
than
disconnect
with charging
image are transferred
while
the
using
the
is charging.
the camera
Nikon Transfer,
charging
• The camera
• Depending
impossible
is connected
to a computer,
may start. If the camera
the battery,
an application
was connected
installed
on the computer,
to the computer
such as
for the sole purpose
of
exit the application.
turns off automatically
after the battery
118
date
14) to charge
• if the camera
• It may take longer
5"
Connection
nor can data be transferred,
the date and time
can be transferred
<[
F
with
be charged,
130) has been exhausted,
or images
on
cannot
has finished
upon computer
to charge the
if there is no communication
with
the computer
for 30 minutes
charging.
specifications,
battery
inserted
settings,
and power
into the camera
supply
via computer
and allocation,
connection.
it may be
Users of PictBridge compatible
(J_[_166) printers can connect the camera directly
to the printer and print pictures without using a computer. Follow the procedures
below to print pictures.
Take
pictures
o_
es for Printing an_
opies using Print
L
Con nect
"
option (_[_] 87)
t
J
rb
to
O,c,u
d
o
O_
iinting
k_
Notes
• When
home
Adapter
electrical
camera
ihe
Cameia
Off and
disconnect
uSB !able
1
Source
the camera
to a printer,
use a fully charged
battery
to prevent
the camera
from
pictures
transferred
the following
a memory
• Taking a memory
For printing
separately)
Do not use any other
is used, COOLPIX $3000 can be powered
make or model
of AC adapter
from
a
as they may cause the
Pictures
to printing
connection,
• inserting
EH 62D (available
outlet.
to heat up or malfunction.
Printing
In addition
printer
turn
off unexpectedly.
• if the A(
[]
on Power
connecting
turning
is €ornpleiel
to a computer
Print set option
photo
and printing
are also available
card into a DPOF compatible
card to a digital
using these methods,
card using the
options
printer's
for printing
over a direct camera
to
pictures:
card slot
lab
specify the pictures
in the playback
menu
and the number
(_
87).
of prints each to the memory
119
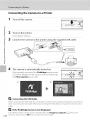
Connecting
the Camera
1
Turn off the camera.
2
Turn on the printer.
to a Printer
o_
m
5"
Check
3
printer
settings.
Connect the camera to the printer
o
o_
using the supplied
USB cable.
J
B
P_
o_
_a
P_
4
The camera is automatically
When
properly
connected,
turned
the PictBridge
((I) will be displayed
in the camera
the Print selection
screen ((2).
on.
startup
monitor,
screen
followed
by
_1_
.......
_
___
II %--_--
(2¸
_1_
Connecting
the
USB
Cable
When connecting
the USB cable, be su re that the connectors
when
the USB cable. When disconnecting
connecting
are properly
oriented,
Do not use _rce
the USB cable, do not pull the con nector
angle.
_1_
If the
PictBridge
Turn off the camera
120
camera's
setup menu
Screen
and disconnect
to Off, then
is not
Displayed
the USB cable. Set Charge
connect
the camera
again.
by computer
(_
140) in the
at a n
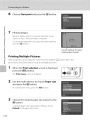
Printing
Pictures One at a Time
After properly connecting the camerato the printer ([_ 120),follow the
procedure described below to print a picture.
1
Use the
picture
multi
and
selector
press
to choose
the _
Rotate the zoom control to W (I_)
thumbnail display, and to i
frame playback.
the
desired
o_
button.
to switch to 12
(C[)to switch back to full-
ro
2
Choose Copies and press the _
3
Choose the numberofcopies(upto
press the _
button.
nine) and
button.
4
Choose Paper size and press the _
5
Choose the desired
button.
paper size and press the
button.
To specify paper size using printer settings, choose
Default in the paper size menu.
121
6
Choose
7
Printing
Start
print
and press
the
_]_ button.
o_
r_
5"
begins.
co
Monitor display returns to the print sdection screen
shown in step 1 when printing is complete.
To canceWprinting before aH copies have been printed,
press the _) button.
o
o_
3
Current number of copies/
total number of prints
o_
Printing
5"
After properly connecting the camera to the printer ([_
Multiple
Pictures
120), folk>w the
procedure described below to print multiple pictures.
1
When
press
the Print
the
selection
screen
is displayed,
Usethe multi selector to choose Paper size
and press the _) button.
To exit the print menu, press the MENUbutton.
3
Choose
the desired
paper
size and press
button.
To specify paper size using printer settings, choose
Default in the paper size menu.
122
I
__
[
i
"_@
_
iVI
MI:NU button,
The Print menu screen isdispiayed.
2
r
the
_J
_
@
J
4
Choose
DPOF
Print
printing
selection,
and press
Print
all images
the _)
or
button.
o_
Print selection
Choose pictures (up to 99) and tile number of
copies (up to nine) of each.
• Press the multi selector • or • to select
•
•
•
•
t_
5"
to
pictures, and press • or • to specify the
number of copies for each.
Picture selected for printing can be
recognized by the check mark (_') and the
numeral indicating the number of copies to
be printed. If no copies have been specified
for pictures, the selection is canceled.
Rotate the zoom control to T (0_)to switch to
full-frame playback.
Rotate the zoom control to W (_1_) to switch
back to 12-thumbnail display.
Press the _) button when setting is complete.
When the menu shown at right is displayed,
choose Start print and press the _) button
to start printing.
Choose Cancel and press the _) button to
return to the print menu.
123
Print
all images
One copy each of all pictures stored in the internal memory, or on the memory
card, is printed.
• When the menu shown at right is displayed,
choose Start print and press the O button
to start print. Choose Cancel and press the _)
button to return to the print menu.
o_
m
_o
DPOF printing
Print pictures for which a print order was
created using the Print set option ([_ 87).
• When the menu shown at right is displayed,
choose Start print and press the _) button
to start printing. Choose Cancel and press
the _) button to return to the print menu.
2.
o
o_
B
o_
n_
• To view the current print order, choose View
images and press the _) button. To print
pictures, press the _) button again.
5
Printing
begins.
Monitor display returns to the print menu (step 2) when
printing is complete.
To cancel printing before all copies have been printed,
press the _) button.
Current print/
total number of prints
[]
Paper
Tile camera
printer),
choose
supports
3.5x5
supported
124
size
the following
by the current
Default
paper
in., 5x7 in., 100x150
printer
in the paper
sizes: Default
mm, 4x6
in., 8x10
will be displayed.
size menu.
(the default
in., Letter,
To specify
paper
size for the current
A3, and A4. Only sizes
paper size using
printer
settings,
The setup
menu contains
the following
options.
Choose how menus are displayed.
welcome
Screen
q3 12S
Choose whether or not a welcome screen is displayed when the camera is turned
on,
@
!29t
Set camera clock and choose home and destination time zones.
lul
Monitor
settings
Adjust photo information
brightness settings.
132
display, post shooting image review, and monitor
Date
impm_t
!33
Imprint shooting date and time or] pictures.
_,1_
ElectronicVR
134
Choose whether to use electronic VR (vibration reduction)
pictures.
_-_
Motion
when taking still
detection
_
135
Enable or disable motion detection, which reduces the effects of subject
movement and camera shake in still pictures.
_--lib
AF
assist
!36
Enable or disable AF assist illumination.
[]
D_gJta_
zoom
q] !36
Enable or disable digital zoom.
'_) Sound
settings
Adjust sound settings.
¢
Auto off
137
Set time before carT]era enters standby mode for saving power.
1_I2U
Format memory/Format
card
!38
Format internal memory or memory card.
jill
Language
!39
Choose the language used for carT]era monitor display.
Video mode
Adjust settings necessary for connection
[_
139
to television.
125
charge
by computer
140
Choose whether or not to charge the camera battery when connecting to a
computer via the USB cable.
Blink Warning
141
Specify whether or not the camera detects human subjects that have blinked with
shooting using face priority.
Reset
all
143
Restore camera settings to the default.
76[
Firmware version
[[_[_ 145
Display camera firmware
Displaying
I
version.
the Setup Menu
Press the
MENUbutton
to display
the menu
screen.
m
If the MENUbutton was pressed in Scene mode, press the
multi selector (_ 9) • to display the tabs.
E
tI1
2
Press the multi selector
Tab selection is activated.
126
([_[_]9) 4.
Date
MENU button
(Setup menu) (_:] 126) -) _
") _11
Set the camera
Date
clock.
Date
Set camera dock to current date and time.
Use the multi selector to set the date and time in the date screen.
• Highlight a different item (day, month, year, hour, minute, and the order in which
day, month, and year are displayed): press _ or i_.
• Edit the highlighted item: press • or V.
• Apply the setting: select the order in which day, month, and year are displayed
and press the _) button (_ 19).
Timezone
1_ Home time zone can be specified and daylight saving enabled or disabled from
Time zone options. When the destination time zone (:_I-) is selected, local time
((:]_:]131) is automatically calculated and date and time in the selected region are
recorded with pictures. Useful when traveling.
Selecting
1
Travel Destination
Use the multi selector
Time Zone
to choose Time zone
and press the _) button.
The Time zone menu is displayed.
2
Choose
_)
_I_ Travel
destination
and
press
the
button.
The date and time displayed in the monitor changes
according to the region currently selected.
129
3
Press i_.
The time
4
zone
selection
screen
is displayed.
Press _ or i_ to choose the travel destination
time zone.
Press •
in a time
to enable
the
automatically
will
zone
saving
advance
the
be displayed
disable
the
Press the
at the
daylight
_)
where
daylight
button
time
top
saving
daylight
time
is in effect
and
by one hour.
of the
time
to choose
saving
function
monitor.
The e_. icon
Press •
to
function.
the travel
destination
time
zone.
While
the
travel
icon will
m
in shooting
Notes
The camera
is inserted
destination
be displayed
time
in the
zone
monitor
is selected,
when
the
the camera
is
mode.
on the
Clock
Battery
clock is powered
or an AC adapter
by the clock
is connected,
batte%
The clock battery
and can provide
charges
when
several days of backup
the main
power
battery
after about
ten hours of charging,
[]
_"
Home
• To switch
Time
Zone
to the home
• To change
the
time zone, choose
home time zone, choose
1_ Home
"_" Home
time
time
zone
zone
in step 2 and press the _) button.
in step 2 and complete
steps 3 and
4.
[]
Daylight
When daylight
Saving
saving
Time
time starts or ends, turn the daylight
time zone selection
screen displayed
[]
the
Imprinting
Enable date
Date
on
im print from the Date
time have been set. When the Date
130
shooting
date
imprinted
on them.
saving
time function
on or off from
the
in step 4,
Pictures
imprint
imprint
option
option
(_
133) in the setup menu
is enabled,
pictures
will
after the date and
be recorded
with
[]
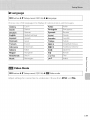
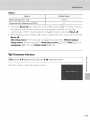
Time Zones
The camera supports the time zones listed below. For time zone not listed below, set the camera
clock to local time,
UTC+/-
Location
UTC +/-
11
Midway,
10
Hawaii, Tahiti
+2
9
Alaska, Anchorage
+3
Samoa
+1
8
PST (PDT): Los Angeles,
Vancouver
7
MST (MDT): Denver,
Phoenix
CST (CDT): Chicago,
Houston,
6
Mexico
Seattle,
Paris, Berlin
Moscow,
Nairobi,
Riyadh,
Kuwait, Manama
+4
+5
Mamabad,
+5.5
New Delhi
Karachi
City
EST (EDT): New York, Toronto,
Lima
+6
4.5
Caracas
+7
4
Manaus
3
Buenos
2
Fernando
]
Azores
5
Location
Madrid,
Colombo,
+8
Aires, %o Paulo
+9
de Noronha
+10
Dhaka
Beijing, Hong
Kong, Singapore
Tokyo, Seoul
Sydney,
Guam
i
÷0
London,
Casablanca
+11
New Caledonia
+12
Auckland,
Fiji
131
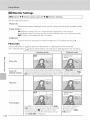
It1 Monitor Settings
MENU
button
@ V (Setup
menu)
(_
126) @
lul Monitor
settings
]
Set tile options below.
Photo
info
Image
review
Choose
information
displayed
in the
monitor
On (default
immediately
setting):
Picture
after it is taken
is automatically
and the monitor
Off: Picture
is not displayed
after
during
shooting
and playback
displayed
in the monitor
display returns to shooting
mode.
mode.
it is taken.
Brightness
Choose
from
five
settings
for
monitor
brightness.
The default
setting
is 3.
Photo Info
Select whether or not the photo information is displayed in the monitor.
See "The Monitor" ([_ 6) for information on indicators displayed in the monitor.
Shooting
mode
Showinfo
Auto
...............
info
(default
setting)
Current set_Engs and operational
operations
are performed
guides are dEsplayed as in Show
mfo above
If no
for a few seconds, the display will be the same as Hide
Hide info
Framing grid
in addition
to information
shown
with
Auto
info above, a framing grid is displayed to help
frame pictures in I_1 (auto) mode. in other
shooting
modes only the information
with Auto info is displayed.
132
shown
The current
settings
operation
guide is
displayed, as in Auto
info above,
or
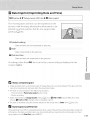
[] Date Imprint (Imprinting
MENU
"_ V (Setup
button
menu)
Date and Time)
126)
([_
-_ []
Date
imprint
The shooting date and time can be imprinted on the
pictures with shooting, allowing the information to be
printed even from printers that do not support date
printing (1_[_90).
Off(default
setting)
Date and time are not imprinted
on pictures.
[]Date
..............
Date is imprinted
[]
on the pictures.
Date and time
Date and time are imprinted
on the pictures.
F,"
At settings other than Off, the icon for the current setting is displayed in the
monitor ([_[_ 6).
_1_
Notes
on Date
• Imprinted
cannot
be imprinted
• The date
is not
Pictures
Movie
• The date
[]
imprinted
part of image
data and cannot
be deleted.
The date and time
after they have been taken.
in the following
situations;
assist scene mode
recording
[]
at an Image
1024
Date
Imprint
in_rmation,
options
from
mode
using
and
the format
Print
(_
using
37) of _
640 x 480
may be difficult
menu's
item (_
to read.
date imprint,
selected
in the setup
Date
18, 129).
Set
DPOF compatible
the date and in_rmadon
in the
setting
x 768 or larger when
is recorded
When printing
using
on pictures
taken in Panorama
• Dates imprinted
Choose
Imprint
dates form a permanent
Print Set menu
printers
that support
can be printed
(_
87).
without
the printing
imprinting
of shooting
date and photo
this in_rmation
on them
133
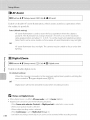
_l_ Electronic VR
MENtJbutton
menu)
V (Setup
")
126)
(_
-_ _4_ Electronic
VR
Choose whether or not electronic VR(vibration reduction) is used when taking still
pictures.
_,II_ AUtO
Electronic
VR is enabled
of still pictures
• The flash
•
A slow
when
is turned
shutter
• The
Continuous
• The
subject
Off (default
and the
effects
of camera
aH of the following
shake
conditions
are reduced
with
shooting
are met.
off or set to sWow sync mode.
speed
is used.
setting
is set to Single
is dark.
setting)
EWectronic VR is disabled.
When Auto is selected, _ is displayed in the monitor (l_
applied according to shooting conditions.
6), and electronic VR is
m
3
rD
_1_
Notes
on Electronic
Reduction
VR does
not function
when
the flash is used, except
Electronic
VR does
not function
when
slow sync with
VR does
not function
with exposures
• Electronic
Electronic
VR is activated
Electronic
VR does
not function
when
• Electronic
VR does
not function
in the following
Sports
Night
(_
Night
1_
55)
landscape
1_
(_
show
Backlight
(_
• The effectiveness
[]
(_
(_
length
of time.
42) is set to Auto.
64) is set to On in smart portrait
mode,
scene mode:
56)
58)
of electronic
VR decreases
taken using electronic
Electronic
VR for
for camera
menu
proof
a certain
is applied,
54, 55) is used.
58)
To tom pensate
movie
Blink
(_
(_
57)
Fireworks
• The picture
that exceed
ISO sensitivity
slow sync mode
54)
1_
Museum
only when
when
red eye reduction
54)
portrait
Dusk/dawn
134
Vibration
• Electronic
(_
108).
as camera
VR may be somewhat
shake increases,
"grainy"
in appearance,
Movies
shake with
movie
recording,
enable
Electronic
VR (_
10% from
the
_
Motion
MENU button
Enable
Detection
-_ 1tl (Setup menu) (_]
motion
shake when
detection
shooting
26)
1-_
to reduce
_ Motion detection
the effects
of subject
movement
and camera
still pictures.
I_ Auto (default Setting)
When the camera detects subject movement or camera shake, the ISO sensitivity
and shutter speed are automatically increased to reduce blurring.
However, motion detection does not function in the following situations.
• When the flash fires
• When ISO sensitivity ([_ 42) is set to Fixed range auto or ISO sensitivity is
fixed at a particular value in i_1 (auto) mode
• In i_1 (auto) mode, when Multi-shot 16 ([[_ 41) is enabled
• When Sports, Night portrait, Dusk/dawn, Fireworks show, or Backlight
scene mode is enabled
• When subject tracking mode is enabled
• When recording movies
Off
Motion detection
is not enabled.
The current motion detection setting can be confirmed in the camera monitor
with shooting ([_ d, 23). The motion detection icon turns green when the camera
detects camera shake and increases shutter speed. When Off is selected, no icon is
displayed.
Notes on Motion
Detection
• Motion detection may be unable to completely eliminate the effects of subject movement and
camera shake in some situations.
• Motion detection may not function if the subject exhibits significant movement or is too dark.
• The pictures taken using motion detection may be somewhat "grainy" in appearance,
135
-'Ill AF Assist
") V (Setup menu) ([_
MENUbutton
Enable
or disable
the subject
1 26) -_ -hi AF assist
AF assist illumination,
is poorly
which
assists autofocus
operation
when
lit.
Auto (default setting)
AF assist illumination is used to assist the focus operation when the subject is
poorly lit. The illuminator has a range of about 1.9 m (6 ft. 2 in.) at the maximum
wide-angle position and about 1.1 m (3 ft. 7 in.) at the maximum telephoto position.
Note that for some scene modes, or focus areas, AF assist illuminator may not light.
Off
AF assist illuminator
lighting.
[]
Digital
does not light. The camera may be unable to focus under dim
Zoom
m
") V (Setup menu) ([_
MENU button
Enable
or disable digital
1 26) -) []
Digital
zoom
zoom.
On (default setting)
When the camera is zoomed in to the maximum optical zoom position, rotating the
zoom control to T triggers digital zoom (_ 25).
Off
Digital zoom will not be activated (except when recording movies).
_1_
Notes
on Digital
• When
digital zoom
• Digital
zoom
When
cannot
136
mode
tracking
When Continuous
Just before
selector,
portrait
When subject
AF area mode
be used in the _llowing
Scene auto
When smart
Zoom
is in effect,
recording
Portrait,
is set to Center
(_
44).
situations,
or Night
portrait
is selected
in scene mode
is selected
mode
is selected
is set to Multi-shot
a movie
16 (_
41)
(Up to 2x zoom can be activated
while
recording
movies)
_,>)Sound
Settings
-'_ V (Setup menu) (1_] 126) =) _o) Sound settings
MENU button
Adjust the following
sound settings.
Button Sound
Select On (default setting) or Off.
When On is selected, a beep will sound once when operations are completed
successfully, twice when the camera acquires focus on the subject, and three times
when an error is detected. Start up sound will also play when the camera is turned on.
Shutter sound
Select On (default setting) or Off.
No sound is played with shutter release when some features such as continuous
shooting or BSS(best shot selector) are enabled, or when recording movies, even if
On is selected.
Auto Off
MENUbutton
"_ V (Setup menu) (1_] 126) =) _ Auto off
When the camera is on and a specified period of time passes with no operations
performed,
the monitor turns off and the camera will enter standby mode ([_[_ 17)
to save power. Once the camera has entered standby mode, the power on lamp
will blink, and if no operations
are performed
for another three minutes, the
camera will turn off.
Choose
tile time allowed
operations
[]
Canceling
Cancel standby
Standby
power switch
shutter release button
• the
I_1 button
[]
Note
• During
• When
before
tile camera
30 s, 1 rain (default
enters
setting),
standby
S rain,
mode
if no
and 30 rain
Mode
the monitor
by pressing
any of the _llowing
buttons.
button
on Auto
The time allowed
situations:
• When
from
mode and reactivate
• the
• the
• the []
to elapse
are performed
a menu
Off
to elapse
he.re
is displayed:
slide show
playback:
the AC adapter
the camera
enters
standby
mode
is fixed in the _llowing
three minutes
up to 30 minutes
EH 62D is connected:
30 minutes
137
I_1 Format
MENUbutton
Memory/L_
menu)
V (Setup
")
Format
(_]
26)
1
Card
-)' I_I Format
mem o ry/[._J
Format
card
Use this option to format the internal memory or a memory card.
Formatting
the Internal
Memory
To fornlat tile internal memory, remove tile memory
card
fronl
tile
Tile
Format
camera.
memory
option
is displayed
in tile
setup
menu.
Formatting
a Memory
Card
When the memory card is inserted in the camera, the
Format card option is displayed in the setup menu.
m
_1_
Formatting
• Formatting
to transfer
• Formatting
default
important
Memory
memory
pictures
the internal
setting
• Do not turn
Internal
the internal
the camera
to a computer
memory
(displayed
and
Memory
or memory
or memory
Cards
cards permanently
he.re
deletes
all data.
Be sure
_rmatting.
card restores album
icon settings
(_
78) to the
as number).
off, or open the
battery
chamber/memory
card slot cover during
formatting,
• Be sure to use this camera
138
they are inserted
to format
memory
into the COOLPIX 53000.
cards previously
used in other devices
the
first time
kl Language
MENU button
Choose
-_ V (Setup menu) (_]] 126) -_
one of 24 languages
for display
Language
of camera
Czech
oansk
i Danish
Deutsch
German
_defa ult setting)
English
Espa_ol
menus
Polski
Polish
Po,.t,.,gu,_s ,,,_,,o,[!,,_,,!,,,_,t,_,
_..........................
PyccKH_
Russian
_s%o'mT
''_°_.........
G,"n"i"&
..................................
Swedish
Spanish
_'EhhnviKa
and messages.
Greek
Turkish
French
_:_
Simplified Chinese
Indonesia
Indonesian
_m_:_
Traditional Chinese
Italiano
Italian
I_:_
Japanese
Magyar
Hungarian
_
Korean
Nederlands
Dutch
Norsk
Norwegia
Video
MENUbutton
Adjust
Thai
_._
Mode
-) ' (Setup menu) ([_
settings
Arabic
for connection
126) -) _tIT:t_Video mode
to a television.
Choose
from
NTSC and PAL.
il
139
•-_ Charge by Computer
MENU button
_ V (Setup menu) _ _ Charge by computer
Choose whether or not the battery inserted in the camera is charged when the
camera is connected to a computer via USBcable (1_]] 117).
Auto (default setting)
When the cameraisconnected to a computer that is running, the battery inserted
into the cameraisautomatically charged using power supplied by the computer.
Off
The battery inserted into the camerais not charged when the camerais connected
to a computer.
n
E
_1_
Notes
on Connecting
• The battery
cannot
PictBridge
standard.
• When
direct
Auto
is selected
connection
in the monitor
disconnect
140
printer.
be charged
the
for Charge
of the camera
after the camera
Camera
to a Printer
with connection
to a printer,
by computer,
to some printers,
is connected
the USB cable. Set Charge
even
if the printer
it may be impossible
If the PictBridge
to a printer
by computer
and turned
to print
startup
complies
with
pictures
with
screen is not displayed
on, turn the camera
to Off and reconnect
the
the camera
off and
to the
Blink Warning
MENU button
Specify
") V (Setup menu) (_
whether
or not the camera
using face priority
•
I_1 (auto)
mode
when
shooting
(when
126) -)
Blink warning
detects
human
in the following
Face priority
([_
subjects
that have blinked
modes.
44) is selected
for AF area mode
option).
•
Scene auto selector (_
51 ), Portrait
selected for tile scene mode.
(_
53), or Night
portrait
(_
54) is
On
When the camera detects that one or more human subjects may have blinked in a
picture taken using face priority, the blink warning screen is displayed in the
monitor.
The face of the human subject that may have blinked when the shutter was
released is framed by a yellow border. Should this occur, check the picture and
determine whether or not another picture should be taken.
See "Operating the Blink Warning Screen" (_ 142) for more information.
Off (default setting)
F,"
Blink warning is not enabled.
_1_ Note on BlinkWarning
Tile blink warning does not fu nction at continuous settings of Continuous, BSS, or Multi-shot 16,
141
Operating
When
the
Blink
the blink warning
displayed
in the monitor,
below are available.
If no operations
the camera
Warning
the operations
are performed
automatically
Screen
screen shown
within
returns
at right
is
described
a few seconds,
to shooting
mode.
Use
Enlarge the detected
face that blinked
Switch to full-frame
playback
,,._oo,,_
T (c_)
W (_1_)
Rotate tile zoom control to T (q).
Rotate the zoom control to W (_1_).
If the camera detects that more than one human
subject blinked, press 4,, V, • or i_ with display
zoomed in to switch to another face.
Select the face to be
displayed
Delete the picture
m
Description
"_
Press the _
button.
_,,,_,,_,_,,_,_
3
rD
142
Switch to shooting
mode
I
Press the _) button or the shutter-release button.
[] Reset All
button
When
") V (Setup rnenu) (I_] 126) -)' ril Reset all
Reset
is selected,
the camera's
settings
will be restored
to their
default
values.
Basic Shooting
Functions
...... _
Option
([_
Auto
32)
Off
Macro mode ([_[_] 33)
Exposure compensation
Shooting
w,_u_,u_,u_,u_,u_,u_,u_
Default value
Flash mode ([_[_]30)
Self-timer
.........
Off
(_]
0.0
34)
Menu
:
Image mode ([_
White balance (_]
Continuous
Option
,,,_'!
.........
37)
Default value
[] 4000×3000
39)Auto
([Z[_ 41)
ISO sensitivity ([_[] 42)
Single
:
Auto
Color options (_[_143)
Standard color
AF area mode ([_[] 44)
Face priority
c
Autofocus
mode ([Z[_ 48)
Scene
Mode
Smart
Portrait
Single AF
Menu
143
Subject
Tracking
Menu
Option
............. /
Aof_oc
ut
s_m_o
u
e_
d
Movie
67q
.....
Option
Autofocus
108)i_J
mode (_[_] 109)
Electronic VR ([_
109)
Default value
TV movie 640
Single AF
Menu
Default value
Option
Text
Welcome screen (_]
Photo info
[_
Brightness
128)
On
132)
(o_o ]o32) ....................
Date im print (_]
(_]
Off
135)
On
136)
On
Button sound ([_[_] 137)
On
Shutter sound (_[_] 1371
1 rain
Auto off ([_[_] 137)
Charge by computer
Blink warning (_]
Auto
Auto
AF assist ([_[_] 1361
Digital zoom (_]
3
Off
1331
Electronic VR (_[_] 134)
Motion detection
None
Auto info
132)
Image review (_]
144
"
Off
Menus (_[_] 1271
m
FulPtime AF
Menu
Movie options (_]
Setup
:2,e ,,2,,!,,ue
_
(_
141)
140)
Auto
Off
Others
• Choosing Reset all also clears the current file number ([_
151) from memory.
Numbering will continue from the lowest number available. To reset file
numbering to "0001 ", delete all pictures ([_ 92) before selecting Reset all.
• The following menu settings will remain unaffected when menus are reset with
Reset all.
Shooting menu: Preset manual data ([_[_ 40) acquired for White balance
Setup menu: Picture selected for Welcome screen ([_[_ 128), Date ([_[_ 129),
Language ([_[_ 139), and Video mode ([_[_ 139)
Ve[ Firmware Version
26)
MENU
button -_ V (Setup menu) ([[_ 1-)'
Ve[Firmware version
F,"
d_
View the current camera firmware version.
145
To ensure continued enjoyment of this Nikon product, observe the following
precautions when using or storing the device.
_I_ Keep dry
The device
will be damaged
if immersed
in water or su_ected
to high humidity.
_I_ Do not drop
The product
may mal_nction
if su _ected
to strong
shock or vibration.
_I_ Handle the lens and all moving parts with care
Do not apply
_rce
to the lens, lens cover,
parts are easily damaged.
damage
Applying
to the lens. Should
the monitor
broken glass and to prevent
or mouth,
_1_
Do
Avoid
storing
5"
CQ
8"
not
point
pointing
the
lens
blur effect in photographs,
_1_
Keep
away
from
or magnetic
Avoid
internal
changes
in temperature,
with
or the
the
product
the battery
Forcibly
power
memory
cutting
or internal
off
while
or
by
the eyes
periods
periods
sensor,
when
using or
producing
a
fields
damage
strong
electromagnetic
produced
data stored
by equipment
on the memory
in temperature
such as when
before
entering
or leaving
To prevent
it to sudden
removing
the product
in these circumstances
circuitry,
caused
circuitry.
bag before exposing
Turn
extended
that generates
magnetic
the monitor,
carrying
Do not remove
for
i_ury
the skin or entering
of the CCD image
of equipment
to form inside the device,
case or a plastic
touching
These
mal_nction
fields
static charge
interfere
be taken to avoid
sources
chamber.
result in camera
light sources _r extended
can cause condensation
_1_
145
sudden
changes
light
in the vicinity
could
card slot or battery
the display
strong
magnetic
fields, Strong
card, or affect the product's
Sudden
crystal from
may cause deterioration
strong
Do not use or store this device
memory
break, care should
at strong
light
white
_1_
monitor,
to the lens cover could
the lens at the sun or other
such as radio transmitters
rD
the liquid
the camera. Intense
radiation
_rce
or
changes
images
building
place
on a cold day,
the device
in a
in temperature,
disconnecting
is on, or while
could
a heated
condensation,
are being
the
power
recorded
result in loss of data or in damage
source
or deleted.
to product
[]
The
Battery
• Check the battery
level before using
not continue
charging
performance,
Whenever
important
possible,
and replace
is fully charged
carry a fully charged
or charge
the battery
if necessary.
as this will result in reduced
spare battery
when
taking
Do
battery
pictures
on
occasions,
• Do not use the battery
• Charge
the camera
once the battery
the battery
at ambient
indoors
with
temperatures
an ambient
below
0 °C (32 °F) or above 40 °C (104 °F).
temperature
of 5 °C to 35 °C (41 °F to 95 °F) before
use.
• When
charging the COOLPIX
$3000 using the Charging AC adapter EH 68P or a computer, the
batteryisnot charged at ambient temperatures below 0 °C (32 °F)or above 45 °C (I13 °F).
• Note that the batterymay
become
hot during use;wait forthe battery to cool before charging.
Failureto observe these precautions could damage
it from
charging
• On cold days, the capacity
before
heading
exchange
outside
as necessary.
• Dirt on the battery
terminals
before
tends to decrease.
Once warmed,
in cold weather.
a cold battery
can prevent
dirty, wipe them
the camera
off with
temperature
it for storage.
Be sure that the battery
Keep spare batteries
may recover
The battery
before
insert it in the camera
should
be stored
excessively
the battery
and completely
with
in hot or extremely
exhaust
it
an ambient
cold locations.
the battery from the camera or optional battery charger when it is not being used.
minute amounts of current flow even when unused, and the battery may become
drained
exhausted
Should
use.
in a cool location
of 15 to 25 °C (59 to 77 °F). Do not store the battery
• Always remove
When inserted,
is fully charged
in a warm place and
some of its charge.
from functioning.
a clean, dry cloth
will not be used for some time,
removing
• Recharge
of batteries
to take pictures
terminals
become
• If the battery
the battery,impair itsperformance or prevent
normally.
and no longer
can result in reduced
the battery
function.
battery
Turning
the camera
on or offwhile
the battery
is
_
_"
life.
S"
at least once every six months
and completely
exhaust
it before returning
it
_-
to storage.
• After removing the battery from the camera
battery case and store in a cool place.
• A marked
drop in the time
temperature,
indicates
• Replace the battery
Please recycle
a fully charged
that the battery
when
it no longer
used batteries
or optional
battery
battery
retains its charge,
needs to be replaced.
holds a charge.
in accordance
with
charger,
when
return
the battery
to the
mB
used at room
Purchase a new EN ELI 0 battery,
Used batteries
are a valuable
resource.
local regulations.
147
Cleaning
Avoid touching glass parts with your fingers. Remove dust or lint with a blower
(typically a small device with a rubber bulb attached to one end that is pumped
to produce a stream of air out the other end). To remove fingerprints or other
stains that cannot be removed with a blower, wipe the lens with a soft cloth,
using a spiral motion that starts at the center of them and working toward the
edges. If this fails, clean the lens using a cloth lightly dampened with
commercial lens cleaner.
Lens
-_,_=w_-_
Remove dust or lint with a blower. To remove fingerprints and other stains,
clean the monitor with a soft, dry cloth, being careful not to apply pressure.
Monitor
Use a blower to remove dust, dirt or sand, then wipe gently with a soft, dry
cloth. After using the camera at the beach or other sandy or dusty
environment, wipe off any sand, dust or salt with a dry cloth lightly dampened
with fresh water and dry thoroughly. Note that foreign matter inside the
camera could cause damage not covered by the warranty,
Body
Do not use alcohol,
thinner,
or other
volatile
chemicals.
Storage
Turn tile camera off when not in use. Be sure that tile power on lamp is off before
putting the camera away. Remove the battery if the camera will not be used for an
extended period. Do not store the camera with naphtha or camphor moth balls, or
in any of the following locations:
• Next to equipment that produces strong electromagnetic fields, such as
televisions or radios
rD
• Exposed to temperatures below -10 °C (14 °F) or above 50 °C (122 °F)
• Places that are poorly ventilated or subject to humidity of over 60%
To prevent mold or mildew, take the cameraout of storageat leastoncea month.
Turn the camera on and release the shutter a few times before putting the camera
awayagain.
[]
Notes
on the
• The monitor
common
product
• White
Monitor
may contain
will
characteristic
streaks may be visible
known
Continuous.
except
148
Nikon
lit or that do not
not indicate
when
a malfunction,
during
light. This is a characteristic
images
sunlight,
and electric
may be difficult
service
representative.
are framed
bright
recorded
a malfunction.
shooting.
It does
we recommend
in the
using the
monitor.
light strikes the image
Smear
not appear
and of images recorded
in these modes,
is lit by an LED backlight.
authorized
subjects
extremely
sensors and does not indicate
in the monitor
When shooting
in the monitor
bright
occurs when
in the cases of movies
as the sun, reflected
• The monitor
as "smear,"
of image
of partial discoloration
the camera
and does
not be affected.
or colored
phenomenon,
• images
a few pixels that are always
to all TFT LCD displays,
with
This
sensor; it is
may also take the form
in images
Multi-shot
that you avoid
bright
recorded
with
16 selected
subjects
for
such
lights.
to see under
Should
bright
the monitor
lighting.
begin
to dim or flicker, contact
your
Rechargeable
battery
Charging AC Adapter
Battery
cha rger
Rechargeable Li ion Battery EN-ELIO
Charging AC Adapter EH 68P*, EH 68P (AIR)*
Battery Charger MH-63
AC Adapter EH 62D
<Connecting
2
the EH-62D>
3
Check that the AC adapter cord has been inserted correctly into
the battery chamber before closing the battery-chamber/
memory card slot cover. If part of the cord has not been inserted
into the chamber the cover may be damaged during closure.
USB cable
Audio/Video
USB Cable UC-E6
cable
Audio Video Cable EG-CP14
* To use the charging AC adapter abroad, be sure to use a power adapter (available
commercially) where necessary. Check beforehand with your travel agent regarding the
necessity for power adapter plugs.
£z
o
o_
149
Approved
Memory
Cards
The folk)wing
Secure Digital
for use in this camera.
All cards of the designated
(SD) memory
cards
make and capacity
have been tested
and approved
can be used, regardless
of speed.
1 If the memory card will be used with a card reader or similar device, check that device
supports 2 GB cards.
2 ,SiP
Contact
n
_u.
z
o_
I
150
SDHC compliant. If the memory card will be used with a card reader or similar
device, check that device supports SDHC.
the manufacturer
for details
on the above
cards.
Pictures, movies or voice memos are assigned file names as follows.
DSCN0001
I
Identifier
I
(not
shown
on camera
monitor)
Original still pictures (voice
memo attachment included)
and movies
DSCN
Cropped Copies(voice memo
attachment included)
Rqrkl
.....
Small copies (voice memo
attachment included)
Quick retouch copies, D_
Lighting coPiesand Skin
softening copies(voice
memo attachment included)
,JPG
JL _J
Extension (indicates file format)
SSCN
File number (assigned automatically
in
.........................................................
ascending order, starting with "0001 ")
FSCN
• Files are stored in folders named with a folder number followed by a five
character identifier: "P_" plus a three digit sequential number for pictures taken
in Panorama assist scene mode (e.g. "101P_001 "; _ 60) and "NIKON" for all
other pictures (e.g. "100NIKON"). When the number of files within a folder
reaches 9999, a new folder will be created. File numbers will be assigned
automatically starting with %001 ."
• Voice memo file names have the same identifier and file number as the picture
to which the voice memo is attached.
• Files copied using Copy>Selected images are copied to the current folder,
where they are assigned new file numbers in ascending order starting from the
largest file number in memory. Copy>All images copies all folders from the
source medium; file names do not change but new folder numbers are
assigned in ascending order, starting from the largest folder number on the
destination medium ([_ 97).
2I
z
o
o_
• A single folder can hold up to 200 pictures; if the current folder already contains
200 pictures, a new folder, named by adding one to the current folder name,
will be created the next time a picture is taken. If the current folder is numbered
999 and contains 200 pictures, or a picture is numbered 9999, no further
pictures can be taken until the internal memory or memory card is formatted
([_[_ 138), or a new memory card is inserted.
151
The following table lists the error messages and other warnings displayed in the
monitor, as well as the solutions for dealing with them.
='_
(blinks)
Problem
Solution _'!_
Clock not set.
Set date and time.
129
Battery running low.
Prepare to charge or replace
battery.
12, 14
Battery exhausted.
Charge or replace battery.
12, 14
Battery temperature
high.
Turn off camera, and allow
battery to cool down before
resuming use. After
five seconds, this message will
disappear, the monitor will
turn off, and the power on
lamp and flash lamp will blink
rapidly. After the lamps blink
for three minutes, the camera
will turn offautomaticaHy.
Pressing the power switch
also turns offthe camera.
17
0
Battery exhausted.
O
Battery tern peratu re
high
_r_o (0 blinks red)
O
m
Please wait for the
_u.
P_
camera to finish
recording.
rD
Memory card is write
protected.
o_
x_
This card cannot be
used.
O
This card cannot be
read.
152
is
Camera cannotfocus.
Refocus.
Use focus lock.
Camera cannot perform
other operations until
recording is complete.
Wait until message clears
from display automatically
when recording is complete.
Write protect switch is
in "lock" position.
Slide write protect switch to
"write" position.
Error accessing memory
card.
26,27
45
21
Use approved card.
Check that connectors are
clean.
150
20
Confirm that memory card
is correctly inserted.
2O
Display
Problem
O
Card is not formatted.
Format card?
No
Yes
Solution
!_]
Formatting deletes all data
stored on the memory card.
Be sure to select No and make
Memory card has not
been formatted for use
in this camera.
copies of any pictures you
wish to keep before
formatting the memory card.
Select Yes and press the _)
button to format the memory
card.
Choose smaller image size.
Delete pictures.
O
Out of memory.
Memory card is full.
Error occurred while
recording picture.
Camera has run out of
file numbers.
Image cannot be
saved.
Picture cannot be used
for welcome screen.
Insufficient space to
save a copy.
@
Album is full. No
further pictures can be
added.
Over 200 pictures have
already been added to
album.
28,
92,110
Insert new memory card.
Remove memory card and
use internal memory.
20
20
Format internal memory or
memory card.
138
Insert a new memory card or
format internal memory or
memory card.
151
The following
be stored.
O
37
pictures cannot
Pictures taken at an Image
mode setting of [] 3968 x
2232
Pictures reduced to 320 x
240 size or smaller with
cropping or small picture
editing
Delete pictures from
destination.
2128
z
o
92
Remove some pictures
from album.
Add to other albums.
153
Display
0
Sound file cannot be
saved.
0
A blink was detected
in the picture just
taken.
0
Image cannot be
modified.
0
Cannot record movie.
Problem
A voice memo cannot
be attached to this file.
96
64
Be sure that the picture
meets editing
requirements.
Movies cannot be edited.
98
Cannot edit selected
_icture.
Time out error while
recording movie.
Memory contains no
images.
The picture has not
been added to album.
m
154
Select a picture taken with
this camera.
Check the picture in playback
mode.
0
g_
Solution
Voice memos cannot be
attached to movies.
One or more portrait
subjects may have
blinked when the
}icture was taken.
No pictures in the
internal memory or
memory card.
P_
"
No pictures are
contained in the
category selected in
auto sort mode.
Choose memory card with
faster write speed.
To play back pictures stored
in internal memory, remove
memory card from the
camera.
To copy picture from
internal memory to
memory card, press the
MENUbutton. The copy
screen will be displayed
and pictures in the internal
memory can be copied to
memory card.
Add the picture to album.
Choose the album that the
20
20
97
74
75
picture was added.
Select the category
containing the sorted
81
Display
Problem
Solution
File not created with this
camera.
File cannot be viewed on this
camera. View file using a
computer or the devices used
to create or edit this file.
@
File contains no image
data.
O
This file cannot be
played back.
0
All images are hidden.
No pictures available for
a slide show.
91
0
This image cannot be
deleted.
0
Travel destination is in
the current time zone.
Picture is protected.
Disable protection.
Destination in same
time zone as home.
92
129
Turn camera off and then on
Lens error
0
again. If error persists, contact
retailer or Nikomauthorized
Lens error.
22
service representative.
(D
Communications
error
System error
0
USB cable disconnected
during data transfer to
_rinter.
Error has occurred in
camera's internal
circuitry.
Turn camera off and
reconnect cable.
12O
Turn camera off, remove and
reinsert battery, and turn
camera on. If error persists,
contact retailer or Nikon
authorized service
213
z
o
representative.
Printer error: check
Printer error.
Check printer. After solving
the problem, select Resume
and press the _) button to
resume printing2
Specified size of paper is
not loaded in printer.
Load the specified paper,
select Resume and press the
_) button to resume
printing2
Paper hasjammed
the printer.
Remove the jammed paper,
select Resume and press the
_) button to resume
printing2
printer status.
Printer error: check
paper
Printer error: paper
jam
in
155
"_--°6_7
°:::::::::::_
¸ .....Problem
..............
=:°°!!!°!!!°!!!_uT[o,_
(_
Printer error: out of
No paper is loaded in
_rinter.
paper
Load the specified paper,
select Resume and press the
_) button to resume
prindng _
Check ink, select Resume and
O/'_"
Printer error: check ink
Ink error,
press the _) button to
resume printing. _
(_)/F_
Printer error: out of ink
Running out of ink or ink
cartridge is empty,
Replace ink cartridge, select
Resume and press the _)
button to resume printing. _
An error caused by the
image file has occurred.
Select Cancel and press the
_) button to cancel printing.
O/'_"
Printer error: file
corrupt
See the documentation
r_
_u.
z
m
156
_rovided with your printer for further guidance and information.
If the camera
fails to function
below
consulting
before
Display,
Settings
and
your
as expected,
check
retailer or Nikon
Power
the list of common
authorized
service
problems
representative.
Supply
Problem
Cause/Solutlon
Camera is off.
Monitor is blank.
Monitor is hard to read.
Camera turns offwithout
warning.
Battery is exhausted.
Standby mode for saving power: press the
power switch, the shutter release button, the
I_ button, or the [] button.
When flash lamp blinks red, wait until flash
has charged.
Camera and computer are connected via USB
cable.
Camera and TV are connected via A/V cable.
When connecting to an electrical outlet using
a Charging AC Adapter, the camera cannot be
turned on.
No indicators displayed in
monitor.
Date imprint
not available.
31
12
11
14
Adjust monitor brightness.
Monitor is dirty. Clean monitor.
132
Battery is exhausted.
Camera has turned off automatically to save
power.
Battery is cold.
The camera turns off if the Charging AC
Adapter is connected while the camera is on.
The camera turns off if the USB cable
22
connecting it to a computer or printer is
disconnected. Reconnect the USB cable.
Date and time of recording are
not correct.
17
12
137
If camera clock has not been set, "Date not
set" indicator blinks with shooting and movie
recording. Pictures and movies recorded
before clock is set are dated %0/00/0000
00:00" or "01/01/2010 00:00" respectively. Set
the correct time and date from the Date
option in the setup menu.
Check camera clock regularly against more
accurate timepieces and reset as required.
Hide info is selected for Photo info.
Select Show info.
146
137
147
14
13,
15,
120
2z
o
18,129
129
132
18,129
157
Problem
Cause/Solution
[)ate not appearing on pictures
even when Date imprint is
enabled.
The current shooting mode is one that does not
support Date imprint.
133
Camera settings reset.
Clock battery is exhausted; all settings were
restored to their default values.
13O
Monitor turns off, and the
power-on lamp blinks rapidly.
Battery temperature is high. Turn off camera and
allow batteryto cool down before resuming use.
After the lamp blinks for three minutes, the
camera will turn off automatically. Pressing the
aower switch also turns offthe camera.
17
The battery is not charged when the camera
is turned off.
Charging stops if the computer enters sleep
mode while the battery is charging. The
camera may be turned off.
Depending upon computer specifications,
settings, and status, it may be impossible to
charge the battery inserted into the camera
via computer connection.
Battery inserted into the
camera is not charged when
the camera is connected to a
computer.
Electronically
In extremely
camera
strong
8-
then
Controlled
rare instances,
Cameras
unusual
may stop functioning.
external
static charge.
turn the camera
17
characters
may appear
in tile monitor
In most cases, this phenomenon
Turn the camera
on again. In the event
off, remove
of continued
is caused
and replace
malfunction,
and tile
by a
the battery,
contact
z
o
S'
your retailer
the power
_-
authorized
source as described
recorded
to internal
occurred.
Data already
x
Shooting
158
or Nikon
memory
service
above
representative.
may result
or the memory
recorded
Note that disconnecting
in the loss of any data not
card at the time the problem
will not be affected.
Problem
Camera cannotfocus.
Pictures are blurred.
Cause/Solution
The intended subject is one with which
autofocus does not perform well.
Select Auto for AF assist in set up menu.
Turn camera off and then on again.
30
Increase the ISO sensitivity value.
Enable electronic vibration reduction or
motion detection.
Use BSS
Use tripod and self-timer.
42
134,
135
41
32
Flash is reflecting off particles in air. Turn flash
off.
Streaks of light or partial
discoloration are visible in the
monitor.
Smear occurs when extremely bright light
strikes the image sensor. When shooting with
Continuous set to Multi-shot 16 and when
recording movies, avoiding bright objects, such
as the sun, reflections of the sun, and electric
lights is recommended.
Optical zoom cannot be used.
Digital zoom cannot be used.
Image
mode
not available.
136
17
Use flash.
Bright specks appear in
pictures taken with flash.
Flash does not fire.
27
31
41,148
Flash is off.
Some scene modes with which the flash does
not function is selected.
30
53
On is selected for Blink proof in smart
portrait menu.
NJ_mode is selected.
Another function that restricts flash is
enabled.
64
Optical zoom cannot be used while recording
movies.
2106
49
z
o
107
Digital zoom is set to Off in the setup menu.
Digital zoom is not available in the following
situations.
136
When Scene auto selector, Portrait, or
Night portrait is selected for scene mode.
When shooting in smart portrait mode.
When shooting in subject tracking mode.
Just before recording a movie (up to 2x can
be applied while recording movies).
When Continuous is set to Multi-shot 16.
51,53,
54
62
65
106
Another function that restricts the Image mode
option is enabled.
41
49
159
Problem
Skin tones are not softened.
No sound when shutter is
released.
"
[[_lJ
Under some shooting conditions, facial skin
tones may not be softened.
Use Skin softening in the playback menu for
pictures containing more than three faces.
103
Off is selected for Sound settings>Shutter
sound in setup menu. No sound is heard with
some shooting modes and settings, even
when On is selected.
137
The speaker is blocked. Do not cover the
speaker.
S, 24
102
Off is selected for AF assist in the setup menu.
AF-assist illuminator may not light depending
on the position of the focus area or the current
scene mode, even when Auto is selected.
53 59,
136
Pictures appear smeared.
Lens is dirty. Clean lens.
146
Colors are unnatural.
White balance does not match light source.
39
Randomly spaced bright pixels
("noise") appear in image.
Shutter speed is too slow or ISO sensitivity is
high as the subject is dark. Noise can be reduced
by:
Using flash.
Specifying a lower ISO sensitivity setting.
3O
42
Flash is off.
Flash window
Pictures are too dark
(underexposed).
m
8_
160
Cause/Solution
AF-assist illuminator does not
light.
n
z
o
_
is blocked.
Subject is beyond flash range.
Adjust exposure compensation.
Increase ISO sensitivity.
Subject is backlit. Select Backlight scene
mode or use fill flash.
3O
24
3O
34
42
30, 58
Pictures are too bright
(overexposed).
Adjust exposure compensation.
34
Unexpected results when flash
set to _) (auto with red-eye
reduction).
When taking pictures with _) (auto with redeye reduction) or fill flash with slow sync and
red eye reduction in Night portrait scene
mode, In-Camera Red Eye Fix may be applied to
areas not affected by red eye. Use any scene
mode other than Night portrait, and change
the flash to any setting other than _
(auto
with red-eye reduction) and try shooting again.
30, 54
Problem
"
Cause/Solution
It may take more time to save images in the
following situations.
When the noise reduction function is in
operation
When the flash mode is set to _
(auto with
red-eye reduction)
When the skin softening function is applied
while shooting
Saving images takes time.
31
31
53, 54,
64
Playback
Problem
_
File cannot be played back.
Cannot
zoom
in on picture.
83
Cause/Solution
File or folder was overwritten
or renamed by
computer or other make of camera.
Movies recorded by a camera other than the
COOLPIX $3000 cannot be played back.
Playback zoom cannot be used with movies,
small pictures, or pictures that have been
cropped to a size of 320 x 240 or smaller.
Voice memos cannot be attached to movies.
Cannot record or play back
voice memos.
]0
Voice memos cannot be attached to images
taken with other cameras. Voice memos
10
96
attached to images using another camera
cannot be played back on this camera.
Cannot use quick retouch,
D Lighting, skin softening,
small picture, or crop.
Pictures not displayed on
television.
Album icon restored to default
settings, or pictures added to
album not displayed in favorite
pictures playback.
These options cannot be used with movies.
These options cannot be used with pictures
taken at an Image mode setting of[]
3968
x 2232.
Select pictures that support quick retouch,
D£ighting, skin softening, small picture, or
crop.
Camera is unable to edit pictures taken with
other cameras.
Select correct Video mode.
Memory card contains no pictures. Replace
the memory card. Remove the memory card
to play back pictures from the internal
memory.
91o
37
z
o
98
98
il
2O
Data in the memory card may not be played
back correctly if overwritten by a computer.
161
Problem
The recorded pictures are not
displayed in auto sort mode.
Nikon Transfer does not start
when camera is connected.
2.
_a
z
o
Cause/Solutlon
The desired picture was sorted to a category
other than the category currently displayed.
Pictures recorded by a camera other than the
COOLPIX $3000 and pictures copied using the
copy option cannot be displayed in auto sort
mode.
Pictures recorded in internal memory or on
the memory card may not be played back
correctly if overwritten by a computer.
Up to 999 pictures and movie fries can be
added to each category. If the desired
category already contains 999 pictures, new
pictures or movies cannot be added.
8O
Camera is off.
17
22
13
Battery is exhausted.
USB cable is not properly connected.
Camera is not recognized by the computer.
Computer is not set to start Nikon Transfer
automatically. For more information on Nikon
Transfer, refer to help information contained
in Nikon Transfer.
Be sure that the computer meets Nikon
Transfer system requirements.
81,97
16
12
With some PictBridge-compatible
printers, the
PictBridge startup screen may not be displayed
and it may be impossible to print pictures when
Auto is selected for the Charge by computer
option in the setup menu. Set the Charge by
computer option to Off and reconnect tile
camera to the printer.
14O
Pictures to be printed are not
displayed.
Memory card contains no pictures. Replace
the memory card.
Remove the memory card to print pictures
from the internal memory.
2O
Cannot select paper size with
camera.
Paper size cannot be selected from the camera if
the printer does not support the paper sizes
used by the camera, or the printer automatically
selects the paper size. Use the printer to select
paper size.
The PictBridge startup screen is
not displayed when the
camera is connected to a
printer.
o_
m
162
m
121,
122
Nikon COOLPIX $3000 Digital Camera
Compact digital camera
12.0 million
t : it}ii
t
1/23-in. CCD; total pixds: approx. 12.39 million
4× opticaJ zoom, NIKKOR Jens
4.9 19.6mm (angJe of view equivalent to that of 27 108mm
lens in 35mm [135] format)
f/-number
f/3.2 5.9
ConstructiQn
6 elements in 5 groups
Up to 4x (angle of view equivalent to that of approx. 432mm
lens in 35ram [135] format)
Electronic VR
Contrast-detect
AF
Focus range (from
lens)
• Approx. 50 cm (1 ft. 8 in.) to 4
• Macro mode: Approx. 8 cm (3.2 in.) to -*- (wide-angle position)
Focus-area selection
Auto @-area automatic selection), center, manual with
g9 focus areas, face priority
@
Frame coverage
(shooting mode)
: Frame coverage
(playback mode)
3_orage
' Media
6.7 cm/2.7-in., approx. 230k-dot, TFT LCD and 5devd
brightness adjustment
Approx. 97 0Yohorizontal and 97 0Yovertical (Compared to actual
p ict u re)
0
0
Approx. 100Yohorizontal
and 100_/_
vertical (Compared to
actual picture)
@-
• Internal memory (approx. 47 MB)
• SD (Secure Digital) memory cards
File system
DCF, Exif 2.2, and DPOF compliant
File formats
Still pictures: JPEG
Sound files (Voice Memo): WAV
Movies: AVI (MotiondPEG compliant)
•
•
•
•
•
•
•
•
12M (High) [4000 x 3000"k]
12M [4000 x 300@
8M [3264 × 2448]
5M [2592 x 1944]
3M [2048 × 1536]
PC [1024 x 768]
VGA [640 × 48@
16:9 [3968 x 2232]
• ISO 80, 100, 200,400, 800, 1600, 3200
• Auto (auto gain from ISO 80 to 1600)
• Fixed range auto (]SO 80-400, ISO 80-800)
163
256-segment matrix, center-weighted
2x spot _olgl_al zoom 2x or more)
(digital zoom less than
Pro ]rammed auto exposure with motion detection
exposure compensation
2.0 tc +2.0 EV in steps of 1/s EV)
[W]: 0.6to+17.2 EV
_: 1.2to 19.0 EV
exposure values achieved with automatic
ao usrmen_ conver_ea _o ]SO 100 values)
iiii_£!£_!i!:iii!!iil!!!!!,!!i!,!!,_,!,iIiii,!iiiii!!i!,!!,i!,!i!i,!,i
_,iii'ii!!i!=i!_!i!!i!iiii
Mechanical and charge-coupled
electronic
and
190 sensitivity
shutter
iiiti'_'''_s_ee_i'_il
_I
_:_il
_i!!i:_,,,,il
ii,,,+i_!!!!!,ii_!ii_!!i
'_''_I
/2@0 -1 s (when ISO sensitivity
is set to Auto)
/2000 -1 s (when ISO sensitivity is fixed at a specific value)
4 s (when scene mode is set to Fireworks show)
ii!_i
!i! i@!! I!II!i!
!!!!
!!i!II!!i!!!
_!
Iii!!
!!!!I,!i,
!I!iElectronically-controlled
Range
ND filter (-2.6 AV) selection
2 steps (f/3.2 and f/8 _N])
Can be selected from 10 and 2 second duration
Range (approx.)
(ISO sensitivity: Auto)
[W]: 0.5 to 4.5 m (1 ft. 8 in. to 14 ft.)
_: 0.S to 2.4 m (1 ft. 8 in. to 7ft. 10 in.)
Flash Control
_L auto flash with monitor preflashes
Hi-Speed USB
2:
DataTransfer
ProtocolMTP, PTP
Can be selected from NTSC and PAL
z
F
O-
rb
Audio video output/digital
YO (USB)
Arabic, Chinese (Simplified and Traditional), Czech, Danish,
Dutch, English, Finnish, French, Greek, German, Hungarian,
indonesian, italian, Japanese, Korean, Polish, Portuguese,
Norwegian, Russian, Spanish, Swedish, Thai, Turkish
One EN-EL10 RechargeabJe Lidon Battery (supplied)
AC Adapter EH-62D (available separately)
Approx. 2 hours and 10 minutes (when using Charging AC
Adapter EH-68P/EH-68P (AR) and when no charge remains)
Approx. 220 shots (EN-EL10)
Approx. 94.3 x 55.9 × 19.0 mm (3.8 × 2.2 x 0.8 in.) (excluding
projections)
i_,_iiili'i ,!iiii _ii
¸i 1!!1iiiii,;;!i
ii/i Approx.
116 g (4.1 oz.) (with battery and SD memory card)
0 to 40 °C (32 to 104 °F)
Less than 85 0_0(no condensation)
164
•
Unless otherwise
Recha rgeable
25 °C (77 °F).
stated, all figures are for a camera
Li ion Battery
EN EL10 operated
with a fully
at an ambient
charged
temperature
of
Based on Camera and imaging Products Association (CIPA) standards for measuring the life
of camera batteries. Measured at 23 °C (73 °F);zoom adjusted with each shot, flash fired
with every other shot, image mode set to [] 4000x3000.
Battery life may vary depending
on shooting interval and length of time menus and images are displayed.
Rechargeable
Li-ion
Battery
EN-ELIO
Rechargeab,e
,,th,um
,on
battery
DC 3.7 V, 740 rnAh
0to40oc/32
to_04
°F/
Approx. 31.5 x 39.5 x 6 mm (1.2 x 1.6 x 0.2 in.) (excluding
projections)
_
:ht : iiiiiiiiiiiiiiiiii
Charging
:
AC Adapter
Approx. 15 g (05 oz)(excluding
EH-68P/EH-68P
battery case)
(AR)
Ac_00
240
v,sU60
Hz,
O.06S
0.04
A
6.s-9.6
VA
_1_
Nikon
DC 5.0 V, 0.5 A
R_
0 to 40 °C (32 to 104 °F)
_"
EH-68P: Approx. 55 x 22 x 65 mm (2.7 x 0.9 x 2.6 in.)
EH-68P (AR): Approx. 55 x 51.6 x 66 mm (2.2 x 2.0 x 2.6 in.)
oz
EH-68P: Approx. 60 g (2.1 oz)
EH-68P (AR): Approx. 65 g (2.3 oz)
o_
Specifications
will not be held liable for any errors this manual
and its specifications
are subject
to change
without
may contain,
notice.
The appearance
of this product
165
Supported
Standards
• DCF: Design Rule for Camera File System is a standard widely used in the digital
camera industry to ensure compatibility
among different makes of camera.
• DPOF: Digital Print Order Format is an industry wide standard that allows
pictures to be printed from print orders stored on memory cards.
• Exif version 2,2: This camera supports Exchangeable image file format (Exit)
version 2.2 for digital still cameras, a standard that allows information stored
with photographs to be used for optimal color reproduction when images are
output from ExiScompliant printers.
• PictBridge: A standard developed cooperatively by the digital camera and
printer industries, allowing photographs to be output directly to a printer
without connecting the camera to a computer.
r_
R,
m
166
AV1151
Symbols
I_1 Auto mode 22
[]
B
Scene mode 50
BacklJght i_
Smart portrait
Battery 12, 14, 130
mode 62
Subject tracking mode 65
Movie mode 106
V Setup menu
58
Battery chamber
Battery charger
125
5
149
Battery latch 5
I_1 Favorite pictures mode 74
Auto sort mode B0
Battery level 22
I_ List by date mode 83
Battery-chamber/memory
5,12,20
T (Tele) 4, 25
Beach/snow
W (Wide) 4, 25
Best Shot Selector 41
q Playback zoom 4, 72
[]
Thumbnail
playback
button
5, 9
Brightness
BSS41
5, 28, 29, 96, 110
Playback mode 5, 8, 28
Built-in
Self timer 32
141
132
flash 4, 30
Built-in microphone
Button sound 137
Flash mode 30
mode) button
Exposure compensation
4, 95
c
_ Macro mode 33
MENUMenu button 5
[]
43
Blink proof 64
Blink warning
Delete button
I_1 (Shooting
55
Black-and-white
4, 69
Help 4, 11
_) Apply selection
[]
_
card slot cover
Calendar display 71
5, 8
Charge by computer
140
34
Charging
14, 149
AC adapter
&g/&Y=lL
61
A
Cloudy
A/V cable 111
Color options
43
AC adapter 149
AF area 26
Compression
ratio 37
AF area mode 44
copying pictures to 112-115
Connector cover 5
Close-up _
Computer
AF assist 136
Aperture
26
Audiodn/Videodn
Auto flash 30
56
39
58
Copying
pictures 97
Crop 105
Auto off 137
Cyanotype
43
D
Auto sort mode 80
Autofocus 33
Date 18, 129
Autofocus
Daylight
mode 48, 67, 109
o_
41
Copy []
Auto mode 22
Auto sort menu 82
z
o
112, 112-115
Continuous
jack 111
t_
Date imprint
133
39
167
Daylight saving time 18, 130
Delete 92
_H
Digital zoom
Help 11
Direct print
Haiti/ray 11
25, 136
I
119
D-Lighting
101
Identifier
DPOF print
DSCN 151
124
image mode 23, 37, 50, 64, 66
Dusk/dawn
iii
image review 132
55
Image size 37
Incandescent
39
E
EH-68P 14, 149
Electronic VR (movie)
Electronic
EN-ELI0
109
VR (still pictures)
134
34
indicator
ISO sensitivity
[]
53
Language 139
Lens 4, 163
44, 46
pictures menu 77
Favorite pictures
File names 151
List by date menu 85
mode 77
List by date mode 83
Lithium-ion
type battery
Fill flash 30
M
Fireworks
show _]:_._
58
Macro mode 33
Firmware
version 145
Memory
capacity
o
Fixed range auto 42
Flash 30, 31
Memory
card 20, 150
o_
m
Hash ]amp 5, 31
Hash mode 30, 31
Flash off 30
Monitor
z
rD
F]uorescent
39
Movie menu 108
Movie options
108
Movie playback
Food _1 57
110
Movie recording 106
Multi selector 5, 9
Format 21,138
card 21, 138
interna] memory
Full-flame playback 28, 29
Full-time AF 48, 109
168
5, 6, 148
Monitor settings 132
Motion detection 135
Folder name 151
Formatting
FSCN 151
22
Memory card slot 5, 20
Menus 127
Focus 26, 44
Focus lock 45
Format memory
23
31,42
t
Landscape
F
g-
20
Internal memory
JPG 151
Eyelet for camera strap 4
Face priority
Internal memory
J_
12, 14
Exposure compensation
Extension 151
Favorite
151
Mu]ti-shot
138
Museum
1641
_
57
N
Night landscape
[]
Night portrait
54
[]
56
14
Nikon
Transfer
112
Number
ofexposures
remaining
22,38
o
Optional
accessories
149
Panorama
assist _
59, 60
Panorama
Maker 112, 116
Setup menu 125
Shooting
22, 24, 26
Shooting menu 36
Shutter sound 137
P
Shutter speed 26
Shutter-release button
Paper size 121,122
Single AF 48, 109
Party/indoor
_,_ 55
Photo info 132
Skin softening 64, 102
Slide show 91
PictBridge
Slow sync 30
119, 166
Playback 28, 29, 69, 72
Small picture
Playback menu 86
Smart portrait menu 64
Smile timer 64
Playback zoom
Portrait _ 53
4, 26
Single41
72
Software
104
Suite 112
Power 18, 22
Sound settings
Power switch 4, 22
Speaker 5
Power-on lamp 4, 22
Preset manual 40
Print 87, 121,122
Sports _ 54
SSCN 151
Standard color 43
Print set 87
Strap 11
Print Set (Date) 88
Subject tracking menu 67
Printer 119
Subject tracking
Sunset _ 55
Protect 94
Quick retouch
Thumbnail playback 69
Time zone 129, 131
100
R
Rechargeable
battery
Rechargeable
Li-ion battery
149
30, 31
Sepia 43
lamp 4, 32
S
Q_
u
_v
Video mode 139
_s
Scene mode 50, 53
Self-timer 32
z
o
USB cable 112, 113, 120
Rotate image 94
RSCN 151
Scene auto selector
12
Tripod socket 5
TV111
2-
TV movie 108
movies 106
Red-eye reduction
Reset all 143
Self-timer
mode 65
I
Q
Recording
137
_
51
ViewNX 112, 115
Vivid color 43
Voice memo
Volume
95
110
w
WAV 151
169
Welcome
screen 128
White balance 39
Z
Zoom control 4, 25, 110
n
_u,
z
@_
m
170
Nikon
No reproduction
in any form of this manual, in whole or in part
(except for brief quotation in critical articles or reviews), may be
made without written authorization
from NIKON CORPORATION.
NIKON CORPORATION
© 2010 Nikon Corporation
YPOB01(11)
6MM78511-01