1
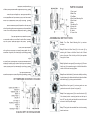
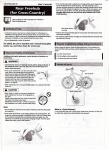
MODEL:
CE27816
16” FAN WALL
INSTRUCTION MANUAL
MANUAL DEL USUARIO
VENTILADOR DE PARED
MODELO:
CE27816
PRECAUCIONES IMPORTANTES
A la hora de usar cualquier electrodoméstico, debe seguirse las siguientes
precauciones básicas de seguridad:
1. Lea todas instrucciones.
2. Con el fin de evitar el riesgo de una descarga eléctrica, no sumerja el cordón,
el enchufe o el aparato mismo en agua u otros líquidos.
3. Si el aparato va a ser usado por niños, o en su presencia, deben ser supervisados constantemente.
4. Desenchufe el aparato mientras no se encuentre en uso, cuando se coloque
o se retire piezas o cuando se proceda a limpiarlo.
5. Evite tocar las piezas en movimiento.
6. No utilice el electrodoméstico que tenga el cordón o el enchufe dañados.
7. El uso de aditamentos no vendidos o recomendados por el fabricante puede
ocasionar fuego, descargas eléctricas o lesiones.
8. No haga uso de esta unidad en el exterior.
9. Nunca introduzca ningún tipo de objeto por las rejillas.
10. No permita que esta unidad se moje o humedezca.
11. Ajuste de manera correcta las rejillas de protección.
This appliance is intended for household use only.
This appliance is equipped with polarized plug. This type of plug has one blade
wider than the other. The plug will fit into an electrical outlet only one way. This is a
safety feature. If you are unable to insert the plug into the outlet, try reversing the
plug. If the plug should still fail to fit, contact an electrician to replace the obsolete
outlet. Do not attempt to defeat the safety purpose of the polarized plug.
CONSUMER SAFETY INFORMATION
GUARDE ESTAS INSTRUCCIONES
SAVE THESE INSTRUCTIONS
INFORMACIÓN DE SEGURIDAD PARA EL USUARIO
Este aparato ha sido diseñado solo para uso doméstico.
Este electrodoméstico viene con un enchufe polarizado. Este tipo de enchufe viene
con una extremidad más ancha que la otra y solo encaja en el tomacorriente de una
sola forma a manera de medida de seguridad. Si no se puede encajar el enchufe
en el tomacorriente, intente dándole la vuelta. Si aún así no encajara, póngase en
contacto con un electricista para reemplazar el tomacorriente obsoleto. No intente
eliminar esta medida de seguridad.
Read all instructions.
To protect against risk of electrical shock do not put cord, plug, or base in
water or other liquid.
3. Close supervision is necessary when any appliance is used by or near children.
4. Unplug from outlet when not in use, before putting on or taking off parts, and before cleaning.
5. Avoid contacting moving parts.
6. Do not operate any appliance with a damaged cord or plug in any manner.
7. The use of attachments not recommended or sold by the manufacturer may cause fire, electric shock or injury.
8. Do not insert foreing objects into guard.
9. Do not alow unit to become wet or damp.
10. Securely fasten iron guard onto rear guard.
1.
2.
When using electrical appliances, basic safety precautions should always
be followed including the following:
IMPORTANT SAFEGUARDS
bracket as shown
Step 7: Firmly push the assembled fan onto the mounting
surfaces to hold 20 pounds weight.
least 18” from the ceiling and should be mounted to wood
if the desired position. mounting bracket must be kept at
Step 6: Use tapping screw (16) to mount the bracket (15)
guard and secure with clips on front guard (1).
DESCRIPCION DE LAS PARTES
1. REJILLA FRONTAL
2. TAPA
3. ASPAS
4. PERILLA TRASERA
5. REJILLA 2
6. MOTOR
7. OSCILATORIO
8. UNION
9. TAPA TRASERA
10. BOTON
11. CABLE DE PODER
Step 5: Mount front guard (1) onto rear guard over rear
with balde cap (2) by turning counterclockwise.
the hole shape in the blade with shaft and tighten the blade
Step 4: Insert the fan blade (3) onto motor shaft by matching
INSTRUCCIONES DE ENSAMBLAJE
Paso 1: Desatornille la perilla girando con referencia opuesta
a las manecillas del reloj.
outside of the motor housing cylinder.
haciendo coincidir los hoyos en la rejilla. Ajuste la rejilla hasta
Step 3: tighten the rear guard (5) mounting nut (4). Be sure
Paso 2: Coloque la rejilla trasera a la parte frontal del motor
thet the nut (4) is screwed enough or it will be flush with the
que las cabezas del motor se introduzcan en los hoyos de la
through the 3 holes.
rejilla.
pins on the motor. Push in firmily until the 3 pins protrude
de que quede bien ajustada, lo suficiente como para que
Step 2: Mount the Rear Guard (5) to the motor (6) by
Paso 3: Asegure la rejilla trasera con la perilla y asegurese
matching the 3 holes on the Rear Guard to the 3 Round
quede acorde con el motor.
Step1: Turn Rear Guard Mounting Nut by counter-c
lockwise.
ASSEMBLING INSTRUCTIONS
1. Front guard
2. Blade Cap
3. Fan Blade
4. Rear Guard Mounting Nut
5. Rear Guard
6. Motor
7. Oscillating Pin
8. Swivel Joint
9. Rear Cover
10. Switch
11. Power Cord
Paso 4:
Inserte las cuchillas haciendo coincidir con las
cabezas, luego apriete y asegure con la tapa respectiva en
dirección opuesta a las manecillas del reloj.
Paso 5: Pruebe el ventilador haciéndolo girar con su mano,
asegúrese de que las cuchillas nunca toquen la perilla ya que
esto hará que no puedan girar de la manera correcta.
Paso 6: Monte la rejilla frontal colocándola de la misma
manera en que colocó la trasera solo que asegurándola con
los ganchos del borde a la rejilla que colocó primero.
Paso 7: Use un destornillador para montar el brazo de apoyo
PARTS DIAGRAM
en la pared para el ventilador.
INSTRUCCIONES DE OPERACION
CABLE DE PODER
Conecte el cable de poder un toma corriente
para iniciar el flujo de electricidad.
VELOCIDAD
La velocidad se ajusta tirando de la
cuerda.
OFF: Apaga la unidad
LOW: Provee velocidad baja
MED: Provee velocidad media
HIGH: Provee velocidad alta
OSCILACION
Para hacer que su ventilador oscile de la
iaquierda a la derecha, tire de la perilla
que esta ubicada encima del motor del
ventilador.
TO STORE:
Clean thoroughly and store in original box
TO CLEAN: Always unplug the fan before cleaning or disassembling. Be sure to
use a soft cloth moistened with mild soap solution. Do not immerse fan in water or
allow water to drip into the fan housing. Avoid the use of gasoline benzine or thinner
to clean, this will result in damage to the fan.
Para limpiar las cuchillas simplemente retire la rejilla frontal liberando los ganchos de agarre. Limpie las cuchillas y las rejillas con una tela humedecida con
un detergente suave o agua. Seque por completo y coloque nuevamente la rejilla
frontal en su lugar. No utilice limpiadores abrasivos. nunca sumerja en el agua el
ventilador ni ninguna de sus partes.
Use a screwdriver to open the cap on the front guard frame to disassemble each
part reverse the order assembly.
INSTRUCCIONES DE MANTENIMIENTO
ALMACENAMIENTO:
Limpie bien toda la unidad y guarde en su caja original
MAINTENANCE INSTRUCTIONS
OSCILLATION:
To make the fan oscillate sideways. push
the oscllating pin provided on the motor
housing.
SPEED:
Speed is adjusted by pulling the strings.
OFF: turns off th unit
LOW: provides low speed
MED: provides medium speed
HIGH: provides high speed
POWER SUPPLY CORD:
Plug the power supply cord into an outlet.
OPERATING INSTRUCTIONS