1
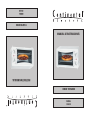
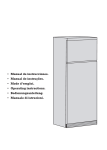
MODEL:
CE23531
TOASTER OVEN
MANUAL DE INSTRUCCIONES
INSTRUCTION MANUAL
HORNO TOSTADOR
MODEL:
CE23531
INSTRUCCIONES IMPORTANTES
DE SEGURIDAD
Cuando se utilizan aparatos eléctricos, se debe respetar ciertas reglas de seguridad,
incluyendo las siguientes:
Por favor lea todas las instrucciones.
No toque las superficies calientes. Utilice las asas o las perillas.
A fin de protegerse contra un choque eléctrico, no sumerja el cable, el enchufe ni
ninguna pieza no removible del aparato.
Se debe tomar mucha precaución cuando el producto se utilice por o en la presencia
de menores de edad.
Desconecte el aparato de la toma de corriente cuando no esté en uso y antes de
limpiarlo. Espere que el aparato se enfríe antes de instalar o retirar los accesorios.
No se debe utilizar ningún aparato eléctrico que tenga el cable o el enchufe averiado,
que presente un problema de funcionamiento o que esté dañado. Devuelva el aparato
al centro de servicio autorizado más cercano para que lo examinen, reparen o ajusten.
También puede llamar gratis al número apropiado que aparece en la cubierta de
este manual.
El uso de accesorios no recomendados por el fabricante presenta el riesgo de lesiones
personales.
No utilice el aparato a la intemperie.
No permita que el cable cuelgue del borde de la mesa o del mostrador ni que entre
en contacto con superficies calientes.
No coloque el tostador sobre ni cerca de una hornilla de gas o eléctrica, ni cerca
de un horno caliente.
Se debe ejercer mucha prudencia al transportar un aparato con aceite u otros líquidos
calientes.
Ajuste todos los controles a la posición de apagado (OFF) antes de enchufar
o desconectar el aparato.
Este aparato se debe utilizar solamente con el fin previsto.
A fin de evitar el riesgo de incendio o choque eléctrico, jamás introduzca alimentos
demasiado grandes ni utensilios de metal adentro del aparato.
Existe el riesgo de incendio si el aparato permanece cubierto mientras se encuentra en
funcionamiento o si éste llegase a entrar en contacto con cualquier material inflamable,
incluyendo las cortinas y las paredes. Asegúrese de no colocar nada sobre el aparato
mientras se encuentre en uso.
No utilice almohadillas de fibras metálicas para limpiar el aparato. Las fibras metálicas
podrían entrar en contacto con las piezas eléctricas del aparato, resultando en el riesgo
de un choque eléctrico.
Tenga mucho cuidado al utilizar recipientes que no sean de metal ni de vidrio.
Cuando este aparato no se encuentre en funcionamiento no se debe almacenar nada
aparte de los accesorios recomendados por el fabricante.
No introduzca los siguientes materiales en el aparato: papel, cartón, envolturas plásticas
ni materiales semejantes.
2
2
SAVE THESE INSTRUCTIONS.
When using electrical appliances, basic safety precautions should always be followed,
including the following:
Read all instructions.
Do not touch hot surfaces. Use handles or knobs.
To protect against risk of electrical shock, do not immerse cord, plug, or any nonremovable parts of this oven in water or other liquid.
Close supervision is necessary when any appliance is used by or near children.
Unplug from outlet when not in use and before cleaning. Allow to cool before
putting on or taking off parts.
Do not operate any appliance with a damaged cord or plug or after the appliance
malfunctions or is dropped or damaged in any manner. Return the appliance to the
nearest authorized service facility for examination, repair, or electrical or mechanical
adjustment. Or, call the appropriate toll-free number listed on the cover of this
manual.
The use of accessory attachments not recommended by the appliance manufacturer
may cause injuries.
Do not use outdoors.
Do not let cord hang over edge of table or counter, or touch hot surfaces.
Do not place on or near a hot gas or electrical burner, or in a heated oven.
Extreme caution must be used when moving an appliance containing hot oil or other
hot liquid.
Turn all controls to OFF before inserting or removing plug from wall outlet.
Do not use appliance for other than intended use.
Oversize foods or metal utensils must not be inserted in this appliance, as they may
create a fire or risk of electric shock.
A fire may occur if the toaster oven is covered or touching flammable material
including curtains, draperies, walls and the like, when in operation. Do not store any
item on top of unit when in operation.
Do not clean with metal scouring pads. Pieces can break off the pad and touch
electrical parts resulting in a risk of electric shock.
Extreme caution should be used when using containers constructed of other than
metal or glass.
Do not store any material, other than manufacturer's recommended accessories, in
this oven when not in use.
Do not place any of the following materials in the oven: paper, cardboard, plastic
wrap, and the like.
Do not cover crumb tray or any parts of the oven with metal foil. This will cause
overheating of the oven.
To stop toasting, broiling or baking turn the controls to OFF.
Use extreme caution when removing tray or disposing of hot grease.
IMPORTANT SAFEGUARDS
3
BROILING
cooking book
dial
multi - use pan
3
Slide in the Multi – Pan under the wire rack.
place food on the wire rack.
NOTE – We always suggest to preheat oven 5 minutes at this setting before
place the food.
LISTA DE COMPONENTES DEL HORNO
4
9. Manija de la puerta
10. Parrilla Inferior
11. Cuerpo
12. Indicador de poder
13. Selector
14. Punto de soporte
15. Manija secundaria
3. Rotate the Temperature Dial clockwise to desired temperature
4. The Timer Dial is the on/off switch
After rotate the Temperature Dial to your desired temperature, then you must
select the Timer Dial with the following options.
a. For short time baking rotate the Timer Dial clockwise (up to 60 minutes ),
At the sound of the bell the bake function will off automatically.
OR
b. For longer time baking, rotate the Time Dial counter – clockwise to
Perilla de Tiempo
Perilla de Temperatura
Manija de la puerta
Parrilla Superior
Puerta
Bandeja
Brazo
Patas de sostenimiento
1.
2.
1.
2.
3.
4.
5.
6.
7.
8.
BAKING
INFORMACIÓN TÉCNICA
automatically turned off.
To stop the cycle at any time, turn the Timer counter – clockwise to “off”
position and the bell will ring.
4 slices will be lighter than 1 slice – adjust Timer accordingly.
Place 1 slice of bread in center of wire rack, 4 slices side by side.
120 V
1300 W
60 min.
385x232x230 mm
3.355 Kg.
1 Bandeja; 1 Brazo; 1 Manija
IMPORTANT: When choosing toast color (light, medium, dark,), Always rotate
timer to over “dark” setting and then Rotate back to “dark”, “medium” or
“light”. This will ensure that the timer operates correctly and safely.
Voltaje
Poder
Contador
Medidas
Peso
Accesorios
The Timer Dial is the on/off Switch.
Choose your crust preference by adjusting the Timer Dial clockwise to
select light, medium or dark, To test the toasting of your type of bread, we
suggest to start at medium setting as bread varies according to humidity,
thickness and texture, Each type of bread will toast differently according
to these properties.
NOTA: Cuando utilice este aparato la primera vez puede notar un olor
particular a humo o incluso a quemado, cosa que es totalmente normal ya que
2.
olor es causando por una película protectora que llevan los utensilios dentro
del horno, que los protege de suciedad e infección durantes la manipulación
de la fabrica a su hogar.
NOTE
Oven unit has a unique Multi – use pan which slides into special grooves
beneath the wire rack.. This pan catches the drippings when baking but
must be removed when toasting to allow for even toasting.
PARA TOSTAR
Rotate the Temperature Dial clockwise to “toast”.
Open the Oven Door and place the bread on the Wire Rack up to 4 slices.
• Rote la perilla re temperatura a la posición “TOSTADO”. Abra la puerta y
coloque el pan dentro del horno sobre las parrillas hasta cuatro pedazos
de pan. Recuerde que debe retirar la bandeja multiusos primero. El pan
debe ser colocado justo sobre las parrillas.
• El Reloj de tiempo de cocción es el botón de Encendido/Apagado.
Escoja su temperatura y nivel de tostado ajustando la perilla a Light (bajo),
MED (medio), DARK (Alto). Para probar o ensayar cual de los niveles es
el mas apropiado recomendamos iniciar en la posición de MED, ya que el
punto del pan varia de acuerdo a la textura, la humedad y el aspecto.
1. Cuando el ciclo haya terminado, usted escuchara un timbre y el p o d e r
eléctrico se apagara automáticamente.
2. Para parar el ciclo en cualquier momento, gire la perilla a la posición
Apagado. Escuchara un timbre.
3. 4 Tajadas de pan se tostaran mas suave que una sola. Aplique la ley
de la proporción.
1.
4
TOASTING
5
Condensation will appear on the oven door for some foods and then
disappear. This is normal.
2. Cook food immediately after defrosting.
3. Frozen foods and thick meat will take longer to cook.
4. When defrosting, do not place food in layers – place as a single layer on
Multi – use pan.
1.
4. Coloque una sola tajada en el centro o alinee las cuatro tajadas h a c i a
los lados.
HORNEANDO
•
•
USEFUL TIPS
•
2.
3.
Coloque los alimentos sobre la bandeja multiusos y luego coloque la
bandeja en la parte superior de las rejillas. Cierre la puerta del horno.
Precaliente el horno siempre ANTES DE HORNEAR. Cuando desee dar
inicio al ciclo de horneo, solamente gire la perilla de temperatura al punto
deseado.
El botón de Apagado/Encendido es el mismo que aplica al cronometro. De
inicio al proceso de horneo que desea completar y manipule los tiempos de
cocción, girando la perilla a las temperaturas o al tiempo deseado.
DESCONGELAR
1.
Slide in the Multi – use Pan under the wire rack. Place the food on the
wire rack and close the oven door. For food with liquids you may choose
to place food directly on Multi – use Pan and place on top of the wire
rack.
Rotate the Temperature Dial clockwise between 2500F- 3500F position.
Rotate the Timer Dial counter – clockwise to “oven on” position. The oven
will remain on until the Timer Dial is manually rotated to “off” position.
This setting is useful for pot roasts etc requiring long cooking time.
•
SLOW COOK
NOTE – To avoid contamination, thawed food should be refrigerated or fully
cooked.
•
•
•
5.
3.
4.
1.
2.
Make sure that all plastic and paper wrappings are removed.
Slide in the Multi – use Pan under the wire rack. Place the food on the top
of the wire rack in the oven. Close the oven door.
Rotate the Temperature Dial Clockwise to 160 0 F position.
Rotate the Timer Dial to minutes setting as desired. The unit will turn itself
off automatically.
Do not preheat. Cook until thawed. Timing varies according to food type
and size.
Asegúrese de que todas las envolturas de los alimentos como plásticos,
cartones, aluminios, etc. sean removidos antes de introducirlos al horno.
Cuando haya hecho lo anteriormente indicado, coloque los alimentos
sobre la bandeja multiusos e introdúzcala en el horno, cierre la puerta.
Rote la perilla de temperatura a la posición de 160º F.
Rote la perilla de tiempo a la posición deseada.
No PRECALIENTE, Cocine hasta que el hielo haya sido derretido. El tiempo
varia de acuerdo a la comida y al tamaño del alimento. Recuerde que para
prevenir la contaminación, la comida descongelada debe ser CONSUMIDA
EL TIEMPO EN QUE SE DESCONGELO, NO DEBE SER REFRIGERADA O
GUARDADA PARA DESPUÉS. PUEDE SER MORTAL.
COCCIÓN LENTA
•
•
•
DEFROSTING
IMPORTANT: When setting the Timer Dial for less than 5 minutes, always
rotate timer to over 5 minutes and then rotate back to your chosen time. This
will ensure a safe and accurate timer setting.
NOTE – Always monitor the food at this setting to ensure that you are not
overcooking.
“oven on” setting. The cooking will continue until the Timer Dial is
manually turned to “off” position and the bell will sound.
Coloque la comida en la bandeja de cocción multiusos. Introduzca la
bandeja en el horno y luego cierre la puerta.
Rota la perilla de temperatura a la posición de 250º F a 350º F.
Rote la perilla de tiempo a la posición de ENCENDIDO. EL horno
permanecerá encendido hasta que la perilla sea girada a la posición de
APAGADO. Esta función del horno es recomendada para cocinar alimentos
que requieren de un proceso de cocción lento, constante y uniforme.
NOTAS DE AYUDA
•
•
Niveles de condensación aparecerán en la puerta del horno ya que
algunas comidas generan humedad. Esto es normal.
Cocine la comida inmediatamente DESPUÉS DE DESCONGELAR.
5
6
•
•
•
•
•
•
CUIDADO Y MANTENIMIENTO
•
•
•
•
La comidas congeladas y gruesas tomaran mas tiempo para enfriarse y
para cocinarse.
No abra la puerta del horno frecuentemente ya que el calor se perderá.
Cuando tueste pan o harinas, e introduzca mas de una tajada de pan o
harina, usted debe considerar un nivel mas alto de temperatura dada la
cantidad de alimento.
Cuando dore, humo saldrá de la puerta de manera considerable.
Asegúrese de remover la grasa después de cocinar.
6
•
DO NOT use the dishwasher to clean any of the accessories which are
included with this product.
DO NOT usr any abrasive cleaning products.
CLEAN accessories with a soft cloth in hot water with liquid detergent or
soap.
Antes de utilizar su horno tostador, lave todos los accesorios. Utilice
solamente jabón de utensilios de cocina.
El primer uso de su horno, causara que la película que recubre las partes
anexas y que protege de infecciones y regeneramiento durante el
transporte del horno de la fabrica a su casa, se queme. El olor a quemado
y desagradable la primera vez es TOTALMENTE NORMAL.
Siempre deje que el horno se enfrié y que pierda los niveles de calor
excesivo antes de limpiarlo todo o parcialmente cualquiera de sus
partes.
La parrilla de cocción puede ser removida para limpiarla de manera fácil y
asegurarse que ningún tipo de exceso de grasa se Acumule en las partes
principales de la misma. Nunca limpie los elementos del horno que se
encargan de calentar Ellos poseen un sistema de auto limpieza.
Limpie la parte inferior de la bandeja o receptáculo de moronas.
Este aparato posee una bandeja o receptáculo de morones, como se
indico en el punto anterior usted debe limpiarla, este receptáculo esta
ubicado en la parte inferior del horno.
Limpie dentro del horno cuando haya concluido ciclos de cocción de
cualquier tipo de alimento graso o no graso.
NUNCA UTILICE MATERIALES ABRASIVOS PARA LIMPIAR EL HORNO.
LIMPIE los accesorios con una tela suave y húmeda en jabón.
Después de limpiar, cierre el panel y asegúrese de que este correctamente
cerrado.
Washing of the interior of the crumb tray is accomplished by pacing unit on
its back side and allow crumb tray to fall forward for easy cleaning.
•
•
•
5. Cleaning the Bottom of the Crumb Tray
This appliance has a drop open crumb tray at the bottom of the baking
chamber. First unplug this appliance and allow to cool.
To clean out the crumbs, simply tilt the unit backwards and push the Crumb
Tray Slide Fastener towards the rear, down allow to drop on counter top.
Wipe interior of crumb tray with a damp cloth. After cleaning, slide the
”Crumb Tray Slide Fasteners ” into the tabs to lock the crumb tray.
PRECAUCIÓN
REMEMBER, do not place the entire unit in water or any liquid.
DO NOT WIPE THE HEATING ELEMENTS – They are self cleaning!
•
1. Before using your Toaster Oven, wash all of the accessories
– Wire Rack and Multi – use pan, in hot water with detergent or soap.
2. Initial start up operation may result in minimal smell and smoke (about
15 min.) This is normal. It is due to the protective substance on heating
elements which protects them from salt effects during shipping from
factory.
3. Always make surer that the appliance is unplugged and allow to cool
before cleaning.
4. The Wire Rack can be removed for easy cleaning.
Open the Oven Door and tilt upward slightly and pull the Wire Rack straight
toward you until it slides out completely. Once the rack is removed, clean
the interior with a damp cloth.
To replace the Wire Rack, open oven Door and tilt upward slightly and slide
the rack into the two rack grooves at either side of the oven chamber and
push straight to the back of the oven chamber. Ensure that the automatic
hooks are in correct position to push in the Wire Rack towards the rear of
oven chamber. The exterior may be wiped with a damp cloth.
•
•
CARE AND CLEANING
Utilice siempre el horno tostador con TODOS SUS ACCESORIOS EN
LUGAR CORRESPONDIENTE DE ACUERDO A SU USO.
NUNCA OPERE EL HORNO CON LA PUERTA ABIERTA.
NUNCA COLOQUE la bandeja o parrillas directamente sobre las rejillas de
calor o anexos de calentamiento del horno, esto causara que los alimentos
se quemen y se estropee su cocción logrando así el daño permanente del
horno.
5. Avoid opening the Oven Door too frequently to prevent heat loss.
6. When toasting, frozen bread or many slices should be at a darker setting
than 1 regular slice.
7. When baking, smoke will likely appear. Removing excess fat prior to baking
can reduce this. Always use Multi – use pan.
7
After cleaning. Close the access panel and check that it is locked securely
into position.
CAUTION
TO PREVENT COUNTERTOP FROM BEING DAMAGED, THE TOASTER OVEN
MUST BE OPERATED WITH THE CRUMB TRAY IN PLACE, SECURELY CLOSED
AND CLEANED OF EXCESS FOOD.
NEVER OPERATE YOUR TOASTER OVEN WITH THE OVEN DOOR OPEN.
NEVER PUT THE MULTI – USE PAN (OR ANY OTHER ACCESSSORY) DIRECTLY
ON THE TOP OF THE LOWER HEATING ELEMENTS.
THE EDGES OF THE METAL GUARD COVERING THE LOWER HEATING
ELEMENT SHOULD NEVER BE TOUCHED DURING CLEANING. ALWAYS USE A
SOFT BRUSH OR OTHER UTENSIL TO PREVENT INJURY.
TAKE CARE
Always leave at least 30mm between the top of food and the top heating
elements.
Remove all plastic and paper from food, TV Dinners, etc before cooking.
Always use oven mitts to remove multi – use pan after cooking.
RECIPE GUIDE
Remember in Bake function only, preheat oven 5 minutes.
Always use oven mitts to remove Multi – use pan after cooking.
FOOD GROUP
QUANTITY
Frozen pizza
2-4 slices
Bacon
4-6 strips
Hamburgers
Up to 4 pcs
(about 1/4 lb ea.)
Fill Multi – use
Leftovers
INSTRUCTIONS
•
•
•
•
Leftovers
(frozen)
con el horno para que haya la ventilación necesaria.
Límpielo al menos cada dos veces que lo use.
Remueva siempre todo tipo de materiales no comestibles.
Siempre utilice los utensilios proveídos para retirar las parrillas o las
bandejas del horno y prevenir quemaduras o arruinamiento del horno.
CUIDE DE SU HORNO TOSTADOR
Chicken
TV Dinners
Fill Multi – use
pan – 1 layer
only
Fill Multi – use
pan – 1 layer only
Place foil container
Directly on wire rack
•
7
Bake on multi – use pan at 4500F
for 15-20 minutes.
Bake on multi – use pan at 450ºF
Use Timer set to 7-12 minutes.
According to taste preference.
Bake on multi – use pan at 4500F
for 20 minutes.
Bake at 2500F-3750F W/timer at
15 minutes. Continue according
to taste
Bake at “defrost” for 10-15
minutes.Then select temperature
according to taste preference
Bake at 4500F for 35 minutes or
until juices run clear with the
“oven on” setting.
Follow package directions
Un cable de poder pequeño es proveído junto con el horno. En caso de
que uno mas largo sea requerido, cómprelo en un proveedor autorizado de
cables eléctricos y asegúrese que el cable coincida con el voltaje de su
horno. NUNCA DEJE QUE EL CABLE CUELGUE DE LAS SUPERFICIE DONDE
EL HORNO ESTA APOYADO.
NOTE-The Recipe Guide is for suggestion only. Temperatures may vary
depending on the size and consistency of the food
Frozen food will take longer to cook than thawed food.
TROUBLESHOOTING GUIDE
Problem
Unit smokes during bake function
Solution
Initial start up operation may result
in minimal smell and smoke (about
15 min.). This is normal. It is due to
the protective substance on heating.
Elements which protects them from
salt effects during shipping from
factory.
Smoke in baking functions often
means the multi – use pan or Interior
is dirty.
Smoke almost always appears in
baking and is normal. Cut off excess
fat prior to baking to reduce smoke
Stop using appliance if smoke
source is the power cord. Unplug.
The wire rack is stuck and oven
Remove wire rack and clean inside
the door does not operate smoothly
Wire Rack grooves inside oven
chamber. Also clean inside of Crumb
tray. Check that hooks on oven door
are properly aligned into wire rack.
Toast black and smoking or too light
Choose a lighter or darker crust
setting
TOAST
BAKE
1.Select the Temperature Dial
clockwise to “toast”.
2.Turn the Timer Dial clockwise to
light, medium or dark setting.
1.Select the Temperature Dial
clockwise to any desired temperature.
2. Turn Timer Dial counter-clockwise
to “oven on” position and when
Remember to use only up to the
“dark” of The Timer, otherwise
the toast will burn.
No need to select temperature as
toast” is automatically preset to
maximum Temperature.
IMPORTANT; When choosing
toast color (light, medium, dark)
always rotate timer to over “dark”
Setting and then rotate back to
“dark”, ”medium” or “light”. This
will ensure that the timer operates
correctly and safely.
IMPORTANT: When setting the Time
Dial for less than 5 minutes, always
rotate timer to over 5 minutes and then
rotate back to your chosen time. This
will ensure a safe and accurate timer
setting.
REMEMBER – The “Timer Dial” is the on/off switch for your choice of Toast and
Bake functions.
QUICK START GUIDE
PLEASE READ THE IMPORTANT SAFEGUARDS FIRST!
The toaster Oven is equipped with all the options of a full – size oven in a
countertop appliance; appliance; it toasts and bakes, Please follow these step
instructions.
8
Dial clockwise to the “off” position.
OR
Use Timer Dial up to 15 minutes – unit
will automatically shut – off.
9
MODEL:
CE23531
TOASTER OVEN
MANUAL DE INSTRUCCIONES
INSTRUCTION MANUAL
HORNO TOSTADOR
MODEL:
CE23531
When using electrical appliances, basic safety precautions should always be followed,
including the following:
Read all instructions.
Do not touch hot surfaces. Use handles or knobs.
To protect against risk of electrical shock, do not immerse cord, plug, or any nonremovable parts of this oven in water or other liquid.
Close supervision is necessary when any appliance is used by or near children.
Unplug from outlet when not in use and before cleaning. Allow to cool before
putting on or taking off parts.
Do not operate any appliance with a damaged cord or plug or after the appliance
malfunctions or is dropped or damaged in any manner. Return the appliance to the
nearest authorized service facility for examination, repair, or electrical or mechanical
adjustment. Or, call the appropriate toll-free number listed on the cover of this
manual.
The use of accessory attachments not recommended by the appliance manufacturer
may cause injuries.
Do not use outdoors.
Do not let cord hang over edge of table or counter, or touch hot surfaces.
Do not place on or near a hot gas or electrical burner, or in a heated oven.
Extreme caution must be used when moving an appliance containing hot oil or other
hot liquid.
Turn all controls to OFF before inserting or removing plug from wall outlet.
Do not use appliance for other than intended use.
Oversize foods or metal utensils must not be inserted in this appliance, as they may
create a fire or risk of electric shock.
A fire may occur if the toaster oven is covered or touching flammable material
including curtains, draperies, walls and the like, when in operation. Do not store any
item on top of unit when in operation.
Do not clean with metal scouring pads. Pieces can break off the pad and touch
electrical parts resulting in a risk of electric shock.
Extreme caution should be used when using containers constructed of other than
metal or glass.
Do not store any material, other than manufacturer's recommended accessories, in
this oven when not in use.
Do not place any of the following materials in the oven: paper, cardboard, plastic
wrap, and the like.
Do not cover crumb tray or any parts of the oven with metal foil. This will cause
overheating of the oven.
To stop toasting, broiling or baking turn the controls to OFF.
Use extreme caution when removing tray or disposing of hot grease.
IMPORTANT SAFEGUARDS
2
SAVE THESE INSTRUCTIONS.
Cuando se utilizan aparatos eléctricos, se debe respetar ciertas reglas de seguridad,
incluyendo las siguientes:
Por favor lea todas las instrucciones.
No toque las superficies calientes. Utilice las asas o las perillas.
A fin de protegerse contra un choque eléctrico, no sumerja el cable, el enchufe ni
ninguna pieza no removible del aparato.
Se debe tomar mucha precaución cuando el producto se utilice por o en la presencia
de menores de edad.
Desconecte el aparato de la toma de corriente cuando no esté en uso y antes de
limpiarlo. Espere que el aparato se enfríe antes de instalar o retirar los accesorios.
No se debe utilizar ningún aparato eléctrico que tenga el cable o el enchufe averiado,
que presente un problema de funcionamiento o que esté dañado. Devuelva el aparato
al centro de servicio autorizado más cercano para que lo examinen, reparen o ajusten.
También puede llamar gratis al número apropiado que aparece en la cubierta de
este manual.
El uso de accesorios no recomendados por el fabricante presenta el riesgo de lesiones
personales.
No utilice el aparato a la intemperie.
No permita que el cable cuelgue del borde de la mesa o del mostrador ni que entre
en contacto con superficies calientes.
No coloque el tostador sobre ni cerca de una hornilla de gas o eléctrica, ni cerca
de un horno caliente.
Se debe ejercer mucha prudencia al transportar un aparato con aceite u otros líquidos
calientes.
Ajuste todos los controles a la posición de apagado (OFF) antes de enchufar
o desconectar el aparato.
Este aparato se debe utilizar solamente con el fin previsto.
A fin de evitar el riesgo de incendio o choque eléctrico, jamás introduzca alimentos
demasiado grandes ni utensilios de metal adentro del aparato.
Existe el riesgo de incendio si el aparato permanece cubierto mientras se encuentra en
funcionamiento o si éste llegase a entrar en contacto con cualquier material inflamable,
incluyendo las cortinas y las paredes. Asegúrese de no colocar nada sobre el aparato
mientras se encuentre en uso.
No utilice almohadillas de fibras metálicas para limpiar el aparato. Las fibras metálicas
podrían entrar en contacto con las piezas eléctricas del aparato, resultando en el riesgo
de un choque eléctrico.
Tenga mucho cuidado al utilizar recipientes que no sean de metal ni de vidrio.
Cuando este aparato no se encuentre en funcionamiento no se debe almacenar nada
aparte de los accesorios recomendados por el fabricante.
No introduzca los siguientes materiales en el aparato: papel, cartón, envolturas plásticas
ni materiales semejantes.
2
INSTRUCCIONES IMPORTANTES
DE SEGURIDAD
3
BROILING
cooking book
dial
multi - use pan
3
1.
TOASTING
Rotate the Temperature Dial clockwise to “toast”.
Open the Oven Door and place the bread on the Wire Rack up to 4 slices.
NOTE
Oven unit has a unique Multi – use pan which slides into special grooves
beneath the wire rack.. This pan catches the drippings when baking but
must be removed when toasting to allow for even toasting.
2.
The Timer Dial is the on/off Switch.
Choose your crust preference by adjusting the Timer Dial clockwise to
select light, medium or dark, To test the toasting of your type of bread, we
suggest to start at medium setting as bread varies according to humidity,
thickness and texture, Each type of bread will toast differently according
to these properties.
IMPORTANT: When choosing toast color (light, medium, dark,), Always rotate
timer to over “dark” setting and then Rotate back to “dark”, “medium” or
“light”. This will ensure that the timer operates correctly and safely.
automatically turned off.
To stop the cycle at any time, turn the Timer counter – clockwise to “off”
position and the bell will ring.
4 slices will be lighter than 1 slice – adjust Timer accordingly.
Place 1 slice of bread in center of wire rack, 4 slices side by side.
BAKING
INFORMACIÓN TÉCNICA
Slide in the Multi – Pan under the wire rack.
place food on the wire rack.
120 V
1300 W
60 min.
385x232x230 mm
3.355 Kg.
1 Bandeja; 1 Brazo; 1 Manija
1.
2.
4
Rote la perilla re temperatura a la posición “TOSTADO”. Abra la puerta y
coloque el pan dentro del horno sobre las parrillas hasta cuatro pedazos
de pan. Recuerde que debe retirar la bandeja multiusos primero. El pan
debe ser colocado justo sobre las parrillas.
• El Reloj de tiempo de cocción es el botón de Encendido/Apagado.
Escoja su temperatura y nivel de tostado ajustando la perilla a Light (bajo),
MED (medio), DARK (Alto). Para probar o ensayar cual de los niveles es
el mas apropiado recomendamos iniciar en la posición de MED, ya que el
punto del pan varia de acuerdo a la textura, la humedad y el aspecto.
1. Cuando el ciclo haya terminado, usted escuchara un timbre y el p o d e r
eléctrico se apagara automáticamente.
2. Para parar el ciclo en cualquier momento, gire la perilla a la posición
Apagado. Escuchara un timbre.
3. 4 Tajadas de pan se tostaran mas suave que una sola. Aplique la ley
de la proporción.
•
PARA TOSTAR
olor es causando por una película protectora que llevan los utensilios dentro
del horno, que los protege de suciedad e infección durantes la manipulación
de la fabrica a su hogar.
NOTA: Cuando utilice este aparato la primera vez puede notar un olor
particular a humo o incluso a quemado, cosa que es totalmente normal ya que
NOTE – We always suggest to preheat oven 5 minutes at this setting before
place the food.
Perilla de Tiempo
Perilla de Temperatura
Manija de la puerta
Parrilla Superior
Puerta
Bandeja
Brazo
Patas de sostenimiento
9. Manija de la puerta
10. Parrilla Inferior
11. Cuerpo
12. Indicador de poder
13. Selector
14. Punto de soporte
15. Manija secundaria
3. Rotate the Temperature Dial clockwise to desired temperature
4. The Timer Dial is the on/off switch
After rotate the Temperature Dial to your desired temperature, then you must
select the Timer Dial with the following options.
a. For short time baking rotate the Timer Dial clockwise (up to 60 minutes ),
At the sound of the bell the bake function will off automatically.
OR
b. For longer time baking, rotate the Time Dial counter – clockwise to
Voltaje
Poder
Contador
Medidas
Peso
Accesorios
1.
2.
3.
4.
5.
6.
7.
8.
LISTA DE COMPONENTES DEL HORNO
4
5
4. Coloque una sola tajada en el centro o alinee las cuatro tajadas h a c i a
los lados.
HORNEANDO
•
1. Condensation will appear on the oven door for some foods and then
disappear. This is normal.
2. Cook food immediately after defrosting.
3. Frozen foods and thick meat will take longer to cook.
4. When defrosting, do not place food in layers – place as a single layer on
Multi – use pan.
•
USEFUL TIPS
•
Coloque los alimentos sobre la bandeja multiusos y luego coloque la
bandeja en la parte superior de las rejillas. Cierre la puerta del horno.
Precaliente el horno siempre ANTES DE HORNEAR. Cuando desee dar
inicio al ciclo de horneo, solamente gire la perilla de temperatura al punto
deseado.
El botón de Apagado/Encendido es el mismo que aplica al cronometro. De
inicio al proceso de horneo que desea completar y manipule los tiempos de
cocción, girando la perilla a las temperaturas o al tiempo deseado.
2.
3.
DESCONGELAR
Slide in the Multi – use Pan under the wire rack. Place the food on the
wire rack and close the oven door. For food with liquids you may choose
to place food directly on Multi – use Pan and place on top of the wire
rack.
Rotate the Temperature Dial clockwise between 2500F- 3500F position.
Rotate the Timer Dial counter – clockwise to “oven on” position. The oven
will remain on until the Timer Dial is manually rotated to “off” position.
This setting is useful for pot roasts etc requiring long cooking time.
1.
•
NOTE – To avoid contamination, thawed food should be refrigerated or fully
cooked.
•
•
•
Asegúrese de que todas las envolturas de los alimentos como plásticos,
cartones, aluminios, etc. sean removidos antes de introducirlos al horno.
Cuando haya hecho lo anteriormente indicado, coloque los alimentos
sobre la bandeja multiusos e introdúzcala en el horno, cierre la puerta.
Rote la perilla de temperatura a la posición de 160º F.
Rote la perilla de tiempo a la posición deseada.
No PRECALIENTE, Cocine hasta que el hielo haya sido derretido. El tiempo
varia de acuerdo a la comida y al tamaño del alimento. Recuerde que para
prevenir la contaminación, la comida descongelada debe ser CONSUMIDA
EL TIEMPO EN QUE SE DESCONGELO, NO DEBE SER REFRIGERADA O
GUARDADA PARA DESPUÉS. PUEDE SER MORTAL.
SLOW COOK
5.
3.
4.
COCCIÓN LENTA
•
•
•
Coloque la comida en la bandeja de cocción multiusos. Introduzca la
bandeja en el horno y luego cierre la puerta.
Rota la perilla de temperatura a la posición de 250º F a 350º F.
Rote la perilla de tiempo a la posición de ENCENDIDO. EL horno
permanecerá encendido hasta que la perilla sea girada a la posición de
APAGADO. Esta función del horno es recomendada para cocinar alimentos
que requieren de un proceso de cocción lento, constante y uniforme.
1.
2.
Make sure that all plastic and paper wrappings are removed.
Slide in the Multi – use Pan under the wire rack. Place the food on the top
of the wire rack in the oven. Close the oven door.
Rotate the Temperature Dial Clockwise to 160 0 F position.
Rotate the Timer Dial to minutes setting as desired. The unit will turn itself
off automatically.
Do not preheat. Cook until thawed. Timing varies according to food type
and size.
DEFROSTING
IMPORTANT: When setting the Timer Dial for less than 5 minutes, always
rotate timer to over 5 minutes and then rotate back to your chosen time. This
will ensure a safe and accurate timer setting.
NOTAS DE AYUDA
•
•
Niveles de condensación aparecerán en la puerta del horno ya que
algunas comidas generan humedad. Esto es normal.
Cocine la comida inmediatamente DESPUÉS DE DESCONGELAR.
5
NOTE – Always monitor the food at this setting to ensure that you are not
overcooking.
“oven on” setting. The cooking will continue until the Timer Dial is
manually turned to “off” position and the bell will sound.
5. Avoid opening the Oven Door too frequently to prevent heat loss.
6. When toasting, frozen bread or many slices should be at a darker setting
than 1 regular slice.
7. When baking, smoke will likely appear. Removing excess fat prior to baking
can reduce this. Always use Multi – use pan.
CARE AND CLEANING
1.
2.
3.
4.
Before using your Toaster Oven, wash all of the accessories
– Wire Rack and Multi – use pan, in hot water with detergent or soap.
Initial start up operation may result in minimal smell and smoke (about
15 min.) This is normal. It is due to the protective substance on heating
elements which protects them from salt effects during shipping from
factory.
Always make surer that the appliance is unplugged and allow to cool
before cleaning.
The Wire Rack can be removed for easy cleaning.
Open the Oven Door and tilt upward slightly and pull the Wire Rack straight
toward you until it slides out completely. Once the rack is removed, clean
the interior with a damp cloth.
To replace the Wire Rack, open oven Door and tilt upward slightly and slide
the rack into the two rack grooves at either side of the oven chamber and
push straight to the back of the oven chamber. Ensure that the automatic
hooks are in correct position to push in the Wire Rack towards the rear of
oven chamber. The exterior may be wiped with a damp cloth.
REMEMBER, do not place the entire unit in water or any liquid.
DO NOT WIPE THE HEATING ELEMENTS – They are self cleaning!
5. Cleaning the Bottom of the Crumb Tray
This appliance has a drop open crumb tray at the bottom of the baking
chamber. First unplug this appliance and allow to cool.
To clean out the crumbs, simply tilt the unit backwards and push the Crumb
Tray Slide Fastener towards the rear, down allow to drop on counter top.
Wipe interior of crumb tray with a damp cloth. After cleaning, slide the
”Crumb Tray Slide Fasteners ” into the tabs to lock the crumb tray.
Washing of the interior of the crumb tray is accomplished by pacing unit on
its back side and allow crumb tray to fall forward for easy cleaning.
DO NOT use the dishwasher to clean any of the accessories which are
included with this product.
DO NOT usr any abrasive cleaning products.
CLEAN accessories with a soft cloth in hot water with liquid detergent or
soap.
6
Utilice siempre el horno tostador con TODOS SUS ACCESORIOS EN
LUGAR CORRESPONDIENTE DE ACUERDO A SU USO.
NUNCA OPERE EL HORNO CON LA PUERTA ABIERTA.
NUNCA COLOQUE la bandeja o parrillas directamente sobre las rejillas de
calor o anexos de calentamiento del horno, esto causara que los alimentos
se quemen y se estropee su cocción logrando así el daño permanente del
horno.
Antes de utilizar su horno tostador, lave todos los accesorios. Utilice
solamente jabón de utensilios de cocina.
El primer uso de su horno, causara que la película que recubre las partes
anexas y que protege de infecciones y regeneramiento durante el
transporte del horno de la fabrica a su casa, se queme. El olor a quemado
y desagradable la primera vez es TOTALMENTE NORMAL.
Siempre deje que el horno se enfrié y que pierda los niveles de calor
excesivo antes de limpiarlo todo o parcialmente cualquiera de sus
partes.
La parrilla de cocción puede ser removida para limpiarla de manera fácil y
asegurarse que ningún tipo de exceso de grasa se Acumule en las partes
principales de la misma. Nunca limpie los elementos del horno que se
encargan de calentar Ellos poseen un sistema de auto limpieza.
Limpie la parte inferior de la bandeja o receptáculo de moronas.
Este aparato posee una bandeja o receptáculo de morones, como se
indico en el punto anterior usted debe limpiarla, este receptáculo esta
ubicado en la parte inferior del horno.
Limpie dentro del horno cuando haya concluido ciclos de cocción de
cualquier tipo de alimento graso o no graso.
NUNCA UTILICE MATERIALES ABRASIVOS PARA LIMPIAR EL HORNO.
LIMPIE los accesorios con una tela suave y húmeda en jabón.
Después de limpiar, cierre el panel y asegúrese de que este correctamente
cerrado.
La comidas congeladas y gruesas tomaran mas tiempo para enfriarse y
para cocinarse.
No abra la puerta del horno frecuentemente ya que el calor se perderá.
Cuando tueste pan o harinas, e introduzca mas de una tajada de pan o
harina, usted debe considerar un nivel mas alto de temperatura dada la
cantidad de alimento.
Cuando dore, humo saldrá de la puerta de manera considerable.
Asegúrese de remover la grasa después de cocinar.
6
•
•
•
PRECAUCIÓN
•
•
•
•
•
•
•
•
•
•
CUIDADO Y MANTENIMIENTO
•
•
•
•
7
After cleaning. Close the access panel and check that it is locked securely
into position.
CAUTION
TO PREVENT COUNTERTOP FROM BEING DAMAGED, THE TOASTER OVEN
MUST BE OPERATED WITH THE CRUMB TRAY IN PLACE, SECURELY CLOSED
AND CLEANED OF EXCESS FOOD.
NEVER OPERATE YOUR TOASTER OVEN WITH THE OVEN DOOR OPEN.
NEVER PUT THE MULTI – USE PAN (OR ANY OTHER ACCESSSORY) DIRECTLY
ON THE TOP OF THE LOWER HEATING ELEMENTS.
THE EDGES OF THE METAL GUARD COVERING THE LOWER HEATING
ELEMENT SHOULD NEVER BE TOUCHED DURING CLEANING. ALWAYS USE A
SOFT BRUSH OR OTHER UTENSIL TO PREVENT INJURY.
TAKE CARE
Always leave at least 30mm between the top of food and the top heating
elements.
Remove all plastic and paper from food, TV Dinners, etc before cooking.
Always use oven mitts to remove multi – use pan after cooking.
RECIPE GUIDE
Remember in Bake function only, preheat oven 5 minutes.
Always use oven mitts to remove Multi – use pan after cooking.
FOOD GROUP
•
•
•
QUANTITY
Up to 4 pcs
(about 1/4 lb ea.)
Fill Multi – use
Hamburgers
4-6 strips
Bacon
2-4 slices
Frozen pizza
Leftovers
•
con el horno para que haya la ventilación necesaria.
Límpielo al menos cada dos veces que lo use.
Remueva siempre todo tipo de materiales no comestibles.
Siempre utilice los utensilios proveídos para retirar las parrillas o las
bandejas del horno y prevenir quemaduras o arruinamiento del horno.
Leftovers
(frozen)
CUIDE DE SU HORNO TOSTADOR
Chicken
TV Dinners
Fill Multi – use
pan – 1 layer
only
Fill Multi – use
pan – 1 layer only
Place foil container
Directly on wire rack
INSTRUCTIONS
Bake on multi – use pan at 4500F
for 15-20 minutes.
Bake on multi – use pan at 450ºF
Use Timer set to 7-12 minutes.
According to taste preference.
Bake on multi – use pan at 4500F
for 20 minutes.
Bake at 2500F-3750F W/timer at
15 minutes. Continue according
to taste
Bake at “defrost” for 10-15
minutes.Then select temperature
according to taste preference
Bake at 4500F for 35 minutes or
until juices run clear with the
“oven on” setting.
Follow package directions
•
Un cable de poder pequeño es proveído junto con el horno. En caso de
que uno mas largo sea requerido, cómprelo en un proveedor autorizado de
cables eléctricos y asegúrese que el cable coincida con el voltaje de su
horno. NUNCA DEJE QUE EL CABLE CUELGUE DE LAS SUPERFICIE DONDE
EL HORNO ESTA APOYADO.
7
NOTE-The Recipe Guide is for suggestion only. Temperatures may vary
depending on the size and consistency of the food
Frozen food will take longer to cook than thawed food.
TROUBLESHOOTING GUIDE
Problem
Unit smokes during bake function
Solution
Initial start up operation may result
in minimal smell and smoke (about
15 min.). This is normal. It is due to
the protective substance on heating.
Elements which protects them from
salt effects during shipping from
factory.
Smoke in baking functions often
means the multi – use pan or Interior
is dirty.
Smoke almost always appears in
baking and is normal. Cut off excess
fat prior to baking to reduce smoke
Stop using appliance if smoke
source is the power cord. Unplug.
Choose a lighter or darker crust
setting
Toast black and smoking or too light
Remove wire rack and clean inside
the door does not operate smoothly
Wire Rack grooves inside oven
chamber. Also clean inside of Crumb
tray. Check that hooks on oven door
are properly aligned into wire rack.
The wire rack is stuck and oven
1.Select the Temperature Dial
clockwise to any desired temperature.
2. Turn Timer Dial counter-clockwise
to “oven on” position and when
1.Select the Temperature Dial
clockwise to “toast”.
2.Turn the Timer Dial clockwise to
light, medium or dark setting.
BAKE
TOAST
Remember to use only up to the
“dark” of The Timer, otherwise
the toast will burn.
No need to select temperature as
toast” is automatically preset to
maximum Temperature.
IMPORTANT; When choosing
toast color (light, medium, dark)
always rotate timer to over “dark”
Setting and then rotate back to
“dark”, ”medium” or “light”. This
will ensure that the timer operates
correctly and safely.
Dial clockwise to the “off” position.
OR
Use Timer Dial up to 15 minutes – unit
will automatically shut – off.
IMPORTANT: When setting the Time
Dial for less than 5 minutes, always
rotate timer to over 5 minutes and then
rotate back to your chosen time. This
will ensure a safe and accurate timer
setting.
REMEMBER – The “Timer Dial” is the on/off switch for your choice of Toast and
Bake functions.
QUICK START GUIDE
PLEASE READ THE IMPORTANT SAFEGUARDS FIRST!
The toaster Oven is equipped with all the options of a full – size oven in a
countertop appliance; appliance; it toasts and bakes, Please follow these step
instructions.
8
9