1
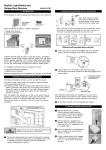
Model CATX510
Programming Guide
The keychain transmitters included with the system have been preprogrammed at the factory, with each button pre-assigned to control a specific
function of the system.
The system will store codes from up to 4 different transmitters. If a 5th
transmitter is programmed to the system, then the first transmitter
programmed to the system will be erased from the system’s memory.
To program new or additional transmitters:
1. Enter the vehicle, and turn the ignition switch to the ON position.
2. Press and release the programming button switch 3 times.
3. The dash mounted LED will flash 1 time, and the parking lights will flash 1
time, indicating that the system is ready to accept programming of channel 1
which is LOCK.
4. Press and hold the lock icon button of the transmitter you wish to program
for 4 seconds or until a long flash from the parking lights.
4a. Repeat step 4 for any additional transmitter you wish to program.
5. Press and release the programming button switch 1 time to advance to
channel 2. The parking lights will flash 2 times and the dash mounted LED will
flash 2 times, indicating that the system is ready to accept programming for
channel 2 which is UNLOCK.
6. Press and hold the unlock icon button of the transmitter you wish to
program for 4 seconds or until a long flash from the parking lights.
6a. Repeat step 6 for any additional transmitter you wish to program.
7. Press and release the programming button switch 1 time to advance to
channel 3. The parking lights will flash 3 times and the dash mounted LED will
flash 3 times, indicating that the system is ready to accept programming for
channel 3 which is REMOTE START.
8. Press and hold both buttons simultaneously of the transmitter you wish to
program for 4 seconds or until a long flash from the parking lights.
8a. Repeat step 8 for any additional transmitter you wish to program.
Model CATX510
Programming Guide
Changing the Remote Control Battery
The 12-volt alkaline battery supplied in your remote
transmitter should last approximately one year, depending on
usage. When the battery begins to weaken, you will notice a
decrease in range, or the distance from your vehicle that
your remote transmitter will operate. Follow the instructions
below to change the remote transmitter battery.
1. Insert the edge of a coin into the slot at the side of the
remote control. Twist the coin to pry the remote control
halves apart.
2. Remove the old battery and replace with a new one.
Be sure to observe the (+) and (-) signs in the battery
compartment.
3. Carefully snap the case halves back together, then test
the remote control.
For Customer Service and Product information Call
1-800-421-3209