1
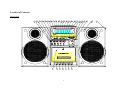
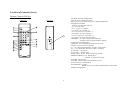
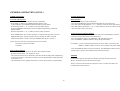
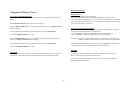
COBY
OPERATION MANUAL
CX-CD425 MINI CD HOME STEREO SYSTEM WITH AM/FM DIGITAL TUNER
1
Safety Precautions
* This product is designed for use in moderate dimares. Do not use or install
this unit where it would be exposed to direct sunlight or in extremely hot
temperatures, or near a radiator, stove or appliance that produces heat.
* Do not take this unit into the bathroom, or near a swimming pool. Do not use
it where it would be exposed to water, moisture, dripping or splashing.
* No objects filled with liquids, such as vases, shall be placed on the product.
* No naked flame sources, such as lighted candies, should be placed on the product.
* If water gets inside the unit. Unplug the power cord from the supply socket
and consult your dealer.
* Do not handle the power cord with wet hands. To avoid electric shock,
NEVER touch any internal parts. Repairs/Servicing should be left to qualified
service personnel.
* When connecting or disconnecting from the mains supply, hold the plug, not
the cord. Pulling the cord may damage it and could be dangerous.
* Do not drop the unit, spill liquid into it or allow objects to fall in it.
* If the unit fails to operate, disconnect from the mains and consult qualified
service personnel.
* When plugged in, a very small current will flow. To save electricity and for
safety when not using the unit for an extended period of time, it is recommended
that the product is completely disconnected at the AC mains socket.
* Consult your nearest dealer when damage, disconnection or contact failure is
found with the cord.
* Do not bend the cord sharply, pull or twist it.
* Do not modify the power cord in any manner.
* Do not insert any metallic object into the unit.
* Unplug the power cord when there is the possibility of lighting.
Positioning the unit
* A minimum distance of 6 INCHES must be maintained to provide sufficient
ventilation.
* Allow adequate ventilation for the unit ventilation should not be impeded by
covering the ventilation openings with items such as newspapers, table cloths,
curtains etc. Donot stand it on a thick pile carpet, or install it in a place with
poor air flow.
* Place the unit on a flat even surface.
* Do not use the unit in excessively hot, cold, dusty, damp or humid place.
* Condensation may form inside the CD player if the unit is left anywhere warm
and damp, or if you move the unit from somewhere cold (e.g. Your car boot)
to a warm room. In this case, let the unit stand for 1-2 hours, or gradually increase
the room temperature so the unit is dry before you use it.
* Do not place it where it could be subject to vibration.
* Do not place it where it could be magnetised by a magnet or speaker since there
are magnets in the speakers, do not place tapes or magnetic cards on them as
recorded data could be erased.
* When this unit is used near a TV, the TV picture could be distorted. If this
happens, move the unit away from the TV. If this does not correct the situation,
avoid using the unit when the TV is turned on.
* Keep the CD door closed so the lens is not contaminated by dust. Do not touch
the lens.
Safety Mechanism:
This unit incorporates a safety interlock mechanism which switches the laser beam
on and off, so that when the disc holder is open, the laser beam stops automatically.
2
Technical specifications
Care & Maintenance
General
Power Supply
Cleaning CDs
AC 230V ~ 50 Hz
AC 110V/220V ~ 60/50 Hz (option)
Output Power
2.5 Watt RMS per channel
5.0 Watt RMS per channel (option)
Main Unit Dimension
Speaker Box Dimension
220 (L) X 160 (W) X 250 (H) mm
197 (L) X 160 (W) X 246 (H) mm
Net Weight
4 Kgs with Plastic Speaker Boxes
6 Kgs with Wooden Speaker Boxes (option)
Use a soft cloth to wipe off any fingerprints and dust from the disc surface.
Wipe in a straight line from the centre to the outside of the disc. Small dust
particles and light stains will not affect reproduction quality.
* Never use chemicals such as record sprays, anti-static sprays, benzine or
thinners to clean your CDs.
* To reduce the risk of scratches, always put CDs back in their cases after use.
* Do not expose CDs to direct sunlight, high humidity or high temperatures
for long periods.
Radio frequency coverage
FM
AM/MW
88 - 108 MHz
540 - 1600 KHz
530 - 1710 KHz (option)
* Do not stick paper or write anything on either side of the CD.
3 beams, Semi-conductor Laser
100Hz - 16 KHz
Cleaning the Lens
* Only discs displaying this symbol can be played on this unit.
CD Player
Optical Pick Up
Frequency Response
A dirty lens will cause sound skipping and, if the lens is very dirty, the CD may
not work. Open the CD door an dclean the lens as follows:
Cassette Player
Tape Speed
Frequency Response
Bias System
4.75 CM/Sec.
125 Hz - 8 KHz
DC Bias
* Unplug the power supply.
* Dust or Dry Particles:
Using a camera lens brush/blower, blow on the lens a couple of times, then
wipe it lightly with the brush to remove dust. Then blow on the lens once more.
* Finger Prints:
If the lens cannot be cleaned by using a brush/blower, use a dry cotton swab
and starting in the middle work to the outside edge.
Speaker Section
Speakers :
Impedance :
Headphones :
3.5" Full Range Speaker X 2
2" Tweeter Speaker X 2 (option)
4 Ohms.
3.5mm stereo jack plug, 8-32 Ohms
3
Preparation for use
Switching on Main Power
Carefully unpack the unit from its carton (do not attempt to connect anything
at this stage). You should have the following items:
Your System cames fitted with a mains power cable and plug.
Packing included
Plug into the mains socket and switch on. Ensure the voltage is compatible.
The Power Standby LED Indicator will On and LCD display the Timer.
1. This User Guide.
2. Main Unit with built in AC plug.
3. Two Speakers Box.
4. Remote Control (batteries not included).
Press the Power Button to turn on your system. The Power Standby LED Indicator
will Off and LCD become On and display the previously selected function.
If any these items is missing, consult your dealer. Keep any packaging in case
you want to transport the Main unit at some later date.
When not in use, switch off and unplug your system from the mains power.
Connections
To adjust the sound level turn the Volume control locatied on the right side of
your system.
- Press the VOLUME "Up" or "Down" to get a satisfactory sound level when
you select the desired program.
- Press the Mute button to muting the sound.
Adjusting the sound
* Connect the speakers to the speaker sockets on the back of the main unit.
* Connect the right speaker to the right socket and left speaker to the left socket.
Connect the left/right speaker lead wires to the speaker terminals. Pay attention
to the polarity. The polarity wires (Red wire or Black wire with White stripe)
should connect to the red colour (+) terminals. The Black wire should connect to
the black colour (-) terminals.
* Connect the AC Power cord to the AC outlet.
* Unwind the FM antenna.
Using Headphones
Plug your headphones into the headphones socket located in the middle of your
system on the left hand side.
The sound will be hear through the headphones, not the speakers.
AC Power Operation
* If you wish to power your Main unit from the mains, find a location that is close
to and within easy access of a mains socket. Do not stretch the cable - if you
cannot reach a supply you should find an alternative location for the system.
* Connect the AC power cord into a suitable outlet and switch on at the mains plug
if the socket has a switch.
Please note :
Headphones should have a 3.5mm diameter stereo plug and an impedance
of 8-32 ohms.
4
Location of Controls
FRONT VIEW
27
26
25
24
23
22
20
21
19
S E NS
OR
18
17
15
16
DN/ REW
T A NDB
S
Y
RA NDO M
14
M EMO RY
DI SPLAY
13
T UNER
12
28
UP/ FF
SLEEP/ TIM E
L UME
VO
UP
PLA Y/PAU SE
STOP B
/ AN D
CD
TUN ER
RE PEAT
M UTE
D OWN
PHON ES
TAPE
E Q
A. L. C. REC ORD ING
7
6
5
4
3
5
2
1
11
10
9
8
30
29
Location of Controls (Cont.)
SIDE VIEW
REAR VIEW
31
33
32
6
34
35
36
Location of Controls (Cont.)
1. PAUSE BUTTON
2. STOP & EJECT BUTTON
3. FAST FORWARD BUTTON
4. REWIND BUTTON
5. PLAY BUTTON
6. RECORDING BUTTON
7. CASSETTE COMPARTMENT
8. VOLUME DOWN : Press to adjust sound level down.
9. VOLUME UP : Press to adjust sound level up.
10. UP/FF : CD - Skip/Search forward or
TUNER - Radio frequency tuning up.
11. DN/REW : CD - Skip/Search backward or
TUNER - Radio frequency tuning down.
12. EQ : Press to select EQ mode (FLAT/CLASSIC/ROCK/POP).
13. MUTE : Press to muting the sound.
14. SLEEP/TIMER : SLEEP - Press to select sleep function or
TIMER - Press to switch Timer function on or off.
15. TAPE : Press to select Tape mode.
16. REPEAT/PRESET : CD - Repeat play or
TUNER - To select preset station
17. DISPLAY : Press to display the Clock Time or Timer.
18. TUNER : Press to select Tuner mode.
19. STOP/BAND : STOP - CD Stop.
BAND - Press to select MW (AM)/FM band in Tuner mode.
20. MEMORY : CD - Press to program the CD tracks.
TUNER - Press to program the Radio stations.
21. POWER STANDBY INDICATOR
22. REMOTE CONTROL SENSOR
23. RANDOM : CD Random play.
24. PLAY/PAUSE : CD Play/Pause.
25. CD : Press to select CD mode.
26. POWER : ON/OFF-Standby button
27. HEADPHONE JACK
28. LCD DISPLAY
29. SPEAKER BOX
30. SPEAKER FRONT COVER
31. CD OPEN/CLOSE CONTROL DOOR
32. TAPE CONTROL DOOR (FLIP DOWN)
33. AC POWER CORD
34. FM ANTENNA WIRE
35. SPEAKER SOCKET (LEFT)
36. SPEAKER SOCKET (RIGHT)
7
Location of Controls (Cont.)
Remote Control (28 Keys)
Rear View
Front View
1
13
POW ER
2
EQ
MUTE
FUN CTION
REPEAT
M-UP
1
2
3
4
8
3
4
14
5
6
7
9
10
10+
MEMORY R ANDOM
INTRO
DI SPLAY
TIMER
19
15
5
6
7
SLEEP
SKI P/ SEARC H
8
9
10
11
16
PLAY/
PAUSE
17
18
+
-
STOP/
BAN D
VOLUME
12
8
1.POWER : ON/OFF-Standby button
2.MUTE : Press to muting the sound.
3.EQ : Press to select EQ mode (FLAT/CLASSIC/ROCK/POP).
4.Program select buttons
TUNER - To recall preset stations.
CD - To recall tracks.
For 1 - 9, press 1 - 9 buttons.
For 10, press 10+ and then 0 .
For 11 -19, press 10+ once then 1 - 9.
For 20, press 10+ twice and then 0 .
For 21 - 20, press 10+ twice then 1 - 9.
For 30, press 10+ three times and then 0 .
5.MEMORY : CD - Press to program the CD tracks.
TUNER - Press to program the Radio stations.
6.RANDOM : CD Random play.
7.DISPLAY : Press to display the Clock Time or Timer.
8.SLEEP : Press to select sleep function.
9.<< : CD - Skip/Search backward / TUNER - Tuning down.
10.>> : CD - Skip/Search forward / TUNER - Tuning up.
11.VOLUME + : Volume up
12.VOLUME - : Volume down
13.FUNCTION : Press to select CD/Tuner/Tape mode.
14.REPEAT/PRESET : CD - Repeat play or
TUNER - To select Preset station
15.INTRO : CD Intro play
16.TIMER : Press to switch Timer function on or off.
17.PLAY/PAUSE : CD Play/Pause.
18.STOP/BAND : CD Stop.
BAND : Press to select MW (AM)/FM band in Tuner mode.
19.Battery Compartment.
GENERAL OPERATION
POWER ON
When power is connected for the first time, or if the power cord was unplugged and
reconnected:
- Press the MEMORY button ONCE. The Minutes segments display "00" . The Hour
segments flash continuously
- The STANDBY LED lights, and the LCD panel appears Clock Time as follows :
- Press the Skip/Search >> or << button to select the desired hour.
- Press the MEMORY button again and the minute segments flash.
- Press the POWER button. The STANDBY LED turns off and the unit defaults to the
FM band of tuner mode.
Afterward, when the POWER is turned on, the previously chosen function will be selected.
- Press the Skip/Search >> or << button to select the desired minute.
- Press the MEMORY button once more. The flashing stops and the time is set.
SETTING THE CLOCK
- At Standby mode (Power Off), press the MEMORY button for some seconds will access
the time format change mode.
- At Normal (Standby Off) mode (Power On), press DISPLAY to display the clock time,
then press the MEMORY button for some seconds will access the time format change mode.
- The actual time format will be shown in the display '12 H' or '24 H' flash continuously.
- Press the Skip/Search >> or << button to change the 12h or 24h format.
9
- All the time information is shown in either 12h ro 24h format.
- In case of a 12-hour clock , watch the AM/PM indication.
GENERAL OPERATION (CONT.)
TIMER OPERATION
TUNER OPERATION
To set the wake-up timer
- Press the POWER button to turn the unit off STANDBY
- Press DISPLAY button. The TIMER indicator appears on the
LCD and flashes. Press MEMORY button the hour segment flashes.
- Press the Skip/Search >> or << button to select the wake-up hour.
- Press the MEMORY button again. The hour segment stops flashing, the minute
segment flashes.
- Press the Skip/Search >> or << button to select te wake-up minute.
Basic operation
- Press POWER button to turn on the power.
- Press the TUNER button and press the BAND button to select AM or FM.
- Press and release the Skip/Search >> or << button to select the desire radio station.
- Press and hold the Skip/Search >> or << button briefly to search up or down for the
next receivable station. (Auto Scan)
To store favourite stations in memory
You can store up to 10 stations for FM and 10 station for AM randomly in memory.
- Select the desired radio station as described above.
- Press the MEMORY button. The MEMORY indicator flashes on LCD.
- Press the PRESET / REPEAT button to assign the present number.
- Press TIMER button once for timer operation. To disable timer operation, press the
TIMER button again. Setting will still be kept in memory for future occasions
when timer operation is desired. (Press the TIMER button again to activate.)
NOTE: The timer will turn on the function last used as follows:
- Previously selected radio station
- CD-track 1
For example : To store a particular radio station on preset CH19, you can press the
PRESET / REPEAT button 19 times. The LCD shows the preset number.
Sleep-to-music function
- Perss CD/TUNER/TAPE button to select the desired function mode.
- Press the SLEEP button. "90" displays on LCD.
- The system will remain on for 90 minutes, then turn off into standby mode automatically.
- To decrease the time in 10-minute-increments, press the SLEEP button and hold until the
desired time is set.
- The SLEEP time will be displayed for about 3 seconds, then go back to original display.
- Press the MEMORY button to store the selection. The MEMORY indicator will be disap
- Repeat steps 3 and 4 to store additional radio stations in memory.
Antenna
For best FM reception, extend the wire antenna located at the back of the unit.
Move it around until you get the best FM reception.
There is a built in ferrite antenna for AM signal. Move or rotate your Main Unit
to obtain the best AM reception.
10
Using the Cassette Player
LISTENING TO TAPE
RECORDING
Stop/Eject button - Press to stop all deck operations. Press again to open the Cassette Doors.
Fast Forward Button - Press to start rapid tape Fast winding in forward direction.
Fast Rewind Button - Press the to start rapid tape Fast winding in reverse direction.
Play Button - Press to start playing a tape.
Pause Button - Press to stop tape operation temporarily.
Press again to resume tape operation.
Record Button - Press together with Play button to start recording.
A. Recording from Radio to Tape
- Press the TUNER button to select tuner mode, and press the STOP/BAND button
to select the desired band.
- Tune in your station and insert your cassette tapes.
- To start recording, press the Record button and the Play button of deck at the same
time to start recording
- To stop recording, press the Stop/Eject Button.
Auto Stop
When the tape reaches the end in play or record, the built-in Auto Stop system releases the
depressed play, record buttons.
When the Auto Stop system operates while recording from the built-in radio or CD Player,
only the cassette function is brought automatically to a stop and the radio or CD Player will
continue to play.
B. Recording from CD to Tape
- Press the CD button to select CD mode.
- Insert the CD you want to record.
- Insert your cassette suitable for recording, press Pause button then press the
Record button and the Play button of deck at the same time. Recording function will
be stand by.
- Activate the CD player, and then press (to release) Pause button to start recording.
- The recording level is set automatically.
- To stop recording, first press Stop button on CD player, then press the Stop/Eject
Button on the tape deck.
INSERTING/REMOVING CASSETTES
- Open/Flip down the Tape Control Door.
- Press the Stop/Eject Button to open the cassette door.
- Slide the cassette tape into the door with the exposed section of the tape facing downwards.
- Push the cassette door closed and securely before starting.
- To remove a cassette, press the Stop/Eject Button to open the door and lift out your tape.
PLAYBACK
- Press the TAPE button to select Cassette Player mode .
- Insert your cassette tapes.
- Press the Play Button to activate playback.
- Adjust the Volume Controls to the desired level.
- Use Pause Button whenever you wanted to stop playback temporarily.
- Press the Stop/Eject Button when finished.
11
CAUTION
To avoid damage to the cassette mechanism or to the cassette tapes,
always depress the Stop/Eject Button between each operation.
Using the CD Player
LOADING/PLAYING DISCS
- Press Power Button to switch On the unit.
- Press the CD Button to select CD mode.
- Open the CD door by hand gentlely. Do not force open the CD door by hand at any time.
- Place the CD in the compartment with the label side facing upwards.
- Close the CD door by hand. When fully closed the CD will rotate briefly. The
LCD Display will indicate the total number of tracks on the disc.
- Once you have loaded a CD, press the CD Play/Pause Button. Playback will begin from
track 1 on the disc you have specified to play. The LCD Display shows the track currently
playing.
- You can open the CD door at any time by pressing the Stop Button. Then open the
CD door by hand on the top of the player.
- Only remove the CD when it has stopped spinning.
- To stop play at any time, press the Stop Button.
TO INTERRUPT PLAYBACK
- To stop a track temporarily, press the Play/Pause Button. The disc will pause and
LCD Display at the current paly position.
- Press the Play/Pause Button again to resume playback from the same point.
Skip Forward or Backward through tracks
- The Skip/Seach function can be used at any time during play.
- To select the next track, press Forward Skip Button. If you are on the last track
of the disc, the player will move to track 1.
- To go back to the beginning of the current track press Backward Skip Button once .
- To go back to the previous track press a the Backward Skip Button twice .
- To play a particular track, load the disc in the CD player and press Forward Skip
Button until the track number you want is shown in the LCD Display.
- Press the Play/Pause Button to play that track.
Handle Compact Discs
- To remove a CD from its storage case, press down on the centre of the case and
lift the disc out.
- Hold the disc by the edges. Avoid touching the recorded side of the disc.
Please note :
* Do not put anything other than a CD in the compartment. Other objects can
damage the mechanism.
* Do not force open/close the CD door by and any time.
* Keep the CD door closed when not in use to prevent dirt and dust from getting
into the mechanism.
* Never insert more than one CD at a time.
* If a disc is deeply scratched or too dirty, it may not play.
* This unit can playback the following media, CD/CD-R/CD-RW can Readable.
TO STOP PLAYBACK
- Press the Stop Button to stop playback at any time.
TO RANDOMING PLAY
- Press RANDOM Button to play the CD randoming.
- To stop play at any time, press the Stop Button.
12
Using the CD Player (Cont.)
Programmed track selection
You can set your Mini Tower System to play a selection of tracks from your disc.
Repeat disc play
You can set your CD player to repeat play a single track, the whole disc or your
programmed track selection.
To select specific tracks
Make sure there is no CD playing.
To repeat a single track
Ensure that the track is first playing by pressing the Play/Pause Button.
Press the MEMORY Button once . The LCD Display the desired number to program.
Press the REPEAT Button twice. The "Repeat 1" LED indicator light up to
indicate 'track repeat' is on.
Press Skip/Search Forward or Backward to display the track number you want.
The selected track will play continuously until you press the Stop Button.
Press the MEMORY Button once to select the next track. The previous track is
now saved.
or press the REPEAT Button once more.
Repeat these steps until all the tracks you want are stored. You can select a
maximum of 20 tracks. You can select a track more than once.
To repeat the whole disc
Ensure that the disc is first playing by pressing the Play/Pause Button.
Press the Play/Pause Button. The Program LED indicator light up.
The first programmed track of your selection starts playing.
Press the REPEAT Button once. The 'Repeat All' LED indicator light up to
indicate 'disc repeat' is on.
After all the programmed tracks have been played, the CD player stops automatically.
The entire disc will play continuously until you press the Stop Button.
To cancel your memorised program, press the Stop Button and open the CD door.
or press the REPEAT Button twice more.
Please note
If during track selection, you press the Play/Pause Button before pressing the
PROG Button, the track will not be stored in the memory and the disc will start
playing from the first selected track.
13
TUNER OPERATION
Using the CD Player (Cont.)
Basic operation
- Press POWER button to turn on the power.
- Press the TUNER button and press the BAND button to select AM or FM.
- Press and release the Skip/Search >> or << button to select the desire radio station.
- Press and hold the Skip/Search >> or << button briefly to search up or down for the
next receivable station. (Auto Scan)
To repeat a programmed selection
Refer to section titled "Programmed Track Selection" on previous page and select your
tracks.
Press Play/Pause Button to play your first selected track.
Press the REPEAT Button twice to repeat a particular track once. The 'Repeat 1' LED
indicator light up.
or press the REPEAT Button once more.
To store favourite stations in memory
You can store up to 10 stations for FM and 10 station for AM randomly in memory.
- Select the desired radio station as described above.
- Press the MEMORY button. The MEMORY indicator flashes on LCD.
- Press the PRESET / REPEAT button to assign the present number.
Press the REPEAT Button once your complete selection of programmed tracks will
repeat. The 'Repeat All' LED indicator light up.
For example : To store a particular radio station on preset CH19, you can press the
PRESET / REPEAT button 19 times. The LCD shows the preset number.
The programmed tracks will play continuously until you press the Stop Button.
- Press the MEMORY button to store the selection. The MEMORY indicator will be disap
- Repeat steps 3 and 4 to store additional radio stations in memory.
The programmed track will play continuously until you press the Stop Button.
or press the REPEAT Button twice more.
Antenna
CAUTION
This product uses a laser. Avoid any direct exposure to the laser beam. Use of controls,
adjustments or procedures not listed in this guide may result in hazardous exposure.
For best FM reception, extend the wire antenna located at the back of the unit.
Move it around until you get the best FM reception.
There is a built in ferrite antenna for AM signal. Move or rotate your Main Unit
to obtain the best AM reception.
14
TROUBLESHOOTING
Before requesting service, check the chart below for a possible cause of the problem you are experiencing. Some simple checks or a minor adjustment on your part may eliminate
the problem and restore proper operation.
If you are in doubt about some of the check points, or if the remedies indicated in the chart do not solve the problem, please consult your dealer for instruction.
Problem
No operation
Checkpoint
1. Is the AC plug connected?
2. Is the desired mode selected?
3. Is the disc inserted correctly?
4. Is the compartment closed?
5. Is the CD lens dirty?
Remedy
1. Reconnect the AC plug properly.
2. Press the desired function button.
3. Insert the disc correctly.
4. Close the compartment lid securely.
5. Clean the CD lens.
No display
Is the AC plug connected?
Reconnect the AC plug.
No sound
1. Are the speakers connected?
2. Is the headphone plugged in firmly?
3. Is the wake-up function activated?
4. Is mute activated?
1. Check the speaker connections.
2. Insert the headphone plug into the phone jack firmly.
3. Turn the power off, then set up again.
4. De - activate mute.
Noise or weak radio reception
Rotate the unit for better reception (AM), move the FM antenna wire for better
reception (FM).
Remarks : The manufacturer reserves the right to amend the specification without prior notice.
15
16
17
18
19