1
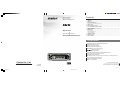
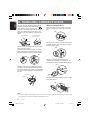
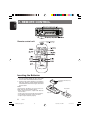
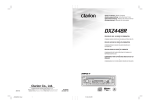
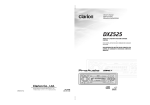
Owner's manual
Mode d'emploi
Manual de instrucciones
AM/FM CD PLAYER
DB346MP
RADIO AM/FM-LECTEUR CD
RADIO DE AM/FM REPRODUCTOR DE CD
Contents
1. FEATURES ...................................................................................................................................... 2
2. CONTROLS .................................................................................................................................. 3
Source Unit ...................................................................................................................................... 3
Display ............................................................................................................................................. 3
3. BUTTON TERMINOLOGY .............................................................................................................. 4
Names of the Buttons and their Functions ...................................................................................... 4
4. PRECAUTIONS .............................................................................................................................. 5
5. HANDLING COMPACT DISCS ....................................................................................................... 6
6. DCP (DETACHABLE CONTROL PANEL) ..................................................................................... 7
7. REMOTE CONTROL ....................................................................................................................... 8
Function of Remote Control Unit Buttons ........................................................................................ 9
8. OPERATIONS ............................................................................................................................... 10
Basic Operations ........................................................................................................................... 10
Radio Mode Operations ................................................................................................................. 12
CD Mode Operations ..................................................................................................................... 13
9. TROUBLESHOOTING .................................................................................................................. 15
10. ERROR DISPLAYS ....................................................................................................................... 16
11. SPECIFICATIONS ......................................................................................................................... 17
1. FEATURES
Visible Blue Negative LCD and White Illuminated Buttons
Aluminum Detachable Faceplate
Rotary Volume for Easy Operation
Z-Enhancer with 3 Mode Sound Selector
MAGNA BASS EX for Dynamic Bass Tuning
FM Reception System
Seek / Manual Up / Down Tuning
8-Times Oversampling Digital Filter and Dual 1-Bit D/A Converters
Preset Station Scan (PS), Automatic Store (AS)
2-Channel RCA Line Level Output
AM 1 Band, FM 3 bands each 6 channels total 24 channels, Preset Memory Function
Repeat / Random Play / Intro Music Scan
200W (50 W X 4) Maximum Power Output
IR Remote Control Included
Clarion Co., Ltd.
All Rights Reserved. Copyright © 2003: Clarion Co., Ltd.
Printed in Malaysia / Imprimé en Malaisie / Impreso en Malasia
Be sure to unfold and read the next page.
Veuillez déployer et vous référer à la page suivante.
Cerciórese de desplegar y de leer la página siguiente.
PE-2642B
280-8014-00
DB245
DB245-Cover
1
20/11/03, 12:17 PM
2
Note : Be sure to unfold this page and refer to the front diagrams as you read each chapter.
Remarque: Veuillez déployer cette page et vous référer aux schémas quand vous lisez chaque chapitre.
English
English
2. CONTROLS / COMMANDES / CONTROLES
3. BUTTON TERMINOLOGY
Note:
• Be sure to read this chapter referring to the front diagrams of chapter “2. CONTROLS” on page 3.
Nota: Cuando lea los capÍtulos, despliegue esta página y consulte los diagramas.
Français
Names of the Buttons and their Functions
SOURCE UNIT / APPAREIL PILOTE / UNIDAD FUENTE
[RELEASE] button
[ISR] button
• Press the [RELEASE] button to unlock the
DCP.
• Recalls ISR radio station in memory.
• Press and hold for 2 seconds or longer:
Stores current station into ISR memory (radio mode only).
Español
[Z-ENCR] button
• Use the button to select one of the three
types of sound characteristics already stored
in memory. (Z-Enhancer)
[FNC] button
• Press the button to turn on the power.
Press and hold the button for 1 second or
longer to turn off the power.
• Switches the operation mode among radio
and CD mode.
[A-M] button
• Press and hold the button for 2 seconds or
longer to switch the MAGNA BASS EX on/off.
• Use the button to switch to the audio mode
(bass, treble, balance, fader)
[ROTARY] knob
• Adjust the volume by turning the knob clockwise or counterclockwise.
• Use the knob to perform various setting.
[CD SLOT]
• CD insertion slot.
DISPLAY / AFFICHEUR / VISUALIZADOR
[SCN] button
• Performs scan play for 10 seconds for each
track while in the CD mode.
[Q] button
• Ejects a CD when it is loaded into the unit.
[RPT] button
• Plays repeatedly while in the CD mode.
[RDM] button
[DIRECT] button
• Stores a station into memory or recall it directly while in the radio mode.
[SS] button
• Press the [SS] button while keeping the
[BND] button pressed, to turn the screen
saver function on or off.
[s
s] button
• Plays or pauses a CD while in the CD
mode.
[DISP] button
• Press the [DISP] button while keeping the
[BND] button pressed, to switch the display
indication (Main display, clock display).
[PS/AS] button
• Performs preset scan while in the radio
mode. When the button is pressed and
held, auto store is performed.
[a], [d] button
• Selects a station while in the radio mode or
selects a track when listening to a CD.
• Press and hold the button for 1 second or
longer to switches the fast-forward/fastbackward.
[BND] button
• Switches the band, or seek tuning or
manual tuning while in the radio mode.
• Plays a first track while in the CD mode.
• Performs random play while in the CD mode.
3
DB245-Cover
4
DB245
2
280-6310-00
DB245
20/11/03, 12:17 PM
280-6310-00
1. When the inside of the car is very cold and the
player is used soon after switching on the
heater, moisture may form on the disc or the
optical parts of the player and proper playback
may not be possible. If moisture forms on the
disc, wipe it off with a soft cloth. If moisture
forms on the optical parts of the player, do not
use the player for about one hour and the condensation will disappear naturally to allow normal operation.
2. Driving on extremely bumpy roads which cause
severe vibration may cause the sound to skip.
3. This unit uses a precision mechanism.
Even in the event that trouble arises, never
open the case, disassemble the unit, or
lubricate the rotating parts.
This equipment has been tested and found to comply with the limits for a Class B digital device, pursuant to Part 15 of the FCC Rules.
These limits are designed to provide reasonable
protection against harmful interference in a residential installation.
This equipment generates, uses, and can radiate
radio frequency energy and, if not installed and
used in accordance with the instructions, may
cause harmful interference to radio communications. However, there is no guarantee that interference will not occur in a particular installation.
If this equipment does cause harmful interference
to radio or television reception, which can be determined by turning the equipment off and on, the
user is encouraged to consult the dealer or an experienced radio/TV technician for help.
! CAUTION
USE OF CONTROLS, ADJUSTMENTS, OR PERFORMANCE OF PROCEDURES OTHER THAN
THOSE SPECIFIED HEREIN, MAY RESULT IN HAZARDOUS RADIATION EXPOSURE.
THE COMPACT DISC PLAYER SHOULD NOT BE ADJUSTED OR REPAIRED BY ANYONE
EXCEPT PROPERLY QUALIFIED SERVICE PERSONNEL.
Bottom View of Source Unit
INFORMATION FOR USERS:.
CHANGES OR MODIFICATIONS TO THIS PRODUCT NOT APPROVED BY THE MANUFACTURER WILL VOID THE WARRANTY AND WILL VIOLATE FCC APPROVAL.
DB245
DB245_EN_Pg02-17
5
20/11/03, 12:16 PM
xxx-xxxx-xx
5
English
4. PRECAUTIONS
English
5. HANDLING COMPACT DISCS
This unit has been designed specifically for
playback of compact discs bearing the
mark. No other discs can be played.
To remove the compact disc from its storage
case, press down on the center of the case
and lift the disc out, holding it carefully by the
edges.
Removing the disc
Note on Compact Discs
Never stick labels on the surface of the compact disc or mark the surface with a pencil or
pen.
No
Proper way to hold
the compact disc
Do not use any solvents such as commercially
available cleaners, anti-static spray, or thinner
to clean compact discs.
Always handle the compact disc by the edges.
Never touch the surface.
To remove fingermarks and dust, use a soft
cloth, and wipe in a straight line from the center of the compact disc to the circumference.
No
No
Do not use compact discs that have large
scratches, are misshapen, or cracked, etc. Use
of such discs will cause misoperation or damage.
No
New discs may have some roughness around
the edges. The unit may not work or the sound
may skip if such discs are used. Use a ball-point
pen, etc. to remove roughness from the edge of
the disc.
Ball-point pen
Roughness
Do not expose compact discs to direct sunlight
or any heat source.
No
Note:
• Do not use commercially available CD protection sheets or discs equipped with stabilizers, etc. These may
get caught in the internal mechanism and damage the disc.
6
DB245
DB245_EN_Pg02-17
6
20/11/03, 12:16 PM
xxx-xxxx-xx
The control panel can be detached to prevent
theft. When detaching the control panel, store it
in the DCP (DETACHABLE CONTROL PANEL)
case to prevent scratches.
We recommend taking the DCP with you when
leaving the car.
Storing the DCP in the DCP Case
Hold the DCP, in the orientation as shown in the
figure below, and put it into the supplied DCP
case. (Ensure the DCP is in the correct orientation.)
DCP
Removing the DCP
1. Press the [FNC] button for 1 second or
longer to switch off the power.
2. Press in the [RELEASE] button.
[RELEASE] button
DCP case
CAUTION
• The DCP can easily be damaged by
shocks. After removing it, be careful not to
drop it or subject it to strong shocks.
• When the Release button is pressed and
the DCP is unlocked, the car’s vibrations
may cause it to fall. To prevent damage to
the DCP, always store it in its case after detaching it. (See figure above.)
• The connector connecting the main unit
and the DCP is an extremely important
part. Be careful not to damage it by pressing on it with fingernails, pens, screwdrivers, etc.
∗ The DCP is unlocked
3. Remove the DCP.
DCP Rear Panel
Main Unit Front
DCP
Attaching the DCP
1. Insert the right side of the DCP into the main
unit.
2. Insert the left side of the DCP into the main
unit.
DCP
connector
Main unit connector
Note:
• If the DCP is dirty, wipe off the dirt with a soft, dry
cloth only.
2.
DCP
1.
DB245
DB245_EN_Pg02-17
7
20/11/03, 12:16 PM
xxx-xxxx-xx
7
English
6. DCP (DETACHABLE CONTROL PANEL)
English
7. REMOTE CONTROL
Remote control unit
Inserting the Batteries
1. Turn the remote control unit over, then slide
the rear cover in the direction of the arrow.
2. Insert the AA (SUM-3, IECR-6/1.5V) batteries
that came with the remote control unit facing
in the directions shown in the figure, then close
the rear cover.
Notes:
Using batteries improperly can cause them to explode. Take note of the following points:
• When replacing batteries, replace both batteries
with new ones.
• Do not short-circuit, disassemble or heat batteries.
• Do not dispose of batteries into fire or flames.
• Dispose of spent batteries properly.
8
AA (SUM-3, IECR-6/1.5V)
Batteries
Rear cover
Rear side
DB245
DB245_EN_Pg02-17
8
20/11/03, 12:16 PM
xxx-xxxx-xx
Functions of Remote Control Unit Buttons
English
Mode
Button
Radio
CD
[FUNC]
Turns power on and off. When press and held for 1 second: Turns power off.
Switches between radio and CD.
[BAND]
Switches reception band.
Plays the first track.
Top play.
[w] , [z]
Increases and decreases volume (in all modes).
[a] , [d]
Moves preset channels up
and down.
Moves tracks up and down.
When pressed and held for 1 second: Fast-forward/
fast-backward.
[s]
Turns mute on and off
Switches between playback and pause.
[MUTE]
Turns mute on and off.
Switches between playback and pause.
[ISR]
Recalls ISR radio station in memory.
Press and hold for 2 seconds or longer: Stores current station into ISR (radio mode only).
[DISP]
Switches among main display, clock display.
[SCN]
Preset scan.
When pressed and held
for 2 seconds: Auto store.
Scan play.
[RPT]
No function
Repeat play.
[RDM]
No function
Random play.
∗ Some of the corresponding buttons on the main unit and remote control unit have different functions.
∗ 2-ZONE button is not available.
DB245
DB245_EN_Pg02-17
9
20/11/03, 12:16 PM
xxx-xxxx-xx
9
English
8. OPERATIONS
Basic Operations
Note:Be sure to read this chapter referring to the front diagrams of
chapter “2. CONTROLS” on page 3.
CAUTION
Be sure to lower the volume before switching off the unit power or the ignition key. The
unit remembers its last volume setting. If
you switch the power off with the volume up,
when you switch the power back on, the
sudden loud volume may hurt your hearing
and damage the unit.
Turning on/off the power
Note:
• Be careful about using this unit for a long time
without running the engine. If you drain the car’s
battery too far, you may not be able to start the
engine and this can reduce the service life of the
battery.
1. Press the [FNC] button.
2. The illumination and display on the unit light
up. The unit automatically remembers its last
operation mode and will automatically switch
to display that mode.
3. Press and hold the [FNC] button for 1 second or longer to turn off the power for the
unit.
Setting the Z-Enhancer
This unit are provided with 3 types of sound tone effects stored in memory. Select the one you prefer.
∗ The factory default setting is “Z-EHCR OFF”.
Each time you press the [Z-ENCR] button, the
tone effect changes in the following order:
“Z-ENHANCER 1” ➜ “Z-ENHANCER 2” ➜ “ZENHANCER 3” ➜ “Z-EHCR OFF” ➜ “ZENHANCER 1”...
• Z-ENHANCER 1 : bass emphasized
• Z-ENHANCER 2 : treble emphasized
• Z-ENHANCER 3 : bass and treble emphasized
• Z-EHCR OFF
: no sound effect
Audio Mode Adjustments
Press the [A-M] button to select the adjustment
mode. The mode switches as follows each time
the [A-M] button is pressed:
BASS ➜ TREB ➜ BAL ➜ FAD ➜ Previous
mode
∗ The display returns to the previous mode 7 seconds after the adjustment.
Selecting a mode
1. Press the [FNC] button to change the operation mode.
2. Each time you press the [FNC] button, the
operation mode changes in the following order:
Radio mode ➜ CD mode ➜ Radio mode...
Note:
• If the CD mode is selected when no disc is inserted, the display shows “no DISC”.
Adjusting the volume
Turning the [ROTARY] knob clockwise increases the volume; turning it counterclockwise
decreases the volume.
∗ The volume level is from 0 (minimum) to 33
(maximum).
10
DB245
DB245_EN_Pg02-17
10
20/11/03, 12:16 PM
xxx-xxxx-xx
Basic Operations
1. Press the [A-M] button and select “BASS”.
2. Turning the [ROTARY] knob clockwise emphasizes the bass; turning it counterclockwise attenuates the bass.
∗ The factory default setting is “0”. (Adjustment
range: –7 to +7)
Adjusting the treble
1. Press the [A-M] button and select “TREB”.
2. Turning the [ROTARY] knob clockwise emphasizes the treble; turning it counterclockwise attenuates the treble.
∗ The factory default setting is “0”. (Adjustment
range: –7 to +7)
Adjusting the balance
1. Press the [A-M] button and select “BAL”.
2. Turning the [ROTARY] knob clockwise emphasizes the sound from the right speaker;
turning it counterclockwise emphasizes the
sound from the left speaker.
∗ The factory default setting is “0”. (Adjustment
range: L13 to R13)
Adjusting the fader
1. Press the [A-M] button and select “FAD”.
2. Turning the [ROTARY] knob clockwise emphasizes the sound from the front speakers;
turning it counterclockwise emphasizes the
sound from the rear speakers.
∗ The factory default setting is “0”. (Adjustment
range: F12 to R12)
Note:
• Bass and Treble can only be adjusted when the
“Z-enhancer” is off.
Turning on/off MAGNA BASS EX
To adjust the MAGNA BASS EX
The MAGNA BASS EX does not adjust the low
sound area like the normal sound adjustment
function, but emphasizes the deep bass sound
area to provide you with a dynamic sound.
∗ The factory default setting is off. Press and hold
the [A-M] button for 2 second or longer to turn the
MAGNA BASS EX and “M-B EX” in the display
lights on or off.
Turning the screen saver function
on or off
This unit is provided with the screen saver function. You can turn on or off this function.
If the button operation is performed with the
screen saver function on, the operation display
corresponding to the button operation is shown
for about 30 seconds and the display returns to
the screen saver display.
∗ The factory default setting is on.
Press the [SS] button while keeping the [BND]
button pressed, to turn the screen saver function on or off.
Switching the Clock Display
Press and hold the [BND] button, and then press
the [DISP] button to switch between the operation mode and the clock display.
Setting the Clock
1. Press and hold the [BND] button, and then
press the [DISP] button to display the clock
display.
2. Press and hold the [BND] button, and then
press the [DISP] button for 2 seconds or
longer.
3. Press the [a] or [d] button to toggle
HOUR and MINUTE selection. Then turn the
[ROTARY] knob clockwise to increase hour /
minute or counterclockwise to decrease hour
/ minute.
4. Press the [BND] button, then clock is set.
Note:
• If you select another operation mode while you
are setting the clock, the clock setting operation
will be canceled.
• If you remove the vehicle's battery for a check or
repair, the clock will be reset, so you must set it
again.
Illumination dimmer function
When the illumination line of this unit is connected with the car-side illumination signal line,
the display illumination of this unit dims in connection with turning on the car-side illumination.
DB245
DB245_EN_Pg02-17
11
20/11/03, 12:16 PM
11
xxx-xxxx-xx
English
Adjusting the bass
Radio Mode Operations
English
FM Reception
For enhanced FM performance the
tuner includes signal actuated stereo control and
multipath noise reduction circuits.
Listening to the radio
1. Press the [FNC] button and select the radio
mode. then the radio will be on.
2. To select a preset band, press the [BND] button, then select one of the preset bands such
as FM1, FM2, FM3 or AM. Every time the [BND]
button is pressed, the display will change as:
FM1 ➜ FM2 ➜ FM3 ➜ AM ➜ FM1
3. Press the [a] or [d] button to tune in the
desired station.
Manual Tuning
1. Press the [BND] button to select the desired
band FM1, FM2, FM3 or AM.
2. Press and hold the [BND] button for 2 seconds or longer, then the "MANU" is lit in the
display, which means that a manual selection
function is on.
3. Press the [a] or [d] button to manually
tune in a station.
Seek Tuning
1. Press the [BND] button to select the desired
band FM1, FM2, FM3 or AM.
2. If the "MANU" is lit in the display, press and
hold the [BND] button for 2 seconds or
longer. When the "MANU" display is off, the
seek tuning is now available.
3. Press the [a] or [d] button to automatically
seek in a station.
Manual memory function
1. Press the [BND] button, to select a band you
want to store in the memory.
2. Press the [a] or [d] button to tune into a
desired station.
3. Press and hold one of the [DIRECT] button
for 2 seconds or longer to store the current
station into preset memory.
Auto store function
(Automatic Station Store)
1. Press [BND] button to select the desired
band FM1, FM2, FM3 or AM.
2. Press and hold the [PS/AS] button for 2 seconds or longer. The stations at which the reception is the strongest will be automatically
stored in the memory.
Notes:
• When the auto store is performed, the station previously store in the memory at that position is
overwritten.
• When the number of stations stored is less than
six, the previous content of the memory for each
direct button will be retained.
Preset Scanning (Preset Station
Scan)
When the [PS/AS] button is pressed, the "SCN"
will be indicated with preset memory numbers
and the stations are tuned in for 7 seconds each
in the order in which they were stored. Press the
[PS/AS] button again to cancel the preset scanning mode.
Instant Station Recall (ISR)
Preset Memory Function
Preset Memory Function can store up to 24
stations: six stations for each of FM1, FM2, FM3
and AM.
12
With this function, a specific radio station can be
recalled from any mode.
ISR memory
1. Press the [FNC] button, then select the radio
mode.
2. Select the radio station which you want to
store in the memory.
3. Press and hold the [ISR] button for 2 sec-
DB245
DB245_EN_Pg02-17
12
20/11/03, 12:16 PM
xxx-xxxx-xx
CD Mode Operations
Radio Operations
Loading a CD
Insert a CD into the center of the CD insertion slot
with the labeled side facing up. “LOAD" appears in
the display, the CD enters into the slot and start playing.
CD SLOT
Area Change
Use this function when you are using the car
stereo anywhere outside the U.S.
Switchable frequency spacing
This car stereo is initially set to tune in frequency intervals of 10 kHz for AM and 200 kHz
for FM, the standard calibrations inside the U.S.
When using the unit outside the U.S., use the
following procedure to switch the frequency
range.
Initial Setting
(U.S. Standard)
New Setting
(outside U.S.)
Frequency
spacing
10 kHz
9 kHz
Frequency
range
530 to
1,710 kHz
531 to
1,629 kHz
Frequency
spacing
200 kHz
50 kHz
Frequency
range
87.9 to
107.9 MHz
87.0 to
108 MHz
Notes:
• Do not put your hand, fingers, or foreign objects
into the CD insertion slot.
• If a CD has already been loaded, another CD
cannot be inserted. Do not insert another one
forcefully.
• Discs not bearing the
mark cannot be played
with the unit. CD-ROMs cannot be played.
• Some CDs recorded in CD-R/CD-RW mode may
not be usable.
Listening to the Disc already Inserted
Press the [FNC] button to select the CD mode,
the CD will start playing.
AM
FM
The table below lists the frequency specifications for the U.S. and other countries.
Switching the area change
Outside U.S. (New Setting)
While pressing the [AM] button, press the [RPT]
button, then "outside U.S." will be selected.
Inside U.S. standard (Initial Setting)
While pressing the [AM] button, press the [SCN]
button, then the "U.S. standard" will be selected.
Stopping (pausing) Playback
While the CD playing pressing the [s] button
will stop the CD and “PAUSE” indicate.
Press the [s] button again to resume playback.
Ejecting the CD
Press the [Q] button, then the CD will be
ejected.
Note:
• If the ejected CD is left as it is, it will be reloaded
after 15 seconds.
• However, single CDs will not be reloaded, so
make sure to remove them.
Top Function
Press the [BND] button, then the CD will start
playing from the first song (track number 1).
DB245
DB245_EN_Pg02-17
13
20/11/03, 12:16 PM
13
xxx-xxxx-xx
English
onds or longer.
Recalling ISR
Press the [ISR] button and the display will show
"ISR". Then the radio station previously memorized will be selected. Press the [ISR] button
again to disengage the unit from the Recalling
ISR function.
CD Mode Operations
English
Selecting Tracks (songs)
Press the [a] or [d] button.
d: Playback will start from the next track.
a: Playback will start from the beginning of
the track currently playing. When this
button is pressed again, the CD will play
from the previous track.
Fast-Forward and Fast-Backward
Press and hold the [a] or [d] button.
d: To fast-forward
a: To fast-backward
∗ Pressing the [a] or [d] button for 1 second or
longer will move forward or backward 3 times
faster than normal play, and pressing it for 3
seconds or longer will do the operation 30 times
faster.
Scan Play (Intro Music Scan)
At Audio CD press the [SCN] button, then the
“SCN” in the display lights on, then the CD will
play the first 10 seconds of each track of the
whole disc. Press the [SCN] button again to disengage the unit from scan play.
∗ A scan play will start from the track following the
one currently playing.
Repeat Play
At Audio CD press the [RPT] button, then the
“RPT” in the display lights on, then the track currently playing will be played repeatedly. Press
the [RPT] button again to disengage the unit
from repeat play.
Random Play
At Audio CD press the [RDM] button, then the
“RDM” in the display lights on, then the entire
tracks on the disc will be played at random.
Press the [RDM] button again to disengage the
unit from random play.
14
DB245
DB245_EN_Pg02-17
14
20/11/03, 12:16 PM
xxx-xxxx-xx
Problem
Power does not turn on.
(No sound is produced.)
Cause
English
9. TROUBLESHOOTING
Solution
Fuse is blown.
Replace with a fuse of the same amperage. If
the fuse blows again, consult your store of
purchase.
Incorrect wiring.
Consult your store of purchase.
Compact disc cannot be
loaded.
Another compact disc is
already loaded.
Eject the compact disc before loading the new
one.
Sound skips or is noisy.
Compact disc is dirty.
Clean the compact disc with a soft cloth.
Compact disc is heavily
scratched or warped.
Replace with a compact disc with no scratches.
Sound is bad directly after
power is turned on.
Let dry for about 1 hour with the power on.
Water droplets may form on
the internal lens when the car
is parked in a humid place.
Nothing happens when
button are pressed.
Display is not accurate.
The microprocessor has
malfunctioned due to noise,
etc.
Turn off the power, then press the [RELEASE]
button and remove the DCP.
Press the reset button for about 2 seconds with
a thin rod.
DCP or main unit connectors
are dirty.
Wipe the dirt off with a soft cloth moistened with
cleaning alcohol.
DB245
DB245_EN_Pg02-17
15
20/11/03, 12:16 PM
15
xxx-xxxx-xx
English
10. ERROR DISPLAYS
■ To protect the system, this unit has been equipped with self diagnostic functions. If a fault
arises, a warning is issued by various error displays. Follow the corrective measures and
remove the fault.
Error Display
Corrective Measure
ERROR 2
This error display indicates that a fault has arisen in the
mechanism of the source unit (for example, the disc cannot be
ejected).
➜ Check the source unit.
ERROR 3
This error display indicates that the pickup focus is off because
of a scratched disc or some other factor during source unit play.
➜ Check the compact disc.
ERROR 6
This indicates that the CD’s TOC (table of contents) cannot be
read, for example because the selected disc is upside-down.
16
DB245
DB245_EN_Pg02-17
16
20/11/03, 12:16 PM
xxx-xxxx-xx
FM Tuner
General
Frequency Range: 87.9 MHz to 107.9 MHz
Usable Sensitivity: 11 dBf
50 dB Quieting Sensitivity: 17 dBf
Alternate Channel Selectivity: 75 dB
Stereo Separation (1 kHz): 35 dB
Frequency Response (±3 dB): 30 Hz to 15 kHz
Power Supply Voltage:
14.4 V DC (10.8 V to 15.6 V allowable),
negative ground
Current Consumption: Less than 15 A
Speaker Impedance: 4 Ω (4 Ω to 8 Ω allowable)
Weight: 2.42 lb. (1.1 kg)
Dimensions:
7" (Width) ✕ 1-15/16" (Height) ✕ 6" (Depth)
178 (W) ✕ 50 (H) ✕ 152 (D) mm
Frequency Range:
AM 530 kHz to 1,710 kHz
Usable Sensitivity: 25 µV
CD Player
System: Compact disc audio system
Usable Discs: Compact disc
Frequency Response: 10 Hz to 20 kHz (±1 dB)
Signal-to-Noise Ratio: 100 dB (1 kHz) IHF-A
Dynamic Range: 95 dB (1 kHz)
Harmonic Distortion: 0.01%
Audio
Maximum Power Output: 200 W (50 W ✕ 4 ch)
Continuous Average Power Output:
17 W ✕ 4, into 4 Ω, 20 Hz to 20 kHz,1%THD
Bass Control Action (30 Hz): ±14 dB
Treble Control Action (10 kHz): ±14 dB
Line Output (with A/C 1 kHz, 10 kΩ): 1.7 V
178 mm
50 mm
188 mm
58 mm
152 mm
AM Tuner
Notes:
• Specifications comply with JEITA Standards.
• Specifications and design are subject to change
without notice for further improvement.
• Please make sure when connecting external
power amplifier, that you properly, to the car chassis, ground the amplifier.
• If this is not done, severe damage to the source
unit way happen.
DB245
DB245_EN_Pg02-17
17
20/11/03, 12:16 PM
17
xxx-xxxx-xx
English
11. SPECIFICATIONS
Owner's manual
Mode d'emploi
Manual de instrucciones
AM/FM CD PLAYER
DB346MP
RADIO AM/FM-LECTEUR CD
RADIO DE AM/FM REPRODUCTOR DE CD
Contents
1. FEATURES ...................................................................................................................................... 2
2. CONTROLS .................................................................................................................................. 3
Source Unit ...................................................................................................................................... 3
Display ............................................................................................................................................. 3
3. BUTTON TERMINOLOGY .............................................................................................................. 4
Names of the Buttons and their Functions ...................................................................................... 4
4. PRECAUTIONS .............................................................................................................................. 5
5. HANDLING COMPACT DISCS ....................................................................................................... 6
6. DCP (DETACHABLE CONTROL PANEL) ..................................................................................... 7
7. REMOTE CONTROL ....................................................................................................................... 8
Function of Remote Control Unit Buttons ........................................................................................ 9
8. OPERATIONS ............................................................................................................................... 10
Basic Operations ........................................................................................................................... 10
Radio Mode Operations ................................................................................................................. 12
CD Mode Operations ..................................................................................................................... 13
9. TROUBLESHOOTING .................................................................................................................. 15
10. ERROR DISPLAYS ....................................................................................................................... 16
11. SPECIFICATIONS ......................................................................................................................... 17
1. FEATURES
Visible Blue Negative LCD and White Illuminated Buttons
Aluminum Detachable Faceplate
Rotary Volume for Easy Operation
Z-Enhancer with 3 Mode Sound Selector
MAGNA BASS EX for Dynamic Bass Tuning
FM Reception System
Seek / Manual Up / Down Tuning
8-Times Oversampling Digital Filter and Dual 1-Bit D/A Converters
Preset Station Scan (PS), Automatic Store (AS)
2-Channel RCA Line Level Output
AM 1 Band, FM 3 bands each 6 channels total 24 channels, Preset Memory Function
Repeat / Random Play / Intro Music Scan
200W (50 W X 4) Maximum Power Output
IR Remote Control Included
Clarion Co., Ltd.
All Rights Reserved. Copyright © 2003: Clarion Co., Ltd.
Printed in Malaysia / Imprimé en Malaisie / Impreso en Malasia
Be sure to unfold and read the next page.
Veuillez déployer et vous référer à la page suivante.
Cerciórese de desplegar y de leer la página siguiente.
PE-2642B
280-8014-00
DB245
DB245-Cover
1
20/11/03, 12:17 PM
2
Table des matières
Français
1. CARACTÉRISTIQUES .................................................................................................................. 18
2. COMMANDES ............................................................................................................................... 3
Appareil Pilote ................................................................................................................................. 3
Afficheur ........................................................................................................................................... 3
3. NOMENCLATURE DES TOUCHES ............................................................................................. 19
Nom des touches et leurs fonctions .............................................................................................. 19
4. PRÉCAUTIONS ............................................................................................................................ 20
5. MANIEMENT DES DISQUES COMPACTS .................................................................................. 21
6. CLAVIER DE COMMANDE AMOVIBLE (DCP) ............................................................................ 22
7. TÉLÉCOMMANDE ........................................................................................................................ 23
Fonctions des touches de la télécommande ................................................................................. 24
8. FONCTIONNEMENT ..................................................................................................................... 25
Fonctionnement de base ............................................................................................................... 25
Fonctionnement de la radio ........................................................................................................... 27
Fonctionnement du mode CD ........................................................................................................ 28
9. EN CAS DE DIFFICULTÉ ............................................................................................................. 30
10. AFFICHAGE DES ERREURS ....................................................................................................... 31
11. CARACTÉRISTIQUES TECHNIQUES ......................................................................................... 32
1. CARACTÉRISTIQUES
Affichage négatif à cristaux liquides bleu visible et touches lumineuses blanches
Façade amovible d’aluminium
Bouton de volume rotatif pour un usage facile
Renforceur-Z avec sélecteur audio trois modes
MAGNA BASS EX pour accord de basse dynamique
Système de réception FM
Syntonisation automatique / manuelle ascendante / descendante
Filtre numérique de suréchantillonnage 8 fois et deux convertisseurs N/A à un seul bit
Balayage des stations préréglées (PS), mémorisation automatique (AS)
Sortie de ligne RCA deux canaux
Préréglage des stations : 1 gamme AM et 3 gammes FM à 6 canaux chacune, pour un total
de 24 canaux
Répétition / lecture aléatoire / balayage des sélections musicales
Puissance maximale de sortie de 200 W (50 W X 4)
Télécommande IR incluse
18
DB245
DB245_FR_Pg18-32
18
20/11/03, 12:12 PM
xxx-xxxx-xx
Note : Be sure to unfold this page and refer to the front diagrams as you read each chapter.
Remarque: Veuillez déployer cette page et vous référer aux schémas quand vous lisez chaque chapitre.
English
English
2. CONTROLS / COMMANDES / CONTROLES
3. BUTTON TERMINOLOGY
Note:
• Be sure to read this chapter referring to the front diagrams of chapter “2. CONTROLS” on page 3.
Nota: Cuando lea los capÍtulos, despliegue esta página y consulte los diagramas.
Français
Names of the Buttons and their Functions
SOURCE UNIT / APPAREIL PILOTE / UNIDAD FUENTE
[RELEASE] button
[ISR] button
• Press the [RELEASE] button to unlock the
DCP.
• Recalls ISR radio station in memory.
• Press and hold for 2 seconds or longer:
Stores current station into ISR memory (radio mode only).
Español
[Z-ENCR] button
• Use the button to select one of the three
types of sound characteristics already stored
in memory. (Z-Enhancer)
[FNC] button
• Press the button to turn on the power.
Press and hold the button for 1 second or
longer to turn off the power.
• Switches the operation mode among radio
and CD mode.
[A-M] button
• Press and hold the button for 2 seconds or
longer to switch the MAGNA BASS EX on/off.
• Use the button to switch to the audio mode
(bass, treble, balance, fader)
[ROTARY] knob
• Adjust the volume by turning the knob clockwise or counterclockwise.
• Use the knob to perform various setting.
[CD SLOT]
• CD insertion slot.
DISPLAY / AFFICHEUR / VISUALIZADOR
[SCN] button
• Performs scan play for 10 seconds for each
track while in the CD mode.
[Q] button
• Ejects a CD when it is loaded into the unit.
[RPT] button
• Plays repeatedly while in the CD mode.
[RDM] button
[DIRECT] button
• Stores a station into memory or recall it directly while in the radio mode.
[SS] button
• Press the [SS] button while keeping the
[BND] button pressed, to turn the screen
saver function on or off.
[s
s] button
• Plays or pauses a CD while in the CD
mode.
[DISP] button
• Press the [DISP] button while keeping the
[BND] button pressed, to switch the display
indication (Main display, clock display).
[PS/AS] button
• Performs preset scan while in the radio
mode. When the button is pressed and
held, auto store is performed.
[a], [d] button
• Selects a station while in the radio mode or
selects a track when listening to a CD.
• Press and hold the button for 1 second or
longer to switches the fast-forward/fastbackward.
[BND] button
• Switches the band, or seek tuning or
manual tuning while in the radio mode.
• Plays a first track while in the CD mode.
• Performs random play while in the CD mode.
3
DB245-Cover
4
DB245
2
280-6310-00
DB245
20/11/03, 12:17 PM
280-6310-00
3. NOMENCLATURE DES TOUCHES
Remarque:
• Lisez bien ce chapitre en vous référant aux schémas de la façade, au chapitre “2. LES COMMANDES”, à
la page 3.
Touche [RELEASE]
Touche [RDM]
• Appuyez sur la touche [RELEASE] pour
déverrouiller le clavier de commande amovible.
• Effectue une lecture aléatoire en mode CD.
Français
Nom des touches et leurs fonctions
Touche [ISR]
Touche [Z-ENCR]
• Utilisez cette touche pour sélectionner l’un des
trois types de caractéristiques sonores déjà
enregistrés en mémoire. (Z-Enhancer)
Touche [FNC]
• Appuyez sur cette touche pour mettre l’appareil
sous tension.
Maintenez la touche enfoncée pendant 1
seconde ou plus pour mettre l’appareil hors tension.
• Commute le mode de fonctionnement entre les
modes radio et CD.
Touche [A-M]
• Maintenez la touche enfoncée pendant 2
secondes ou plus pour activer / désactiver
MAGNA BASS EX.
• Utilisez cette touche pour commuter sur le
mode audio (graves, aigus, balance, fader).
Bouton [ROTARY]
• Réglez le volume en tournant le bouton dans le
sens des aiguilles d’une montre ou dans le sens
inverse.
• Utilisez le bouton pour effectuer différents
réglages.
[CD SLOT]
• Rappel d’une station de radio ISR placée en
mémoire.
• Pression de 2 secondes ou plus :
enregistrement de la station actuelle dans la
mémoire ISR (en mode radio seulement).
Touche [DIRECT]
• Enregistre une station dans la mémoire ou
rappelle la station directement en mode radio.
Touche [SS]
• Appuyez sur la touche [SS] tout en maintenant
la touche [BND] enfoncée pour mettre la
fonction d’économiseur d’écran en ou hors service.
s]
Touche [s
• Lit un CD ou effectue une pause en mode CD.
Touche [DISP]
• Appuyez sur la touche [DISP] tout en maintenant
la touche [BAND] enfoncée pour commuter les
données de l’affichage (affichage principal,
affichage de l’horloge).
Touche [PS/AS]
• Effectue un balayage préréglé en mode radio.
Lorsque vous maintenez la touche enfoncée,
elle effectue une mémorisation automatique.
Touche [a], [d]
• Fente d’insertion de CD.
Touche [SCN]
• Lit les 10 premières secondes de chaque plage
en mode CD.
Touche [Q]
• Sélectionne une station en mode radio ou
sélectionne une plage pendant la lecture d’un
CD.
• Maintenez pressée la touche pendant une
seconde ou plus pour sélectionner l’avance
rapide ou le retour rapide.
• Éjecte le CD chargé dans l’appareil.
Touche [BND]
Touche [RPT]
• Sélectionne la gamme ou commute sur la
syntonisation automatique ou manuelle en mode
radio.
• Lit la première plage en mode CD.
• Effectue une lecture répétée en mode CD.
DB245
DB245_FR_Pg18-32
19
20/11/03, 12:12 PM
19
xxx-xxxx-xx
4. PRÉCAUTIONS
Français
1. Lorsque l’habitacle de la voiture est très froid
et que le lecteur est utilisé juste après la mise
en route du chauffage, de la condensation risque de se former sur le disque ou sur les pièces
optiques du lecteur et d’empêcher le bon
déroulement de la lecture. Si de la condensation s’est formée sur le disque, essuyez le
disque avec un chiffon doux. Si de la condensation s’est formée sur les pièces optiques du
lecteur, attendez environ une heure avant
d’utiliser le lecteur pour que la condensation
puisse s’évaporer naturellement et permettre
un fonctionnement normal.
2. Une conduite sur routes mauvaises qui
provoque de fortes vibrations peut entraîner
des interruptions du son.
3. L’appareil utilise un mécanisme de précision.
Même s’il se produit une anomalie, il ne faut
jamais ouvrir le coffret, démonter l’appareil ou
graisser les pièces rotatives.
L’appareil a été testé et jugé conforme aux
limites des appareils numériques de classe B,
aux termes de la section 15 de la
réglementation FCC.
Ces limites ont pour but d’assurer une protection raisonnable contre les interférences parasites dans une installation résidentielle.
Cet appareil engendre, utilise et peut émettre
une énergie radioélectrique et, s’il n’est pas
installé et utilisé en stricte conformité avec les
instructions, il peut provoquer des interférences
parasites dans les liaisons radiophoniques.
Ceci ne garantit pas pour autant qu’une installation particulière n’émettra aucune
interférence.
Si l’appareil engendre des interférences parasites avec la réception radio ou télévision, ce
qui pourra être déterminé en éteignant puis en
rallumant l’appareil, il est conseillé à l’utilisateur
de consulter son magasin ou un technicien de
radio-télévision expérimenté.
! ATTENTION
L’UTILISATION DE COMMANDES, LES RÉGLAGES OU L’EXÉCUTION D’OPÉRATIONS NON
SPÉCIFIÉS AUX PRÉSENTES RISQUENT D’ENTRAÎNER UNE EXPOSITION À UN
RAYONNEMENT DANGEREUX.
LES RÉGLAGES ET LES RÉPARATIONS DU LECTEUR DE DISQUES COMPACTS DOIVENT
ÊTRE CONFIÉS UNIQUEMENT À UN TECHNICIEN QUALIFIÉ.
Vue de l’appareil pilote par dessous
INFORMATION AUX UTILISATEURS :
TOUTE MODIFICATION DE L’APPAREIL NON APPROUVÉE PAR LE FABRICANT ANNULERA
LA GARANTIE ET ENFREINDRA L’APPROBATION FCC.
20
DB245
DB245_FR_Pg18-32
20
20/11/03, 12:12 PM
xxx-xxxx-xx
5. MANIEMENT DES DISQUES COMPACTS
Retrait du disque
Remarques sur les disques compacts
Ne collez jamais d’étiquettes sur la surface du
disque compact et n’y écrivez rien avec un
stylo ou un crayon.
Non
No
Façon correcte de
tenir le disque
Tenez toujours le disque compact par les
bords. Ne touchez jamais sa surface.
Pour enlever les marques de doigt et la
poussière, utilisez un chiffon doux, et essuyez
le disque en ligne droite, du centre du disque
vers la périphérie.
N’utilisez aucuns solvants, comme des produits
de nettoyage, des vaporisateurs antistatique ou
des diluants vendus dans le commerce, pour
nettoyer les disques compacts.
Non
No
Non
No
N’utilisez pas de disques compacts fortement
rayés, gondolés ou fendillés, etc. Cela
provoquerait des anomalies de fonctionnement
ou des dommages.
Les disques neufs présenteront certaines
aspérités sur les bords. Avec ces disques,
l’appareil peut ne pas fonctionner ou le son
s’interrompre. À l’aide d’un stylo-bille, etc.,
retirez les aspérités sur le pourtour du disque.
Non
No
Ball-point
pen
Stylo-bille
Aspérités
Roughness
N’exposez pas les disques compacts à la
lumière directe du soleil, ni à une source de
chaleur.
Non
No
Remarque:
• N’utilisez pas de feuilles de protection de CD en vente dans le commerce, ni de disques dotés de stabilisateur,
etc. Ils pourraient se coincer dans le mécanisme interne et endommager le disque.
DB245
DB245_FR_Pg18-32
21
20/11/03, 12:12 PM
21
xxx-xxxx-xx
Français
L’appareil a été conçu spécifiquement pour la
lecture des disques compacts portant le label
. Il ne permet de lire aucun autre disque.
Pour sortir le disque compact de son étui de
rangement, appuyez sur le centre de l’étui, et
soulevez le disque en le tenant délicatement
par les bords.
6. CLAVIER DE COMMANDE AMOVIBLE (DCP)
Français
Le clavier de commande se retire, de façon à
éviter le vol. Quand vous l’enlevez, rangez-le
dans le boîtier du DCP (CLAVIER DE
COMMANDE AMOVIBLE) pour le protéger des
rayures.
Nous vous recommandons d’emporter le clavier
de commande avec vous quand vous quittez
votre voiture.
Rangement du clavier DCP dans le
boîtier de clavier DCP
Saisissez le clavier DCP, et orientez-le comme
le montre la figure ci-dessous, puis placez-le
dans le boîtier de clavier DCP fourni. (Vérifiez
que le clavier DCP est orienté correctement.)
DCP
Retrait du DCP
1. Maintenez la touche [FNC] enfoncée pendant 1 seconde ou plus pour mettre l’appareil
hors tension.
2. Appuyez sur la touche [RELEASE].
Boîtier
du DCP
DCP
case
[RELEASE]
[Touche
] button
RELEASE
∗ Le clavier DCP est déverrouillé.
3. Retirez le DCP.
DCP
Fixation du clavier DCP
1. Insérez le côté droit du DCP dans l’appareil
principal.
2. Insérez le côté gauche du DCP dans
l’appareil principal.
2.
ATTENTION
• Le clavier de commande amovible est très
sensible aux chocs. Après l’avoir enlevé,
veillez à ne pas l’échapper ou le heurter
violemment.
• Si vous appuyez sur la touche de
dégagement et que le clavier DCP est
déverrouillé, il risque de tomber sous
l’effet des vibrations de la voiture. Pour
éviter d’endommager le DCP, rangez-le
toujours dans son boîtier après l’avoir
retiré. (Voir la figure ci-dessus.)
• Le connecteur qui raccorde l’appareil principal au DCP est une pièce extrêmement
importante. Faites attention de ne pas
l’abîmer en appuyant dessus avec les
ongles, des stylos à bille, un tournevis,
etc.
Panneau arrière
du DCP
DCP Rear Panel
Avant de l’appareil
principal
Main Unit Front
DCP
Connecteur
connector
DCP
Main unit connector
Connecteur
de l’appareil
principal
DCP
1.
22
Remarque:
• Si le clavier de commande amovible est sale,
n’essuyez la saleté qu’avec un chiffon doux et sec.
DB245
DB245_FR_Pg18-32
22
20/11/03, 12:12 PM
xxx-xxxx-xx
7. TÉLÉCOMMANDE
Récepteur de télécommande
Français
Rayon d’action : 30° dans toutes les directions
Télécommande
Émetteur de signal
Installation des piles
1. Retournez la télécommande, et glissez le
couvercle arrière dans le sens de la flèche.
2. Insérez les piles AA (SUM-3, IECR-6 / 1,5 V)
fournies avec la télécommande dans le sens
indiqué sur la figure, puis refermez le couvercle
arrière.
Remarques:
Une utilisation incorrecte des piles risque de les faire
exploser. Notez les points suivants :
• Quand vous remplacez les piles, remplacez les
deux piles en même temps.
• Ne court-circuitez pas, ne démontez pas ou ne
chauffez pas les piles.
• Ne jetez pas les piles au feu ou aux flammes.
• Mettez les piles usées au rebut de la manière
appropriée.
Piles
AA
AA (SUM-3,
IECR-6/1.5V)
(SUM-3,
Batteries IECR-6 / 1,5 V)
Couvercle
arrière
Rear cover
Dos
Rear
side
DB245
DB245_FR_Pg18-32
23
20/11/03, 12:12 PM
23
xxx-xxxx-xx
Fonctions des touches de la télécommande
Mode
Radio
Touche
CD
Français
[FUNC]
Met sous et hors tension. Pression de 1 seconde : mise hors tension.
Commutation entre radio et CD.
[BAND]
Commutation de la
gamme de réception.
Lecture de la première plage.
Lecture TOP.
[w] , [z]
Augmentation et diminution du volume (tous les modes).
[a] , [d]
Balayage ascendant /
descendant des canaux
préréglés.
Sélection ascendante / descendante des plages.
Pression de plus de 1 seconde : avance rapide /
retour rapide.
[s]
Activation / désactivation
du silencieux.
Commutation entre la lecture et la pause.
[MUTE]
Activation / désactivation
du silencieux.
Commutation entre la lecture et la pause.
[ISR]
Rappel d’une station de radio ISR placée en mémoire.
Pression de 2 secondes ou plus : enregistrement de la station actuelle dans l’ISR (en
mode radio seulement).
[DISP]
Commute entre l’affichage principal et l’affichage de l’horloge.
Lecture des introductions.
[SCN]
Balayage des stations
préréglées.
Pression de 2 secondes :
préréglage automatique
des stations.
[RPT]
Aucune fonction
Lecture répétée.
[RDM]
Aucune fonction
Lecture aléatoire.
∗ Certaines des touches correspondantes de l’appareil principal et de la télécommande ont des
fonctions différentes.
∗ La touche 2-ZONE n’est pas offerte.
24
DB245
DB245_FR_Pg18-32
24
20/11/03, 12:12 PM
xxx-xxxx-xx
8. FONCTIONNEMENT
Fonctionnement de base
Assurez-vous de baisser le volume avant
d’éteindre l’appareil ou de couper le contact.
L’appareil mémorise son dernier réglage de
volume. Si vous mettez l’appareil hors
tension quand le volume est fort, au moment
où vous rallumerez l’appareil,
l’augmentation brusque du volume risque de
vous abîmer les tympans et d’endommager
l’appareil.
Mise sous / hors tension
Remarque:
Réglage du volume
Tournez le bouton [ROTARY] dans le sens des
aiguilles d’une montre pour augmenter le volume; tournez-le dans le sens inverse pour
diminuer le volume.
∗ Le niveau de volume se règle entre 0 (minimum) et 33 (maximum).
Réglage de la fonction Z-Enhancer
L'appareil possède 3 types d'effets de tonalité
enregistrés en mémoire. Sélectionnez celui de votre
choix.
∗ Le réglage par défaut de l'usine est “Z-EHCR
OFF”.
• Prenez garde de ne pas utiliser l’appareil
longtemps sans que le moteur de la voiture
ne tourne. Si la batterie se décharge, vous ne
pourrez plus démarrer le moteur, et vous
risquez d’écourter la durée de vie de la
batterie.
1. Appuyez sur la touche [FNC].
2. L’éclairage et l’afficheur de l’appareil
s’allument. L’appareil se souvient du dernier
mode de fonctionnement, et il commutera
automatiquement pour afficher ce mode.
3. Maintenez la touche [FNC] enfoncée pendant
1 seconde ou plus pour mettre l’appareil hors
tension.
Chaque fois que vous appuyez sur la touche
[Z-ENCR], l'effet de tonalité change dans l'ordre
suivant:
“Z-ENHANCER 1” ➜ “Z-ENHANCER 2” ➜ “ZENHANCER 3” ➜ “Z-EHCR OFF” ➜ “ZENHANCER 1”...
• Z-ENHANCER 1 : les graves sont
accentuées
• Z-ENHANCER 2 : les aigus sont accentués
• Z-ENHANCER 3 : les graves et les aigus
sont accentués
• Z-EHCR OFF
: pas d'effet sonore
Sélection d’un mode
Réglage de la fonction Z-Enhancer
1. Appuyez sur la touche [FNC] pour changer
de mode de fonctionnement.
2. Chaque fois que vous appuyez sur la touche
[FNC], le mode de fonctionnement change
dans l’ordre suivant :
Mode radio ➜ Mode CD ➜ Mode radio...
Remarque :
• Si vous sélectionnez le mode CD alors qu’il
n’y a pas de disque dans l’appareil,
l’indication “no DISC” apparaît sur
l’affichage.
Press the [A-M] button to select the adjustment
mode. The mode switches as follows each time
the [A-M] button is pressed:
BASS ➜ TREB ➜ BAL ➜ FAD ➜ Previous
mode
∗ L'affichage retourne au mode précédent 7
secondes après le réglage.
Ajustement des graves
1. Appuyez sur la touche [A-M], et sélectionnez
“BASS”.
2. Tournez le bouton [ROTARY] dans le sens
des aiguilles d'une montre pour accentuer
les graves ou dans le sens inverse pour les
atténuer.
∗ Le réglage par défaut de l'usine est “0”.
(Plage de réglage : –7 to +7)
DB245
DB245_FR_Pg18-32
25
20/11/03, 12:12 PM
25
xxx-xxxx-xx
Français
ATTENTION
Remarque : Lisez bien ce chapitre en vous référant aux
schémas de la façade, au chapitre “2. LES
COMMANDES”, à la page 3.
Fonctionnement de base
Ajustement des aigus
Français
1. Appuyez sur la touche [A-M], et sélectionnez
“TREB”.
2. Tournez le bouton [ROTARY] dans le sens
des aiguilles d'une montre pour accentuer
les aigus ou dans le sens inverse pour les
atténuer.
∗ Le réglage par défaut de l'usine est “0”.
(Plage de réglage: –7 à +7)
Ajustement de la balance (équilibreur droite-gauche)
1. Appuyez sur la touche [A-M], et sélectionnez
“BAL”.
2. Tournez le bouton [ROTARY] dans le sens
des aiguilles d'une montre pour augmenter le
son de l'enceinte droite; tournez-le dans le
sens inverse pour accentuer le son de
l'enceinte gauche.
∗ Le réglage par défaut de l'usine est “0”.
(Plage de réglage: L13 à R13)
d’écran. Vous pouvez activer ou désactiver
cette fonction.
Si vous appuyez sur une touche lorsque la
fonction d’économiseur d’écran est en service,
l’affichage de l’opération correspondant à la touche actionnée apparaît pendant environ 30
secondes, puis l’affichage revient à
l’économiseur d’écran.
∗ Le réglage par défaut de l’usine est “activé”.
Appuyez sur la touche [SS] tout en maintenant
la touche [BND] enfoncée pour mettre la
fonction d’économiseur d’écran en ou hors service.
Commutation de l’affichage de
l’horloge
Maintenez la touche [BND] enfoncée, et
appuyez sur la touche [DISP] pour commuter
entre le mode de fonctionnement et l’affichage
de l’horloge.
Ajustement du fader (équilibreur avant-arrière)
Réglage de l’horloge
1. Appuyez sur la touche [A-M], et sélectionnez
“FAD”.
2. Tournez le bouton [ROTARY] dans le sens
des aiguilles d'une montre pour augmenter le
son des enceintes avant; tournez-le dans le
sens inverse pour accentuer le son des
enceintes arrière.
1. Tenez la touche [BND] enfoncée, et pesez
ensuite sur la touche [DISP] pour afficher
l’horloge.
2. Maintenez pressée la touche [BND], puis la
touche [DISP] pendant 2 secondes ou plus.
3. Pressez la touche [a] ou [d] pour commuter entre les sélections HOUR et
MINUTE. Tournez ensuite le bouton [ROTARY] dans le sens des aiguilles d’une
montre pour faire monter les heures / les
minutes ou dans le sens inverse pour les
faire descendre.
4. Pesez sur la touche [BND] , et l’horloge est
réglée.
∗ Le réglage par défaut de l'usine est “0”. (Plage
de réglage: F12 à R12)
Remarque:
• Le réglage des graves et des aigus n’est possible
que si le “Z-enhancer” est désactivé.
Mise en / hors service de MAGNA
BASS EX
Pour régler MAGNA BASS EX
La fonction MAGNA BASS EX ne règle pas la
zone des sons graves comme la fonction
ordinaire de réglage du son, mais elle accentue
la zone des sons graves de façon à produire un
son dynamique.
∗ Le réglage par défaut de l’usine est “hors service”. Maintenez la touche [A-M] enfoncée pendant 2 secondes ou plus pour allumer ou éteindre
MAGNA BASS EX et “M-B EX” sur l’affichage.
Mise en / hors service de la
fonction d’économiseur d’écran
Remarque:
• Si vous sélectionnez un autre mode de
fonctionnement pendant le réglage de l’horloge,
cet ajustement est annulé.
• Si vous retirez la batterie pour un contrôle ou une
réparation, l’horloge est remise à zéro, et
l’ajustement est à refaire.
Fonction d’atténuateur d’éclairage
Lorsque le circuit d’éclairage de l’appareil est
raccordé au circuit de signal d’éclairage de la
voiture, la luminosité de l’écran de l’appareil
s’atténue lorsqu’on allume les lampes de la
voiture.
L’appareil est doté d’une fonction d’économiseur
26
DB245
DB245_FR_Pg18-32
26
20/11/03, 12:12 PM
xxx-xxxx-xx
Fonctionnement de la radio
Préréglage manuel
Pour une performance FM accrue, le tuner
comporte une commande stéréo
déclenchée par signal et des circuits de réduction
du bruit par trajets multiples.
1. Appuyez sur la touche [BND] pour
sélectionner la gamme que vous voulez
mettre en mémoire.
2. Pressez la touche [a] ou [d] pour
syntoniser la station souhaitée.
3. Maintenez l’une des touches [DIRECT]
enfoncée pendant 2 secondes ou plus pour
mémoriser la station en cours de réception.
Écoute de la radio
1. Appuyez sur la touche [FNC] , et sélectionnez
le mode radio. La radio sera alors allumée.
2. Pour sélectionner une gamme préréglée,
enfoncez la touche [BND], puis choisissez
l’une d’entre elles, soit FM1, FM2, FM3 ou
AM. Chaque fois que vous appuyez sur la
touche [BND] , l’affichage change comme suit :
FM1 ➜ FM2 ➜ FM3 ➜ AM ➜ FM1
3. Appuyez sur la touche [a] ou [d] pour
accorder la station voulue.
Accord manuel
1. Appuyez sur la touche [BND] pour
sélectionner la gamme désirée : FM1, FM2,
FM3 ou AM.
2. Maintenez la touche [BND] enfoncée pendant 2 seconde ou plus; "MANU" s’allume
ensuite, et la syntonisation manuelle est possible.
3. Appuyez sur la touche [a] ou [d] pour
accorder une station manuellement.
Syntonisation automatique
1. Appuyez sur la touche [BND] pour
sélectionner la gamme désirée : FM1, FM2,
FM3 ou AM.
2. Si "MANU"est allumé sur l’afficheur,
maintenez la touche [BND] enfoncée pendant 2 seconde ou plus. Quand "MANU"
s’éteint sur l’afficheur, la syntonisation
automatique est possible.
3. Appuyez sur la touche [a] ou [d] pour
accorder une station automatiquement.
Préréglage des stations
Il est possible de mémoriser jusqu’à 24 stations,
soit 6 stations pour chacune des gammes FM1,
FM2, FM3 et AM.
Fonction de mémoire automatique
(Aémorisation Automatique des
Stations)
1. Appuyez sur la touche [BND] pour
sélectionner la gamme désirée : FM1, FM2,
FM3 ou AM.
2. Maintenez la touche [PS/AS] enfoncée pendant 2 secondes ou plus. Les stations offrant
une bonne réception seront
automatiquement mémorisées.
Remarques:
• Lors d’une mémorisation automatique, la station
préalablement enregistrée sur une touche est
écrasée.
• S’il y a moins de 6 stations stockées, le contenu
préalable de la mémoire pour chaque touche de
préréglage est conservé.
Balayage préréglé (balayage des
stations préréglées)
Lorsque vous appuyez sur la touche [PS/AS],
"SCN" s’affiche avec les numéros de mémoire
de préréglage, et les stations se font entendre 7
secondes chacune dans l’ordre où elles ont été
mémorisées. Pesez à nouveau sur la touche
[PS/AS] pour annuler le balayage préréglé.
Rappel instantané de station (ISR)
Cette fonction vous permet de rappeler une station de radio donnée à partir de n’importe quel
mode.
Mémoire ISR
1. Appuyez sur la touche [FNC], puis
sélectionnez le mode radio.
2. Sélectionnez la station de radio que vous
voulez enregistrer dans la mémoire.
3. Maintenez la touche [ISR] enfoncée pendant
2 secondes ou plus.
DB245
DB245_FR_Pg18-32
27
20/11/03, 12:12 PM
27
xxx-xxxx-xx
Français
Réception FM
Français
Fonctionnement de la radio
Fonctionnement du mode CD
Rappel ISR
Appuyez sur la touche [ISR] ; l’affichage indique
“ISR”, et la station de radio précédemment
mémorisée est sélectionnée. Appuyez à
nouveau sur la touche [ISR] pour annuler la
fonction de rappel ISR.
Chargement d’un CD
Insérez un CD au centre de la fente d’insertion de
CD, son étiquette orientée vers le haut. “LOAD"
apparaît sur l’afficheur, le CD entre dans la fente, et
la lecture commence.
FENTE
À CD
CD
SLOT
Changement géographique
Utilisez cette fonction pour écouter l’autoradio
n’importe où hors des É.-U.
Espacement entre voies commutable
Par défaut, cet autoradio se syntonise à des
intervalles de fréquence de 10 kHz pour l’AM et
de 200 kHz pour la FM, les écarts standard aux
É.-U. Quand vous employez l’appareil à
l’extérieur des É.-U., suivez la démarche
suivante pour commuter la plage de fréquences.
Le tableau ci-dessous décrit les normes de
fréquences aux É.-U. et dans les autres pays.
Réglage initial
Nouveau réglage
(norme américaine) (hors des É.-U.)
9 kHz
AM
530 à
1.710 kHz
531 à
1.629 kHz
Espacement
200 kHz
entre voies
FM
Plage de
fréquences
• Les disques qui ne portent pas le label
ne
peuvent pas être lus sur l’appareil. La lecture des
CD-ROM n’est pas possible.
• Certains CD enregistrés en mode CD-R / CD-RW
ne peuvent pas être utilisés.
Écoute d’un disque déjà inséré
Espacement
10 kHz
entre voies
Plage de
fréquences
Remarques:
• Ne mettez pas la main, les doigts ni des corps
étrangers dans la fente d’insertion de CD.
• S’il y a déjà un CD dans l’appareil, vous ne
pouvez pas en charger un second. N’en insérez
pas un autre de force.
50 kHz
87,0 à
108 MHz
87,9 à
107,9 MHz
Appuyez sur la touche [FNC] pour sélectionner
le mode CD, et la lecture s’amorcera.
Arrêt (pause) de la lecture
Si vous appuyez sur la touche [s] pendant la
lecture du CD, le CD s’arrête, et “PAUSE”
s’affiche.
Appuyez à nouveau sur la touche [s] pour
reprendre la lecture.
Éjection du CD
Commutation du changement géographique
Hors des É.-U. (nouveau réglage)
En tenant la touche [AM] enfoncée, appuyez sur
la touche [RPT], et l’option “Hors des É.-U.” sera
sélectionnée.
Appuyez sur la touche [Q], et le CD sortira.
Norme à l’intérieur des É.-U. (réglage initial)
En tenant la touche [AM] enfoncée, appuyez sur
la touche [SCN], et l’option “Norme Américaine”
sera sélectionnée.
Fonction TOP
28
Remarque:
• Si vous laissez le CD dans cette position, il sera
réinséré au bout de 15 secondes.
• Toutefois, les CD simples ne se rechargeront pas;
veillez donc bien à les retirer.
Appuyez sur la touche [BND] pour amorcer la
lecture du CD à partir de la première chanson
(plage numéro 1).
DB245
DB245_FR_Pg18-32
28
20/11/03, 12:13 PM
xxx-xxxx-xx
Fonctionnement du mode CD
Sélection de plages (chansons)
Français
Appuyez sur la touche [a] ou [d].
d: La lecture commence à partir de la
plage suivante.
a: La lecture reprend au début de la plage
actuelle. À chaque pression sur cette
touche, la plage précédente est
sélectionnée.
Avance rapide / retour rapide
Appuyez en continu sur la touche [a] ou [d].
d: Recherche rapide avant
a: Recherche rapide arrière
∗ Une pression d’au moins 1 seconde sur la touche [a] ou [d] fait avancer ou reculer à une
vitesse 3 fois supérieure à la vitesse normale de
lecture, et une pression d’au moins 3 secondes
fait avancer ou reculer 30 fois plus vite.
Lecture des introductions
(balayage des sélections
musicales)
À CD audio, appuyez sur la touche [SCN].
“SCN” s’allume sur l’afficheur, et les dix
premières secondes de chaque plage du disque
sont reproduites. Appuyez une nouvelle fois sur
la touche [SCN] pour annuler cette fonction.
∗ Une lecture des introductions commence à partir
de la plage suivant celle qui est en cours de lecture.
Lecture répétée
À CD audio, appuyez sur la touche[RPT] .
“RPT” s’allume sur l’afficheur, et la plage
actuelle est répétée en continu. Appuyez une
nouvelle fois sur la touche [RPT] pour annuler la
lecture répétée.
Lecture aléatoire
À CD audio, appuyez sur la touche [RDM].
“RDM” s’allume sur l’afficheur, et toutes les
plages du disque sont lues au hasard. Pour annuler la lecture aléatoire, appuyez une nouvelle
fois sur la touche [RDM].
DB245
DB245_FR_Pg18-32
29
20/11/03, 12:13 PM
29
xxx-xxxx-xx
9. EN CAS DE DIFFICULTÉ
Problème
Pas d’alimentation.
( Pas de son.)
Cause
Solution
Français
Fusible sauté.
Remplacez le fusible par un autre de même
ampérage. Si le fusible saute à nouveau,
consultez votre magasin.
Raccordement incorrect.
Consultez votre magasin.
Impossible de charger le
disque compact.
Il y a déjà un disque dans le
tiroir.
Éjectez le disque avant d’en mettre un autre.
Interruptions du son ou
parasites.
Le disque est sale.
Nettoyez le disque avec un chiffon doux.
Le disque est fortement rayé
ou gondolé.
Remplacez-le par un disque sans rayures.
Des gouttelettes d’eau
risquent de se former sur la
lentille interne si la voiture a
été garée dans un lieu
humide.
Allumez l’appareil, et laissez-le sécher pendant
environ 1 heure.
Le son se détériore tout de
suite après la mise sous
tension.
Rien ne se passe quand on Mauvais fonctionnement du
appuie sur les touches.
microprocesseur dû au bruit,
L’affichage est incorrect.
etc.
Éteignez l’appareil, appuyez sur la touche de
dégagement du, et retirez le clavier DCP.
Appuyez sur la touche de réinitialisation
pendant environ 2 secondes avec une tige
mince.
Touche de réinitialisation
Les connecteurs du DCP ou
de l’appareil principal sont
sales.
30
Enlevez la saleté avec un chiffon doux humecté
d’alcool de nettoyage.
DB245
DB245_FR_Pg18-32
30
20/11/03, 12:13 PM
xxx-xxxx-xx
10. AFFICHAGE DES ERREURS
■ Afin de protéger le système, l’appareil présente des fonctions d’auto-diagnostic. En cas de
problème, divers messages d’erreur servent à vous avertir. Appliquez les solutions
proposées pour résoudre le problème.
Solution
ERROR 2
Ce message indique qu’un problème a été localisé dans le
mécanisme de l’appareil pilote (par exemple, le disque ne peut
pas être éjecté).
➜ Contrôlez l’appareil pilote.
ERROR 3
Ce message apparaît quand vous utilisez l’appareil pilote et que
le capteur ne peut pas se positionner correctement à cause de
rayures sur le disque ou d’autres facteurs.
➜ Contrôlez le disque compact.
ERROR 6
Cet affichage indique que la table des matières (TOC) du CD ne
peut pas être lue, par exemple parce que le disque sélectionné
est mis à l’envers.
DB245
DB245_FR_Pg18-32
31
20/11/03, 12:13 PM
31
xxx-xxxx-xx
Français
Message d’erreur
11. CARACTÉRISTIQUES TECHNIQUES
Français
Tuner FM
Généralités
Plage de fréquences: 87,9 MHz à 107,9 MHz
Sensibilité utilisable: 11 dBf
Seuil de sensibilité à 50 dB: 17 dBf
Sélectivité de canal de substitution: 75 dB
Séparation stéréo (1 kHz): 35 dB
Réponse en fréquence (±3 dB): 30 Hz à 15 kHz
Tension d’alimentation:
14,4 V CC (10,8 V à 15,6 V admissible),
masse négative
Consommation : inférieure à 15 A
Impédance des enceintes:
4 Ω (4 Ω à 8 Ω admissible)
Poids: 2,42 lb (1,1 kg)
Dimensions:
7 po (largeur) X 1 15/16 po (hauteur) X 6 po
(profondeur)
178 (L) ✕ 50 (H) ✕ 152 (P) mm
Tuner AM
Plage de fréquences:
AM 530 kHz à 1.710 kHz
Sensibilité utilisable: 25 µV
178 mm
50 mm
188 mm
58 mm
Système: Système audionumérique de disque
compact
Disques utilisables: Disques compacts
Réponse en fréquence: 10 Hz à 20 kHz (±1 dB)
Rapport signal sur bruit: 100 dB (1 kHz) IHF-A
Plage dynamique: 95 dB (1 kHz)
Distorsion harmonique: 0,01%
Son
Puissance maximale de sortie:
200 W (50 W ✕ 4 canaux)
Puissance de sortie continue moyenne:
17 W ✕ 4, sur 4 Ω, 20 Hz à 20 kHz,1%DHT
Plage de variation des graves (30 Hz): ±14 dB
Plage de variation des aigus (10 kHz): ±14 dB
Sortie de ligne (à 1 kHz CA, 10 kΩ): 1,7 V
32
152 mm
Lecteur CD
Remarques:
• Les caractéristiques techniques sont conformes
aux normes JEITA.
• La conception et les caractéristiques techniques
peuvent être modifiées sans préavis en vue de
l’amélioration du produit.
• Quand vous raccordez un amplificateur de puissance externe, veillez bien à mettre l’amplificateur
correctement à la masse sur le châssis de la
voiture.
• Sinon, vous risquez d’endommager gravement
l’appareil pilote.
DB245
DB245_FR_Pg18-32
32
20/11/03, 12:13 PM
xxx-xxxx-xx