1
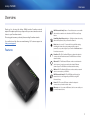
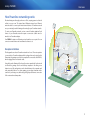
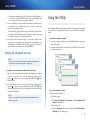
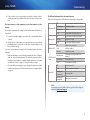
User
Guide
Linksys PLW400
Powerline AV Wireless Network Extender
Linksys PLW400
Contents
Contents
Overview . . . . . . . . . . . . . . . 3
Features . . . . . . . . . . . . . . . . . . . . . 3
How Powerline networking works . . . . . . . . . . . 4
Example installation . . . . . . . . . . . . . . . . . . . . . . . . 4
Installing the PLW400 . . . . . . . . . . 5
Installation overview . . . . . . . . . . . . . . . . 5
Tips . . . . . . . . . . . . . . . . . . . . . . . . . . . . . . . . 5
How to connect your PLW400 . . . . . . . . . . . . . 5
Setting up advanced security . . . . . . . . . . . . . 6
Using the Utility . . . . . . . . . . . . 6
Troubleshooting . . . . . . . . . . . . 8
Specifications . . . . . . . . . . . . 10
2
Linksys PLW400
Overview
Overview
Thank you for choosing this Linksys PLW400 wireless Powerline network
adapter. This adapter provides easy setup and let you connect wireless network
devices to your Powerline network.
This setup guide assumes you already have a working Powerline network.
You can find more help from our award-winning, 24/7 customer support at
Linksys.com/support.
Features
Wi-Fi Protected Setup™ button—Press this button to connect with
other wireless network devices that have a Wi-Fi Protected Setup
button.
HomePlug Simple Connect button—Configures advanced security
(the network password) for your Powerline network.
Reset button (recessed)—To restore the factory default settings
(including the advanced security settings and the network
password), use a pointed object to press and hold the Reset button
for at least ten seconds.
Powerline LED—The Powerline LED turns on when the adapter is
connected to the Powerline network. The LED flashes to indicate
network activity.
Ethernet LED—The Ethernet LED turns on when a wired network
device is turned on and connected to the adapter’s Ethernet
(network) port. The LED flashes to indicate network activity.
Wireless LED—The Wireless LED turns on when a wireless network
device is connected to your PLW400.
Wi-Fi Protected Setup LED—This LED flashes while a wireless
network device is connecting with your PLW400 using Wi-Fi
Protected Setup.
Power LED—The power LED turns on when the adapter is
connected to a powered electrical outlet.
Ethernet port—Use a network (Ethernet) cable to connect this port
to a wired network device.
3
Linksys PLW400
Overview
How Powerline networking works
Electrical wiring runs through your home or office, carrying power to electrical
outlets in every room. The typical wired Ethernet network uses Ethernet
network cables to connect your wired network devices. A Powerline network
uses your existing household wiring as the wiring for your Powerline network.
To create your Powerline network, use two or more Powerline adapters. Each
device on your Powerline network requires a connection (either wired or
wireless) to a Powerline adapter.
Your PLW400 contains one Ethernet port and a wireless access point. You can
connect one wired device and several wireless devices to it.
Router
Example installation
This diagram shows a basic Powerline network in a house. The router upstairs
is connected to a Powerline adapter, which is plugged into an electrical outlet.
Downstairs, the gaming console and a computer are connected to the PLW400,
which is plugged into an electrical outlet.
Using the household wiring of the home, the router expands the local network
to include the gaming console and desktop computer in the living room.
Internet access, files, and printers can be shared between the computers and
other networked devices. For online gaming, you can play downstairs in the
comfort of your living room, while using the high-speed Internet connection
of the router and modem upstairs.
Modem
PLE400
Computer
PLW400
Gaming
Console
4
Linksys PLW400
Installing the PLW400
Installing the PLW400
Installation overview
To set up your Powerline network, you should:
••
Make sure you already have Internet access and a working home
Powerline network.
••
Make sure that the wireless devices that you want to connect to the
PLW400 have a working wireless feature. An easy way to test this is to
first try to connect the wireless network device to your home’s wireless
router while near the router.
How to connect your PLW400
After you have a basic Powerline network set up, you can add this PLW400
anywhere in your home.
TIP
You can also set up and configure all of your Linksys Powerline
devices using the configuration utility. For more information, see
“Using the Utility” on page 6.
To connect your PLW400:
1. Make sure that the power switch on the right side is set to I (on).
Tips
••
If possible, connect Powerline adapters directly to a wall power outlet,
and not to an extension cord, power strip, or surge protector.
••
If a Powerline adapter must be installed onto a power strip, make sure
that no other electronic devices are connected to the same power strip.
••
If possible, position the PLW400 near the wireless devices that you want
to connect.
••
Avoid obstructions (such as metal file cabinets, mirrors, and thick walls)
between the PLW400 and any wireless device you want to connect.
2. If your home network already has security set up (recommended):
a. Connect the PLW400 to a power outlet near your main wireless router.
b. On the PLW400, press and hold the Wi-Fi Protected Setup
button
at least one second, until the the Wi-Fi Protected Setup LED flashes.
5
Linksys PLW400
c. Within two minutes, press the Wi-Fi Protected Setup
button on
your wireless router. The PLW400 retrieves the security settings from
the router and connects to your wireless network.
3. Move your PLW400 to a power outlet near the wireless network device(s)
you want to connect. Typically, this area is not covered well by your
home’s wireless network router.
The Powerline LED
flashes, then stays on when the connection to the
rest of the Powerline network is finished. Your home’s wireless network is
now available in the area surrounding the PLW400.
4. Connect the wireless network device to the wireless network in the
usual manner. For instructions, see your wireless network device’s user
documentation. The PLW400’s Wireless LED
flashes, then stays on
when a wireless network device successfully connects.
Using the Utility
Using the Utility
If you’re having difficulty connecting the adapters using the previous method,
or if you’d like to set more advanced options, you can use the configuration
utility.
To install the configuration utility:
1. Connect a computer’s Ethernet port to the PLW400’s Ethernet port using
the provided cable.
2. Insert the setup CD into the computer’s CD or DVD drive, then follow the
on-screen instructions.
Setting up advanced security
NOTE
The devices connected to the Powerline adapters will temporarily
lose Internet connection during the security setup.
To configure your network adapter with advanced security:
1. On one of the existing Powerline adapters that already have advanced
security set up, press and hold the HomePlug Simple Connect
button for at least one second, until the Powerline LED
begins
flashing slowly.
2. On your PLW400, press and hold the HomePlug Simple Connect
button for at least one second, until the Powerline LED
begins
flashing slowly. When the LED stops flashing, the network key has been
shared with the PLW400.
NOTE
The devices connected to the adapters will regain Internet access
within five minutes.
To use the configuration utility:
1. After the utility is installed:
On Windows systems:
a. Click Start, All Programs, Cisco Systems, then Cisco Powerline AV
Utility. The utility opens.
On Mac OS X systems:
a. Open the Applications folder, then double-click the Cisco Powerline
AV Utility icon. The utility opens.
6
Linksys PLW400
NOTE
If you try to change the settings of a Powerline device from a
computer that is not connected directly to that device with a cable,
you are prompted for a password. The device password is printed
on the back of the device.
Using the Utility
4. Click the Quality of Service tab to specify how the network prioritizes
network bandwidth.
2. Click the Network Status tab to view details of the Powerline adapters
that are connected to your network.
5. Click the Administrator tab to restart an adapter, restore factory defaults,
or upgrade the adapter’s firmware.
•• If a connected adapter is not listed here, click Refresh.
•• To change information for any adapter that’s listed, select the adapter,
then click Edit.
3. Click the Security tab to manually change the network key for each
device. If you need to revert to the default key, click Restore Default Key.
7
Linksys PLW400
6. Click the Wireless Settings tab to change the wireless network name
(SSID), wireless security type, or passkey.
Troubleshooting
Troubleshooting
Your wireless network device is not recognized by your network.
Try the following:
Settings are applied to the adapter(s) immediately. Close the window to
exit the utility.
••
Make sure that the wireless device is turned on and that its wireless
networking is turned on.
••
If possible, position the PLW400 near the wireless device that you want
to connect.
••
Avoid obstructions (such as metal file cabinets, mirrors, and thick walls)
between the PLW400 and any wireless device you want to connect.
If you have set up advanced security for the Powerline network, check the
following:
••
Make sure all adapters on the Powerline network have been configured
with the same network password. The network password must be
identical in order for them to communicate with each other. See “Setting
up advanced security” on page 6 or “Using the Utility” on page 6.
The Ethernet LED does not turn on after you connected a wired Ethernet
device to the Powerline adapter.
Follow these instructions:
1. Make sure that the Ethernet network cable is securely connected to the
adapter.
2. Make sure that the Ethernet network cable is securely connected to the
network device you are connecting.
Or:
1. Disconnect the adapter from the power outlet.
2. Disconnect the Ethernet network cable from the adapter.
3. Wait five seconds.
4. Re-connect the Ethernet network cable to the adapter.
5. Re-connect the adapter to the power outlet.
8
Linksys PLW400
6. If this solution does not work, make sure that the electrical outlet is
working properly. Plug a different device into the outlet, and try to turn
it on.
You cannot connect to other computers on your local network or to the
Internet.
Troubleshooting
The LEDs are flashing and I don’t know what it means.
Refer to the following table of LED behavior to help diagnose the problem:
Powerline LED
If you did not set up advanced security for the Powerline network, follow these
instructions:
1. Locate the Powerline adapter connected to the computer that cannot
connect.
2. On the left side of the adapter, use a pointed object to press and hold
the Reset button for at least ten seconds. This resets the adapter to its
factory default settings.
If you have set up advanced security for the Powerline network, check the
following:
••
••
Make sure all adapters on the Powerline network have been configured
with the same network password. The network password must be
identical in order for them to communicate with each other. See “Setting
up advanced security” on page 6 or “Using the Utility” on page 6.
If you are adding a new adapter to a pre-existing Powerline network with
a unique network password, follow the instructions in “Using the Utility”
on page 6.
Ethernet LED
Wireless LED
Off
Not connected to Powerline network
Flashing fast
Send/Receive data
Flashing slow
Pairing
Solid
Connected to Powerline network
Off
Not connected to Ethernet network
Flashing
Send/Receive data
Solid
Connected to Ethernet network
Off
Wireless not connected
Solid
Wireless enabled
Flashing
Send/Receive data
Flashing slow
Connection in progress (up to two
minutes)
Wi-Fi Protected
Setup
Flashing fast
Power LED
Connection error.
Solid
Connection successful
Off
Device power off
Solid
Device power on and ready
Flashing fast
momentarily
Factory default
Flashing fast
indefinitely
Pairing error/system error
WEB
If your questions are not addressed here, go to the Linksys Support
website at Linksys.com/support.
9
Linksys PLW400
Specifications
Specifications
Model
PLW400
Standards
HomePlug AV, IEEE 801.11b/g/n, 802.3, 802.3u
Ports
Fast Ethernet (10/100)
Buttons
Wi-Fi Protected Setup, Easy Connect, Reset
LEDs
Powerline, Ethernet, Wireless, Wi-Fi Protected
Setup, Power
Security Features
128-Bit AES Link Encryption, WPA2, WPA, WEP
Modulation schemes
1024/256/64/16/8 QAM, QPSK, BPSK, ROBO
Network client support
Up to 8 Powerline client devices, up to 32
wireless client devices
Utility OS requirements
Windows 7/Vista/XP, Mac OS X v10.5 or higher
Default SSID
“CiscoXXXXX” where XXXXX is the last 5 digits of
the adapter’s serial number
Environmental
Dimensions
113 × 73 × 33 mm (4.45 × 2.87 × 1.3 inches)
Weight
158 g (5.6 oz.)
Power
100-240V AC, 50-60 Hz
Certifications
FCC, IC, CE, WiFi, HomePlug AV
Operating Temp.
0 to 40ºC (32ºF to 104ºF)
Storage Temp.
-20 to 70ºC (-4ºF to 158ºF)
Operating Humidity
10 to 85% Non-condensing
Storage Humidity
5 to 90% Non-condensing
10
Visit linksys.com/support for award-winning 24/7 technical support
Cisco, the Cisco logo, and Linksys are trademarks or registered trademarks of Cisco and/or its affiliates in the United States and other countries.
A listing of Cisco’s trademarks can be found at www.cisco.com/go/trademarks. All other trademarks mentioned in this document are the property of their respective owners.
© 2012 Cisco and/or its affiliates. All rights reserved.
3425-01010
120126MS