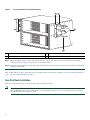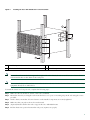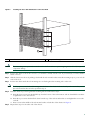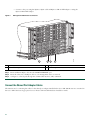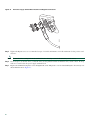
1
QUICK START GUIDE
Cisco ASR 1006 Router
1
Documentation and Resources
2
Prepare for Installation
3
Rack-Mount the Router
4
Connect the Router to the Network
5
Start the System
6
Configure the Router
7
After Installation
1 Documentation and Resources
Documentation for the Cisco ASR 1000 Series Aggregation Services Routers documentation is online with the exception of the
regulatory compliance and safety documentation and the Cisco ASR 1000 Series Aggregation Services Routers documentation
flyer. Refer to the following documentation for installation and replacement of parts (including shared port adapters) and
regulatory compliance information.
• Shared port adapter documentation—See the Cisco ASR 1000 Series Aggregation Services Routers SIP and SPA Hardware
Installation Guide
• Hardware installation documentation—See the Cisco ASR 1000 Series Aggregation Services Routers Hardware Installation
and Initial Configuration Guide
Document Revision History
The Document Revision History table below records technical changes to this document.
Document Version
Date
Change Summary
OL-13209-03
November 2008
Improved the two-minute window allotted time to replace a power
supply. You now have up to a maximum of five minutes to replace a
power supply.
OL-13209-02
October 2008
Support for Cisco ASR1000-ESP20
OL-13209-01
May 2008
First version of this document.
Documentation Survey
Is Cisco documentation helpful? Click here or go to http://www.cisco.com/warp/public/732/docsurvey/rtg/ to give us your
feedback.
Obtaining Documentation and Submitting a Service Request
For information on obtaining documentation, submitting a service request, and gathering additional information, see the
monthly What’s New in Cisco Product Documentation, which also lists all new and revised Cisco technical documentation, at:
http://www.cisco.com/en/US/docs/general/whatsnew/whatsnew.html
Subscribe to the What’s New in Cisco Product Documentation as a Really Simple Syndication (RSS) feed and set content to be
delivered directly to your desktop using a reader application. The RSS feeds are a free service and Cisco currently supports RSS
version 2.0.
2
2 Prepare for Installation
This section contains information about tools and parts, warnings, site preparation information, and information for
rack-mount installation and equipment shelf or tabletop installation.
Warning
Only trained and qualified personnel should install, replace, or service this equipment. Statement 1030
Before beginning this router installation, read the Regulatory Compliance and Safety Information for the Cisco ASR 1000 Series
Aggregation Services Routers document.
Site Preparation and Unpacking
• Lift the router safely out of the packing container.
• Ensure the power service at the site is suitable for the router you are installing.
• Check the packing slip to ensure that all the proper components are present.
• Locate and have accessible the Site Log for recording information about this installation.
Tools and Parts
Use the following list of tools and parts as a checklist for preparing to install the Cisco ASR 1000 Series Aggregation Services
Router:
• ESD-preventative wrist strap
• AC power cord
• Appropriate cables to connect the router to the network and to the console terminal
• Optional tape measure and level
• Screwdrivers: Number 2 Phillips screwdriver and 3/16-inch flat-blade screwdriver
• Grounding lug and wires
• The rack-mount and cable-management kit:
– Four 19-inch rack-mount brackets (front and rear rails) and two cable-management brackets
– Three sets of screws: one set for front rack-mount brackets (black screws), another set for rear rack-mount brackets,
and a set for the cable-management brackets (package with four screws)
Prepare for Equipment Shelf or Tabletop Installation
For a equipment shelf or tabletop installation, verify the following before installing the router:
• The router is off the floor and has adequate ventilation.
• An adequate chassis ground (earth) connection exists for the router.
• The router needs at last 3 inches (7.62 cm) of clearance at the inlet and exhaust vents (sides of router).
• The router needs 19 inches (48.26 cm) of clearance at the front and rear to allow for field-replaceable unit replacement or
installation, or to access cables or equipment.
• The shared port adapters are installed. If shared port adapters are not installed, then the slots must not be empty. Use filler
panels for an empty slot.
3
Prepare for Rack-Mount Installation
Before you begin the rack-mounting tasks:
• Decide whether or not you want to front rack-mount or rear rack-mount the chassis
• Decide whether or not you want to attach cable-management brackets to your chassis.
Note
If you install cable-management brackets, make certain that the chassis is installed in the equipment rack first.
• Decide if a two-post or four-post rack-mount will be used.
3 Rack-Mount the Router
This section provides information for rack-mounting the router.
Attach the Rack-Mount Brackets—Chassis Front-Mounted
To install the rack-mount brackets on a Cisco ASR 1006 Router for a front rack-mount configuration, follow these steps:
Step 1
Locate the threaded holes in the front sides of the chassis. Make certain that you hold the front rack-mount bracket
with the ear and holes facing outward and towards the front of the chassis.
Step 2
Align the rack-mount bracket to the side of the router. Depending on which set of rack-mount bracket holes you choose
to use to attach the rack-mount bracket to the router, the chassis will either be recessed in the rack or protrude from
the rack.
Step 3
Position the front rack-mount bracket top hole with the chassis first top hole behind the side vent holes as shown in
Figure 1Figure 1.
Figure 1
Cisco ASR 1006 Router Vent Hole Location and Front Rack-Mount Brackets
1
Cisco ASR
1006
2
2
1
3
0
F1
280093
F0
R1
R0
1
Chassis vent hole location
2
Front rack-mount bracket
4
3
Front rack-mount bracket ear holes
Step 4
Figure 2
Insert and tighten the black screws on one side.
Front Rack-Mount Brackets for the Cisco ASR 1006 Router
C/A
C/A
C/A
C/A
2
3
C/A
3
F1
STAT
US
PWR STATU
S
PWR
STAT
R1
STAT
A/L
3
STAT
STAT
US
STAT
US
1
S
C/A
A/L
1
A/L
2
SPA-4XOC3-PO
S
0
STBY
10
CRIT
ACTV MAJ
STBY MIN
ASR1000-R
P1
PWR
R0
S
C/A
A/L
0
10
SPA-4XOC3-PO
ACTV
ASR1000-ESP
PWR
S
C/A
A/L
2
C/A
A/L
3
F0
SPA-4XOC3-PO
C/A
A/L
1
C/A
STBY
ASR1000-ESP
A/L
C/A
0
SPA-4XOC3-PO
S
2
C/A
A/L
2
3
ACTV
STAT
SPA-4XOC3-PO
C/A
A/L
1
A/L
US
A/L
2
3
C/A
C/A
A/L
1
2
0
ASR1000-S
IP10
SPA-4XOC3-PO
S
STAT
0
PWR
US
PWR STATU
S
A/L
3
A/L
C/A
A/L
C/A
A/L
S
C/A
A/L
C/A
C/A
A/L
2
C/A
A/L
SPA-4XOC3-PO
C/A
A/L
1
C/A
A/L
1
C/A
A/L
3
C/A
A/L
0
0
A/L
2
C/A
A/L
SPA-4XOC3-PO
S
S
C/A
C/A
0
STAT
US
A/L
SPA-4XOC3-PO
C/A
1
SPA-4XOC3-PO
S
C/A
A/L
A/L
3
A/L
ASR1000-S
IP10
STAT
A/L
3
C/A
A/L
1
1006
C/A
A/L
2
C/A
0
C/A
2
C/A
A/L
C/A
A/L
1
A/L
PWR STATU
S
A/L
1
C/A
0
C/A
A/L
C/A
C/A
A/L
0
Cisco ASR
C/A
0
SPA-4XOC3-PO
S
STAT
US
3
US
2
C/A
A/L
STAT
A/L
C/A
1
ASR1000-S
IP10
SPA-4XOC3-PO
S
C/A
A/L
1
STAT
US
A/L
3
C/A
A/L
0
STAT
US
A/L
2
C/A
A/L
STAT
US
A/L
1
C/A
STAT
US
A/L
0
2
F1
HD
O
AC
USB
0
1
BF
DISK
0
1
BF
DISK
CRIT
ACTV MAJ
STBY MIN
ASR1000-R
CARRIER
F0
LINK
HD
O
AC
BITS
USB
P1
MGMT ETHERN
ET
CON
AUX
CARRIER
LINK
MGMT ETHERN
280035
R1
BITS
ET
CON
AUX
R0
4
3
2
1
Front rack-mount bracket screws
3
Front rack-mount bracket ear holes
2
Front rack-mount bracket
4
Side vent location
1
Step 5
Repeat Step 1 through Step 4 on the other side of the chassis. Use black screws to secure the rack-mount brackets to
the chassis.
Step 6
To install the Cisco ASR 1006 Router in the equipment rack, see “Four-Post Rack Installation” section on page 6 or
“Two-Post Rack Installation” section on page 8.
Attach the Rack-Mount Brackets—Chassis Rear Rack-Mounted
To install the rack-mount on a Cisco ASR 1006 Router for a rear rack-mount configuration, follow these steps:
Step 1
Locate the threaded holes in the rear sides of the chassis.
Step 2
Position the rear rack-mount bracket top hole with the chassis second top hole in from the back (See Figure 2). Make
certain that you hold the rear rack-mount bracket with the earholes facing outward and towards the rear of the chassis.
Align the rack-mount bracket to the side of the router.Attaching the Rear Rack-Mount Brackets to the Cisco ASR 1006
Router.
5
Figure 3
Cisco ASR 1006 Router Rear Rack-Mounting
1
2
1
3
1
280038
0
0
4
1
Rear rack-mount bracket attached to the chassis
3
Components that slide into the mounted bracket
2
Rear rack-mount bracket component
4
Rear rack-mount bracket screw
Step 3
Insert and tighten the five screws. After the bracket is secured to the side of the chassis, slide the two remaining
components (item 3, Figure 3) into the side rack-mount bracket.
Step 4
Repeat Step 1 through Step 3 on the other side of the chassis. Use five screws on each side to secure the rear rack-mount
brackets to the chassis.
This completes the procedure for attaching rear rack-mount brackets to the chassis. Continue on to Four-Post Rack Installation,
page 6 or Two-Post Rack Installation, page 8.
Four-Post Rack Installation
This section describes the types of racks used for rack-mounting the chassis.
Note
6
Inner clearance (the width between the inner sides of the two posts or rails) must be at least 19 inches (48.26 cm). The
Cisco ASR1006 chassis requires a minimum of 7 rack units (22.3 inches or 56.6 cm) of vertical rack space. Airflow
through the chassis is from front to back.
Figure 4
Installing the Cisco ASR 1006 Router in a Four-Post Rack
1
A
A
A
C/
L
C/
A/
1
C/
A/
L
C/
A/
2
A
L
C/
A/
0
3
A
L
C/
A/
1
L
A/
A/
0
00
C/
A/
1
C/
A/
L
C/
A/
C/
A/
3
L
C/
A/
L
PWR
F1
STAT
F0
STAT
A
A/
C/
A/
L
C/
A/
A/
L
C/
A/
L
C/
A/
A
L
SPA-4XOC3-POS
C/
A/
3
A
L
C/
A/
1
ASR1000-SIP10
L
L
C/
A/
L
C/
A/
L
C/
A/
C/
A/
L
C/
A/
0
STBY
1
A
L
C/
A/
2
A
PWR STATUS
L
A
1
ACTV
A
SPA-4XOC3-POS
A
0
SPA-4XOC3-POS
L
SPA-4XOC3-POS
3
A/
L
2
A
A
2
C/
A
2
L
A
2
C/
A/
3
A
L
C/
A/
1
ASR1000-ESP10
A
L
SPA-4XOC3-POS
A
L
C/
A/
2
3
PWR
SPA-4XOC3-POS
A
A
A
L
L
A
A
1
C/
1006
A
STA
A/
C/
TUS
L
3
L
A/
0
SPA-4XOC3-POS
C/
3
C/
A/
0
A
2
L
A
3
C/
L
PWR STATUS
L
A
1
A
2
A/
2
A
A
2
A
0
A/
C/
1
A
L
C/
L
STA
C/
L
A
ASR1000-SIP10
L
SPA-4XOC3-POS
A
L
A
SPA-4XOC3-POS
C/
3
A/
Cisco ASR
A
1
A/
0
A
2
C/
A/
C/
PWR STATUS
A
TUS
11
C/
A
STA
A/
TUS
C/
0
SPA-4XOC3-POS
STA
L
L
STA
A/
A
TUS
A/
A
0
ASR1000-SIP10
SPA-4XOC3-POS
C/
STA
L
3
C/
L
A
STA
TUS
A/
2
A
L
TUS
C/
A
STA
A/
3
L
STA
L
A
TUS
C/
A/
A/
TUS
L
2
C/
1
STA
A/
L
TUS
C/
A
0
STA
TUS
L
1
A/
TUS
A/
C/
STA
TUS
C/
0
2
SPA-4XOC3-POS
0
ACTV
STBY
ASR1000-ESP10
PWR
R1
R1
STAT
CRIT
ACTV MAJ
STBY MIN
ASR1000-RP1
F1
AC
HD
O
USB
0
PWR
R0
R0
STAT
CRIT
ACTV MAJ
STBY MIN
ASR1000-RP1
1
BF
DISK
CARRIER
AC
F0
LINK
HD
O
BITS
USB
0
1
MGMT ETHERNET
CON
BF
DISK
AUX
CARRIER
LINK
R1
BITS
MGMT ETHERNET
CON
R0
4
3
280084
AUX
1
Rear of four-post rack
3
Ear holes for the chassis front rack-mount bracket
2
Ear holes for the chassis rear rack-mount bracket
4
Front of four-post rack
Note
Because the rack-mount brackets support the weight of the entire chassis, be sure to use all screws to fasten the two
rack-mount brackets on the chassis to the rack posts.
Note
We recommend that you allow at least 1 or 2 inches (2.54 or 5.08 cm) of vertical clearance between the router and any
equipment directly above and below it.
To install the chassis in a four-post rack, complete the following steps:
Step 1
Make sure the rack brakes are locked or the rack is stabilized.
Step 2
Mount the chassis by securing the rack-mount brackets to two posts or mounting strips in the rack using the screws
provided.
Step 3
On the chassis, ensure that all screw fasteners on the installed components are securely tightened.
Step 4
Make sure that your path to the rack is unobstructed.
Step 5
(Optional) Install a shelf in the rack to support the Cisco ASR 1006 Router.
Step 6
Lift the chassis into position between the rack posts (requires two people).
7
Step 7
Align the mounting bracket holes with the rack post holes and attach the chassis to the rack. At this point, if there is a
third person, then that person can insert the screws while the other two people hold that chassis in place, unless the
chassis is resting on a shelf).
Step 8
Position the chassis until the rack-mounting ears are flush against the mounting rails on the rack.
Step 9
Hold the chassis in position against the mounting rails and follow these steps:
a. Insert the bottom screw into the third hole up from the bottom of the rack mount ear and use a hand-held screwdriver
to tighten the screw to the rack rail.
b. Insert the top screw into the third hole down from the top of the rack-mount bracket ear and tighten the screw to the
rack rail.
c. Insert a screw in the middle of the rack-mount bracket on both sides of the chassis. See Figure 4. Repeat these steps for
the other side of the chassis.
Note
As a result of using the specified rack-mount bracket ear holes, the cable-management bracket can be easily
attached to the rack-mount bracket when the chassis is in the rack.
This completes the procedure for installing the chassis in the four-post rack. Proceed to the “Attach the Cable-Management
Bracket” section on page 10 to continue the installation.
Two-Post Rack Installation
Note
8
TInner clearance (the width between the inner sides of the two posts or rails) must be at least 19 inches (48.26 cm). The
height of the chassis is 1.73 inches (4.39 cm). Airflow through the chassis is from front to back.
Installing the Cisco ASR 1006 Router in a Two-Post Rack
A
A
A
C/
A/
A/
11
L
C/
A/
1
C/
A/
L
C/
A/
0
L
C/
A/
3
A
L
C/
A/
1
L
A/
C/
A/
00
C/
A/
1
C/
A/
L
C/
A/
C/
A/
3
L
C/
A/
L
A/
PWR
F0
STAT
6
A
C/
L
C/
A/
A/
L
A/
L
C/
A/
A
L
L
A/
C/
A/
L
C/
A/
L
C/
A/
A/
ACTV
L
C/
A/
L
C/
A/
STBY
1
A
L
C/
A/
2
0
L
A
A
PWR STATUS
A
SPA-4XOC3-POS
A
1
C/
L
SPA-4XOC3-POS
3
A/
0
SPA-4XOC3-POS
2
A
A
2
C/
L
L
SPA-4XOC3-POS
C/
3
A
1
ASR1000-SIP10
L
A
A
A
2
C/
A/
3
A
L
C/
A/
1
ASR1000-ESP10
A
L
SPA-4XOC3-POS
A
L
C/
A/
2
3
PWR
SPA-4XOC3-POS
C/
A
A
L
L
A
A
1
C/
A
STA
A/
C/
TUS
L
3
L
A/
0
SPA-4XOC3-POS
C/
3
C/
A/
0
A
2
STAT
A/
L
PWR STATUS
L
A
1
F1
C/
A
A
2
A
0
L
A
3
A
L
A
2
A/
STA
L
A/
C/
2
SPA-4XOC3-POS
A
C/
L
1
SPA-4XOC3-POS
C/
3
A/
L
A
ASR1000-SIP10
L
Cisco ASR
100
A
1
A/
0
A
A
2
C/
A/
C/
PWR STATUS
A
2
A
0
C/
0
SPA-4XOC3-POS
TUS
C/
L
STA
A/
0
ASR1000-SIP10
A
A
TUS
A/
A
L
L
SPA-4XOC3-POS
C/
STA
L
3
C/
A
A
STA
TUS
A/
STA
TUS
C/
2
A
L
TUS
3
L
STA
L
A
1
TUS
C/
A/
A/
STA
L
2
C/
TUS
A/
L
STA
C/
A
STA
TUS
L
1
A/
STA
TUS
A/
C/
0
TUS
C/
0
2
STA
TUS
Figure 5
SPA-4XOC3-POS
0
ACTV
STBY
PWR
R1
R1
STAT
CRIT
ACTV MAJ
STBY MIN
ASR1000-RP1
F1
AC
HD
O
USB
0
PWR
R0
R0
STAT
CRIT
ACTV MAJ
STBY MIN
ASR1000-RP1
280085
ASR1000-ESP10
1
BF
DISK
CARRIER
AC
F0
LINK
HD
O
BITS
USB
0
1
MGMT ETHERNET
CON
BF
DISK
AUX
CARRIER
LINK
R1
BITS
MGMT ETHERNET
CON
AUX
R0
2
Front rack-mount bracket ear hole location
1
1
2
Two-post rack equipment
If you are using a two-post rack, secure the rack to the floor surface to prevent tipping and avoid bodily injury and
component damage.
Caution
Step 1
Position the chassis so the front is closest to you and lift it carefully into the rack. To prevent injury, avoid any sudden
twists or moves.
Step 2
Slide the chassis into the rack, pushing it back until the rack-mount brackets meet the mounting strips or posts on both
sides of the rack.
Step 3
Position the chassis until the rack-mounting ears are flush against the mounting rails on the rack.
Note
Step 4
To allow space to attach the cable-management brackets to the chassis in the rack easily, make certain that you use
the rack-mount bracket ear holes specified in Step 4.
Hold the chassis in position against the mounting rails and follow these steps:
a. Insert the bottom screw into the third hole up from the bottom of the rack mount ear and use a hand-held screwdriver
to tighten the screw to the rack rail.
b. Insert the top screw into the third hole down from the top of the rack-mount bracket ear and tighten the screw to the
rack rail.
c. Insert a screw in the middle of the rack-mount bracket on both sides of the chassis. See Figure 4.
Step 5
Repeat these steps for the other side of the chassis.
9
Note
As a result of using the specified rack-mount bracket ear holes, the cable-management bracket can be easily
attached to the rack-mount bracket when the chassis is in the rack.
This completes the procedure for installing the chassis in a two-post rack. Proceed to the “Attach the Cable-Management
Bracket” section on page 10 to continue the installation.
Attach the Cable-Management Bracket
The cable-management brackets mount to each rack-mount bracket on the chassis to provide cable-management to both sides
of the chassis (parallel with card orientation). These brackets are screw mounted to the rack-mount brackets to allow easy
installation and removal of cables.
The cable-management brackets for the Cisco ASR 1006 Router contain 5 independent cable-management “U” type features
with four screws and provides cable dressing of each card module slots. For Cisco ASR 1000 SIPs, these brackets work in tandem
with shared port adapter product feature cable-management device to allow installation and removal of adjacent cards without
the need to remove cables.
Note
Make certain that the cable-management bracket “U” type feature is facing upwards when you attach it to the chassis
as shown in Figure 6.
Follow these steps to attach the cable-management brackets to both sides of the Cisco ASR 1006 Router in the rack:
Step 1
Align the cable-management bracket to the rack-mount bracket on one side of the Cisco ASR 1006 Router. The
cable-management bracket aligns to the top hole of the chassis rack-mount bracket.
Step 2
Using a Phillips screwdriver, insert one screw through cable-management bracket and into the chassis rack-mount and
tighten the screw.
Note
10
Use the package of four screws that came with your chassis (two screws for each bracket).
Figure 6
Attaching the Cable-Management Bracket to the Cisco ASR 1006 Router
A
C/
A/L
A
C/
A/L
C/
A
-POS
SPA-4XOC3
A
C/
A/L
C/
A
A/L
A
C/
1
2
3
A/L
A
C/
A/L
-POS
SPA-4XOC3
C/
A
3
C/
3
C/
A
ST
AT
US
A/L
A
C/
A/L
A
C/
-POS
SPA-4XOC3
A
C/
C/
A/L
A
C/
A/L
A
1
-POS
SPA-4XOC3
1
2
3
A/L
ST
AT
US
2
3
A/L
A
C/
A/L
0
A
C/
A/L
A
C/
ST
AT
US
A/L
A
C/
ST
AT
US
A/L
0
3
A
C/
A/L
ST
AT
C/
A/L
A
C/
A/L
2
1
A
US
C/
ST
AT
A/L
3
A
C/
A/L
A
C/
A/L
-POS
SPA-4XOC3
2
A
C/
-POS
SPA-4XOC3
3
A/L
-POS
SPA-4XOC3
0
3
A
C/
A/L
A
C/
2
1
1
A/L
A
1
0
A
C/
A/L
A
C/
ST
AT
US
A/L
A
C/
A/L
A
C/
A/L
2
1
A/L
-POS
SPA-4XOC3
0
A
C/
A/L
0
A
280036
0
1
2
A/L
C/
US
A
2
A/L
A/L
C/
A
A/L
A
C/
C/
A/L
A
3
2
-POS
SPA-4XOC3
1
-POS
SPA-4XOC3
ST
AT
US
0
A
C/
ST
AT
US
A/L
A
C/
A/L
A
C/
A/L
-POS
SPA-4XOC3
0
A
C/
A/L
0
C/
A
A/L
3
ST
AT
US
2
3
A/L
A
C/
A/L
1
0
A
US
C/
3
2
1
0
A
A/L
C/
ST
AT
A/L
A
C/
A/L
A
C/
A/L
A
A/L
C/
-POS
SPA-4XOC3
ST
AT
US
1
2
1
1
Cable-management bracket screw location
2
Cable-management bracket
3
Chassis front rack-mount bracket and ear holes
Step 3
Using the bottom rack-mount ear hole, insert the screw through cable-management bracket and into the chassis
rack-mount bracket (see Figure 6).
Step 4
Using a Phillips screwdriver and the cable-management screw, thread and tighten the screw to the cable-management
bracket.
Step 5
Repeat Step 1through Step 4 for the other side of the Cisco ASR 1006 Router.
This completes the procedure for installing the cable-management bracket on a Cisco ASR 1006 Router for a rack-mount
configuration.
11
Chassis Ground Connection Installation
Before you connect power or turn on power to your router, you must provide an adequate chassis ground (earth) connection
for the router chassis. A ground connector is provided on each Cisco ASR 1006 Router. See Figure 7.
Caution
The dual-lug chassis stud must be installed, the SIP and SPA must be fully inserted and screwed in and earthed to
prevent a potential hazard in a telecom line.
Have the recommended tools and supplies available before you begin this procedure: Phillips screwdriver, dual-lug chassis
ground component, and grounding wire.
Step 1
Use the wire stripper to strip one end of the AWG #6 gauge wire approximately 0.75 inches (19.05 mm).
Step 2
Insert the AWG #6 gauge wire into the wire receptacle on the grounding lug.
Step 3
Use the crimping tool to carefully crimp the wire receptacle around the wire; this step is required to ensure a proper
mechanical connection.
Step 4
Attach the grounding lug with the wire so the grounding wire does not overlap the power supply.
Figure 7
Attaching a Grounding Lug to the Chassis Ground Connector
4
2
280034
3
1
1
Chassis earth ground studs and lead wire
3
Earth ground connector on the chassis
2
Grounding screws
4
Earth ground symbol
Step 5
Locate the chassis ground connector on the side of your chassis.
Step 6
Insert the two screws through the holes in the grounding lug.
Step 7
Use the Number 2 Phillips screwdriver to carefully tighten the screws until the grounding lug is held firmly to the
chassis. Do not overtighten the screws.
12
Step 8
Connect the opposite end of the grounding wire to the appropriate grounding point at your site to ensure an adequate
chassis ground.
This completes the procedure for attaching a chassis ground connection. Go to the “Connect the Router to the Network” section
on page 13 for information on attaching cables.
4 Connect the Router to the Network
This section provides information about cables and ports and attaching the router to the network.
• Console and Auxiliary Port Cable Connections, page 13
• Management Ethernet Port Cable Connection, page 13
• Connect the Shared Port Adapter Cables, page 14
• Install the Cables in the Cable-Management Bracket, page 15
Console and Auxiliary Port Cable Connections
This section describes how to attach a cable to the console or auxiliary ports on the Cisco ASR 1006 Router. The Cisco
ASR 1006 Router uses RJ-45 ports for both the auxiliary port and console port to attach a modem or console terminal.
The console DCE-mode port connects a console terminal and a DTE-mode auxiliary port connects a modem or other DCE device
to your router.
Note
Both the console and the auxiliary ports are asynchronous serial ports; any devices connected to these ports must be
capable of asynchronous transmission. (Asynchronous is the most common type of serial device; for example, most
modems are asynchronous devices.)
Step 1
Before connecting a terminal to the console port, configure the terminal to match the router console port as follows:
9600 baud, 8 data bits, no parity, 1 stop bits. See Figure 8 for console and auxiliary port connector location.
Step 2
After you establish normal router operation, you can disconnect the terminal.
Note
For console and auxiliary port pinouts, see Appendix A, Cisco ASR 1000 Series routers Specifications, in the Cisco ASR
1000 Series Aggregation Services Routers Hardware Installation and Initial Configuration Guide.
Management Ethernet Port Cable Connection
Before you can use the console interface on the router using a terminal or PC, you must perform the following steps:
Step 1
Configure your terminal emulation software with the following settings: 9600 bits per second (bps), 8 data bits, No
parity, one stop bit, No flow control.
Note
Step 2
For information about how to change the default settings to meet the requirements of your terminal or host, refer
to the Cisco IOS Terminal Services Configuration Guide.
Connect a terminal or PC to the console port using the cable and adapters provided in the accessory kit that shipped
with your Cisco ASR 1006 Router:
– Place the console port mode switch in the in position (factory default).
13
– Connect to the port using the RJ-45-to-RJ-45 cable and RJ-45-to-DB-25 DTE adapter or using the
RJ-45-to-DB-9 DTE adapter.
Management Ethernet Port Connectors
A/L
AT
ST
C/
A
C/
A
AT
US
ST
A/L
3
C/
A
AT
US
ST
A/L
C/
A
A/L
POS
3
C/
A
ST
AT
US
A/L
A
C/
A/L
A
C/
SPA-4
XOC3-POS
1
2
3
A/L
C/
A
A/L
POS
C/
A
ST
AT
US
A/L
0
3
C/
A
A/L
AT
US
C/
A
3
C/
A
A/L
C/
A
2
A
C/
1
0
A
US
C/
AT
ST
A/L
A
C/
A/L
SPA-4XOC3-
SPA-4XOC3-
2
A/L
3
A/L
C/
A
POS
2
C/
A
A/L
POS
POS
1
C/
A
AT
US
ST
A/L
A
C/
A/L
C/
A
A/L
SPA-4XOC3-
2
C/
A
POS
SPA-4XOC3-
4
3
2
1
1
AUXiliary connection
3
BITS port
2
MGMT Ethernet port
4
Cable-management U feature device
Step 3
Insert an Ethernet RJ-45 cable into the MGMT ETHERNET port.
Step 4
Insert the other end of the RJ-45 cable to your management device or network.
Step 5
Configure to a fixed speed through the command line interface (CLI) commands.
280086
0
1
2
3
A/L
SPA-4XOC3-
0
3
2
1
A/L
C/
A
A/L
POS
ST
AT
US
A/L
A
C/
A/L
A
C/
A/L
2
1
0
US
C/
A
AT
ST
A/L
C/
A
A/L
C/
A
A/L
SPA-4XOC3-
1
1
ST
A/L
3
2
1
C/
A
A/L
2
SPA-4XOC3-
1
0
C/
A
A/L
0
A
C/
A/L
POS
0
A
C/
AT
US
POS
3
SPA-4XOC3-
0
A
C/
A/L
0
A
C/
A/L
POS
3
A/L
A
C/
A/L
A
C/
A/L
SPA-4XOC3-
ST
A/L
A
C/
A/L
A
C/
A/L
C/
A
1
0
US
C/
A
AT
POS
3
2
1
0
C/
A
A/L
ST
A/L
A
C/
A/L
C/
A
A/L
C/
A
A/L
SPA-4XOC3-
SPA-4XOC3-
2
A/L
C/
A/L
A
C/
A
C/
A/L
A
C/
US
A
Figure 8
Connect the Shared Port Adapter Cables
The instructions for connecting the cables for the shared port adapter installed in the Cisco ASR 1006 Router are contained in
the Cisco ASR 1000 Series Aggregation Services Routers SPA and SIP Hardware Installation Guide.
14
Install the Cables in the Cable-Management Bracket
No specific card level cable-management will be provided on the SIP carrier cards. SPAs utilize the SPA cable-management
brackets that are provided with each SPA as part of their accessory kits. Cables coming off the front side of the SPAs and SIPs
utilize the chassis level cable-management brackets provided on the chassis rack mount brackets (see Figure 8).
To secure shared port adapter interface cables and input or output cables connected to the Cisco ASR 1006 Router, follow these
steps:
Step 1
When installing the network interface cables, route the cables up to and through the cable-management bracket ‘U’
device. If you are using very thin cables that slip through the bracket openings, insert nylon cable ties through the holes
in the bracket and wrap them around the cables to secure them. See Figure 8.
Step 2
Route the excess cable out through either end of the bracket, coil it, and secure it to the rack using nylon cable ties or
some other mode of attachment.
Step 3
It might be necessary to bundle longer cables to avoid tangling them. Do this at the cable-management bracket or at
the rack, but leave enough slack in the cables to remove processor modules and change cables as required. Also, do not
block the power supply air vents with cables.
This completes the procedure for installing the cables in the cable-management bracket. Proceed to the “Start the System”
section on page 15 to complete the installation.
5 Start the System
Before you start the system, you must connect power to it.
Connecting AC-Input Power to the Cisco ASR 1006 Router
Follow these steps to connect an AC-input power supply to the Cisco ASR 1006 Router:
Step 1
Figure 9
At the rear of the chassis, check that the AC power supply switch is in the Standby position.
Cisco ASR 1006 Series Router AC Power Supply Inlet and Standby Switch
1
2
This unit
migh
one powe t have more than
r su
All connec pply connection.
tions
to de-energ must be removed
ize the un
it.
1
AC power inlet
2
280083
100-240V
~ 16-7A
50-60HZ
AC power supply standby switch
15
Step 2
Plug the power cable into the inlet.
Note
For additional AC power cable strain relief, secure the cable to the power supply handle by inserting a nylon cable tie
through the hole in the handle and around the cable.
Figure 10
Cisco ASR 1006 Series Router AC Power Supply
6
7
8
OUTPUT INPUT INPUT
FAIL
OK
OK
ALARMS
60V
1A MAX
100-240V~ 16-7A
50-60HZ
5
280029
This unit might have more than
one power supply connection.
All connections must be removed
to de-energize the unit.
4
3
2
1
1
AC power supply fan
5
AC power supply handle
2
DB-25 alarm connector
6
AC power inlet
3
Tie-wrap tab
7
AC power supply Standby switch
4
AC power supply captive screw
8
AC power supply LEDs
Step 3
Plug the AC power supply cable into the AC power source at your site.
Step 4
Place the power supply Standby switch in the On (I) position.
This completes the procedure for connecting AC-input power.
Connect DC Power to the Cisco ASR 1006 Router
This section provides instructions for installing the DC power supply into the Cisco ASR 1006 Router. Read the safety warnings
before you begin.
Warning
Installation of the equipment must comply with local and national electrical codes. Statement 1074
Warning
Never install an AC power module and a DC power module in the same chassis. Statement 1050
Warning
When installing or replacing the unit, the ground connection must always be made first and disconnected last.
Statement 1046
16
Warning
This equipment must be grounded. Never defeat the ground conductor or operate the equipment in the absence of
a suitably installed ground conductor. Contact the appropriate electrical inspection authority or an electrician if
you are uncertain that suitable grounding is available. Statement 1024
Warning
This unit might have more than one power supply connection. All connections must be removed to de-energize the
unit. Statement 1028
Warning
This product relies on the building’s installation for short-circuit (overcurrent) protection. Ensure that the
protective device is rated not greater than: AC power supplies 20 A and DC power supplies 40 A. Statement 1005
Figure 11 shows the DC power supply and components for the Cisco ASR 1006 Router.
Figure 11
Cisco ASR 1006 Router DC Power Supply
9
10
OUTPUT INPUT INPUT
OFF
FAIL
OK
OK
55
-48/-60V
ALARMS
60V
1A MAX
40A
7
280023
8
This unit might have more than one power supply connection. All connections must be removed to de-energize the unit.
6
5
4
3
2
1
1
Fan
6
DC power supply grounding lugs
2
DB-25 alarm connector
7
Power supply captive screw
3
Tie-wrap tab Power supply ground lugs
8
Power supply handle
4
DC Power supply terminal and plastic cover
9
Power supply ON/OFF (I/O) circuit breaker switch
5
Earth grounding symbol
10 DC power supply LEDs
Read these important notices before you install the DC-input power supply in the Cisco ASR1006 router:
• The color coding of the DC-input power supply leads depends on the color coding of the DC power source at your site.
Typically, green or green/yellow is used for ground (GND), black is used for -48V on negative (–) terminal and red is used
for RTN on the positive (+) terminal. Make certain the lead color coding you choose for the DC-input power supply matches
lead color coding used at the DC power source.
• For DC input power cables, select the appropriate wire gauge based on the National Electrical Code (NEC) and local codes
for 40-amp service at nominal DC input voltage (–48/–60 VDC). Three pairs of cable leads, source DC (–) and source DC
return (+), are required for each power distribution unit (PDU). These cables are available from any commercial cable
vendor. All input power cables for the chassis should have the same wire gauge and cable lengths should match within 10
percent of deviation. Each DC input power cable is terminated at the PDU by a cable lug. The cable lugs must be dual-hole,
and have a straight tongue. They must be able to fit over 1/4-inch terminal studs at 0.625-inch (15.88-mm) centers.
17
DC input power cables must be connected to the PDU terminal studs in the proper positive (+) and negative (–) polarity.
In some cases, the DC cable leads are labeled, which is a relatively safe indication of the polarity. However, you must
verify the polarity by measuring the voltage between the DC cable leads. When making the measurement, the positive
(+) lead and the negative (–) lead must always match the (+) and (–) labels on the power distribution unit.
Note
• An earth ground cable is required for each DC PDU. We recommend that you use at least 6-AWG multistrand copper wire.
This wire is not available from Cisco Systems; it is available from any commercial cable vendor. The ground wire cable lug
should be dual-hole and able to fit over M6 terminal studs at 0.625 inch (15.88mm) centers. Recommended lug terminal
wire size Panduit part number:
– LCD8-14A-L for 8AWG wire size
– LCD6-14A-L for 6AWG wire size
Figure 12
Cisco ASR 1006 Router DC Input Power Cable Lug
All measurements in inches
2.24
End View
0.48
Ø 0.267
2 holes
0.63
0.37
0.08
Note
Caution
25527
Crimp area
0.25
To avoid hazardous conditions, all components in the area where DC input power is accessible must be
properly insulated. Therefore, before installing the DC cable lugs, be sure to insulate the lugs according to the
manufacturer’s instructions.
Before you connect DC-input power, you must install the DC power ground leads to the DC power supply.
Obtain these necessary tools and equipment:
• Number 2 Phillips screwdriver
• A 3/16-inch flat-blade screwdriver
Installing the Cisco ASR 1006 Router DC Ground Lugs
To install the grounding lugs on the DC power supply, follow these instructions. Figure 11 (item #6) shows the location of the
DC power supply grounding stud.
Step 1
Make certain that the chassis ground is connected before you begin installing the DC power supply.
Step 2
Locate the stud on the DC power supply for the GND connection which must be connected first and follow these steps:
a. Using the grounding lug, replace the washers and Kepnut screw in the following order.
- Flat washer
- Grounding cable lug
- Kepnut screw
b. Tighten the Kepnut screws on the power supply studs.
Step 3
18
Tighten the Kepnut screw (use the screwdriver to tighten the ground screw in the terminal block to a torque of
20+/–2 in-lbs / 2 per.) to complete the installation. Figure 13 shows the installed DC power supply ground stud.
Figure 13
DC Power Supply Ground Studs and Cables
1
2
OFF
-48/-60V
40A
This unit might have more than one power supply connection. All connections must be removed to de-energ
4
280024
3
1
Negative lug and wire with sleeving wrapped around the
wire and end of lug
3
Location of sleeving wrapped around the wire and end of
the grounding stud
2
Positive lug and wire with sleeving wrapped around the
wire and end of lug
4
Earth ground lug and wire
Step 4
Ground the other end of the grounding wires to an appropriate grounding point at your site.
Step 5
Repeat Steps 2 through Step 4 on the second DC power supply.
Wiring the DC-Input Power Source
Note
The color coding of the DC-input power supply leads depends on the color coding of the DC power source at your site.
Typically, green or green/yellow is used for ground (GND) on the power supply. Negative –48V black is on negative (–)
terminal and red is used for RTN on the positive (+) terminal. Make certain the lead color coding you choose for the
DC-input power supply matches lead color coding used at the DC power source.
Step 1
Make sure the power switch circuit breaker is in the Off (O) position.
Step 2
Locate and remove the plastic cover from the terminal block.
19
Figure 14
DC Power Supply Terminal Block
1
2
OFF
55
-48/-60V
ht have m
4
ore than on
e power su
pply conn
ection. Al
l connectio
ns must be
remov
280027
This unit
mig
40A
3
1
DC power supply terminal block negative stud
3
Terminal block slotted keyed area
2
DC power supply terminal block positive stud
4
DC power supply terminal block plastic cover
Caution
Step 3
20
Before you continue to install the terminal block ground wires, stop and perform Step 5. To prevent any contact
with metal lead on the ground wire and the plastic cover.
You must wrap the positive and negative lead cables with sleeving. Take each lead wire and cover the area from the lug
to the wire with heavy shrink sleeving (see Figure 15, item 3).
Figure 15
DC Power Supply Terminal Block Positive and Negative Cable Lugs With Protective Sleeving
1
2
OFF
-48/-60V
40A
This unit might have more than one power supply connection. All connections must be removed to de-energ
4
280024
3
1
Negative lug and wire with sleeving wrapped around the
wire and end of lug
3
Location of sleeving wrapped around the wire and end of
the grounding stud
2
Positive lug and wire with sleeving wrapped around the
wire and end of lug
4
Earth ground lug and wire
Step 4
For easier cable-management, insert the negative lead cable first. Replace the ground lug with cable in the following
order:
a. Flat Washer
b. Ground lug with negative wire
c. Kepnut screw
21
DC Power Supply Terminal Block Positive and Negative Connections
280311
Figure 16
Step 5
Tighten the Kepnut screw to recommended torque of 18 in-lbs minimum to 22 in-lbs maximum for the positive stud
and wire.
Note
Secure the wires coming in from the terminal block so that they cannot be disturbed by casual contact.
Step 6
Use tie wraps to secure the wires, so that the wires are not pulled from the terminal block by casual contact. Ti-wrap
studs are located below the power supply terminal block
Step 7
Replace the terminal block plastic cover and tighten the screw. The plastic cover is slotted and keyed to fit correctly over
the terminal block. See Figure 17.
22
Figure 17
DC Power Supply Terminal Block and Plastic Cover
1
2
OFF
55
-48/-60V
ht have m
ore than on
e power su
pply conn
ection. Al
4
l connectio
ns must be
remov
280027
This unit
mig
40A
3
1
Negative lead
3
Plastic cover slotted area
2
Positive lead
4
Terminal block plastic cover
Caution
Secure the wires coming in from the terminal block so that they cannot be disturbed by casual contact. There are
tabs located on the base of the DC power supply to which to secure the ties.
Step 8
Use tie wraps to secure the wires, so that the wires are not pulled from the terminal block by casual contact. The DC
power supply has tie-wrap tabs to aid in securing the wires (see Figure 11, item #3). Make sure the tie wrap allows for
some slack in the ground wire.
Step 9
Switch the circuit breaker switch to the On (|) position.
Note
The requirement for maximum torque applied to the power or ground Kepnuts must be 8 in-lb when the power or
ground lug is not present.
This completes the procedure for connecting DC-input power. Your installation is complete. Proceed to the “Verifying Power
Supply Operation” section on page 23 to start the router.
Verifying Power Supply Operation
Follow this procedure to verify power supply is operating correctly in your Cisco ASR10006 router.
Step 1
Check that the power supply LEDs are:
• INPUT OK is green
• FAN OK is green
• OUTPUT FAILED is not illuminated
23
Step 2
To ensure that the power supply state is OK, type the show platform command. This output sample is from a Cisco
ASR1006 router. The other Cisco ASR1000 routers display similar type of output.
MCP_SCAL_R1#sho plat
Chassis type: ASR1006
The following output displays:
Slot
1
1/1
2
2/0
2/1
R0
F0
P0
P1
Type
ASR1000-SIP10
SPA-8X1GE-V2
ASR1000-SIP10
SPA-1X10GE-L-V2
SPA-8X1GE-V2
ASR1000-RP1
ASR1000-ESP20
ASR1006-PWR-AC
ASR1006-PWR-AC
State
ok
ok
ok
ok
ok
ok,active
ok,active
ok
ps, fail
Insert Time
00:03:19
00:02:23
00:03:19
00:02:22
00:02:17
00:03:19
00:03:19
00:02:50
00:02:50
Slot
CPLD Version
1
2
R0
F0
07091401
07091401
08060301
08041102
Firmware
Version
12.2(33r)XN2
12.2(33r)XN2
12.2(0:0)
12.2(33r)XN2
MCP_SCAL_R1#
If the LEDs indicate a power problem or the power supply state is ps,fail, then contact a customer service representatives for
assistance or additional instructions.
Start the System
After installing your Cisco ASR 1006 Router and connecting cables, start the router as follows.
Step 1
Check for the following:
• Make certain that each shared port adapter is firmly seated in its subslot and its captive screws are securely tightened.
• The Cisco ASR1000-ESP10 embedded services processors in the Cisco ASR 1006 router are inserted in slot F0 and F1, is
firmly seated in its slot, and its captive screws are securely tightened.
• All network interface cables are connected.
• The console terminal is turned on.
Step 2
Turn on power. The green OK LED on the power supply turns on.
Step 3
Listen for the fans; you should immediately hear them operating.
Step 4
During the boot process, observe the power LEDs. The power LED should be green on all boards. The Status LED lights
yellow to indicate booting and then green when IOS is running.
Table 1 provides information about the LEDs as the system starts.
Table 1
Cisco ASR 1006 Router LED Activity
LED Label
LED
Color
In the Power Up State -Behavior Description
PWR
Power
Solid green
All power requirements are within specification
Off
Off, the router is in standby mode.
24
LED Label
LED
Color
In the Power Up State -Behavior Description
STAT
System status
Solid green
Cisco IOS has successfully booted.
Yellow
BOOT ROM has successfully loaded.
Red
System failure.
ACTV
Active
Green
Lit when this is the active ASR 1000 Series RP1.
STBY
Standby
Yellow
Lit when this is the standby ASR 1000 Series RP1.
CRIT
Critical
Solid red
Critical alarm indicator. This is on at power up, turned
off by software.
MAJ
Major
Solid red
Major alarm indicator.
MIN
Minor
Amber
Minor alarm indicator.
DISK HD
Internal Hard Drive
Flashing green
Active indicator.
Off
No activity.
Flashing green
Active indicator.
Off
No activity.
Flashing green
Active indicator.
Off
No activity.
DISK USB
DISK BF
External USB FLASH
Internal FLASH (BootDisk)
During the boot process, observe the system LEDs. The STAT LED comes on immediately as yellow, then turns to green
when the Cisco IOS is booted. The shared port adapter LEDs go on and off irregularly.
Note
The system boots differently depending on the configuration that ships with your system. This output is only an
example of what can display.
Step 5
Observe the initialization process. When the system boot is complete (a few seconds), the Cisco ASR 1000 Series RP1
route processor begins to initialize. The console screen displays a script and system banner similar to the following:
rommon 1 >
rommon 1 > boot
Located rp_super.ppc.nader.5g.evfc.bin
Image size 211681484 inode num 12, bks cnt 51681 blk size 8*512
#########################################################################################################
##############
#########################################################################################################
##############
#########################################################################################################
##############
#########################################################################################################
##############
#########################################################################################################
##############
#########################################################################################################
##############
#########################################################################################################
##############
#########################################################################################################
##############
#########################################################################################################
##############
#############################################
Boot image size = 211681484 (0xc9e00cc) bytes
Using midplane macaddr
Package header rev 0 structure detected
Calculating SHA-1 hash...done
25
validate_package: SHA-1 hash:
calculated 479a7d62:6c128ba8:3616b8da:93cb3224:5c1aeb34
expected
479a7d62:6c128ba8:3616b8da:93cb3224:5c1aeb34
Image validated
PPC/IOS XE loader version: 0.0.3
loaded at:
00800000 0D1E2004
zimage at:
00807673 009B8C69
initrd at:
009B9000 01006219
isord at:
01007000 0D1DF800
avail ram:
00400000 00800000
Kernel load:
Uncompressing image... dst: 00000000 lim: 00400000 start: 00807673 size: 001B15F6...done.
Now booting the IOS XE kernel
Restricted Rights Legend
Use, duplication, or disclosure by the Government is
subject to restrictions as set forth in subparagraph
(c) of the Commercial Computer Software - Restricted
Rights clause at FAR sec. 52.227-19 and subparagraph
(c) (1) (ii) of the Rights in Technical Data and Computer
Software clause at DFARS sec. 252.227-7013.
cisco Systems, Inc.
170 West Tasman Drive
San Jose, California 95134-1706
Cisco IOS Software, IOS-XE Software (PPC_LINUX_IOSD-ADVIPSERVICESK9-M), Experimental Version
12.2(20071221:020608) [BLD-mcp_dev.MCP_INCREMENTAL_BLD_20071220 102]
Copyright (c) 1986-2007 by Cisco Systems, Inc.
Compiled Thu 20-Dec-07 18:10 by mcpre
Image text-base: 0x10062890, data-base: 0x132A7900
This product contains cryptographic features and is subject to United
States and local country laws governing import, export, transfer and
use. Delivery of Cisco cryptographic products does not imply
third-party authority to import, export, distribute or use encryption.
Importers, exporters, distributors and users are responsible for
compliance with U.S. and local country laws. By using this product you
agree to comply with applicable laws and regulations. If you are unable
to comply with U.S. and local laws, return this product immediately.
A summary of U.S. laws governing Cisco cryptographic products may be found at:
http://www.cisco.com/wwl/export/crypto/tool/stqrg.html
If you require further assistance please contact us by sending email to
[email protected].
cisco ASR1006 (RP1) processor with 541737K/6147K bytes of memory.
4 Gigabit Ethernet interfaces
32768K bytes of non-volatile configuration memory.
1869396K bytes of physical memory.
7798783K bytes of eUSB flash at bootflash:.
--- System Configuration Dialog --Would you like to enter the initial configuration dialog? [yes/no]: no
Press RETURN to get started!
26
*Feb 19 17:34:27.361: % Error opening nvram:/ifIndex-table No such file or directory
*Feb 19 17:34:28.235: %ASR1000_MGMTVRF-6-CREATE_SUCCESS_INFO: Management vrf Mgmt-intf created with ID
4085, ipv4 table-id 0xFF5, ipv6 table-id 0x1E000001
*Feb 19 17:34:29.720: %PARSER-4-BADCFG: Unexpected end of configuration file.
*Feb 19 17:34:29.809: %NETCLK-5-NETCLK_MODE_CHANGE: Network clock source not available. The network clock
has changed to freerun
*Feb 19 17:34:10.138: %CPPHA-7-SYSREADY: F0: cpp_ha: CPP client process FMAN-FP (5 of 5) ready.
*Feb 19 17:34:29.824: %LINK-3-UPDOWN: Interface GigabitEthernet0, changed state to up
*Feb 19 17:34:10.269: %IOSXE-6-PLATFORM: F0: cpp_cp: cpp_mlp_svr_client_bind: cpp_mlp_svr_ifm_init()
successful
*Feb 19 17:34:10.362: %CPPHA-7-START: F0: cpp_ha: CPP 0 preparing image /usr/cpp/bin/cpp-mcplo-ucode
*Feb 19 17:34:10.473: %CPPHA-7-START: F0: cpp_ha: CPP 0 startup init image /usr/cpp/bin/cpp-mcplo-ucode
*Feb 19 17:34:14.688: %CPPHA-7-START: F0: cpp_ha: CPP 0 running init image /usr/cpp/bin/cpp-mcplo-ucode
*Feb 19 17:34:14.919: %CPPHA-7-READY: F0: cpp_ha: CPP 0 loading and initialization complete
*Feb 19 17:34:14.919: %CPPHA-6-SYSINIT: F0: cpp_ha: CPP HA system configuration start.
*Feb 19 17:34:15.179: %IOSXE-6-PLATFORM: F0: cpp_cp: Process CPP_PFILTER_EA_EVENT__API_CALL__REGISTER
*Feb 19 17:34:15.286: %CPPHA-6-SYSINIT: F0: cpp_ha: CPP HA system enabled.
*Feb 19 17:34:15.287: %CPPHA-6-SYSINIT: F0: cpp_ha: CPP HA system initializaton complete.
*Feb 19 17:34:30.823: %LINEPROTO-5-UPDOWN: Line protocol on Interface GigabitEthernet0, changed state to
down
*Feb 19 17:35:12.865: %LINK-5-CHANGED: Interface GigabitEthernet0/0/0, changed state to administratively
down
*Feb 19 17:35:12.865: %LINK-5-CHANGED: Interface GigabitEthernet0/0/1, changed state to administratively
down
*Feb 19 17:35:12.865: %LINK-5-CHANGED: Interface GigabitEthernet0/0/2, changed state to administratively
down
*Feb 19 17:35:12.865: %LINK-5-CHANGED: Interface GigabitEthernet0/0/3, changed state to administratively
down
*Feb 19 17:35:13.865: %LINEPROTO-5-UPDOWN: Line protocol on Interface GigabitEthernet0/0/0, changed state
to down
*Feb 19 17:35:13.865: %LINEPROTO-5-UPDOWN: Line protocol on Interface GigabitEthernet0/0/1, changed state
to down
*Feb 19 17:35:13.866: %LINEPROTO-5-UPDOWN: Line protocol on Interface GigabitEthernet0/0/2, changed state
to down
*Feb 19 17:35:13.866: %LINEPROTO-5-UPDOWN: Line protocol on Interface GigabitEthernet0/0/3, changed state
to down
*Feb 19 17:35:19.167: %ASR1000_OIR-6-REMSPA: SPA removed from subslot 0/0, interfaces disabled
*Feb 19 17:35:19.171: %ASR1000_OIR-6-INSCARD: Card (fp) inserted in slot F0
*Feb 19 17:35:19.171: %ASR1000_OIR-6-ONLINECARD: Card (fp) online in slot F0
*Feb 19 17:35:19.187: %ASR1000_OIR-6-INSCARD: Card (cc) inserted in slot 0
*Feb 19 17:35:19.187: %ASR1000_OIR-6-ONLINECARD: Card (cc) online in slot 0
*Feb 19 17:35:19.189: %ASR1000_OIR-6-INSSPA: SPA inserted in subslot 0/0
*Feb 19 17:35:19.452: %SYS-5-RESTART: System restarted -Cisco IOS Software, IOS-XE Software (PPC_LINUX_IOSD-ADVIPSERVICESK9-M), Experimental Version
12.2(20071221:020608) [BLD-mcp_dev.MCP_INCREMENTAL_BLD_20071220 102]
Copyright (c) 1986-2007 by Cisco Systems, Inc.
Compiled Thu 20-Dec-07 18:10 by mcpre
*Feb 19 17:35:19.455: %SYS-6-BOOTTIME: Time taken to reboot after reload = 78809 seconds
*Feb 19 17:35:19.551: %CRYPTO-6-ISAKMP_ON_OFF: ISAKMP is OFF
*Feb 19 17:35:19.551: %CRYPTO-6-ISAKMP_ON_OFF: ISAKMP is OFF
*Feb 19 17:35:21.669: %DYNCMD-7-CMDSET_LOADED: The Dynamic Command set has been loaded from the Shell
Manager
*Feb 19 17:35:22.221: %CRYPTO-6-ISAKMP_ON_OFF: ISAKMP is OFF
Router>
The next example provides the display when the system boots from TFTP
mcp-4ru-16-rp0-rommon 2 >boot tftp:
IP_ADDRESS: 172.27.55.215
IP_SUBNET_MASK: 255.255.255.128
DEFAULT_GATEWAY: 172.27.55.129
27
TFTP_SERVER: 172.27.55.254
TFTP_FILE: asr1000rp1-advipservicesk9.v122_33_xn_asr_rls0_throttle_20080114_045627.bin
Using midplane macaddr
TFTP_MACADDR: 00:1a:30:44:34:ff
TFTP_VERBOSE: Progress
TFTP_RETRY_COUNT: 18
TFTP_TIMEOUT: 7200
TFTP_CHECKSUM: Yes
ETHER_PORT: 3
ETHER_SPEED_MODE: Auto Detect
link up 1000Mbps/FD.
Receiving asr1000rp1-advipservicesk9.v122_33_xn_asr_rls0_throttle_20080114_045627.bin from 172.27.55.254
!!!!!!!!!!!!!!!!!!!!!!!!!!!!!!!!!!!!!!!!!!!!!!!!!!!!!!!!!!!!!!!!!!!!!!!!!!!!!!!!!!!!!!!!!!!!!!!!!!!!!!!!!
!!!!!!!!!!!!!!!!!!!!!!!!!!!!!!!!!!!!!!!!!!!!!!!!!!!!!!!!!!!!!!!!!!!!!!!!!!!!!!!!!!!!!!!!!!!!!!!!!!!!!!!!!
!!!!!!!!!!!!!!!!!!!!!!!!!!!!!!!!!!
!!!!!!!!!!!!!!!!!!!!!!!!!!!!!!!!!!!!!!!!!!!!!!!!!!!!!!!!!!!!!!!!!!!!!!!!!!!!!!!!!!!!!!!!!!!!!!!!!!!!!!!!!
!!!!!!!!!!!!!!!!!!!!!!!!!!!!!!!!!!!!!!!!!!!!!!!!!!!!!!!!!!!!!!!!!!!!!!!!!!!!!!!!!!!!!!!!!!!!!!!!!!!!!!!!!
!!!!!!!!!!!!!!!!!!!!!!!!!!!!!!!!!!!!!!!!!!!!!!!!!!!!!!!!!!!!!!
!!!!!!!!!!!!!!!!!!!!!!!!!!!!!!!!!!!!!!!!!!!!!!!!!!!!!!!!!!!!!!!!!!!!!!!!!!!!!!!!!!!!!!!!!!!!!!!!!!!!!!!!!
!!!!!!!!!!!!!!!!!!!!!!!!!!!!!!!!!!!!!!!!!!!!!!!!!!!!!!!!!!!!!!!!!!!!!!!!!!!!!!!!!!!!!!!!!!!!!!!!!!!!!!!!!
!!!!!!!!!!!!!!!!!!!!!!!!!!!!!!!!!!!!!!!!!!!!!!!!!!!!!!!!!!!!!!!!
!!!!!!!!!!!!!!!!!!!!!!!!!!!!!!!!!!!!!!!!!!!!!!!!!!!!!!!!!!!!!!!!!!!!!!!!!!!!!!!!!!!!!!!!!!!!!!!!!!!!!!!!!
!!!!!!!!!!!!!!!!!!!!!!!!!!!!!!!!!!!!!!!!!!!!!!!!!!!!!!!!!!!!!!!!!!!!!!!!!!!!!!!!!!!!!!!!!!!!!!!!!!!!!!!!!
!!!!!!!!!!!!!!!!!!!!!!!!!!!!!!!!!!!!!!!!!!!!!!!!!!!!!!!!!!!!!!!!
!!!!!!!!!!!!!!!!!!!!!!!!!!!!!!!!!!!!!!!!!!!!!!!!!!!!!!!!!!!!!!!!!!!!!!!!!!!!!!!!!!!!!!!!!!!!!!!!!!!!!!!!!
!!!!!!!!!!!!!!!!!!!!!!!!!!!!!!!!!!!!!!!!!!!!!!!!!!!!!!!!!!!!!!!!!!!!!!!!!!!!!!!!!!!!!!!!!!!!!!!!!!!!!!!!!
!!!!!!!!!!!!!!!!!!!!!!!!!!!!!!!!!!!!!!!!!!!!!!!!!!!!!!!!!!!!!!!!
!!!!!!!!!!!!!!!!!!!!!!!!!!!!!!!!!!!!!!!!!!!!!!!!!!!!!!!!!!!!!!!!!!!!!!!!!!!!!!
File reception completed.
Boot image size = 206610636 (0xc50a0cc) bytes
Using midplane macaddr
Package header rev 0 structure detected
Calculating SHA-1 hash...done
validate_package: SHA-1 hash:
calculated 5e4c2c77:ef886ca7:ebe74c2d:d72aa38c:b018a947
expected
5e4c2c77:ef886ca7:ebe74c2d:d72aa38c:b018a947
Image validated
PPC/IOS XE loader version: 0.0.3
loaded at:
00800000 0CD0C004
zimage at:
00807673 009B8E43
initrd at:
009B9000 01006D0B
isord at:
01007000 0CD0A000
avail ram:
00400000 00800000
Kernel load:
Uncompressing image... dst: 00000000 lim: 00400000 start: 00807673 size: 001B17D0...done.
Now booting the IOS XE kernel
%IOSXEBOOT-4-BOOT_PARAMETER: (rp/0): Booting with custom BOOT_PARAM setting
%IOSXEBOOT-4-BOOT_PARAMETER: (rp/0): Hardware watchdog timer disabled in ROMMON
%IOSXEBOOT-4-DEBUG_CONF: (rp/0): Using DEBUG_CONF file /misc/scratch/debug.conf
Restricted Rights Legend
Use, duplication, or disclosure by the Government is
subject to restrictions as set forth in subparagraph
(c) of the Commercial Computer Software - Restricted
Rights clause at FAR sec. 52.227-19 and subparagraph
(c) (1) (ii) of the Rights in Technical Data and Computer
Software clause at DFARS sec. 252.227-7013.
cisco Systems, Inc.
170 West Tasman Drive
San Jose, California 95134-1706
28
Cisco IOS Software, IOS-XE Software (PPC_LINUX_IOSD-ADVIPSERVICESK9-M), Experimental Version
12.2(20080110:152728) [BLD-mcp_dev.MCP_CRYPTO_INCREMENTAL_BLD_20080110 103]
Copyright (c) 1986-2008 by Cisco Systems, Inc.
Compiled Thu 10-Jan-08 07:29 by mcpre
Image text-base: 0x10062810, data-base: 0x132AF1F8
This product contains cryptographic features and is subject to United
States and local country laws governing import, export, transfer and
use. Delivery of Cisco cryptographic products does not imply
third-party authority to import, export, distribute or use encryption.
Importers, exporters, distributors and users are responsible for
compliance with U.S. and local country laws. By using this product you
agree to comply with applicable laws and regulations. If you are unable
to comply with U.S. and local laws, return this product immediately.
A summary of U.S. laws governing Cisco cryptographic products may be found at:
http://www.cisco.com/wwl/export/crypto/tool/stqrg.html
If you require further assistance please contact us by sending email to
[email protected].
cisco ASR1000 (RP1) processor with 753834K/6147K bytes of memory.
2 Packet over SONET interfaces
32768K bytes of non-volatile configuration memory.
2097152K bytes of physical memory.
439807K bytes of eUSB flash at bootflash:.
39004543K bytes of SATA hard disk at harddisk:.
1020584K bytes of USB flash at usb0:.
SETUP: new interface POS0/1/0 placed in "shutdown" state
SETUP: new interface POS0/1/1 placed in "shutdown" state
Press RETURN to get started!
*Feb 13 12:48:53.340: %LINK-5-CHANGED: Interface GigabitEthernet0, changed state to administratively down
*Feb 13 12:48:53.513: %NETCLK-5-NETCLK_MODE_CHANGE: Network clock source not available. The network clock
has changed to freerun
*Feb 13 12:48:41.846:
*Feb 13 12:48:41.980:
successful
*Feb 13 12:48:42.084:
*Feb 13 12:48:42.197:
*Feb 13 12:48:47.581:
*Feb 13 12:48:47.812:
*Feb 13 12:48:47.812:
*Feb 13 12:48:49.090:
*Feb 13 12:48:54.382:
down
*Feb 13 12:48:57.074:
Manager
*Feb 13 12:48:59.697:
*Feb 13 12:48:59.707:
*Feb 13 12:48:59.707:
*Feb 13 12:48:59.710:
*Feb 13 12:48:59.710:
*Feb 13 12:48:59.730:
*Feb 13 12:48:59.730:
*Feb 13 12:48:59.732:
*Feb 13 12:48:59.735:
*Feb 13 12:48:59.943:
%CPPHA-7-SYSREADY: F0: cpp_ha:
%IOSXE-6-PLATFORM: F0: cpp_cp:
CPP client process FMAN-FP (5 of 5) ready.
cpp_mlp_svr_client_bind: cpp_mlp_svr_ifm_init()
%CPPHA-7-START: F0: cpp_ha: CPP 0 preparing image /usr/cpp/bin/cpp-mcplo-ucode
%CPPHA-7-START: F0: cpp_ha: CPP 0 startup init image /usr/cpp/bin/cpp-mcplo-ucode
%CPPHA-7-START: F0: cpp_ha: CPP 0 running init image /usr/cpp/bin/cpp-mcplo-ucode
%CPPHA-7-READY: F0: cpp_ha: CPP 0 loading and initialization complete
%CPPHA-6-SYSINIT: F0: cpp_ha: CPP HA system configuration start.
%IOSXE-6-PLATFORM: F0: cpp_cp: Process CPP_PFILTER_EA_EVENT__API_CALL__REGISTER
%LINEPROTO-5-UPDOWN: Line protocol on Interface GigabitEthernet0, changed state to
%DYNCMD-7-CMDSET_LOADED: The Dynamic Command set has been loaded from the Shell
%SYS-5-CONFIG_I: Configured from memory by console
%ASR1000_OIR-6-REMSPA: SPA removed from subslot 0/1, interfaces disabled
%ASR1000_OIR-6-REMSPA: SPA removed from subslot 0/2, interfaces disabled
%ASR1000_OIR-6-INSCARD: Card (fp) inserted in slot F0
%ASR1000_OIR-6-ONLINECARD: Card (fp) online in slot F0
%ASR1000_OIR-6-INSCARD: Card (cc) inserted in slot 0
%ASR1000_OIR-6-ONLINECARD: Card (cc) online in slot 0
%ASR1000_OIR-6-INSSPA: SPA inserted in subslot 0/1
%ASR1000_OIR-6-INSSPA: SPA inserted in subslot 0/2
%SYS-5-RESTART: System restarted --
29
Cisco IOS Software, IOS-XE Software (PPC_LINUX_IOSD-ADVIPSERVICESK9-M), Experimental Version
12.2(20080110:152728) [BLD-mcp_dev.MCP_CRYPTO_INCREMENTAL_BLD_20080110 103]
Copyright (c) 1986-2008 by Cisco Systems, Inc.
Compiled Thu 10-Jan-08 07:29 by mcpre
*Feb 13 12:49:01.253: %CRYPTO-6-ISAKMP_ON_OFF: ISAKMP is OFF
Router>
During the boot process, observe the system LEDs. The LEDs on the shared port adapter go on and off in irregular sequence.
They may go on, go out, and go on again for a short time. On the router, the green STATUS LED comes on and stays on. For
software configuration information, see the Cisco ASR 1000 Series Aggregation Services Software Configuration Guide.
6 Configure the Router
Using the Console Interface
To access the command-line interface using the console, follow these steps:
Step 1
Once the terminal console port is connected, configure your terminal emulation software with valid settings. Start at
the following prompt:
Press Return for Console prompt
Step 2
Press Return to enter user EXEC configuration mode. The following prompt appears:
Router>
Step 3
From user EXEC configuration mode, enter the enable command as shown in the following example:
Router> enable
Step 4
At the password prompt, enter your system’s password. If an enable password has not been set on your system, this
step may be skipped. The following example shows entry of the password called enablepass:
Password: enablepass
Step 5
When your enable password is accepted, the privileged EXEC configuration mode prompt appears:
Router#
Step 6
You now have access to the CLI in privileged EXEC configuration mode and you can enter the necessary commands to
complete your desired tasks.
Step 7
To exit the console session, enter the quit command as shown in the following example:
Router# quit
Configure Global Parameters Using the Setup Facility
When you first start the setup program, you must configure the global parameters. These parameters are used for controlling
system-wide settings. Complete the following steps to enter the global parameters:
Step 1
Connect a console terminal to the console port and then boot the router. The system boots from flash memory. The
following information appears after about 30 seconds. This is only an example of the output display; prompts may vary.
Step 2
The first sections of the configuration script appear only at an initial system startup. On subsequent uses of the setup
facility, the script begins with a System Configuration Dialog as shown below: When asked if you would like to enter
the initial configuration dialog, enter yes.
Would you like to enter the initial configuration dialog? [yes/no] yes
At any point you may enter a question mark '?' for help.
Use ctrl-c to abort configuration dialog at any prompt.
30
Default settings are in square brackets '[]'.
Basic management setup configures only enough connectivity for management of the system, extended setup
will ask you to configure each interface on the system.
--- System Configuration Dialog --Would you like to enter the initial configuration dialog? [yes/no]: y
At any point you may enter a question mark '?' for help.
Use ctrl-c to abort configuration dialog at any prompt.
Default settings are in square brackets '[]'.
Basic management setup configures only enough connectivity
for management of the system, extended setup will ask you
to configure each interface on the system
Would you like to enter basic management setup? [yes/no]: n
First, would you like to see the current interface summary? [yes]: y
Any interface listed with OK? value "NO" does not have a valid configuration
Interface
GigabitEthernet0/0/0
GigabitEthernet0/0/1
GigabitEthernet0/0/2
GigabitEthernet0/0/3
GigabitEthernet0
IP-Address
unassigned
unassigned
unassigned
unassigned
unassigned
OK?
NO
NO
NO
NO
YES
Method
unset
unset
unset
unset
unset
Status
down
down
down
down
administratively down
Protocol
down
down
down
down
down
Configuring global parameters:
Enter host name [Router]:
The enable secret is a password used to protect access to
privileged EXEC and configuration modes. This password, after
entered, becomes encrypted in the configuration.
Enter enable secret: test
The enable password is used when you do not specify an
enable secret password, with some older software versions, and
some boot images.
Enter enable password: tests
The virtual terminal password is used to protect
access to the router over a network interface.
Enter virtual terminal password: test
Configure SNMP Network Management? [yes]: n
Configure IP? [yes]: y
Configure RIP routing? [no]:
Configure bridging? [no]:
Configure CLNS? [no]:
Configuring interface parameters:
Do you want to configure GigabitEthernet0/0/0
interface? [yes]: n
Do you want to configure GigabitEthernet0/0/1
interface? [yes]: n
Do you want to configure GigabitEthernet0/0/2
interface? [yes]: n
Do you want to configure GigabitEthernet0/0/3
interface? [yes]: n
Do you want to configure GigabitEthernet0
interface? [no]: n
The following configuration command script was created:
31
hostname Router
enable secret 5 $1$6r./$U5wHcV3uRWkKWK/fap474.
enable password tests
line vty 0 4
password test
no snmp-server
!
ip routing
no bridge 1
no clns routing
!
interface GigabitEthernet0/0/0
shutdown
no ip address
!
interface GigabitEthernet0/0/1
shutdown
no ip address
!
interface GigabitEthernet0/0/2
shutdown
no ip address
!
interface GigabitEthernet0/0/3
shutdown
no ip address
!
interface GigabitEthernet0/1/0
shutdown
no ip address
!
interface GigabitEthernet0/1/1
shutdown
no ip address
!
interface FastEthernet0/3/0
shutdown
no ip address
!
interface FastEthernet0/3/1
shutdown
no ip address
!
interface FastEthernet0/3/2
shutdown
no ip address
!
interface FastEthernet0/3/3
shutdown
no ip address
!
interface FastEthernet0/3/4
shutdown
no ip address
!
interface FastEthernet0/3/5
shutdown
no ip address
!
interface FastEthernet0/3/6
shutdown
no ip address
!
interface FastEthernet0/3/7
shutdown
no ip address
32
!
interface GigabitEthernet0
shutdown
no ip address
dialer-list 1 protocol ip permit
dialer-list 1 protocol ipx permit
!
end
[0] Go to the IOS command prompt without saving this config.
[1] Return back to the setup without saving this config.
[2] Save this configuration to nvram and exit.
Enter your selection [2]:
Router#reload
Proceed with reload? [confirm]
*Jan 11 06:59:29.476: %SYS-5-RELOAD: Reload requested by console. Reload Reason: Reload command.
System Bootstrap, Version 12.2(20071105:235056) [gschnorr-mcp_rommon_rel_1_25 101], DEVELOPMENT SOFTWARE
Copyright (c) 1994-2007 by cisco Systems, Inc.
Compiled Mon 05-Nov-07 16:50 by gschnorr-mcp_rommon_rel_1_25
Current image running: Boot ROM1
Last reset cause: LocalSoft
SATA drive PCI config error
ASR1006-RP1 platform with 2097152 Kbytes of main memory
rommon 1 > b tftp:images/packages_crypto/asr1000rp1-advipservicesk9.mcp_dev_20080109_101550.bin
IP_ADDRESS: 2.1.6.5
IP_SUBNET_MASK: 255.255.0.0
DEFAULT_GATEWAY: 2.1.0.1
TFTP_SERVER: 2.0.0.2
TFTP_FILE: images/packages_crypto/asr1000rp1-advipservicesk9.mcp_dev_20080109_101550.bin
Using midplane macaddr
TFTP_MACADDR: 00:14:a8:ff:42:ff
TFTP_VERBOSE: Progress
TFTP_RETRY_COUNT: 18
TFTP_TIMEOUT: 7200
TFTP_CHECKSUM: Yes
ETHER_PORT: 3
ETHER_SPEED_MODE: Auto Detect
link up 1000Mbps/FD.......
Receiving images/packages_crypto/asr1000rp1-advipservicesk9.mcp_dev_20080109_101550.bin from 2.0.0.2
!!!!!!!!!!!!!!!!!!!!!!!!!!!!!!!!!!!!!!!!!!!!!!!!!!!!!!!!!!!!!!!!!!!!!!!!!!!!!!!!!!!!!!!!!!!!!!!!!!!!!!!!!
!!!!!!!!!!!!!!!!!!!!!!!!!!!!!!!!!!!!!!!!!!!!!!!!!!!!!!!!!!!!!!!!!!!!!!!!!!!!!!!!!!!!!!!!!!!!!!!!!!!!!!!!!
!!!!!!!!!!!!!!!!!!!!!!!!!!
File reception completed.
Boot image size = 206741708 (0xc52a0cc) bytes
Using midplane macaddr
Package header rev 0 structure detected
Calculating SHA-1 hash...done
validate_package: SHA-1 hash:
calculated a8301e1e:17821e94:07654c49:4ca6fe49:518af2c2
expected
a8301e1e:17821e94:07654c49:4ca6fe49:518af2c2
Image validated
33
PPC/IOS XE loader version: 0.0.3
loaded at:
00800000 0CD2C004
zimage at:
00807673 009B8E53
initrd at:
009B9000 01006E53
isord at:
01007000 0CD2A000
avail ram:
00400000 00800000
Kernel load:
Uncompressing image... dst: 00000000 lim: 00400000 start: 00807673 size: 001B17E0...done.
Now booting the IOS XE kernel
%IOSXEBOOT-4-BOOT_PARAMETER: (rp/0): Booting with custom BOOT_PARAM setting
%IOSXEBOOT-4-DEBUG_CONF: (rp/0): File /misc/scratch/debug.conf is absent, ignoring
Restricted Rights Legend
Use, duplication, or disclosure by the Government is
subject to restrictions as set forth in subparagraph
(c) of the Commercial Computer Software - Restricted
Rights clause at FAR sec. 52.227-19 and subparagraph
(c) (1) (ii) of the Rights in Technical Data and Computer
Software clause at DFARS sec. 252.227-7013.
cisco Systems, Inc.
170 West Tasman Drive
San Jose, California 95134-1706
Cisco IOS Software, IOS-XE Software (PPC_LINUX_IOSD-ADVIPSERVICESK9-M), Experimental Version
12.2(20080109:162316) [BLD-mcp_dev.MCP_CRYPTO_INCREMENTAL_BLD_20080109 103]
Copyright (c) 1986-2008 by Cisco Systems, Inc.
Compiled Wed 09-Jan-08 08:25 by mcpre
Image text-base: 0x10062810, data-base: 0x132AED48
This product contains cryptographic features and is subject to United
States and local country laws governing import, export, transfer and
use. Delivery of Cisco cryptographic products does not imply
third-party authority to import, export, distribute or use encryption.
Importers, exporters, distributors and users are responsible for
compliance with U.S. and local country laws. By using this product you
agree to comply with applicable laws and regulations. If you are unable
to comply with U.S. and local laws, return this product immediately.
A summary of U.S. laws governing Cisco cryptographic products may be found at:
http://www.cisco.com/wwl/export/crypto/tool/stqrg.html
If you require further assistance please contact us by sending email to
[email protected].
cisco ASR1006 (RP1) processor with 548011K/6147K bytes of memory.
8 FastEthernet interfaces
6 Gigabit Ethernet interfaces
32768K bytes of non-volatile configuration memory.
2097152K bytes of physical memory.
947711K bytes of eUSB flash at bootflash:.
253407K bytes of USB flash at usb0:.
--- System Configuration Dialog --Would you like to enter the initial configuration dialog? [yes/no]: n
34
Note
Basic management setup configures enough connectivity for managing the system; extended setup will ask you to
configure each interface on the system. For detailed information about setting global parameters, refer to the Cisco ASR
1000_Series Aggregation Services Routers Software Configuration Guide.
Check the Running Configuration Settings
To check the value of the settings you have entered, enter the show running-config command at the Router# prompt:
Router# show running-config
To review changes you make to the configuration, use the EXEC mode show startup-config command to see the changes in
NVRAM.
Save the Running Configuration to NVRAM
To store the configuration or changes to your startup configuration in NVRAM, use the copy running-config startup-config
command to save your configuration changes to the startup configuration so that the changes will not be lost if the software
reloads or a power outage occurs. For example:
Router# copy running-config startup-config
Building configuration...
It might take a minute or two to save the configuration. After the configuration has been saved, the following output appears:
[OK]
Router#
On most platforms, this task saves the configuration to NVRAM. On the Class A Flash file system platforms, this task saves
the configuration to the location specified by the CONFIG_FILE environment variable. The CONFIG_FILE variable defaults to
NVRAM.
To review changes you make to the configuration, use the EXEC mode show startup-config command to see the changes.
Note
Using the copy running-config startup-config command saves the configuration settings that you created in the router
using configuration mode and the setup facility. If you fail to do this, your configuration will be lost the next time you
reload the router.
Perform Other Configuration Tasks
To make advanced configuration changes after you establish the basic startup configuration for your router, refer to the Cisco
ASR 1000 Series Aggregation Services Routers Software Configuration Guide and modular configuration and modular
command reference publications in the Cisco IOS software configuration documentation set that corresponds to the software
release installed on your Cisco hardware. These publications contain additional information on using the configure command.
The configuration publications also provide information about the following tasks:
• Understanding Diagnostic Mode feature
• Understanding Command Modes
• Booting and rebooting the router
• Understanding software packages for the Cisco ASR 1000 Series Aggregation Services Routers
• Software Upgrades
35
7 After Installation
Follow the instructions in this section to replace field replaceable units (FRUs) after installation. The Cisco ASR 1006 Router
supports the following components as FRUs:
• Cisco ASR1000-ESP10 and Cisco ASR1000-ESP20 embedded services processors
• Shared port adapters
• Power supplies
Note
For a complete list of Cisco ASR 1000 Series Routers field replaceable units, go to the Cisco ASR 1000 Series
Aggregation Services Router Hardware Installation and Initial Configuration Guide, Chapter 8.
The following topics are covered in this section:
• Power Off the Cisco ASR 1006 Router, page 36
• Replace a Power Supply in a Cisco ASR 1006 Router, page 37
• Install and Remove the Shared Port Adapter, page 40
Warning
Only trained and qualified personnel should be allowed to install, replace, or service this equipment.
Statement 1030
Power Off the Cisco ASR 1006 Router
This section explains how to shut down the Cisco ASR 1000 Series router. It is recommended that before turning off all power
to the chassis, you issue the reload command. This insures that the operating system cleans up all the file systems. Once the
reload operation is complete, then the Cisco ASR 1006 Router can be powered off safely.
To remove power from the Cisco ASR 1006 Router, follow this procedure:
Step 1
Slip on the ESD-preventative wrist strap that was included in the accessory kit.
Step 2
Before you shutdown power to the router, issue the IOS reload command to halt the system and then wait for ROM
Monitor to execute before proceeding to the next step. The following screen shot shows an example of the reload
command:
Router#reload
Proceed with reload? [confirm]
*Jun 18 19:38:21.870: %SYS-5-RELOAD: Reload requested by console. Reload Reason: Reload command.
Step 3
Remove any power cables from the Cisco ASR 1006 Router.
a. For AC power supplies, place the Standby switch in the Standby position and unplug the AC power cord from the
power outlet.
b. For DC power supplies, switch the circuit breaker to the Off (O) position. Then remove the terminal block plug from
the DC power supply.
Note
36
After powering off the router, wait a minimum of 30 seconds before powering it on again.
Replace a Power Supply in a Cisco ASR 1006 Router
This section provides instructions for removing and replacing the AC power supply and the DC power supply in a Cisco
ASR 1006 Router. Before you begin, make certain the chassis is grounded.
Remove and Then Replace an AC Power Supply
To remove a live Cisco ASR 1006 Router AC power supply that is not operating normally (and then replace the AC power supply
within five minutes), follow this procedure:
Step 1
Slip on the ESD-preventative wrist strap that was included in the accessory kit.
Step 2
Before you turn off a power supply, make certain the chassis is grounded.
Step 3
Turn the power supply Standby switch to the Standby position.of the power supply.
Step 4
Unplug the power cable from the AC inlet on the back of the power supply and the power source.
Step 5
Unscrew the power supply captive screws.
Note
Two power supplies must be installed in the chassis at all times to ensure sufficient cooling. The system fans are inside
the power supply units and must spin for cooling. Because all the system fans can be powered by one power supply, the
second power supply unit does not have to be powered on, but it must be installed.
Caution
Step 6
If you remove a power supply, the system can run for a maximum of five minutes before the system shuts down.
The fans and power elements are independent within the power supply. Therefore, it is not required that the
replacement power supply be energized within five minutes. The only requirement is that the power supply be
installed in the chassis, which energizes the fans and maintains proper system cooling.
Grasping the power supply handles, pull the power supply from the chassis. When you remove the AC power supply,
you will see the following type of messages in the log report:
6ru_perf2#show log
Syslog logging: enabled (0 messages dropped, 6 messages rate-limited, 0 flushes, 0 overruns, xml
disabled, filtering disabled)
No Active Message Discriminator.
No Inactive Message Discriminator.
Console logging: disabled
Monitor logging: level debugging, 0 messages logged, xml disabled,
filtering disabled
Buffer logging: level debugging, 81 messages logged, xml disabled,
filtering disabled
Exception Logging: size (4096 bytes)
Count and timestamp logging messages: disabled
Persistent logging: disabled
No active filter modules.
Trap logging: level informational, 78 message lines logged
Log Buffer (10000000 bytes):
*Jan 10 06:08:14.713: %CMRP-3-PEM_REMOVE_SHUT: R0/0: cmand: The system will shut down in 5 minutes
*Jan 10 06:08:14.718: %ASR1000_PEM-6-REMPEM_FM: PEM/FM slot P1 removed
*Jan 10 06:08:28.966: %ASR1000_PEM-6-INSPEM_FM: PEM/FM slot P1 inserted
37
The second is after enabling console logging.
Output is at the console (and in the log).
6ru_perf2#conf Configuring from terminal, memory, or network [terminal]?
Enter configuration commands, one per line. End with CNTL/Z.
6ru_perf2(config)#log con
% Ambiguous command: "log con"
6ru_perf2(config)#logg con
6ru_perf2(config)#^Z
6ru_perf2#
*Jan 10 06:08:54.643: %SYS-5-CONFIG_I: Configured from console by console
6ru_perf2#
6ru_perf2# *Jan 10 06:09:05.023: %CMRP-3-PEM_REMOVE_SHUT: R0/0: cmand: The system will shut down in 5
minutes
*Jan 10 06:09:05.026: %ASR1000_PEM-6-REMPEM_FM: PEM/FM slot P0 removed
*Jan 10 06:09:10.500: %ASR1000_PEM-6-INSPEM_FM: PEM/FM slot P0 inserted
6ru_perf2#
Step 7
Replace the AC power supply within five minutes or the system will shutdown.
You have removed an AC power supply from the Cisco ASR 1006 Router and now must replace the AC power supply within
five minutes.
Step 1
Insert another AC power supply in power supply Slot 0 or power supply Slot 1 until it is full seated.
Step 2
Tighten the captive screws. Insert the AC power cable.
Step 3
Plug the power supply cable into the power source.
Step 4
Place the power supply Standby switch in the On (I) position.
Step 5
The power supply LEDs light when power is supplied to the router.
You have completed a live change-out procedure (that is, removing and replacing an AC power supply) for an AC power supply
not operating properly in the Cisco ASR 1006 Router within five minutes.
Remove the DC Power Supply
Step 1
Before servicing the power supply, switch the circuit breaker Off in your equipment area. As an additional precaution,
tape the circuit breaker switch in the Off position.
Step 2
Slip on the ESD-preventative wrist strap that was included in the accessory kit.
Step 3
Switch the power supply circuit breaker switch to Off (O).
Step 4
Locate the terminal block on the rear of the chassis on the power supply.
Step 5
Remove the slotted plastic cover from the terminal block.
a. Loosen and remove the single screw on the plastic cover. The plastic cover has slots that help to slide it out diagonally
from the terminal block.
b. Using a nut driver (7/16 size), unscrew the positive kepnut, positive ground cable, and the flat washer, in that order.
The terminal block houses two double-hole barrel lugs.
c. Follow Step 4b and remove the negative ground cable.
38
Figure 18
DC Power Supply Terminal Block
1
2
OFF
55
-48/-60V
ore than on
4
e power su
pply conn
ection. Al
l connectio
ns must be
remov
280027
This unit
might have
m
40A
3
1
DC power supply terminal block negative lead stud
3
Plastic cover sloted and keyed area
2
DC power supply positive lead stud
4
DC power supply terminal block plastic cover
Step 6
Locate the power supply ground stud. Remove the earth ground (GND) cable from the power supply. For DC power
supply ground stud, see Figure 13.
Step 7
Loosen and remove the Kepnut screw, washer, and ground lug in that order.
Warning
When installing the unit, the ground connection must always be made first and disconnected last.
Step 8
Loosen the captive screws on the DC power supply.
Note
Two power supplies must be installed in the chassis at all times to ensure sufficient cooling. The system fans are inside
the power supply units and must spin for cooling. Because all the system fans can be powered by one power supply, the
second power supply unit does not have to be powered on, but it must be installed.
Caution
Step 9
If you remove a power supply, the system can run for a maximum of five minutes before the system shuts down.
The fans and power elements are independent within the power supply. Therefore, it is not required that the
replacement power supply be energized within five minutes. The only requirement is that the power supply be
installed in the chassis, which energizes the fans and maintains proper system cooling.
Grasping the power supply handles, pull the power supply from the chassis. When you remove the DC power supply,
you will see the following type of messages in the log report:
6ru_perf2#show log
Syslog logging: enabled (0 messages dropped, 6 messages rate-limited, 0 flushes, 0 overruns, xml
disabled, filtering disabled)
No Active Message Discriminator.
No Inactive Message Discriminator.
39
Console logging: disabled
Monitor logging: level debugging, 0 messages logged, xml disabled,
filtering disabled
Buffer logging: level debugging, 81 messages logged, xml disabled,
filtering disabled
Exception Logging: size (4096 bytes)
Count and timestamp logging messages: disabled
Persistent logging: disabled
No active filter modules.
Trap logging: level informational, 78 message lines logged
Log Buffer (10000000 bytes):
*Jan 10 06:08:14.713: %CMRP-3-PEM_REMOVE_SHUT: R0/0: cmand: The system will shut down in 5 minutes
*Jan 10 06:08:14.718: %ASR1000_PEM-6-REMPEM_FM: PEM/FM slot P1 removed
*Jan 10 06:08:28.966: %ASR1000_PEM-6-INSPEM_FM: PEM/FM slot P1 inserted
The second is after enabling console logging.
Output is at the console (and in the log).
6ru_perf2#conf Configuring from terminal, memory, or network [terminal]?
Enter configuration commands, one per line. End with CNTL/Z.
6ru_perf2(config)#log con
% Ambiguous command: "log con"
6ru_perf2(config)#logg con
6ru_perf2(config)#^Z
6ru_perf2#
*Jan 10 06:08:54.643: %SYS-5-CONFIG_I: Configured from console by console
6ru_perf2#
6ru_perf2# *Jan 10 06:09:05.023: %CMRP-3-PEM_REMOVE_SHUT: R0/0: cmand: The system will shut down in 5
minutes
*Jan 10 06:09:05.026: %ASR1000_PEM-6-REMPEM_FM: PEM/FM slot P0 removed
*Jan 10 06:09:10.500: %ASR1000_PEM-6-INSPEM_FM: PEM/FM slot P0 inserted
6ru_perf2#
Step 10 Replace the DC power supply within five minutes or the system will shutdown.
This completes the procedure of removing a DC power supply from the Cisco ASR 1006 Router.
Replace the DC Power Supply
For instructions to replace the DC power supply in the Cisco ASR 1006 Router, go to Connect DC Power to the Cisco ASR 1006
Router, page 16.
Install and Remove the Shared Port Adapter
This section provides instructions for installing and removing a shared port adapter in a SIP Each SPA circuit board is mounted
to a metal carrier and is sensitive to electrostatic discharge (ESD) damage.
Caution
Always handle the SPA by the carrier edges and handle; never touch the SPA components or connector pins. (See
Figure 19.)
When a subslot is not in use, a SPA blank filler plate must fill the empty subslot to allow the router or switch to conform to
electromagnetic interference (EMI) emissions requirements and to allow proper airflow across the SPAs. If you plan to install a
SPA in a subslot that is not in use, you must first remove the SPA blank filler plate.
40
Figure 19
Handling a SPA
70006
Printed circuit board
Metal carrier
GND
To install a shared port adpter into a SPA interface processor (SIP), follow these steps:
Step 1
Before you begin, make certain the chassis is grounded.
Step 2
To insert the SPA in the SIP, locate the guide rails inside the SIP that hold the SPA in place. They are at the top left and
top right of the SPA slot and are recessed about an inch.
Step 3
Carefully slide the SPA all the way in the SIP until the SPA is firmly seated in the SPA interface connector. When fully
seated, the SPA might be slightly behind the SIP faceplate. See Figure 20.
Installing and Removing a SPA Into and From a SIP
C/A
ASR1000-SIP
10
STAT
US
SPA-4XOC3
-POS
C/A
C/A
US
STAT
A/L
2
C/A
3
C/A
A/L
PWR STAT
US
C/A
A/L
1
SPA-4XOC3
-POS
SPA-4XOC3
-POS
C/A
A/L
0
STAT
US
A/L
0
A/L
3
C/A
A/L
C/A
C/A
A/L
1
A/L
2
3
SPA-4XOC3
STAT
US
A/L
3
-POS
C/A
ASR1000-SIP
10
STAT
US
A/L
3
SPA-4XOC3
-POS
C/A
PWR STAT
US
C/A
A/L
0
2
3
C/A
A/L
C/A
A/L
A/L
C/A
A/L
1
SPA-4XOC3
-POS
A/L
2
3
SPA-4XOC3
281171
C/A
C/A
A/L
US
C/A
1
STAT
C/A
SPA-4
A/L XOC3-POS
0
STAT
US
A/L
3
STAT
US
Figure 20
-POS
41
Step 4
After the SPA is properly seated, fasten the SPA in place with the captive installation screws on either side of the SPA.
Note
The shared port adapter ships installed. These instructions are provided for future use. Cabling information is included
with the specific shared port adapter documentation.
Step 1
Attach an ESD wrist strap between you and an unpainted chassis surface.
Step 2
If attached, remove any cables from the SPA.
Step 3
Before removing any shared port adapter, shut down the interface so that there is no traffic running through the shared
port adapter when it is removed.
Note
Removing a shared port adapter while traffic is flowing through the ports can cause system disruption.
Step 4
Remove the shared port adapter from the chassis slot. Unfasten the captive installation screws on either side of the SPA.
Step 5
Grasp the handle and pull the shared port adapter or blank shared port adapter from the router.
Step 6
Locate the shared port adapter slot guides inside the Cisco ASR 1006 Router. They are near the top, and are recessed
about one-half inch.
Caution
The shared port adapter must slide into the slot guides under the chassis lid. Do not allow the shared port adapter
components to come in contact with the system board or the shared port adapter could be damaged.
Step 7
Carefully slide the shared port adapter into the shared port adapter slot and seat it. When installed, the shared port
adapter input/output panel should be flush with the face of the router.
Step 8
Reconnect any cables, including the shared port adapter and power cables, and place the cables through any
cable-management bracket.
Note
If the shared port adapter fails to come up, reseat or reinsert the shared port adapter: do not use excessive force.
Step 9
Power on the router by turning the power switch to the On(|) position.
Note
For detailed Cisco SPA and SIP information, see the Cisco ASR 1000 Series Aggregation Services Routers SIP and SPA
Hardware Installation Guide.
42
Americas Headquarters
Cisco Systems, Inc.
170 West Tasman Drive
San Jose, CA 95134-1706
USA
www.cisco.com
Tel: 408 526-4000
800 553-NETS (6387)
Fax: 408 527-0883
Asia Pacific Headquarters
Cisco Systems, Inc.
168 Robinson Road
#28-01 Capital Tower
Singapore 068912
www.cisco.com
Tel: +65 6317 7777
Fax: +65 6317 7799
Europe Headquarters
Cisco Systems International BV
Haarlerbergpark
Haarlerbergweg 13-19
1101 CH Amsterdam
The Netherlands
www-europe.cisco.com
Tel: 31 0 800 020 0791
Fax: 31 0 20 357 1100
Cisco has more than 200 offices worldwide. Addresses, phone numbers, and fax numbers are listed on the
Cisco Website at www.cisco.com/go/offices.
© 2008 Cisco Systems, Inc. All rights reserved.
Printed in the USA on recycled paper containing 10% postconsumer waste.
OL-13209-03
44