1
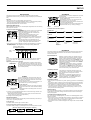
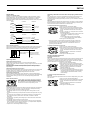
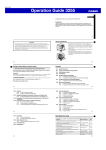
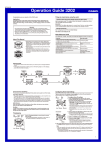
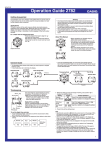
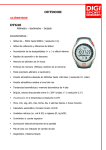
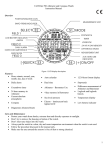
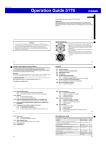
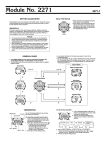
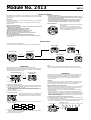
Module No. 2413
2413-1
GETTING ACQUAINTED
Congratulations upon your selection of this CASIO watch. To get the most out of your
purchase, be sure to carefully read this manual and keep it on hand for later reference
when necessary.
Precautions
• This watch is intended for use up to skin diving and snorkeling. It is not designed for
use during scuba diving.
• Never operate the buttons of the watch while underwater or while floating on the
water’s surface.
After Skin Diving/Snorkeling
• To avoid corrosion, rinse your watch thoroughly with fresh water to remove
salt water, dirt, etc. (When possible, soak the watch in fresh water overnight to
make sure that all salt is removed.)
• When using a metal band, occasionally clean inside the gaps in the band
using a soft toothbrush and soapy water. Failure to do so can result in
corrosion of the watch, soiling of clothing, or irritation to sensitive skin.
About This Manual
• Button operations are indicated using the letters shown
in the illustration.
• Each section of this manual provides you with the
information you need to perform operations in each
mode. Further details and technical information can be
found in the “REFERENCE” section.
Before Skin Diving/Snorkeling
• Before beginning skin diving or snorkeling, check to make sure that neither of
the following is on the display.
❑ ERROR message (indicating sensor malfunction)
❑ BATT message (indicating low battery power)
• Make sure that the watch is set to the correct time of day.
• Check the glass, case and band for cracks or chips.
• Make sure that the band is fastened securely around your wrist.
While Skin Diving/Snorkeling
• The indicator ERROR on the display may indicate bad data.
• To avoid scratching the watch, take care when skin diving/snorkeling near
rocks or coral.
GENERAL GUIDE
• Press C to change from mode to mode.
• In any mode (except for the Stopwatch Mode), press B to illuminate the display.
Altimeter Mode
Depth Gauge Mode
▲
▲
Barometer Mode
Timekeeping Mode
▲
Sensor
Stopwatch Mode
▲
TIMEKEEPING
Use the Timekeeping Mode to set and view the current time and date.
• You can display either of two screen formats in the Timekeeping Mode: a Time and
Date screen or a Time and Pressure Graph screen. Press D in the Timekeeping
Mode to toggle between the two screens.
Time and Date Screen
▲
▲
BAROMETER
This watch uses a pressure sensor to measure air pressure (barometric pressure).
There are two types of measurements: regular barometric pressure readings and
Barometer Mode barometric pressure readings, which are described below.
• You can calibrate the pressure sensor if you suspect the barometric pressure
reading is incorrect.
Press D.
Day of
the week
Note
The watch does not make any allowance for leap years. Be sure to make the
necessary changes to the date setting to allow for February 29 during a leap year.
Time and Pressure
Graph Screen
Month – Day
PM indicator
Alarm Mode
▲
▲
Press C.
Important!
The pressure sensor built into this watch measures changes in air pressure, which
you can then apply to your own weather predictions. It is not intended for use as a
precision instrument in official weather prediction or reporting applications.
Seconds
Hour : Minutes
To reset the seconds count to zero
1. While the Time and Date screen is on the display in the Timekeeping Mode, hold
down A until the second’s digits start to flash, which indicates the setting screen.
2. Press D to reset the seconds count to 00.
• Pressing D while the seconds count is in the range of 30 to 59 resets the
seconds to 00 and adds 1 to the minutes. In the range of 00 to 29, the minutes
count is unchanged.
3. Press A to exit the setting screen.
To set the time and date
1. While the Time and Date screen is on the display in the
Timekeeping Mode, hold down A until the second’s
digits start to flash, which indicates the setting screen.
2. Press C to move the flashing around the display in the sequence shown below to
select other settings.
Regular Barometric Pressure Readings
The watch takes regular barometric pressure readings every three hours starting from
midnight each day. The data produced by these readings is used for the graphic
display and barometric pressure graph in the Timekeeping Mode.
• Measurements are taken nine, six, and three seconds before each of the regular
measurement times.
• The watch calculates the average of the three readings, and displays the result.
• Regular barometric pressure readings are different from the readings taken in the
Barometer Mode. Regular barometric pressure readings are used as the data for the
barometric pressure graph and graphic indicator on the Time and Pressure Graph
Screen in the Timekeeping Mode.
To display regular barometric pressure reading graphics
In the Timekeeping Mode, press D to display the Time and Pressure Graph Screen
for the regular barometric pressure readings.
• The barometric pressure graph shows the relative changes between readings for the
past 18 hours. The flashing marker on the right indicates the latest reading.
Example: 10:58pm
Graphic indicator
Seconds
Day
Minutes
Month
3. While a setting is flashing, press D (+) to change it.
• While any setting is flashing on the display, press B to toggle between 12-hour
timekeeping and 24-hour timekeeping.
4. Press A to exit the setting screen.
3:00am – 6:00am – 9:00am – Noon – 3:00pm – 6:00pm – 9:00pm
▲
Day of the week
Hour
Up
No change
Down
Barometric Pressure Graph
2413-2
• Each mark on the graphic indicator indicates the relative change between the latest
barometric reading and the one before it.
–
0
+
more than
more than
11hPa/mb down 11hPa/mb up
6 – 10hPa/mb
down
6 – 10hPa/mb
up
4 – 5hPa/mb
down
4 – 5hPa/mb up
2 – 3hPa/mb
down
2 – 3hPa/mb up
1hPa/mb down or
1hPa/mb up
• The examples on the left indicate that the latest reading is less than the previous
one, while those on the right indicate the latest reading is greater.
Barometric Pressure Graph
Barometric pressure indicates changes in the atmosphere. By monitoring these
changes you can predict the weather with reasonable accuracy. The following shows
how to interpret the data that appears on the barometric pressure graph.
A rising graph generally means improving weather.
A falling graph generally means deteriorating weather.
Note that if there are sudden changes in weather or temperature, the graph line of
past measurements may run off the top or bottom of the display. The entire graph will
become visible once barometric conditions stabilize.
If any of the conditions listed below is present during one of the regular 3-hour
measurements, a blank is inserted into the graph in place of a mark. The next time a
successful reading is obtained (during a regularly scheduled 3-hour measurement),
the current reading is compared with the last successful reading and the
corresponding mark is added to the graph.
• Sensor data error (ERROR flashing on the display)
• Low battery power (BATT flashing on the display)
• Reading outside of measurement range (FULL on the display)
▲
▲
Noon
3pm
6pm
Barometer Mode Screen
A measurement cycle starts after you enter the Barometer Mode, with readings being
taken every three seconds for the first four or five minutes. After that, readings are
taken every minute.
Measurements you take in the Barometer Mode do not affect the barometric pressure
information that appears on the Timekeeping Mode Screens. This means you can use
the Timekeeping Mode Screen to see trends over a longer span, and the Barometer
Mode to find out barometric pressure changes over a shorter term.
To start a barometric pressure measurement cycle
Press C to enter the Barometer Mode. After a few
Graphic indicator
seconds, the result of the current barometric pressure
reading appears on the display.
• Barometric pressure is displayed in units of 1hPa/mb (or
0.05inHg).
• The mode indicator flashes while a measurement
operation is in progress.
• While a barometric pressure measurement operation is
in progress in the Barometer Mode, press D to stop the
Barometric pressure
current operation and restart a new measurement cycle.
Mode indicator
ALTIMETER
A built-in altimeter uses a pressure sensor to detect the current air pressure, which is
then used to estimate the current altitude. The watch is pre-programmed with ISA
(International Standard Atmosphere) preset values, which are used to convert air
pressure readings to altitude values. If you preset a reference altitude, the watch will
also calculate the current relative altitude based on your preset value.
Timekeeping
Mode time
• Some countries express barometric pressure in units of millibars (mb) instead of
hecto-pascal (hPa). It really makes no difference, because 1hPa = 1mb. In this
manual, we use hPa/mb or hPa (mb).
• You can change the measured barometric pressure unit between hecto-pascals/
millibars (hPa/mb) and inchesHg (inHg). See “To specify the barometric pressure
unit” for details.
• The message FULL appears on the display whenever the barometric pressure
reading is outside the measurable range of 600hPa/mb to 1100hPa/mb (17.70inHg
to 32.45inHg). The barometric pressure value reappears when the barometric
pressure reading returns to the measurable range.
Barometer Mode Graphic Indicator
In the Barometer Mode, the graphic indicator shows the
Graphic indicator
current barometric pressure. Segments are darkened in
(Indicates 1018hPa/mb)
the graphic indicator from the left (lower pressure) to the
right (higher pressure).
• In the range of 600 to 950hPa/mb each rise of 35hPa/
mb causes one more segment to be darkened. In the
range of 951 to 1045hPa/mb, each rise of 5hPa/mb
causes one more segment to be darkened. All segments
are darkened when the barometric pressure is 1046hPa/
mb or greater.
• When the barometric pressure unit is set to inHg, the
watch actually measures in hPa/mb units and then
converts to inHg. Because of this, the graphic indicator
will show the hPa/mb value before switching to the
corresponding inHg value.
Important!
• This watch estimates altitude based on air pressure. This means that altitude
readings for the same location may vary if air pressure changes.
• Do not rely upon this watch for altitude measurements or perform button operations
while engaging in sports where there are sudden altitude changes, while sky diving,
hang gliding, or paragliding, or while riding a gyrocopter, glider, or any other aircraft.
• Note that the following conditions will prevent you from obtaining accurate readings:
When air pressure changes because of changes in the weather
Extreme temperature changes
When the watch itself is subjected to strong impact
• In order to avoid measurement problems caused by differences in the watch’s
temperature, be sure to wear the watch so that it comes into direct contact with your
skin.
• Do not use this watch for measuring altitude in applications that demand
professional or industrial level precision.
How the Altimeter Works
The watch measures relative altitudes in relation to a reference altitude set by you.
You can set a reference altitude using zero reset, or by specifying an altitude value
from a map, sign post, etc.
• After you set the reference altitude, the watch adjusts its air pressure to altitude
conversion calculation accordingly.
Setting a Reference Altitude Value
With this method, you can specify a current altitude value you obtain from a map or
signpost. Then the watch measures altitude relative to the value you set.
• When mountain climbing, you can set the reference value in accordance with a
marker along the way or altitude information from a map.
• The altitude measurements produced by this watch are subject to error caused by
changes in air pressure. Because of this, we recommend that you update the
reference altitude whenever one is available during your climb.
To set a reference altitude value
1. Press C to enter the Altimeter Mode, and wait for a few seconds until the current
altitude value appears on the display.
2. Hold down A until the current altitude value starts to flash. This indicates the
reference altitude setting screen.
3. Use D (+) and B (–) to change the displayed value in 5-meter (20-foot)
increments.
• You can set a reference altitude value in the range of 0 to 4000 meters (0 to
13120 feet).
4. Press A to exit the setting screen.
• After you press A, the numbers on the display indicate that the watch is making
internal adjustments. This operation takes about nine seconds. Once adjustments
are finished, the altitude display appears.
Reference Altitude Zero Reset
With zero reset, you can set the reference altitude to zero. The watch then measures
altitude relative to zero.
• To determine the height of a tall building, set the reference altitude to 0 on the
ground floor. Note, however, that you may not be able to get a good reading if the
building is pressurized or air-conditioned.
• Before beginning a climb up a mountain, you could set the reference altitude to 0m
at the foot of the mountain. This makes it possible to determine the difference in
altitude between the reference point and your destination.
To zero reset the reference altitude
1. Press C to enter the Altimeter Mode, and wait for a few seconds until the current
altitude value appears on the display.
2. Hold down A until the current altitude value starts to flash. This indicates the
reference altitude setting screen.
3. Press B and D at the same time to change the displayed value to zero.
4. Press A to exit the setting screen.
• After you press A, the numbers on the display indicate that the watch is making
internal adjustments. This operation takes about nine seconds. Once adjustments
are finished, the altitude display appears.
Using the Altimeter Mode
A measurement cycle starts after you enter the Altimeter Mode, with readings being
taken every three seconds for the first four or five minutes. After that, readings are
taken every minute.
• Altitude is displayed in 5-meter (20-foot) units.
• The mode indicator flashes while a measurement
operation is in progress.
• While an altitude measurement operation is in progress
in the Altimeter Mode, press D to stop the current
operation and restart a new measurement cycle.
• The measured altitude may be a negative value in
cases where there is a reference altitude value set or
because of certain atmospheric conditions.
• You can change the unit of measurement for the
Altitude
displayed altitude values between meters (M) and feet
Timekeeping
(F). See “To specify the altitude unit”.
Mode time
Graphic indicator
(Indicates 1550m)
Mode
indicator
• The message FULL appears whenever the altitude reading is outside the display
range of –4000 to +4000 meters (–13120 to +13120 feet). The altitude value
reappears when the altitude reading returns to the measurable range.
• In the Altimeter Mode, the graphic indicator shows the current altitude. Segments
are darkened in the graphic indicator from the left (lower altitude) to the right (higher
altitude). In the range of 5 to 1000 meters (20 to 4000 feet), each increase of 45
meters (180 feet) causes one more segment to be darkened. In the range of 1005 to
2800 meters (4020 to 9400 feet), each increase of 195 meters (580 feet) causes
one more segment to be darkened. All segments are darkened when the altitude is
2805 meters (9420 feet) or greater.
2413-3
DEPTH GAUGE
STOPWATCH
The pressure sensor of the watch can also be used to take underwater depth
measurements while skin diving or snorkeling. Depth is displayed up to 30 meters (99
feet).
Important!
• Never use this watch to measure depth while scuba diving.
• Leaving the watch in the Depth Gauge Mode while not in the water uses up battery
power. Exit the Depth Gauge Mode whenever you are not using it.
• See “Depth Gauge Mode” for more information.
Hours
Seconds
Minutes
Depth Gauge Mode Screen
Depth measurement starts after you enter the Depth Gauge Mode, with a new reading
taken every three seconds.
To perform a depth measurement
Just before starting your dive, press C to enter the Depth
Gauge Mode.
• Depths are displayed in 0.1-meter (1-foot) units.
• The mode indicator flashes while a measurement
operation is in progress.
• The depth reading is automatically reset to zero
whenever you enter the Depth Gauge Mode.
• The depth reading shows 0.0 meters (0 feet) when the
Depth value
watch is submerged at a depth of 0 to 1 meter (0 to 3
feet).
Mode indicator
• You can change the unit of measurement for the
Timekeeping
displayed depth values between meters (M) and feet
Mode time
(F). See “To specify the depth measurement unit”.
Mode
indicator
The stopwatch lets you measure elapsed time, split times,
and two finishes.
• The display range of the stopwatch is 23 hours, 59
minutes, 59.99 seconds.
• The stopwatch continues to run, restarting from zero
after it reaches its limit, until you stop it.
• The stopwatch measurement operation continues even
if you exit the Stopwatch Mode.
• All of the operations in this section are performed in the
Stopwatch Mode, which you enter by pressing C.
1/100 second
To measure times with the stopwatch
Elapsed Time
D
Start
➤D
Stop
➤D
Re-start
➤D
Stop
➤B
Clear
➤B
Split
➤B
Split release
➤D
Stop
➤B
Clear
➤B
Split
➤D
Stop
➤B
Split release
➤B
Clear
Split Time
D
Start
Two Finishes
D
Start
• When a depth of 30 meters (99 feet) is exceeded, the message FULL appears on
the display. The depth value reappears when the depth reading returns to the
measurable range.
First runner
finishes.
Display time of
first runner.
Second runner
finishes.
Display time of
second runner.
Enters the Depth Gauge
Mode (Measurement start)
REFERENCE
Display: 0
Depth = 1 meter
(3 feet)
Display:
Actual depth
This section contains more detailed and technical information about watch operation.
It also contains important precautions and notes about the various features and
functions of this watch.
Sensor Data Errors
Whenever a sensor problem, poor electrical contact, or
other abnormality occurs during a barometric pressure,
altitude, or depth measurement operation, the watch
beeps for about three seconds and the ERROR indicator
starts to flash on the display to indicate a sensor error. All
measurement operations are disabled while the ERROR
indicator is on the display.
If the ERROR indicator appears, press C to change to
another mode, and then return to the mode where the
error occurred. If the ERROR indicator appears again, it
could mean that the watch is malfunctioning. Contact the
store or dealer where you purchased the watch.
Note
You cannot exit the Depth Gauge Mode while any reading other than 0.0 meters (or
feet) is on the display. See “Depth Gauge Measurement Precautions” for more
information.
Depth Gauge Mode Graphic Indicator
In the Depth Gauge Mode, the graphic indicator shows
Graphic indicator
the current depth. The first bar appears on the right of the
(Indicates 5m)
indicator when depth reaches 1 meter (3 feet). One more
bar appears with each additional 1 meter (3 feet) of depth,
up to 30 meters (99 feet).
Low Battery Indicator
If the cause of the low battery indicator is due to cold
conditions (about –10°C/14°F), normal operation should
return after the watch is brought back to normal
temperature.
If the cause of the low battery indicator is due to low
battery power (indicated when BATT appears under
normal temperatures), you should have the watch’s
batteries replaced as soon as possible.
ALARM
You can set a Daily Alarm that sounds at the same time
each day, while the alarm is turned on. You can also turn
on an Hourly Time Signal that causes the watch to beep
twice every hour on the hour.
• All of the operations in this section are performed in the
Alarm Mode, which you enter by pressing C.
Mode
indicator
To set the alarm time
1. In the Alarm Mode, hold down A until the hour digits of
the alarm time start to flash, which indicates the setting
screen.
Alarm on indicator/
• Displaying the alarm time setting screen turns on the
Hourly time signal
Daily Alarm.
on indicator
Alarm time
(Hour : Minutes)
2. Press C to move the flashing between the hour and minute’s digits, and then use
D (+) to change the flashing digits.
• When setting the alarm time using the 12-hour format, take care to set the time
correctly as am (no indicator) or pm (P indicator).
3. Press A to exit the setting screen.
Daily Alarm Operation
The alarm sounds at the preset time each day for about 20 seconds (in all modes) or
until you stop it by pressing any button.
To test the alarm
In the Alarm Mode, hold down D to sound the alarm.
To turn the Daily Alarm and Hourly Time Signal on and off
In the Alarm Mode, press D to cycle through the on and off settings as shown below.
[Alarm On indicator/Hourly Time Signal On indicator]
Daily Alarm
Only
Hourly Time
Signal only
Both On
Both Off
Auto Return Features
• After you perform an operation in any mode, pressing C returns to the Timekeeping
Mode.
• If you leave the watch for about one hour without performing any button operation in
the Barometer Mode or Altimeter Mode, or in the Depth Gauge Mode with a current
depth reading of 0, the watch beeps and returns to the Timekeeping Mode.
• If you leave a screen with flashing digits on the display for two or three minutes
without performing any operation, the watch saves anything you have input up to
that point and exits the setting screen.
Setting Scrolling
The D and B buttons are used in various setting screens to scroll through settings
on the display. In most cases, holding down either of these buttons scrolls through
settings at high speed.
12-hour/24-hour Timekeeping Formats
The 12-hour/24-hour timekeeping format you select in the Timekeeping Mode is also
applied in all modes.
• With the 12-hour format, the P (PM) indicator appears to the left of the hour digits for
times in the range of noon to 11:59 p.m. and no indicator appears to the left of the
hour digits for times in the range of midnight to 11:59 a.m.
• With the 24-hour format, times are displayed in the range of 0:00 to 23:59, with 24H
indicator.
2413-4
Altimeter Mode
How does the altimeter work?
Generally, air pressure and temperature decrease as altitude increases. Under its
factory defaut setting, this watch bases its altitude measurements on International
Standard Atmosphere (ISA) values stipulated by the International Civil Aviation
Organization (ICAO). These values define relationships between altitude, air pressure,
and temperature.
Altitude
Air Pressure
4000 m
3500 m
3000 m
2500 m
2000 m
1500 m
1000 m
0m
500 m
Temperature
616 hPa/mb
About 8 hPa/mb per 100 m
–11°C
701 hPa/mb
About 9 hPa/mb per 100 m
–4.5°C
795 hPa/mb
About 10 hPa/mb per 100 m
2°C
899 hPa/mb
About 11 hPa/mb per 100 m
8.5°C
1013 hPa/mb
About 12 hPa/mb per 100 m
About 6.5°C
per 1000 m
15°C
Source: International Civil Aviation Organization
Altitude
14000 ft
12000 ft
10000 ft
8000 ft
6000 ft
4000 ft
2000 ft
0 ft
Temperature
Air Pressure
19.03 inHg
About 0.15 inHg per 200 ft
16.2°F
22.23 inHg
About 0.17 inHg per 200 ft
30.5°F
25.84 inHg
About 0.192 inHg per 200 ft 44.7°F
29.92 inHg
About 0.21 inHg per 200 ft
About 3.6°F
per 1000 ft
59.0°F
Source: International Civil Aviation Organization
How is altitude expressed?
There are two standard methods of expressing altitude: absolute altitude and relative
altitude. Absolute altitude expresses an absolute height above sea level. Relative
altitude expresses the difference between the height of two different places.
Height of building 130 m
(relative altitude)
Rooftop at an altitude of
230 m above sea level
(altitude above sea level)
Sea
Depth Gauge Mode
About depth and water pressure
Water pressure increases with depth. In the case of sea water (specific
gravity=1.025), water pressure increases by 1 ATM (1.03 kg/cm 2) with each 10 meters
(33 feet) of depth.
This watch makes use of the relationship between pressure and depth, using a
pressure sensor to calculate the water pressure and then converting this data into
depth readings.
Depth Gauge Measurement Precautions
You cannot exit the Depth Gauge Mode or change the measurement unit setting while
the depth reading on the display is any value other than zero. This is to prevent
accidental switching from the Depth Gauge Mode while underwater.
Automatic Zero Depth Reset
The initial displayed depth reading is zero whenever you enter the Depth Gauge
Mode, even if you are underwater. Because of this, you should enter the Depth Gauge
Mode just before starting your dive. Do not enter the Depth Gauge Mode while
underwater.
Manual Zero Depth Reset
In some cases, such as when the sensor is exposed to
wide changes in temperature, the display may show a
depth of greater than 1.0 meter (3 feet) even when you
are on the surface. In this case, hold down C and D at
the same time to reset the depth reading to zero.
Backlight Precautions
The backlight uses an EL (electro-luminescent) panel that causes the entire display to
glow for easy reading in the dark. In any mode (except for the Stopwatch Mode),
press B to illuminate the display for about one second.
• The backlight does not turn on if you press B while a setting screen is on the
display.
• The electro-luminescent panel that provides illumination loses power after very long
use.
• The watch may emit an audible sound whenever the display is illuminated. This is
due to vibration of the EL panel used for illumination, and does not indicate
malfunction.
• The illumination provided by the backlight may be hard to see when viewed under
direct sunlight.
• The backlight turns off whenever an alarm sounds.
• The backlight remains lit for about one second from the point you press the button,
even if it is already lit when you press the button. If you keep the button depressed
for one second or more, the backlight turns off.
• Frequent use of the backlight shortens battery life.
Calibrating a Barometric Pressure Value and Specifying a Measurement
Unit
The pressure sensor of this watch is calibrated at the factory before shipment and
further adjustment is normally not required. If you notice serious errors in the
barometric pressure readings produced by the watch, you can calibrate the sensor to
correct the errors.
Important!
Incorrectly calibrating the barometric pressure sensor can result in incorrect readings.
Before performing the calibration procedure, compare the readings produced by the
watch with those of another reliable and accurate barometer.
To calibrate the barometric pressure value
1. Press C to enter the Barometer Mode.
2. After the result of the current measurement appears,
hold down A until the barometric pressure value starts
to flash. This indicates the barometric value setting
screen.
3. Use D (+) and B (–) to change the value in 1hPa/mb
(0.05inHg) increments.
• You can calibrate the barometric pressure value in the
range of 600 to 1100hPa/mb (17.70 inHg to
32.45inHg).
• Pressing B and D at the same time displays
“ xxxx”, which indicates factory preset calibration.
4. Press A to exit the setting screen.
• When you press A to exit the setting screen after changing the barometric
pressure setting, numbers cycle on the display at high speed for about nine
seconds. This does not indicate malfunction. It indicates that the watch is
performing internal calibration.
To specify the barometric pressure unit
1. Press C to enter the Barometer Mode.
2. After the result of the current measurement appears,
hold down A until the barometric pressure value starts
to flash. This indicates the barometric value setting
screen.
3. Press C to toggle the measurement unit between
hPa/mb and inHg.
4. Press A to exit the setting screen.
Specifying the Measurement Unit
To specify the altitude unit
Important!
You cannot set the reference altitude value and specify the altitude measurement unit
during the same procedure. You must complete one operation (reference altitude
value setting, for example), exit the setting screen, and then start the other operation
(altitude measurement unit specification, in this example).
1. Press C to enter the Altimeter Mode.
2. After the result of the current measurement appears,
hold down A until the altitude value starts to flash. This
indicates the reference altitude value setting screen.
3. Press C to toggle the measurement unit between
meters (M) and feet (F).
4. Press A to exit the setting screen.
• If you change the altitude measurement unit (M or F)
after setting a reference altitude, the Altimeter Mode
performs altitude measurements based on factory
default settings.
To specify the depth measurement unit
Important!
You cannot change the depth measurement unit when the depth reading is any value
other than zero.
1. Press C to enter the Depth Gauge Mode.
2. Hold down A until the current measurement unit starts
to flash. This indicates the measurement unit setting
screen.
3. Press C to toggle the measurement unit between
meters (M) and feet (F).
4. Press A to exit the setting screen.