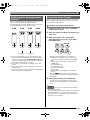
1
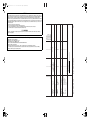
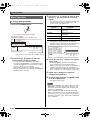
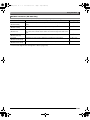
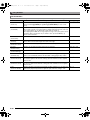
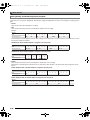
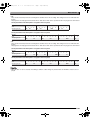
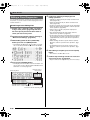
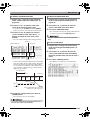
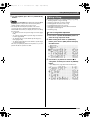
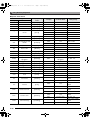
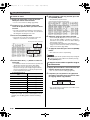
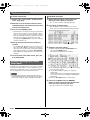
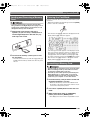
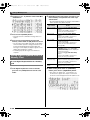
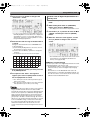
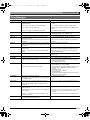
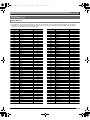
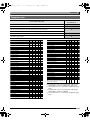
CTK6000_e_Cover1-4.fm 1 ページ 2010年7月12日 月曜日 午後12時53分 E USER’S GUIDE Please keep all information for future reference. This recycle mark indicates that the packaging conforms to the environmental protection legislation in Germany. K Safety Precautions Before trying to use the keyboard, be sure to read the separate “Safety Precautions”. MA1007-A Printed in China CTK6000/WK6500E1A CTK6000/WK6500E1A CTK6000_e_Cover1-4.fm 2 ページ 2010年7月12日 月曜日 午後12時53分 Messages O : Yes X : No Mode 2 : OMNI ON, MONO Mode 4 : OMNI OFF, MONO Mode 1 : OMNI ON, POLY Mode 3 : OMNI OFF, POLY O O X O O X X O X O X X : All sound off : Reset all controller : Local ON/OFF : All notes OFF : Active Sense : Reset Aux System Exclusive :True # Program Change X X O O : Clock : Commands System Real Time X X X X X X : Song Pos : Song Sel : Tune System Common O *2 O 0 - 127 O *2 O 0 - 127 Filter cutoff Vibrato rate Vibrato depth Vibrato delay DSP Parameter4 DSP Parameter5 DSP Parameter6 DSP Parameter7 Reverb send Chorus send NRPN LSB, MSB RPN LSB, MSB O O O O O O O O O O O *2 O *2 O O O O O O O O X O O *2 O *2 *3 *3 *3 O O O *2 O O O O O O O O O O O O O X O O O X O O O O O O O O O Control Change Key’s Ch’s After Touch Pitch Bender Note ON Note OFF Velocity Note Number True voice 0 1 6, 38 7 10 11 16 17 18 19 64 66 67 72 73 O *2 O X O X X O 9nH v = 1 - 127 X 9nH v = 0, 8nH V =** O 9nH v = 1 - 127 X 9nH v = 0 0 - 127 0 - 127 *1 0 - 127 Mode 3 X Mode 3 X Default Messages Altered Mode 1 - 16 1 - 16 1 - 16 1 - 16 Default Changed Basic Channel Recognized Transmitted Function Models: CTK-6000 / WK-6500 74 76 77 78 80 81 82 83 91 93 98, 99 100, 101 Bank select Modulation Data entry LSB, MSB Volume Pan Expression DSP Parameter0 DSP Parameter1 DSP Parameter2 DSP Parameter3 Hold 1 Sostenuto Soft pedal Release time Attack time Declaration of Conformity Model Number: CTK-6000/WK-6500 Trade Name: CASIO COMPUTER CO., LTD. Responsible party: CASIO AMERICA, INC. Address: 570 MT. PLEASANT AVENUE, DOVER, NEW JERSEY 07801 Telephone number: 973-361-5400 This device complies with Part 15 of the FCC Rules, Operation is subject to the following two conditions: (1) This device may not cause harmful interference, and (2) this device must accept any interference received, including interference that may cause undesired operation. Remarks Remarks Version : 1.0 FCC WARNING Changes or modifications not expressly approved by the party responsible for compliance could void the user’s authority to operate the equipment. *1: Depends on tone. *2: For details about NRPN, RPN, and system exclusive messages, see MIDI Implementation at http://world.casio.com/. *3: In accordance with pedal effect setting. NOTICE This equipment has been tested and found to comply with the limits for a Class B digital device, pursuant to Part 15 of the FCC Rules. These limits are designed to provide reasonable protection against harmful interference in a residential installation. This equipment generates, uses and can radiate radio frequency energy and, if not installed and used in accordance with the instructions, may cause harmful interference to radio communications. However, there is no guarantee that interference will not occur in a particular installation. If this equipment does cause harmful interference to radio or television reception, which can be determined by turning the equipment off and on, the user is encouraged to try to correct the interference by one or more of the following measures: • Reorient or relocate the receiving antenna. • Increase the separation between the equipment and receiver. • Connect the equipment into an outlet on a circuit different from that to which the receiver is connected. • Consult the dealer or an experienced radio/TV technician for help. CTK6000_e.book 3 ページ 2010年7月12日 月曜日 午後12時50分 Important! Please note the following important information before using this product. • Before using the optional AC Adaptor to power the unit, be sure to check the AC Adaptor for any damage first. Carefully check the power cord for breakage, cuts, exposed wire and other serious damage. Never let children use an AC adaptor that is seriously damaged. • Never attempt to recharge batteries. • Do not use rechargeable batteries. • Never mix old batteries with new ones. • Use recommended batteries or equivalent types. • Always make sure that positive (+) and negative (–) poles are facing correctly as indicated near the battery compartment. • Replace batteries as soon as possible after any sign they are getting weak. • Do not short-circuit the battery terminals. • The product is not intended for children under 3 years. • Use only a CASIO AD-A12150LW adaptor. • The AC adaptor is not a toy. • Be sure to disconnect the AC adaptor before cleaning the product. This mark applies in EU countries only. Manufacturer: CASIO COMPUTER CO.,LTD. 6-2, Hon-machi 1-chome, Shibuya-ku, Tokyo 151-8543, Japan Responsible within the European Union: CASIO EUROPE GmbH Casio-Platz 1, 22848 Norderstedt, Germany ● Any reproduction of the contents of this manual, either in part or its entirety, is prohibited. Except for your own, personal use, any other use of the contents of this manual without the consent of CASIO is prohibited under copyright laws. ● IN NO EVENT SHALL CASIO BE LIABLE FOR ANY DAMAGES WHATSOEVER (INCLUDING, WITHOUT LIMITATION, DAMAGES FOR LOSS OF PROFITS, BUSINESS INTERRUPTION, LOSS OF INFORMATION) ARISING OUT OF THE USE OF OR INABILITY TO USE THIS MANUAL OR PRODUCT, EVEN IF CASIO HAS BEEN ADVISED OF THE POSSIBILITY OF SUCH DAMAGES. ● The contents of this manual are subject to change without notice. ● The actual appearance of the product may be different from that shown in the illustrations in this User’s Guide. ● Company and product names used in this manual may be registered trademarks of others. E-1 CTK6000_e.book 2 ページ 2010年7月12日 月曜日 午後12時50分 Contents General Guide ............................. E-4 Applying Effects to a Sound .... E-32 Reading the Display ...........................................E-6 Modes.................................................................E-7 Menus.................................................................E-7 , Precautions while “Please Wait” is displayed ............................................................E-7 Saving Settings ..................................................E-8 Configuration of Effects.................................... E-32 Selecting an Effect ........................................... E-34 Creating a User DSP ....................................... E-37 Returning the Digital Keyboard to Its Factory Default Settings .....................................E-8 Getting Ready to Play ................ E-9 Preparing the Music Stand .................................E-9 Power Supply .....................................................E-9 Connections .............................. E-11 Connecting Headphones ..................................E-11 Connecting a Pedal ..........................................E-11 Connecting a Microphone (WK-6500 only).......E-11 Connecting Audio Equipment or an Amplifier ......................................................E-12 Bundled and Optional Accessories ..................E-12 Selecting and Playing a Tone .. E-13 To turn on Digital Keyboard power ...................E-13 Listening to Demo Tunes .................................E-14 Selecting a Tone ..............................................E-14 Layering and Splitting Tones ............................E-15 Raising and Lowering Keyboard Tuning (Transpose) ......................................................E-18 Using Octave Shift............................................E-18 Using the Metronome .......................................E-19 Using the Pitch Bend Wheel.............................E-20 Selecting a Temperament and Fine Tuning Its Scale........................................E-21 Playing Arpeggio Phrases Automatically (Arpeggiator) ....................................................E-23 Using Auto Accompaniment ... E-24 Playing an Auto Accompaniment .....................E-24 Selecting a Chord Fingering Mode ...................E-26 Modifying Auto Accompaniment Patterns.........E-27 Using One-Touch Presets ................................E-27 Using Auto Harmonize .....................................E-28 Using the Rhythm Editor ..................................E-29 E-2 Using the Mixer ......................... E-39 Mixer Overview ................................................ E-39 Mixer Operation ............................................... E-40 Mixer Parameter Settings ................................ E-42 Using the Tone Editor............... E-45 Tone Creation Overview .................................. E-45 Creating a User Tone....................................... E-46 Tone Parameter Settings ................................. E-48 Music Presets............................ E-50 Using Music Presets ........................................ E-50 Creating a User Preset .................................... E-54 Editing a Chord Progression ............................ E-58 Saving Keyboard Setups to Registration Memory ................ E-62 To save a setup to registration memory........... E-63 To recall a setup from registration memory ..... E-63 Using the Song Sequencer ...... E-64 Starting One-touch Recording (EASY REC) .... E-64 What you can do with the song sequencer ...... E-66 Recording Individual Tracks............................. E-68 Using Panel Record to Rewrite Song Header Settings...................................... E-72 Playing a Recorded Song ................................ E-73 Editing a Song.................................................. E-75 Editing a Track ................................................. E-79 Editing Events .................................................. E-81 Directly Inputting Note Events (Step Input) ...... E-94 Using the Function Menu ......... E-96 Using the Function Menu ................................. E-96 Function Menu Settings ................................... E-97 CTK6000_e.book 3 ページ 2010年7月12日 月曜日 午後12時50分 Contents Using a Memory Card............. E-102 Loading and Removing a Memory Card.........E-103 Entering the Card Mode .................................E-103 Formatting a Memory Card.............................E-103 Saving Digital Keyboard Data to a Memory Card..................................................E-104 Loading Data from a Memory Card ................E-106 To delete a file from a memory card...............E-107 To rename a file on a memory card................E-107 Playing a Music File from a Memory Card......E-108 Error Messages ..............................................E-111 Connecting to a Computer .... E-112 Minimum Computer System Requirements....E-112 Storing and Loading Digital Keyboard Memory Data ..................................................E-113 Reference ................................ E-114 Troubleshooting..............................................E-114 Specifications .................................................E-116 Operating Precautions....................................E-118 DSP Effect List ...............................................E-119 Fingering Guide ..............................................E-124 Supported Input Characters ...........................E-124 Chord Example List ........................................E-125 Assigning a MIDI Channel to Each Part .........E-126 Parameter List ................................................E-127 MIDI Implementation Chart E-3 CTK6000_e.book 4 ページ 2010年7月12日 月曜日 午後12時50分 General Guide • Illustrations in this User’s Guide show the WK-6500. L-1 - L-18 C-1 - C-13 Dial S-1 T-1 - T-8 Back E-4 R-1 - R-20 CTK6000_e.book 5 ページ 2010年7月12日 月曜日 午後12時50分 General Guide • In this manual, the term “Digital Keyboard” refers to the CTK-6000/WK-6500. • This manual uses the numbers and names below to refer to buttons and controllers. • The following explains the meanings of the # and $ symbols that appear on the product console and with the key names below. # : Indicates a function that is enabled by holding down the R-13 (FUNCTION) button when pressing a button. For example, SONG SEQUENCER, # EDIT means that the EDIT function is enabled by depressing the R-13 (FUNCTION) button. $ : Indicates a function that is enabled by holding down the button for some time. For example, METRONOME, BEAT $ means that the BEAT function is enabled by holding down the button for some time. L-1 POWER button . . . . . . . . . . . . . . . . . . . . . . . . . . . . . ☞13 L-2 MAIN VOLUME knob. . . . . . . . . . . . . . . . . . . . . . . . . ☞13 L-3 MIC VOLUME knob (WK-6500 only) . . . . . . . . . . . . . ☞11 TONE buttons RHYTHM buttons L-4 [A] POPS/ROCK/DANCE button . . . . . . . . . . ☞14, 24 L-5 [B] JAZZ/EUROPEAN button . . . . . . . . . . . . . . . ☞24 L-6 [C] LATIN button . . . . . . . . . . . . . . . . . . . . . . . . . ☞24 L-7 [D] WORLD/VARIOUS, MUSIC PRESET button . . . . . . . . . . . . . . . . . ☞24,50 R-1 [A] PIANO, 5 button. . . . . . . . . . . . . . . . . ☞14, 59, 88 R-2 [B] E. PIANO, 1 button. . . . . . . . . . . . . . . ☞14, 59, 88 R-3 [C] ORGAN, 2 button . . . . . . . . . . . . . ☞14, 59, 88, 89 R-4 [D] GUITAR, • button . . . . . . . . . . . . . . . . ☞14, 59, 88 R-5 [E] BASS, REST button . . . . . . . . . . . . . . . . . ☞14, 94 R-6 [F] STRINGS button. . . . . . . . . . . . . . . . . . . . . . . ☞14 R-7 [G] BRASS, 6 button. . . . . . . . . . . . . ☞14, 59, 88, 89 R-8 [H] REED/PIPE, 7 button . . . . . . . . . ☞14, 59, 88, 89 [E] PIANO RHYTHMS, ONE TOUCH PRESET button . . . . . . . . . ☞24, 27, 50 R-9 [I] SYNTH, 8 button. . . . . . . . . . . . . . . . . ☞14, 88, 89 [F] USER RHYTHMS button . . . . . . . . . . . . . ☞24, 27 R-11 [K] GM/DRUMS, . button. . . . . . . . . . . ☞14, 94 L-10 METRONOME, $BEAT button . . . . . . . . . . . . . . . . ☞19 R-12 [L] USER TONES button . . . . . . . . . . . . . . . . ☞14, 46 L-11 TEMPO w button . . . . . . . . . . . . . . . . . . . . . . . . . . . ☞19 R-13 FUNCTION button. . . . . . . . . . . . . . . . . . . . . . . . . . . ☞96 L-12 TEMPO q, #TAP button . . . . . . . . . . . . . . . . . . ☞19 R-14 NO/y/–, YES/t/+, #TRANSPOSE buttons . . . . . . . . . . . . ☞6, 14, 18, 24 L-8 L-9 RHYTHM/SONG CONTROLLER buttons R-10 [J] OTHERS, , button . . . . . . . . . . ☞14, 59, 88, 89 R-15 EXIT button L-13 INTRO, REPEAT button . . . . . . . . . . . . . ☞27, 74, 108 R-16 ENTER button L-14 NORMAL/FILL-IN, sREW button . ☞14, 27, 73, 108 R-17 u, t, y, i buttons . . . . . . . . . . . . . . . . . . . . . . . . ☞7 L-15 VARIATION/FILL-IN, dFF button . ☞14, 27, 73, 108 L-16 SYNCHRO/ENDING, PAUSE button ☞24, 27, 73, 108 L-17 START/STOP, PLAY/STOP, DEMO button . . . . . . . . . . . . . . . . . . ☞14, 24, 73, 108 R-18 AUTO HARMONIZE/ARPEGGIATOR, $TYPE button. . . . . . . . . . . . . . . . . . . . . . . . . . ☞23, 28 R-19 SPLIT button . . . . . . . . . . . . . . . . . . . . . . . . . . . . . . . ☞15 R-20 LAYER, $OCTAVE button. . . . . . . . . . . . . . . . ☞15, 18 L-18 ACCOMP ON/OFF, $CHORDS, PART SELECT, DEMO button . . . . . ☞14, 24, 26, 109 S-1 PITCH BEND wheel . . . . . . . . . . . . . . . . . . . . . . . . . ☞20 T-1 SD CARD SLOT . . . . . . . . . . . . . . . . . . . . . . . . . . . ☞102 C-1 Display . . . . . . . . . . . . . . . . . . . . . . . . . . . . . . . . . . . . . ☞6 T-2 USB jack . . . . . . . . . . . . . . . . . . . . . . . . . . . . . . . . . ☞112 C-2 RHYTHM EDITOR button . . . . . . . . . . . . . . . . . . . . . ☞29 T-3 SUSTAIN/ASSIGNABLE JACK . . . . . . . . . . . . . . . . ☞11 C-3 SONG SEQUENCER, #EDIT button . . . . . ☞7, 68, 75 T-4 PHONES jack . . . . . . . . . . . . . . . . . . . . . . . . . . . . . . ☞11 C-4 RECORD button . . . . . . . . . . . . . . . . . . . . . . ☞64, 68, 69 T-5 AUDIO IN jack. . . . . . . . . . . . . . . . . . . . . . . . . . . . . . ☞12 C-5 MIXER, #EFFECT button . . . . . . . . . . . . . . . . ☞34, 40 T-6 DC 12V jack . . . . . . . . . . . . . . . . . . . . . . . . . . . . . . . . ☞9 C-6 TONE EDITOR, #SCALE button . . . . . . . . . . ☞21, 46 T-7 MIC IN jack (WK-6500 only) . . . . . . . . . . . . . . . . . . . ☞11 C-7 CARD, #LOAD/SAVE button . . . . . ☞7, 103, 104, 106 T-8 LINE OUT R, L/MONO jacks . . . . . . . . . . . . . . . . . . ☞12 Dial. . . . . . . . . . . . . . . . . . . . . . . . . . . . . . . . . . ☞6, 14, 24 REGISTRATION buttons C-8 BANK, DELETE button . . . . . . . . . . . ☞59, 62, 86, 93 C-9 1, INSERT button . . . . . . . . . . . . . . . . ☞59, 62, 88, 94 C-10 2, COPY button. . . . . . . . . . . . . . . . . . . . . . . . ☞62, 88 C-11 3, QUANTIZE button . . . . . . . . . . . . . . . . . . . ☞62, 89 C-12 4, STEP button . . . . . . . . . . . . . . . . . . . . . ☞60, 62, 94 C-13 STORE, #MENU button . . . . . . . . . . . . . . . ☞7, 62 E-5 CTK6000_e.book 6 ページ 2010年7月12日 月曜日 午後12時50分 General Guide Tempo, measure, beat area Reading the Display This section explains the contents of the Digital Keyboard’s display screen. 1 2 Tempo is shown as the current setting value, as beats per minute. Auto Accompaniment, the metronome (page E-19), and other playback is performed at the tempo shown here. The MEASURE and BEAT values are counted up as Auto Accompaniment, the metronome, or other playback progresses. Currently Selected Item Indication The item that is currently selected on a display screen is indicated by thick brackets (%) and by a large dot (0). The currently selected item is the one that is affected by the R-14 (–, +) buttons or dial operations. 4 5 6 3 Detailed information area This area displays a variety of information while the Digital Keyboard is being used. Use this area to confirm proper operation when changing values, when selecting a menu item, and when performing other operations. Level meter area This level meter shows the volume level of the notes that are sounded when you play something on the keyboard or when Auto Accompaniment is played. There are a total of 32 parts, 16 each in Group A and Group B. The L indicator will be displayed in the lower left corner while Group A parts are being indicated by the level meter, while the M indicator will be displayed in the lower left corner while Group B parts are being indicated. For details about parts, see “How Parts are Organized” (page E-39). Indicator areas The indicator area shows such information as the current mode (page E-7), the status of settings, the status of Auto Accompaniment, and other information. There are two types of indicators: text type indicators such as :, and pointer (K) type indicators. In the case of pointer type indicators, a setting or status is indicated by the location of the K next to fixed text along the sides of the display. For example, the location of the pointer (K) on the right side of the display in the sample below indicates REVERB. Registration bank area This area shows the number of the currently selected registration bank (page E-62). Chord area This area shows the chord being played when Auto Accompaniment (page E-24) or music preset (page E-50) is being used. It also can display fraction chords by showing the chord root (C, G, etc.) and type (m, 7th, etc.). E-6 On this screen, “RHYTHM” is selected because it is enclosed by thick brackets. This indicates that the rhythm setting can be changed. On this screen, “Touch” is selected because the 0 is next to it. This indicates that the value to the right of “Touch”, which is enclosed in thick brackets, can be changed. CTK6000_e.book 7 ページ 2010年7月12日 月曜日 午後12時50分 General Guide Modes Menus Your Digital Keyboard has three modes: a rhythm mode, a card mode, and a song sequencer mode. The currently selected mode is shown as an indicator on the display. Card mode C-7 (CARD) or R-15 (EXIT) button You can use the same operations to display mode and function specific menus. To display a menu, hold down the R-13 (FUNCTION) button as you press the C-13 (MENU) button. For example, the “Performance” menu shown below will appear if you perform the above operation while in the rhythm mode. This menu provides instant access to performance functions. C-7 (CARD) button Rhythm mode C-3 (SONG SEQUENCER) button C-3 (SONG SEQUENCER) or R-15 (EXIT) button Song sequencer mode • Rhythm mode (: indicator displayed) The rhythm mode is the initial power on default mode. The rhythm mode is the base mode, and it is the mode you should enter when you want to play on the keyboard or use Auto Accompaniment. • Card mode (; indicator displayed) Enter the card mode when you want to perform memory card operations. See “Using a Memory Card” (page E-102) for more information. – In the rhythm mode, pressing the C-7 (CARD) button will enter the card mode. – In the card mode, pressing the C-7 (CARD) button or the R-15 (EXIT) button will return to the rhythm mode. • Song sequencer mode (< indicator displayed) Enter the sequencer mode when you want to record performances using the keyboard and Auto Accompaniment, or to play back song data. For details, see “Using the Song Sequencer” (page E-64). – In the rhythm mode, pressing the C-3 (SONG SEQUENCER) button will enter the song sequencer mode. – In the song sequencer mode, pressing the C-3 (SONG SEQUENCER) button or the R-15 (EXIT) button will return to the rhythm mode. • The currently selected item is the one with the 0 next to it. You can use the R-17 (t, y) buttons to move the 0 up and down. You also can use the R-17 (u, i) buttons to scroll between menu pages. • To exit a displayed menu, press the R-15 (EXIT) button. You may need to press the R-15 (EXIT) button more than once in some cases. • The menu items and operations for specific modes and functions are described in each section of this user’s guide. , Precautions while “Please Wait” is displayed Never try to perform any operation, or insert or remove a memory card while the message “Please Wait” is on the display. Wait until the message disappears. • “Please Wait” indicates that the Digital Keyboard is performing a data save operation. Turning off the Digital Keyboard or removing the memory card can cause Digital Keyboard data to be deleted or become corrupted. It also can cause the Digital Keyboard to fail to turn on when the L-1 (POWER) button is pressed. • If this happens, refer to “Troubleshooting” (page E-114). • After entering any mode besides the rhythm mode and performing the operations you want, be sure to return to the rhythm mode. The rhythm mode is the initial power on default mode. • Unless otherwise specifically noted, all of the operations described in this user’s guide are performed in the rhythm mode. E-7 CTK6000_e.book 8 ページ 2010年7月12日 月曜日 午後12時50分 General Guide Saving Settings Your Digital Keyboard is equipped with a song sequencer and other features that you can use to store data you create. This stored data is retained even when the Digital Keyboard is turned off.* However, the tone, rhythm, and other settings you configure on the Digital Keyboard’s console normally are returned to their initial power on defaults whenever you turn off power. You can configure the Digital Keyboard so it remembers its latest setup or to apply a predetermined default setup each time you turn it on. For details, see “AutoResume (Auto Resume)” (page E-100) and “Default (Default Settings)” (page E-100). * The following data and settings are always retained even when power is turned off. – Registration setup data (page E-62) – Song sequencer data (page E-64) – User rhythm data (page E-29) – User preset data (page E-54) – User tone data (page E-45) – Scale fine tuning setting (page E-22) – Auto Resume setting (page E-100) Returning the Digital Keyboard to Its Factory Default Settings You can delete all data in keyboard memory and return all keyboard parameters to their initial factory default settings. For details, see “To initialize all data and settings (or parameter settings only)” (page E-101). E-8 CTK6000_e.book 9 ページ 2010年7月12日 月曜日 午後12時50分 Getting Ready to Play Preparing the Music Stand Music stand Using a Household Power Outlet Make sure that you use only the AC adaptor (JEITA Standard, with unified polarity plug) specified for this product. Use of a different type of AC adaptor can cause malfunction. Specified AC Adaptor: AD-A12150LW Use the supplied power cord to connect the AC adaptor as shown in the illustration below. T-6 (DC 12V) jack Household power outle Power Supply Prepare a household power outlet or batteries. Power cord • Be sure to comply with the separate “Safety Precautions”. Incorrect use of this product creates the risk of electric shock and fire. • Always make sure that the product is turned off before plugging in or unplugging the AC adaptor, or before loading or removing batteries. AC adaptor • The AC adaptor will become warm to the touch after very long use. This is normal and does not indicate malfunction. • To prevent breaking of the wire, take care to avoid putting any type of load on the power cord. No bending! No winding! • Never insert metal, pencils, or any other objects into the product’s DC 12V jack. Doing so creates the risk of accident. E-9 CTK6000_e.book 10 ページ 2010年7月12日 月曜日 午後12時50分 Getting Ready to Play ■ Low Battery Indication Using Batteries You can use six D-size batteries for power. • Use alkaline or zinc-carbon batteries. Never use oxyride or any other nickel based batteries. 1. Open the battery cover on the bottom of the Digital Keyboard. The following shows the approximate battery life. 4 hours* on alkaline batteries * The above values are standard battery life at normal temperature, with the volume at medium setting. Temperature extremes or playing at very loud volume settings can shorten battery life. The indicators shown below start to flash to let you know when battery power is low. Replace the batteries with new ones. 2. Load six D-size batteries into the battery compartment. • Make sure the positive + and negative - ends of the batteries are facing as shown in the illustration. Low battery indication (flashing) 3. Insert the tabs of the battery cover into the holes on the side of the battery compartment, and close the cover. Tabs E-10 CTK6000_e.book 11 ページ 2010年7月12日 月曜日 午後12時50分 Connections Connecting Headphones Using headphones cuts off output from the built-in speakers, which means you can practice playing even late at night without disturbing others. • Be sure to turn down the volume level before connecting headphones. Connecting a Microphone (WK-6500 only) You can connect a dynamic microphone (only) to the Digital Keyboard for output thorough the Digital Keyboard’s speakers. T-4 (PHONES) jack T-7 (MIC IN) jack • Headphones do not come with the Digital Keyboard. • Use commercially available headphones. • Do not listen to very high volume output over headphones for long periods. Doing so creates the risk of hearing damage. • If you are using headphones that require an adaptor plug, make sure you do not leave the adaptor plugged in when removing the headphones. Connecting a Pedal Connecting an optionally available pedal let’s you perform pedal operations that add more versatility to your keyboard play. For information about the types of effects that can be applied by pressing the pedal, see “Ped.Assign (Pedal Assign)” (page E-97). • You can adjust the volume level of microphone input with the L-3 (MIC VOLUME) knob. Microphone volume control is independent of overall keyboard volume. • Built-in effects (reverb, chorus, DSP) are also applied to input from the microphone. You also can use the Mixer to adjust how effects are applied, the speaker stereo pan position, and other parameters. For details, see “Selecting and Playing a Tone” (page E-13) and “Using the Mixer” (page E-39). • Before connecting a microphone, make sure that the Digital Keyboard and microphone are turned off. • Before connecting a microphone, set both the L-2 (MAIN VOLUME) and L-3 (MIC VOLUME) knobs to low levels. Adjust volume settings to appropriate levels after connecting the microphone. T-3 (SUSTAIN/ASIGNABLE) jack E-11 CTK6000_e.book 12 ページ 2010年7月12日 月曜日 午後12時50分 Connections Connecting Audio Equipment or an Amplifier You can connect audio equipment or a music amplifier to the Digital Keyboard and then play through external speakers for more powerful volume and better sound quality. • Whenever connecting a device to the Digital Keyboard, first use the L-2 (MAIN VOLUME) knob to set the volume to a low level. After connecting, you can adjust the volume to the level you want. • Whenever you connect any device to the Digital Keyboard, be sure to read the user documentation that comes with the device. Pin plug Playing an External Device from the Digital Keyboard Use a commercially available connecting cord to connect the external audio equipment to the Digital Keyboard’s T-5 (AUDIO IN) jack as shown in Figure . The connecting cord should have a stereo mini plug on one end and a plug that matches the configuration of the external device on the other end. Use the L-2 (MAIN VOLUME) knob to adjust the volume level. Portable audio player, etc. Stereo mini plug Audio amplifier AUX IN jack, etc. RIGHT (Red) LEFT (White) Guitar amplifier Keyboard amplifier, etc. INPUT 1 INPUT 2 Bundled and Optional Accessories Use of unauthorized accessories creates the risk of fire, electric shock, and personal injury. Standard plug Outputting Keyboard Notes to Audio Equipment Use commercially available connecting cords to connect the external audio equipment to the Digital Keyboard’s T-8 (LINE OUT) jacks as shown in Figure . LINE OUT R jack output is right channel sound, while LINE OUT L/MONO jack output is left channel sound. It is up to you to purchase connecting cords like the ones shown in the illustration for connection of audio equipment. Normally in this configuration you must set the audio equipment’s input selector to the setting that specifies the terminal (such as AUX IN) to which the Digital Keyboard is connected. Use the L-2 (MAIN VOLUME) knob to adjust the volume level. Outputting Keyboard Notes to a Musical Instrument Amplifier Use a commercially available connecting cord to connect the amplifier to either of the Digital Keyboard’s T-8 (LINE OUT) jacks as shown in Figure . LINE OUT R jack output is right channel sound, while LINE OUT L/MONO jack output is left channel sound. Connecting to the LINE OUT L/ MONO jack only outputs a mixture of both channels. It is up to you to purchase connecting cord like the one shown in the illustration for connection of the amplifier. Use the L-2 (MAIN VOLUME) knob to adjust the volume level. E-12 • You can get information about accessories that are sold separately for this product from the CASIO catalog available from your retailer, and from the CASIO website at the following URL. http://world.casio.com/ CTK6000_e.book 13 ページ 2010年7月12日 月曜日 午後12時50分 Selecting and Playing a Tone L-1 L-4 R-1 R-12 R-1 - R-12 L-2 R-14 L-17 L-14 L-18 L-15 R-19 R-20 To turn on Digital Keyboard power 1. Rotate the L-2 (MAIN VOLUME) knob towards MIN to set the volume to a low level. 2. Referring to “Connections” (page E-11), connect headphones, amplifier, or other device. 3. Use the L-1 (POWER) button to turn on power. • The Digital Keyboard display screen wi