1
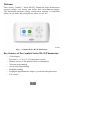
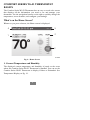
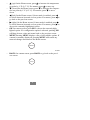
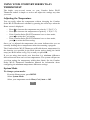
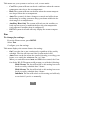
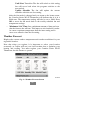
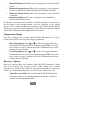
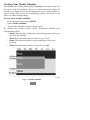
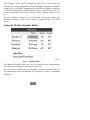
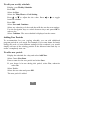
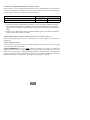
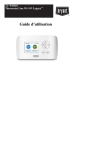
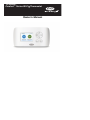
TC-WHS01 Comfort™ Series Wi-Fir Thermostat Owner’s Manual TABLE OF CONTENTS PAGE GETTING STARTED . . . . . . . . . . . . . . . . . . . . . . . . . . . . . . . . . . . . . . . . . . . 1 COMFORT SERIES Wi-- Fi THERMOSTAT BASICS . . . . . . . . . . . . . . . . . 3 What’s on the Home Screen? . . . . . . . . . . . . . . . . . . . . . . . . . . . . . . . . . . . . . 3 Using the Navigation Buttons . . . . . . . . . . . . . . . . . . . . . . . . . . . . . . . . . . . . 4 Idle Screen . . . . . . . . . . . . . . . . . . . . . . . . . . . . . . . . . . . . . . . . . . . . . . . . . . . 6 About Your Comfort Series Wi-- Fi Thermostat . . . . . . . . . . . . . . . . . . . . . . . 7 CONNECTING TO THE INTERNET . . . . . . . . . . . . . . . . . . . . . . . . . . . . . . 8 Setting up Wi-- Fi and Obtaining a Registration Code . . . . . . . . . . . . . . . . . . . 8 Configuring a Web Portal Account . . . . . . . . . . . . . . . . . . . . . . . . . . . . . . . . 10 Re-- Registering the Comfort Series Wi-- Fi Thermostat . . . . . . . . . . . . . . . . . 12 USING YOUR COMFORT SERIES Wi-- Fi THERMOSTAT . . . . . . . . . . . 13 System Mode . . . . . . . . . . . . . . . . . . . . . . . . . . . . . . . . . . . . . . . . . . . . . . . . 13 Fan . . . . . . . . . . . . . . . . . . . . . . . . . . . . . . . . . . . . . . . . . . . . . . . . . . . . . . . 14 Weather Forecast . . . . . . . . . . . . . . . . . . . . . . . . . . . . . . . . . . . . . . . . . . . . . 15 Resetting the Thermostat . . . . . . . . . . . . . . . . . . . . . . . . . . . . . . . . . . . . . . . 16 Rebooting the Thermostat . . . . . . . . . . . . . . . . . . . . . . . . . . . . . . . . . . . . . . 17 Cleaning the Thermostat . . . . . . . . . . . . . . . . . . . . . . . . . . . . . . . . . . . . . . . 17 What To Do If You Move . . . . . . . . . . . . . . . . . . . . . . . . . . . . . . . . . . . . . . . 17 TABLE OF CONTENTS (CONT.) CONFIGURING YOUR COMFORT SERIES THERMOSTAT . . . . . . . . 18 Configuring Personal Preferences . . . . . . . . . . . . . . . . . . . . . . . . . . . . . . . . 19 Utility CPP Settings . . . . . . . . . . . . . . . . . . . . . . . . . . . . . . . . . . . . . . . . . . . 22 Set Up Reminders and Alerts . . . . . . . . . . . . . . . . . . . . . . . . . . . . . . . . . . . . 23 Configure Alerts . . . . . . . . . . . . . . . . . . . . . . . . . . . . . . . . . . . . . . . . . . . . . . 24 Wi-- Fi . . . . . . . . . . . . . . . . . . . . . . . . . . . . . . . . . . . . . . . . . . . . . . . . . . . . . . 26 Creating Your Weekly Schedule . . . . . . . . . . . . . . . . . . . . . . . . . . . . . . . . . . 27 Using the Weekly Schedule Editor . . . . . . . . . . . . . . . . . . . . . . . . . . . . . . . . 28 Scheduling a Vacation . . . . . . . . . . . . . . . . . . . . . . . . . . . . . . . . . . . . . . . . . 30 UNDERSTANDING ALERTS . . . . . . . . . . . . . . . . . . . . . . . . . . . . . . . . . . . . 32 List of Alerts . . . . . . . . . . . . . . . . . . . . . . . . . . . . . . . . . . . . . . . . . . . . . . . . 32 WARRANTY . . . . . . . . . . . . . . . . . . . . . . . . . . . . . . . . . . . . . . . . . . . . . . . . . . 35 GETTING STARTED Safety Considerations Improper installation, adjustment, alteration, service, maintenance, or use can cause explosion, fire, electrical shock, or other conditions which may cause death, personal injury or property damage. Consult a qualified installer, service agency or your distributor or branch for information or assistance. The qualified installer or agency must use factory--authorized kits or accessories when modifying this HVAC system. Refer to the individual instructions packaged with the kits or accessories when installing. Follow all safety codes. Wear safety glasses, protective clothing, and work gloves. Have a fire extinguisher available. Read these instructions thoroughly and follow all warnings and cautions included in literature and attached to the unit. Consult local building codes and the current edition of the National Electrical Code (NEC) NFPA 70. In Canada, refer to the current editions of the Canadian Electrical Code CSA C22.1. on the unit Recognize safety information. When you see this symbol and in instructions or manuals, be alert to the potential for personal injury. Understand the signal words DANGER, WARNING, and CAUTION. These words are used with the safety--alert symbol. DANGER identifies the most serious hazards, which will result in severe personal injury or death. WARNING signifies hazards, which could result in personal injury or death. CAUTION is used to identify unsafe practices, which may result in minor personal injury or product and property damage. NOTE is used to highlight suggestions which will result in enhanced installation, reliability, or operation. 1 Welcome The Carrier Comfortt Series Wi--Fi Thermostat helps homeowners conserve energy, save money and reduce their environmental impact. This thermostat automates energy conservation, making it comfortable when you are home and saving money when you are not. A13335 Fig. 1 - Comfort Series Wi-- Fi Thermostat Key features of the Comfort Series Wi--Fi Thermostat: d d d d d d d d Color display Precision +/-- 1° F (0.5° C) temperature control Remote access via the Internet, tablet or smartphone Vacation programming Seven--day programming Humidity sensing Intelligent algorithms that adapt to your home and preferences Fan control 2 COMFORT SERIES Wi--Fi THERMOSTAT BASICS The Comfort Series Wi--Fi Thermostat has an easy--to--read color screen that displays all the information you need to set and manage your thermostat. Use the navigation buttons on the right to quickly change the temperature, access features, and configure your settings. What’s on the Home Screen? Whenever you press a button, the Home screen is displayed. 4 5 1 2 3 A13368 Fig. 2 - Home Screen 1. Current Temperature and Humidity The displayed current temperature and humidity is based on the room where the Comfort Series Wi--Fi Thermostat is installed. You can set the Comfort Series Wi--Fi Thermostat to display Celsius or Fahrenheit. See Temperature Display on Pg. 19. 3 2. System Mode The current method of temperature control: heat, cool, or auto. See System Mode on Pg. 13. 3. Current Set Point The temperature at which the system is programmed to maintain at a particular point in time. Press Y(up) or (down) to adjust it manually by increments of 1° F (0.5° C). If the system is set to Auto, press A(left) or "(right) to switch between heat and cool set points. When you manually adjust the set temperature, you put the system into a Hold mode. See Hold Action on Pg. 20. To return back to the pre--programmed temperature, press OK. For maximum savings you should program your Comfort Series Wi--Fi Thermostat to control the temperature automatically. See Creating Your Weekly Schedule on Pg. 27. 4. Current Time/Date Displays the current date and time for your time zone. 5. Internet Access Indicates the Comfort Series Wi--Fi Thermostat is connected to the Internet. The more bars, the stronger the signal. A chain link indicates communication with the Carrier web servers. Using the Navigation Buttons The navigation buttons located on the right of the Comfort Series Wi--Fi Thermostat let you select options and control the thermostat. OK A13356 4 d d d d d d Y (up) On the Home screen, press Y to increase the temperature set point by 1° F (0.5° C). For menus, press Y to move up. B (down) On the Home screen, press B to decrease the temperature set point by 1° F (0.5° C). For menus, press B to move down. A (left) On the Home screen, if Auto mode is enabled, press A to switch between heat and cool set points. For menus, press A to go back to the previous screen. " (right) On the Home screen, if Auto mode is enabled, press " to switch between heat and cool set points. For menus, press " to choose the currently highlighted option. OK On a menu screen, press OK to choose the currently highlighted option. If a configuration option is selected, pressing OK will keep its new value and return back to the previous screen. MENU Pressing MENU displays a list of all available options. If a menu is currently displayed, pressing MENU will cancel any unsaved changes and return to the Home screen. MENU A13357 d BACK On a menu screen, press BACK to go back to the previous screen. BACK 5 A13358 On-- Screen Keyboard If you need to type in any information, an on--screen keyboard will appear. To enter a letter or number, move to the character by pressing the arrow keys and then press OK to select it. Select the [Caps] key to enter capital letters; select the [&@#] key to enter commonly used symbols. If you make a mistake, press the [X] backspace key to delete the text . To keep your changes, select Save. To cancel your changes, press BACK. Idle Screen When you are not actively using your Comfort Series Wi--Fi Thermostat, the screen will dim and display the idle screen. A13369 Fig. 3 - Idle Screen The Idle screen can show the temperature, time and date, humidity, weather conditions, and operating mode (red for heat, blue for cool). Snowflake and flame icons indicate if cooling or heating is currently engaged. 6 NOTE: You need to connect your Comfort Series Wi--Fi Thermostat to the Internet for the outdoor temperature, outdoor humidity, and weather indicators to function. To customize the content of the idle screen: From the Home screen, press MENU. Select Settings " Preferences " Idle Screen From here you can enable/disable the idle screen, the temperature bubbles, and date/time display. About Your Comfort Series Wi--Fi Thermostat The About menu displays useful information about your Comfort Series Wi--Fi Thermostat, its serial number, and optional information about the contractor who installed it. You may need this information if you are having difficulties or need technical support. The About page also displays information about your current Wi--Fi configuration. You can use these settings to help troubleshoot Internet connectivity issues. To view information about your Comfort Series Wi- Fi Thermostat: From the Home screen, press MENU. Select About. 7 CONNECTING TO THE INTERNET Connect your Comfort Series Wi--Fi Thermostat to the Internet so you can control it from your own personalized, secure Carrier Web Portal, smartphone, or tablet. From the Web Portal, you can: Program, configure and control your Comfort Series Wi--Fi Thermostat. d Control your Comfort Series Wi--Fi Thermostat from anywhere you have Internet access (including smartphones and tablets). d Use local weather data to maximize energy savings. d Receive important alerts and reminders about your heating and cooling system. NOTE: To connect your system to your personalized Carrier Web Portal you must have a broadband Internet connection and a wireless 802.11 b/g/n (Wi--Fi) home network. NOTE: In order to utilize and receive email alerts, this thermostat must be connected to the Internet via a Wi--Fi signal and the end--user must have a valid email address. d Setting Up Wi--Fi and Obtaining a Registration Code The Comfort Series Wi--Fi Thermostat uses your home Wi--Fi network to connect to the Internet. First, enable Wi--Fi on the Comfort Series Wi--Fi Thermostat (see instructions to the right). The Comfort Series Wi--Fi Thermostat will display a list of available networks, along with an indication of the signal strength (the more bars, the better) and whether encryption is used. If your home network is not listed, or if the signal strength is very low, try adjusting the antenna on your wireless router. If that doesn’t improve the signal, try moving your router closer to the Comfort Series Wi--Fi Thermostat. 8 Once your network has been detected, select it from the list. If the network is encrypted, you will be asked to enter a password for that network. This is the password you created when the wireless router was first set up. After you provide the password, your Comfort Series Wi--Fi Thermostat will automatically connect to the Internet. A chain link on the screen indicates you have established a connection with the Carrier web servers. Write down the registration code as you will need it when configuring your Web Portal account. You can leave the code displayed on the screen while you continue with the next step. To set up Wi- Fi: From the Home screen, press MENU. Select Register Thermostat. Select Continue. Select Wi--Fi Settings. Select Wi--Fi Radio " Enabled. Select your network from the list. If prompted, enter your network password. The Comfort Series Wi--Fi Thermostat will automatically connect to the Internet and display a registration code. Write down the registration code; you will need it in the next step. Having Trouble? If you are having trouble connecting to the Internet or finding your Wi--Fi network, you may need to configure your network parameters manually. See Wi--Fi on Pg. 26. 9 Configuring a Web Portal Account After a Wi--Fi connection has been established, it’s time to set up your personal Carrier Wi--Fi Web Portal. To save time, we recommend having your Internet--connected device close to the thermostat as you register for your Carrier Wi--Fi Web Portal. 1. Once the thermostat has been connected to your Wi--Fi network, record the four--digit Registration Code that appears on the thermostat display. 2. Go to www.carrier.com/myhome and select Register Thermostat from the Login section. 3. Select Create a New Account and enter your email address and create a password (must be eight characters in length), then reconfirm your password and click Create Web Portal. A13371 10 A13372 4. Enter the four--digit Registration Code you recorded earlier and click Register. A13373 NOTE: If you forgot the registration code, select Register Thermostat again from the Comfort Series Wi--Fi Thermostat menu and obtain a new registration code. 5. On the thermostat, accept the confirmation message by selecting OK. 11 6. Go to www.carrier.com/myhome and enter your username/password in the Login section. 7. Complete all three sections of the registration page and accept the Terms of the Privacy Policy. Select Done. Your Comfort Series Wi--Fi Thermostat is now registered. You can now monitor and control your thermostat from the Web Portal or from your smartphone or tablet. Re--registering the Comfort Series Wi-- Fi Thermostat There are times when you may need to re--register your Comfort Series Wi--Fi Thermostat. For example, if you are a new homeowner who has just moved to a home with an existing Comfort Series Wi--Fi Thermostat. To re--register your Comfort Series Wi--Fi Thermostat, reset the registration and redo the registration process. To reset your registration: From the Home screen, press MENU. Select Settings " Reset. Select Reset Registration. Confirm the reset by selecting Yes. 12 USING YOUR COMFORT SERIES Wi--Fi THERMOSTAT The bright, easy--to--read screen on your Comfort Series Wi--Fi Thermostat makes it simple to review and adjust the settings any time you want. Adjusting the Temperature You can easily adjust the temperature without changing the Comfort Series Wi--Fi Thermostat’s schedule by pressing the arrow keys when the Home screen is displayed. Press Y to increase the temperature set point by 1° F (0.5° C). Press B to decrease the temperature set point by 1° F (0.5° C). d If the Comfort Series Wi--Fi Thermostat is set to Auto mode, press A to select the Cool setting. d If the Comfort Series Wi--Fi Thermostat is set to Auto mode, press " to select the Heat setting. Once you’ve adjusted the temperature, the screen indicates that you are currently holding the set temperature rather than running a program. d d The Comfort Series Wi--Fi Thermostat will hold the new temperature for the duration you specified in the Hold Action option during the initial setup (see Hold Action on Pg. 20) or until you press OK. If you are using Auto mode, note that there is a minimum difference allowed between heat and cool set temperatures. The system will prevent you from setting the temperature within these limits. See the Comfort Series Wi--Fi Thermostat Installation Manual for information about configuring the minimum temperature difference settings. System Mode To change system mode: From the Home screen, press MENU. Select System Mode. Select your temperature mode: Heat, Cool, Auto or Off. 13 This menu sets your system to use heat, cool, or auto mode: d d d d d Cool The system will turn on the air conditioner when the current temperature rises above the set temperature. Heat The system will turn on the heat when the current temperature drops below the set temperature. Auto The system is in Auto--changeover mode and will activate the heating or cooling systems to keep your home within the desired range of set temperatures. Auxiliary Heat Only The system will only use the auxiliary or back--up heat source to maintain the heat set point temperature (only appears if auxiliary heat is configured). Off The system is off and will only display the current temperature. Fan To change fan settings: From the Home screen, press MENU. Select Fan. Configure your fan settings. This menu displays the current furnace fan setting: d d On Forces the fan to run continuously, regardless of the weekly schedule. The fan will also run if the system mode is Off. Auto Turns on the fan when the system is heating or cooling your home, or to satisfy the minimum fan “on” time. When you switch between Auto and ON in fan control, the Comfort Series Wi--Fi Thermostat will prompt you with the following: Hold 2 hours The fan will switch to this setting but revert back to weekly schedule after 2 hours. Hold 4 hours The fan will switch to this setting but revert back to weekly schedule after 4 hours. Indefinite The fan will switch to this setting and will only revert back if you do so manually . 14 d Until Next Transition The fan will switch to this setting but will revert back when the program switches to the next period. Update Schedule The fan will update the current schedule with this new fan setting. After the fan mode is changed and you return to the home screen, the Comfort Series Wi--Fi Thermostat will indicate that it is in a Hold state. The temperature setting will also be set to Hold. Press OK to revert the fan mode back to the weekly schedule fan and temperature settings. Minimum “On” Time Sets a minimum amount of time per hour that the furnace fan will run. This improves air circulation, results in a more consistent temperature than the Auto setting and is more cost--effective than the On setting. Weather Forecast Displays the current outdoor temperature and weather conditions for your registered location. Note that when you register, it is important to select your location accurately, as Carrier will use your local weather data to optimize your heating and cooling. You must register your Comfort Series Wi--Fi Thermostat for this feature to operate. A13375 Fig. 4 - Weather Forecast Screen 15 To view the weather forecast: From the Home screen, press MENU. Select Weather Forecast. Press OK to switch between the 4--day and 24--hour forecast. Resetting the Thermostat At some point during the life of the Comfort Series Wi--Fi Thermostat you may want to quickly reconfigure it or restore it to the default state. To reset your Comfort Series Wi- Fi Thermostat: From the Home screen, press MENU. Select Settings " Reset. Choose the reset option that suits your needs. d Reset Registration Resets the connection between your Comfort Series Wi--Fi Thermostat and your personalized Web Portal. This terminates the link between the Comfort Series Wi--Fi Thermostat and your email address/password. Note: After this reset, you must re--register your Comfort Series Wi--Fi Thermostat if you want to continue to use your Web Portal. d Reset Preferences and Schedule Resets all your preferences, reminders, alerts and programming back to the default state. d HVAC Equipment Settings Resets the Comfort Series Wi--Fi Thermostat’s equipment, threshold and sensor configuration. d Reset All Settings Resets the Comfort Series Wi--Fi Thermostat back to its default factory settings and removes any registration information. d Reset Contractor Info Resets any information about the Contractor who installed the Comfort Series Wi--Fi Thermostat. 16 Rebooting the Comfort Series Wi--Fi Thermostat You can reboot the thermostat by removing the thermostat carefully from the wall, wait three seconds and reattach to the thermostat wall plate. The thermostat will reboot but will not alter programming or configuration options. Cleaning the Comfort Series Wi--Fi Thermostat You can clean the Comfort Series Wi--Fi Thermostat’s screen by spraying water or any mild, non--abrasive household cleaner on to a clean cloth. Wipe the surface of the screen with the dampened cloth. NOTE: Do not spray any liquids directly onto your Comfort Series Wi--Fi Thermostat. What To Do If You Move If you move there a few things to consider about your Carrier system: If you did not activate your personalized Web Portal, you can simply take the Comfort Series Wi--Fi Thermostat with you or leave it in the house. If you already have registered your Comfort Series Wi--Fi Thermostat, you need to update your Web Portal to reflect your new address. 17 Leaving It Behind If you’re moving and are not taking your Comfort Series Wi--Fi Thermostat with you, log onto the Web Portal and select Reset under the Settings tab. Select Reset Registration. This terminates the association between your Comfort Series Wi--Fi Thermostat and your personalized Web Portal (you can also accomplish the same thing by choosing Reset Registration on the Comfort Series Wi--Fi Thermostat itself). You can always add another device for your new home with the same account. The new homeowners will need to register the Comfort Series Wi--Fi Thermostat and set up their own Web Portal. Taking It With You If you’re moving and want to take the Comfort Series Wi--Fi Thermostat with you, you’ll need to re--connect it to the Internet and update your location and house information (select My House under the Settings tab) . CONFIGURING YOUR COMFORT SERIES Wi--Fi THERMOSTAT This section describes how to configure the personal preferences, temperature settings, and operation of your Comfort Series Wi--Fi Thermostat. There are three key steps: Configure Personal Preferences d Set up Reminders and Alerts d Create your Weekly Schedule NOTE: You can also configure your Comfort Series Wi--Fi Thermostat from your personalized Web Portal. Simply open a web browser, go to www.Carrier.com/myhome, and log in. d 18 Configuring Personal Preferences The Preferences menu has settings for personalizing your Comfort Series Wi--Fi Thermostat. To configure personal Preferences: From the Home screen, press MENU. Select Settings " Preferences. Adjust each option to your personal preferences. Name You can customize the name of your Comfort Series Wi--Fi Thermostat to suit your needs (i.e. Main Floor). This is useful if you have multiple systems or zones. You can view and edit your Comfort Series Wi--Fi Thermostat name in the About menu on your Comfort Series Wi--Fi Thermostat and also in your Web Portal. Temperature Display Select Temperature Display to select Fahrenheit (°F) or Celsius (°C). Date and Time Select Date & Time to: Set the current date. Set the current time. d Select a 12--hour or 24--hour time format. d Select your time zone. d Enable or disable daylight savings adjustments. If you are connected to the Internet, the time and date are programmed automatically. d d Brightness The color screen has adjustable backlight brightness. You can control the intensity when the screen is active (i.e., when you are pushing buttons) and when the display is in standby mode (idle screen). 19 Select Brightness to: d d d Set the Active brightness intensity. Set the Standby (idle screen) brightness intensity. Set the minimum time the Comfort Series Wi--Fi Thermostat will stay in active brightness before switching to standby brightness. Hold Action Whenever you manually adjust the set temperature, the Comfort Series Wi--Fi Thermostat will indicate you are in a “Hold” mode. You can select how long the Comfort Series Wi--Fi Thermostat will hold the new temperature before reverting back to the regular program: d d d d d d Hold 2 hours Hold 4 hours Until next transition Thermostat will hold temperature until the next program period. Indefinite Thermostat will hold temperature until you press OK. Update Schedule When you adjust the set temperature, the system will update the temperature in the Weekly Schedule for the current period. Ask Me Every time you adjust the set temperature you will be asked which of the options you would like to choose. Access Control You can protect your Comfort Series Wi--Fi Thermostat so that certain features will require the user to enter a 4--digit access code. Use the arrow keys to highlight a number and then press OK. When you are done, select Save. The access control will be required once the idle screen is displayed. To disable this feature, delete the number by selecting the backspace key multiple times. You can also configure the level of access control: d Restrict All Access Unauthorized users will only be able to view the home screen and the weather information. 20 Restrict Details Access The code is required to access the Details screen. d Restrict Program Access The code is required to view and modify the Comfort Series Wi--Fi Thermostat’s Weekly Schedule. d Restrict Vacation Access The code is required to view and create a Vacation. d Restrict QuickSave The code is required to exit QuickSave mode from the Web Portal. In all cases, once the code is enabled, it will be required to access any of the list items in the Settings menu, with the exception of the About screen. Once a valid code has been entered on the Comfort Series Wi--Fi Thermostat, access to restricted features will be allowed until the Comfort Series Wi--Fi Thermostat backlight timer has expired. d Temperature Range You can configure the Comfort Series Wi--Fi Thermostat so only a specific heat and/or cool set point range is permitted. d d Heat Temp Range Press Y or B to select the upper and lower bounds that the heat can be set to and then press OK. Users will not be able to set the Comfort Series Wi--Fi Thermostat to a temperature above this limit. Cool Temp Range Press Y or B to select the upper and lower bounds that the cool can be set to and then press OK. Users will not be able to set the Comfort Series Wi--Fi Thermostat to a temperature below this limit. Recovery Options Recovery options allow the Comfort Series Wi--Fi Thermostat to learn how your heating and cooling system works, taking into account infrastructure, weather and historical operating performance so that your home is a comfortable temperature as soon as you walk in the door. d Smart Recovery Heat The Comfort Series Wi--Fi Thermostat will start heating at the optimum time to ensure the set point is reached at the programmed time. 21 d d d Smart Recovery Cool The Comfort Series Wi--Fi Thermostat will start cooling at the optimum time to ensure the set point is reached at the programmed time. Random Start Heat Programming a time in this section will produce a random delay when there is a call for heat. In applications with multiple heating systems, this prevents all the systems from activating at the same time (thus creating a peak power demand). Press Y or B to select a delay time and then press OK. Random Start Cool Programming a time in this section will produce a random delay when there is call for cooling. In applications with multiple cooling systems, this prevents all systems from activating at the same time, (thus creating a peak power demand). Press Y or B to select a delay time and then press OK. Utility CPP Setting This section is only applicable if your utility company is running a Critical Peak Pricing program that you have agreed to be a part of. Contact your local electrical utility company for information about programs in your area. CPP Response Your utility may send voluntary events to your Comfort Series Wi--Fi Thermostat. You can choose to Always Accept these events. In which case, you would just be notified that an event is in progress. Or if you choose Ask Me, when the Utility issues an event, you will be asked if you want to participate. If you do not acknowledge the event prior to the start, the system will default to yes. Preferred Strategy During a Critical Peak Pricing event the Utility may select an energy saving strategy, or allow you to use your preferred strategy. Select from one of the options as your preferred energy saving strategy to be used during Critical Peal Pricing events. 22 d d d d Absolute Temperature Set a specific heat and cool set point to be used when an event is initiated by the Utility company. If the set point at the time of the event is more favorable (lower in heat mode or higher in cool mode) than what you have programmed, the Comfort Series Wi--Fi Thermostat will use the more favorable set point for the duration of the event. Relative Temperature Program a temperature set back (heat) or set forward (cool) from your existing set point. For example, if you program a 4° F set forward, and your current cool set point is 76° F, during an event your Comfort Series Wi--Fi Thermostat set point will change to 80° F until the event has expired. System Off If this option is selected, the Comfort Series Wi--Fi Thermostat will turn off heating and cooling for the duration of this event. Duty Cycle This option allows you to program the maximum amount of time the system will run during a 1 hour period. For example, if you select 30%, the air conditioner will run for a maximum of 18 (0.3 x 60) minutes regardless of whether the set point has been met. 0% essentially turns the system off, whereas 100% runs the system at full capacity. Set Up Reminders and Alerts Your Comfort Series Wi--Fi Thermostat can be programmed to remind you about required filter changes and regular maintenance. NOTE: If you are unsure what equipment you have installed, or if you need to replace instead of clean your filters, please contact your heating and cooling contractor, or consult your original equipment manuals for the recommended maintenance procedures. To set up Reminders: From the Home screen, press MENU. Select Reminders and Alerts. Adjust each option to your personal preferences. 23 HVAC Service The HVAC Service (Maintenance) alert is displayed on the screen when regularly scheduled maintenance is required. It will also show your contractor’s contact information (if programmed by the contractor). Select this item to turn the reminder on or off, show the date of the last service, and select a reminder interval. Furnace Filter Sets the reminder period for cleaning or replacing the furnace air filter. Select this item to turn the reminder on or off and set the reminder interval in run--time hours or calendar months. You can also check the date of the last filter change. UV Lamp If the HVAC system uses a UV lamp for air purification, the Comfort Series Wi--Fi Thermostat can remind you that it is time to clean or replace the lamp. Select this item to turn the reminder on or off and to set the reminder in calendar months. You can also check the date of the last lamp change. Configure Alerts The Comfort Series Wi--Fi Thermostat can generate alerts when the temperature of your home reaches a pre--programmed temperature. This protects your home from damage due to freezing or excessive heat. If this alert has been set up, you will see the alert on the Comfort Series Wi--Fi Thermostat’s screen. If you’ve configured your personal Web Portal, you will also receive an email alert. To set up Alerts: From the Home screen, press MENU. Select Reminders and Alerts. Adjust each option to your personal preferences. 24 Low Temp Alert Select this item to set the temperature at which the Comfort Series Wi--Fi Thermostat will generate a Low Temperature alert. The range can be adjusted to: d d Off – no alert will be generated. Set temperature range of 35 to 68° F (1.5 to 20° C). High Temp Alert Select this item to set the temperature at which the Comfort Series Wi--Fi Thermostat will generate a High Temperature alert. The range can be adjusted to: d d Off – no alert will be generated. Set temperature range of 60 to 104° F (15.5 to 40° C). Aux Heat Runtime Alert (optional) If you have a heat pump with auxiliary heat configuration, you can program the Comfort Series Wi--Fi Thermostat to generate an alert if the auxiliary heat runs for more than this programmed amount of time during a 24--hour period. Aux Outdoor Temp Alert (optional) If you have a heat pump with auxiliary heat configuration, you can also program the Comfort Series Wi--Fi Thermostat to generate an alert if the auxiliary heat is called when the outdoor temperature exceeds this programmed set point. (This feature requires an Internet connection to function properly.) Display Alerts on Thermostat Select No if you do not want any of the alerts to be displayed on the screen. Alerts will continue to be displayed on the Web Portal and sent via email. 25 Enable Heating/Cooling Alerts Select No if you do not want the Comfort Series Wi--Fi Thermostat to generate an alert if a system is not responding to a call for heat or cool. If disabled, these alerts will not be shown on the Comfort Series Wi--Fi Thermostat or Web Portal and no emails will be sent. Wi--Fi The Comfort Series Wi--Fi Thermostat supports Wi--Fi 802.11 b/g/n. Use the Advanced Configuration option in the Wi--Fi menu to configure your network parameters. Choose the network from the list or manually add a new one (i.e. if your network does not broadcast its SSID). To configure Wi- Fi manually: From the Home screen, press MENU. Select Wi--Fi. Adjust the network options for your home network. You will then be able to view and configure the following network parameters: DHCP (select Disabled to use a static IP Address; if unsure, leave DHCP Enabled) d SSID d Encryption (WEP, WEP128, WPA, or WPA2) d Password (if encryption is used) d Wi--Fi Channel d IP Address and IP Subnet d Gateway Primary and Secondary DNS If you need to specify your thermostat’s MAC address in your router’s configuration, you can obtain it from the About menu. d 26 Creating Your Weekly Schedule Your heating and cooling needs change depending on the time of day and day of the week. For example, if there’s no one in the house during the workday you might want to let the temperature go up in the summer, to reduce energy used by the air conditioning system, and down in the winter, to reduce heating energy. To view your weekly schedule: From the Home screen, press MENU. Select Weekly Schedule. Your weekly schedule is shown on the screen. By default, the Comfort Series Wi--Fi Thermostat includes four configurable periods: d Awake The start time of this period typically represents when you get up in the morning. d Work This represents when you leave to go to work. d Home This represents when you get home from work in the evening. d Sleep This represents is when you go to bed at night. A13376 Fig. 5 - Weekly Schedule 27 The Comfort Series Wi--Fi Thermostat learns how your home and heating and cooling equipment perform. Intelligent algorithms combine weather data, your HVAC equipment run times and occupancy schedules to optimize performance and maximize energy savings. This means you can be comfortable when you are home and save money when you are not. If your schedule changes, you can quickly and easily update the thermostat settings on the device itself or online through your Web Portal. Using the Weekly Schedule Editor A13377 Fig. 6 - Schedule Editor The Weekly Schedule editor lets you to set specific times, temperatures and furnace fan settings for each day of the week. If your system is enabled for auto change--over mode, the heat and cool set temperatures will automatically be adjusted to ensure a minimum difference. 28 To edit your weekly schedule: Display your Weekly Schedule. Press OK. Select the Day. Select the Time, Heat or Cool Setting. Press Y or B to adjust the the value. Press A or " to toggle between columns. Press OK. Select Save and Continue. Select any other days of the week that will also use the new settings. Use the navigation keys to switch between days and press OK to select a day. Select Continue. The new schedule is displayed on the screen. Adding New Periods To accommodate for your varying schedule you can add additional program periods in your week. For example if you come home for lunch during the week or want different settings for the weekend, you would simply add one of the existing periods at the allocated time and day or create a completely new one. To add a new period: Display the schedule for a day and select Add New. Select Create New Item. Enter a name for the new period and select Save. If your house is in--use during this period, select Yes; otherwise select No. Select Enable. Select the new time and press OK. The new period is added. 29 Disable a Period To disable a period entirely, select the period’s Time and then select Disable. Scheduling a Vacation The Comfort Series Wi--Fi Thermostat’s Vacation feature helps you conserve energy while you are away for extended periods of time. It also ensures your home is comfortable when you return. A vacation event includes a name, start date and time, as well as the end date and time. You can enter any number of uniquely named vacations. Other vacation features to choose from include: To schedule a vacation: From the Home screen, press MENU. Select Vacation. Select Add Vacation. Enter a Name. Enter the Start and End dates and times of your vacation. Carrier optimize Select Yes to have the Comfort Series Wi--Fi Thermostat automatically set your Heat Temperature, Cool Temperature, System Mode and Furnace Fan settings to maximize energy conservation while you are away. Select No to manually configure Heat Temperature, Cool Temperature and Fan settings. These settings will be remembered the next time you create a vacation event. Heat Temperature Programs the set temperature when the system is in Heat mode (i.e., when the furnace is on). Set a lower temperature to save energy. 30 Cool Temperature Programs the set temperature when the system is in Cool mode (i.e., when the air conditioner is on). Set a higher temperature to save energy. You can also choose to turn off your cooling system while you are away to save more energy. Delete Vacation You can delete individual or all vacation events: d To remove an individual vacation event, display the details about the vacation event, then select Delete Vacation " Yes. d To remove all vacation events, display the Vacation menu and select Delete All " Yes. Fan Toggles the fan setting between ON and Auto. d ON The fan runs all the time regardless of programming or if there is a call for heat or cool. The fan will also run if the System Mode is OFF. d Auto This option turns the furnace fan on but only when the system is heating or cooling your home, or to satisfy the minimum fan run time as programmed. d Fan Min On Time This feature allows you to determine a minimum time per hour that the furnace fan will run. This improves air circulation and provides a more consistent temperature within the home. It is more cost--effective than choosing the ON fan setting. In either mode, the Comfort Series Wi--Fi Thermostat will ensure that when your vacation ends, the Comfort Series Wi--Fi Thermostat will revert to the regular settings. NOTE: If you were running your regular program prior to the start of your vacation, on your return, the Comfort Series Wi--Fi Thermostat will restore your home to those settings. If you were in Hold mode prior to the start of your vacation, the Comfort Series Wi--Fi Thermostat will restore the home to whatever the set temperature was just prior to your vacation. 31 UNDERSTANDING ALERTS From time to time your Carrier system will display an alert — a reminder to change the furnace filter, or perform regular maintenance, for example. If you have connected your Comfort Series Wi--Fi Thermostat to the Internet, these alerts can also be sent to you via email. When an alert displays, you can dismiss it or ask to be reminded later. For example, if you receive a furnace filter alert and choose Remind me later, the alert will clear and display again 24 hours later. If you choose OK when the alert displays, it will reset the reminder. List of Alerts Your Comfort Series Wi--Fi Thermostat can generate the following alert messages (some alerts may not apply depending on your system.) Furnace Air Filter Furnace filter needs to be cleaned or changed. UV Lamp UV lamp needs to be changed. Low Temp Alert Temperature in the home is too low. High Temp Alert Temperature in the home is too high. Heat Not Responding The system has failed to heat the home. Cool Not Responding The system has failed to cool the home. Maintenance Reminder HVAC system due for regular maintenance. Auxiliary Heat Run Time Auxiliary heat source is running too often. Auxiliary Outdoor Temperature Your Comfort Series Wi-- Fi Thermostat auxiliary heat has been called to run when the outdoor temperature exceeds the programmed set point. 32 NOTES 33 NOTES 34 THERMOSTAT LIMITED WARRANTY CARRIER CORPORATION Limited Warranty for Thermostats FOR WARRANTY SERVICE OR REPAIR: Contact the installer or a Carrier dealer. You may find the installer’s name on the equipment or in your Owner’s Packet. You can also find a Carrier dealer online at www.carrier.com For help, contact: Carrier Corporation, Consumer Relations, P.O. Box 4808, Syracuse, New York 13221, Phone 1--800--227--7437 PRODUCT REGISTRATION: You can register your product online at www.carrier.com. Model Number_______________________ Serial Number_______________________ Date of Installation____________________ Installed by_________________________ Name of Owner_______________________ Address of Installation_________________ Carrier Corporation (hereinafter “Company”) warrants this product against failure due to defect in materials or workmanship under normal use and maintenance as follows. All warranty periods begin on the date of original installation. If a part fails due to defect during the applicable warranty period Company will provide a new or remanufactured part, at Company’s option, to replace the failed defective part at no charge for the part. Alternatively, and at its option, the Company will provide a credit in the amount of the then factory selling price for a new equivalent part toward the retail purchase price of a new Company product. Except as otherwise stated herein, those are Company’s exclusive obligations under this warranty for a product failure. This limited warranty is subject to all provisions, conditions, limitations and exclusions listed below and on the reverse (if any) of this document. 35 THERMOSTAT LIMITED WARRANTY OWNER--OCCUPIED, RESIDENTIAL APPLICATIONS This warranty is to the original purchasing owner and is transferable only to the extent and as stated in the Warranty Conditions and below. The warranty period in years, depending on the part and the claimant, is as shown in the chart below. Limited Warranty (Years) Original Owner Subsequent Owner 5* (or 3) 3 Product TC--WHS Thermostats*** * If properly registered within 90 days, otherwise 3 years (except in California and Quebec and other jurisdictions that prohibit warranty benefits conditioned on registration, registration is not required to obtain longer warranty periods). See Warranty Conditions below. ***Applies only to Thermostats. Active electronic finished good accessories have different warranty terms. See product for details. OTHER RESIDENTIAL APPLICATIONS (Apartments, Rental Properties, etc.) The warranty period is three (3) years. The warranty is to the original owner and is not transferable. OTHER APPLICATIONS The warranty period is one (1) year on all such applications. The warranty is to the original owner only and is not transferable. LEGAL REMEDIES: The owner must notify the Company in writing, by certified or registered letter to Carrier Corporation, Warranty Claims, P.O. Box 4808, Syracuse, New York 13221, of any defect or complaint with the product, stating the defect or complaint and a specific request for repair, replacement, or other correction of the product under warranty, mailed at least thirty (30) days before pursuing any legal rights or remedies. 36 THERMOSTAT LIMITED WARRANTY WARRANTY CONDITIONS: 1. To obtain the longer warranty periods as shown in the table under original owner, for the original purchaser, the product must be properly registered at www.carrier.com within ninety (90) days of original installation. In jurisdictions where warranty terms conditioned on registration are prohibited by law, registration is not required and the longer warranty period shown will apply. 2. Where a product is installed in a newly constructed home, the date of installation is the date the homeowner purchased the home from the builder. 3. If the date of original installation cannot be verified, then the warranty period begins ninety (90) days from the date of product manufacture (as indicated by the model and serial number). Proof of purchase may be required at time of service. 4. The remainder of the first three years of warranty is freely transferable without registration. 5. Product must be installed properly and by a licensed HVAC technician. 6. The warranty applies only to products remaining in their original installation location. 7. Installation, use, care, and maintenance must be normal and in accordance with instructions contained in the Installation Instructions, Owner’s Manual and Company’s service information. 8. Defective parts must be returned to the distributor through a registered servicing dealer for credit. LIMITATIONS OF WARRANTIES: ALL IMPLIED WARRANTIES AND/OR CONDITIONS (INCLUDING IMPLIED WARRANTIES OR CONDITIONS OF MERCHANTABILITY AND FITNESS FOR A PARTICULAR USE OR PURPOSE) ARE LIMITED TO THE DURATION OF THIS LIMITED WARRANTY. SOME STATES OR PROVINCES DO NOT ALLOW LIMITATIONS ON HOW LONG AN IMPLIED WARRANTY OR CONDITION LASTS, SO THE ABOVE MAY NOT APPLY TO YOU. THE EXPRESS WARRANTIES MADE IN THIS WARRANTY ARE EXCLUSIVE AND MAY NOT BE ALTERED, ENLARGED, OR CHANGED BY ANY DISTRIBUTOR, DEALER, OR OTHER PERSON, WHATSOEVER. 37 THERMOSTAT LIMITED WARRANTY THIS WARRANTY DOES NOT COVER: 1. Labor or other costs incurred for diagnosing, repairing, removing, installing, shipping, servicing or handling of either defective parts, or replacement parts, or new units. 2. Any product purchased over the Internet. 3. Normal maintenance as outlined in the installation and servicing instructions or Owner’s Manual, including filter cleaning and/or replacement and lubrication. 4. Failure, damage or repairs due to faulty installation, misapplication, abuse, improper servicing, unauthorized alteration or improper operation. 5. Failure to start or damages due to voltage conditions, blown fuses, open circuit breakers, the inadequacy, unavailability or interruption of electrical, internet service provider, or mobile device carrier service or your home network. 6. Failure or damage due to floods, winds, fires, lightning, accidents, corrosive environments (rust, etc) or other conditions beyond the control of Company. 7. Parts not supplied or designated by Company, or damages resulting from their use. 8. Products installed outside the U.S.A. or its territories and Canada. 9. Electricity or fuel costs, or increases in electricity or fuel costs from any reason whatsoever, including additional or unusual use of supplemental electric heat. 10. Any cost to replace, refill or dispose of refrigerant, including the cost of refrigerant. 11. ANY SPECIAL, INDIRECT OR CONSEQUENTIAL PROPERTY OR COMMERCIAL DAMAGE OF ANY NATURE WHATSOEVER. Some states or provinces do not allow the exclusion of incidental or consequential damages, so the above limitation may not apply to you. This Warranty gives you specific legal rights, and you may also have other rights which vary from state to state or province to province. 11/13 49004DP153 38 www.Carrier.com/homecomfort S 1-- 800-- CARRIER Copyright 2013 Carrier Corp. S 7310 W. Morris St. S Indianapolis, IN 46231 Edition Date: 11/13 Catalog No: OMTC ---WHS---01 Manufacturer reserves the right to change, at any time, specifications and designs without notice and without obligations. Replaces: New