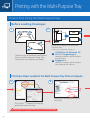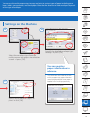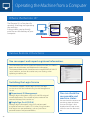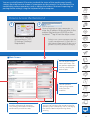
1
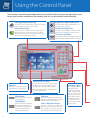
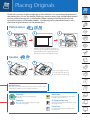
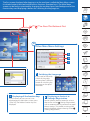
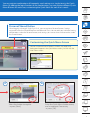
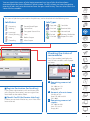
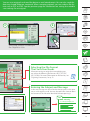
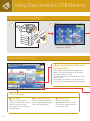
Using the Control Panel /
Placing Originals
Customizing
the Main Menu
Quick
Operation
Guide
Registering
Frequently Used Setting
Combinations
Checking the Job Status/
Machine Status
Copying Documents
Sending Faxes
Sending Scanned Data
Registering
New Addresses
Storing Data
in USB Memory
Using Data Stored
in USB Memory
Digitizing Documents
Finishing Documents
Printing
from a Computer
Printing with the MultiPurpose Tray
This guide describes the basic operations of each function and introduces several of the machine's most useful functions. To learn more about the functions
described in this guide, see the e-Manual. After you finish reading this guide,
store it in a safe place for future reference.
Operating the Machine
from a Computer
Using the Control Panel
The machine is operated and configured in the control panel. By learning more about the various
names and functions available on the machine, you can use the machine more efficiently.
Settings/Registration Key
Brightness Adjustment Dial
Energy Saver Key
Volume Settings Key
Press this key to configure the machine's settings
and to register items on the machine.
You can set the machine to enter sleep mode
when you do not use the machine for a while.
When you want to use the machine again, press
this key to cancel the sleep mode.
Use this dial to adjust the brightness of
the touch panel display.
Press this key to adjust the volume of the
alarm when sending or receiving a fax.
Counter Check Key
Press this key to display the total number of
copies and prints output with the machine.
Touch Panel Display
Edit Pen
The pen used to operate the
control panel is stored here.
Main Menu
Press this button to display
the Main Menu.
Quick Menu
Press this button to display
the Quick Menu buttons
that you have registered to
perform frequently used
setting combinations.
2
By using the touch panel, you can select
functions such as copy and print, and
configure the settings of the machine.
If the desired function is not displayed,
try pressing [Show All].
Shortcut
Press these buttons to switch the
display to another function without
returning to the Main Menu.
Status Monitor/Cancel
You can use this key to confirm the
job status, such as print, send, and
receive jobs. You can also use this
key to pause or cancel a print job.
Indicator Lights
These lights indicate
the status of the
machine. They flash
when a job is being
processed or an error
has occurred, are lit
when the machine's
main power is On,
and are dark when
the machine's main
power is Off.
Placing Originals
There are two ways to place originals on the machine. You can either place them on
the platen glass, or use the feeder. When you want to copy/scan multiple documents
at once, place the originals in the feeder. When copying/scanning originals that
cannot be placed in the feeder (books, a single page of a stapled document, etc.),
place the original directly on the platen glass.
Platen Glass
1
2
3
With the side of the original you want to
scan face down, align the top edge of your
original with the back edge of the platen
glass (by the arrow in the top left corner).
Feeder
1
2
Place the originals in the
feeder with the side that
you want to scan face up.
Numeric Keys
Use these keys when entering numeric values, such as when
entering fax numbers or the number of copies.
Start Key
Reset Key
Stop Key
ID (Log In/Out) Key
Press this key to start copying or
scanning.
Press this key to stop a copy/scan job
currently in progress.
Press this key to restore the standard
settings of the machine.
Press this key to log in/out when using
the login service.
Clear Key
Press this key to clear entered values
or characters.
3
Customizing the Main Menu
Selecting a Function
1
2
3
4
1
Changing the Function Key Layout
You can set to display/hide each function key, and place
frequently used function keys in easy to access positions. You can
also change the number of keys displayed on a single screen.
B
A
C
3
Changing the
Background of the
Main Menu Screen
You can select from five types of
backgrounds.
A
B
C
2
Enables you to select the number of buttons and the layout.
Enables you to select the order to display the function keys.
Enables you to place a blank space on the Main Menu screen.
Registering a Function Key
Shortcut Button
Since shortcut buttons are always displayed
on the left side of the touch panel display
even when the function is switched, you
can switch the function without returning
to the Main Menu screen.
4
To delete a shortcut
button that has been
set, select [Unassigned]
on the setting screen.
The first screen displayed after logging in to the machine is called the Main Menu screen.
It includes buttons that lead to the various functions (function keys). The Main Menu
screen can be freely customized by changing the number, layout, and background of the
function keys and displaying a button for switching the language, etc.
Press This Button at First
4
Other Main Menu Settings
A
B
C
A Switching the Language
If you need to frequently
switch the language,
you can place a shortcut
button for switching the
language on the top of
the screen.
C Displaying all the function keys
If the function you want to use is not
displayed on the Main Menu screen, press
[Show All]. The hidden function keys are
displayed.
B Displaying a shortcut to
Settings/Registration
You can place a shortcut button for an item
that can be set from (Settings/Registration),
such as automatic density correction or paper
drawer settings. This enables a setting to be
quickly displayed without selecting it from
(Settings/Registration).
5
Registering Frequently Used Setting Combinations
すでにあった物の線をまびき、調整しました。
テイストが合わなければ、新規制作します。。
60mm
Various Quick Menu Functions
20mm
Quick Menu Button
By registering a combination of settings as a Quick Menu button,
you can perform a series of settings with only one-touch. You can
also add a send destination to the setting combination, thus helping
prevent mistakes when sending.
Press This Button at First
120%
Scan two-sided original.
Send the scanned image in
Compact PDF format via e-mail.
Name of the Button
Comment for the Button
How to Register Settings Set in a Function Screen as a Quick Menu Button
1
2
Specify the settings that you want to register
→ press
→ [Register to Quick Menu].
*When in the E-mail Send screen.
6
Confirm the settings → press [Next]
→ select the operation that will
be performed when you press the
registered button → press [Next].
You can register combinations of frequently used settings as a single item in the Quick
Menu. By adding the login function to the combination, you can register different Quick
Menu Buttons for each user, customizing the Quick Menu for each user's needs.
Personal/Shared Button
When logging in through Single Sign On-H, you can register a Personal button. Settings
registered under the Shared button are available to all users. You can add your individual setting
combinations under the Personal button, and settings you want to share with coworkers under
the Shared button.
Customizing the Quick Menu Screen
You can customize how a button's number, size, order, and
background appear in the Quick Menu screen, just like with the
Main Menu screen.
3
4
Select the button to register
→ press [Next].
Enter the Quick Menu button name,
and a comment if necessary
→ press [OK].
7
Checking the Job Status/Machine Status
Log Screen
The Log screen displays a list of jobs that have been executed.
To switch between the
Job Status screen and
the Log screen, press
the tab at the top of
this screen. You can also
switch the job type, such
as copy jobs and send/
received jobs.
Ch
a
e
ng
Press This Button at First
Job Status Screen
The Job Status screen displays a list of
jobs that are currently being executed.
Operations that can be performed on jobs being executed or the job history
To cancel a job or change the job priority,
select a job and press a button under the job
(log) list.
■■Details
Displays detailed information for the selected
job. A three digit number starting with a
"#" indicates the status when an error has
occurred.
■■Cancel
Cancels the selected job.
8
■■Interrupt/Priority (for Copy/Print Jobs)
Changes the priority of copy and print jobs.
■■Print List (for Send Jobs)
Press [Print List] when you have trouble sending
faxes, etc. The transmission status up until the
current time is printed.
■■Specify as Send Dest. (for Send Log)
Enables you to reuse a destination. If you select a
destination in the send history and press [Specify as
Send Dest.], you can send fax and scan data to that
destination.
You can check the status of jobs being executed or a log of jobs that have been
executed from the Status Monitor/Cancel screen. On this screen, you can change the
priority of jobs and set a destination from the past send history. You can also check the
status of consumables.
The status of jobs being executed or the job history can be checked with the following icons.
Job Types
Job Status
Executing
Paused/Need Paper
Copy Job
Send Job
Waiting
Secure Print
Print Job
Received Job
Interrupt/
Priority Printing
Encrypted Secure Print
Send Job
Network Job
Sent
Fax Job
Memory Media Job
Error
Before Output
I-Fax Job
Report Print Job
Canceling
After Output
Checking the status of
consumables
Press [Consumables] to display the
status of consumables such as paper
and toner.
A
B
C
A Remaining amount of
toner
■■Register Destination (for Send Log)
If you select a destination in the send history and
press [Register Destination], you can register that
destination to the address book.
■■Check I-Fax RX (for Receive Jobs/Log)
Enables you to check whether any new I-faxes have
been received.
OK: 100% to 11%
Low: 10% to 1%
Empty: 0%
B Amount of waste toner
OK: 0% to 79%
Near Full: 80% to 99%
Full: 100%
C Remaining amount of
staples
OK: 100% to 26%
Low: 25% to 1%
Empty: 0%
9
Copying Documents
How to Copy Documents
1
2
P.3
Specify the copy
functions as
necessary.
Various Copy Functions
Enlarging or Reducing
You can copy from one paper size to
another, such as from LTR to STMT
(preset zoom), or change the zoom ratio
manually by entering an enlargement/
reduction ratio. You can press [Direct] to
cancel the set zoom ratio.
Caution Regarding
Original Orientation
When setting page numbers
or margins, take care with the
orientation of the original.
Select the button for an icon
displayed on the touch panel
display in accordance with
the actual orientation of the
original you have placed.
When using functions where the orientation of the original
is important, buttons for selecting the orientation are
displayed on the setting screen.
10
Option Screen Functions
The Option screen contains convenient
copy functions, like copying double-sided
originals, such as driver's licenses or ID
cards, to a single sheet of paper, etc. Other
convenient Option screen functions are
described in "Finishing Documents," on p. 24.
This section describes the Copy function. Understand the basic flow of operations and
the various information displayed on the Copy Basic Features screen to efficiently and
conveniently make copies. The various copy functions such as two-sided copying and
ID card copying can be set from the Copy Basic Features screen.
3
4
Select the paper
drawer that contains
the paper you want
to copy on.
Enter the number
of copies to
make, using the
numeric keys.
*Paper Drawer 1 is
selected by default.
Confirming the Copy
Settings
If you have specified multiple
copy settings, check them before
executing the copy. You can also
change the settings from the
displayed screen.
Selecting the Optimal Paper for Copying
When changing the paper, select a paper drawer or the multipurpose tray. Information for the paper loaded in the paper
drawers and the multi-purpose tray is indicated with an icon on
the Copy Basic Features screen and the Select Paper screen.
Paper drawer number
Paper size
Press [Options] →
[Copy ID Card].
Remaining paper
Paper type and orientation
11
Sending Faxes
How to Send Faxes
1
2
P.3
Various Fax Functions
You can specify the destination from the
Address Book or a one-touch button.
It is convenient to register destinations in the Address Book. By
registering frequently used destinations in one-touch buttons, you can
eliminate the need to search for them in the Address Book.
For information on registering destinations to the Address Book/onetouch buttons, see "Registering New Addresses," on p. 16.
Address Book: You can register
up to 1,600 destinations.
One-touch buttons: You can
register up to 200 destinations.
■■ Original Type
Adjusting the Volume of
the Incoming Fax Tone
You can adjust the volume of the incoming fax tone
using the button on the side of the control panel.
12
Select [Text] for originals
that have been printed
out and are comprised
mainly of text. Select
[Photo] for photo or hand
drawn originals.
The basic steps for sending a fax are to place an original and specify a destination fax
number. If you feel it is troublesome to enter a fax number, register it in the Address
Book or a one-touch button. You can also adjust the density and resolution to send
faxes that can easily be read by the recipient.
3
4
Enter the fax number using the numeric keys.
*You can also specify the destination from the Address
Book or a one-touch button.
Sending Faxes According to the Original
Type
With originals that are comprised only of text or originals that
contain photos, you can send clear and highly faithful faxes by
setting the various functions such as resolution, density, and the
original type according to the features of the original.
■■ Resolution
If you raise the resolution, the
size of the data sent for the fax is
higher, but the fax will be more
faithful to the original.
For example, you can send
originals that contain only
text with a low resolution and
originals that contain photos, etc. with a high resolution.
■■ Density
You can perform adjustment with
<Background Density> to send
clear faxes when the text printed
on the reverse side of originals
using thin paper is visible.
13
Sending Scanned Data
How to Send Scanned Data via E-Mail
1
2
Enter the e-mail
address → press [OK].
*You can also specify
the destination from the
Address Book or a onetouch button.
P.3
Various Send Settings
Sending Data According to
the Original Type
You can send high-quality data by
specifying the settings such as original type
and resolution according to the features of
the original.
See the previous page for details.
Sending Data to a Server
In addition to sending data as an e-mail attachment, you can create
a shared folder on a network to perform centralized management
of scanned data on a server. You can send to file servers that
support various protocols including SMB, FTP, and WebDAV.
To send to a file server, it is necessary
to set a server name (host name),
folder path, user name, and password
on the machine according to the
settings of the server.
14
Sending to a Personal
Folder
By registering a shared folder on a
network as a personal folder, you
can send scan data to that folder.
This function can be used when
performing user authentication with
a login service such as SSO-H.
You can scan originals and send the data as e-mail attachments. You can also send the
data to a shared folder on a network. When scanning originals, you can select a file format such as PDF or JPEG. See the previous page for information on setting the suitable
scan settings for an original.
3
4
Specifying Settings According to
the Original to Scan.
Selecting the File Format
That Suits Your Needs
When converting an original to scanned data, you
can select the following file formats: JPEG, TIFF, PDF,
XPS, OOXML. For more information on file formats, see
"Digitizing Documents," on p. 22.
Entering the Subject and Message
A title and message can be set for the data to send, in the same
way as with regular e-mail. You can also add a file name to allow
the content of the file to be identified without opening it.
title : Meeting
to : [email protected]
15
Registering New Addresses
How to Register New E-Mail Addresses in the Address Book
1
2
You can also find the Address Book
on the Fax screen.
The Address Book/
one-touch buttons are
available on the Fax Basic
Features screen as well. The
procedure for registering fax
numbers is the same as with
the Scan and Send function.
How to Register One-Touch Buttons
1
16
2
By registering destinations in the Address Book or a one-touch button, you can reduce
the time it takes to enter in destinations. You can register not only e-mail addresses
and fax numbers, but also file servers and groups of addresses. You can register up to
1,600 addresses in the Address Book, and 200 in one-touch buttons.
3
4
Destination Type
Select the type of destination you
would like to register.
The information that is required
differs depending on the type of
destination you are registering.
Check the information required for
each type of destination.
3
■■E-Mail
E-mail address
■■Fax
Fax number, subaddress, and password
■■I-Fax
I-fax address, mode and conditions if required by
the destination
■■File
File destination's file path, protocol, host name
4
Select the onetouch button
you would
like to register
to → press
[Register/Edit].
Select the type of destination to register.
17
Storing Data in USB Memory
How to Store Scanned Data
1
2
Insert a USB Flash
Drive into the
machine's USB
port → place the
original.
Various Scan Settings
When the Buttons Are Not Displayed
If [Network] and [Memory Media] are not displayed as in the screenshot
below, perform the following steps. (These settings can only be
performed by the administrator.)
1. Press
(Settings/Registration)
→ [Preferences] → [Display Settings]
→ [Store Location Display Settings].
2. Set <Network> and <Memory Media>
to 'On'→ press [OK].
3. Restart the machine.
Scanning the Original Clearly
Selecting the type of original enables you to easily
specify optimal settings for your original type.
18
■■ Photo
■■ Text/Photo
■■ Text
Select this option
when scanning
originals that
contain only
images, such
as pictures and
illustrations.
Select this option
when scanning
originals that
contain both images
and text, such as
an illustrated news
article.
Select this
option when
scanning
originals that
contain only text,
such as a textonly printout.
You can store scanned data in memory media. Memory media can be connected to the
machine through the USB port on the side of the machine to the right of the control
panel. When scanning data, by setting the original type, file format, and file name, you
can save data in an easy to use format.
3
4
Select the USB as
the data destination
→ press [Scan] →
configure the settings
for scanning → press
the Start key.
Selecting the File Format That Suits Your Need
When converting an original to scanned data, you can select the
following file formats: JPEG, TIFF, PDF, XPS, OOXML. For more
information on file formats, see "Digitizing Documents," on p.
22.
Removing the Memory Media
When removing memory media from the machine, make sure you
first press
and follow the instructions displayed on the screen. If
you do not follow the proper procedure, the scanned data may be
damaged or may not be stored in memory media.
Setting the File Name
You can use up to 24 characters for
the file name. If you do not specify
the file name, the current date and
time are automatically assigned as
the file name.
19
Using Data Stored in USB Memory
%
How to Access Stored Data
1
2
Press [Access Stored Files]
→ [Memory Media].
Various Print Settings
Adjusting the Print Data to Fit
the Paper Size
If the image is too big or too small for the
paper size it will be printed on, this feature
adjusts the image size to fit.
To use this feature, select the paper size with
[Select Paper].
If the paper size selection is set to 'Auto' the
image will not be adjusted to fit on the paper.
Print Settings
20
■■ Finishing
■■ 2-Sided Printing
■■ Select Paper
You can set sorting and
stapling when printing. These
features are useful when
printing PDF files containing
multiple pages.
You can set the machine to
print multiple-page data on
both sides of the paper.
You can select paper
appropriate to the print data
size from the paper drawer or
multi-purpose tray.
You can print data stored in memory media. You can also have the machine
automatically adjust a PDF or XPS file to print to a selected and loaded paper size, and
can set sorting or stapling when printing multiple pages. Furthermore, you can print
files that have been stored in another imageRUNNER ADVANCE by accessing it.
3
4
Select the USB where the print data
is stored → select the data you
want to print → press [Print].
Configure the print settings
→ press [Start Printing].
Using the Network
If an imageRUNNER ADVANCE with an Advanced Box exists
on the same network, this machine can access and print data
in the Advanced Box of that machine. You can also store data
scanned using this machine in the Advanced Box of another
imageRUNNER ADVANCE on the network.
You can use this feature when
printing PDF or XPS files.
Network
Removing
Memory Media
When removing memory
media from the machine,
make sure you first press
the
button and follow
the instructions displayed
on the screen. If you do
not follow the proper
procedure, the data may
be damaged.
21
Digitizing Documents
Available File Formats
Press the file format button
on the Scan and Send Basic
Features screen.
File Formats
■■JPEG
■■XPS
Create a JPEG file. The Grayscale or Full Color
mode is automatically selected for the color
mode.
Create an XPS file. You can also specify additional
settings.
■■TIFF
Create an Office Open XML (pptx) file. The
Grayscale or Full Color mode is automatically
selected for the color mode. You can also specify
additional settings.
Create a TIFF file. The Black & White mode is
automatically selected for the color mode.
■■PDF
Create a PDF file. You can also specify additional
settings.
The symbols displayed in the file
format button indicate the color
mode that is automatically set, or the
color mode that can be selected.
22
■■OOXML
Color
Gray Scale
Black and White
You can send or store scanned originals in a variety of formats, such as JPEG, XPS, and
PDF. Also, when sending/storing a PDF file, you can outline images, reduce the file size,
and perform a wide variety of other settings. Select the optimal file type for how you
want to use the digitized data.
Detailed PDF Settings
■■Trace & Smooth
You can create a PDF file, containing an
outline image that is reusable in Adobe
Illustrator. By overlaying scanned images,
you can display clear, easy to read text in the
document.
■■Encrypt
You can create an Encrypted PDF. You can
set restrictions on opening and printing the
PDF, and can password the PDF as well.
■■Compact
Use this when you want to reduce the file
size. You can compress a scanned original
using a high compression ratio.
■■Apply Policy
You can create a PDF compatible with the
Rights Management Server. The permission
to access the stored PDF can be edited with
the Adobe LiveCycle Rights Management ES.
■■OCR (Text Searchable)
Use this to extract text data from the part
that can be recognized as text. You can
search the created PDF document.
*Some functions require optional products.
Some buttons may not appear on your
machine.
■■Add Digital Signatures
Use this to extract text data from the part
that can be recognized as text. You can
search the created PDF document.
Adding Settings to a PDF
You can add certain settings
from [Set Details] when
selecting PDF, XPS, or OOXML
as the file format.
As shown in the sample image,
you can combine multiple
settings, including:
■■Trace &
Smooth
■■OCR (Text
Searchable)
ABCDE
••Digital signatures to help
prevent data from being
altered
••OCR to allow text searching
••Encryption
••Trace & Smooth to clearly
display scanned data.
■■Encrypt
■■Digital Signature
23
Finishing Documents
Various Finishing Functions
Sorting Copies
■■Collate
1
1
1
2
2
1
2
3
3
4
2
3
4
3
4
4
■■Group
1
2
1
2
3
4
1
4
3
2
1
4
3
2
1
4
3
2
3
4
■■Offset
Shifts the position of each copy set while
printing, and can be combined with the Collate
or Group function. An optional staple finisher is
required to use this mode.
How to Staple Documents (When Using the Copy Function)
When using the Staple function, take care of the
orientation of the original, and specify the settings
according to the instructions on the screen.
1
■■Portrait
Place the original so that its top edge
is inserted in the feeder.
■■Landscape
Place the original so that its left
edge is inserted in the feeder.
Depending on the alignment of the paper and the
stapling position, the staples may be inserted from the
back of the paper.
Press [Options]
on the Copy
screen →
[Finishing].
*You can use the Staple function when a staple finisher is attached to the machine.
24
By setting a finishing function when copying or printing, you can output documents in a manner that is easy to see and manage. This is especially useful when copying or printing documents
with multiple pages, for example by using the Collate function to collate copies in page order, or
the N On 1 function to combine multiple pages together on a single sheet of paper.
Printing Multiple Pages to a Single
Sheet of Paper
Two-Sided Printing
You can copy one-sided
originals to both sides of the
paper, or two-sided originals
to separate sheets of paper.
You can print a multiple
page document or twosided document on a single
sheet of paper.
Paper That Does Not Support Finishing
Do not use the finishing functions with the following paper, as
doing so may not work properly or may cause trouble.
••Custom Size papers
••Envelopes
••Transparencies
••Labels
These finishing functions can also be set when printing from
a computer. See the following page.
2
3
Press [Staple] → [Next].
Select the position for stapling and
the original orientation → press [OK].
25
Printing from a Computer
How to Print from a Computer
1
2
Select the print function from the menu of
the application you are using.
Select the machine as the printer to
print from → click [Properties].
Various Settings on the Basic Settings Tabs
Install the Printer Driver
Install the printer driver in the computer to use for printing in advance. For
instructions on how to install the driver, see the installation guide included
on the printer driver CD.
Printing Documents Privately
Select secure printing when executing a print job. The print
job is protected by a PIN. The print is only output after entering
the PIN from the touch panel display of the machine.
password
password
Checking the Print
Settings and Device
Settings
You can check the print settings and
the optional equipment attached to
the device.
26
Use the printer driver to print data on your computer from the machine. The printer driver contains many print settings, but the most frequently used settings are on the [Basic Settings] tab.
Utilize the [Basic Settings] tab first.
3
4
Select the paper source and specify
the print settings → click [OK].
Enter the number of copies → click
[OK].
Customizing the Layout
■■Output Size
■■Page layout
Select the paper drawer that
contains the paper you want to
print on. If you do not select a
paper drawer, Paper Drawer 1 is
used.
Select [2 on 1], etc. to print
multiple pages to a single sheet
of paper.
■■Orientation
Select [Portrait] or [Landscape]
for the paper orientation.
■■Manual Scaling
Set an enlargement/reduction
ratio to print with according to
the paper size.
Setting the Finishing Mode
■■Finishing
■■1-sided/2-sided/Booklet Printing
Select [Collate] or [Group] for the
sorting method.
Set whether to use one-sided or two-sided printing.
■■Binding Location
Set the binding location when performing twosided printing or stapling.
The detailed finishing settings are
equivalent to those for the Copy
function. See the previous page.
27
Printing with the Multi-Purpose Tray
How to Print Using the Multi-Purpose Tray
Before Loading Envelopes
1
2
A
B
Loading Envelopes into the MultiPurpose Tray
*Make sure that the flap is facing up.
A COM10 No.10, Monarch, DL,
ISO-C5, Yougatanaga 3
Take the stack of envelopes and loosen
them, and then remove curling. Also
remove the air inside the envelopes.
Load the envelopes so that the flap is
on the far side.
B Nagagata 3
Load the envelopes so that the flap is
facing towards the machine.
Printing to Paper Loaded in the Multi-Purpose Tray from a Computer
5
6
Select the multi-purpose tray →
click [OK].
Click [Print] → [Properties] from the
application you are using.
For instructions on using the printer driver, see the previous page.
28
You can use the multi-purpose tray to copy and print to various types of paper including envelopes, labels, transparencies, and bond paper. Note that the direction to load envelopes depends
on the type of envelope.
Settings on the Machine
3
4
Specify the detailed envelope type
settings → press [OK].
Select the envelope type from the
multi-purpose tray paper size selection
screen → press [OK].
You can register
paper information in
advance.
This eliminates the need to set the
multi-purpose tray paper selection
screen displayed each time paper is
loaded in the multi-purpose tray.
7
Specify the number of copies to
print → click [OK].
29
Operating the Machine from a Computer
What is the Remote UI?
The Remote UI is a function for
remotely checking and operating
the machine.
It also enables you to directly
print files on the desktop of your
computer.
Remote UI : Portal
Device Basic Information
Device Status
Printer :
Scanner :
Fax :
Ready to print
Ready to Scan
Ready to sent or
receive faxes.
Error Information
No error
Consumables Information
Paper Information
Various Remote UI Functions
You can export and import registered information.
The information that can be exported/imported includes the Address
Book, one-touch button, and Web browser information.
The exported data can be shared between imageRUNNER ADVANCE
series machines, and can be used to carry over settings when
replacing a machine, etc.
Switching the Login Service
The machine supports various login services. The login
service to use can be switched using Service Management
Service.
■■Department ID Management
Manages login information using an ID and PIN assigned
to each department. The number of prints made can be
counted and copy limits can be set.
■■Single Sign On-H (SSO-H)
Manages login information using an ID and password
assigned to each user. Enable SSO-H when using functions
that require user personalization, such as Quick Menu
personal buttons and personal folders.
30
You can check the
consumable and
machine status.
You can check the amount of
remaining paper and toner.
An error message is also
displayed on the top screen
when an error has occurred,
etc.
You can use the Remote UI function to check the status of the machine and specify
settings from the browser screen of a computer on the network. Use the Remote UI to
comfortably perform operations such as editing the Address Book and importing/exporting device settings using the keyboard of your computer.
How to Access the Remote UI
1
2
Open a browser on your computer →
enter the IP address of the machine in the
address field and press [ENTER] on the
keyboard → log in from the login screen.
Check the IP address of
the machine in [TCP/
IP Settings] (Settings/
Registration).
To log in as a system manager, enter the
System management ID/System PIN →
click [Administrator Login]. To log in as a
general user, click [General User Login].
■■Main Screen
You can check the job
status and history. You
can perform operations
such as switching the
order of jobs.
You can perform
settings/registration
and restart the
machine.
Installing software and managing
user setting information can only be
performed by an administrator.
You can use functions that are convenient for
operating from a computer, such as managing
the Address Book and performing direct
printing.
31
CANON INC.
30-2, Shimomaruko 3-chome, Ohta-ku, Tokyo 146-8501, Japan
CANON U.S.A., INC.
One Canon Park, Melville, NY 11747, U.S.A.
CANON CANADA INC.
6390 Dixie Road Mississauga, Ontario L5T 1P7, Canada
CANON EUROPA N.V.
Bovenkerkerweg 59, 1185 XB Amstelveen, The Netherlands
(See http://www.canon-europe.com/ for details on your regional dealer)
CANON LATIN AMERICA, INC.
703 Waterford Way Suite 400 Miami, Florida 33126 U.S.A.
CANON AUSTRALIA PTY. LTD
1 Thomas Holt Drive, North Ryde, Sydney, N.S.W. 2113, Australia
CANON CHINA CO., LTD
15F Jinbao Building No.89 Jinbao Street, Dongcheng District, Beijing 100005, China
CANON SINGAPORE PTE. LTD.
1 HarbourFront Avenue #04-01 Keppel Bay Tower, Singapore 098632
CANON HONGKONG CO., LTD
19/F., The Metropolis Tower, 10 Metropolis Drive, Hunghom, Kowloon, Hong Kong
FT6-0273 (000)
xxxxxxxxxx © CANON INC. 2013 PRINTED IN CHINA