1
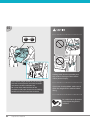
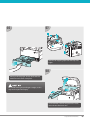
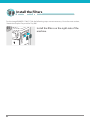
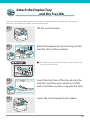
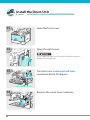
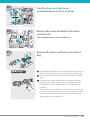
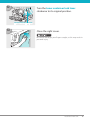
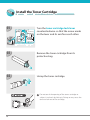
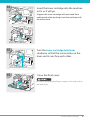
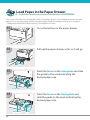
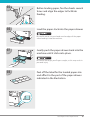
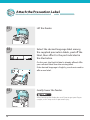
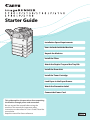
Starter Guide
Installation Space Requirements
Items Included with the Machine
Unpack the Machine
Install the Filters
Attach the Duplex Tray and the Tray Rib
Install the Drum Unit
Install the Toner Cartridge
Load Paper in the Paper Drawer
Attach the Precaution Label
Connect the Power Cord
This guide explains the procedures from unpacking
the machine through power cord connection.
Be sure to read the manual before using the
machine. The remarks for important safety
instructions are described in “User’s Guide.” Read the
manual also.
Keep the manual for future reference.
CONTENTS
01
Installation Space Requirements
02
Items Included with the Machine
03
Unpack the Machine
06
Install the Filters
07
Attach the Duplex Tray and the Tray Rib
08
Install the Drum Unit
12
Install the Toner Cartridge
14
Load Paper in the Paper Drawer
16
Attach the Precaution Label
17
Connect the Power Cord
Symbols Used in This Manual
The following symbols are used in this manual to explain procedures, restrictions, handling precautions, and
instructions that should be observed for safety.
Indicates a caution concerning operations that may lead to injury to persons if not
performed correctly. To use the machine safely, always pay attention to these
cautions.
Indicates operational requirements and restrictions. Be sure to read these items
carefully to operate the machine correctly, and avoid damage to the machine or
property.
Indicates an operation that must not be performed. Read these items carefully, and
make sure not to perform the described operations.
ii Installation Space Requirements
To ensure proper ventilation and easy operation, set up the machine in an area that meets the
minimum requirements for clearance, as illustrated below.
View from Above
(When the optional Staple Finisher-H1 is attached.)
* The width is 37 1/8" (941 mm) when no options are attached.
4" (100 mm)
37 3/4" (960 mm)
21 1/4" (540 mm)
50 1/4" (1,276 mm)*
01
Items Included with the Machine
In the next section “Unpack the Machine,” check each item against this list as you remove it from the
accessories box (except for the drum unit).
Filters*1
Duplex Tray
Tray Rib
Drum Unit
Paper Size Labels
Precaution Labels
Power Cord
Telephone Line Cable*2
CD-ROM × 5*3
Paper Manual × 3
Registration Card
*1 These filters are not supplied with the imageRUNNER 1730iF/1730.
*2 Only for the imageRUNNER 1750iF/1740iF/1730iF. For instructions on how to connect the cable, see Chapter 2, “Before You Start Using
the Machine,” in the User’s Guide.
*3 The number of CD-ROMs may vary depending on the models you purchased.
02 Unpack the Machine
01
03
Remove the materials shown in blue and set
aside the machine’s accessories box on the
right side for later use.
02
Press the button on the paper drawer.
Pull out the paper drawer as far as it will go
and then remove the tape and the packing
material inside.
04
Lift the paper drawer and pull it out
completely.
For Users with the Optional Cassette:
Go to the installation manual supplied with the
optional cassette to attach the cassette to the
machine, then continue from step 7 under “Unpack
the Machine” in this document.
03
05
97.7
lb
44.3
kg
Holding other than the specified parts
may result in damage to the machine
and/or personal injury.
The machine weighs about 97.7 lb (44.3 kg).
Use two or more persons to lift the machine
and move it to the installation site.
Be sure to firmly hold the front of the
machine by the paper drawer slot and lifting
handles on the rear side of the machine.
If you have a back problem, make sure to
check the weight of this machine before
lifting.
Be careful not to slip on the
polyethylene bag for the
machine.
04 Unpack the Machine
06
07
Remove all shipping tape from the flap side
edges.
08
Gently push the paper drawer back into the
machine until it clicks into place.
Be careful not to get your fingers caught, as this
may result in personal injury.
Lift the feeder, remove the protective sheet,
and take out the drum unit.
Unpack the Machine 05
Install the Filters
For the imageRUNNER 1730iF/1730, the following steps are not necessary. Go to the next section,
“Attach the Duplex Tray and the Tray Rib.”
01
06 Install the filters on the right side of the
machine.
Attach the Duplex Tray
and the Tray Rib
If you are attaching the optional Staple Finisher-H1 to the machine, the following steps are not
necessary. Go to the next section, “Install the Drum Unit.”
01
02
Lift the control panel.
Attach the duplex tray by inserting its tabs
into the slots on the machine.
Be careful not to accidentally insert the tabs into the slot
circled in the illustration.
03
04
Insert the front tabs of the tray rib into the
slots first and then press down on its left
end so that the rear tabs snap into the slots.
Lower the control panel back in place.
07
Install the Drum Unit
01
Open the front cover.
02
Open the right cover.
Always open the right cover during installation to prevent
damage to the drum unit.
03
Turn the toner container lock lever
counterclockwise 90 degrees.
Toner Container Lock Lever
04
08 Remove the waste toner container.
05
Turn the drum unit lock lever
counterclockwise as far as it will go.
Drum Unit Lock Lever
06
Remove the cover attached to the drum
insertion slot.
The removed cover is not used later on.
07
Remove the drum unit from its protective
bag.
Do not touch or expose the cylindrical, blue-green part to
light for a long time, as the print quality may deteriorate.
Do not expose the drum unit to direct sunlight or strong
light.
Condensation (water droplets on the inside or outside)
may form on the drum unit when it is brought into an
environment with a sudden change in temperature or
humidity.
When moving a new drum unit to a location with change
in temperature, leave the drum unit in the protective bag
at the new location for two or more hours to allow it to
adjust to the new temperature.
Install the Drum Unit 09
08
09
Pull the two orange rings out and remove
the protective cover.
Holding the tab and the part with the blue
marking, slowly insert the drum unit until it
stops.
Make sure that the drum unit slides properly along
the rails on the machine.
10
Turn the drum unit lock lever clockwise to
its original position.
Drum Unit Lock Lever
11
10 Install the Drum Unit
Reinsert the removed waste toner
container.
12
Turn the toner container lock lever
clockwise to its original position.
Toner Container Lock Lever
13
Close the right cover.
Be careful not to get your fingers caught, as this may result in
personal injury.
Install the Drum Unit 11
Install the Toner Cartridge
01
Turn the toner cartridge lock lever
counterclockwise so that the arrow marks
on the lever and its axis face each other.
Toner Cartridge Lock Lever
02
03
Remove the toner cartridge from its
protective bag.
Uncap the toner cartridge.
Do not touch the opening of the toner cartridge or
subject it to shock by hitting it. Doing so may cause the
toner to leak out of the cartridge.
12 04
Insert the toner cartridge into the machine
as far as it will go.
Support the toner cartridge with one hand from
underneath while pushing it into the machine with
the other hand.
05
Turn the toner cartridge lock lever
clockwise so that the arrow marks on the
lever and its axis face each other.
Toner Cartridge Lock Lever
06
Close the front cover.
Be careful not to get your fingers caught, as this may result in
personal injury.
Install the Toner Cartridge 13
Load Paper in the Paper Drawer
This section describes how to load plain paper in the paper drawer. If you load paper other than plain
paper such as recycled paper, specify the type of paper loaded in the paper drawer. (See Chapter 3,
“Configuring the Machine’s Basic Settings,” in the Reference Guide.)
01
Press the button on the paper drawer.
02
Pull out the paper drawer as far as it will go.
03
Pinch the lever on the side guide and slide
the guide to the mark indicating the
desired paper size.
Side Guide
Lever
04
Pinch the lever on the front guide and
slide the guide to the mark indicating the
desired paper size.
Front Guide
14 Lever
05
06
Before loading paper, fan the sheets several
times and align the edges to facilitate
feeding.
Load the paper stack into the paper drawer.
Be careful not to cut your hands on the edges of the paper
when loading it into the machine.
07
Gently push the paper drawer back into the
machine until it clicks into place.
Be careful not to get your fingers caught, as this may result in
personal injury.
08
Peel off the label for the loaded paper size
and affix it to the part of the paper drawer
indicated in the illustration.
Load Paper in the Paper Drawer 15
Attach the Precaution Label
01
02
Lift the feeder.
Select the desired language label among
the supplied precaution labels, peel off the
label, then affix it to the part indicated in
the illustration.
On this part, the English label is already affixed. Affix
your selected label over the existing label.
If the desired language is English, you do not need to
affix a new label.
03
Gently lower the feeder.
When lowering the feeder, be careful not to get your fingers
caught, as this may result in personal injury.
16 Connect the Power Cord
For Users with the Optional Finisher:
Go to the installation manual supplied with the optional finisher to attach the finisher to the
machine, then connect the power cord.
01
02
Connect the power cord to the socket on
the left side of the machine and to the wall
outlet.
You have now completed assembling the
machine. Please go to the User’s Guide to
check and see what settings you need in
order to use the machine’s functions.
17
CANON INC.
30-2, Shimomaruko 3-chome, Ohta-ku, Tokyo 146-8501, Japan
CANON U.S.A., INC.
One Canon Plaza, Lake Success, NY 11042, U.S.A.
CANON CANADA INC.
6390 Dixie Road Mississauga, Ontario L5T 1P7, Canada
CANON EUROPA N.V.
Bovenkerkerweg 59-61 1185 XB Amstelveen, The Netherlands
(See http://www.canon-europe.com/ for details on your regional dealer)
CANON LATIN AMERICA, INC.
703 Waterford Way Suite 400 Miami, Florida 33126 U.S.A.
CANON AUSTRALIA PTY. LTD
1 Thomas Holt Drive, North Ryde, Sydney, N.S.W. 2113, Australia
CANON CHINA CO., LTD
15F Jinbao Building No.89 Jinbao Street, Dongcheng District, Beijing 100005, China
CANON SINGAPORE PTE. LTD.
1 HarbourFront Avenue #04-01 Keppel Bay Tower, Singapore 098632
CANON HONGKONG CO., LTD
19/F., The Metropolis Tower, 10 Metropolis Drive, Hunghom, Kowloon, Hong Kong
FT5-3724 (000)
xxxxxxxxxx © CANON INC. 2011 PRINTED IN CHINA