1
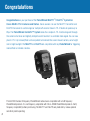
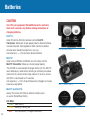
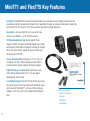
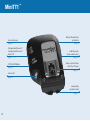
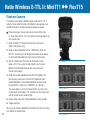
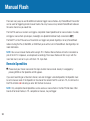
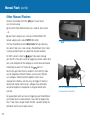
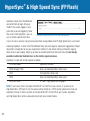
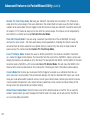
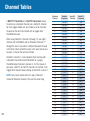
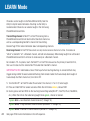
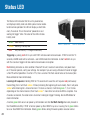
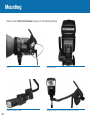
Owner’s Manual
MiniTT1 /FlexTT5 for Canon
™
340 – 354 MHz, US FCC/Canada IC
™
Safety Warnings
Please pay attention to the following safety warnings:
• Operating temperature: above -15° C (5° F) and below 50° C (120° F)
• Storage temperature, without batteries: above -30° C (-22° F) and below 85° C (185° F)
-- Remove batteries during storage.
• Battery Requirements:Qty. 2 AA (IEC:LR6) for FlexTT5
CR2450 or CR2354 for MiniTT1
• Do not remove instrument covers during operation.
• Do not operate the device in the presence of flammable gases or fumes. Operation of any
electrical instrument in such an environment constitutes a definite safety hazard.
• There are no user serviceable parts inside the MiniTT1 or FlexTT5. Do not install substitute parts
or perform any unauthorized modification of the instrument. Refer servicing only to qualified and authorized personnel.
• Red LED’s are used for dim light application and do not indicate a hazardous status.
• The MiniTT1 or FlexTT5 are accessory devices for cameras and flashes. Do not use this product
in a manner not specified in documentation.
WARNING – To avoid battery leakage, follow these guidelines:
• Always remove the batteries when the unit is not in use for extended periods of time, or
during shipping or long distance travel.
• Never mix old and new batteries. Always use a fresh pair of matched batteries.
• Always change batteries promptly at the first indication of low battery operation.
• Do not use or leave the unit in extreme temperature or humid environments.
2
Congratulations
Congratulations on your purchase of the PocketWizard MiniTT1™/ FlexTT5™ System for
Canon DSLR E-TTL II cameras and flashes. Canon owners can use the MiniTT1 Transmitter and
FlexTT5 Transceiver to control single or multiple off-camera Canon E-TTL II flashes at speeds up to
8fps. The PocketWizard ControlTL™ System takes the complex E-TTL II data being sent through
the camera’s hot shoe and digitally interprets and transmits it as a reliable radio signal. You can now
place E-TTL II (or manual) flash units anywhere to illuminate the scene: Around corners, out-of-sight
and in bright sunlight. The MiniTT1 and FlexTT5 are compatible with any PocketWizard for triggering
manual flash or remote cameras.
This US FCC/Canada IC frequency PocketWizard radio slave is compatible with all US frequency
PocketWizard products. It is not frequency compatible with CE or JAPAN PocketWizard products. Verify
frequency compatibility before purchasing. The MiniTT1 and FlexTT5 are protected by various patents
and other patents pending.
3
Table of Contents
4
Safety Warnings
2
Congratulations
3
Batteries
6
MiniTT1 and FlexTT5 Key Features
7
MiniTT1 Feature Call-outs
8
FlexTT5 Feature Call-outs
9
READ ME FIRST
10
Powering On
11
Basic Wireless E-TTL II: MiniTT1 OO FlexTT5
12
No Flash on Camera
12
Flash on Camera
13
Ratio Wireless E-TTL II: MiniTT1 OO FlexTT5
14
Flash on Camera
14
General E-TTL II Considerations
15
Manual Flash
16
Remote Speedlites
16
Other Manual Flashes
17
Table of Contents (cont’d)
5
HyperSync® & High Speed Sync (FP Flash)
18
Advanced Features via PocketWizard Utility
20
Channels
22
Channel Tables
23
LEARN Mode
24
Remote Camera Triggering
26
Auto-Relay Mode
27
Reset
28
Status LED
29
Mounting
30
Long Range Performance
31
Troubleshooting
32
Canon Compatibility
35
Specifications
36
FCC Warning
39
Batteries
CAUTION
Turn OFF your equipment (PocketWizard units, electronic
flash units, cameras, etc.) before making connections or
changing batteries.
FlexTT5:
Install 2 fresh AA (IEC:LR6) batteries into the FlexTT5
Transceiver. Make sure to note proper polarity. Alkaline batteries
are recommended. Rechargeable or other chemistry batteries
will also work, though life expectancy may vary.
Life expectancy = ~60 hours with alkaline batteries
MiniTT1:
Install a fresh CR2450 or CR2354 coin cell battery into the
MiniTT1 Transmitter. Make sure to note proper polarity.
The CR2450 is recommended for longer battery life. The MiniTT1
saves batteries by automatically entering an extremely low power
state when the camera enters sleep mode, or if not on a camera
and TEST is not pressed for 10 seconds.
Life expectancy = 100’s of hours/thousands of triggers and varies
based on usage profile
FlexTT5 Battery Polarity
MiniTT1 Battery Polarity
MiniTT1 and FlexTT5:
Look at the normal LED blink to determine battery level,
or use the PocketWizard Utility.
LED Blink:
Green Good battery
Amber Warning – battery low
Red Very low battery – change immediately
6
CR2450 & CR2354 batteries
MiniTT1 and FlexTT5 Key Features
ControlTL: PocketWizard’s newest firmware platform taps into the camera’s digital communications
to enable an entirely new level of remote flash capabilities through our proven radio system, beginning
with remote TTL for Canon E-TTL II flash systems with Slide-n-Shoot Simplicity.
HyperSync - Achieve better than X-sync with many
cameras and flashes – up to 1/500th second.
FP/High-Speed Sync: Need more speed? Push
beyond 1/500th and go into FP/High-Speed sync mode
automatically. No buttons to press or settings to change
other than your shutter speed will give you flash sync
all the way to 1/8000th.
Power Tracking: When working in E-TTL II, you can
change any of your control settings on your flash or
camera and the system adjusts for those changes.
Eight Frames per second: Never before have you
been able to shoot remote E-TTL II at this speed.
Nothing else comes close.
Low Profile Design: The FlexTT5 lies flat to stay out of
the way and uses a flip-up antenna for additional range
when needed. The MiniTT1, with an internal antenna,
weighs in at 2.3 oz. and is the smallest PocketWizard
ever.
7
What’s in the Box?
- MiniTT1 or FlexTT5
- Batteries
- USB Cord
- QuickGuide
MiniTT1™
Internal Antenna
page 31
Configuration/Channel 1
Configuration/Channel 2
Power Off
page 11, 22
TEST/LEARN Button
page 24
Battery Compartment
(on bottom)
page 6
USB Connector
(under rubber cover)
page 20
Canon-style Hot Shoe
with Pass Through
page 12
Status LED
page 29
Locking Ring
(on bottom foot)
page 12
8
FlexTT5™
USB Connector (behind antenna)
page 20
Lanyard Loop
page 30
Adjustable Antenna
page 31
Zone Selector
page 14
Configuration/Channel 1
Configuration/Channel 2
Power Off
page 11, 22
TEST/LEARN Button
page 24
Remote Studio or other
flash Triggering Port
page 17
Remote Camera Triggering Port
page 26
Status LED
page 29
9
Battery Compartment
(2 AA [IEC:LR6])
page 6
1/4-20 mount
(on bottom)
page 30
Canon-style
Hot Shoe with
Pass Through
page 12
Locking Ring
(on bottom foot)
page 30
READ ME FIRST
If this is the first time you are using a remote E-TTL II flash system, we recommend you
consult your camera and flash manuals for your camera for the basics of positioning your
flash units.
Review the owner’s manuals for your camera and flash system. For most basic functions
when using Canon’s system or PocketWizard’s, operation is identical. Important exceptions
will be noted in this manual.
All equipment should be turned OFF when making connections, otherwise unwanted
triggering may occur when inserting or removing a flash or camera cable.
The first exposure after making initial connections or powering on may not be properly
exposed. The first shot is a camera calibration shot. Always test fire at least twice!
You may use a FlexTT5 as a transmitter instead of a MiniTT1 in all scenarios.
Make sure all PocketWizard radios are set to the same PocketWizard channel. The
PocketWizard channel is used instead of Canon’s E-TTL II communication channel.
See the LEARN Mode and channels section for more information.
IMPORTANT: Canon flashes set to <SLAVE> and connected to FlexTT5 radios will have
slave mode automatically turned off, but will still function as slaves correctly. Set the
Canon slave group via the FlexTT5 Zone Switch.
Only compatible Canon Speedlites can be used in the MiniTT1 or FlexTT5 hot shoe.
Other brands of hot shoe flashes, E-TTL compatible or manual, will not trigger.
10
Powering On
1. Turn OFF all your equipment (PocketWizard radios,
electronic flashes, cameras, etc.) before making connections.
2. When all equipment is connected, turn ON your MiniTT1
or FlexTT5 first by setting the power switch to C.1 or C.2
(see Channels for more information on C.1 and C.2). Verify
radio blinks normally (short blink every 2 seconds)
3. Turn on your connected camera and flash equipment last.
The first exposure after making initial connections and
powering on may not be properly exposed. The first shot is a
camera calibration shot. Always test at least twice.
Power switch OFF
Connecting a MiniTT1 or FlexTT5 to your camera when the
camera is already turned on may cause erratic behavior. Either
follow the sequence above or let your camera “sleep”, then
try again.
NOTE: A few flash adjustments may not be available when the
flash is in the shoe of a powered on MiniTT1 or FlexTT5 and
sitting on an active camera. For example, you cannot take a
580EX II out of <MASTER> mode if the flash is in the hot shoe of
a powered on remote FlexTT5. Turn the MiniTT1 or FlexTT5 off,
wait for the camera to sleep, or remove the flash from the shoe to
access these special mode changes.
11
Power switch ON and set to C.1
Basic Wireless E-TTL II: MiniTT1 OO FlexTT5
No Flash on Camera
This simple mode of operation allows you to use one or more
remote E-TTL II flashes as one zone of light. All remote E-TTL II
flashes will fire at the same power level which is chosen
automatically by the camera.
1. Slide the MiniTT1 Transmitter onto the camera
and tighten the locking ring.
2. Slide the remote Speedlite onto a FlexTT5
Transceiver, tighten the locking ring, and secure
the FlexTT5. Repeat for each remote Speedlite.
The remote Speedlites should be set to normal
mode, not <MASTER> or <SLAVE>.
3. Trigger normally.
MiniTT1 on camera shoe
Please read your Canon manuals on Fully
O
Automatic Wireless Flash (also called E-TTL II
Wireless Autoflash).
This mode of operation is the same as using Canon’s
wireless system with one of the following directly in
the shoe of the camera:
• A Canon ST-E2 in non-ratio mode
• A 580EX (I or II) Speedlite in <MASTER> mode,
main flash off, in non-ratio mode.
12
Speedlite on FlexTT5 mounted on
flash stand
Basic Wireless E-TTL II: MiniTT1 OO FlexTT5 (cont’d)
Flash on Camera
This mode is identical to the previous page, adding a flash
to the top hot shoe of the MiniTT1. All remote E-TTL II
flashes and the master flash will be treated as one zone of
light and will fire at the same power level which is chosen
automatically by the camera.
IMPORTANT: The Speedlite in the MiniTT1’s top shoe
must be in <MASTER> mode, otherwise the remote flashes
will not trigger. Wait for the camera to sleep, turn OFF the
MiniTT1, or remove the flash from the shoe before
engaging <MASTER> mode.
Please read your Canon manuals for the steps to enter
O
<MASTER> mode.
1. Slide the MiniTT1 Transmitter onto the camera and tighten
the locking ring.
Speedlite on MiniTT1 in camera shoe
in <MASTER> mode
2. Slide a Canon Speedlite set for <MASTER> onto the MiniTT1 and secure its locking shoe.
3. Slide the remote Speedlite onto a FlexTT5 Transceiver, tighten the locking ring, and secure the
FlexTT5. Repeat for each remote Speedlite. The remote Speedlites should be set to normal
ETTL mode, not <MASTER> or <SLAVE>.
4. Trigger normally.
NOTE: You can use a 430EX (I or II) as a single zone master! These flashes do not have a master
mode, and cannot usually trigger remote E-TTL II flashes. Enable Force TTL Master Mode in the
PocketWizard Utility and they can.
This mode also benefits the 580EX (I or II) by reducing the “flickering pre-flash” normally
associated with master mode. On that flash, set the wireless selector to <OFF> and enable
Force TTL Master Mode. See the PocketWizard Utility help for more information.
13
Ratio Wireless E-TTL II: MiniTT1 OO FlexTT5
Flash on Camera
This mode uses Canon’s Wireless Flash Ratio with E-TTL II
system. Place remote flashes into different slave groups and
control the balance of light among the groups or zones.
Please read your Canon manuals for more information
O
on Flash Ratio with E-TTL II and how to control groups from
the master flash.
1. Slide the MiniTT1 Transmitter onto the camera and
tighten the locking ring.
2. Slide a Canon Speedlite (set for <MASTER>) onto the
MiniTT1 and secure its locking shoe. Enable slave groups
in the master Speedlite per flash manual instructions.
3. Set the remote FlexTT5 radios to the desired slave
group (A, B, C) by using the Zone Switch on the side.
Note that PocketWizard Zones are used instead of
Canon slave groups.
4. Slide the remote Speedlite onto a FlexTT5, tighten the
locking ring, and secure the FlexTT5. Repeat for each
remote Speedlite. The remote Speedlites should be set
to normal ETTL mode, not <MASTER> or <SLAVE>.
The slave group is set by the Zone Switch and not in the
remote flash. All remote E-TTL II flashes on the same Zone
will be treated as one zone of light.
Ratio Mode
FlexTT5 Zone A
5. Adjust ratios using the master Speedlite’s flash controls.
6. Trigger normally
14
You may use Canon’s Speedlite Transmitter, the ST-E2, instead
of a 580EX to control ratios.
FlexTT5 Zone B
Ratio Wireless E-TTL II: MiniTT1 OO FlexTT5 (cont’d)
General E-TTL II Considerations
There are several important factors to keep in mind when
using the ControlTL system to extend Canon’s wireless
functionality:
• Operate the camera normally by pressing the shutter release button halfway to establish focus or metering before shooting. On some Canon cameras, pressing the shutter release button too quickly before camera wakeup may cause the pre-flash to miss or cause an over/under-expose.
Canon ST-E2
• The range of Canon’s E-TTL II ability to measure
light may be exceeded by the range of the ControlTL
system. In other words, it is possible to place Speedlites so far away that the camera cannot
accurately measure their light in the frame. Adjust your remote flashes to light the subject better
so the camera can make a proper exposure calculation.
• Angle of operation is extended. You can place flashes in more places, including behind you,
than allowed by Canon’s light pulse system.
• Consider your metering mode carefully: center-weighted, evaluative, spot, etc. When pushing the envelope of flash distances, you need to be sure you craft your remote lighting in a way that works with your metering mode.
• Review the Troubleshooting section for more information.
15
Manual Flash
There are many ways to use PocketWizard radios to trigger manual flashes. Any PocketWizard Transmitter
can be used for triggering remote manual flashes. You may have as many remote PocketWizard radios on
the same channel as you would like.
The FlexTT5 used as a receiver can trigger a compatible Canon Speedlite set to manual mode in its shoe,
or trigger a manual flash (studio pack, monolight, non-Speedlite hotshoe flash) connected to
.
The MiniTT1 or FlexTT5 used as a Transmitter can trigger and provide HyperSync for any PocketWizard
radio including the Plus II, MultiMAX, or OEM flash packs with a built-in PocketWizard. See HyperSync for
more information.
NOTE: You can use manual flashes while using E-TTL II flashes. Manual flashes will not be calculated as
part of the E-TTL II exposure, so compensate accordingly. The manual flashes will fire in sync with the
main flash burst, and not in sync with the E-TTL II pre-flash.
Remote Speedlites
Please read your Canon manuals for the steps to enter manual mode. Usually it is engaged by
O
pressing MODE on the Speedlite until M appears.
If you are transmitting on a Standard channel, and wish to trigger a remote Speedlite, the Speedlite must
be set to manual mode. If the Speedlite in the shoe of the remote FlexTT5 is set to E-TTL, the LED on the
FlexTT5 will blink red indicating an error. Set the flash to manual.
NOTE: Only compatible Canon Speedlites can be used as a manual flash in the FlexTT5 hot shoe. Other
brands of hot shoe flashes, E-TTL compatible or manual, may not trigger.
16
Manual Flash (cont’d)
Other Manual Flashes
Connect the remote FlexTT5’s
sync terminal using:
port to your flash’s
a) the correct PocketWizard flash sync cable for best results.
- or b) your flash’s original sync cable and a PocketWizard PC
female adapter, part number MPCF (804-605).
Use
for remote manual flash
Visit the PocketWizard.com Cable Finder for help selecting
the correct flash sync cable. Using a PocketWizard direct cable
is always preferred over an adapter for ultimate reliability.
DO NOT connect a flash to
port. You could damage
your FlexTT5. This port is only for triggering a Canon motor drive
and is not designed for the voltages or current found on flashes.
Attempting to connect 2 flashes to the
port, or 1
flash to this port while there is another in the FlexTT5’s shoe,
can be dangerous. Different flashes can have very different
sync voltages. Connecting them together could cause
damage to the flashes, and they may not trigger. 2 identical
flashes with known identical sync voltages may work when
connected together, but operation is not guaranteed to be
risk free.
For guaranteed safety and secure triggering, one PocketWizard
per remote flash is recommended. If you need to trigger more
than 1 flash from a single remote FlexTT5, consider setting the
additional flash to use its optical slave.
17
FlexTT5 mounted with Velcro ®
& connected to studio flash
HyperSync® & High Speed Sync (FP Flash)
HyperSync allows for a PocketWizard
connected flash to begin firing just
*before* the camera triggers a sync
pulse. Since you are triggering “faster
than a wire” with HyperSync, you can
Setting the HyperSync Offset in the PocketWizard Utility
sync at shutter speeds faster than
X-sync for many cameras and get more usable flash energy before Auto FP (High Speed Sync) is activated.
Adjusting HyperSync is done in the PocketWizard Utility (see next page for adjustment suggestions). Proper
adjustment is dependent on on your equipment’s abilities. Try the default setting and look for clipping
(black lines in your images). Adjust up or down as needed to eliminate the black lines. It is not always
possible to eliminate the black lines as the shutter speed increases.
HyperSync is used with shutter speeds as follows:
1/200 and slower
HyperSync not used
1/250 through 1/350
Auto-calculated HyperSync offset used
1/400
Full HyperSync offset used
1/500
Auto-calculated HyperSync offset used
1/640 and faster
FP Flash / High Speed Sync engaged
NOTE: If you have a flash in the shoe of the MiniTT1 or FlexTT5 on your camera, it must be set to
High Speed Sync (FP Flash). If not, the camera will be limited to a 1/200 shutter speed and will not use
HyperSync timings. If there is no flash in the shoe of MiniTT1 or FlexTT5 on your camera, HyperSync
and High Speed Sync will be used automatically with your remote flashes.
18
HyperSync® & High Speed Sync (FP Flash) (cont’d)
HyperSync is set in a transmitting radio only. It is not
used in a remote FlexTT5. All receiving PocketWizard
radios, including the Plus II, etc., will trigger in sync with
HyperSync. At 1/640 and above, Standard triggers
are not sent.
NOTE: HyperSync requires a MiniTT1 or FlexTT5 as a
transmitter. A Standard transmitter like a Plus II cannot
trigger a remote FlexTT5 and achieve HyperSync.
If you are seeing Front Curtain clipping (top of frame
is dark), then your HyperSync offset should be moved
towards 0 (zero). If you are seeing Rear Curtain clipping
(bottom of frame is dark), then your HyperSync offset
should be moved away from 0 (zero).
When making adjustments, try adjusting in 30 microsecond steps until you see some changes, then try
smaller steps to fine tune your setting. Remember to
press Set Both Configs in the Utility after every
adjustment.
For some camera and flash combinations it is not possible
to eliminate clipping, especially at the faster HyperSync
shutter speeds like 1/400 and 1/500. Use a slower
shutter speed or use 1/640 or higher and engage
FP Flash/High Speed Sync. FP Flash/High Speed Sync
is not available on shutter speeds between 1/250 and
1/640 when using ControlTL radios.
19
Front Curtain Clipping = move HyperSync
slider towards 0
Rear Curtain Clipping = move HyperSync
slider away from 0
Advanced Features via PocketWizard Utility
Advanced features in the MiniTT1 and FlexTT5 are
available when using the PocketWizard Utility and
connecting your radio to your PC or Mac via a USB
cable. Be sure to install the Utility before connecting!
Download the latest version of the Utility at
PocketWizard.com here. Be sure to read the help
within the Utility for more information on how to
use it.
Turn your radio on before connecting to your computer
and you will see battery level in addition to detailed
status information.
PocketWizard Utility
Review the Reset section in this manual to understand
more about the features set in the Utility and how you
can revert them to their factory defaults in the field.
Firmware: The Maintenance section of the Utility is your
portal to firmware updates via the internet.
Channels: Within the Utility you can set the channels that
will be used for C.1 and C.2. See the Channels and Learn
Mode sections in this manual for more information on how
setting channels works in the field and via the Utility.
MiniTT1 USB port
HyperSync: This powerful feature is set within the Utility.
See the HyperSync section of this manual for more
information.
20
FlexTT5 USB port
Advanced Features via PocketWizard Utility (cont’d)
Remote TTL Flash Sleep Delay: Normally your ControlTL transmitter tells all remote E-TTL II flashes to
sleep when the camera sleeps. This saves batteries in the remote flash but could cause the flash to take a
moment to be ready before the next trigger. Enable this feature to have your ControlTL transmitter wait to tell
all remote E-TTL II flashes to sleep until a time after the camera sleeps. This feature can be independently
over-ridden by a remote flash using Flash Idle Time Out Mode.
Flash Idle Timeout Mode: If you are using a standard transmitter like a Plus or MultiMAX, the sleep
command is never issued – the flash would always remain powered on. Enabling this feature causes the
connected flash to remain awake for a set period after any radio activity, then enter its sleep mode for
power saving. This control overrides Remote TTL Flash Sleep Mode.
Force TTL Master Mode: Enables the use of a 430EX or 430EX II in the shoe of a ControlTL transmitter
as a master to trigger remote flashes. The transmitter tells the camera that <MASTER> mode is active even
though that mode is not available or set in the flash. This also benefits the 580EX. Set the 580EX in the shoe
to normal mode (<MASTER>=OFF) and enable Force TTL Master Mode. This will make the 580EX in the
shoe not emit communication flashes. This reduces the “flickering pre-flash” that bothers some subjects.
Camera Model: Set to Auto, your radio uses the first trigger of a session as a calibration shot. You can
select your exact camera model. This will eliminate losing a first shot to calibration BUT means you cannot
swap your radio onto another model of camera, nor will you be able to Auto-calibrate your selected camera
if some variable (temperature, new camera firmware, potentially certain custom functions) throws off the
timing. Auto is the recommended and default setting.
Bottom Shoe Disable Mode: Check this box to turn off the bottom shoe on a FlexTT5. This is useful for
remote cameras where you want to deploy the FlexTT5 radio in the shoe, but do not want the FlexTT5 to
act as an Auto-Relay transmitter.
21
Channels
Channels enable you to work with other photographers and to keep your triggering exclusive. Some
channels operate on different frequencies to help you avoid interference. All PocketWizard radio slaves set
to the same channel work together.
ControlTL uses a new channel system in addition to the Standard channel system used in other
PocketWizard radios. The MiniTT1 Transmitter and FlexTT5 Transceiver can trigger all existing
PocketWizard radios. They can also be taught channels (including new ControlTL channels) by existing
PocketWizard transmitters. The FlexTT5 can operate as a receiver for any PocketWizard transmitter.
IMPORTANT: When a MiniTT1 or FlexTT5 is used as a transmitter, it always sends out 2 triggers, one
ControlTL trigger on a ControlTL channel, and one Standard trigger on its channel. This enables you to use
an E-TTL II system with other manual flashes. The ControlTL system synchronizes both triggers precisely.
MiniTT1 & FlexTT5 Channel
Compatibility
HyperSync
(See Page 25)
E-TTL II
MiniTT1
FlexTT5
ControlTL Channels 1 – 20
Standard Channels 1 - 32
Zones A, B, C
Yes
Yes
Plus II & Plus
Standard Channels 1 – 4 Yes
No
MultiMAX & MAX
(see Page 25)
Standard Channels 1 – 16
Quad-Triggering Channels 17 - 32
(Zones A, B, C)
Yes
No
OEM units w/ PocketWizard
(see Page 25)
Standard Channels 1 – 16
Quad-Triggering Channels 17 - 32
(Zones A, B, C)
Yes
No
Canon E-TTL II system channels are not used by the ControlTL system.
22
Channel Tables
A MiniTT1 Transmitter or a FlexTT5 Transceiver always
transmits on a Standard Channel and a ControlTL Channel
for every trigger. Make sure you choose a set of channels/
frequencies that will not interfere with or trigger other
PocketWizard users.
When using ControlTL channels 5 through 14, you might
interfere with a MultiMAX user on Standard Channels 17
through 26, even if you select a different Standard Channel
in the Utility. Check with other users in the area and be sure
to select a channel that will not interfere.
ControlTL channels 1-4 are repeated when teaching with
a Standard transmitter like the MultiMAX or a Legacy
PocketWizard on Standard channels 5 -16. That means if
you teach a MiniTT1 or FlexTT5 channel 5 in the field, it will
trigger other Control radios listening on ControlTL channel 1.
NOTE: Early Quick Guides refer to “Legacy Channels”
instead of Standard channels. They are the same thing.
23
Standard
Channel
1
2
3
4
5
6
7
8
9
10
11 12 13 14 15 16 17 18 19 20 21 22 23 24 25 26 27 28 29 30 31 32
Standard
Frequency
344.04
344.04
344.04 344.04 344.04 344.04 344.04 344.04 344.04 344.04 344.04 344.04 344.04 344.04 344.04 344.04 346.5 347 347.5 348
348.5 349 349.5 350 350.5 351 351.5 352 352.5 353 353.5 354 ControlTL
Channel
1
2
3
4
1
2
3
4
1
2
3
4
1
2
3
4
5
6
7
8
9
10 11 12 13 14 15 16 17 18 19 20 ControlTL
Frequency
340
345
341
346
340
345
341
346
340
345
341
346
340
345
341
346
346.5
347
347.5
348
348.5
349
349.5
350
350.5
351
340.5
341.5
342
342.5
343
345.5
LEARN Mode
Channels can be taught via the PocketWizard Utility. See the
Utility’s help for more information. Teaching via the Utility is
recommended. Channels can also be taught in the field using
PocketWizard transmitters.
Transmitting channel: A MiniTT1 or FlexTT5 learning from a
PocketWizard transmitter will learn both a Standard channel as
well as a corresponding ControlTL channel for transmitting.
Review Page 22 for more information about corresponding channels.
TEST/LEARN Button
Receiving channel: A FlexTT5 Transceiver can only receive on one channel at a time. It receives on
*either* a ControlTL *or* a Standard channel, not both simultaneously. When being taught from a Standard
PocketWizard transmitter it will learn to receive only on a Standard channel.
For remote E-TTL II systems, teach the MiniTT1 or FlexTT5 to be used as the primary transmitter first,
then use it to teach all the remote FlexTT5 radios their ControlTL channel.
IMPORTANT NOTES: Hold radios at least 2 feet apart when teaching/learning. A connected flash may
trigger during LEARN. To avoid undesired flashing from remote radios that have already been taught or
have already had their channel set, turn them OFF.
1. Turn the MiniTT1 or FlexTT5 radio ON and select the channel, C.1 or C.2, to be taught.
2. Press and hold TEST for several seconds. When the LED blinks amber, release TEST.
3. Quickly press and hold TEST on the teaching transmitting radio (MiniTT1, FlexTT5, Plus II, MultiMAX, etc.). When the LED on the radio being taught blinks green, channel is learned.
1 green blink = Low Standard channel learned (1 through 16)
2 green blinks = High Standard channel learned (MultiMAX 17 through 32)
3 green blinks = ControlTL channel learned (ControlTL 1 through 20)
24
See page 29 for more information on the LED sequence.
LEARN Mode (cont’d)
For remote E-TTL II to function, the ControlTL channel must be learned. If you see only 1 or 2 green blinks
after teaching then a Standard channel was learned and E-TTL II will not function. If you desire E-TTL II
functionality, teach the FlexTT5 again from the MiniTT1 or FlexTT5 to be used as the primary transmitter
and look for 3 green blinks.
To teach all radios in a system Standard channels, use the Standard transmitter as the teaching radio for
all learning radios, including MiniTT1 or FlexTT5 to be used as the primary transmitter.
If you see no green blinks during the LEARN cycle then the radio did not learn a new channel and will use
the previous one. Hold the radios farther apart and try teaching again.
SPECIAL NOTES
• Activating LEARN in a MiniTT1 causes a large drain on the coin cell battery. To maintain the best
battery life, use the PocketWizard Utility to teach channels to the MiniTT1 whenever possible.
• Channels learned in the field are not displayed in the PocketWizard Utility.
• A Sekonic Meter cannot be used to teach. Its brief trigger mode is not compatible with LEARN.
• Custom IDs from MultiMAX radios are not learned.
• FAST MODE in a MAX Receiver or MultiMAX (set for RECEIVE) offers no benefit when triggered by a ControlTL transmitter. Turn FAST MODE off for best performance. If left on, it will negatively affect
HyperSync timing.
• HyperSync requires a MiniTT1 or FlexTT5 as a transmitter. A Standard transmitter cannot trigger a FlexTT5 and achieve HyperSync.
25
Remote Camera Triggering
As with other PocketWizard radios, the MiniTT1 and FlexTT5
can be used to trigger a remote camera. To perform this operation
a PocketWizard motor drive cable is required. For cameras with
Canon’s E3 connector, you need the PocketWizard CM-E3-ACC
cable. For cameras with Canon’s N3 Motor drive connector, you
need the CM-N3-ACC cable.
1.Slide the FlexTT5 onto the shoe of the remote camera to
be triggered.
2. Connect the motor drive cable from
port on the
FlexTT5 to the remote terminal on the camera.
3. Use the MiniTT1 or any PocketWizard Transmitter to trigger
If you are using the MiniTT1 radio as the transmitter, be sure
to hold it properly to maximize range. Using the MiniTT1 in this
manner causes a large drain on the coin cell battery. To maintain
the best battery life, use a FlexTT5 or another PocketWizard as
the hand held transmitter.
FlexTT5 connected to remote camera
NOTE: With this remote camera setup you are engaging
Auto-Relay Mode and sending triggers one channel higher. Read
more about that mode for information about using a camera with
remote flash.
NOTE: The FlexTT5 should be in the shoe of the remote camera
to be triggered. Removing it from the shoe may cause unwanted
triggering to occur.
NOTE: Continuous motor drive triggering of remote cameras is
not available. Single shot mode is required.
26
Hold up and away for best range
Auto-Relay Mode
You can trigger flashes in sync with your remote camera.
This is called Relay Mode. Here’s how it works:
• Press TEST on a PocketWizard that you are holding
in your hands.
• The FlexTT5 connected to your remote camera receives
the signal and triggers your camera.
• The FlexTT5 switches to transmit mode and waits for the
camera to provide a sync pulse.
• The FlexTT5 triggers the flash in its shoe in sync with
other remote PocketWizard radios.
The channel used for relay transmitting is 1 channel higher
than the taught or default channel, unless you set the
channels using the PocketWizard Utility. Be careful not to
teach or set your remote flashes the same channel as your
remote camera or proper synchronization will not occur.
Example: If you taught the camera-connected FlexTT5 unit
Standard Channel 3 then relay transmit occurs on both
ControlTL and Standard Channel 4.
Remember, set the transmitter in your hand and the receiving
channel on the remote FlexTT5 connected to your remote
camera to the same channel. Set the transmitting channel in
that camera’s FlexTT5 to the channel you wish to use for your
remote flashes.
27
FlexTT5 configured for Auto-Relay
with local Speedlite
Reset
The MiniTT1 and FlexTT5 can be reset in the field.
There are two types of reset.
RESET A: Returns both C.1 and C.2 to the channels you last set
in the PocketWizard Utility. Reset A is primarily used for resetting
channels that were taught in the field.
1. Turn the radio off
2. While holding TEST, slide the power switch to C.1 (C.1 and C.2
are always reset together).
Flex TEST button
3. Hold TEST for a few moments until you see 2 green blinks, then release TEST. The channels
are restored to their last Utility values. If you’ve never set the channels using the Utility, then
the channels are restored to factory defaults.
RESET B: Returns all of your radio’s settings, including channels and all settings from the
PocketWizard Utility, to factory defaults.
1. Turn the radio off
2. While holding TEST, slide the power switch to C.1 (C.1 and C.2 are always reset together).
3. Hold TEST for ~10 seconds until you see 4 green blinks, then release TEST. The radio is reset
to factory defaults.
Default Settings:
28
ControlTL Tx Channel = 1 Standard Tx Channel = 1 Use ControlTL for Rx Channel = Enabled ControlTL Rx Channel = 1 Camera Model = Auto HyperSync Offset = -170
Remote TTL Flash Sleep Delay = Disabled
Flash Idle Time Out Mode = Disabled
Force TTL Master Mode = Disabled
Bottom Shoe = Enabled
Status LED
The Status LED indicates that the unit is powered on,
and displays battery level and other special status modes.
Under normal operation the LED will display a short blink
every 2 seconds. This is the normal “powered on and
waiting for trigger” blink. The color of the LED indicates
battery level:
Green Good battery
Amber Warning – battery low
Red
MiniTT1 Status LED
FlexTT5 Status LED
Very low battery – change immediately
Triggering: a pulsing red LED in sync with TEST indicates normal transmission. If TEST is held for 10
seconds, LEARN mode will be activated – see LEARN mode for information. A short red blink in sync
with the camera’s trigger indicates normal transmission or reception.
Red blinking indicates an error condition. Power off the unit, reseat all connections, and power back
on. If the error persists, verify your settings. For example if you are using a Standard channel to trigger
a FlexTT5 with a Speedlite in it set to E-TTL, this is an error. The flash needs to be set to manual (See
Manual Mode for more information).
Learning LED sequence: Holding TEST for 10 seconds will cause the unit to pulse red (continuously
transmitting), then it will flash amber 4 times (indicating the beginning of Learn mode), then it will pulse
amber while listening for a channel to learn. If it learns a channel, it will blink green 1, 2, or 3 times
depending on the channel learned, then flash amber 1 more time to indicate LEARN is complete. If no
channels are learned, the radio returns to normal “waiting for trigger” blinking. See LEARN Mode for
more information.
A normal green blink occurs on power up initialization and after Set Both Configs has been pressed in
the PocketWizard Utility. If TEST is held on power up then RESET may occur causing 2 or 4 green blinks
to occur. See RESET for information. Steady green blinks during firmware updates are also normal.
29
Mounting
Mount a remote FlexTT5 Transceiver using any of the following methods.
30
Velcro ®
Speedlite Stand
Maximum range, no cord
Maximum range, OC-E3 cord with added ferrite clamp
Long Range Performance
Long distance performance from your PocketWizards
depends on the orientation and position of the units.
Whenever possible, try to maintain a line of sight
between the units and keep the antennas parallel.
Best
While radio does not require line of sight, it does help
Positioning
dramatically. Make sure the units are not near any
large metal, concrete, or high water-content objects.
People and trees are mostly water! Make sure they
are not blocked by these objects or by hills. Do not
mount the units close to the ground – try to have
them several feet above the Earth or building floors
whenever possible.
Acceptable
Worst
Blocking Signal
Maintain at least 36” (~ 1 meter) distance between
antennas. Avoid direct antenna contact with anything metallic. “Dead spots” have a number of causes,
but the solution is usually the same: move the unit a few inches or feet away from the problem area.
SPECIAL NOTE: Some Canon flash models emit RF interference that can reduce the effective operating
range of many radio slaves, including the FlexTT5. Those models include: 430EX, 580EX, 580EX II and
others. For those model flashes, please consider the mounting suggestions in the pictures above to
optimize range. If using Canon’s off shoe cord OC-E3, consider adding a ferrite clamp on the cable near
the flash to further increase range.
The Canon 430EX II performs dramatically better in this regard. It does not require special mounting
consideration and yields greater range.
31
Troubleshooting
Why is my photo not properly exposed?
Consult the owner’s manuals for your flash and camera to understand how exposure decisions are made.
While the ControlTL system can greatly expand the operating range of Canon’s E-TTL II system, and overcome inherent problems with an optical communication system, it does nothing with exposure decisions
made by the camera. Make certain your shooting situation allows enough direct or reflected pre-flash to
be visible to the camera.
If you have more than one remote E-TTL II flash (either in basic E-TTL II mode or on one Canon group/zone
when using ratios) then it is one “piece of light.” If the camera can measure the output from one flash, but
does not see the other, it will make a calculation based on the light it sees. Both flashes will get sent the
same value from the camera and both flashes will trigger at that same value. This may not yield the results
you want. You may need to reposition the flashes to ensure the camera yields a proper exposure.
Why didn’t my remote flash trigger in the exposure?
Watch the remote flash as you trigger. If you see the small pre-flash happen, but not a 2nd flash, then
the camera decided not to use that flash in the exposure. The camera did not see enough of the pre-flash
to make a flash exposure calculation. The radios and flash are working properly. Reposition the flash or
subject so that the reflected light will be more visible to the camera, or add another flash to provide more
pre-flash light for the camera to measure. If you are using a light modifier on the remote flash, try adjusting it to allow more light or consider removing it. Other questions to consider in your shooting scenario:
• Is the ambient light brighter than the pre-flash from the camera’s perspective?
• Is the pre-flash to subject distance too great or at too great an angle relative to the camera?
• Is the subject too small (not enough reflected pre-flash reaching the camera) for the metering mode selected in the camera?
32
Troubleshooting (cont’d)
Why is my exposure bouncing around?
If you are in Shutter Priority mode (Tv) and the ambient light levels are changing dramatically shot to shot,
it is possible for the camera and flash to mis-communicate. The camera may have shifted values before
the radio had time to transmit them. Try another mode or make sure to remain half-pressed on the shutter
release longer after a dramatic light change.
Why does my flash say TTL and not E-TTL?
This can occur if you make flash connections with the flash turned on as you slide it onto MiniTT1 or
FlexTT5 or if some other communication error occurs. Make sure all equipment is turned off before
making connections. Turn everything off and back again.
Why won’t my camera go above 1/200 shutter speed?
If you have a flash in the shoe of the MiniTT1 or FlexTT5 on the camera, make sure it is set to High Speed
Sync (FP Flash) per your flash instructions.
If you have a powered off MiniTT1 in the shoe, either turn it back on and select C.2 (make sure no one is
using this channel!) or remove the unit from the shoe.
What Canon features are not available through the ControlTL system at this time?
Rear Curtain Sync, FEB, stroboscopic, adjusting flash settings via the camera’s menus, individual
manual control of slave groups without using Canon’s ratio system, FEC set on the flash, and other
features not expressly mentioned. These features may be implemented soon so be sure to check
www.PocketWizard.com for future firmware updates.
33
Notes
34
Canon Compatibility
The MiniTT1/FlexTT5 are E-TTL II compatible with these Canon cameras:
DSLR Cameras 1Ds MKIII, MKII, 1D MKIII, MKII, 1D MKII N
5D, 5D MKII1
20D, 30D2, 40D, 50D
Rebel XT / 350D, Rebel XTi / 400D, Rebel XS / 1000D,
Rebel XSi / 450D
The MiniTT1/FlexTT5 are E-TTL II compatible with these Canon flashes:
Flash Units
580EX, 580EX II, 430EX, 430EX II
NOTES on overall system performance (visit PocketWizard.com for the latest updates):
1. HyperSync performance varies by camera. Although all cameras listed will have some HyperSync benefit,
some will not achieve 1/400 or 1/500. See PocketWizard.com for a listing of specific camera capabilities
and HyperSync settings.
2. Commonly, a normal shutter release occurs after first pressing the shutter button halfway to establish focus and exposure. If the camera is in sleep mode and the shutter release is pressed all the way down without first establishing focus and exposure, the first exposure may not be proper.
3. Canon flash models 430EX, 580EX, and 580EX II emit RF interference that can substantially reduce the
effective operating range of many radio slaves, including the FlexTT5. For these model flashes, please utilize the mounting suggestions on Page 30 to optimize range. Using Canon’s off shoe cord OC-E3, greatly improves range. Consider adding a ferrite clamp on the cable near the flash to further increase range. The Canon
430EX II performs dramatically better in this regard. It does not require special mounting consideration and yields greater range.
NOTES for specific cameras:
1. On the 5D MarkII, a flash mounted in the hot-shoe of a MiniTT1/FlexTT5 on camera will currently not function. This should be solved with further testing.
35
2. When remote triggering the 30D camera, it must be set to “Auto Power Off – Disable” otherwise
once camera sleeps, trigger will not work.
Specifications
See Channel Tables for more information on Standard and ControlTL Frequencies and Channels
36
MiniTT1
FlexTT5
E-TTL Compatibility Canon E-TTL II
Canon E-TTL II
Maximum Range MiniTT1 triggering remote PocketWizards
on Standard channels:
1200 feet (365 meters)
FlexTT5 triggering remote PocketWizards
on Standard channels:
1200 feet (365 meters)
MiniTT1 triggering remote FlexTT5
using ControlTL channels:
800 feet (240 meters)
FlexTT5 triggering remote FlexTT5
using ControlTL channels:
800 feet (240 meters)
See Long Range Performance and SPECIAL NOTE regarding interference from some flash models for more information.
Frequency
340 - 354 MHz
340 - 354 MHz
Channels 52 Channels over 26 Frequencies
52 Channels over 26 Frequencies
Transmit power
Less than 0.001 watt
(1/1000 of a watt or 1 milliwatt)
Less than 0.001 watt
(1/1000 of a watt or 1 milliwatt)
Power 3VDC Lithium coin cell:
CR2450 or CR2354
2 x AA ( IEC:LR6 ) Alkaline
recommended, other chemistries (NiMH, NiCad, Lithium) allowed
Battery Life 60 Hours
Hundreds of hours depending on
shooting habits
Auto Power-off Sleeps when the camera sleeps
Zones 3: A-B-C
3: A-B-C
Maximum FPS
(Frames Per Second)
8 FPS
8 FPS
Minimum Receive
Contact Time
80 milliseconds
Specifications (cont’d)
37
MiniTT1
FlexTT5
Camera/P1
Port 1/8” (3.5 mm) stereo miniphone for
2-stage remote camera triggering.
Port Voltage Handling: up to 50 Volts,
100 milliamp continuous
Tip = Trigger
Ring = Pre-Trigger
Sleeve = Ground
Flash/P2 Port
1/8” (3.5 mm) mono miniphone.
Port Voltage Handling: up to 200 Volts,
4 amps peak, 250 milliamp continuous,
non-polarized
Voltage present 3.3 VDC (all pins) - safe for all Canon cameras 3.3 VDC (all pins) - safe for all Canon cameras
Hot Shoe voltage protection
Hot Shoe: up to 50V
Hot Shoe: up to 50V
USB
5VDC regulated, 100mA
Pin 1 Positive, Pin 4 Ground
5VDC regulated, 100mA
Pin 1 Positive, Pin 4 Ground
Mounting
Hot-shoe
Hot-shoe, 1/4-20, lanyard, Velcro
Construction
High impact plastic, captive battery door.
Hot-shoe made of glass reinforced resin.
High impact plastic, captive battery door.
Hot-shoe made of glass reinforced resin.
Dimensions 2.8” (7.1 cm) long x 1.9” (4.9 cm)
wide x 1.3” (3.3 cm) tall
3.6” (9.2 cm) long x 2.9” (7.3 cm) wide x
1.4” (3.6 cm) tall, antenna lowered
Antenna
Internal
2.7” (6.9 cm) rubberized, 180 degree swing
Weight (with batteries)
2.3 oz (65 grams)
2.0 oz (57 grams) without battery
5.4 oz (153 grams)
3.8 oz (108 grams) without batteries
Operating Temperature
Above -15 C (5 F) and below 50 C (120 F)
Above -15 C (5 F) and below 50 C (120 F)
Storage Temperature
Above -30 C (-22 F) and below 85 C (185 F)
without batteries
Above -30 C (-22 F) and below 85 C (185 F)
without batteries
38
The FCC wants you to know:
WARNING
Changes or modifications to this unit not expressly approved by the party responsible
for compliance could void the user’s authority to operate the equipment.
NOTE: This equipment has been tested and found to comply with the limits for a Class B digital device,
pursuant to Part 15 of the FCC rules. These limits are designed to provide reasonable protection against
harmful interference in a residential installation. This equipment generates, uses, and can radiate radio
frequency energy, and, if not installed and used in accordance with the instructions, may cause harmful
interference to radio communications. However, there is no guarantee that interference will not occur in a
particular installation. If this equipment does cause harmful interference to radio or television reception,
which can be determined by turning the equipment off and on, the user is encouraged to try to correct
the interference by one or more of the following measures:
1. Reorient or relocate the receiving antenna.
2. Increase the separation between the equipment and the receiver.
3. Consult the dealer or an experienced radio or television technician for help.
This device complies with Part 15 of the FCC rules and also with RSS-210 of Industry Canada. Operation
is subject to the following two conditions: (1) This device may not cause harmful interference, and (2) This
device must accept any interference received, including interference that may cause undesired operation.
MiniTT1 FCC ID Number: KDS-PW3-004
FlexTT5 FCC ID Number: KDS-PW3-005
MiniTT1 CANADA IC: 2170A-PW3004
FlexTT5 CANADA IC: 2170A-PW3005
39
For more information on this product, including detailed
features and specifications, go to:
www.PocketWizard.com
MAKE IT POSSIBLE™
© 2009 LPA Design, Inc. All rights reserved. Product features and specifications
are subject to change without notice. PocketWizard, ControlTL, MiniTT1, FlexTT5,
HyperSync, Plus II and MultiMAX are either trademarks or registered trademarks
of LPA Design, Inc. All other trademarks contained herein are the property of their
respective owners.
This product is covered under a warranty. For more information on this warranty
and to register your product, please go to www.PocketWizard.com/support.
US Patent: 5,359,375 and Patents Pending
V1.0 – February 2009 – LPF381