1
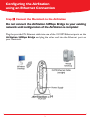
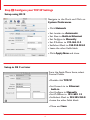
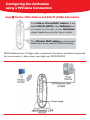
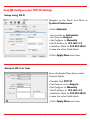
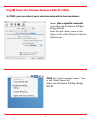
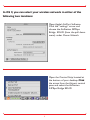
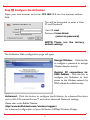
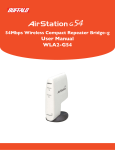
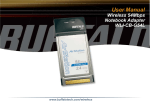
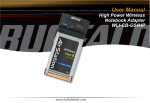
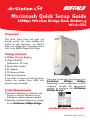
®
Macintosh Quick Setup Guide
54Mbps Wireless Bridge Base Station-g
WLA-G54
Preparation
This Quick Setup Guide will guide you
through quickly and easily installing this
product on your Macintosh. For detailed
setup and configuration instructions, please
refer to the Buffalo Support Web Pages.
Package Contents:
◗ 54Mbps Wireless Bridge-g
◗ Utility CD-ROM
(Software for PC only)
◗ Quick Setup Guides
◗ AC Adapter
◗ 7ft. Ethernet Cable
◗ Warranty Statement
If any of the contents are missing, please
contact the reseller from which this
product was purchased.
There are 2 methods of configuring your
AirStation
54Mbps
Bridge.
Depending on the configuration of your
computer, choose the appropriate
method to configure the AirStation
54Mbps Bridge.
System Requirements
◗ Macintosh Desktop or notebook with
Airport or Airport Extreme card or
third-party wireless adapter installed
◗ Existing Local Area Network to connect
to the AirStation 54Mbps Bridge.
www.buffalotech.com/wireless
1
MAC-WLA-G54 Rev A
Do not connect the AirStation 54Mbps Bridge to your existing
network until configuration of the AirStation is complete!
Deciding on a Mode for Initial Connection to the AirStation
Wireless Connection
Wired Connection
Configuration using a Web Browser
Buffalo recommends using a wired connection, meaning your computer is physically
connected to the AirStation with an Ethernet cable plugged into one of the four
LAN ports.This type of setup will eliminate possible setup problems due to any issues
with the Airport,Airport Extreme or third-party wireless adapter on the Macintosh
being used to configure the bridge.
The AirStation 54Mbps Wireless Bridge Base Station is compatible with
Apple’s Airport Extreme and Airport Cards. The AirStation 54Mbps Bridge
is Wi-Fi™ certified for 802.11b interoperability.
Airport software version 3.1 and 3.1.1 supports the AirStation 54Mbps Notebook
Adapter (WLI-CB-G54A) with Powerbooks and the AirStation 54Mbps
Desktop PCI Adapter (WLI-PCI-G54) with Macintosh desktops with an available
PCI slot.
Recommeded Browsers and Updating Firmware
The AirStation can be configured with any Web browser version 5 or later.
Firmware Updates can only be performed by the recommended Web Browsers
below.
OSX - The AirStation can be updated using Netscape v7 or Apple's Safari
Web browser v1.0b2 or later.
OS9 - The AirStation can be updated using Netscape v5 or later or Internet
Explorer 5.0 or later.
2
Configuring the AirStation
using an Ethernet Connection
Step Connect the Macintosh to the AirStation
Do not connect the AirStation 54Mbps Bridge to your existing
network until configuration of the AirStation is complete!
Plug the provided 7ft. Ethernet cable into one of the 10/100M Ethernet ports on the
AirStation 54Mbps Bridge and plug the other end into the Ethernet port on
your Macintosh.
3
Step Configure your TCP/IP Settings
Setup using OS X
Navigate to the Dock and Click on
System Preferences.
- Click Network
- Set Location to Automatic.
- Set Show to Built-in Ethernet
- Set Configure to Manually
- Set IP Address to 192.168.11.2
- SetSubnet Mask to 255.255.255.0
- Leave the other fields blank
- Click Apply Now and close.
Setup in OS 9 or later
From the Apple Menu Items, select
Control Panels.
- Double click TCP/IP
- Set Connect via to Ethernet
built-in
- Set Configure to Manually
- Set IP Address to 192.168.11.2
- SetSubnet Mask to 255.255.255.0
- Leave the other fields blank
- Close and Save
4
Step Configure the AirStation
Open your web browser and enter 192.168.11.1 into the browser address
field.
You will be prompted to enter a User
ID and Password
User ID: root
Password: leave blank
(enter no password)
NOTE: These are the factory
default settings
The AirStation 54Mbps Bridge configuration page will open.
Encrypt Wireless - Click this link
to configure a password to encrypt
Wireless data for security.
Restrict PC connections for
MAC Address - Click this link to
configure the AirStation to limit
access to the Wireless network by
MAC address for added security.
Advanced - Click this button to configure the AirStation for advanced functions such as Wi-Fi Protected Access™ and other advanced Network settings.
If at any time you wish to restore settings to factory defaults, press the red INIT button
on the rear of the AirStation for several seconds until the red DIAG light illuminates.
For advanced configuration of your AirStation 54Mbps Wireless Bridge, please
refer to the User Manual on the Utility CD or the Buffalo Wireless Support Website:
http://www.buffalotech.com/wireless/support
5
Configuring the AirStation
using a Wireless Connection
Step Gather MAC Address and ESS-ID (SSID) Information
The LAN or Wired MAC address is the
default ESS-ID (SSID) of the AirStation and
is located on the rear of the AirStation
clearly labeled next to the 4-port switch.
The Wireless MAC address is located and
labeled here and is used for WDS functionality.
MAC Addresses are 12-digit codes comprised of numbers and letters separated
by a semi-colon (:) after every two digits. ex: 00:00:00:00:00
6
Step Configure your TCP/IP Settings
Setup using OS X
Navigate to the Dock and Click on
System Preferences.
- Click Network
- Set Location as Automatic
- Set Show to Airport
- Set Configure to Manually
- Set IP Address to 192.168.11.2
- SetSubnet Mask to 255.255.255.0
- Leave the other fields blank
- Click Apply Now and close
Setup in OS 9 or later
From the Apple Menu Items, select
Control Panels.
- Double click TCP/IP
- Set Connect via to Airport.
- Set Configure to Manually
- Set IP Address to 192.168.11.2
- SetSubnet Mask to 255.255.255.0
- Leave the other fields blank
- Click Apply Now and close.
7
Step Select the Wireless Network ESS-ID (SSID)
In OSX, you can select your wireless network in two locations:
Select Join a specific network
and select the AirStation 54Mbps
Bridge ESS-ID
from the pull down menu in the
Airport tab of the Network System
Preferences.
Click the “signal strength meter” icon
in the Finder menu bar.
Select the AirStation 54Mbps Bridge
ESS-ID.
8
In OS 9, you can select your wireless network in either of the
following two locations:
Open Apple’s AirPort Software.
Click the “settings” arrow and
choose the AirStation 54Mbps
Bridge ESS-ID (from the pull down
menu) under Choose Network.
Open the Control Strip located at
the bottom of your desktop. Click
the arrow from the Airport control
pane and select the AirStation
54Mbps Bridge ESS-ID
9
Step Configure the AirStation
Open your web browser and enter 192.168.11.1 into the browser address
field.
You will be prompted to enter a User
ID and Password
User ID: root
Password: leave blank
(enter no password)
NOTE: These are the factory
default settings
The AirStation Web configuration page will open.
Encrypt Wireless - Click this link
to configure a password to encrypt
Wireless data for security.
Restrict PC connections for
MAC Address - Click this link to
configure the AirStation to limit
access to the Wireless network by
MAC address for added security.
Advanced - Click this button to configure the AirStation for advanced functions
such as Wi-Fi Protected Access™ and other advanced Network settings.
Please refer to the Buffalo Website:
http://www.buffalotech.com/wireless/support
for advanced configuration of your AirStation 54Mbps Wireless Bridge.
10
Connect the AirStation
to your existing LAN
Once Configuration is complete, plug the provided 7ft. Ethernet cable into one of
the 10/100M Ethernet ports on the AirStation 54Mbps Bridge and plug the other
end into an Ethernet hub or switch on your Local Area Network.
If at any time you wish to restore settings to factory defaults, press the red INIT button
on the rear of the AirStation for several seconds until the red DIAG light illuminates.
Configure your TCP/IP Settings to match LAN settings
Once the AirStation is connected to the existing LAN, users accessing the
LAN through the AirStation must configure the Network Settings (OSX) and
TCP/IP Settings (OS9) to match your existing LAN.
Contact your network administrator if your computer requires a static IP
Address or if using DHCP Services.
Apple, Macintosh and the Apple logo are trademarks of Apple Computer Inc.
For more information regarding Apple Products, visit
http://www.apple.com
11
Buffalo Technology
Technical Support
Buffalo Technology offers Toll-Free Technical Support 24 hours a day, 7 days a week
for this product. Customers in the United States and Canada can obtain technical
support using the following information:
◗
◗
◗
◗
Online Help
Web
E-mail
Telephone
Available on the AirNavigator CD enclosed with your purchase.
www.buffalotech.com/wireless
[email protected]
866-752-6210
(USA & Canada only)
The constantly evolving state of wireless products and operating systems requires
Buffalo Technology to occasionally release updated software to take advantage of
new technologies and to comply with industry standards. For the most recent software,
firmware, driver, and technical whitepaper releases available, please visit the Buffalo
Technology website.
FCC Compliance Statement - See owners manual for complete statement.
This device complies with Part 15 of the FCC Rules. Operation is subject to the following two
conditions: (1) This device may not cause harmful interference, and (2) this device must accept
any interference received, including interference that may cause undesired operation.
R&TTE Compliance Statement - See owners manual for complete statement.
This equipment complies with all the requirements of the DIRECTIVE 1999/5/EC OF THE
EUROPEAN PARLIAMENT AND THE COUNCIL of 9 March 1999 on radio equipment and
telecommunication terminal Equipment and the mutual recognition of their conformity
(R&TTE).
Copyright © 2003 Buffalo Technology, Inc. All Rights Reserved.
Buffalo Technology (USA) Inc., is part of MELCO INC., the global manufacturers of IT peripherals, including memory, networking,
and multimedia products, inside many of the world's computers. All trademarks are property of their respective owners.
12