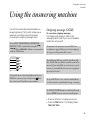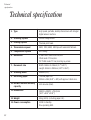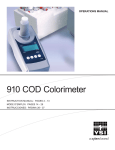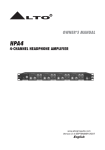
1
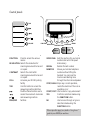
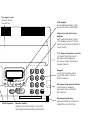
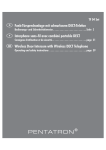
GH
YES
4
NO
PQ
DEL/REC
RESOLUTION CONTRAST POLL SPEED DIAL
MONITOR
STOP/
CLEAR
START/
COPY
DF60 telephone, fax
and answering machine
User guide
REDIAL
7
TU
8
0
DE
3
MN
6
WX
YZ
FUNCTION
©/
JKL
5
V
RS
§§
2
O
I
TAD
©©
C
1
F
AB
DF60
9
Control panels
TAD
01
©©
02
§§
03
©/
YES
04
DEL/REC
FUNCTION
NO
RESOLUTION CONTRAST POLL SPEED DIAL
MONITOR
Press to access the various
menus
RESOLUTION Selects the resolution for
scanning documents to be sent
or copied
CONTRAST
Selects the contrast for
scanning documents to be sent
or copied
POLL
Accesses your DF60’s polling
facility
TAD
Use this button to access the
answering machine facilities
©©
Multifunctional buttons use to
§§
access the one-touch memories
©/
and answering machine
DEL/REC
facilities
FUNCTION
STOP/
CLEAR
REDIAL
START/
COPY
Sets the machine for you to dial
numbers stored in the speed
dial memory
REDIAL
Redials the last number
MONITOR
Allows you to dial a telephone
number without lifting the
handset. You can hear the
line tone and dialling tone
through the internal loudspeaker
STOP/CLEAR Stops any current operation,
resets the machine if there is an
operating error
START/COPY Use to send or copy a document
YES
Confirms selections made using
the FUNCTION button
NO
Use to move through or ignore
selections made using the
FUNCTION button
SPEED DIAL
Please open this page for a further “at a glance”
guide to your DF60 fax machine.
At a glance
At a glance
Telephone
line cord
Mains in socket
and on/off switch
Handset cradle
Handset
TAD button
DF60
operates the Telephone
Answering Device (TAD)
functions. Use to access or
programme the answer
machine.
TAD
01
©©
02
§§
03
©/
04
Handset cable socket
Handset cable socket
One touch memory buttons
plug the handset cable
into the handset here
plug the handset cable
into the main unit here
use to access stored numbers
or, in conjunction with the TAD
button to operate the answer
machine.
DEL/REC
Directory label
Fax paper cover
lift up to insert
new fax roll.
LCD display
shows dialled numbers, time,
day and function information
Stop/clear and start/copy
buttons
starts and stops faxes, clears
LCD display, returns DF60 to
standby mode and activates the
copier facility.
T/P, Ring and speaker controls
(on side of machine) select
the type of exchange you
are using, ringer volume and
speaker volume
GH
NO
PQ
MONITOR
STOP/
CLEAR
REDIAL
START/
COPY
5
TU
8
6
Keypad
use to dial numbers and to
input information into the
DF60’s memory.
WX
YZ
RESOLUTION CONTRAST POLL SPEED DIAL
JKL
MN
2
V
RS
FUNCTION
7
3
O
I
YES
4
C
1
DE
F
AB
9
0
Document jam remove button
press down to release a
document stuck inside the
fax machine.
Document guide tray
Control panels
Monitor button
allows you to dial a number or monitor
call progress without lifting the handset.
place document to be faxed or
copied face up in this tray.
Contents
In this guide
At a glance
1
Introduction
3
Setting up
4
Using the telephone
12
Using the answering machine
16
Using the fax machine
23
Help
31
Technical specification
33
Technical information
34
Index
36
Customer Helpline
Should you have problems with your DF60, call
the BT Helpline on 0345 771777. Calls are
charged the local rate.
Hints and tips boxes
In this user guide, we’ve included helpful tips and
useful notes. They are shown in grey boxes.
2
Introduction
Introduction Your DF60 fax machine is designed for
ease of use and made to the high standards set by BT.
We thank you for choosing a BT product and
expect that you will have many years of
quality service
Please read these instructions carefully
before use, and retain this User Guide for
future reference.
For your records
Date of Purchase:
Place of Purchase:
Serial Number (on base of unit):
Purchase price:
(for warranty purposes, proof of purchase is
required, so please keep your receipt see also
page 32.)
3
Customer Helpline
Should you have problems with your
machine, call the DF60 Helpline on
0345 771777. Calls are charged at the local rate.
Setting up
Setting up Follow these steps to get your DF60 up and
running and ready to use.
Electrical storm warning
Note 1.
Please note that during periods of electrical
storm, you are advised to disconnect your DF60
because damage may occur.
Note 2.
If a fault occurs during the 12 month warranty
period and it is due to accidental or wilful
damage (including lightning and electrical
damage) BT will not replace or repair the
equipment free of charge. Should any damage of
this nature occur, you are advised to claim
against your home contents insurance.
Check that your DF60 is complete, when
you unpack you must have:
• DF60 Fax, phone and answering machine
with telephone line cord attached
• handset
• handset cord
• mains power cable with 13amp plug attached
• roll of thermal fax paper (15m)
Your DF60 display has a protective plastic film
covering it. Please remove this before use.
4
Setting up
1 Check your telephone wall
socket
4 Plug mains power cable into
back of main unit.
ON
OFF
If you do not have a BT socket, call 150 and ask
for a BT engineer to come and fit the right
socket. This is a chargeable service.
2 Plug the handset cord into the
handset and side of the main unit
5 Now plug the mains lead into a
convenient mains socket and
switch on the machine.
OFF
When the power is switched
on, the Liquid Crystal Display
indicates PAPER END and a
series of beeps are heard
indicating that the fax paper
should be loaded.
ON
6 Load fax paper
3. Plug the line cord into the BT
socket
Your DF60 is designed to accept thermal fax
rolls 210mm wide, up to 30 metres in length
and with a core size of approx. 13mm diameter.
• Lift the fax paper cover on your DF60
T/P
5
RING
SPEAKER
Setting up
• Lift the small white lever on the right
hand side
• Push down the small white lever and close
the cover leaving the excess paper on the
outside of the cover.
• Tear off the spare paper along the
serrated edge.
• Display shows the time, day and AUTO.
7 Setting the date and time
If necessary you can alter the date and time.
1
GH
©©
NO
WX
MONITOR
STOP/
CLEAR
START/
COPY
REDIAL
7
V
©/
DEL/REC
RESOLUTION CONTRAST POLL SPEED DIAL
MN
6
TU
8
9
YZ
FUNCTION
3
PQ
RS
§§
JKL
5
O
YES
2
4
I
TAD
C
DF60
DE
F
AB
0
• Press the FUNCTION button until display
shows: SET TIME & ID?
• Press the YES button, display shows the pre
set date and time.
• Place the paper roll in the compartment
ensuring both ends are located on the spigot
and that the paper is coming off the bottom
of the roll.
• Using the keypad enter the new date and
time in the format DayDay, MonthMonth,
YearYear, HourHour, MinuteMinute using
the 24 hour clock for the time.
eg: To set 25 minutes past 4 in the afternoon
on 28th February 1996 enter: 2802961625.
• Press the YES button to confirm the setting.
• Press the STOP/CLEAR button to return
to standby.
T/P
RING
SPEAKER
• Pull off 150 - 200 mm of paper and feed it
under the black rubber roller as shown until
it reappears, pulling through any slack and
making sure the paper is straight. You may
feel slight resistance from the roller.
6
Setting up
• Press the FUNCTION button until display
shows: SET TIME & ID?
• Press the YES button until display shows:
ID. NUMBER:_
• Using the keypad enter your phone number.
You can enter a number of up to 20 digits.
Use the © button to enter spaces or to move from
left to right through the display.
Use the § button to delete digits.
If entering an international code you can enter
enter a + before your number by pressing the
REDIAL button.
GH
4
•
•
•
•
•
JKL
5
MN
O
Your name and number can be printed at the
top of each page you send.
For example, to enter the name JOHN:
I
8 Entering your name and
number (ID)
6
Press the 5 button until display shows: J.
Press the 6 button until O is shown.
Press the 4 button until H is shown.
Press the 6 button until N is shown.
Press the YES button to confirm your entry.
The name is now entered and your DF60
returns to standby.
Use the © button to enter spaces or to move from
left to right through the display.
Use the § button to delete characters.
If the letter you need is displayed on the same
button as the previous letter, use the © button to
advance to the next character space and enter the
letter normally.
To clear an entry press the NO button.
• Press the YES button to confirm your
entry, display shows: ID. NAME:_
You can now enter your name (up to 32
characters in length).
You can use the keypad to type in letters by
pressing the number button which displays the
letter you want. Press the button until the letter
you want is shown.
7
Use the 1 button to enter &, / or 1.
Use the 0 button to enter ,, ., a space or 0
(unlike the space provided by the © button, the 0
button can be used to change an existing letter to
a space when editing a name).
To clear an entry press the NO button.
Setting up
Name and number position
INSIDE? - your name and number is printed at
You can change the position at the top of the
page where your name and number are
printed. You can also turn it off so they are not
printed at all.
the top of the page inside the image area.
• Press the FUNCTION button until display
shows: SET OPTIONS?
• Press the YES button.
• Press the NO button until display shows: ID
POSITIONS?
• Press the YES button and the display shows
NO ID? - your name and number is not printed.
the current setting.
• Press the NO button to view the available
options: INSIDE?, OUTSIDE? and NO ID?
• Press the YES button to select your option.
Outside
XX XXXX XXXXXX XXX
XXXX XXX XXXXX
XXXX XXXXX XXXXXX
XX XXXX XXXXXX XXX
XXXX XXX XXXXX
XXXX XXXXX XXXXXX
R
Mr Smith
Mr Jones
A
To:
From:
EA
FAX MESSAGE
E
Dear Mr Smith
We thank you for choosing a BT product and expect that
you will have many years of quality service
G
➡
➡
Please read these instructions carefully before use, and
retain this User Guide for future reference.
A
Inside
Customer Helpline
Should you have problems with your machine, call the DF60
Helpline on 0345 771777. Calls are charged at the local rate.
IM
To return to the standby mode press the
STOP/CLEAR button.
OUTSIDE? - your name and number is printed
at the top of the page outside the image area.
Mr Jones
8
Setting up
• When the display shows the dialling mode
9 Setting the dial mode
YES
FUNCTION
that is right for you press the YES button,
you will hear a tone confirming your
selection.
• Press the STOP button to return to standby.
NO
RESOLUTION CONTRAST POLL SPEED DIAL
REDIAL
Your DF60 has two dialling modes: TONE and
PULSE, it is pre-set to TONE. This will be the
correct setting for all direct lines and most
switchboards, however for some switchboards
it may need to be set to PULSE.
If you are in doubt about the right setting for you,
contact your communications manager.
To set the Dial mode:
• Press the FUNCTION button until SET
OPTIONS? appears.
• Press the YES button and the display shows:
DIAL MODE?
• Press the YES button, display shows:
DIAL MODE: TONE?
• Press the NO button to change from TONE
to PULSE.
9
The T/P (T=TONE, P=PULSE) selector
on the side of the DF60 main unit
must also be switched to the setting you
T/P
have selected on the display. This will ensure that
calls can still be made during power failure.
Setting up
10 Setting the answer mode
Which setting is correct for you?
Your DF60 answers calls/receives faxes in one
of four modes: TAD, MANUAL, FAX or FAX/TEL.
It is preset to TAD mode.
ANSWER: TAD (telephone answering device)
To change the Answer mode:
• Press the FUNCTION button until SET
OPTIONS? appears.
• Press the YES button and the display shows:
DIAL MODE?
• Press the NO button, display shows:
ANSWER MODE?
• Press the YES button and the display shows:
ANSWER: followed by one of the available
answer options.
• Press the NO button to view the available
options:
ANSWER: TAD?
ANSWER: MANUAL?
ANSWER: FAX?
ANSWER: FAX/TEL?
When your DF60 is set to TAD mode it will
receive both voice messages and faxes.
Calls are answered automatically after the
number of rings you have set, and your
outgoing message is played back, callers can
then leave a message.
If your DF60 detects a fax signal whilst the
answer machine is operating, or if no message
is left, it will automatically switch to FAX mode
and faxes are received as normal.
If you have selected TAD mode the display will
show: RING COUNT: 2ND? This means that
your DF60 will automatically answer calls after
two rings. If you want to change the number of
rings before answering, pressing the NO
button will display the available options.
• Press the YES button to select your option.
To switch auto answer mode on/off
If you want to switch your DF60’s auto answer
mode on or off:
• Press the FUNCTION and then the REDIAL
• Auto answer mode is switched off.
• Repeat this procedure to switch Auto answer
mode back on.
• Press the YES button to select your option.
• Press the STOP/CLEAR button to return
to standby.
The auto answer mode will be either the default
mode or the one you have selected.
10
Setting up
ANSWER: MANUAL
Your DF60 will not automatically answer a call
in MANUAL mode. If the call is a fax, press the
START/COPY button to commence reception.
When set to ANSWER: MANUAL, if a call is not
answered after 20 rings, your DF60 will answer
the call and automatically switch to TAD mode.
ANSWER: FAX
In FAX mode, the answer machine is switched
off and your DF60 automatically answers in fax
reception mode after the number of rings you
have set.
If you have selected FAX mode the display will
show: RING COUNT: 2ND? This means that
your DF60 will automatically answer calls after
two rings. If you want to change the number of
rings before answering, pressing the NO
button will display the available options.
If the handset is picked up before your DF60
automatically answers, you can talk to the caller.
11
ANSWER: FAX/TEL
When in FAX/TEL mode your DF60 answers a
call after one ring and checks for a fax signal.
If no fax signal is detected the caller is put on
hold and your DF60 rings to indicate you
should lift the handset and answer the call
manually. If the handset is not lifted before
ringing stops your DF60 will assume it is a fax
call and prepare to receive a fax. Your DF60
remains in fax reception mode for
approximately 35 seconds or, if it is a fax call,
until the fax has been received.
If you have selected FAX/TEL mode, display
shows: FAX/TEL TIME 20?
This means that your DF60 is set to ring for 20
seconds if no fax tones are detected. This time
can be altered, pressing the NO button will
display the available options: 10, 20 or 30 secs
• Press the YES button to select your option.
• Press the STOP/CLEAR button to return
to standby.
Using the telephone
Using the telephone
To make a call
To redial the last number
Lift the handset, display shows: PHONE MODE.
Dial the number you want and wait for the
ringing tone. Display shows last 11 digits dialled.
If the number you dialled is engaged or doesn’t
answer, you can try again by lifting the
handset, or pressing the MONITOR button,
then pressing the REDIAL key.
One-touch fax/phone names and numbers
YES
FUNCTION
Your DF60 can store 4 names and numbers in
its one touch memory. This allows you to
access your most frequently dialled numbers at
the touch of a button.
NO
RESOLUTION CONTRAST POLL SPEED DIAL
MONITOR
STOP/
CLEAR
REDIAL
START/
COPY
TAD
01
©©
02
§§
03
©/
On-hook dialling
For added convenience, you can dial your
number without lifting the handset.
• Press the MONITOR button. When you
hear the dialling tone, dial the number.
• If the call is answered pick up the handset
and begin talking.
• If the call is not answered, simply press the
MONITOR button and try again later.
04
DEL/REC
The ©© button is one-touch number 01.
The §§ button is one-touch number 02.
The ©/ button is one-touch number 03.
The DEL/REC button is one-touch number 04.
A number may also be dialled by first entering
the number then pressing the MONITOR button
or lifting the handset. There will be a short pause
and then the number is automatically dialled.
12
Using the telephone
To store one-touch fax/phone names
and numbers
• Press the FUNCTION button then press the
one touch button under which you wish to
store the name and number. The display
shows: (XX) NAME: _
The (XX) on the display represents the number
of the button under which your one-touch
number will be stored.
You can now enter a name.
You can use the keypad to type in letters by
pressing the number button which displays the
letter you want. Press the button until the letter
you want is shown.
If the letter you need is displayed on the same
button as the previous letter, use the © button to
advance to the next character space and enter the
letter normally.
Use the 1 button to enter &, / or 1.
Use the 0 button to enter ,, ., a space or 0
(unlike the space provided by the © button, the 0
button can be used to change an existing letter to
a space when editing a name).
To clear an entry press the NO button.
Use the © button to enter spaces or to move from
left to right through the display.
For example, to enter the name JOHN:
Use the § button to delete characters.
GH
•
•
•
•
•
5
MN
O
I
4
JKL
6
Press the 5 button until display shows: J.
Press the 6 button until O is shown.
Press the 4 button until H is shown.
Press the 6 button until N is shown.
Press the YES button to confirm your entry.
• Display shows (XX) NUMBER?
You can now enter the phone number of the
person who’s name you have just entered.
• Enter the phone number using the keypad
as if you were dialling the number normally.
You can enter a name of up to 11 characters and
a number of up to 34 digits in length into your
DF60’s one touch memory.
13
• When the correct number is entered press
the YES button to store it. A tone will sound
to confirm your entry and your DF60 will
return to standby mode.
Using the telephone
To dial one-touch fax/phone numbers
• Press the MONITOR button or lift the
handset.
• Press the relevant one touch button (01-04),
the display shows the number to be dialled.
Your DF60 automatically dials the stored
number.
Keep a reminder of the names in the one-touch
memory on the panel to the left of the one-touch
buttons. Slide out the plastic cover, write in the
names and replace the cover. Writing the name in
pencil allows you to neatly change it if necessary.
Additional labels are printed on page 38.
Your DF60 can print out a list of all the names
and numbers stored in it’s one touch dial memory.
Please refer to “print outs” on page 28.
To store SPEED DIAL fax/phone names and
numbers
Your DF60 can store up to 45 names and
numbers which can be accessed by using the
SPEED DIAL facility.
• Press the FUNCTION button until the
display shows: SET CODED DIAL?
• Press the YES button and the display
shows: CODE NUMBER? (_ )
• Using the keypad, enter the two digit code
between 05 and 49, under which you want to
store the name and number, display shows:
(XX) NAME:_. (XX is the code number you
entered)
Speed dial code numbers must be between 05 and
49. Numbers 01 to 04 are used by the one touch
dialling memories.
You can now enter a name using the keypad in
the same way as for one-touch names.
• Press the YES button to confirm your entry,
display shows: (XX) NUMBER:_.
You can now enter a number using the keypad
in the same way as for one-touch names.
• Press the YES button to confirm your entry,
display shows: SET CODED DIAL?.
Use the © button to enter spaces or to move from
left to right through the display.
Use the § button to delete digits.
Repeat the above process to enter up to 44
more names and numbers.
• Press the STOP/CLEAR button to return to
standby mode.
You can enter a name of up to 11 characters and
a number of up to 34 digits in length into your
DF60’s speed dial memory.
Your DF60 can print out a list of all the names
and numbers stored in it’s speed dial memory.
Please refer to “print outs” on page 28.
14
Using the telephone
To dial SPEED DIAL phone numbers
• Press the MONITOR button or lift the
handset.
• Press the SPEED DIAL button and the
display shows: ( ENTER CODE.
• Enter the relevant SPEED DIAL code
number, display shows the number dialled
Adjusting the speaker and ringer
volumes
T/P
RING
SPEAKER
To adjust speaker volume
You can set the volume of the monitor speaker
by adjusting the speaker control on the right
hand side of the unit.
To adjust ringer volume control
The volume of the ring tone can be set to low,
medium or high. Choose the preferred level by
adjusting the RING switch on the right hand
side of the unit.
15
Using the answering
machine
Using the answering machine
Your DF60 incorporates a digital telephone
answering device (TAD) which allows you a
maximum recording time of 10 minutes
(including the outgoing message time).
Your DF60’s TELEPHONE ANSWERING
DEVICE (TAD) is operated by using the ©©,
§§, ©/ II and DEL/REC buttons in conjunction
with the TAD button.
Outgoing message (OGM)
To record an outgoing message
The Outgoing Message or OGM is the
message a caller hears if you are not available
to take the call yourself.
To maximise the efficiency of your DF60’s fax
reception we suggest that you record an outgoing
message of no longer than 20 seconds.
TAD
01
©©
02
§§
03
©/
04
DEL/REC
If you pick up an extension telephone after your
DF60 has answered your call, pressing
9 on
the extension will stop the answer machine.
Your Outgoing Message could be something like
this: “Hello, I‘m sorry that I can’t take your call at
present. If you would like to send a fax you can do
so now, if you would like to leave a message please
speak after the tone”.
As your DF60 has a very sensitive michrophone
you do not need to speak loudly during recording.
In TAD FUNCTION mode you will usually need
to press STOP twice to return to standby mode.
• Make sure there’s no background noise
• Press the TAD button. The display shows:
TAD FUNCTION
16
Using the answering
machine
• Press the DEL/REC button and the
display will show: RECORD OGM?
• Press the YES button and the display shows:
LIFT HANDSET!!
To play back Outgoing Message (OGM)
If you are replacing a previously recorded
Outgoing Message (OGM) display shows:
NEW OGM? Press the YES button.
• Lift the handset and speak clearly into it to
record your message.
• Press the TAD button and the display will
show: TAD FUNCTION
• Press the ©/ II button and the display will
show: MESSAGE EMPTY, Followed by:
PLAYBACK OGM?
If you don’t lift the handset and record a message
within 7 secs the display reverts back to TAD
FUNCTION. You must now repeat the last 2 steps.
When you have finished speaking, pause for
one second, then:
• Replace the handset and your message is
played back to you.
Display shows: RECORD OGM?
• Press the YES button to record your
message again.
• Press the STOP/CLEAR button to return to
standby mode.
The amount of recording time allowed for an
outgoing message is the the same as that allowed
for a memo. (See ‘to limit your memo recording
time’, page 21).
17
To listen to the Outgoing message (OGM)
which you have recorded:
If incoming messages have been previously
recorded your DF60 will display: MESSAGE 01.
Fast forward to the end of the messages using the
©© button, display shows: PLAYBACK OGM?
• Press the YES button to listen to your
Outgoing message.
• Press the STOP/CLEAR button to return to
standby mode.
Using the answering
machine
Incoming messages and memos
An incoming message (ICM) is the message a
caller leaves on your answering machine if you
are not able to take the call yourself. Memos
are treated in the same way as incoming
messages but are recorded using the handset
(see page 21).
Message indicator
To check the number and time of messages
You can check how many messages you have
and the time that they were received.
• Press the FUNCTION button followed by
the ©© button.
• The display shows: TOTAL MESSAGE: XX
followed by: MESSAGE (01) and the date and
time the first message was received.
• The display then shows: MESSAGE (02) and
so on until all messages have been displayed.
To play back messages
YES
NO
When a message has been left on your DF60’s
answering machine a black square will flash on
the right hand side of the liquid crystal display.
Your DF60 also incorporates an audible
message indicator which is pre-set to ON. This
facility gives a short beep every 6 seconds to
indicate that new messages have been
received.
To switch the audible indicator off
• Press the TAD button.
• Press the §§ button.
• Press the YES button until the display
shows : MESSAGE BEEP: ON.
• Press the NO button to switch between ON
and OFF.
• Press the YES button.
• Press the STOP button.
To listen to a message (ICM) or memo left on
your answering machine:
• Press the TAD button and the display will
show: TAD FUNCTION
• Press the ©/ II button and the display will
show the time and date of your first message
and then: MESSAGE (01), your DF60 will
then automatically play back the message
through the speaker.
Once playback has started, if you prefer messages
can be listened to through the handset.
If you have more than one message they are
played back in the order they were recorded.
If you have no messages display shows:
MESSAGE EMPTY!
To pause while listening to your messages,
press the ©/ II button. Press the ©/ II button
again to resume playback.
18
Using the answering
machine
• Press the ©© button to skip to the next
message.
• Press the §§ button once to return to the
beginning of the message being played, or
twice in quick succession to skip to the
previous message.
To ensure you have the maximum amount of
memory available for new messages, old messages
should be deleted as soon as possible.
To erase a message
To erase a message press the DEL/REC
button while the message to be deleted is
being played back. Playback is halted and
display shows: MESSAGE DELETE?.
• Press the YES button to confirm, or press
the NO button to resume playback. If you
press the YES button, playback resumes
with the next message.
To automatically erase messages
You can set your DF60 to automatically delete a
message once you have listened to it.
In this mode messages can be played back once
only, they will then be permanently erased.
• Press the TAD button, then the §§ button,
display shows: REMOTE TAD ON or OFF
• Press the YES button until the display
shows: AUTO DELETE: OFF?
19
• Press the NO button to change between OFF
and ON.
• Press the YES button to confirm your
option, display shows: TAD FUNCTION.
• Press the STOP/CLEAR button to return to
standby mode.
To limit incoming message recording time
Your DF60 has a total recording time of 10
minutes (including your outgoing message and
memos). The amount of recording time
allowed for each incoming message is pre-set
to 30 seconds. This time limit can be changed
or switched off completely.
To prevent incoming messages being cut short you
may wish to inform a caller via your outgoing
message of the amount of time they have to speak.
To change the recording time limit
• Press the TAD button then press the §§
•
•
•
•
•
•
button.
Press the YES button until the display
shows: ICM TIME OUT: ON?
Press the YES button.
Display shows: RECORD TIME: 30s?
Press the NO button to display the available
options: 20 - 70s.
Press the YES button to select your option,
display shows: TAD FUNCTION.
Press the STOP/CLEAR button to return to
standby mode.
Using the answering
machine
To switch the recording time limit off
• Press the TAD button then press the §§
•
•
•
•
button.
Press the YES button until the display
shows: ICM TIME OUT: ON?
Press the NO button to change ON to OFF.
Press the YES button to select your option.
Press the STOP/CLEAR button to return to
standby mode.
With OFF selected the recording time is
limited only by your DF60’s amount of free
memory space.
Call screening
This facility (pre-set to ON) allows you to listen
to messages as they are being recorded. If,
during the message, you decide to take the
call, lift the handset and speak to the caller.
Your DF60’s answering machine will
automatically stop recording.
To switch call screening off
• Press the TAD button then press the §§
•
•
•
•
button.
Press the YES button until the display
shows: CALL SCREEN: ON?
Press the NO button to switch between ON
and OFF.
Press the YES button to confirm your
selection.
Press the STOP/CLEAR button to return to
standby mode.
20
Using the answering
machine
Recording a memo
A message can be left using your DF60’s
handset. This message is called a memo.
• Display shows: TAD FUNCTION.
To record a memo
• Press the TAD button, display shows:
TAD FUNCTION
• Press the DEL/REC button, display shows:
RECORD OGM?
• Press the NO button, display shows:
RECORD MEMO ?
• Press the YES button, display shows:
LIFT HANDSET!!
• Pick up the handset within 10 seconds and
speak clearly into it to record your message,
display shows: RECORD MEMO (01)
As you record your memo the display indicates
the length of the message in minutes and
seconds 00:00.
• When you have finished your message,
replace the handset and the message is
automatically played back to you.
The display will then ask if you want to record
a second message.
To limit your memo recording time
Your DF60 has a total recording time of 10
minutes. You can limit the amount of time
allowed for each memo.
• Press the TAD button then press the §§
button, display shows: REMOTE TAD: ON? or
REMOTE TAD: OFF?
• Keep pressing the YES button until the
display shows: MEMO TIME OUT: OFF?
• Press the NO button to change the display
from OFF to ON.
• Press the YES button to select your option.
If you select ON, display shows: RECORD
TIME: 30s? Pressing the NO button will display
the available options: 20 - 70s.
Limiting the amount of time allowed for a memo
will also limit the time allowed for an outgoing
message to be recorded. However, it will not affect
a previously recorded outgoing message.
• Press the YES button to select your option.
• Press the STOP/CLEAR button to return to
standby mode.
If you selected OFF the recording time is
unlimited.
To playback or erase a memo
• Press the YES button if you wish to record
another message.
• Press the STOP/CLEAR button twice to
return to standby mode.
21
Your DF60 treats memos as incoming
messages and they are all played back in
chronological order - to play back or erase see
Incoming messages and memos (page 18).
Using the answering
machine
To set the Remote Access Facility
You can operate the answering machine from
another telephone using the Remote Access
Facility. This is useful if you are on holiday or
away on business and you want to play back
messages and memos.
• Press the TAD and §§ buttons and the
display will show: REMOTE TAD: OFF?
• Change the display to ON by pressing the
NO button. The display shows: REMOTE
TAD: ON?
• Press the YES button and the display shows:
PASSWORD: 0000
• Enter a 4 number code using the keypad.
• Press the YES button to confirm your entry.
• Press the STOP/CLEAR button.
Display shows: TAD FUNCTION
• Press the STOP/CLEAR button to return to
standby mode.
For your code make it an easy-to-remember
number, eg Birthdays, house numbers etc. Using
your confidential code, only you will be able to
operate the answering machine from an outside
location, using any TouchTone telephone.
If your DF60’s answer machine does not respond
you may need to press the ✱ button again.
When you have entered the code you will hear
a long tone to confirm that you are in remote
access mode.
Using your Touch Tone keypad:
• Press 1 and any messages will be
played back.
• Press 2 and you can re-record your
outgoing message (OGM).
• Press 3 to switch to Answering Machine
(TAD) mode on.
• Press 4 to playback any recorded memos.
• Press 5 to record a memo.
• Press 6 to switch to Answering Machine
(TAD) mode off.
• Press 8 to automatically delete the message
you are listening to.
• Press 0 to exit from remote control mode or
to stop the current activity.
Using the Remote Access Facility
When the Remote Access Facility is set to
ON you can operate the answer machine
from any Touch Tone telephone. After dialling
your number press the ✱ button twice
during or after your outgoing message, the
answer machine stops and waits for your 4
number code.
22
Using the fax machine
Using the fax machine
Sending a fax
Feed the document into DF60 face up.
The display changes from: DOCUMENT
LOADING to DOCUMENT SET
Once you have loaded the document you wish
to fax you can choose to dial a FAX number in
one of the following ways:
Normal dialling
One-touch
dialling
GH
4
NO
PQ
RESOLUTION CONTRAST POLL SPEED DIAL
MONITOR
STOP/
CLEAR
START/
COPY
REDIAL
TU
V
FUNCTION
©/
DEL/REC
7
JKL
5
8
DE
3
MN
Speed Dialling
6
WX
YZ
RS
§§
2
O
I
YES
C
1
TAD
©©
F
AB
DF60
9
0
Redial
enter the number using
the key pad
press the appropriate
One Touch key.
(01 to 04).
press the SPEED DIAL
button and then use the
key pad to dial the preprogrammed two digit
number (05 - 49).
Use the REDIAL button to
dial last entered number.
You do not need to lift the handset or press the
MONITOR button when dialling a fax.
Warning-do not try to send a fax if it is:
• too thick or too thin and flimsy
• cloth, metal or carbon coated
• wet with ink, paste or correcting fluid
• wrinkled or torn
• folded
To fax these types of documents, do so by first
photocopying them and then faxing the copy.
23
To send a fax automatically
After dialling press the START/COPY button
When the transmission of the document is
completed you will hear several beeps. You can
insert another page while the FAX is beeping.
Using the fax machine
Sending a fax manually
Press the MONITOR button or lift the handset
and dial the number. After dialling you can
press the START/COPY button immediately,
or you can monitor the call’s progress, via the
in-built speaker, and press the START/COPY
button at an appropriate time. This can be
useful if the fax machine you are calling is
operating in conjunction with an answer
machine which has a long outgoing message.
You should press the START/COPY button as
the outgoing message is ending.
You can also send a fax during a voice call by
pressing the START/COPY button at a
convenient point in the conversation.
If your fax call is not successful in connecting,
your DF60 will automatically retry four times.
If the call is still unsuccessful a confirmation
report is printed informing you that the line
was busy.
Receiving a fax
If set to MANUAL, to receive a fax lift the
handset or press the MONITOR button, then
press the START/COPY button.
In any other mode your DF60 will answer and
receive a fax automatically.
Setting the answer mode is explained in full under
the Setting up section of this guide (Page 10).
Caution
Your DF60 uses a thermal printing system. It
should be noted that documents printed on
thermal paper will fade with time. This time is
dependent on light and heat conditions. To keep a
permanent copy, photocopy the document using a
plain paper copier.
Delaying a fax
This allows you to transmit a Fax to another
machine automatically at a pre-set time. This
can be useful if you want to send a Fax abroad
or at a time when call charges are lower.
Your document must be loaded before starting
this function.
• Press the FUNCTION button until DELAYED
FEATURE? is displayed.
• Press the YES button and the display
shows: DELAYED SEND?
24
Using the fax machine
If delayed sending is already set the display
shows: CANCEL? followed by the fax number to be
dialled.
• Press the YES button to cancel sending,
display shows: DOCUMENT SET
You must now begin programming the delayed
send function again.
Adjusting the resolution and
contrast
You can choose different settings when
copying or sending a document.
Your document must be loaded before starting
this function.
• Press the RESOLUTION button three times
• Press the YES button and the display shows:
TIME: 00.00
• Enter the time you wish the document to be
sent, using the key pad numbers and the
§ © buttons. The time must be entered
using the 24 hour clock.
• Press the YES button and the display
changes to: PHONE
:
• Enter the Fax number you wish the
document to be sent to by using the key pad,
or the pre-set One-touch or Speed Dial
numbers if the number is stored in your
DF60’s memory.
• Press the YES button, a tone will sound to
confirm your setting and the display shows :
DELAYED SET and the time you have set the
document to be sent. If necessary change
the RESOLUTION and CONTRAST to suit
the document you are sending.
Your DF60 will now send your fax at the time
you have specified.
If the document is ejected before sending, the
DELAYED setting is automatically cleared.
25
to view the options. For documents with fine
detail, choose the FINE setting.
For documents with pictures, choose
PICTURE setting and for a normal
document choose STD.
• Press the CONTRAST button three times to
view the options. You can choose LIGHT,
NORMAL or DARK. For light documents in
pencil or thin print quality select the LIGHT
setting. For documents with a dark
background, select the DARK setting.
If you have selected PICTURE resolution, you
cannot set the contrast to LIGHT or DARK.
These settings only apply to a document being
sent or copied.
Your DF60 returns to STD/NORMAL after
each document has been copied or sent.
Using the fax machine
Setting the fax monitor
Polling
This lets you monitor the progress of a fax call
via your DF60’s in-built speaker.
Your DF60 is supplied with this function
switched OFF. We recommend that you keep
this function OFF at first and switch it ON later
should you need it.
This allows another fax machine to retrieve a
document from your DF60 or for your DF60 to
retrieve a document from another fax machine
at a time that’s convenient to them.
With the fax monitor switched to OFF you will
hear fax tones during incoming calls only until
your DF60 begins to receive the fax. You will
also hear fax tones during an outgoing call up
until the call is answered.
With the fax monitor switched to ON you will
hear fax tones during incoming and outgoing
calls up to the point where the document
begins to be sent or received, between pages
and at the end of a call.
To set-up a fax document to be polled by
another machine.
• Load the document
• Press the POLL button, display shows:
POLLING?
• Press the NO button, display shows:
POLLED?
• Press the YES button, display shows:
POLLED SET.
• Your fax will then be sent when another fax
machine calls your DF60
• To cancel the POLLED settings, press
the STOP/CLEAR button.
To switch the fax monitor on
• Press the FUNCTION button until SET
OPTIONS? is displayed.
• Press the YES button and display shows:
DIAL MODE?
• Press the NO button until display shows:
FAX MONITOR?
• Press the YES button and display shows:
FAX MONITOR: OFF?
• Press the NO button to switch betweeen OFF
and ON.
• Press the NO button to confirm your
selection.
26
Using the fax machine
To poll a document from another
fax machine
• Press the POLL button, display shows:
POLLING?
• Press the YES button, display shows:
PHONE
:_
• Using the keypad, enter the number you
wish to poll.
• Press the YES button.
• Your DF60 will then poll the the number you
have entered.
• Press the YES button and the display
shows: TIME: XX:XX (current time).
If delayed polling is already set the display shows:
CANCEL? followed by the fax number to be polled.
• Press the YES button to cancel polling, display
shows: DOCUMENT SET
You must now begin programming the delay
polling function again.
• Using the key pad enter the time you want
to poll.
To delay Polling
You can set up your DF60 to poll from another
machine at a certain time.
• Press the YES button, display shows:
PHONE :_
• Using the key pad enter the number you
want to poll.
• Press the FUNCTION button until the
display shows: DELAYED FEATURE?
• Press the YES button and the display shows:
DELAYED SEND?
• Press the NO button and the display shows:
DELAYED POLLING?
• Press the YES button to confirm your
setting.
• Your DF60 then returns to standby mode.
Your DF60 will poll the number entered at
the selected time.
To cancel delayed polling repeat the above
procedure, when display shows: CANCEL?
followed by the number you have set, press the
YES button.
27
Using the fax machine
To set up for daily polling
You can poll another machine at a designated
time each day.
• Press the FUNCTION button until the
display shows: DELAYED FEATURE?
• Press the YES button then press the
NO button until the display shows: DAILY
POLLING?
• Press the YES button and the display
shows: TIME: XX:XX (current time).
If daily polling is already set the display shows:
CANCEL? followed by the fax number to be polled.
• Press the YES button to cancel polling, display
shows: DOCUMENT SET
You must now begin programming the daily
polling function again.
• Using the key pad enter the time you want
to poll.
• Press the YES button, display shows:
PHONE :_
• Using the key pad enter the number you
want to poll.
• Press the YES button.
• Until reset, your DF60 will poll this number
at the same time every day.
To cancel daily polling repeat the above
procedure, when display shows: CANCEL?
followed by the number you have set, press the
YES button.
Print outs
Your DF60 will automatically print out an
activity report, after every 50 transactions. It
will also print out a confirmation report after
every failed transaction. In addition your DF60
can be set to print out a confirmation report
either after every sent fax or after every
transaction.
To change the confirmation reports
• Press the FUNCTION button until display
shows: SET OPTIONS?
• Press the YES button display shows:
DIAL MODE?
• Press the NO button until display
shows: CONFIRM REPORT?
• Press the YES button.
• Press the NO button to display the available
options: CONFIRM: NO?, CONFIRM: TX
ONLY? or CONFIRM: TX & RX?
• Press the YES button to confirm your option.
CONFIRM: NO?
CONFIRM: TX ONLY?
CONFIRM: TX & RX?
Only failed transaction
reports will be printed.
Failed transaction and
sent transaction
reports will be printed.
Reports will be printed
after every transaction.
28
Using the fax machine
To set manual print outs
Your DF60 can be set to print on demand
details of transactions, stored names and
numbers and settings.
• Press the FUNCTION button until display
shows: PRINT REPORT?
• Press the YES button.
• Press the NO button to display the available
options: ACTIVITY REPORT?, PHONE
DIRECTORY ? or TERMINAL DATA?
• Press the YES button to confirm your option.
ACTIVITY REPORT?
PHONE DIRECTORY?
TERMINAL DATA?
This details all
transactions since the
last automatic activity
report was printed.
This prints out a list of
all the names and
numbers stored in the
one touch and speed
dial memories.
This prints out details
of the settings
programmed into
your DF60.
Using as a copier
You can use your DF60 as a convenient low
volume desktop copier.
Caution
Your DF60 uses a thermal printing system. It
should be noted that documents printed on
thermal paper will fade with time. This time is
dependent on light and heat conditions.
To copy a document
• Load the document face up
• Set the resolution and contrast setting to
suit the document quality.
The automatic setting is FINE resolution
• Press the START/COPY button
• If copying more than one page, insert the
next page while your DF60 is beeping
• To stop copying, or to eject the document
before copying begins, press the
STOP/CLEAR button.
You can receive but not make telephone calls
while your DF60 is copying.
Your DF60 cannot make copies if the handset
is not in place.
29
Using the fax machine
Never attempt to pull a jammed document out of
your DF60 without pressing the paper release
button located at the side of the machine.
Caution
Always remember to remove clips, staples etc
from the document to avoid damaging the unit.
In an emergency, push the jam remove button.
30
Help
Help If you have any problems using your DF60, this section
will give you the most common, easy to follow solutions.
No dialling tone
Paper jams
Is the line cord plugged into the phone socket?
If a document jams in the machine, press the
DOCUMENT JAM button at the bottom
right hand side of the machine while you pull
the document free.
Cannot dial out
Check the telephone line connections. Check
that the telephone is correctly set for Tone or
Pulse dialling.
To reset
If you encounter a problem and your DF60 will
not respond to any button presses, turn off the
power switch for ten seconds. Turning the
power back on will reset your DF60 to standby
mode. Your personalised settings and
memorised numbers will be maintained.
Your DF60 prints error codes in the activity
report. The codes and meanings are
listed below.
Sending
Error code
Meaning
ER05, 06, 23
Unable to send document or
sending stopped due to fax
machine incompatibility.
Unable to send document due
to fax machine incompatibility.
Sending document stopped
due to poor telephone line
condition.
Document transmission is
completed, but receiving
quality at the other end is poor
due to poor telephone line
connection.
Paper roll will not feed
ER12, 13, 14
Check that the fax paper roll is inserted
correctly and that the release lever is in the
down position.
ER18,20
Error code 70 appears
ER44,45
The unit is overheated. Let it cool down before
continuing.
Other error code numbers appear
Check the error code list. If you have an
error message, press the STOP/CLEAR
button and try again.
31
Fax error codes
Help
Error code
Meaning
Both
ER71
Sending document stopped
due to paper jam or
excessive paper length.
Sending document stopped
due to a problem at the
receiving machine.
Unable to send documents
because the line to the other
party is busy.
Error code
Meaning
ER70
Overheated due to heavy
usage of the machine
Sending/receiving of
document stopped due to the
STOP/CLEAR button being
pressed
ER96,97,98
BUSY
ER80
Service
Customer Helpline
Receiving
Error code
Meaning
ER02, 04, 07, Unable to receive or receiving
08,11, 41
stopped due to:
- varying or poor telephone
line condition
- problem at the transmitting
fax machine
- fax machine incompatibility
ER12,13,14
Unable to receive due to fax
machine incompatibility
ER42, 43, 46 Receiving is completed, but
receiving quality is poor due to
poor telephone line condition
ER73
Receiving stopped due to no
recording paper
ER91, 92, 93, Receiving stopped due to a
94, 95
problem at the transmitting
fax machine
ER 99
Unable to receive document
due to poor telephone line
condition
If you experience problems, please call the BT
Helpline on 0345 77177(calls charged at the
local rate).
Guarantee
Your DF60 is supplied with 12 months
warranty. If your DF60 should become faulty
during this period, contact your supplier.
Some suppliers offer extended warranty
schemes for cover outside the initial 12 month
period. Please ask them for details.
If your DF60 should develop a fault outside
the warranty period, contact the BT helpline
on 0345 77177 (calls charged at the local rate)
for assistance.
32
Technical
specifacation
Technical specification
33
1. Type
High speed, portable, desktop transceiver with integral
digital answer machine.
2. Scanning system
Contact image sensor.
3. Printing system
Thermal print head.
4. Transmission speed
9600/ 7200/ 4800/ 2400 bps with automatic fallback.
5. Compression system
MH coding.
6. Resolution
STANDARD mode 3.58 line/mm.
FINE mode 7.7 line/mm.
PICTURE mode 7.7 line/mm 16 grey scales.
7. Document size
Width: 145mm to 216mm (5.7” to 8.5”).
Length: 50mm to 1500mm (1.97” to 59.0”).
8. Scanning width
216mm (8.5”).
9. Recording paper
Thermal paper roll
210mm x 30m (8.25” x 98”) with approx. 13mm core.
10. Answer machine memory
capacity
≈ 10 minutes (total).
11. Dimensions
306(W) x 208(D) x 75(H)mm
[12.0” x 8.19” x 2.95”].
12. Weight
≈ 3kg (6.5lb) (including paper roll).
13. Power consumption
≈ 10W in standby.
Max operating 90W.
Technical
information
Technical information
Choosing a position
Your DF60 should be kept clear of dust, moisture, high
temperature and vibration and should not be exposed to direct
sunlight. Don’t install it close to radiators or air-conditioning
outlets or in excessively warm, humid or dusty places.
You may connect it
To direct exchange lines.
To extensions with new plug and socket arrangements provided
with these direct exchange lines.
To compatible switchboards.
Warning
The apparatus is only designed to be operated in a normal office
or domestic environment where the relative humidity does not
exceed 60%. It should not be used in bathrooms or near water.
You may NOT connect it
To shared service (party) lines.
Connecting to the UK network
DF60 is tested and approved for connection to the UK network,
provided that it is used in accordance with the guidelines in this
booklet.
Approval number
BABT Certificate Number/Approval Number for the DF60
503522 APPROVED for connection to telecommunication
systems specified in the instructions for use subject to conditions
set out in them. CE compliant to 89/336/EEC (EMC Directive)
Approval for use
This apparatus has been approved for use with the following
facilities:
One touch keys for PHONE and FAX
Terminal and subscriber identifier
Transmission status report
Manual mode
Auto/manual answer
Polling
Single document feeder
Fax switch
Simple telephone
Answer machine
The connection to the telecommunication system must be
unplugged before the earth is disconnected. The connection to
the telecommunication system must not be hardwired.
This apparatus may be used on telecommunications systems
employing loop disconnect or MF signalling.
Any other usage will invalidate the approval of the apparatus if,
as a result, it then ceases to conform to the standards against
which approval was granted.
How many phones you can have
Your exchange line provides only a small current to make your
telephone ring. Although you may have any number of sockets it
is important to limit the number of telephones and other items of
apparatus connected to the line by these sockets. This ensures
that each telephone will receive enough current to ring.
Every telephone or item of apparatus has a Ringer Equivalence
Number (REN)
In most cases a standard line should provide enough current
for two or more telephones or items of apparatus , if the REN’s
add up to no more than 4.
34
Technical
information
DF60 has a REN of 1. Any telephone provided by BT may be
assumed to have a REN of 1 unless otherwise stated on the base.
Even where the number of telephones has been limited, there is
no guarantee that the different types of telephone on the same
line will ring.
Safety warning
Interconnection circuits should be such that the equipment
continues to comply with the requirements of 4.2 of EN 41003 for
TNV circuits and 2.3 of EN 60950 for SELV circuits, after making
connections between circuits.
The provided handset must only be connected to the socket on
the side of the machine.
Interconnection directly, or by way of other apparatus, of ports
marked Safety Warning. See instructions for use. with ports
marked or not so marked may produce hazardous conditions on
the network. Advice should be obtained from a competent
engineer before such a connection is made.
Another approved handset may be connected but the apparatus
has been calibrated and approved for the provided handset.
While operation may be possible initially, changes to or
modernisation of the network taking place in the normal course
of events may result in the apparatus being connected to a
network service with which it is not designed to be compatible.
Failure of the apparatus to work under these circumstances may
not be the responsibility of the network operator.
In the unlikely event of any such problems occurring, the user
should contact the supplier or maintainer of the apparatus.
Difficulty may be experienced when making calls from other
apparatus. Such difficulties may include:
• Difficulties in making a call
• Problems in telephone conversation being experienced by both
parties to the call.
Connecting to switchboards
Your DF60 is approved only for use with a compatible
switchboard including those which do not provide secondary
proceed indication.
If you do have a compatible switchboard, it cannot be guaranteed
that the DF60 will operate correctly under all possible conditions
of connection.
If you have any difficulties, contact BT on 0800 800 152
35
Index
Index
Activity report
Answer mode
Answering machine
BT socket
Call screening
Confirmation report
Contrast
Control panel
Copying
Customer help line
Date and time
Dial mode
Directory label
Error codes
Fax monitor
Fax receiving
Fax delaying
Fax sending
Guarantee
Handset cord
Help
Incoming messages Last number redial
Loading fax paper
28
10
16
5
20
28
25
1
29
3
6
9
1
32
26
24
24
auto
23
manual
24
32
5
31
playback 18
erasing
19
auto erase 19
date & time 18
12
5
Mains power cable
Manual print outs
Memo
Message indicator
Monitor button
Name and number
- recording
- playback
- entering
- position
On hook dialling
One touch numbers Outgoing message Paper
Phone directory
Polling
Print outs
Receiving a fax
Recording
Remote access
Resolution
Ringer volume
Sending a fax
storing
dialling
recording
playback
loading
jam
delaying
daily
time
message
memo
5
29
21
21
18
12
7
8
12
13
14
16
17
5
31
29
26
27
28
28
24
19
16
21
22
25
15
23
36
Index
Setting up
Speaker volume
Speed dial numbers TAD
Tone/pulse selector
Technical information
Technical specification
Telephone
Terminal data
Volume
-
37
storing
dialling
mode
using
speaker
ringer
4
15
14
15
10
16
9
34
33
12
27
15
15
Replacement Directory labels
If you require additional directory labels,
carefully cut out one of the labels printed below
and use it as a replacement.
01
01
01
01
02
02
02
02
03
03
03
03
04
04
04
04
01
01
01
01
02
02
02
02
03
03
03
03
04
04
04
04
38
Offices in Europe, North America,
Japan and Asia Pacific.
The telecommunications services described in this publication
are subject to availability and may be modified from time to time.
Services and equipment are provided subject to British
Telecommunications plc’s respective standard conditions of contract.
Nothing in this publication forms any part of any contract.
© British Telecommunications plc 1996.
Registered Office: 81 Newgate Street, London EC1A 7AJ.
Registered in England No. 1800000.
Printed in England. Issue No.1 (8/96).
Designed by The Art & Design Partnership Limited.
CE compliant to 89/336/EEC
(EMC Directive) & 73/23/EEC
(Low Voltage Directive)
APPROVED for connection to
telecommunication systems specified
in the instructions for use subject to
the conditions set out in them