1
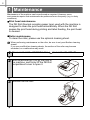
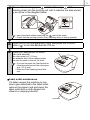
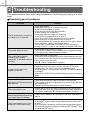
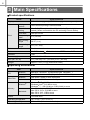
User's Guide QL-700 Be sure to read and understand this guide before using the machine. We recommend that you keep this guide nearby for future reference. www.brother.com US ENG ver.0 Thank you for purchasing the Brother QL-700. We strongly recommend that you read this guide carefully before using the Brother QL-700, and then keep it nearby for future reference. We provide service & support for users who register their products on our website. We recommend that you take this opportunity to register with us by visiting us at: Online User Registration http://registermybrother.com/ Online Support Page http://solutions.brother.com/ NOTE: It is also possible to access the above sites from the online user registration page displayed at the end of the software installation. We look forward to your registration. 1 Introduction Contents Introduction •••••••••••••••••••••••••••••••••••••••••••••••••••• 1 1 2 3 Contents ••••••••••••••••••••••••••••••••••••••••••••••••••••••••••••••••••••••••• 1 Maintenance •••••••••••••••••••••••••••••••••••••••••••••••••••••••••••••••••••• 2 Troubleshooting •••••••••••••••••••••••••••••••••••••••••••••••••••••••••••••••• 4 Main Specifications•••••••••••••••••••••••••••••••••••••••••••••••••••••••••••• 6 2 Reference 1 Maintenance Maintenance of the machine can be performed as required. However, some environments require that maintenance be performed more frequently (e.g. in dusty conditions). Print head maintenance The DK Roll (thermal recording paper type) used with the machine is designed to clean the print head automatically. When the DK Roll passes the print head during printing and label feeding, the print head is cleaned. Roller maintenance To clean the roller, please use the optional cleaning sheet. When performing maintenance on the roller, be sure to only use Brother cleaning sheets. If you use non-Brother cleaning sheets, the surface of the roller may become scratched, or a malfunction may result. 1 Press and hold the ON/OFF button ( ) to turn the QL-700 off. 2 Hold the Brother QL-700 by the front of the machine, and firmly lift the DK Roll compartment cover to open it. 3 Remove the DK Roll. 3 4 Remove the backing paper and feed the edge of the cleaning sheet into the printing unit until it reaches the area shown by an arrow in the diagram below. • Insert the sheet without removing the part of the sheet. • Check that the printing surface of the cleaning sheet is facing upwards. 5 Close the DK Roll compartment cover and press the ON/OFF button ( ) to turn the Brother QL-700 on. 6 Press the Feed button for more than one second. Feed button The roller spins by 4" (10 cm). The adhesive face of the cleaning sheet removes the stain or dust on the roller. • If you do not press the Feed button for more than one second, the roller spins only 1/3" (8 mm). • Dispose of the cleaning sheet after use. Label outlet maintenance If a label causes the machine to jam due to glue attached to the label outlet, remove the power cord and clean the label outlet with a cloth dipped into ethanol or isopropyl alcohol. Label outlet 4 Reference 2 Troubleshooting If the problems below occur while using this machine, the following may help you to solve them. Potential types of problems Problem Solution • Is the cable loose? Check that the cable is connected securely. • Is the DK Roll installed correctly? If not, remove the DK Roll and reinstall it. • Is there enough roll remaining? Check that there is enough roll remaining. The QL printer does not print, or • Is the DK Roll compartment cover open? a printing error is received. Check that the DK Roll compartment cover is closed. • Has a print error or transmission error occurred? Turn off the Brother QL printer and then turn it on again. If there is still a problem, contact your Brother dealer. • If the printer is connected via a USB hub, try connecting it directly to the PC. If not, try connecting it to another USB port. The power button is not lit. • Is the power cord inserted correctly? Check that the power cord is inserted. If it is inserted correctly, try plugging it into another electrical outlet. The printed label contains streaks or poor quality characters, or the label is not fed correctly. • Is the print head or roller dirty? While the print head generally remains clean under normal use, lint or dirt from the roller may become stuck on the printer head. If this occurs, clean the roller. See Î "Roller maintenance" in page 2. A data transmission error appears on the PC. • Is the correct port chosen? Check that the correct port is chosen from the "Print to the following port" list in the Printer Properties dialog box. • Is the QL printer in cooling mode (the STATUS lamp is flashing in orange)? Wait until the STATUS lamp stops flashing and then try printing again. Labels are jammed in the cutter. • Contact Brother Customer Service at 1-877-BROTHER. • Check that the ejection path of the label is not blocked. The label is not ejected properly • Check that the DK Roll is set properly by removing the DK Roll after printing. and reinstalling it. • Ensure that the DK Roll cover is closed properly. The print quality is poor • Is there dirt or lint on the roller preventing it from rolling freely? Clean the roller using the cleaning sheet (separately available). For details, please see Î "Roller maintenance" in page 2 After replacing the Roll while the Add-In feature was activated, the • Close P-touch Editor to exit the Add-In, and then reactivate the Add-In. layout style was not updated. The P-touch Add-In icon is not displayed in Microsoft® Word. • Is Microsoft® Word started up from Microsoft® Outlook®? • Is Microsoft® Word chosen as the default editor for Microsoft® Outlook®? Due to program limitations, the Microsoft® Word Add-In does not work with the above settings. Quit Microsoft® Outlook®, and restart Microsoft® Word. 5 Problem Cutter error Solution • If a cutter error occurs, keep the DK roll compartment cover closed and press the ON/OFF button. The cutter moves back to the normal position and turns the machine OFF automatically. After the machine is OFF, inspect the label outlet and remove the paper jam. • Set the label vertical to the print head as shown below. Label exit slot Recommended print direction Print head • Some types of scanner are not able to read the bar code. Try using another scanner. • We recommend printing the Bar code with Print Quality options set to "Give priority to print quality". The printed bar code cannot be read. Windows® XP: To change the Print Quality options, open the printer properties by going to [Control Panel]-[Printers and Other Hardware][Printer and Faxes], right-clicking the printer whose settings are to be changed, then selecting [Properties]. Then, in the [General] tab, click [Printing Preferences...]. Windows Vista®: To change the Print Quality options, open the printer properties by going to [Control Panel]-[Hardware and Sound]-[Printers], right-clicking the printer whose settings are to be changed, then selecting [Properties]. Then, in the [General] tab, click [Printing Preferences...]. Windows® 7: To change the Print Quality options, open the printer properties by going to - [Devices and Printers], right-clicking the printer whose settings are to be changed, and selecting [Printer properties]. Then, in the [General] tab, click [Preferences...]. Mac OS X 10.4.11 - 10.7: To change the Print Quality options, open the print dialog box and choose "Basic" from the print options pop-up menu. After exiting P-touch Editor Lite, how do I restart the program while the machine is still on? There are three ways to restart. Perform any of the following. • Turn off the P-touch labeler and then turn it back on. • Disconnect and then reconnect the USB cable while the labeler is on. • Launch P-touch Editor Lite from My Computer. I want to reset the printer/delete the data transferred from the PC. Press and hold the CUT button while holding down the ON/OFF button when the machine is turned off. When the Editor Lite lamp starts flashing and the STATUS lamp lights orange, press the CUT button six times while continuing to hold down the ON/OFF button. The machine will then reset. All data transferred from the PC will be deleted and the machine will be reset to factory settings. 6 Reference 3 Main Specifications Product specifications Items Specifications Display Editor Lite lamp (green), STATUS lamp (green, orange, red) Print Printing method Direct thermal printing via thermal head Speed of printing Max. 5.9" (150 mm)/sec, Max. 93 labels/min. (Standard Address Labels) (When connected to the PC and using P-touch Editor) Print head 300 dpi/720 dot Max. printing width 2.3" (59 mm) Max. printing length 39.37" (1 m) Min. printing length 0.5" (12.7 mm) Cutter Durable automatic cutter Button ON/OFF button ( Interface USB ), Editor Lite button, FEED button, CUT button Power supply 120V AC 60Hz 1.7A Size (W x D x H) 5.0" (128 mm) x 8.7" (221 mm) x 6.0" (153 mm) Weight Approx. 2.5 lb (1.1 kg) (Without DK Rolls) Operating environment Item OS Hard Disk Specifications Windows® Microsoft® Windows® XP/Windows Vista®/Windows® 7 Macintosh Mac OS X 10.4.11 - 10.7 (Only with P-touch Editor 5.x) Windows ® Disk space 70 MB or more disk space Macintosh Disk space 100 MB or more disk space Windows® Windows® XP: 128 MB or more Windows Vista®: 512 MB or more Windows® 7: 1 GB (32-bit) or 2 GB (64-bit) or more Macintosh Mac OS X 10.4.11: 256 MB or more Mac OS X 10.5.x: 512 MB or more Mac OS X 10.6: 1 GB or more Mac OS X 10.7: 2 GB or more Memory Others CD-ROM drive Operating temperature 50°F to 95°F (10°C to 35°C) Operating humidity 20% to 80% (without condensation)