1
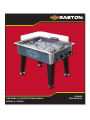
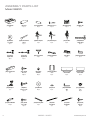
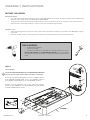
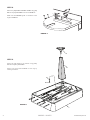
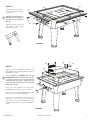
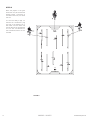
ASSEMBLY & INSTRUCTION MANUAL
MODEL#: X6855
ATOMIC
ROD HOCKEY
PLEASE STAPLE YOUR PURCHASE RECEIPT TO PAGE 10
AND FILE THIS MANUAL FOR FUTURE REFERENCE.
ATOMIC ROD HOCKEY
Model# X6855
Toll Free Customer Relations: 1-800-225-5712
E-mail: [email protected]
INTRODUCTION
CONGRATULATIONS!!
You have chosen a table with unsurpassed value that will provide years of
entertainment.Thank you for your support!
!
COMPLETELY UNPACK ALL COMPONENTS AND VERIFY YOU HAVE ALL THE
CORRECT PIECES. IF YOU NOTICE DEFECTIVE OR MISSING PARTS, DO NOT
IMMEDIATELY RETURN THE TABLE TO THE STORE. INSTEAD, PLEASE CALL
US FIRST AT:
!
1-800-225-5712 (M-F 8:30AM-4:30PM Mountain Time)
Please read the instructions carefully after you have unpacked the carton, and familiarize yourself with the
assembly order & names of parts.
!
THIS ITEM HAS MANY PARTS AND STEPS OF ASSEMBLY. IT IS VERY
IMPORTANT THAT THE STEPS ARE FOLLOWED CLOSELY. FOR THIS REASON,
IT IS IMPORTANT TO HAVE TWO ADULTS AND A FEW HOURS SET ASIDE FOR
ASSEMBLY.
!
If at any time you have questions regarding your table, please do not hesitate to contact us via:
PHONE:
EMAIL:
MAIL:
*
1-800-225-5712 (M-F 8:30am-4:30pm MT)
[email protected]
Classic Sport Companies Inc.
Attn: Customer Relations
5151 Bannock Street, Ste. D
Denver, CO 80216
THROUGHOUT THE MANUAL, WATCH FOR THIS SIGN, SHOWING SPECIAL
TIPS AND HELPFUL HINTS.
*
TABLE OF CONTENTS
Introduction .............................................................................. 1
Assembly Parts List ...................................................... 2 - 3
Before You Begin................................................................... 4
Tools Required ........................................................................ 4
Assembly Instructions ................................................. 4 - 8
Troubleshooting ..................................................................... 9
Parts Reorder List .............................................................10
Warranty Information ......................................................11
1 800 225 5712
MODEL: X6855
1
ASSEMBLY PARTS LIST
Model X6855
2
(#1) Cabinet
1 pc
(#2) Legs
4 pcs
(#3) Rod Handle
10 pcs
(#4) Bolt, 1/8” x 1”
10 pcs
(#5) Rod Spring
10 pcs
(#6) Bolt, 1/2”
2 pcs
(#7) Washer,
3 x 13mm
2 pcs
(#8) Goalie Control
Knob
2 pcs
(#9) Blue Players
5 pcs
(#10) Red Players
5 pcs
(#11) Goalies
2 pcs
(#12) Medium
Player Rod
2 pcs
(#13) Short
Player Rod
4 pcs
(#14) Long
Player Rod
4 pcs
(#15) Leg Leveler
4 pcs
(#16) Goal Barrier
2 pcs
(#17) Goal
2 pcs
(#18) Puck Catcher
2 pcs
(#19) Scoreboard
1 pc
(#20) Screw,
T4 x 1/2”
26 pcs
(#21) Clear
Washers
10 pcs
(#22) Corner Wall
Post
4 pcs
(#23) Long Side
Plastic Wall
2 pcs
(#24) Short End
Plastic Wall
2 pcs
(#25) Adaptor
1 pc
(#26) Bolt,
5/16” x 1-3/4”
12 pcs
(#27) Washer
12 pcs
(#28) Puck
2 pcs
(#29) 4mm Allen
Key
1 pc
(#30) Spike Nut,
1/8”
10 pcs
(#31) Track Bracket
10 pcs
(#32) Screw,
T4 x 1-1/4”
10 pcs
(#33) End Top Rail
2 pcs
(#34) Side
Top Rail-A
1 pc
(#35) Side
Top Rail-B
1 pc
(#36) Screw,
T4 x 5/8”
10 pcs
MODEL: X6855
[email protected]
ASSEMBLY INSTRUCTIONS
BEFORE YOU BEGIN
IMPORTANT NOTES:
•
Your table will be assembled upside down at first. FOR YOUR SAFETY and to avoid damaging the table, please do NOT flip the
table over onto its legs unless YOU HAVE HELP FROM OTHERS.
•
To protect the surfaces of the table during assembly, find a clean, level place to work on. Using the box for this works well.
•
Once the table is assembled, never lift or move it by the rods; this will damage the table.
ASSEMBLY TIPS:
•
When assembling parts that have more than one bolt, start all the bolts by hand for that particular step BEFORE you tighten
them down.
•
Keep the hardware pieces in their respective compartments during assembly so they are easily accessible.
TOOLS NEEDED:
•
Phillips head screwdriver
•
Wrench (included)
•
An electric screwdriver is very helpful in assembly. However, be sure to
SET AT LOW TORQUE and USE EXTREME CAUTION; you can over-tighten
the hardware and strip the screws, or make them poke through the table’s
parts!
STEP 1
ROD ASSEMBLY
*
The (R14) LONG PLAYER ROD anS (R12) MEDIUM PLAYER ROD
are verV cXose in XenZth. PXease make note \hich one is XonZer.
A) The (#14) LONG PLAYER RODS are for the hWINGi positions;
(#12) MEDIUM PLAYER RODS are for the hCENTERi positions;
(#13) SHORT PLAYER RODS are for the hDEFENSEi positions.
20
35
B) After you have placed the rods in their respective positions,
attach the (#3) HANDLES and (#5) SPRINGS using (#4) BOLTS
and (#30) SPIKE NUTS as shown.
4
5
14
13
30
12
3
13
4
1 800 225 5712
FIGURE 1
14
1
MODEL: X6855
3
STEP 2
8
Attach the (#8) GOALIE CONTROL KNOBS using (#6)
BOLTS and (#7) WASHERS as shown in FIGURE 3a.
Make sure the INTERNAL goalie hLi bracket is at the
angle in FIGURE 3a.
7
6
FIGURE 2
15
STEP 3
Attach the (#2) LEGS to the cabinet using (#26)
BOLTS and (#27) WASHERS.
2
Attach one (#15) LEG LEVELER to each leg by
twisting clockwise.
27
26
FIGURE 3
1
4
MODEL: X6855
[email protected]
STEP 4
Flip table over onto its legs.
At least two adults are needed
for this step!
*
33
34
33
When turninZ the tabXe over,
DO NOT rest the \eiZht of
the tabXe on onXV one siSe of
the XeZs.
Attach the (#33, #34, #35)
TOP RAILS using (#32)
SCREWS as shown.
32
!
FIGURE 4
22
20
STEP 5
17
16
Attach the (#23, #24)PLASTIC WALLS and
(#22) POSTS using (#36) SCREWS and (#21)
WASHERS as shown.
*
35
32
21
36
19 23
24
It is verV heXpfuX to ASSEMBLE ALL OF THE
SIDEBOARDS FIRST, then pXace them onto the
ice. Line up one of the corner sections \ith the
preSriXXeS hoXes, anS secure. Work Vour \aV
arounS the rest of the tabXe, to ensure that the
siSeboarSs are XeveX.
Place the (#17) GOALS and (#16) GOAL
BARRIERS onto the playing surface as shown.
Secure the (#18) PUCK CATCHERS to the end
panels as shown using (#20) SCREWS.
20
18
Finally, pull the puck sensors up through the rail
and insert into the bottom of the scoreboard,
then attach the (#19) SCOREBOARD to the
(#34) TOP SIDE RAIL using (#20) SCREWS as
shown.
FIGURE 5
1 800 225 5712
MODEL: X6855
5
STEP 6
Place the players in the gear
boxes that are just beneath the
playing surface. Push them in
until their sticks are just above
the hicei.
11
You are now ready to play. To
activate the scoreboard, plug
one end of the adaptor into a
wall outlet, and the other end
into the back of the scoreboard.
You can also use batteries for
the scoreboard, which are not
included.
10
BLUE
9
10
RED
9
BLUE
BLUE
RED
10
RED
BLUE
9
BLUE
9
10
RED
10
RED
BLUE
9
11
RED
FIGURE 6
6
MODEL: X6855
[email protected]
TROUBLESHOOTING
Model X6855
TROUBLESHOOTING
POSSIBLE CAUSES
SOLUTIONS
Scoreboard does not turn on,
randomly resets itself, or resets
the score during the game.
Adaptor is not plugged in.
Plug adaptor into wall, and other end into metal
switchbox, the part on which the serial number
is located.
Scoreboard lights up, but some
of the LED’s are out, making the
numbers hard to read, or there
is no sound.
Loose connection inside the
scoreboard itself.
Remove the plastic ‘cap’ of the scoreboard to
reveal the wires and circuitry inside. Check that
all wires are connected.
The scoreboard has short
circuited.
Replace scoreboard.
Puck sensors are not plugged in.
Make sure puck sensors are connected to the
scoreboard as shown in Step 5.
Puck sensor has short circuited.
Replace puck sensor.
“Wing” players can’t reach the
puck at the end of the table.
A medium player rod is in the
“Wing” spot.
Check the positions of the rods, making sure
you have the longest in the “wing” positions.
“Center” player keeps breaking
at the base near the gear box.
A long player rod is in the
“Center” spot, causing the player
to hit the playing surface and
break.
Check the positions of the rods, making sure
you have the medium player rods in the “center”
positions.
Goalie doesn’t move from side
to side completely.
Internal goalie “L” bracket was
attached at the wrong angle.
See Step 2 in the assembly instructions.
Hockey player doesn’t spin.
Nut and bolt that attaches the
gear box to the rod has come
loose.
Re-tighten the nut and bolt. Apply a small dab
of clear nail polish or medium-grade Lock-Tite
to the nut; this will prevent it from loosening up
in the future.
Scoreboard does not register
points made.
1 800 225 5712
MODEL: X6855
7
PARTS REORDER LIST
Model X6855
REF #
PART #
/
Notes:
DESCRIPTION
CA0INET
1
2E3
4
RC56577
ROD 8AND2E
9
R8565:;
0O2T< /=:> ? />
;
RC59517
SPRIN3
6
R859595
0O2T< /=1>
@
R859597
AAS8ER< 4 B /4CC
:
RC59545
3OA2IE CONTRO2 DNO0
7
RC59541
P2AEERS< 02FE
/5
RC59591
P2AEERS< RED
//
RC59544
3OA2IE< 02FE
/1
RC56554
CEDIFC P2AEER ROD
/4
RC56559
S8ORT P2AEER ROD
/9
RC56551
2ON3 P2AEER ROD
/;
RC5951;
2E3 2EGE2ER
/6
RC5;55@
3OA2 0ARRIER
/@
RC5;554
3OA2
/:
PFCD CATC8ER
/7
SCORE0OARD
15
R859/4@
SCREA< T9 B /=1>
1/
R8565@7
AAS8ER< C2EAR
11
RS595;/
P2ASTIC AA22 POST
14
RS59599
P2ASTIC AA22< 2ON3
19
RS5959;
P2ASTIC AA22< S8ORT
1;
RE595/@
ADAPTER
16
R85;56:
0O2T< ;=/6> B /H4=9>
1@
R85;5//
AAS8ER
1:
RC59547
PFCD
R8565:6
SPIDE NFT< /=:>
4/
RC56/1;
TRACD 0RACDET
41
R8565:@
SCREA< T9 B /H/=9>
17
45
9CC A22EN DEE
44
TOP END RAI2
49
TOP SIDE RAI2HA
4;
TOP SIDE RAI2H0
46
R8565::
SCREA< T9 B ;=:>
4@
RC5;557
3EAR 0OB< SPEED SDATE
4:
RC565;4
3OA2IE CONTRO2< INTERNA2 2EGER
47
RE5655/
PFCD SENSOR
95
RC59594
3OA2IE< RED
9/
8ARDAARE PACD< B6:;;
SIJK LMKJN OIM PQPLRPSRKT CPRR UIV WVLXLOYZ [K PXXKWM GLNP IV
CPNMKVCPV\ IOR]T S^LWWLOY _ 8PO\RLOY X^PVYKN PWWR]T PVLXKN
N`SaKXM MI X^POYK [LM^I`M OIMLXKT
8
MODEL: X6855
[email protected]
WARRANTY INFORMATION
Model X6855
90-DAY LIMITED WARRANTY
Classic Sport Companies, Inc. warrants to the original consumer that the table is to be free from defects in
workmanship or materials under normal use and conditions for a period of ninety (90) days from the date of original
purchase.
PRODUCT REGISTRATION
Your table should be registered within 30 days from the date of original purchase. Registration may be submitted
through the following means:
Phone:
Website:
Mail:
1-800-225-5712
www.classicsport.com
Classic Sport Companies, Inc.
Attn: Product Registration
5151 Bannock Street, Suite D
Denver, CO 80216
WARRANTY COVERAGE
Except as provided below, this Limited Warranty covers all defects in materials and workmanship on tables in a
residential, single family home environment. This Warranty is void if the table is:
•
•
•
damaged through unreasonable usage, negligence, misuse, abuse, acts of nature, transportation/
third party freight damage, or by accident
used in commercial applications (store display models, etc.) or rentals
subject to improper service
What is NOT covered: Light bulbs, accessories, cosmetic parts (graphics, laminates, polish) and other items that wear
out with normal usage.
WARRANTY CLAIMS
If during the 90 day Limited Warranty period, any part or component of the table is found by Classic Sport Companies,
Inc. to be defective, we will replace that part or component without charge (including non-expedited shipping and
handling). Pictures of defects and a copy of the purchase receipt may be required for certain claims.
For all claims, please have your purchase receipt and model number readily available when contacting our Customer
Relations Department:
Phone:
1-800-225-5712 (M-F 8:30 a.m. - 4:30 p.m. Mountain Time)
E-mail:
Mail:
[email protected]
Classic Sport Companies Inc.
Customer Relations
5151 Bannock Street, Suite D
Denver, CO 80216
This warranty gives you specific legal rights, though you may have other rights that vary by state.
1 800 225 5712
MODEL: X6855
9
staple purchase receipt here
EASTON ATOMIC ROD HOCKEY
Model# X6855
Toll Free Customer Relations: 1-800-225-5712
E-mail: [email protected]
10
[email protected]
Classic Sport Companies, Inc.
5151 Bannock St., Suite D
Denver, CO 80216
[email protected]
1-800-225-5712
303-991-8010


![VadaTech VT85x User Manual[1]](http://vs1.manualzilla.com/store/data/005803212_1-bb50408d9ec4263de47f5dcd2a97e7b3-150x150.png)