1
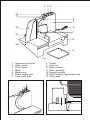
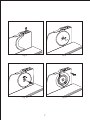
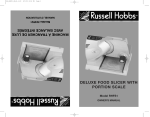
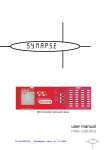
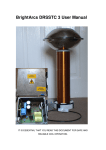
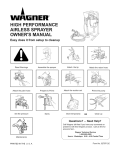
Food Slicer
Use and Care Instructions
Model BKS600
EURO-PRO OPPERATING LLC
BOSTON, MA 02465
Tel.:1 (800) 798-7398
www.euro-pro.com
USER MANUAL FOR FOOD SLICER MODEL BKS600
IMPORT ANT SAFEGUARDS
WARNING: A risk of fire and electric shock exists in all
electrical appliances and may cause personal injury or death.
Please follow all safety instructions.
1.
READ ALL INSTRUCTIONS BEFORE USING APPLIANCE.
2.
The appliance is designed for household use only. It is not intended for commercial
use. The electronic scale is not for trading use.
3.
Do not use the appliance for other than intended use.
4.
Do not use outdoors.
5.
The safety switch prevents accidental operation of the slicer by pressing the switch
plate. Do not attempt to defeat this safety feature.
6.
Unplug the appliance from power outlet before putting on or taking off parts and
before cleaning. Be careful, the blade continues to turn for a while even after the
appliance is switched off.
7.
Do not operate the appliance continuously for more than 10 minutes. Allow the
appliance to cool down for one hour before second operation.
8.
Do not use the appliance to cut deep frozen food, bones or jellylike wet food.
9.
Operate the appliance only when the blade-locking knob is properly engaged and
tightened. Avoid contacting moving parts, such as blade or gear.
10. Handle the blade carefully when cleaning, removing and inserting, as the blade is
extremely sharp. Do not touch the sharp edge of the blade. Do not use or install the
blade in any way other than recommended in this manual.
11. To avoid danger of injury, always cut the food with feeder and food press. The food
press must not be removed, unless the size and shape of the food do not permit their
use.
12. Always set the adjustment plate to position '0' before and after cleaning.
13. To protect against risk of electric shock, do not operate this appliance if it has a
damaged cord or plug, is not working properly, has been dropped or damaged, or is
dropped into water or any other liquid. Return the appliance to service center for
examination and repair.
14. Do not let the cord hang over the edge of table or touch hot surface.
1
REV. 08/02A
15. Do not use accessories not supplied with this appliance.
16. Do not allow children to get access to this appliance.
17. Close supervision is necessary when the appliance is used by or near disabled
persons.
18. Clean the appliance before the first time usage. See “Cleaning Instructions”.
SA VE THESE INSTRUCTIONS
THE APPLIANCE IS DESIGNED FOR HOUSEHOLD USE ONLY
Short Cord Instructions
CAUTION: A short power supply cord is provided to reduce the risk of personal injury
resulting from because entangled in or tripping over a longer cord.
Extension Cord Use
If extension cord is required, special care and caution is necessary. The extension cord
should be marked with an electrical rating of 125V and at least 10A, 1250W. The power
supply and the extension should be arranged so that it will not drape over the countertop
or tabletop where it can be pulled on by children or tripped over accidentally.
Polarized Plug
This appliance has a polarized plug (one blade is wider than the other). As a safety
feature to reduce the risk of electric shock, this plug is intended to fit into a polarized
outlet only one way. If the plug does not fit fully in the outlet, reverse the plug. If it still
does not fit, contact a qualified electrician. Do not attempt to defeat this safety feature.
2
DIRECTIONS FOR USE
CAUTION: Blade is sharp.
Handle carefully.
1.
Place the food slicer (Fig. 1) on a flat solid surface so that the appliance has good
adhesion.
2.
Make sure the safety lock is at '0' position before the appliance is plugged in the
electrical outlet.
3.
Plug in the electrical outlet with alternating current and voltage supply specified for
the appliance 120 V~, 60 Hz, 90W .
4.
To turn on the appliance, first turn the safety switch from position '0' to '1' then press
down the pulse switch plate (Fig. 2). Keep pressing down the switch plate during
slicing. Be very careful when operating the appliance.
5.
To turn off the appliance, release your hand pressing the switch plate. The switch
plate will spring up automatically and the slicer will stop.
6.
Place the food tray on the side of appliance (Fig. 3) to collect the food.
7.
Set the desired cutting thickness by turning the slice thickness adjustment knob (Fig.
4). Setting 0-20 can be chosen. Always return the supporting plate to setting '0' after
use.
8.
The slicer can be used to cut meat, ham, sausage, bread, vegetable or cheese.
Blade cutting speed can be adjusted to cut different kinds of food. Use the highest
speed for sausage while the lowest speed is for cheese. Select the cutting speed by
sliding the speed control button (Fig. 5) to appropriate food symbol :
Cheese
Vegetable
Bread
Sausage
9.
Put the food on the feeder and push the food with food press plate. Cut the food by
sliding the feeder forward (Fig. 6). To avoid danger of injury, always cut the food with
feeder and food press plate. In case the shape or size of food does not allow the
use of feeder, the feeder can be removed by tilting to the side (Fig. 7). However
extra care should be taken during cutting.
10. The blade is protected by a blade cover. Always cut the food with blade cover
installed.
11. Turn the safety switch to position '0' after finish slicing.
3
CLEANING INSTRUCTIONS
CAUTION: Blade is sharp.
Handle carefully.
Do not wash in dishwasher.
Do not immerse the main unit in liquid. Do not remove the lubricant from the
gears
1.
Always unplug the appliance and let the blade come to stop before cleaning.
2.
Never immerse the appliance into water.
3.
Adjust the supporting plate to setting '0' before cleaning.
4.
To clean the blade, remove the blade cover by sliding upward (Fig. 8). The blade
cover has latches to engage both with motor assembly and blade. Remove the blade
by turning the blade knob 90 degrees clockwise (Fig. 9) and pulling outward (Fig. 10).
5.
The blade, blade cover, food press plate and food tray can be washed and then dried.
Be careful when cleaning the blade as it is extremely sharp. Do not touch the sharp
edge by hand.
6.
For thorough cleaning, pull out the motor assembly from the motor housing (Fig. 11).
Clean the outer surface of the motor assembly by a dry cloth only. Never immerse
the motor assembly in water.
7.
For feeder, supporting plate, base and motor housing, clean the outer surfaces by a
damp cloth. Use domestic cleaning detergent for worse dirt. Do not use sharp
objects to remove the dirt as it will damage the coating on surface.
8.
After cleaning, put back the motor assembly on the motor housing. Install the blade
and blade cover on motor assembly in reverse order of step 4. Make sure the blade
cover is properly engaged.
4
1 2 3
10
11
4
5
6
12
7
13
8
14
9
Fig. 1
1.
2.
3.
4.
5.
6.
7.
Speed control button
Safety switch
Pulse switch
Blade
Blade cover
Power supply cord
Food press plate
Fig. 2
8. Feeder
9. Food tray
10. Motor housing
11. Motor assembly
12. Supporting plate
13. Slice thickness adjustment knob
14. Tilting base
5
Fig. 3
Fig. 4
Fig. 5
Fig. 6
Fig. 7
6
Fig. 8
Fig. 9
Fig. 10
Fig. 11
7
HINTS FOR USING FOOD SLICER
1.
Roasts: Beef, pork, poultry and lamb -- Allow roasts to stand for 20 minutes after
removing from oven.
2.
Bulk Bacon -- With a sharp knife, remove rind from “thoroughly chilled” bacon. Trim
bacon to fit securely on food tray, fat side down.
3.
Cheese and cold cuts -- Slice as needed to retain flavor. Remove the plastic or hard
casting from “well chilled” food before slicing. Use gentle pressure for uniform slices.
4.
When you are going to slice very thin food, unplug the unit and moisten the blade
with a damp cloth; this helps to prevent sticking. If cheese builds up on blade or
under blade cover, unplug the slicer and wipe blade clean with a damp cloth.
5.
When slicing food that is not uniform in size, always slice with the largest side first.
6.
Vegetables and fruits -- Slice potatoes, tomatoes, carrots, cucumbers, cabbage, lettuce,
eggplant, squash and zucchini in a matter of minutes.
7.
Breads – Do not use excessive pressure or squeeze the loaf. Trim or cut bread to fit
comfortably on feeder. Move the loaf of bread smoothly through the blade with
continuous “gentle” pressure on the loaf.
8
ONE (1) YEAR LIMITED WARRANTY
EURO-PRO Operating LLC warrant this product to be free from defects in material and workmanship for a period of one
(1) year from the date of purchase when utilized for normal household use.
If your appliance fails to operate properly while in use under normal household conditions within the warranty period, return
the complete appliance and accessories, freight prepaid to EURO-PRO Operating LLC. For Customer Service support call
1(800) 798-7398 or visit our website www.euro-pro.com. If the appliance is found by EURO-PRO to be defective in
material or workmanship, EURO-PRO will repair or replace it free of charge. Proof of purchase date and $16.95 to
to cover the cost of return shipping and handling must be included.*
The liability of EURO-PRO Operating LLC is limited solely to the cost of the repair or replacement of the unit at our option.
This warranty does not cover normal wear of parts and does not apply to any unit that has been tampered with or used for
commercial purposes. This limited warranty does not cover damage caused by misuse, abuse, negligent handling or
damage due to faulty packaging or mishandling in transit.
This warranty is extended to the original purchaser of the unit and excludes all other legal and/or conventional warranties.
The responsibility of EURO-PRO Operating LLC if any, is limited to the specific obligations expressly assumed by it under the
terms of the limited warranty. In no event is EURO-PRO Operating LLC liable for incidental or consequential damages of any
nature whatsoever. Some states do not permit the exclusion or limitation of incidental or consequential damages, so the
above may not apply to you.
This warranty gives you specific legal rights, and you may also have other rights which vary from state to state.
*Important: Carefully pack item to avoid damage in shipping.
Be sure to include proof of purchase date and to
attach tag to item before packing with your name, complete address and phone number with a note giving
purchase information, model number and what you believe is the problem with the item. We recommend you insure
the package (as damage in shipping is not covered by your warranty). Mark the outside of your package
"ATTENTION CUSTOMER SERVICE".
OWNERSHIP REGISTRATION CARD
Please fill out and mail the product registration card within ten (10) days of purchase.
The registration will enable us to contact you in the unlikely event of a product safety notification. By
returning this card you acknowledge to have read and understood the instructions for use, and warnings set forth in the
accompanying instructions.
Appliance model
Date purchased
Name
of store
Owner's name
Address
City
State
9
Zip Code
Printed in China