1
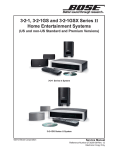
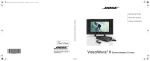
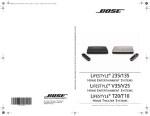
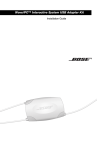
®
COMPANION 2 Series II
MULTIMEDIA SPEAKERS
!"#$%&'()*+,$
)*+-(,$.(*'*-%+/
0/1+2$(,&*1+.+'-1+/#
Français
Español
English
SAFETY INFORMATION
Please read this owner’s guide
Please take the time to follow the instructions in this owner’s guide carefully. It will help
you set up and operate your system properly and enjoy all of its advanced features. Please
save this owner’s guide for future reference.
WARNING: To reduce the risk of fire or electrical shock, do not expose the product to rain or
moisture.
WARNING: The apparatus shall not be exposed to dripping or splashing, and objects filled
with liquids, such as vases, shall not be placed on the apparatus. As with any electronic
product, use care not to spill liquids into any part of the system. Liquids can cause a failure
and/or a fire hazard.
The lightning flash with arrowhead symbol within an equilateral triangle alerts the
user to the presence of uninsulated, dangerous voltage within the system enclosure that may be of sufficient magnitude to constitute a risk of electrical shock.
The exclamation point within an equilateral triangle, as marked on the system, is
intended to alert the user to the presence of important operating and maintenance instructions in this owner’s guide.
WARNING: No naked flame sources, such as lighted candles, should be placed on the
apparatus.
Class B emissions
This Class B digital apparatus meets all requirements of the Canadian Interference-!
Causing Equipment Regulations (Canada only).
WARNING: To prevent electric shock, match the wide blade of the line cord plug into the wide
slot of the AC (mains) receptacle. Insert fully.
This product conforms to the EMC Directive 89/336/EEC and to the Low Voltage Directive 73/23/EEC. The complete Declaration of Conformity can be
found at www.bose.com/static compliance/index.html.
Notes:
• The product label is located on the bottom of the product.
• This product is intended to be used only with the power supply provided.
• These speakers must be used indoors. They are neither designed nor tested for use
outdoors, in recreational vehicles, or on boats.
• Where the mains plug or appliance coupler is used as the disconnect device, such
disconnect device shall remain readily operable.
©2006 Bose Corporation. No part of this work may be reproduced, modified, distributed, or otherwise used without prior written permission.
Design and specifications subject to change without notice.
2
English
Español
Français
Arabic
Important Safety Instructions
1.
2.
3.
4.
5.
6.
7.
8.
9.
10.
11.
12.
Read these instructions – for all components
before using this product.
Keep these instructions – for future !
reference.
Heed all warnings – on the product and in the
owner’s guide.
Follow all instructions.
Do not use this apparatus near water or
moisture – Do not use this product near a
bathtub, washbowl, kitchen sink, laundry tub,
in a wet basement, near a swimming pool, !
or anywhere else that water or moisture are
present.
Clean only with a dry cloth – and as directed
by Bose Corporation. Unplug this product
from the wall outlet before cleaning.
Do not block any ventilation openings. Install in accordance with the manufacturer’s
instructions – To ensure reliable operation of
the product and to protect it from overheating,
put the product in a position and location that
will not interfere with its proper ventilation. For
example, do not place the product on a bed,
sofa, or similar surface that may block the !
ventilation openings. Do not put it in a built-in
system, such as a bookcase or a cabinet that
may keep air from flowing through its ventilation openings.
Do not install near any heat sources, such
as radiators, heat registers, stoves, or other !
apparatus (including amplifiers) that produce
heat.
Do not defeat the safety purpose of the polarized or grounding-type plug. A polarized
plug has two blades with one wider than the
other. A grounding-type plug has two blades
and a third grounding prong. The wider blade
or third prong are provided for your safety. !
If the provided plug does not fit in your outlet, !
consult an electrician for replacement of the
obsolete outlet.
Protect the power cord from being walked
on or pinched, particularly at plugs, convenience receptacles, and the point where they
exit from the apparatus.
Only use attachments/accessories
specified by the manufacturer.
Unplug this apparatus during lightning
storms or when unused for long periods
of time – to prevent damage to this product.
13.
14.
15.
16.
17.
Refer all servicing to qualified service
personnel. Servicing is required when the
apparatus has been damaged in any way:
such as power supply cord or plug is
damaged; liquid has been spilled or objects
have fallen into the apparatus; the apparatus has been exposed to rain or moisture,
does not operate normally, or has been
dropped – Do not attempt to service this
product yourself. Opening or removing covers
may expose you to dangerous voltages or other hazards. Please call Bose to be referred to
an authorized service center near you.
To prevent risk of fire or electric shock,
avoid overloading wall outlets, extension
cords, or integral convenience receptacles.
Do not let objects or liquids enter the
product – as they may touch dangerous voltage points or short-out parts that could result
in a fire or electric shock.
See product enclosure for safety-related
markings.
Use proper power sources – Plug the product into a proper power source, as described
in the operating instructions or as marked on
the product.
Information about products that
generate electrical noise
If applicable, this equipment has been tested and
found to comply with the limits for a Class B digital
device, pursuant to Part 15 of the FCC rules. These
limits are designed to provide reasonable protection against harmful interference in a residential installation. This equipment generates, uses, and can !
radiate radio frequency energy and, if not installed
and used in accordance with the instructions, may
cause harmful interference to radio communications. However, this is no guarantee that interference will not occur in a particular installation. If this
equipment does cause harmful interference to radio or television reception, which can be determined by turning the equipment off and on, you are
encouraged to try to correct the interference by one
or more of the following measures:
• Reorient or relocate the receiving antenna.
• Increase the separation between the equipment
and receiver.
• Connect the equipment to an outlet on a different
circuit than the one to which the receiver is !
connected.
Consult the dealer or an experienced radio/TV !
technician for help.
3
Français
4
Español
English
English
Español
Français
S. Chin
Arabic
CONTENTS
SAFETY INFORMATION
2
GETTING STARTED
6
Before you begin . . . . . . . . . . . . . . . . . . . . . . . . . . . . . . . . . . . . . . . . . . . . . . . . . . . . . . . . 6
Unpacking the carton . . . . . . . . . . . . . . . . . . . . . . . . . . . . . . . . . . . . . . . . . . . . . . . . . . . . 6
SETTING UP
7
Choosing a speaker location . . . . . . . . . . . . . . . . . . . . . . . . . . . . . . . . . . . . . . . . . . . . . . . 7
Connecting the speakers . . . . . . . . . . . . . . . . . . . . . . . . . . . . . . . . . . . . . . . . . . . . . . . . . . 7
Making the sound source connections . . . . . . . . . . . . . . . . . . . . . . . . . . . . . . . . . . . . . . . 8
Connecting to your computer . . . . . . . . . . . . . . . . . . . . . . . . . . . . . . . . . . . . . . . . .
8
Connecting the speakers to a power outlet . . . . . . . . . . . . . . . . . . . . . . . . . . . . . .
9
Connecting an optional second source . . . . . . . . . . . . . . . . . . . . . . . . . . . . . . . . . 10
Connecting to the headphone jack . . . . . . . . . . . . . . . . . . . . . . . . . . . . . . . . . . . . 10
USING THE SPEAKERS
11
Enjoying the sound . . . . . . . . . . . . . . . . . . . . . . . . . . . . . . . . . . . . . . . . . . . . . . . . . . . . . 11
Controlling the volume . . . . . . . . . . . . . . . . . . . . . . . . . . . . . . . . . . . . . . . . . . . . . . 11
Cleaning the speakers . . . . . . . . . . . . . . . . . . . . . . . . . . . . . . . . . . . . . . . . . . . . . . . . . . . 12
Troubleshooting . . . . . . . . . . . . . . . . . . . . . . . . . . . . . . . . . . . . . . . . . . . . . . . . . . . . . . . . 12
REFERENCE
13
Contacting Customer Service . . . . . . . . . . . . . . . . . . . . . . . . . . . . . . . . . . . . . . . . . . . . . 13
Limited warranty . . . . . . . . . . . . . . . . . . . . . . . . . . . . . . . . . . . . . . . . . . . . . . . . . . . . . . . 13
Technical information . . . . . . . . . . . . . . . . . . . . . . . . . . . . . . . . . . . . . . . . . . . . . . . . . . . . 13
For your records
Serial numbers are located on the bottom of the RIGHT Companion® 2 Series II speaker.
Serial number: ___________________________________________________________________
Dealer name: ____________________________________________________________________
Dealer phone: _______________________________ Purchase date: _____________________
We suggest you keep your sales receipt with this owner’s guide.
5
Français
Español
English
GETTING STARTED
Before you begin
Thank you for choosing Bose® Companion® 2 Series II multimedia
speaker system. Unique features and Bose technologies make these
speakers a superior choice for upgrading your computer audio. They
also provide rich, full stereo sound from a second source, like a portable
MP3 or CD player.
Benefits of your Companion 2 speakers:
• TrueSpaceTM stereo signal processing circuitry adds spaciousness.
• Ported cabinet design provides clear, deep musical tones.
• Sleek design blends in with contemporary office décor.
Unpacking the carton
Carefully unpack your speakers and save all of the packing materials,
which provide the safest means for shipping or transporting.
If any part appears damaged, do not attempt to use it (Figure 1). Notify
your authorized Bose dealer immediately. Or, to contact Bose directly,
refer to the address sheet included in the carton.
WARNING: To avoid danger of suffocation, keep the plastic bags that wrap
these speakers out of the reach of children.
Figure 1
LEFT speaker
Carton
contents
RIGHT speaker
Owner’s
guide
RCA
audio input cable
Speaker
cable
Mini-plug
audio input cable
AC power pack*
*The proper type and voltage for your area.
Now is a good time to copy the serial number, located on the bottom of
the RIGHT speaker, onto the form labeled “For your records” on page 5.
6
English
Español
Français
Nederlands
Thai
Korean
S. Chin
Arabic
SETTING UP
Choosing a speaker location
The angled design of these speakers allows them to direct sound
upward toward a seated listener. So placing them on a desktop is a
good choice. Magnetic shielding protects your computer monitor from !
interference when the speakers are positioned close to it.
Place the speaker that has a volume control knob on the front within
easy reach to the right of your computer. Place the other speaker on the
left (Figure 2).
Note: LEFT and RIGHT labels on the back of the two speakers can serve
as a placement aid.
Figure 2
Speakers in
position near
the computer
LEFT
speaker
RIGHT
speaker
Volume
control
Headphone
jack
You may prefer placing the RIGHT speaker on your left to more easily
reach the volume control and the headphone jack.
This does no harm, although it changes how you hear the left and right
stereo sound. For an accurate sound stage, the music recorded from
stage left during a live performance comes from the left speaker. Changing the placement of LEFT and RIGHT speakers alters that effect.
Connecting the speakers
A speaker cable is attached to the rear of the LEFT speaker. Insert the
free end of this cable into the jack marked TO LEFT SPEAKER on the
back of the RIGHT speaker (Figure 3 on page 8).
7
Français
Español
English
SETTING UP
Figure 3
RIGHT
speaker
Speaker cable
connection
LEFT
speaker
TO LEFT
SPEAKER
Speaker cable
Making the sound source connections
Your Companion® 2 speakers can provide sound from two audio sources
simultaneously. This allows you to listen to music from an MP3 or CD
player and still hear the alert tones from your computer.
Connecting to your computer
Two audio input cables are supplied with the speakers.
• Use the cable that has a stereo mini plug on one end if your computer
has a stereo mini audio in jack. Insert the mini plug into the jack.
• Use the cable that has RCA plugs on each end if your computer has
RCA audio in jacks. Insert the plugs at one end of this cable into the
jacks on the computer, matching red to red and white to white.
Two pairs of jacks on the back of the RIGHT speaker are labeled !
AUDIO INPUT. Each pair includes a white jack marked L above a red jack !
marked R (Figure 4 on page 9).
• Use the free end of the audio input cable to connect to one pair of the
AUDIO INPUT jacks.
8
1.
Insert the white RCA plug into the white jack labeled L.
2.
Insert the red RCA plug into the red jack labeled R.
English
Español
Français
Thai
Korean
S. Chin
Arabic
SETTING UP
Figure 4
Computer
Connection to
the computer
LEFT
speaker
RIGHT
speaker
L
R
RCA audio input cable
Speaker cable
Connecting the speakers to a power outlet
Use the supplied power pack, which has a cable that connects to the
RIGHT speaker.
1.
Insert the cable connector into the jack labeled 12V on the back of
the speaker (Figure 5).
2.
Plug the power pack into an AC (mains) outlet.
Figure 5
RIGHT
speaker
Connection
to power
12V
To other speaker
Power pack
To computer
AC outlet
CAUTION: Use only the power supply provided with the speakers.
Note: Bose recommends using a high-quality surge suppressor on all
electronics equipment.
9
Français
Español
English
SETTING UP
Connecting an optional second source
Use the audio output cable provided with your MP3 player, CD player, or
other sound source. Or, if the other (unused) cable supplied with the
speakers works with your source, you may use it.
• Connect the RCA plugs on one end of the cable to the unused AUDIO
INPUT jacks on the back of the RIGHT speaker (Figure 6).
1.
Insert the white RCA plug into the white jack labeled L.
2.
Insert the red RCA plug into the red jack labeled R.
• Connect the other end of this cable to the audio output jack on the
player.
Figure 6
Connection
to a second
source
RIGHT
speaker
Optional
sound source
To
AC
To other speaker
Stereo mini plug
audio output cable
To computer
Make sure both plugs are inserted firmly.
Connecting to the headphone jack
Headphones plug into the jack on the front of the RIGHT speaker
(Figure 7). Inserting the plug mutes sound from the speakers.
Figure 7
Headphone
jack on RIGHT
speaker
RIGHT
speaker
Headphone jack
WARNING: Long-term exposure to loud music may cause hearing
damage. It is best to avoid extreme volume levels when using headphones,
especially for extended periods.
10
English
Español
Français
Nederlands
Thai
Korean
S. Chin
Arabic
USING THE SPEAKERS
Enjoying the sound
Before using your Companion® 2 speakers, make sure your computer
and other sound source are plugged in and turned on.
Controlling the volume
You can raise or lower the volume of the speakers or a connected headphone by turning the knob on the front of the RIGHT speaker (Figure 8).
Figure 8
RIGHT
speaker
Speaker
volume knob
Volume control
To control your sound sources independently:
• Use your computer volume control, which may include an external
control as well as one on screen.
• Use the volume control on the second sound source.
To avoid constant adjustments, balance the volume levels:
1.
On your computer and other sound source, set the volume so the
two are roughly equal in output. Make it about two-thirds the !
maximum volume on each.
2.
Use the knob on the RIGHT speaker to adjust the volume as you
listen. Turn it right to raise and left to lower the volume (Figure 8).
A second option may be more convenient:
1.
Turn the volume knob on the RIGHT speaker completely to the right
for maximum volume.
2.
Use the volume control on each sound source (computer or player)
to adjust the volume as you listen.
11
Français
Español
English
USING THE SPEAKERS
Cleaning the speakers
Wipe the speakers using a soft, dry cloth. Do not use solvents, !
chemicals, or sprays. Lightly vacuum the grilles as needed.
CAUTION: Do not allow liquids to spill or objects to drop into any
openings.
Troubleshooting
Problem
What you can do
No sound
•
•
•
No sound from !
one speaker !
•
•
Make sure the sound source is plugged in and turned on, !
it is not on mute, and the volume is turned up.
Make sure headphones are not plugged into the RIGHT
speaker.
Be sure the power pack is securely plugged into the RIGHT
speaker and into the AC (mains) outlet.
Make sure the speakers are connected properly and all connectors
are inserted firmly.
Check the sound source. If it is mono (has one channel only),
you need a mono-to-stereo adapter to send the sound to both
speakers. To request an adapter, contact Bose® Customer Service.
Refer to the address sheet included in the carton.
Sound is distorted
•
Decrease the volume of the sound source affected, and
increase the volume on the speakers.
Background noise
when no source!
is playing
•
Decrease the volume level on your speakers, and increase the !
level on each sound source to your preferred volume.
12
English
Español
Français
Nederlands
Thai
Korean
S. Chin
Arabic
REFERENCE
Contacting Customer Service
For additional help in solving problems, contact Bose® Customer !
Service. Refer to the address sheet included in the carton.
Limited warranty
This system is covered by a transferable limited warranty.
Details of the limited warranty are provided on the Product Registration
Card that came with your system. Please fill out the information section
on the card and mail it to Bose. Or, register your product at
www.bose.com\register. Failure to do so, however, will not affect your
limited warranty rights.
Technical information
Driver complement
One magnetically shielded 2.5" (6.4 cm) full-range driver per speaker
Power pack rating
U.S./Canada: 120V
60 Hz 20VA maximum
Europe:
230V
50 Hz 20VA maximum
Australia:
240V
50 Hz 20VA maximum
Japan:
100V
50/60 Hz 20VA maximum
Speaker inputs
Input power: 12V
1.2 A
Input signal: 2.25V maximum input
Dimensions (approximate)
71/2 "H x 31/8"W x 57/8"D (top rear to bottom front) !
(19 cm x 8 cm x 15 cm)
Weight
RIGHT speaker: 2.3 lb (1 kg)
LEFT speaker: 1.8 lb (.8 kg)
13
©2006 Bose Corporation, The Mountain,
Framingham, MA 01701-9168 USA
AM296581 Rev.00