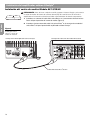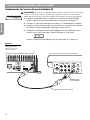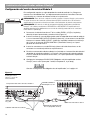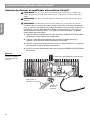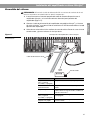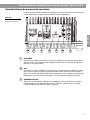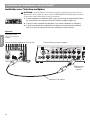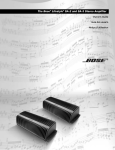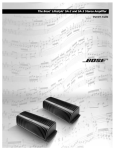
1
The Bose® Lifestyle® SA-2 and SA-3 Stereo Amplifier
Owner’s Guide
Guía del usuario
Notice d’utilisation
Safety Information
English
WARNING: To reduce the risk of fire or electrical shock, do not expose the product to rain or moisture.
WARNING: The apparatus shall not be exposed to dripping or splashing, and objects filled with
liquids, such as vases, shall not be placed on the apparatus. As with any electronic products, use
care not to spill liquids into any part of the system. Liquids can cause a failure and/or a fire hazard.
These CAUTION marks are located on the enclosure of your product:
The exclamation point within an equilateral triangle, as marked on the system, is
intended to alert the user to the presence of important operating and maintenance
instructions in this owner’s guide.
The lightning flash with arrowhead symbol within an equilateral triangle alerts the
user to the presence of uninsulated dangerous voltage within the system enclosure
that may be of sufficient magnitude to constitute a risk of electrical shock.
Class B emissions
This Class B digital apparatus meets all requirements of the Canadian Interference-Causing
Equipment Regulations.
CAUTION: To prevent electric shock, match the wide blade of the line cord plug to the wide slot
of the AC (mains) receptacle. Insert fully.
CAUTION: This product is not designed for use in recreational vehicle or marine applications.
WARNING: No naked flame sources, such as lighted candles, should be placed on the apparatus.
Note: The product label is located on the bottom of the product.
Please read this owner’s guide
Please take the time to follow the instructions in this owner’s guide carefully. It will help you
set up and operate your system properly and enjoy all of its advanced features. Please save
this owner’s guide for future reference.
©2004 Bose Corporation. No part of this work may be reproduced, modified, distributed or otherwise used
without prior written permission. All trademarks referenced herein are property of Bose Corporation.
All rights reserved. Bose, Acoustimass, Lifestyle, Personal and Wave are registered trademarks of Bose
Corporation.
2
Important Safety Instructions
1.
6.
7.
8.
9.
10.
11.
12.
13.
14.
15.
16.
17.
18.
19.
Clean only with a dry cloth – and as directed by Bose® Corporation. Unplug this product from the wall outlet before cleaning.
Do not block any ventilation openings. Install in accordance
with the manufacturer’s instructions – To ensure reliable operation of the product and to protect it from overheating, put the product in a position and location that will not interfere with its proper
ventilation. For example, do not place the product on a bed, sofa, or
similar surface that may block the ventilation openings. Do not put it
in a built-in system, such as a bookcase or a cabinet that may keep
air from flowing through its ventilation openings.
Do not install near any heat sources, such as radiators, heat
registers, stoves or other apparatus (including amplifiers)
that produce heat.
Do not defeat the safety purpose of the polarized or grounding-type plug. A polarized plug has two blades with one
wider than the other. A grounding-type plug has two blades
and a third grounding prong. The wider blade or third prong
are provided for your safety. If the provided plug does not fit
in your outlet, consult an electrician for replacement of the
obsolete outlet.
Protect the power cord from being walked on or pinched,
particularly at plugs, convenience receptacles, and the point
where they exit from the apparatus.
Only use attachments/accessories specified by the manufacturer.
Use only with the cart, stand, tripod, bracket
or table specified by the manufacturer or
sold with the apparatus. When a cart is used,
use caution when moving the cart/apparatus
combination to avoid injury from tip-over.
Unplug this apparatus during lightning storms or when
unused for long periods of time – to prevent damage to this
product.
Refer all servicing to qualified service personnel. Servicing
is required when the apparatus has been damaged in any
way: such as power-supply cord or plug is damaged; liquid
has been spilled or objects have fallen into the apparatus;
the apparatus has been exposed to rain or moisture, does
not operate normally, or has been dropped – Do not attempt to
service this product yourself. Opening or removing covers may
expose you to dangerous voltages or other hazards. Please call
Bose to be referred to an authorized service center near you.
To prevent risk of fire or electric shock, avoid overloading
wall outlets, extension cords, or integral convenience receptacles.
Do not let objects or liquids enter the product – as they may
touch dangerous voltage points or short-out parts that could result
in a fire or electric shock.
See product enclosure bottom for safety related markings.
Use Proper Power Sources – Plug the product into a proper
power source, as described in the operating instructions or as
marked on the product.
Avoid Power Lines – Use extreme care when installing an outside
antenna system to keep from touching power lines or circuits, as
contact with them may be fatal. Do not install external antennas
near overhead power lines or other electric light or power circuits,
nor where an antenna can fall into such circuits or power lines.
20. Ground All Outdoor Antennas – If an external antenna or cable
system is connected to this product, be sure the antenna or cable
system is grounded. This will provide some protection against voltage surges and built-up static charges.
Section 810 of the National Electrical Code ANSI/NFPA No. 70 provides information with respect to proper grounding of the mast and
supporting structure, grounding of the lead-in wire to an antenna
discharge unit, size of grounding conductors, location of antennadischarge unit, connection to grounding electrodes, and requirements for the ground electrode. Refer to the antenna grounding
illustration on this page.
Antenna grounding
Example of antenna grounding as per National Electrical Code,
ANSI/NFPA 70.
Antenna lead-in wire
Ground clamp
Antenna discharge unit
(NEC Section 810-20)
Grounding conductors
(NEC Section 810-21)
Electric service
equipment
Ground clamps
Power service grounding electrode
system (NEC ART 250, Part H)
Note to CATV system installer
This reminder is provided to call the CATV system installer’s attention to
Article 820-40 of the NEC (of USA) that provides guidelines for proper
grounding. In particular, it specifies that the cable ground shall be connected to the grounding system of the building, as close to the point of
cable entry as is practical.
Information about products that generate
electrical noise
If applicable, this equipment has been tested and found to comply with
the limits for a Class B digital device, pursuant to Part 15 of the FCC
rules. These limits are designed to provide reasonable protection against
harmful interference in a residential installation. This equipment generates, uses, and can radiate radio frequency energy and, if not installed
and used in accordance with the instructions, may cause harmful interference to radio communications. However, this is no guarantee that interference will not occur in a particular installation. If this equipment does
cause harmful interference to radio or television reception, which can be
determined by turning the equipment off and on, you are encouraged to
try to correct the interference by one or more of the following measures:
• Reorient or relocate the receiving antenna.
• Increase the separation between the equipment and receiver.
• Connect the equipment to an outlet on a different circuit than the one
to which the receiver is connected.
• Consult the dealer or an experienced radio/TV technician for help.
Note: Unauthorized modification of the receiver or radio remote control
could void the user’s authority to operate this equipment.
This product complies with the Canadian ICES-003 Class B
specifications.
2a
English
2.
3.
4.
5.
Read these instructions – for all components before using this
product.
Keep these instructions – for future reference.
Heed all warnings – on the product and in the owner’s guide.
Follow all instructions.
Do not use this apparatus near water or moisture – Do not
use this product near a bathtub, washbowl, kitchen sink, laundry
tub, in a wet basement, near a swimming pool, or anywhere else
that water or moisture are present.
2b
English
Contents
Where to find...
4
4
4
5
English
Setting Up Your Lifestyle® Stereo Amplifier . . . . . . . . . . . . . . . . . . . . . . . . . . . . . . . . . . . . . . . . . .
Identifying your system . . . . . . . . . . . . . . . . . . . . . . . . . . . . . . . . . . . . . . . . . . . . . . . . . . . . . .
Selecting a location for your Lifestyle® stereo amplifier . . . . . . . . . . . . . . . . . . . . . . . . . . . . . .
Mounting your Lifestyle® stereo amplifier . . . . . . . . . . . . . . . . . . . . . . . . . . . . . . . . . . . . . . . . .
Model AV-18/38/48 media center setup . . . . . . . . . . . . . . . . . . . . . . . . . . . . . . . . . . . . . . . . .
Model AV-28 media center setup . . . . . . . . . . . . . . . . . . . . . . . . . . . . . . . . . . . . . . . . . . . . . . .
Multi-room interface setup . . . . . . . . . . . . . . . . . . . . . . . . . . . . . . . . . . . . . . . . . . . . . . . . . . . .
Model 20 music center setup . . . . . . . . . . . . . . . . . . . . . . . . . . . . . . . . . . . . . . . . . . . . . . . . . .
Model 5 music center setup . . . . . . . . . . . . . . . . . . . . . . . . . . . . . . . . . . . . . . . . . . . . . . . . . . .
Connecting speakers to your Lifestyle® stereo amplifier . . . . . . . . . . . . . . . . . . . . . . . . . . . . .
Powering-up your system . . . . . . . . . . . . . . . . . . . . . . . . . . . . . . . . . . . . . . . . . . . . . . . . . . . .
7
7
8
9
10
12
14
16
18
20
21
Español
Setting Up Additional Rooms For Sound . . . . . . . . . . . . . . . . . . . . . . . . . . . . . . . . . . . . . . . . . . . .
Setup guidelines for additional rooms . . . . . . . . . . . . . . . . . . . . . . . . . . . . . . . . . . . . . . . . . . .
Setting up remote controls for other rooms . . . . . . . . . . . . . . . . . . . . . . . . . . . . . . . . . . . . . . .
Setting up the amplifier room code . . . . . . . . . . . . . . . . . . . . . . . . . . . . . . . . . . . . . . . . . . . . .
22
22
23
24
Setting Up Advanced Features . . . . . . . . . . . . . . . . . . . . . . . . . . . . . . . . . . . . . . . . . . . . . . . . . . . .
Amplifier mode switches . . . . . . . . . . . . . . . . . . . . . . . . . . . . . . . . . . . . . . . . . . . . . . . . . . . . .
Stereo or mono output (SA-3 only) . . . . . . . . . . . . . . . . . . . . . . . . . . . . . . . . . . . . . . . . . . . . . .
Automatic detection of a local source (SA-3 only) . . . . . . . . . . . . . . . . . . . . . . . . . . . . . . . . . .
Single and supplemental amplifiers . . . . . . . . . . . . . . . . . . . . . . . . . . . . . . . . . . . . . . . . . . . . .
25
25
25
25
25
Maintaining Your Lifestyle® Stereo Amplifier . . . . . . . . . . . . . . . . . . . . . . . . . . . . . . . . . . . . . . . . . .
Cleaning the amplifier . . . . . . . . . . . . . . . . . . . . . . . . . . . . . . . . . . . . . . . . . . . . . . . . . . . . . . . .
Protecting outdoor wiring . . . . . . . . . . . . . . . . . . . . . . . . . . . . . . . . . . . . . . . . . . . . . . . . . . . . .
Troubleshooting . . . . . . . . . . . . . . . . . . . . . . . . . . . . . . . . . . . . . . . . . . . . . . . . . . . . . . . . . . . .
Customer service . . . . . . . . . . . . . . . . . . . . . . . . . . . . . . . . . . . . . . . . . . . . . . . . . . . . . . . . . . .
Limited warranty . . . . . . . . . . . . . . . . . . . . . . . . . . . . . . . . . . . . . . . . . . . . . . . . . . . . . . . . . . . .
Accessories . . . . . . . . . . . . . . . . . . . . . . . . . . . . . . . . . . . . . . . . . . . . . . . . . . . . . . . . . . . . . . .
Technical information . . . . . . . . . . . . . . . . . . . . . . . . . . . . . . . . . . . . . . . . . . . . . . . . . . . . . . . .
26
26
26
26
27
27
27
28
For your records
Record the model number, serial number, and purchase date. The serial number is located on
the bottom panel of your Lifestyle® stereo amplifier.
Model: SA2
SA3
Serial number: ______________________________________
Purchase date: ______________________________________
We suggest you keep your sales receipt and a copy of your product registration card together
with this owner’s guide.
3
Français
Introducing the Lifestyle® SA-2 and SA-3 Stereo Amplifier . . . . . . . . . . . . . . . . . . . . . . . . . . . . . .
Before you begin . . . . . . . . . . . . . . . . . . . . . . . . . . . . . . . . . . . . . . . . . . . . . . . . . . . . . . . . . . .
Unpacking the carton . . . . . . . . . . . . . . . . . . . . . . . . . . . . . . . . . . . . . . . . . . . . . . . . . . . . . . . .
Connection panel features . . . . . . . . . . . . . . . . . . . . . . . . . . . . . . . . . . . . . . . . . . . . . . . . . . . .
Introducing the Lifestyle® SA-2 and SA-3 Stereo Amplifier
English
Before you begin
Thank you for purchasing a Lifestyle® SA-2 or SA-3 stereo amplifier. The Lifestyle® stereo
amplifier provides you with a simple solution when you want to add Bose® non-powered
environmental speakers or Bose non-powered accessory speakers to your Lifestyle® system.
Bose proprietary Integrated Signal Processing technology, featured in the amplifier, provides
full, rich stereo sound, even when the speakers are playing at low volumes. By using the
Lifestyle® stereo amplifier to expand your system, you can enjoy Bose quality sound and
Lifestyle® system convenience in your yard, patio, swimming deck, garage, or utility room.
Unpacking the carton
WARNING: To avoid danger of suffocation, keep the plastic bags out of the reach of children.
Carefully unpack the shipping carton. Make sure the shipping carton for your Lifestyle®
stereo amplifier includes the parts identified in Figure 1. We recommend saving the packing
materials. You may need them later. The original packing materials provide the safest way to
transport this product.
Note: Locate the serial number on the bottom panel of the amplifier, and write it in the appropriate blank on page 3.
If any part of the product appears to be damaged, do not attempt to use it. Contact your
authorized Bose dealer immediately, or call Bose Customer Service. Refer to the address list
enclosed in the product packaging for correct phone numbers.
Figure 1
Europe (230V)
Australia (240V)
Contents of the shipping
carton
UK/Singapore (230V)
SA-2 stereo
amplifier
120V power cord*
USA/Canada
8-to-9-pin
DIN adapter
SA-3 stereo
amplifier
20-ft Bose® link A cable
*The Lifestyle® stereo amplifier
includes a 120V AC (mains) power
cord for use in the USA and Canada,
or the appropriate 230V or 240V
power cord for international use.
Note: Use only the power cord supplied with your Lifestyle® stereo amplifier. If the power cord
does not fit your power (mains) outlet, DO NOT alter the plug in any way. Contact Bose Customer
Service for assistance.
Note: The Lifestyle® stereo amplifier is designed for use with Bose non-powered environmental
speakers or Bose non-powered accessory speakers ONLY.
4
Introducing the Lifestyle® SA-2 and SA-3 Stereo Amplifier
Connection panel features
English
The connection panel includes the input/output connections plus room code switches and
amplifier LED status indicators.
Figure 2
Lifestyle® amplifier
connection panel
1
2
3
4
5
6
7
1
AC POWER
AC power cord connector. There is no on/off switch on this product. Power is applied when
the power cord is installed and plugged into an AC (mains) receptacle.
2
VCA
Local volume control connections. Allows you to control the volume in a room using a wallmounted control. Contact your Bose® dealer or call Bose Customer Service for information on
installing this feature. See the contact list inside the back cover of this guide.
3
SPEAKER OUTPUTS
Left and right amplifier speaker outputs. A 6-ohm minimum load is required. To determine the
correct speaker wire size, see “Wire recommendations” on page 28.
5
Introducing the Lifestyle® SA-2 and SA-3 Stereo Amplifier
English
4
ROOM CODE switches
Microswitches for setting room code and amplifier advanced features.
For switches A, B, and C,
see “Setting Up Advanced
Features” on page 25.
For switches 6 through 9, see
“Setting up the amplifier room
code” on page 24.
SA-3
SA-2
6
5
LED status indicator
The green LED indicates the operational state of the amplifier. See
“Powering-up your system” on page 21.
6
AUX INPUT (SA-3 only)
Left and right channel line inputs for a local audio device.
7
Bose® link INPUT/OUTPUT
Nine-pin DIN connectors used for connecting the amplifier to a Bose® link network.
Input signals are passed through to the output connector to allow daisy chaining.
Setting Up Your Lifestyle® Stereo Amplifier
Identifying your system
This section provides placement and mounting instructions for the Lifestyle® stereo amplifier.
Following this information you will find a section that describes how to set up the amplifier
with your particular home entertainment system.
The set of instructions you need depends on whether you have a media center, music center,
or multi-room interface. The product label on the bottom panel identifies the model you have.
For the AV-18, AV-38, or AV-48 media center, see
“Model AV-18/38/48 media center setup” on
page 10.
Model
AV-18/38/48
media center
For the AV-28 media center, see
“Model AV-28 media center setup” on page 12.
Model AV-28
media center
For the multi-room interface,
see “Multi-room interface setup” on page 14.
Multi-room
interface
For the Model 20 music center,
see “Model 20 music center setup” on page 16.
For the Model 5 music center,
see, “Model 5 music center setup” on page 18.
Model 20
music center
®
®
Model 5
music center
Note: If you are planning to use this amplifier beyond a second room, you will need to change
some switch settings in the amplifier and remote. See “Setting Up Additional Rooms For Sound”
on page 22.
7
English
The Lifestyle® stereo amplifier and additional remote come ready to be installed and used in a
second room (Room B).
Setting Up Your Lifestyle® Stereo Amplifier
Selecting a location for your Lifestyle® stereo amplifier
English
Your Lifestyle® stereo amplifier does not need to be situated close to either your Lifestyle®
system or the accessory speakers. Consider the following guidelines when selecting a
location for your amplifier.
CAUTION: DO NOT mount the amplifier on surfaces that are not sturdy enough, or that have
hazards concealed behind them, such as electrical wiring or plumbing.
CAUTION: The amplifier must be used indoors. It is neither designed nor tested for use outdoors, in recreational vehicles, or on boats.
• Locate the amplifier indoors and within 8 feet (2.5 m) of a power outlet.
• Make sure that the amplifier is located within the reach of the supplied 20-foot audio input
cable.
• Place the amplifier in an area where the maximum ambient temperature is less than 104°F
(45°C).
• For optimum performance, place the amplifier in a well-ventilated area.
• DO NOT place the amplifier in a completely enclosed area. If adequate ventilation is not
provided, the amplifier will automatically protect itself by reducing its volume level in order
to limit its temperature.
• DO NOT place the amplifier on any heat-sensitive surface, such as the finished surface of
fine furniture. Like all electrical equipment, it generates some heat.
• DO NOT use the amplifier in a damp location. It is important to prevent moisture from
getting into the unit.
8
Setting Up Your Lifestyle® Stereo Amplifier
Mounting your Lifestyle® stereo amplifier
• When placing the amplifier on a horizontal surface like a floor or shelf, the amplifier’s rubber
feet provide stability and prevent scratches.
• ONLY when mounting the amplifier on a wall, remove the rubber feet and use the existing
guide holes in the amplifier’s enclosure for mounting hardware. See Figure 4 for recommended mounting methods and hardware.
• When mounting the amplifier vertically or horizontally on a wall, ALWAYS mount the
amplifier in an orientation shown in Figure 3.
Figure 3
Shelf placement
Vertically mounted on wall
Horizontally mounted on wall
Wood wall
Figure 4
Mounting methods and
hardware
Connector panel up
Connector
panel on
the left
Installation options
3
Wallboard
1
/32 in (2.25 mm)
/2 in (12 mm)
(4) #10 x 21/2 in (M5 x 75 mm)
(4) #10 x 11/2 in (M5 x 36 mm)
(4) #10 (M5)
¾ in (1.9 cm) minimum
3
/8 in (0.95 cm) minimum
To mark mounting hole locations, remove
the rubber feet, hold the amplifier in position,
and mark the wall through the clearance
holes in the housing.
9
English
Your Lifestyle® stereo amplifier can be placed on a shelf or mounted on a wall (Figure 3).
Setting Up Your Lifestyle® Stereo Amplifier
Model AV-18/38/48 media center setup
English
CAUTION: Before making connections, turn the Lifestyle® system off and disconnect the media
center from the AC (mains) power outlet. DO NOT plug the amplifier into an outlet until you have
completed all other connections.
1. Insert one end of the Bose® link A cable into the Bose® link output connector on the rear
panel of the media center (Figure 5).
2. Insert the other end of the Bose® link A cable, into the Bose® link input connector on the
rear panel of the Lifestyle® stereo amplifier.
Figure 5
Lifestyle® stereo amplifier to
AV-18/38/48 media center
connections
Lifestyle® stereo amplifier rear panel
AV-18/38/48 media center rear panel
BoseLink
OUTPUT
BoseLink
INPUT
20-ft Bose® link A cable
10
Setting Up Your Lifestyle® Stereo Amplifier
Setting up RC-18S and RC-38S remotes
1. Remove the remote control battery cover and locate the microswitches (Figure 6).
2. Make sure that the house code settings (switches 1, 2, 3, and 4) match the house code
settings in your main room remote.
Note: If this remote is to be used beyond a second room, other switch settings will need to be
changed. See “Setting Up Additional Rooms For Sound” on page 22.
Figure 6
Remote microswitches
House code switches
must match main room remote
ON
Check the expansion protocol setting in your system
For the Lifestyle® stereo amplifier to work properly with your home entertainment system, the
expansion protocol menu item must be set to Bose® link. To verify this:
1. Turn on your Lifestyle® DVD home entertainment system and your TV.
2. Press the System button on your main room remote.
3. Select the Audio tab and navigate down to Expansion Protocol.
4. Verify that the setting Bose® link is selected. If not, select Bose® link now.
5. Press the Exit button on the remote.
11
English
Your additional remote is shipped from the factory already set up for a second room (room B).
To make sure that this remote will work with your home entertainment system, do the following to check the house code setting.
Setting Up Your Lifestyle® Stereo Amplifier
Model AV-28 media center setup
English
CAUTION: Before making connections, turn the Lifestyle® system off and disconnect the media
center from the AC (mains) power outlet. DO NOT plug the amplifier into an outlet until you have
completed all other connections.
1. Insert the 8-to-9-pin adapter into the SPEAKER ZONES 2 output connector on the rear
panel of the media center (Figure 7).
2. Insert one end of the Bose® link A cable into the 8-to-9-pin adapter.
3. Insert the other end of the Bose® link A cable, into the Bose® link input connector on the
rear panel of the Lifestyle® stereo amplifier.
Figure 7
Lifestyle® stereo amplifier
to AV-28 media center
connections
Lifestyle® stereo amplifier rear panel
AV-28 media center rear panel
BoseLink
OUTPUT
BoseLink
INPUT
8-to-9-pin
DIN adapter
20-ft Bose® link A cable
12
Setting Up Your Lifestyle® Stereo Amplifier
Setting up the RC-28S remote
1. Remove the remote control battery cover and locate the microswitches (Figure 8).
2. Make sure that the house code settings (switches 1, 2, 3, and 4) match the house code
settings in your main room remote.
3. Make sure switches 5, 7, and 8 are up, and switches 6 and 9 are down.
Note: Refer to your Lifestyle® system owner’s guide for more information on operating your
system in more than one room.
Figure 8
Remote microswitches
House code switches must
match main room remote
ON
Setting the Zone 2 Protocol in your home entertainment system
For the Lifestyle® stereo amplifier to work properly with a Lifestyle® media center, you will
need to set the Zone 2 Protocol to Legacy mode (Figure 9).
1. Turn on your Lifestyle® DVD system and your TV.
2. Press the Settings button on your main room remote control.
3. Scroll down the menu to System Setup and press the Enter button.
4. Scroll down the menu to the last item, Zone 2 Protocol.
5. Press the right arrow remote button to change the protocol from Normal to Legacy.
6. Turn the system off and on again to ensure that the Zone 2 Protocol is reset to Legacy.
Figure 9
Setting Zone 2 Protocol
13
English
Your second remote is shipped from the factory already set up for Zone 2. To make sure that
this remote will work with your home entertainment system, do the following to check the
house code setting.
Setting Up Your Lifestyle® Stereo Amplifier
Multi-room interface setup
English
CAUTION: Before making any connections, turn the Lifestyle® system off and disconnect the
music center from the AC (mains) power outlet. DO NOT plug the amplifier into an outlet until you
have completed all other connections.
1. Insert the 8-to-9-pin adapter into one of the unused ROOM output connectors (B, C, or
D) on the rear of the multi-room interface (Figure 10).
2. Insert one end of the Bose® link A cable into the 8-to-9-pin adapter.
3. Insert the other end of the Bose® link A cable, into the Bose® link input connector on the
rear panel of the Lifestyle® stereo amplifier.
Figure 10
Lifestyle® stereo amplifier
to multi-room interface
connections
Lifestyle® stereo amplifier rear panel
Multi-room interface rear panel
BoseLink
OUTPUT
BoseLink
INPUT
8-to-9-pin
DIN adapter
20-ft Bose® link A cable
14
Setting Up Your Lifestyle® Stereo Amplifier
Setting up the Personal® music center
Note: Refer to your Lifestyle® system owner’s guide for more information on operating your
system in more than one room.
Selecting other rooms with the Personal® music center
The Personal® music center allows you to control up to four sets of Bose® powered speakers
placed in individual rooms. These rooms are referred to as room A, B, C, and D, with room
A being the primary room (the one used for a one-room system). If two or more rooms are
connected to your system, the Personal® music center displays ROOM and HOUSE buttons,
and room indicators (A, B, C, and/or D). Figure 11 shows a sample display for a two-room
system.
Figure 11
Sample display for a tworoom system
Press the ROOM button to control a single room or two or more rooms that share a source.
Press the HOUSE button to control all connected rooms as one.
The room indicators tell you what was selected
by the ROOM or HOUSE button.
15
English
Systems that have a multi-room interface are controlled by the Personal® music center which
requires no internal switch settings before it allows you to control more than one room of
speakers. However, if you purchase a second Personal® music center, you must follow the
procedure for setting up the Personal® music center for the first time.
Setting Up Your Lifestyle® Stereo Amplifier
English
Model 20 music center setup
CAUTION: Before making connections, turn the Lifestyle® system off and disconnect the music
center from the AC (mains) power outlet. DO NOT plug the amplifier into an outlet until you have
completed all other connections.
®
1. Insert the 8-to-9-in DIN adapter into the SPEAKER ZONES 2 output connector on the
rear panel of the music center (Figure 12).
2. Insert one end of the Bose® link A cable into the 8-to-9-pin adapter.
3. Insert the other end of the Bose® link A cable into the Bose® link input connector on the
rear panel of the Lifestyle® stereo amplifier.
4. Set the ROOM CODE switches of the Lifestyle® stereo amplifier to room E
(switch 7 up, switches 6, 8 and 9 down).
See “Setting up the amplifier room code” on page 24.
Figure 12
Lifestyle® stereo amplifier to
Model 20 music center
connections
Lifestyle® stereo amplifier rear panel
Model 20 music center rear panel
BoseLink
OUTPUT
BoseLink
INPUT
8-to-9-pin
DIN adapter
20-ft Bose® link A cable
16
Setting Up Your Lifestyle® Stereo Amplifier
Setting up the RC-20 remote for Zone 2
1. Remove the remote control battery cover and locate the miniature switches (Figure 13).
2. Make sure that the house code settings (switches 1, 2, 3, and 4) match those in your first
remote.
3. Slide switch 5 down (off), and switches 6 and 8 up (on).
Note: Refer to your Lifestyle® system owner’s guide for more information on operating your
system in more than one room.
Figure 13
RC-20 remote Zone 2
switch settings
17
English
If your system uses a Model 20 music center, you need to set up a second RC-20 remote
control to operate the ZONE 2 outputs.
Setting Up Your Lifestyle® Stereo Amplifier
Model 5 music center setup
English
This setup requires a 3-ft audio input adapter cable. Contact your Bose® dealer or Bose
Customer Service. See the list of locations and phone numbers included in the shipping carton.
CAUTION: Before making connections, turn the Lifestyle® system off and disconnect the music
center from the AC (mains) power outlet. DO NOT plug the amplifier into an outlet until you have
completed all other connections.
®
CAUTION: DO NOT connect the audio input cable for the Lifestyle® stereo amplifier to the
SPEAKERS A or SPEAKERS B outputs. The amplifier is designed to work properly with the fixed
output level available from the FIXED OUTPUT connectors.
1. Disconnect the Acoustimass® cable from the FIXED L and R outputs on the rear panel of
the music center (Figure 14).
2. Insert the red RCA piggyback connector of the three-foot audio input adapter cable into
the R (right) FIXED OUTPUT connector. Insert the white RCA piggyback connector into
the L (left) FIXED OUTPUT connector. Insert the 3.5 mm mini-plug into the SYSTEM
CONTROL 2 connector on the rear panel of the music center.
3. Insert the red RCA connector of the Acoustimass module cable into the red piggyback
connector and the white RCA connector into the white piggyback connector.
4. Plug one end of the 20-foot audio cable (supplied) into the free end of the three-foot
audio input adapter cable. Plug the other end of the 20-foot audio cable into the Bose®
link input connector on the rear panel of the Lifestyle® stereo amplifier.
5. Set the ROOM CODE switches of the Lifestyle® stereo amplifier to room E
(switch 7 up, switches 6, 8 and 9 down).
See “Setting up the amplifier room code” on page 24.
Figure 14
Lifestyle® stereo amplifier
to Model 5 music center
connections
Lifestyle® stereo amplifier rear panel
Model 5 music center rear panel
SYSTEM CONTROL 2
3.5 mm mini-plug
BoseLink
OUTPUT
BoseLink
INPUT
Fixed L and
R speaker
outputs
Acoustimass module cable
18
20-ft Bose® link A cable
3-ft audio input adapter
(available from Bose)
Setting Up Your Lifestyle® Stereo Amplifier
Setting up the RC-5 remote
1. Remove the remote control battery cover and locate the miniature switches (Figure 15).
2. Make sure that the house code settings (switches 1, 2, 3, and 4) match those in your first
remote.
3. Slide switch 5 down (off) and 6 up (on).
Note: Refer to your Lifestyle® system owner’s guide for more information on operating your
system in more than one room.
Figure 15
RC-5 remote switch
settings
19
English
If your system uses a Model 5 music center, you need to set up a second RC-5 remote control to operate your Lifestyle® stereo amplifier.
Setting Up Your Lifestyle® Stereo Amplifier
Connecting speakers to your Lifestyle® stereo amplifier
English
CAUTION: DO NOT connect any make or model of powered speakers to the speaker outputs of
the Lifestyle® stereo amplifier. Doing so may cause damage to the equipment.
CAUTION: Make sure that the amplifier is disconnected from AC power before making speaker
connections.
CAUTION: The Lifestyle® stereo amplifier requires a 6-ohm minimum load.
Speaker cord consists of two insulated wires. One wire is usually marked (striped, collared, or
ribbed), indicating that it should be connected to the positive (+) terminal. The plain wire
should always be connected to the negative (–) terminal. For recommended wire sizes and
lengths, see “Wire recommendations” on page 28.
1. Remove the terminal block connector from the SPEAKER OUTPUTS connector on the
rear panel of the amplifier.
2. Connect the left speaker cord to the L positive (+) and minus (–) terminals of the 4-pin
terminal block connector.
3. Connect the right speaker cord to the R positive (+) and minus (–) terminals of the 4-pin
terminal block connector.
4. Plug the terminal block connector into the SPEAKER OUTPUTS connector.
Figure 16
Connecting speaker cable
to SPEAKER OUTPUTS
Rear panel of Lifestyle® stereo amplifier
Positive (+) wire
(marked with stripe)
Terminal block
connector
20
Setting Up Your Lifestyle® Stereo Amplifier
Powering-up your system
1. Using the power cord included with your Lifestyle® stereo amplifier, firmly insert the small
connector on one end of the power cord into the AC power connector on the rear panel
of the amplifier (Figure 17).
2. Connect the power cord of the Lifestyle® stereo amplifier and your Lifestyle® music
system to an AC (mains) outlet. The status LED tells you the operational status of the
amplifier.
3. Select a music source with your Personal® music center or your new remote control and
adjust the volume to your liking.
Rear panel of Lifestyle® stereo amplifier
Figure 17
Connecting the power cord
AC power cord
ROOM
CODE
Status LED
LED activity
Meaning
Constant slow blinking
(1 sec. on, 3 sec. off)
The amplifier is OFF (standby).
Continuously lit
The amplifier is ON and ready to produce sound.
Blinking quickly
The amplifier is ON and receiving data commands
from the media center through the Bose® link port.
Constant slow blinking
(1 sec. on, 5 sec. off)
The amplifier is set up as a supplemental amplifier
and it is OFF.
Lit but rapidly flickering
The amplifier is set up as a supplemental amplifier
and it is ON.
21
English
CAUTION: DO NOT plug the AC power cord into an AC (mains) outlet until all other connections
are complete.
Setting Up Additional Rooms For Sound
English
Setup guidelines for additional rooms
If you have a Lifestyle® 18 series II, 28 series II, 38 or 48 home entertainment system, you can
experience stereo sound in up to 14 other rooms using Lifestyle® stereo amplifiers, compatible speaker systems and remote controls for the other rooms.
• Remote controls for other rooms must be set to the same house code as the main room
remote, but each remote must be set to a different room code. See “Setting up remote controls for other rooms” on page 23.
• The Lifestyle® amplifier and its remote control must be set to the same room code. See
“Setting up the amplifier room code” on page 24.
• When using more than one amplifier to power more than two speakers in a room (Figure 18,
room C), all amplifiers must be set to the same room code. Also, one amplifier must be set
to the single amp mode and all others must be set to the supplemental amp mode. See
“Single and supplemental amplifiers” on page 25.
Figure 18
Sample installation of
Lifestyle® stereo amplifiers
ROOM C – Patio
RC-18S
Remote
Control
On
Off
Mute
All
FM·AM
TV
CBL·SAT
Track
Chapter
Preset
Channel
RC-38S
Remote
Control
On
Off
Mute
CD·DVD
LOCAL
OR
Mute
All
AUX
OR
Personal
Music Center
II
FM·AM
TV
CBL·SAT
Track
Chapter
Preset
Channel
VCR
251® speakers
Seek
Repeat
Shuffle
Repeat
Shuffle
1
2
3
1
2
3
4
5
6
4
5
6
7
8
Info
9
7
Last
Info
Switch settings: SA-3
• Room code C
• Single amp
AUX
Volume
Seek
OUT
L R
IN
Mute
CD·DVD
LOCAL
VCR
Volume
®
Switch settings: SA-3
• Room code C
• Supplemental
amp
Freespace® 51
speakers
8
9
OUT
L R
IN
Last
0
0
Remote Room Code = C
ROOM B – Bedroom
RC-18S
Remote
Control
On
Off
Mute
All
Mute
CD·DVD
FM·AM
TV
CBL·SAT
LOCAL
Track
Chapter
Preset
Channel
OR
RC-38S
Remote
Control
On
Off
Mute
All
AUX
VCR
Volume
FM·AM
TV
CBL·SAT
Track
Chapter
Preset
Channel
Seek
1
4
7
2
5
8
Info
0
Switch settings: SA-2
• Room code B
• Single amp
OUT
L R
IN
AUX
VCR
Volume
Seek
Repeat
Shuffle
191 speakers
Mute
CD·DVD
LOCAL
Personal®
OR Music Center
II
3
6
Repeat
Shuffle
1
2
4
5
9
7
8
Last
Info
3
6
9
Last
0
Remote Room Code = B
ROOM A – Home Theater
Left
Surround
Right
Surround
Lifestyle® system
remote control
Media Center
Main
Acoustimass®
Module
Left
22
Center
Right
Bose® link
Setting Up Additional Rooms For Sound
Setting up remote controls for other rooms
1. Remove the remote control battery cover and locate the microswitches (Figure 19).
2. Make sure that the house code settings (switches 1, 2, 3, and 4) match the house code
settings in your main room remote.
3. This remote is shipped from the factory set for room B. If this remote is used beyond a
second room, set switches 6, 7, 8, and 9 to the same room code as set in the Lifestyle®
stereo amplifier.
Note: Refer to your Lifestyle® system owner’s guide for more information on operating your
system in more than one room.
Figure 19
ON
Microswitch settings for
RC-18S and RC-38S
remotes
Room
Room
RC-18S or RC-38S
remote
To set up the Personal® music center II:
Refer to the owner’s guide included with the Personal® music center II for instructions on
configuring this remote for other rooms.
23
English
To set up the RC-18S or RC-38S remote:
Setting Up Additional Rooms For Sound
English
Setting up the amplifier room code
The room code of the amplifier must match the room code of the remote used in the room
where the speakers are installed.
Figure 20
Room code switches
Amplifier room code
settings
Room
SA-3
SA-2
Room
B
A B C 6 7 8 9
I
A B C 6 7 8 9
C
A B C 6 7 8 9
J
A B C 6 7 8 9
D
A B C 6 7 8 9
K
A B C 6 7 8 9
E
A B C 6 7 8 9
L
A B C 6 7 8 9
F
A B C 6 7 8 9
M
A B C 6 7 8 9
G
A B C 6 7 8 9
N
A B C 6 7 8 9
H
A B C 6 7 8 9
24
O
A B C 6 7 8 9
Setting Up Advanced Features
Amplifier mode switches
Figure 21
Switch Position Function
A
Down
Mono output
Up*
Stereo output
SA-2 and SA-3
microswitches
B
Down*
Up
Local source auto detect Off
Local source auto detect On
C
Down*
Up
Single amp
Supplemental amp
SA-3
*Factory setting
SA-2
Stereo or mono output (SA-3 only)
The output of the SA-3 amplifier can be set to stereo (switch A up – factory setting) or mono
(switch A down). The mono output mode feeds left and right channel audio to both the left
and right outputs. This mode is useful in situations where a stereo output isn’t feasible such
as when outdoor speakers are used in a large area.
Automatic detection of a local source (SA-3 only)
When a source is connected to the AUX INPUT connectors, you can set the amplifier to
detect when that source is turned on, thereby automatically switching the amplifier from
standby to on.
The amplifier is shipped with this feature turned off. For local source automatic detection, set
switch B up.
Single and supplemental amplifiers
If you want to cover a large area, such as an outdoor patio, requiring more than one set of
speakers, you can install additional amplifiers. See the setup for room C in “Setup guidelines
for additional rooms” on page 22.
• Leave switch C down (factory setting – single amp mode) on one amplifier and set switch C
up (supplemental amp mode) on all other amplifiers.
• Set the room code in all amplifiers to the same room code as in the remote control.
• Now, you can turn them all on and off, change their volumes, or mute them together using a
single remote control.
25
English
The advanced features of the Lifestyle® stereo amplifier are set up using microswitches A, B,
and C (Figure 21). The SA-3 has all three switches, but the SA-2 has only switch C.
Maintaining Your Lifestyle® Stereo Amplifier
English
Cleaning the amplifier
CAUTION: Disconnect the power cord from the AC outlet before cleaning.
The amplifier, which is designed only for indoor use, may become dusty over time. To clean
the amplifier, use only a soft, dry cloth to remove dust from the outside of the enclosure. You
may use a brush attachment on a vacuum cleaner to clean the hard-to-reach areas. DO NOT
use any solvents, chemicals, or cleaning solutions containing alcohol, ammonia, or abrasives.
Protecting outdoor wiring
Although some Bose® speakers are designed and tested to stand up to outdoor weather conditions, the bare ends of the speaker wire can be affected by exposure to the elements. This
is especially true of salt water exposure.
You may use a silicone caulking material, such as RTV adhesive, to protect speaker wire connections. It is commonly available at hardware stores. If you do use caulking, apply it only
after the wires are connected and the knobs tightened down. Check the caulking annually,
and re-apply as needed.
Troubleshooting
If you have a problem operating your Lifestyle® system after installing the Lifestyle® stereo
amplifier, follow the guidelines below. For additional help, see the troubleshooting information
in your system owner’s guide. If the problem still exists, contact your Bose® dealer to arrange
for service, or contact Bose Customer Service. Refer to the address list enclosed in the product packaging for correct phone numbers.
Problem
What to do
Neither speaker
plays
• Make sure the Lifestyle® media/music center and the amplifier are plugged in and turned on.
• Make sure the plugs are inserted fully and the outlets are in working order.
• Be sure a music source is selected (AM, FM, CD, AUX, etc.). If CD or AUX is selected, check to be sure there
is a CD in the player or the source connected to AUX is turned on.
• If using a Model 20 music center, make sure the audio input cable is inserted into SPEAKER ZONE 2.
• If using a Model 5 music center for home theater (Lifestyle® 12 or Lifestyle® 8 systems), make sure the
amplifier audio input cable is plugged into the FIXED OUTPUT connectors on the music center. (Then the
speaker output cable to the Acoustimass® module should be connected to the piggyback connectors on the
audio input cable.)
• Disconnect any headphones.
• Make sure the remote control switch settings are correct.
Only one speaker
plays
• Check the wires connected to the speaker that does not play.
• Make sure the wires are in good condition and are firmly connected at both ends.
• See “Connecting speakers to your Lifestyle® stereo amplifier” on page 20.
One speaker still
does not play
• Disconnect the wires from that speaker and the amplifier. Disconnect the other cable from its speaker, and
connect that end of the cable to the speaker that does not play. If the speaker still does not play, the problem is in the speaker. If the speaker now plays, continue checking for the source of the problem.
• Disconnect the same cable from the amplifier. Connect it to the other outputs on the amplifier. If the speaker
plays, the problem is in the original cable that was connected to that speaker. If the speaker does not play,
the problem is in that channel of the amplifier.
Right and left stereo
channels are heard
on the wrong speakers.
• Check the speaker cable connections to be sure the cable connected to the SPEAKER OUTPUTS L at the
amplifier are connected at the other end to the speaker on the left in your listening area.
• Check the speaker cable connections to be sure the cable connected to the SPEAKER OUTPUTS R at the
amplifier are connected at the other end to the speaker on the right in your listening area.
26
Maintaining Your Lifestyle® Stereo Amplifier
What to do
Bass or treble is
weak
• Check the speaker wire connections. Make sure the wires are connected + to + and – to –.
• See “Connecting speakers to your Lifestyle® stereo amplifier” on page 20.
Interference
• Make sure the speaker wires are firmly inserted in the terminals on the back of the speaker and on the
amplifier rear panel. Check to be sure no wires are touching across terminals.
• See “Connecting speakers to your Lifestyle® stereo amplifier” on page 20.
Remote does not
adjust the volume
• Be sure the 1/8 in (3.5 mm) mini-plug is firmly inserted in the SYSTEM CONTROL 2 connector (Model 5
music center only).
• If you are using an RC-20 or RC-5 remote control, make sure the remote control switch settings are correct.
• If you are using a local volume control (VCA), turn it to the off position.
Volume
suddenly decreases
• Lower the volume setting to see if the level returns to normal. If so, the sudden loss of volume was an intentional action of the amplifier’s overload protection feature. This engages automatically if the volume is set
too high and is overdriving the speakers. Choosing a lower setting should ensure continuous, even volume.
Zone 2 does not
work at all
• If you are using a Lifestyle® DVD system, the stereo amplifier will not work unless “Zone 2 Protocol” in
the system settings menu is set to “Legacy”. For more information, consult your Lifestyle® DVD system
owner’s guide.
English
Problem
Customer service
For additional help in solving problems, contact Bose® Customer Service. Refer to the
address list enclosed in the product packaging for correct phone numbers.
Limited warranty
The Lifestyle® stereo amplifier is covered by the Bose limited one-year transferable warranty.
Details of the coverage are provided on the product registration card that came with the
product. Please fill out the information section of the card and mail it to Bose. Failure to do so
will not affect your warranty rights.
Accessories
• Bose® link-to-Model 5 adapter cable (PN 278128)
• Bose® link 50-foot extension/expansion cable (PN 275475-050)
27
Maintaining Your Lifestyle® Stereo Amplifier
English
Technical information
Features
• Bose® proprietary digital signal processing technology
• Built-in digital volume control
• Thermal overload protection
• Protective rubber feet
Power rating
• USA/Canada: 120V
50/60 Hz, 220W (SA-2), 400W (SA-3)
• International: 220-240V
50/60 Hz, 220W (SA-2), 400W (SA-3)
Input sensitivity
• 0.5 Vrms @ 1 kHz
Signal to Noise ratio (S/N)
• 90 dB
SA-2
SA-3
Input/output
connectors
VCA volume control connector
Speaker left/right outputs
Bose® link input/output
VCA volume control connector
Speaker left/right outputs
AUX input
Bose® link input/output
Output power
(continuous ave.)
40W per channel minimum into 6
ohms, from 30 to 15 kHz, with no
more than 0.5% THD.
100W per channel minimum into
6 ohms, from 30 to 15 kHz, with
no more than 0.5% THD.
Dimensions
14¼"W x 5½"D x 3½"H
(36.2 x 13.8 x 9.0 cm)
14¼"W x 5½"D x 4¼"H
(36.2 cm x 13.8 cm x 10.7 cm)
Weight
7.6 lb (3.42 kg)
11.0 lb (4.95 kg)
Finish
• Black powdercoat
Wire recommendations
28
Length (max.)
Gauge
30 ft (9 m)
45 ft (14 m)
70 ft (21 m)
18 (0.75 mm2)
16 (1.7 mm2)
14 (2.0 mm2)
Maintaining Your Lifestyle® Stereo Amplifier
English
29
Información de seguridad
ADVERTENCIA: Con el fin de reducir el riesgo de descarga eléctrica, no exponga el producto a lluvia
o humedad.
Español
ADVERTENCIA: Este aparato no debe recibir salpicaduras ni mojarse, por lo que no deben
colocarse sobre él objetos que contengan líquido, como jarrones, etc. Al igual que ocurre con
cualquier producto electrónico, cuídese de no derramar líquido en ningún componente del sistema.
Los líquidos pueden provocar fallos o un incendio.
Las indicaciones de PRECAUCIÓN siguientes están ubicadas en la caja inferior del producto:
El signo de exclamación dentro de un triángulo equilátero, tal como aparece
marcado en el sistema, sirve para avisar al usuario de que existen instrucciones
de funcionamiento y mantenimiento importantes en esta guía del usuario.
El símbolo de un relámpago con una flecha dentro de un triángulo equilátero avisa
al usuario de que dentro de la caja del sistema puede haber voltaje sin aislar de una
magnitud suficiente para constituir un riesgo de descarga eléctrica.
Emisiones de clase B
Este aparato digital de clase B cumple todos los requisitos de las leyes de Canadá sobre
equipos que causan interferencias.
PRECAUCIÓN: Para evitar que se produzcan descargas eléctricas, ponga la patilla de hoja
plana de la clavija del cable de línea en la ranura ancha de la toma de CA (red eléctrica).
Introdúzcala hasta el tope.
PRECAUCIÓN: Este producto no se ha diseñado para ser utilizado en vehículos de recreo o en
emplazamientos sobre el agua.
ADVERTENCIA: No coloque sobre el aparato ninguna llama viva, como por ejemplo una vela.
Nota: La etiqueta del producto se encuentra en la base.
Por favor, lea esta guía del usuario.
Dedique el tiempo que sea necesario para seguir las instrucciones de esta guía del usuario
cuidadosamente. Le ayudará a configurar y utilizar correctamente el sistema y a disfrutar de
todas sus funciones avanzadas. Guarde la guía del usuario para utilizarla como material de
referencia en el futuro.
©2004 Bose Corporation. Ninguna parte de esta obra puede reproducirse, modificarse, distribuirse o
usarse de ninguna otra manera sin consentimiento previo por escrito. Todas las marcas comerciales
mencionadas en este documento son propiedad de Bose Corporation. Reservados todos los derechos.
Bose, Acoustimass, Lifestyle, Personal y Wave son marcas comerciales registradas de Bose Corporation.
2
Contenido
Dónde encontrar…
4
4
4
5
Instalación del amplificador estéreo Lifestyle® . . . . . . . . . . . . . . . . . . . . . . . . . . . . . . . . . . . . . . . .
Identificación del sistema . . . . . . . . . . . . . . . . . . . . . . . . . . . . . . . . . . . . . . . . . . . . . . . . . . . . .
Selección de la ubicación del amplificador estereofónico Lifestyle® . . . . . . . . . . . . . . . . . . . .
Montaje del amplificador estéreo Lifestyle® . . . . . . . . . . . . . . . . . . . . . . . . . . . . . . . . . . . . . . .
Instalación del centro de medios Modelo AV-18/38/48 . . . . . . . . . . . . . . . . . . . . . . . . . . . . . .
Instalación del centro de medios Modelo AV-28 . . . . . . . . . . . . . . . . . . . . . . . . . . . . . . . . . . .
Configuración de la interfaz de múltiples salas . . . . . . . . . . . . . . . . . . . . . . . . . . . . . . . . . . . .
Configuración del centro de música Modelo 20 . . . . . . . . . . . . . . . . . . . . . . . . . . . . . . . . . . .
Configuración del centro de música Modelo 5 . . . . . . . . . . . . . . . . . . . . . . . . . . . . . . . . . . . .
Conexión de altavoces al amplificador estereofónico Lifestyle® . . . . . . . . . . . . . . . . . . . . . . .
Encendido del sistema . . . . . . . . . . . . . . . . . . . . . . . . . . . . . . . . . . . . . . . . . . . . . . . . . . . . . . .
7
7
8
9
10
12
14
16
18
20
21
Configuración de sonido en salas adicionales . . . . . . . . . . . . . . . . . . . . . . . . . . . . . . . . . . . . . . . .
Directrices de instalación en salas adicionales . . . . . . . . . . . . . . . . . . . . . . . . . . . . . . . . . . . .
Configuración de los controles remotos de otras salas . . . . . . . . . . . . . . . . . . . . . . . . . . . . . .
Configuración del código de sala del amplificador . . . . . . . . . . . . . . . . . . . . . . . . . . . . . . . . .
22
22
23
24
Configuración de las funciones avanzadas . . . . . . . . . . . . . . . . . . . . . . . . . . . . . . . . . . . . . . . . . .
Interruptores de modo de amplificador . . . . . . . . . . . . . . . . . . . . . . . . . . . . . . . . . . . . . . . . . .
Salida estéreo o mono (sólo SA-3) . . . . . . . . . . . . . . . . . . . . . . . . . . . . . . . . . . . . . . . . . . . . . .
Detección automática de una fuente local (sólo SA-3) . . . . . . . . . . . . . . . . . . . . . . . . . . . . . .
Amplificadores únicos y adicionales . . . . . . . . . . . . . . . . . . . . . . . . . . . . . . . . . . . . . . . . . . . .
25
25
25
25
25
Mantenimiento del amplificador estéreo Lifestyle® . . . . . . . . . . . . . . . . . . . . . . . . . . . . . . . . . . . . .
Limpieza del amplificador . . . . . . . . . . . . . . . . . . . . . . . . . . . . . . . . . . . . . . . . . . . . . . . . . . . . .
Protección del cableado a la intemperie . . . . . . . . . . . . . . . . . . . . . . . . . . . . . . . . . . . . . . . . .
Resolución de problemas . . . . . . . . . . . . . . . . . . . . . . . . . . . . . . . . . . . . . . . . . . . . . . . . . . . . .
Servicio al cliente . . . . . . . . . . . . . . . . . . . . . . . . . . . . . . . . . . . . . . . . . . . . . . . . . . . . . . . . . . .
Garantía limitada . . . . . . . . . . . . . . . . . . . . . . . . . . . . . . . . . . . . . . . . . . . . . . . . . . . . . . . . . . .
Accesorios . . . . . . . . . . . . . . . . . . . . . . . . . . . . . . . . . . . . . . . . . . . . . . . . . . . . . . . . . . . . . . . .
Información técnica . . . . . . . . . . . . . . . . . . . . . . . . . . . . . . . . . . . . . . . . . . . . . . . . . . . . . . . . .
26
26
26
26
27
27
27
28
Para conservar como referencia
Anote el número del modelo, el número de serie y la fecha de compra. El número de serie
se encuentra en la cara inferior del amplificador estereofónico Lifestyle®.
Modelo: SA2
SA3
Número de serie: ______________________________________
Fecha de compra: ______________________________________
Se recomienda conservar el recibo de compra y una copia de la tarjeta de registro del
producto junto con esta guía del usuario.
3
Español
Presentación del amplificador estéreo SA-2 y SA-3 Lifestyle® . . . . . . . . . . . . . . . . . . . . . . . . . . . .
Antes de comenzar . . . . . . . . . . . . . . . . . . . . . . . . . . . . . . . . . . . . . . . . . . . . . . . . . . . . . . . . . .
Desembalaje de la caja . . . . . . . . . . . . . . . . . . . . . . . . . . . . . . . . . . . . . . . . . . . . . . . . . . . . . .
Características del panel de control . . . . . . . . . . . . . . . . . . . . . . . . . . . . . . . . . . . . . . . . . . . . .
Presentación del amplificador estéreo SA-2 y SA-3 Lifestyle®
Español
Antes de comenzar
Gracias por adquirir un amplificador estéreo Lifestyle® SA-2 o SA-3. El amplificador estéreo
Lifestyle® es una solución sencilla para agregar altavoces ambientales sin autoamplificación
Bose® o altavoces adicionales sin autoamplificación Bose al sistema Lifestyle®. Este
amplificador incorpora la tecnología Integrated Signal Processing, patentada por Bose, que
garantiza la reproducción de sonido estereofónico envolvente y multidimensional incluso a
bajos niveles de volumen. Al expandir las capacidades de su sistema con el amplificador
estereofónico Lifestyle®, usted podrá disfrutar de sonido de calidad Bose y la comodidad del
sistema Lifestyle® en su jardín, patio, piscina, garaje o cuarto de servicio.
Desembalaje de la caja
ADVERTENCIA: Mantenga las bolsas de plástico fuera del alcance de los niños, para evitar el
peligro de asfixia.
Desembale cuidadosamente la caja de envío. Asegúrese de que la caja del amplificador
estereofónico Lifestyle® contenga las piezas identificadas en la Figura 1. Recomendamos que
conserve los materiales de embalaje, ya que podría necesitarlos en el futuro. Los materiales
de embalaje originales permiten transportar este producto de la forma más segura.
Nota: Busque el número de serie en la cara inferior del amplificador, y apúntelo en el espacio
correspondiente de la página 3.
Si alguna pieza del producto parece estar dañada, no utilice el sistema. Notifiquelo de
inmediato a un distribuidor autorizado de Bose o llame al Departamento de atención al
cliente de Bose. En la lista de direcciones que figura en el embalaje del producto podrá
encontrar el número de teléfono correcto.
Figura 1
Europa (230 V)
Australia (240 V)
Contenido de la caja
de envío
Reino Unido/Singapur (230 V)
Amplificador
estéreo SA-2
Cable eléctrico*
de 120 V
EE.UU./Canadá
Adaptador
DIN de
8 a 9 patillas
Amplificador
estéreo SA-3
Cable A de enlace Bose®
de 6 m
*El amplificador estereofónico
Lifestyle® viene con un cable de
alimentación para redes eléctricas de
120 V CA (para su uso en EE. UU. y
Canadá), o el correspondiente cable
para redes de 230 ó 240 V (para uso
en otros países).
Nota: Utilice sólo el cable de alimentación suministrado con el amplificador estereofónico
Lifestyle®. Si el enchufe del cable no entra en la toma de alimentación de la red eléctrica, NO lo
altere de ninguna forma; póngase en contacto con las oficinas de atención al cliente de Bose
para obtener asistencia.
Nota: El amplificador estereofónico Lifestyle® es compatible ÚNICAMENTE con los altavoces
ambientales o accesorios sin autoalimentación de Bose.
4
Presentación del amplificador estéreo SA-2 y SA-3 Lifestyle®
Características del panel de control
Este panel de conexión incluye las conexiones de entrada y salida y los interruptores del
código de sala y los indicadores de estado (LED) del amplificador.
Figura 2
Panel de conexión del
amplificador Lifestyle®
Español
1
2
3
4
5
6
7
1
ALIMENTACIÓN CA
Conector del cable de alimentación de CA. Este producto no tiene interruptor de encendido/
apagado. La alimentación se recibe cuando se instala el cable de alimentación y se enchufa
a un cajetín de la red eléctrica.
2
V de CA
Conexiones del control de volumen local. Permite controlar el volumen de una sala con un
control de pared. Póngase en contacto con su distribuidor Bose® o llame al Departamento
de atención al cliente de Bose para obtener información sobre cómo instalar esta función.
Consulte la lista de contactos que se encuentra en la contraportada de esta guía.
3
SALIDAS DE ALTAVOCES
Salidas de altavoces amplificadores izquierdo y derecho. Se requiere una carga mínima de
6 ohmios. Para determinar el tamaño correcto del cable del altavoz, consulte
“Recomendaciones sobre los cables”, en la página 28.
5
Presentación del amplificador estéreo SA-2 y SA-3 Lifestyle®
4
Interruptores del CÓDIGO DE SALA
Microinterruptores para fijar el código de sala y funciones avanzadas del amplificador.
Para los interruptores A, B
y C, consulte
“Configuración de las
funciones avanzadas”, en SA-3
la página 25.
Para los interruptores 6 a 9,
consulte “Configuración del
código de sala del
amplificador”, en la página 24.
Español
SA-2
6
5
LED indicador de estado
El LED verde indica el estado operativo del amplificador. Consulte la “Encendido del
sistema”, en la página 21.
6
SALIDA AUX (sólo SA-3)
Entradas de línea de canal izquierdo y derecho para un dispositivo de audio local.
7
ENTRADA/SALIDA de enlace Bose®
Los conectores DIN de nueve patillas se usan para conectar el amplificador a una red de
enlace Bose®. Las señales de entrada se envían a través del conector de salida para permitir
la conexión en cadena.
Instalación del amplificador estéreo Lifestyle®
Identificación del sistema
El amplificador estéreo Lifestyle® y el control remoto adicional vienen listos para instalar y
para utilizarlos en una segunda sala (Sala B).
En esta sección encontrará instrucciones de ubicación y montaje del amplificador estéreo
Lifestyle®. Después, encontrará un apartado donde se detalla cómo configurar el
amplificador para utilizarlo con su sistema de cine en casa.
En el caso del centro de medios AV-18, AV-38 o
AV-48, consulte “Instalación del centro de medios
Modelo AV-18/38/48”, en la página 10.
En el caso del centro de medios AV-28, consulte
“Instalación del centro de medios Modelo AV-28”,
en la página 12.
Modelo
AV-18/38/48,
centro de
medios
Modelo AV-28,
centro de
medios
En el caso de la interfaz de múltiples salas, consulte
“Configuración de la interfaz de múltiples salas”,
en la página 14.
Interfaz
de múltiples
salas
En el caso del centro de música Modelo 20, consulte
“Configuración del centro de música Modelo 20”,
en la página 16.
En el caso del centro de música Modelo 5, consulte
“Configuración del centro de música Modelo 5”, en
la página 18.
Centro
de música
Modelo 20
®
®
Centro
de música
Modelo 5
Nota: Si ha pensado utilizar este amplificador en una habitación que no sea contigua, tendrá
que cambiar algunos de los ajustes de los interruptores del amplificador y el control remoto.
Consulte la “Configuración de sonido en salas adicionales”, en la página 22.
7
Español
Las instrucciones dependerán de que usted disponga de un centro de medios, un centro de
música o una interfaz para múltiples salas. La etiqueta del producto que figura en el panel
inferior le indicará el modelo que usted tiene.
Instalación del amplificador estéreo Lifestyle®
Selección de la ubicación del amplificador estereofónico Lifestyle®
El amplificador estéreo Lifestyle® no necesita colocarse cerca del sistema Lifestyle® ni de los
altavoces accesorios. Tenga presentes las directrices siguientes a la hora de elegir un
emplazamiento para el amplificador.
PRECAUCIÓN: NO monte el amplificador en superficies que no sean lo suficientemente
robustas o que oculten posibles fuentes de peligro, tales como cables eléctricos o cañerías.
Español
PRECAUCIÓN: El amplificador debe instalarse bajo techo; no está diseñado ni ha sido probado
para uso al aire libre o en embarcaciones.
• Instale el amplificador bajo techo y a menos de 2,5 m de una toma de corriente.
• Asegúrese de instalar el amplificador al alcance del cable de entrada de audio provisto
(aproximadamente, 10 m).
• Instale el amplificador en un zona cuya temperatura ambiente no supere los 45°C (104°F).
• Para optimizar el rendimiento, instale el amplificador en una zona bien ventilada.
• NO ponga el amplificador en una zona totalmente cerrada: si no dispone de suficiente
ventilación, el amplificador reducirá automáticamente el volumen como medida de
protección para limitar su temperatura.
• NO coloque el amplificador sobre superficies termosensibles, como por ejemplo en el
acabado de un mueble fino. Al igual que todo equipo eléctrico, esta unidad genera cierta
cantidad de calor.
• NO utilice el amplificador en lugares húmedos, ya que es importante impedir que la
humedad penetre en la unidad.
8
Instalación del amplificador estéreo Lifestyle®
Montaje del amplificador estéreo Lifestyle®
El amplificador estéreo Lifestyle® se puede colocar sobre una estantería o en la pared (Figura 3).
• Si va a montar el amplificador sobre una superficie horizontal, como por ejemplo el piso
o un estante, acóplele patas de caucho para aumentar la estabilidad y protegerlo de las
rayas.
• Cuando monte el amplificador en posición vertical u horizontal en una pared, móntelo
SIEMPRE con la orientación que se muestra en Figura 3.
Figura 3
Colocación sobre estante
Montado en vertical en una pared
Pared de madera
Figura 4
Métodos de montaje y
piezas
Panel de conexiones hacia arriba
Panel de
conexiones a
la izquierda
Opciones de instalación
3
Montado en horizontal en una
pared
Pared de madera laminada
1
/32 pulgada (2,25 mm)
/2 pulgada (12 mm)
(4) n.º 10 x 21/2 pulgada
(M5 x 75 mm)
1
(4) n.º 10 x 1 /2 pulgada (M5 x 36 mm)
(4) n.º 10 (M5)
¾ pulgada (1,9 cm) mínimo
3
/8 pulgada (0,95 cm) mínimo
Para marcar los puntos donde se deben
practicar los orificios de montaje, saque las
patas de goma, sujete el amplificador en el
sitio donde lo va a poner y marque la pared
a través de los orificios que tiene la caja.
9
Español
• SÓLO en el caso de que vaya a montar el amplificador en la pared, quítele las patas de
caucho y utilice los orificios de guía de la caja para instalar las piezas de montaje. Consulte
Figura 4 para ver los métodos y piezas de montaje recomendados.
Instalación del amplificador estéreo Lifestyle®
Instalación del centro de medios Modelo AV-18/38/48
PRECAUCIÓN: Antes de hacer cualquier conexión, apague el sistema Lifestyle® y desconecte
el centro de medios de la toma de corriente alterna (CA) de la red eléctrica. NO enchufe el
amplificador en la toma de corriente hasta haber conectado todos los demás componentes.
Español
1. Introduzca un extremo del cable A de enlace Bose® en el conector de salida del enlace
Bose® del panel posterior del centro de medios (Figura 5).
2. Introduzca el otro extremo del cable A de enlace Bose® en el conector de entrada del
enlace Bose® del panel posterior del amplificador estéreo Lifestyle ®.
Figura 5
Conexiones del
amplificador estéreo
Lifestyle® al centro de
medios AV-18/38/48
Panel posterior del amplificador estéreo Lifestyle®
Panel posterior del centro de medios AV-18/38/48
BoseLink
OUTPUT
BoseLink
INPUT
Cable A de enlace Bose® de 6 m
10
Instalación del amplificador estéreo Lifestyle®
Configuración de los controles remotos RC-18S y RC-38S
El control remoto adicional se envía de fábrica ya configurado para una segunda sala (sala B).
Para que el control remoto funcione con el sistema de entretenimiento, compruebe la
configuración del código doméstico como se indica a continuación.
1. Quite la tapa del compartimiento de pilas del control remoto y busque los interruptores
en miniatura (Figura 6).
Nota: Si se va a usar en una sala que no sea contigua, será necesario cambiar los ajustes de los
interruptores. Consulte la “Configuración de sonido en salas adicionales”, en la página 22.
Figura 6
Microinterruptores del
control remoto
Los interruptores del código doméstico deben coincidir
con los del control remoto de la sala principal
ON
Compruebe la configuración del protocolo de expansión del sistema
Para que el amplificador estéreo Lifestyle® funcione correctamente con el sistema de
entretenimiento doméstico, es necesario que el elemento de menú del protocolo de
expansión se fije en Bose® link. Para comprobarlo:
1. Encienda el sistema de entretenimiento para el hogar con DVD Lifestyle® y la televisión.
2. Pulse el botón System (Sistema) del control remoto de la sala principal.
3. Seleccione la ficha Audio y desplácese hasta Expansion Protocol (Protocolo de
expansión).
4. Compruebe que está seleccionada la opción Bose® link. En caso contrario, seleccione
Bose® link.
5. Pulse el botón Exit (Salir) del control remoto.
11
Español
2. Compruebe que los ajustes de código doméstico (interruptores 1, 2, 3 y 4) coinciden con
los del control remoto de la sala principal.
Instalación del amplificador estéreo Lifestyle®
Instalación del centro de medios Modelo AV-28
PRECAUCIÓN: Antes de hacer cualquier conexión, apague el sistema Lifestyle® y desconecte
el centro de medios de la toma de corriente alterna (CA) de la red eléctrica. NO enchufe el
amplificador en la toma de corriente hasta haber conectado todos los demás componentes.
1. Introduzca el adaptador de 8 a 9 patillas en el conector de salida SPEAKER ZONES 2
(Altavoz zona 2) del panel posterior del centro de medios (Figura 7).
Español
2. Introduzca un extremo del cable A de enlace Bose® en el adaptador de 8 a 9 patillas.
3. Introduzca el otro extremo del cable A de enlace Bose® en el conector de entrada del
enlace Bose® del panel posterior del amplificador estéreo Lifestyle®.
Figura 7
Conexiones del
amplificador estéreo
Lifestyle® al centro de
medios AV-28
Panel posterior del amplificador estéreo Lifestyle®
Panel posterior del centro de medios AV-28
BoseLink
OUTPUT
BoseLink
INPUT
Adaptador DIN de 8 a 9 patillas
Cable A de enlace Bose® de 6 m
12
Instalación del amplificador estéreo Lifestyle®
Configuración del control remoto RC-28S
El segundo control remoto se envía de fábrica configurado para la Zona 2. Para que funcione
con el sistema de entretenimiento del hogar, realice la siguiente comprobación del código
doméstico.
1. Quite la tapa del compartimiento de pilas del control remoto y busque los interruptores
en miniatura (Figura 8).
3. Asegúrese de que los interruptores 5, 7 y 8 están subidos y de que los interruptores 6 y
9 están bajados.
Nota: Consulte la guía de usuario del sistema Lifestyle® para obtener más información sobre
cómo utilizar el sistema en varias salas.
Figura 8
Microinterruptores del
control remoto
Los interruptores del código doméstico deben coincidir
con los del control remoto de la sala principal
ON
Configuración del Protocolo de zona 2 en el sistema de
entretenimiento doméstico
Para que el amplificador estéreo Lifestyle® funcione con un centro de medios Lifestyle®,
tendrá que fijar el Protocolo de zona 2 en el modo Legacy (Anterior) (Figura 9).
1. Encienda el sistema de DVD Lifestyle® y la televisión.
2. Pulse el botón Settings (Configuración) del control remoto de la sala principal.
3. Desplácese hacia abajo, hasta System Setup (Configuración del sistema) y pulse el
botón Enter (Intro).
4. Desplácese hasta el último elemento del menú, Zone 2 Protocol (Protocolo de zona 2).
5. Pulse el botón de flecha derecha del control remoto para cambiar el protocolo de
Normal a Legacy (Anterior).
6. Apague el sistema y vuelva a encenderlo para asegurarse de que el Protocolo de
zona 2 queda fijado en Legacy (Anterior).
Figura 9
Configuración del protocolo
de zona 2
13
Español
2. Compruebe que los ajustes de código doméstico (interruptores 1, 2, 3 y 4) coinciden con
los del control remoto de la sala principal.
Instalación del amplificador estéreo Lifestyle®
Configuración de la interfaz de múltiples salas
PRECAUCIÓN: Antes de hacer cualquier conexión, apague el sistema Lifestyle® y desconecte
el centro de música de la toma de corriente alterna (CA) de la red eléctrica. NO enchufe el
amplificador en la toma de corriente hasta haber conectado todos los demás componentes.
1. Introduzca el adaptador de 8 a 9 patillas en uno de los conectores de salida ROOM (sala)
no utilizados (B, C o D) de la parte posterior de la interfaz de múltiples salas (Figura 10).
Español
2. Introduzca un extremo del cable A de enlace Bose® en el adaptador de 8 a 9 patillas.
3. Introduzca el otro extremo del cable A de enlace Bose® en el conector de entrada del
enlace Bose® del panel posterior del amplificador estéreo Lifestyle ®.
Figura 10
Conexiones del
amplificador estéreo
Lifestyle® a la interfaz
de múltiples salas
Panel posterior del amplificador estéreo Lifestyle®
Panel posterior de la interfaz para múltiples habitaciones
BoseLink
OUTPUT
BoseLink
INPUT
Adaptador DIN de
8 a 9 patillas
Cable A de enlace Bose® de 6 m
14
Instalación del amplificador estéreo Lifestyle®
Configuración del centro de música Personal®
Los sistemas dotados de una interfaz para múltiples habitaciones se controlan mediante el
centro de música Personal®, que no requiere que se configuren los interruptores internos
para ofrecerle el control de altavoces en más de una habitación. Sin embargo, si usted
adquiere un segundo centro de música Personal®, tendrá que efectuar el procedimiento de
configuración inicial del centro de música Personal®.
Nota: Consulte la guía de usuario del sistema Lifestyle® para obtener más información sobre
cómo utilizar el sistema en varias salas.
Español
Selección de otras salas con el centro de música Personal®
El centro de música Personal® permite controlar hasta cuatro juegos de altavoces
autoalimentados Bose® instalados en habitaciones distintas. Dichas habitaciones se
denominan A, B, C y D, siendo A la habitación principal (es decir, la que se utiliza para el
sistema de una sola habitación). Si hay dos o más habitaciones conectadas al sistema, el
centro de música Personal ® muestra los botones ROOM y HOUSE y los indicadores de
habitación (A, B, C o D). En la Figura 11 se ilustra un ejemplo de la pantalla de un sistema
para dos habitaciones.
Figura 11
Ejemplo de pantalla de
un sistema para dos
habitaciones
Pulse el botón ROOM (Sala) para controlar una sola habitación,
o dos o más habitaciones que comparten una sola fuente.
Pulse el botón HOUSE (Casa) para controlar todas las
habitaciones conectadas como si se tratara de una sola.
Los indicadores de habitación muestran lo que se
seleccionó con los botones ROOM o HOUSE.
15
Instalación del amplificador estéreo Lifestyle®
Configuración del centro de música Modelo 20
®
PRECAUCIÓN: Antes de hacer cualquier conexión, apague el sistema Lifestyle® y desconecte
el centro de música de la toma de corriente alterna (CA) de la red eléctrica. NO enchufe el
amplificador en la toma de corriente hasta haber conectado todos los demás componentes.
1. Introduzca el adaptador DIN de 8 a 9 patillas en el conector de salida SPEAKER
ZONES 2 (Altavoz zona 2) del panel posterior del centro de música (Figura 12).
Español
2. Introduzca un extremo del cable A de enlace Bose® en el adaptador de 8 a 9 patillas.
3. Introduzca el otro extremo del cable A de enlace Bose® en el conector de entrada del
enlace Bose® del panel posterior del amplificador estéreo Lifestyle®.
4. Configure los interruptores ROOM CODE (Código de sala) del amplificador estéreo
Lifestyle® para la sala E (interruptor 7 arriba, interruptores 6, 8 y 9 abajo).
Consulte “Configuración del código de sala del amplificador”, en la página 24.
Figura 12
Conexiones del
amplificador estéreo
Lifestyle® al centro de
música Modelo 20
Panel posterior del amplificador estéreo Lifestyle®
Cara posterior del centro de música modelo 20
BoseLink
OUTPUT
BoseLink
INPUT
Adaptador DIN
de 8 a 9 patillas
Cable A de enlace Bose® de 6 m
16
Instalación del amplificador estéreo Lifestyle®
Configuración del control remoto RC-20 para ZONE 2
Si el sistema emplea un centro de música Modelo 20, es preciso configurar un segundo
control remoto RC-20 para controlar las salidas ZONE 2.
1. Quite la tapa del compartimiento de pilas del control remoto y busque los micro
interruptores (Figura 13).
2. Compruebe que los ajustes de código residencial (interruptores 1, 2, 3 y 4) coincidan con
los del primer mando.
Español
3. Baje el interruptor 5 (posición de apagado) y suba los interruptores 6 y 8 (posición de
encendido).
Nota: Consulte la guía de usuario del sistema Lifestyle® para obtener más información sobre
cómo utilizar el sistema en varias salas.
Figura 13
Configuración de interruptor
para zona 2 del control
RC-20
17
Instalación del amplificador estéreo Lifestyle®
Configuración del centro de música Modelo 5
Esta configuración requiere un cable adaptador de entrada de audio de 1 m. Póngase en
contacto con el distribuidor Bose® o el departamento de atención al cliente Bose. Consulte
la lista de oficinas y números de teléfono incluida en la caja de envío.
®
PRECAUCIÓN: Antes de hacer cualquier conexión, apague el sistema Lifestyle® y desconecte
el centro de música de la toma de corriente alterna (CA) de la red eléctrica. NO enchufe el
amplificador en la toma de corriente hasta haber conectado todos los demás componentes.
Español
PRECAUCIÓN: NO conecte el cable de entrada de audio del amplificador estereofónico
Lifestyle® a las salidas para altavoces SPEAKERS A o SPEAKERS B. El amplificador está
diseñado para funcionar debidamente con el nivel de salida fija producido en los conectores
FIXED OUTPUT (Salida fija).
1. Desconecte el cable de Acoustimass® de las salidas FIXED L y R (Fijas, izquierda y
derecha) del panel posterior del centro de música (Figura 14).
2. Inserte el conector en cascada RCA rojo del cable del adaptador de entrada de audio de
1 m en el conector FIXED OUTPUT R (Salida fija, derecha), y el conector en cascada RCA
blanco en el conector FIXED OUTPUT L (Salida fija, izquierda). Introduzca la miniclavija
de 3,5 mm en el conector SYSTEM CONTROL 2 (Control de sistema), en el panel
posterior del centro de música.
3. Inserte los conectores en cascada RCA rojo y blanco del cable Acoustimass en los
conectores en cascada rojo o blanco, respectivamente.
4. Enchufe un extremo del cable de audio de 6 m (incluido) en el extremo libre del cable del
adaptador de entrada de audio de 1 m. Enchufe el otro extremo del cable de audio de
6 m en el conector de entrada del enlace Bose®, en el panel posterior del amplificador
estéreo Lifestyle®.
5. Configure los interruptores ROOM CODE (Código de sala) del amplificador estéreo
Lifestyle® para la sala E (interruptor 7 arriba, interruptores 6, 8 y 9 abajo).
Consulte “Configuración del código de sala del amplificador”, en la página 24.
Figura 14
Conexiones del
amplificador estéreo
Lifestyle® al centro de
música Modelo 5
Cara posterior del centro de música modelo 5
Panel posterior del amplificador estéreo Lifestyle®
SYSTEM CONTROL 2
Miniclavija de 3,5 mm
BoseLink
OUTPUT
BoseLink
INPUT
Salidas de
altavoz fijas,
izq. y der.
Cable del módulo de Acoustimass
18
Cable A de enlace Bose® de 6 m
Adaptador de entrada de audio
de 1 m (disponible en Bose)
Instalación del amplificador estéreo Lifestyle®
Configuración del mando a distancia RC-5
Si el sistema emplea un centro de música modelo 5, es preciso configurar un segundo
control remoto RC-5 para controlar el amplificador estereofónico Lifestyle®.
1. Quite la tapa del compartimiento de pilas del control remoto y busque los micro
interruptores (Figura 15).
2. Compruebe que los ajustes de código residencial (interruptores 1, 2, 3 y 4) coincidan con
los del primer mando.
Español
3. Baje el interruptor 5 (posición de apagado) y suba el interruptor 6 (posición de
encendido).
Nota: Consulte la guía de usuario del sistema Lifestyle® para obtener más información sobre
cómo utilizar el sistema en varias salas.
Figura 15
Ajustes de los interruptores
del control remoto RC-5
19
Instalación del amplificador estéreo Lifestyle®
Conexión de altavoces al amplificador estereofónico Lifestyle®
PRECAUCIÓN: NO conecte un altavoz autoalimentado de ninguna marca o modelo a las
salidas de altavoces del amplificador estéreo Lifestyle®. Este tipo de conexión perjudicaría el
equipo.
PRECAUCIÓN: Desconecte el amplificador de la alimentación de CA antes de conectar los
altavoces.
Español
PRECAUCIÓN: El amplificador estéreo Lifestyle® requiere una carga mínima de 6 ohmios.
El cable del altavoz consta de dos cables aislados. Uno de ellos suele estar marcado (con
rayas, un collarín o acanaladuras), para indicar que debe conectarse al terminal positivo (+).
El conductor sin marcar debe conectarse siempre al terminal negativo (–). En la sección
“Recomendaciones sobre los cables”, en la página 28 hallará los tamaños y longitudes
recomendados para estos cables.
1. Saque el conector del bloque de terminales del conector SPEAKER OUTPUTS (Salidas
de altavoces) del panel posterior del amplificador.
2. Conecte el cable del altavoz izquierdo a los terminales izquierdos positivo (+) y
negativo (-) del conector de 4 patillas del bloque de terminales.
3. Conecte el cable del altavoz derecho a los terminales derechos positivo (+) y negativo (-)
del conector de 4 patillas del bloque de terminales.
4. Enchufe el conector del bloque de terminales al conector SPEAKER OUTPUTS (Salidas
de altavoces).
Figura 16
Conexión del cable
de altavoz a SPEAKER
OUTPUTS (Salidas de
altavoces)
Panel posterior del amplificador estéreo Lifestyle®
Cable positivo (+)
(marcado con una raya)
Conector del
bloque de
terminales
20
Instalación del amplificador estéreo Lifestyle®
Encendido del sistema
PRECAUCIÓN: NO enchufe el cable de alimentación CA en una toma de corriente de la red
eléctrica hasta haber conectado todos los demás componentes.
1. Inserte firmemente el conector pequeño del cable de alimentación provisto con el
amplificador Lifestyle®, en la toma de corriente alterna del panel posterior del
amplificador (Figura 17).
3. Seleccione una fuente de música mediante el centro de música Personal® o con el nuevo
control remoto, y ajuste el volumen al nivel que desee.
Panel posterior del amplificador estéreo Lifestyle®
Figura 17
Conexión del cable
de alimentación
Cable de alimentación de CA
ROOM
CODE
LED de estado
Actividad del LED
Significado
Parpadeo constante y
lento (1 segundo
encendido y 3 apagado)
El amplificador está en OFF (en espera).
Encendido
permanentemente
El amplificador está encendido y listo para emitir
sonidos.
Parpadeo rápido
El amplificador está encendido y recibe comandos
de datos desde el centro de medios, mediante el
puerto de enlace Bose®.
Parpadeo constante y
lento (1 segundo
encendido y 5 apagado)
El amplificador está configurado como adicional
y está apagado.
Se enciende pero con
parpadeo muy rápido
El amplificador está configurado como adicional
y está encendido.
21
Español
2. Conecte el cable de alimentación del amplificador estereofónico Lifestyle® y el sistema
de música Lifestyle® a una toma CA de la red eléctrica. El LED de estado indica el estado
operativo del amplificador.
Configuración de sonido en salas adicionales
Directrices de instalación en salas adicionales
Si dispone de un sistema de entretenimiento para el hogar Lifestyle® 18 de la serie II, 28 de la
serie II, 38 ó 48, puede experimentar un sonido estéreo en hasta 14 habitaciones más con los
amplificadores estéreo, sistemas de altavoces compatibles y controles remotos Lifestyle®.
Español
• Los controles remotos de otras salas se deben configurar con el mismo código doméstico
que el control remoto de la sala principal, pero cada uno de esos controles remotos puede
tener su propio código individual de sala. Consulte la “Configuración de los controles
remotos de otras salas”, en la página 23.
• El amplificador Lifestyle® y su control remoto se deben configurar con el mismo código de
sala. Consulte la “Configuración del código de sala del amplificador”, en la página 24.
• Cuando se utiliza más de un amplificador para dos altavoces de una sala (Figura 18,
sala C), todos los amplificadores deben tener el mismo código de sala. Asimismo, es
necesario configurar un amplificador en el modo de amplificador único; los demás deben
configurarse en el modo de amplificador adicional. Consulte “Amplificadores únicos y
adicionales”, en la página 25.
Figura 18
Instalación de muestra de
los amplificadores estéreo
Lifestyle®
SALA C: Patio
Control
remoto
RC-18S
On
Off
Mute
All
On
Off
Mute
CD·DVD
FM·AM
TV
CBL·SAT
LOCAL
O
Track
Chapter
Preset
Channel
Control
remoto
RC-38S
Mute
All
AUX
FM·AM
TV
CBL·SAT
Track
Chapter
Preset
Channel
VCR
251® altavoces
Seek
Repeat
1
AUX
Volume
Seek
Shuffle
2
Repeat
Shuffle
3
2
3
4
5
6
4
5
6
7
8
9
7
8
9
Last
Info
Info
1
Last
0
Configuración del
SA-3
interruptor:
• Código de sala C
• Amplificador
adicional
L R
Configuración del
SA-3
interruptor:
• Código de sala C
• Amplificador
único
L R
Configuración del
SA-2
interruptor:
• Código de sala B
• Amplificador
único
L R
OUT
IN
Mute
CD·DVD
LOCAL
VCR
Volume
O
Personal®
Centro de
música II
Altavoces
Freespace® 51
0
OUT
IN
Código de control remoto = C
SALA B: dormitorio
Control
remoto
RC-18S
On
Off
Mute
All
Mute
CD·DVD
FM·AM
TV
CBL·SAT
LOCAL
Track
Chapter
Preset
Channel
O
Control
remoto
RC-38S
On
Off
Mute
All
AUX
VCR
Volume
FM·AM
TV
CBL·SAT
Track
Chapter
Preset
Channel
Seek
1
2
4
5
7
8
Info
0
191 altavoces
OUT
IN
AUX
VCR
Volume
Seek
Repeat
Shuffle
Personal®
Centro de
música II
Mute
CD·DVD
LOCAL
O
3
6
Repeat
Shuffle
1
2
4
5
9
7
8
Last
Info
3
6
9
Last
0
Código de control remoto = B
SALA A: Cine en casa
Izquierdo
Envolvente
Derecho
Envolvente
Control remoto del
sistema Lifestyle®
Principal
Enlace
Bose®
Módulo
Acoustimass®
Izquierdo
22
Central
Derecho
Centro
multimedia
Configuración de sonido en salas adicionales
Configuración de los controles remotos de otras salas
Para configurar los controles remotos RC-18S o RC-38S:
1. Quite la tapa del compartimiento de pilas del control remoto y busque los
microinterruptores (Figura 19).
2. Compruebe que los ajustes de código doméstico (interruptores 1, 2, 3 y 4) coinciden con
los del control remoto de la sala principal.
Nota: Consulte la guía de usuario del sistema Lifestyle® para obtener más información sobre
cómo utilizar el sistema en varias salas.
Figura 19
ON
Configuración de los
microinterruptores de los
controles remotos RC-18S
y RC-38S
Sala
Sala
Control remoto
RC-18S o RC-38S
Para configurar el Centro de música II Personal®:
Consulte la guía de usuario que se entrega con el centro de música II Personal® si desea
obtener instrucciones para configurar este control remoto en otras salas.
23
Español
3. Este control remoto se envía de fábrica configurado para la sala B. Si va a utilizarlo en
otra sala que no sea contigua, configure los interruptores 6, 7, 8 y 9 con el mismo código
de sala que el amplificador estéreo Lifestyle®.
Configuración de sonido en salas adicionales
Configuración del código de sala del amplificador
El código de sala del amplificador debe coincidir con el código de sala del control remoto
que se usa en la sala donde están instalados los altavoces.
Figura 20
Interruptores del código de sala
Configuración del código
de sala del amplificador
Sala
Español
SA-3
SA-2
24
Sala
Configuración de las funciones avanzadas
Interruptores de modo de amplificador
Las funciones avanzadas del amplificador estéreo Lifestyle® se configuran con los micro
interruptores A, B y C (Figura 21). El SA-3 tiene los tres interruptores; el SA-2 sólo tiene el
interruptor C.
Figura 21
SA-3
SA-2
Interruptor Posición Función
A
Abajo
Salida mono
Arriba*
Salida estéreo
B
C
Abajo*
Arriba
Detección automática de fuente local
desactivada
Detección automática de fuente local activada
Abajo*
Arriba
Amplificador único
Amplificador adicional
*Configuración de fábrica
Salida estéreo o mono (sólo SA-3)
Es posible configurar la salida del amplificador SA-3 como estéreo (interruptor A arriba,
según el ajuste de fábrica) o mono (interruptor A abajo). El modo de salida mono proporciona
el audio de los canales izquierdo y derecho a las salidas izquierda y derecha. Este modo
resulta útil en las situaciones en las que no es viable aplicar una salida estéreo, como cuando
se utilizan altavoces de exteriores en zonas amplias.
Detección automática de una fuente local (sólo SA-3)
Cuando se conecta una fuente a los conectores AUX INPUT (Entrada auxiliar), es posible
configurar los amplificadores para que detecten cuándo se activa esa fuente y pongan
automáticamente el amplificador en modo activo.
El amplificador se entrega con esta función desactivada. Para la detección automática de la
fuente local, ponga el interruptor B arriba.
Amplificadores únicos y adicionales
Si desea abarcar una gran superficie, como un patio exterior, que requiera más de un
conjunto de altavoces, puede instalar amplificadores adicionales. Consulte la configuración
para sala C en “Directrices de instalación en salas adicionales”, en la página 22.
• Deje el interruptor C bajado (es el ajuste de fábrica: modo de amplificador único) en un
amplificador y suba el interruptor C (modo de amplificador adicional) en el resto de los
amplificadores.
• Configure el mismo código de sala del control remoto en todos los amplificadores.
• Ya puede encenderlos y apagarlos, cambiar el volumen o silenciarlos al mismo tiempo con
un único mando a distancia.
25
Español
Micro interruptores SA-2
y SA-3
Mantenimiento del amplificador estéreo Lifestyle®
Limpieza del amplificador
Español
PRECAUCIÓN: Desconecte el cable de alimentación de la salida de CA antes de limpiar el
equipo.
Puede que el amplificador, que está diseñado para utilizarse exclusivamente bajo techo,
acumule polvo con el paso del tiempo. Si necesita limpiar el amplificador, utilice sólo un paño
suave y seco para quitar el polvo del exterior de la caja. Puede usar también el accesorio de
cepillo del aspirador para limpiar las zonas más inaccesibles. NO use disolventes, sustancias
químicas ni soluciones detergentes que contengan alcohol, amoníaco o abrasivos.
Protección del cableado a la intemperie
Aunque ciertos altavoces Bose® están diseñados para usarse al aire libre y han demostrado
ser capaces de tolerar las condiciones climáticas exteriores, los extremos descubiertos de
los cables de altavoz pueden verse afectados por la exposición a la intemperie. Esto es cierto
especialmente en caso de exposición al agua del mar.
Para proteger las conexiones de los cables de altavoz, puede recubrirlas con material de
calafateo siliconizado, como por ejemplo adhesivo RTV. Este producto se consigue
fácilmente en ferreterías. Si decide usar el calafateo, aplíquelo sólo después de conectar los
cables y apretar las perillas. Compruebe el estado del recubrimiento una vez al año, y vuelva
a aplicarlo según la necesidad.
Resolución de problemas
Si experimenta dificultades para utilizar el sistema Lifestyle® después de instalar el
amplificador estereofónico Lifestyle®, siga las directrices que figuran a continuación. Para
obtener asistencia adicional, consulte la sección sobre resolución de problemas de la guía
del usuario. Si el problema persiste, póngase en contacto con un distribuidor de Bose® para
encargar servicio técnico, o bien llame al Departamento de atención al cliente de Bose. En la
lista de direcciones que figura en el embalaje del producto podrá encontrar el número de
teléfono correcto.
Problema
Acción
No funciona ninguno
de los altavoces.
• Asegúrese de que tanto el centro de música Lifestyle® como el amplificador estén enchufados y
encendidos.
• Asegúrese de que los conectores estén insertados por completo y que las salidas estén funcionando.
• Compruebe que se haya seleccionado una fuente de sonido (AM, FM, CD, AUX, etc.). Si se ha seleccionado
CD o AUX, compruebe que haya un CD en el lector, o que esté encendida la fuente conectada a la salida
AUX.
• Si utiliza un centro de música Modelo 20, asegúrese de que el cable de entrada de audio esté enchufado en
la toma SPEAKER ZONE 2.
• Si utiliza un centro de música modelo 5 para cine en casa (sistemas Lifestyle® 12 o Lifestyle® 8), cerciórese
de que el cable de entrada de audio esté enchufado en las salidas FIXED OUTPUT del centro de música. En
este caso, el cable de salida del altavoz que va al módulo Acoustimass® debe conectarse a las tomas en
cascada (o de configuración en Y) del cable de entrada de audio.
• Desconecte los auriculares.
• Compruebe que los interruptores del mando a distancia estén configurados correctamente.
Sólo funciona uno
de los altavoces.
• Compruebe los cables conectados al altavoz que no funcionan.
• Asegúrese de que los cables estén en buenas condiciones y conectados firmemente en ambos extremos.
• Consulte la “Conexión de altavoces al amplificador estereofónico Lifestyle®”, en la página 20.
Uno de los altavoces
sigue sin funcionar.
• Desconecte los cables de ese altavoz y del amplificador. Desconecte el cable del altavoz que funciona y
enchúfelo en el altavoz que no funciona. Si sigue sin funcionar, significa que el problema está en el altavoz.
Si suena, siga probando hasta encontrar el origen del problema.
• Desconecte el mismo cable del amplificador y conéctelo a las demás salidas del amplificador. Si el altavoz
funciona, significa que el problema reside en el cable que se hallaba originalmente conectado a ese altavoz;
si no funciona, es porque el problema reside en ese canal del amplificador.
26
Mantenimiento del amplificador estéreo Lifestyle®
Acción
Los canales de
estéreo derecho
e izquierdo se
reproducen en los
altavoces opuestos.
• Compruebe las conexiones de los cables de altavoz para cerciorarse de que el otro extremo del cable
acoplado a las salidas SPEAKER OUTPUT L esté enchufado al altavoz de la izquierda en el área de
escucha.
• Compruebe las conexiones de los cables de altavoz para cerciorarse de que el otro extremo del cable
acoplado a las salidas SPEAKER OUTPUT R esté enchufado al altavoz de la derecha en el área de escucha.
Los graves o los
agudos son débiles.
• Revise las conexiones de los cables de altavoz; Compruebe que todos los conductores estén
conectados + a + y – a –.
• Consulte “Conexión de altavoces al amplificador estereofónico Lifestyle®”, en la página 20.
Interferencia
• Asegúrese de que los cables de altavoz estén bien insertados en los terminales de las caras posteriores del
altavoz y del amplificador. Asegúrese de que no haya conductores haciendo contacto entre los terminales.
• Consulte “Conexión de altavoces al amplificador estereofónico Lifestyle®”, en la página 20.
El mando a distancia
no permite ajustar el
volumen.
• Asegúrese de que la miniclavija de 3,5 mm está debidamente introducida en el conector SYSTEM
CONTROL 2 (sólo para el centro de música Modelo 5).
• Si utiliza un control remoto RC-20 o RC-5, compruebe que los interruptores estén configurados
correctamente.
• Si utiliza un control de volumen local (VCA), póngalo en posición OFF (apagado).
Volumen
disminuye
súbitamente
• Baje el ajuste de volumen para ver si el nivel vuelve a la normalidad. En caso afirmativo, la pérdida repentina
del volumen es una acción intencional ejecutada por la función de protección contra sobrecargas del
amplificador. Esta función se habilita automáticamente si el volumen está demasiado alto y está
sobrecargando a los altavoces. Elija un volumen más bajo para garantizar un nivel continuo y uniforme.
La Zona 2 no
• Si utiliza un sistema de DVD Lifestyle®, el amplificador estéreo funcionará únicamente si usted fija el
“Protocolo de la zona 2” en “Anterior”. Si desea obtener más información, consulte la guía del usuario del
funciona en absoluto
sistema DVD Lifestyle®.
Servicio al cliente
Para obtener ayuda adicional sobre la resolución de problemas, póngase en contacto con
el Departamento de atención al cliente de Bose®. En la lista de direcciones que figura en el
embalaje del producto podrá encontrar el número de teléfono correcto.
Garantía limitada
El amplificador estereofónico Bose Lifestyle® está amparado por una garantía transferible
limitada de un año. Los detalles sobre la cobertura constan en la tarjeta de registro del
producto que se incluye con el mismo. Sírvase rellenar la sección de información solicitada
y remitir la tarjeta a Bose. En caso de no hacerlo, los derechos de la garantía no resultan
afectados.
Accesorios
• Cable adaptador de enlace al Modelo 5 de Bose® (PN 278128)
• Cable alargador de 15 m de Bose® (PN 275475-050)
27
Español
Problema
Mantenimiento del amplificador estéreo Lifestyle®
Información técnica
Características
• Tecnología de tratamiento de señales digitales patentada por Bose®
• Control digital de volumen incorporado
• Protección contra sobrecargas térmicas
Español
• Patas protectoras de caucho
Voltaje
• EE.UU./Canadá: 120 V
50/60 Hz, 220 W (SA-2), 400 W (SA-3)
• Modelos internacionales: 220-240 V
50/60 Hz, 220 W (SA-2), 400 W (SA-3)
Sensibilidad de entrada
• 0,5 Vrms a 1 kHz
Proporción señal a ruido (S/R)
• 90 dB
SA-2
SA-3
Conectores de
entrada y salida
Conector del control de volumen
VCA
Salidas de altavoz izquierda y
derecha
Entrada y salida de enlace Bose®
Conector del control de volumen
VCA
Salidas de altavoz izquierda y
derecha
Entrada AUX
Entrada y salida de enlace Bose®
Potencia de
salida (promedio
continuo)
40 W mínimo por canal en 6 ohm,
de 30 a 15 kHz, sin más de un
0,5% de D.A.T.
100 W mínimo por canal en 6 ohm,
de 30 a 15 kHz, sin más de un
0,5% de D.A.T.
Dimensiones
14¼" A x 5½" P x 3½" a
(40,1 cm x 27,9 cm x 9,0 cm)
14¼" A x 5½" P x 4¼" a
(36,2 cm x 13,8 cm x 10,7 cm)
Peso
3,42 kg
4,95 kg
Acabado
• Pintura en polvo negra
Recomendaciones sobre los cables
28
Longitud
(máx.)
Calibre
9m
14 m
21 m
0,75 mm2
1,7 mm2
2,0 mm2
Mantenimiento del amplificador estéreo Lifestyle®
Español
29
Informations de sécurité
AVERTISSEMENT : Afin de limiter les risques d’incendie ou d’électrocution, n’exposez pas
l’appareil à la pluie ou à l’humidité.
Français
AVERTISSEMENT : Protégez-le de tout risque de ruissellement ou d’éclaboussure. Ne placez
pas d’objets contenant des liquides, tels que des vases, sur l’appareil. Comme avec tout appareil
électronique, veillez à ne pas renverser de liquides sur aucune partie de l’appareil. Les liquides
peuvent provoquer des pannes et/ou un risque d’incendie.
Ces marquages de SÉCURITÉ sont situés sur le boîtier de votre système :
Le symbole représentant un point d’exclamation à l’intérieur d’un triangle
équilatéral, tel qu’il figure sur le système, signale à l’utilisateur la présence
d’instructions importantes relatives au fonctionnement et à l’e