1
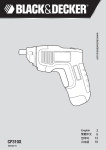
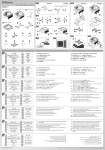
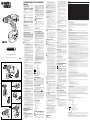
–––––––––––––––––––––––––––––––––––––––––––––––––––––– 12V 10mm Dual Speed Cordless Drill/Driver HM1200 ® –––––––––––––––––––––––––––––––––––––––––––––––––––––– Technical Data –––––––––––––––––––––––––––––––––––––––––––––––– Cordless Drill/ Driver HM1200 –––––––––––––––––––––––––––––––––––––––––––––––– Voltage V 12 –––––––––––––––––––––––––––––––––––––––––––––––– No Load Speed RPM 350/700 –––––––––––––––––––––––––––––––––––––––––––––––– Max. Torque Nm 9 –––––––––––––––––––––––––––––––––––––––––––––––– Drilling Capacity - Wood / Steel mm 13/10 –––––––––––––––––––––––––––––––––––––––––––––––– Chuck Capacity mm 1.0-10 –––––––––––––––––––––––––––––––––––––––––––––––– Weight g 90 0 –––––––––––––––––––––––––––––––––––––––––––––––– Battery –––––––––––––––––––––––––––––––––––––––––––––––– V Voltage 12 –––––––––––––––––––––––––––––––––––––––––––––––– C a pa ci t y Ah 1.2 –––––––––––––––––––––––––––––––––––––––––––––––– g 480 Weight –––––––––––––––––––––––––––––––––––––––––––––––– Charger –––––––––––––––––––––––––––––––––––––––––––––––– Approx. Charging Time Hour 6 –––––––––––––––––––––––––––––––––––––––––––––––– 1 70 Weight g –––––––––––––––––––––––––––––––––––––––––––––––– Intended Use Your Black & Decker drill / screwdriver has been designed for screwdriving applications and for drilling wood, metal and plastics. This tool is intended for consumer use only. Your Black & Decker charger has been designed for charging Black & Decker batteries of the type supplied with this tool. Safety Instructions HM1200 www.blackanddecker.com This manual is applicable for -B1& -KR only Black & Decker Copyright 2007 (Oct–2007) A 4 3 10 11 8 2 9 1 7 6 5 B C 14 12 13 D 5 6 16 11 15 F E 17 3 1 When using power tools, always observe the safety regulations applicable in your country to reduce the risk of fire, electric shock, personal injury and material damage. Read the following safety instructions before attempting to operate this product. Keep these instructions in a safe place! The following symbols are used throughout this manual: Denotes risk of personal injury, loss of life or damage to the tool in case of non-observance of the instructions in this manual. Denotes risk of electric shock. Fire hazard. 1. Keep work area clean. Cluttered areas and benches can cause accidents. 2. Consider work area environment. Do not expose power tool to humidity. Keep work area well lit (250-300 Lux). Do not use Power Tools in the presence of inflammable liquids or gases. 3. Keep children away. Do not let children come into contact with the tool or extension cord. Keep all people away from the work area. 4. Dress properly. Do not wear loose clothing or jewelry. They can be caught in moving parts. Preferably wear rubber gloves and non-slip footwear when working outdoors. Wear protective hair covering to keep long hair out of the way. When working outdoors, preferably wear suitable gloves and non-slip footwear. 5. Personal protection. Always use safety glasses. Everyday eyeglasses only have impact resistant lenses, they are not safety glasses. Use a face or dust mask whenever the operations may produce dust or flying particles. If these particles might be considerably hot, also wear a heat-resistant apron. Wear ear protection whenever the sound level seems uncomfortable, i.e. if the sound pressure stated in this manual exceeds 85 dB(A). 6. Do not overreach. Keep proper footing and balance at all times. 7. Stay alert. Watch what you are doing. Use common sense. Do not operate the tool when you are tired. 8. Secure workpiece. Use clamps or a vice to hold the workpiece. It is safer and it frees both hands to operate the tool. 9. Connecting dust extraction equipment. If devices are provided for the connection of dust extraction and collection ensure these are connected and properly used, especially in confined areas. 10. Remove adjusting keys and wrenches. Always check that adjusting keys and wrenches are removed from the tool before switching on. 11. Use appropriate tool. The intended use is laid down in this instruction manual. Do not force small tools or attachments to do the job of a heavy-duty tool. The tool will do the job better and safer at the rate for which it was intended. Do not force the tool. Warning! The use of any accessory or attachment or performance of any operation with this tool, other than those recommended in this instruction manual may present a risk of personal injury. 12. Check for damaged parts. Before using the tool, carefully check it for damage to ensure that it will operate properly and perform its intended function. Check for misalignment and seizure of moving parts, breakage of parts and any other conditions that may affect its operation. Have damaged guards or other defective parts repaired or replaced as instructed. Do not use the tool if the switch is defective. Have any damaged or defective parts replaced by an authorized repair agent. Never attempt any repairs yourself. 13. Remove the battery. Where the design permits, remove the battery when the tool is not in use, before changing any parts of the tool, accessories or attachments and before servicing. 14. Avoid unintentional starting. Do not carry the tool with a finger on the switch. Be sure that the switch is released when plugging in. 15. Do not abuse cord. Never carry the charger by its cord or yank it to disconnect from the socket. Keep the cord away from heat, oil and sharp edges. 16. Store idle tools. When not in use, power tools must be stored in a dry place and locked up securely, out of reach of children. 17. Maintain tools with care. Keep the tools in good condition and clean for better and safer performance. Follow the instructions for maintenance and changing accessories. Inspect the tool cords at regular intervals and, if damaged, have them repaired by an authorized repair agent. Inspect the extension cords periodically and replace them if damaged. Keep all controls dry, clean and free from oil and grease. 18. Have your tool repaired by an authorized repair agent. This Power Tool is in accordance with the relevant safety regulations. To avoid danger, electric appliances must only be repaired by qualified technicians using original spare parts. Additional Safety Instructions for Batteries and Chargers Batteries 19. Never attempt to open for any reason. 20. Do not expose the battery to water. 21. Do not store in locations where the temperature may exceed 40ºC. 22. Charge only at ambient temperatures between 4ºC and 40ºC. 23. Charge only using the charger provided with the tool. 24. When disposing of batteries, follow the instructions given in the section “Protecting the environment”. 25. Leaks from battery cells can occur under extreme conditions. The battery fluid, a 25-30% solution of potassium hydroxide, can be harmful. In case of skin contact:: (a) wash quickly with soap and water; or (b) neutralize with a mild acid such as lemon juice or vinegar. If the liquid gets into the eyes, flush them immediately with clean water for a minimum of 10 minutes. Seek medical attention. 26. Fire hazard! Avoid short-circulating the contacts of a detached battery (e.g. when storing the battery in a toolbox). Do not incinerate the battery. 27. 28. Do not attempt to charge damaged batteries. Chargers 29. Use your Black & Decker charger only to charge the battery in the tool with which it was supplied. Other batteries could burst, causing personal injury and damage. 30. Never attempt to charge non-rechargeable batteries. 31. Have defective cords replaced immediately. 32. Do not expose to water. 33. Do not open the charger. 34. Do not probe the charger. 35. The charger is intended for indoor use only. Specific Safety Rules 36. Hold tool by insulated gripping surfaces when performing an operation where the cutting tool may contact hidden wiring or its own cord. Contact with a “live” wire will also make exposed metal parts of the tool “live” and shock the operator. 37. When working on a ladder or on scaffolding be sure to lay the tool down on its side when not in use. Some tools with large battery packs will stand upright but may be easily knocked over. 38. Avoid touching the tip of a drill bit just after drilling, as it may be hot. 39. When fitting and changing accessories, always use the instructions supplied with the accessory. 40. Should your tool develop a fault, do not try to fix it yourself, but take it to one of our authorized repair agents. 41. Warning: Some dust created by power sanding, sawing, grinding, drilling, and other construction activities contains chemicals known to cause cancer, birth defects or other reproductive harm. Some examples of these chemicals are: Lead from lead-based paints, • • Crystalline silica from bricks and cement and other masonry products, and Arsenic and chromium from chemically-treated • lumber (CCA). Your risk from these exposures varies, depending on how often you do this type of work. To reduce your exposure to these chemicals: work in a well ventilated area, and work with approved safety equipment, such as those dust masks that are specially designed to filter out microscopic particles. Avoid prolonged contact with dust from power sanding, sawing, grinding, drilling, and other construction activities. Wear protective clothing and wash exposed areas with soap and water. Allowing dust to get into your mouth, eyes, or lay on the skin may promote absorption of harmful chemicals. Labels on your tool They may include the following symbols. V .......... volts A .......... Amperes Hz .......... Hertz W .......... Watts Min. .......... Minutes .......... Alternating current .......... Direct current .......... No load speed no .......... Class II Construction .......... Earthing terminal .......... Safety alert symbol .../min .......... Revolutions or reciprocation per minute .../bpm .......... Beats per minute Save these instructions! push until the battery snaps into place. To remove the battery, push the two release buttons (6) simultaneously when at the same time pulling the battery out of the receptacle. Battery storage and carrying cap (11) is provided for use whenever the battery is out of the tool or charger. Remove cap before placing battery in charger or tool. WARNING! Do not store or carry battery so that metal objects can contact exposed battery terminals. For example, do not place battery in aprons, pockets, toolboxes, product kit boxes, drawers, etc. with loose nails, screws, keys, etc. without battery cap. Without cap in place, battery could short circuit causing fire or burns or damage to battery. • Fitting and Removing a Drill Bit or Screwdriver Bit (Fig. C) N.B. Accessories mentioned in this manual may not neccessarily be included in your pack. The tool is equipped with a keyless chuck to allow for easy exchange of bits. Warning: First remove the battery from the tool. Lock the tool by setting the forward/ reverse slide • (2) to the center position (fig. A). • Open the chuck (4) by turning the front part (12) with one hand while holding the rear part (13) with the other. Insert the bit shank (14) into the chuck. • • Firmly tighten the chuck by turning the front part (12) with one hand while holding the rear part (13) with the other. This tool is supplied with a double-ended screwdriver bit in the bit holder (7) (fig. A). • To remove the screwdriver bit from the bit holder, lift the bit from the recess. • To store the screwdriver bit, firmly push it into the holder. Removing and Refitting the chuck (Fig. D) • • • • • Instruction for Use Always observe the safety instructons and applicable regulations. Let the tool work at its own pace. Do not overload. Use only Black & Decker battery packs and chargers. Charging the Battery (Fig. A) • • • • • • • • • • • Double Insulation The tool is double insulated. Double insulation means that all the external metal parts ar e electrically insulated from the mains power supply. This is done by placing insulated barriers between the electrical and mechanical components so as to making unnecessary for the tool to be earthed. Note: Double insulation does not take the place of normal safety precautions when operating this tool. The insulation system is for added protection against injury resulting from a possible electrical insulation failure within the tool. Using an Extension Cable An extension cable should not be used unless absolutely necessary. Use of an improper extension cable could result in a risk of fire and electric shock. If an extension cable must be used, use only those that are approved by the country’s Electrical Authority. Make sure that extension cord is in good condition before using. Always use the cord that is suitable for the power input of your charger (see technical data on name plate). When using a cable reel, always unwind the cable completely. Features (fig. A) 1. 2. 3. 4. 5. 6. 7. 8. 9. 10. 11. Two-speed on / off switch Forward / reverse slider Mode selector/ torque adjustment collar Chuck Battery Battery release button Bit holder Charger connector Charger plug Charger Battery Cap • • • • Fitting and Removing the Battery (Fig. B) • To fit the battery (5), line it up with the receptacle on the tool. Slide the battery into the receptacle and A forward / reverse control slider (2) determines the direction of the tool and also serves as a lock off. For drilling and for tightening screws, use forward (clockwise) rotation. For loosening screws or removing a jammed drill bit, use reverse (counterclockwise) rotation. To select forward rotation, push the forward/reverse slider (2) to the left. To select reverse rotation, push the forward/reverse slider to the right. To lock the tool, set the forward/reverse slider into the center position. Selecting the Operating Mode or Torque (Fig. E) This tool is fitted with a collar to select the operating mode and to set the torque for tightening screws. Large screws and hard work piece materials require a higher torque setting than small screws and soft work piece materials. The collar has a wide range of settings to suit your application. • For drilling in wood, metal and plastics, set the collar (3) to the drilling position by aligning the symbol with the marking (17). • For screwdriving, set the collar to the desired setting. If you do not yet know the appropriate setting, proceed as follows: • Set the collar (3) to the lowest torque setting. • Tighten the first screw. • If the clutch ratchets before the desired result is achieved, increase the collar setting and continue tightening the screw. Repeat until you reach the correct setting. Use this setting for the remaining screws. Switching On and Off (Fig. A) • Assembly and Adjustment Prior to assembly and adjustment always unplug the tool. The battery needs to be charged before first use and whenever it fails to produce sufficient power on jobs that were easily done before. A new battery, or a battery that has not been used for an extended period of time, achieves full performance only after approximately 5 charging and discharging cycles. The battery may become warm while charging; this is normal and does not indicate a problem. Do not charge the battery at ambient temperatures below 4ºC or above 40ºC. Recommended charging temperature is aprproximately 24ºC. No not use the charger supplied with this tool to charge any other tool or battery. To charge the battery, make sure that it is fitted on the drill. Insert the charger plug (9) into the connector (8). Plug in the charger (10). Switch on at the mains. Your power pack was sent from the factory in an uncharged condition. Before attempting to use it, it must be charged for at least 9 hours. After normal usage, your power pack should be fully charged in 3 to 6 hours. If the power pack is run-down completely, it may take up to 6 hours to become fully charged. If the power pack does not charge properly – ( i ) Check current at receptacle by plugging in a lamp or other appliance. ( ii ) Check to see if receptacle is connected to a light switch that turns power off when you turn out the lights. ( iii ) Move charger and power pack to a surrounding air temperature of 4ºC to 40ºC. ( iv ) If the receptacle and temperature are OK, and you do not get proper charging, take or send the power pack and charger to your local Black & Decker service center. To prolong power pack life, avoid leaving the power pack on charge for extended periods of time (over 30 days without use). Although overcharging is not a safety concern, it can significantly reduce overall power pack life. Before using the tool, unplug the charger and disconnect the tool from the charger. When disconnecting the tool from the charger, be sure to unplug the charger from the outlet first then disconnect the charger cord from the tool. Do not use the tool while it is connected to the charger. Selecting the Direction of Rotation (Fig. A) Electrical safety The electric motor has been designed for one voltage only. Always check that the power supply corresponds to the voltage on the rating plate. Warning: Never connect the live (L) or neutral (N) wires to the earth pin marked E or . Open the chuck jaws as far as possible. Insert a screwdriver into the chuck and remove the chuck retaining screw (15) by turning clockwise as shown. Tighten an Allen key (16) (not supplied) into the chuck and strike it with a hammer as shown. Remove the chuck by turning it counterclockwise. To refit the chuck, screw it onto the spindle and secure it with the chuck retaining screw. • To switch the tool on, press the on/off switch (1). When slightly pressing the switch, the tool will run at low speed. When pressing the switch further, the tool will run at high speed. To switch the tool off, release the variable speed switch. Handy Hints Drilling WARNING: Drill may stall (if overloaded or • • • • • • • • • improperly used) causing a twist. Always expect the stall. Grip the drill firmly to control the twisting action (see Fig. F) and prevent loss of control that could cause personal injury. If a stall does occur, release the trigger immediately and determine the reason for the stall before re-starting. Do not click the trigger of a stalled drill off and on in an attempt to start it. Damage to the drill can result. Always apply a light pressure in a straight line with the drill bit. Run the drill very slowly, using light pressure, until the hole is started enough to keep the drill bit from slipping out of it. Use a block of wood to back up work pieces that may splinter. Use spade bits when drilling large diameter holes in wood. Use HSS drill bits when drilling in metal. Use a lubricant when drilling metals other than cast iron and brass. Make an indentation using a center punch at the center of the hole to be drilled in order to improve accuracy. Keep the motor running while pulling the bit out of a drilled hole. This will help reduce jamming. When using twist drill bits to drill holes in wood, it will be necessary to pull the bits out frequently to clear chips from the flutes. Screwdriving • • • Always use the correct type and size of screwdriver bit. If screws are difficult to tighten, try applying a small amount of washing liquid or soap as a lubricant. Always hold the tool and screwdriver bit in a straight line with the screw. Maintenance Your Black & Decker power tool has been designed to operate over a long period of time with a minimum of maintenance. Continuous satisfactory operation depends upon proper tool care and regular cleaning. Regularly clean the ventilation slots in your tool • using a soft brush or dry cloth. Regularly clean the motor housing using a damp • cloth. Do not use any abrasive or solvent-based cleaner. • Regularly open the chuck and tap it to remove any dust from the interior. This tool is not user-serviceable. Take it to an authorized Black & Decker repair agent for service. Your charger does not require any maintenance apart from regular cleaning. Unplug the charger before cleaning it. Important To ensure product SAFETY and RELIABILITY, repairs, maintenance and adjustment (other than those listed in this manual) should be performed by authorized service centers or other qualified organizations, always using identical replacement parts. Unit contains no user serviceable parts inside. Accessories The performance of any power tool is dependent upon the accessory used. Black & Decker accessories are engineered to high quality standards and are designed to enhance the performance of your power tool. By using Black & Decker accessories you will get the very best from your tool. The following accessories should be used only in the sizes specified below: Bit for metal drilling - up to 10mm Bit for masonry drilling - up to 10mm Bit for wood drilling - up to 13mm. Black & Decker offers a large selection of accessories available at our local dealer or authorized service center at extra cost. CAUTION: The use of any non-recommended accessories may be hazardous. Protecting The Environment Rechargeable Batteries This product uses nickel-cadmium (NiCd) rechargeable and recyclable batteries, which can be charged many times to give long life and Cd repeatedly full power. This symbol indicates the NiCd batteries contained within this unit must be disposed of properly and not discarded in everyday household waste, which may be disposed of in an incinerator or landfill site. NiCd batteries can be harmful to the environment and can explode when exposed to fire. Do NOT incinerate or composted. Please think of the protection of our environment. Therefore, when the batteries no longer hold a charge, they should be removed from the tool and recycled. Black & Decker recommends the following: • Discharge batteries completely by running the unit until the energy is completely discharged and then remove from the tool. Place the battery in suitable packaging to ensure that the terminals cannot be short circulated. • Take the battery pack to your local recycling station. If necessary, contact your local municipality for proper disposal instructions in your city/town. The collected batteries will be disposed of properly and/ or used for recycling purposes whilst protecting the environment. Note: you as a customer are responsible for proper disposal or recycling of the battery pack. Unwanted Tools Should you find one day that your tool needs replacement, or if it is of no further use to you, think of the protection of the environment. Black & Decker recommends you to contact your local council for disposal information. Service Information Black & Decker offers a full network of company-owned and authorized service locations throughout Asia. All Black & Decker Service Centers are staffed with trained personnel to provide customers with efficient and reliable power tool service. Whether you need technical advice, repair, or genuine factory replacement parts, contact the Black & Decker location nearest to you. Notes • • • • Black & Decker’s policy is one of continuous improvement to our products and, as such, we reserve the right to change product specifications without prior notice. Standard equipment and accessories may vary by country. Product specifications may differ by country. Complete product range may not be available in all countries. Contact your local Black & Decker dealers for range availability. HM1200 12V 10mm Dual Speed Cordless Drill / Driver Data Teknis Cordless Drill / Driver HM1200 Input Daya V 12 Kecepatan tanpa beban RPM 360/700 Max. Torgeu Nm 9 Kapasitas Drill- Kayu / Logam mm 13/10 Kapasitas chuck mm 1.0-10 Berat g 900 Batery Input Daya V 12 Kapasitas Ah 1.2 Berat g 480 Charger Kapasitas masa charging jam Berat g 6 170 Kegunaan Black & Decker drill / screwdriving Anda telah dirancang sesuai untuk kegunaan kayu lunak, logam, plastik juga screwdriving. Petunjuk keselamatan Sewaktu menggunakan power tool, selalu patuhi peraturan keselamatan yang berlaku di negara Anda untuk mengurangi risiko kebakaran, kejut listrik, cedera pribadi dan kerugian materi. Baca petunjuk keselamatan berikut sebelum mencoba mengoperasikan produk ini. Simpan petunjuk-petunjuk ini di tempat yang aman! • Menunjukkan risiko kecelakaan diri, kematian, atau kerusakan pada alat, jika tidak menuruti petunjuk-petujuk pemakai manual ini. • Menunjuk risiko terhadap kejutan listrik. • Kebakaran Tempat kerja 1) Jaga agar tempat kerja bersih. Tempat kerja dan bangku yang berserakan dapat mengakibatkan kecelakaan. 2) Pertimbangkan lingkungan daerah kerja. Jaga agar power tool tidak terkena kelengasan. Jaga agar tempat kerja mempunayai cukup cahaya. Jangan gunakan Power Tool jika terdapat cairan atau gas yang mudah tebakar. 3) Jauhkan dari jangkauan anak-anak. Jangan biarkan anak-anak menyentuh alat atau kabel perpangjang. Jauhkan semua orang dai tempat kerja. 4) Berpakaian rapi. Jangan memakai baju yang longgar atau pehiasan. Baju yang longgar dan perhiasan dapat tersangkut pada bagian-bagian yang bergerak. Lebih baik memakai sarung tangan karet dan sepatu yang tidak licin bila bekerja di lapangan. Pakailah penutup sebagai pelindungan bagi rambut panjang. 5) Keselamatan peribadi. Pakailah kacamata pelindung. Pakailahjuga pelindung muka atau penutup hidung kalau-kalau pengoperasian menimbulkan debu atau partikel yang beterbangan. Ambillah tindakan yang sesuai untuk melindungi pendengaran bila tekanan suara melewati 85dB(A). 6) Jangan menjangkau terlampau jauh. Jaga penempatan posisi kaki dan keseimbangan yang baik setiap saat. 7) Waspada. Perhatikan apa yang sedang Anda lakukan. Gunakan akal sehat. Jangan gunakan alat sewaktu Anda merasa lelah. 8) Bahan yang dikerjakan harus kokoh. Gunakan klem atau vice untuk menahan bahan yang dikerjakan. Lebih aman dan bebas apabila kedua tangan mengoperasikan alat. 9) Ekstraksi debu. Jika alat disediakan untuk dihubungkan ke penghisap dan pengumpul debu, pastikan bahwa alat-alat ini terhubung dengan baik, terutama di tempat-tempat tertutup. 10) Lepaskan kunci penyetel dan kunci inggris. Selalu periksa bahwa kunci penyetel dan kunci inggris dilepaskan dari alat sebelum dinyalakan. 11) Gunakan alat yang benar. Penggunaan yang dimaksud dijabarkan dalam buku manual instuksi ini. Jangan memaksa alat-alat kecil atau bagian-bagian tambahannya untuk melakukan pekerjaan alat pekerjaan berat. Alat akan melakukan pekerjaan lebih baik dan lebih aman apabila digunakan pada kisaran yang dimaksud. Jangan memaksa alat. Perhatian! Penggunaan aksesoris atau bagian tambahan atau kinerja pengoperasian dengan alat ini, selain yang dianjurkan dalam buku manual instruksi dapat mengakibatkan risiko cedera peribadi. 12) Pemeriksaan bagian-bagian yang rusak. Sebelum menggunakan alat, periksa dengan teliti apakah terdapat kerusakan untuk memastikan bahwa alat beoperasi dengan benar dan melakukan fungsi yang dimaksud. Periksa apakah terdapat ketidak-sejajaran dan goncangan pada bagian-bagian yang bergerak, kerusakan pada bagian alat dan kondisi-kondisi lain yang mungkin dapat mengpengaruhi pengoperasiannya. Penahan yang rusak atau bagian yang cacat lainnya harus diperbaiki atau diganti sesuai dengan instruksi. Jangan gunakan alat jika sakelarnya cacat. Bagian-bagaian yang rusak atau cacat harus diperbaiki oleh agen reparasi resmi. Jangan upayakan untuk melakukan perbaikan sendiri. 13) Keluarkan aki. Keluarkan aki sekiranya anda tidak menggunakan alat atau menukar aksoseris. 14) Hindari memulai alat dengan tidak sengaja. Jangan membawa alat dengan steker terancap dengan jari di sekelar. Pastikan bahwa sakelar dilepaskan sewaktu steker terancap. 15) Jangan menyalahkan-gunakan kabel. Jangan membawa alat dengan kabelnya atau menariknya untuk mencabut dari stopkontak. Jauhkan kabel dari panas, minyak dan ujung yang tajam. 16) Simpan alat-alat yang tak terpakai. Sewaktu tidak digunakan, alat harus disimpan di tempat yang kering dan dikunci dengan aman, jauhkan dari jangkauan anak-anak. 17) Pelihara alat dengan teliti. Simpan alat dalam keadaan baik dan bersih untuk kinerja yang lebih baik dan lebih aman. Ikuti petunjuk untuk pemeliharaan dan penggantian aksesori. Simpan semua handle dalam keadaan kering, bersih, dan bebas dari minyak dan oli. 18) Alat harus direparasi oleh agen reparasi resmi. Power tool ini sesuai dengan peraturan keselamatan yang bersangkutan. Untuk mencegah bahaya, alat-alat listrik boleh direparasi oleh teknisi yang memenuhi syarat. Keselamatan tambahan bagi Aki dan Charger Aki • Jangan membuka aki. Ada bahaya terjadinya korsleting • Jauhkan aki dari terkena air o • Jangan simpan aki di tempat yang boleh melebihi 40 C o o • Charger hanya sesuai di simpan di antara 4 Cdan 10 C • Hanya gunakan charger yang sesuai dengan alat anda • Janganlah membuang aki kedalam sampah rumah tangga, kedalamapi atau kedalam air.Aki sebaliknya sebaliknya dikumpulkan, didaur ulangkan atau dibuang sesuai dengan usaha untuk melestarikan alam • Jika aki tidak digunakan dengan betul, dapat keluar cairan dari aki. Jagalah supaya anda tidak terkena pada cairan ini, Jika secara tidak disengaja anda terkena pada cairan ini, cucikan dengan air. Jika cairan tersebut terkena pada mata, selain itu mintakan bantuan dari seorang docter. Cairan yang kekuar dari aki dapat mengakibatkan gangguan kulit atau kebakaran Charger Gunakan charger Black & Decker anda dengan aki yang sesuai. Aki yang berlainan dengan charger boleh terbakar dan mencederakan • Jangan charge aki yang sudah lama tidak di pakai • Segera tukar kabel sekiranya kabel sudah rusak • Jauhkan charger dari terkena air • Jangan mencuba membuka atau membetulkan charger • Charger hanya sesuai untuk kegunaan di dalam rumah Petunjuk Keselamatan Pegang alat di permukaan pegangan beinsulasi sewaktu mengoperasikan alat di mana alat pemotong mungkin akan bersentuh dengan kabel tersembunyi atau kabelnya sendiri. Bersentuhan dengan kabel kawat, hidup” akan menyebabkan bagian-bagian logam alat yang terpapar menjadi hidup” dan menimbulkan kejut listrik operator. • Sekiranya anda mengunakan tangga untuk membuat sesuatu kerja, pastikan anda baringkan alat anda di posisi yang betul. • Jangan memegang mata obeng selepas anda menggunakan alat kerana mata obeng mungkin panas. • Semasa memasang atau menukar aksesoris, gunakan panduan ynag di sediakan. • Sekiranya ada kerosakkan pada alat anda, segera bawa alat anda ke agen reparasi terdekat anda. Peringatan! Sebagian debu yang dihasilkan oleh mengampls, menggergaji, menggerinda, membor dan kegiatan konstruksi lain yang mengandung bahan kimia yang diketahui dapat menyebabkan kanker, cacat lahir atau bahaya reproduktif lain. Beberapa contoh bahan kimia adalah: • Timah dari cat yang terbuat dari timah • Silica kristalin dari batu bata dan semen dan produk-produk bahan banganan lainnya • Arsenik dan kromium dari chemically-treated lumber (CCA) Label-label pada alat Termasuk simbol-simbol berikut: V………………….voltase A………………….ampere Hz…………………Hertz W………………….Watt Min………………..Menit …………………..arus listrik bergantian AC/DC ……………….arus listrik langsung no …………………kecepatan tanpa beban ………….. Konstruksi Kelas II ………….. termonal arde ………….. symbol kewaspadan untuk keselamatan …/min ……….…... Revolusi atau resiprokasi per menit …/bpm …………… Detak per menit Insulasi Ganda Alat anda ini di ‘insulasi ganda’ kan untuk memberikan pengamanan tambahan. Ini berarti bahwa alat ini seluruhnya dikonstruksikan dengan insulasi yang terdiri dari dua lapisan yang terpisa, atau dengan sebuah insulasi yang tebalnya dobel antara anda dan system listrik ini. Cacatan: Insulasi ganda ini bukan untuk menggantikan tindakan pencegahan yang biasanya berlaku pada pengoperasian alat ini. Sistem insulasi yang kwalitasnya ditingkatkan ini, adalah sebagai perlindunggan tambahan terhadap kecelakaan, yang diakibatkan oleh kerusakan pada listrik yang dapat terjadi dalam peralatan. Keselamatan Listrik Motor listrik ini didesain hanya untuk tingkat voltase tertentu saja. Anda harys selalu mengecek suplai tenaga listrik sesuai dengan voltase yang dicantumkan pada alat pada pelat data-data. Peringatan! Jangan sambungkan kabel kawat hidup (L) atau neutral (N) ke penjepit arde yang bertanda (E) Kabel Perpanjangan Kabel perpanjangan tidak boleh digunakan kecuali jika mutlak perlu. Penggunaan kabel perpanjangan yang tidak sesuai dapat mengakibatkan risiko kebakaran atau kejut listrik. Jika kabel perpanjangan harus digunakan, hanya gunakan kabel yang telah dijinkan oleh Otoritas Listrik negara bersangkutan. Pastikan bahwa kabel perpanjangan dalam dalam kondisi baik sebelum digunakan. Selalu gunakan kabel yang sesuai untuk input daya charger anda ( lihat data teknis pada plat nama). Sewaktu menggunakan gulungan kabel, selalu lepaskan kabel secara keseluruhan. Pejelasan (Fig. A) 1) Dua speed sakelar on/off 2) Penggeser maju/mundur 3) Ring untuk menyentel momen putar 4) Cekaman mata bor yang dikunci dan dibuka dengan tangan 5) Aki 6) Gagang pelepas untuk bateri 7) Tempat menyimpan bit/mata obeng 8) Penyambung untuk charger 9) Adapter 10) Charger 11) Penutup bateri Perakitan dan Penyetelan Sebelum perakitan dan penyetelan, selalu cabut steker alat. Memasang dan Mengeluarkan Aki ( Fig B) • Untuk memasang aki (5) dorong aki kedalam celah di bahgian belakang alat. • Pastikan aki betul-betul masuk kedalam celah alat • Untuk lepaskan aki dari alat, tekan kedua-dua tombol (6) tarik bateri kebelakang dari gagang alat. Penutup aki (11) harus di gunakan untuk menutup bateri sekikanya alat tidak digunakan. Buka penutup aki sekiranya anda ingin menggunakan alat atau anda ingin charge aki anda. Peringatan! Jangan simpan atau bawa aki anda ke tempat yang boleh merusakkan aki anda. Contoh : Jka aki tidak digunakan, jauhkan aki dari klip kertas, uang logam, kunci,paku, sekrup atau benda-benda kecil dari logam lainnya,yang dapat menjembatani kontak-kontak. Korseleting antara kontak-kontak aki dapat mengakibatkan kebakaran atau api. Memasang dan mengeluarkan bit dan mata obeng (fig. C) N.B. Aksesori yang tertaluk di dalam manual ini tidak semestinya akan datang dengan alat ini. Alat ini dipasang dengan keyless chuck supaya senang menukar bits. Peringatan! Keluarkan bateri dari alat • Untuk menggunci alat, tekan penggeser maju/mundur(2) diposisi tengah (fig.A) • Buka chuck (4) dengan memutar selubung (12) berlawan arah jarum jam dengan satu tangan, sementara memegang bagian belakang (13) dengan sebelah tangan • Masukkan bits ke dalam chuck • Ketatkan chuck dengan memutar (12) kearah jarum jam dengan satu tangan, sementara memegang bagian belakang (13) dengan sebelah tangan Alat ini datang dengan bits yang berlainan di tempat penyimpan bits (7) (fig. A) • Untuk mengeluarkan bits, tarik bits ke atas dengan pelahan • Untuk meyimpan bits, tekan bits dengan pelahan ke dalam penyimpan bits Melepaskan dan memasang chuck (fig. D) • Buka gigi chuck sejauh mungkin • Masukkan obeng ke dalam chuck dan lepaskan sekrup penahan chuck (15) dengan memetar berlawanan arah jarum jam • Kencangkan kunci Allen ke dalam chuck dan pukul dengan palu seperti yang di tujukan • Putar chuck ke arah berlawan arah jarum jam • Untuk memasang chuck, putarkan chuck ke dalam shaft kearah jarum jam dan ketatkan chuck dengan menggunakan sekrup Petunjuk untuk pemakai • Ikutilah selalu prosedur untuk keselamatan serta peraturan-peraturan yang telah di sediakan • Gunakan sedikit tekanan saja. Tekanan berlebihhan tidak mempercepat pengeboran, tetapi mengurangi kinerja alat dan dapat memperpendek usia alat • Gunakan Aki dan Charger Black & Decker sahaja Charging bateri (fig. A) • Aki harus di charge terlebih dahulu sebelum di gunakan • Aki yang baru atau yang sudah lama di tidak dipergunakan, setelah kira-kira 5 kali diisi dipakai mencapai dayanya yang maksimal • Aki akan menjadi panas semasa di charge o o o • Jangan charge aki di bawa suhu 4 C atau melebihi 40 C. Suhu yang sesuai ialah 24 C • Jangan menggunakan aki yang tidak sesuai untuk chgarger yang terdapat pada alat ini • Pastikan aki berada di alat semasa menggecharge • Dorong charger (10) kedalam kontak • Untuk menggunakan alat yang baru di beli, aki harus di charge lebih kurang 9 jam • Selepas menggunakan alat, aki harus dicharge 3 hingga 6 jam. Ia mengambil masa 6 jam sekiranya bateri betul-betul kehabisan • Sekiranya aki yang sedang di charge mengalami kerosakkan, (i) periksa plug anda. (ii) periksa dan pastikan o o penggeser maju/mundur di posisi tenggah. (iii) Bawa alat anda di tempat suhu 4 C hingga 40 C. (iv) Sekira ia benar –benar rusak, bawa aki dan charger anda ke agen reparasi Black & Decker resmi yang terdekat • Untuk menggaja aki dengan baik, jangan tinggalkan aki terisi penuh lebih dari 30 hari. Aki akan cepat rusak sekiranya di biar begitu sahaja • Sebelum mengunakan alat, cabut charger dari alat dan tanggalkan alat dari charger • Bila tanggalkan alat dari charger, pastikan cabut charger dari kontaknya dahulu • Jangan mengunakan alat semasa adapter chager masih ada di belakang alat Pilih arah rotasi (fig. A) • Penggser maju/mundur (2) adalah untuk memilih arah rotasi. Ia juga boleh di gunakan untuk menggunci alat. Untuk perakitan atau penyetelan sekrup pilih posisi maju. Untuk melepaskan mata obeng pilih posisi mundur • Untuk memilih rotasi maju, dorong penggeser maju/mundur (2) ke kiri • Untuk memilih rotasi mundur, dorong penggeser maju/mundur ke kanan • Untuk menggunci alat, dorong penggeser maju/mundur ke posisi tenggah Menyentel momen putar (fig.E) • Alat ini telah di sediakan dengan menyentel momen putar. Dengan cara melakukan uji coba sebelumnya didapatkan penyetelan mana dari 17 penyetelan dari ring untuk menyentel momen putar (3) yang memasukkan sekrup tanam sama rata pada pemukaan bahan. • Untuk menggunakan membor kayu, logam dan plastik putar menyentel momen putar (3) ke arah (17) • Untuk penyetelan sekrup, putar menyentel momen ke posisi yang di inginkan Jika anda tidak pasti, sila ikut arahan berikut: • Putar menyentel momen (3) ke tahap yang rendah • Tanam sekrup sama rata dengan permukaan bahan • Jika setelan momen putar betul, akan meleset klos keselamatan putar segera setelah permukaan sekrup tanam sama rata dengan permukaan bahan atau momen putar yang disetelkan sebelum tercapai Menghidup dan matikan (fig. A) • Untuk menhidupkan alat, tekan sakelar (1) • Tekanan pada sakelar variable menentukan kecepatan alat • Untuk menghentikan alat, lepaskan sakelar kecepatan variable Peringatan! Alat akan terkunci sekiranya terlalu banyak tekanan pada bahan yang dikerjakan • Jangan menghidup-matikan alat yang mogok untuk menyalakanya, ia dapat mengakibatkan kerusakkan pada alat • Selalu gunakan tekanan pada garis lurus di mata bor • Gunakan tekanan yang cukup untuk menjaga mata bor tetap menggigit • Gunakan twist bit,spade bit atau hole saw untuk menggebor kayu • Gunakan HSS bit untuk menggebor logam • Beri lapisan minyak yang tipis pada mata bor sekiranya menggerbor logam • Jaga agar motor tetap berjalan sambil menarik mata bor keluar dari lobang Screwdriving • Selalu gunakan mota obeng yang sesuai untuk digunakan • Sekiranya sekrup tidak merembes ke dalam bahan beri lapisan minyak yang tipis pada mata sekrup Pemeliharaan Power tool Black & Decker telah dirancang untuk beroperasi selama jangka waktu yang panjang dengan pemeliharaan minimum. Pengoperasian yang memuaskan secara terus-menerus tergantung pada perawatan alat yang benar dan pembersihan tetap. Peringatan! Keluarkan Aki dari ini sebelum membuat pemeliharaan. • Jaga agar celah ventilasi bersih dan bersihkan kerangka mesin secara teratur dengan kain lembut. • Bagian luar dapat dibersihkan dengan kain lembab. Jangan gunaka cairan pelarut. Alat ini tidak boleh diservis oleh pemakai. Bawa alat ke agen reparasi resmi BLACK & DECKER. Reparasi hanya dapat dilakukan oleh teknisi yang memenuhi syarat; jika tidak dapat menimbulkan bahaya bagi pemakai. Aksesori Kinerja power tool tergantung pada aksesori yang digunakan. Aksesori Black & Decker dan Piranha dirancang sampai standar kualitas tinggi dan dirancang untuk meningkatkan kinerja power tool. Membeli aksesori Black & Decker akan memastikan bahwa Anda mendapatkan yang terbaik dari alat Black & Decker Anda. • Bit untuk logam – 10mm • Bit untuk tembok – 10mm • Bit untuk kayu –13 mm Black & Decker menawar pilihan luas aksesori yang tersedia di dealer setempat atau pusat servis resmi dengan ongkos tambahan Melindungi Lingkungan Jika suatu hari Anda mendapatkan product BLACK & DECKER Anda perlu diganti, atau jika tidak lagi berguna bagi Anda, jangan membuangnya bersama limbah rumah tangga. Produk ini harus diambil terpisah. Pengambilan produk-produk bekas dan pengemasannya secar terpisah memungkinkan bahan didaur-ulang dan digunakan kembali. Penggunaan-ulang bahan yang didaur ulang membantu mencegah polusi lingkungan dan mengurangi permitaan akan bahan mentah. Informasi Servis Black & Decker menawarkan jaringan lengkap lokasi servis sah yang dimiliki perusahaan di seluruh Asia. Semua Pusat Servis Black & Decker mempunyai staf yang terdiri dari personil terlatih untuk memberikan servis power tool yang efisien dan handal. Apakah anda memerlukan nasehat teknis, reparasi, atau bagian pengganti pabrik orisinil, sila hubungi lokasi Black & Decker yang terdekat dengan anda. Catatan • Kebijakan Black & Decker merupakan salah satu perbaikan terus – menerus terhadap produk kami, dan dengan demikian kami mempunyai hak untuk mengganti spesifikasi produk tanpa pemberitahuan sebelumnya. • Perlengkapan dan aksesori standar dapat berubah menurut negara. • Jenis produk lengkap tidak tersedia di semua negara. Hubungi dealer Black & Decker setempat anda untuk jenis – jenis yang tersedia. 12V 10mm ͕՜ؼμҢμШޭՅ HM1200 Ɂ٣Ѵ ӺؚμҢμШޭՅ 05 36. ຫఋ൘ Ⴎ൝ང ෧ን ၁ ၵ࿕ၕ ዻ௴ ઠဨ લૐ ຫဧዻხ ྨၕ ಕ௴ લૐ ၒച ጠ ྤ ཊགྷ. ఝဧ ሽ൘ ኟၕ ຫဧዻ௴ લૐ௴ ໞါ ༘௴ ၰၒ ༱ ࿌ჵఁఋ. 37. ൛ ၵ࿕ၦ ୵ ፎ ച ൛ ๗ቼ ୵ၕ ၼხ ൠཊགྷ. ൯ဨ ್આཀఁఋ. 38. ิዜၕ ୶ဨ ોᅰዾ ઠဨ གྷ ิዜ ጀନ ႞લౘ ხᆹ ጸၨዻཊགྷ. 39. લૐ බ႞ਜ਼ ແૺඓ ຫဧၴਜ਼ ჯႚ ༘൘ዻხ ધ લၨ ༘൘ ૺຫ ൭ૺཊགྷ. 40. ઠધ: ႖ ົಉ, ჲ, ൠ, ൛ၦ ૺረ ઁ໕ ၵ࿕ თ ෧ແዽ ึჰ௴ ྭ, ၉ຮ ౾ၕ ၉෧གྷሠ௴ ጷዼමჲၦ ዅጀ࿌ ၰཀఁఋ. ၦዽ ጷዼ මჲၡ ௴ ఋၗ ੪ཀఁఋ. இ ໜึ ኲၨቼၡ இ ด, གྷඊቼ ෟ ૺረ ໐Ⴎ લຫ ෧ແዻ௴ ሙ൘༺ራ൚ ཇ൘ᆽ ጷዼ ᅧ൘ ඛႁ(CCA) અᆖ௴ ๗ ෟ ሙഞ ၦ౹ මჲ ிᆖౙ ઠဨ ཉੜዽ ཅᅰ ືጄ ၮၕ ༘ ၰધ, ຫધ௴ ၵ࿕ ๙ ๗ഖጁఁఋ. ጷዼ මჲ ఝዽ ிᆖၕ ბၦૺ ၁ጄ௴ ጹૺਜ਼ ၹ௴ લ ၵ࿕ጄ ዻඑ ึჰ ൠ༺ሙ( ුໞึၴଆხ ઃஒ ༘ ၰഛ ધྦౘ ઇ)౾ၡ ྦ႖ ၿ๗ ᅎဧዻഛ ዻཊགྷ. ႖ྮ V 12 ඳิዻ ፂ႖༘ RPM 350/700 ᆊఝ ቔሙ Nm 9 ൛ ૐඅ ሙૺ-ඛႁ/ᅪႁ mm 13/10 ᅨ ሙૺ mm 1.0-10 თ g 900 ႖ྮ V 12 ဧ Ah 1.2 თ g 480 ǹȗިШԺ ǹȗޞ͒ܤǻƱޛɁੴƢਘڊΞ͈͒ڇܓ ఝ႕ၨ ᆚ႖ གྷ གྷ 6 თ g 170 ยቼ ྭኲ࿌ ጘ്ᆫ ဉቼ ึ ો ჯ ඳิዻ ፂ႖༘ ၦთ ႗ ႚხ ఎၴ ྦ႖ ઠધ ૺጭ ึఙ ፂ႖༘ ವ௴ ထฟ༘ ึఙ ረગ༘ ሽ൘ ᆚ႖ૺ ݮΌ Black&Decker൛/ೡၦ௴ ༺ሙೡၦ ၵ࿕ ඛႁ, ᅪႁ ෟ ዯೡ༺ኋၕ ఝືၒച ዻ௴ ൛ ၵ࿕ၕ ၁ጄ ໕ઢ࿘ཀఁఋ. ม લૐ௴ ਜ਼ႜဧၒചൢ ຫဧዻഛ ࿌ ၰཀఁఋ. લૐဉ ጀନ ႞લౘ ၉ጨၡ Black&Deckerሽ൘ ᆚ႖ዻඓ གྷ Black&Deckerᆚ႖ૺ ຫဧጄ ጁఁఋ. ۭߝ࠵ऀ ߝΖǹȗҗݮײϜ߈ƩߝੋࢷڌԦߥਣވިؾਜ਼ޭ࠘ޜɁੋވƣȘƢܤ ߜݮΞ̻ۭߝȳࣻࠗޜٟੂ݃ڊڑըߥਣޜΖੂɁߝ݃ڊڑޙޱޜऀ࠵ߝۭިޞ͒ܤ ϼը࠵ऀؖҗۭߝ߆ܤػեǽੂ݃ڊڑ. ఋၗၔ ม ໕ ຫဧ௴ ૺጭၮఁఋ. ม ໕ၡ ხᆹၕ ა༘ዻხ ྨၔ ઠဨ ረஃ ༘ ၰ௴ ཅᅰ ືጄ, ແ ఎᆔ, ವ௴ લૐ ືၡ ၁ጔၕ ረஔఁఋ. ႖ၡ ၁ጔၕ ረஔఁఋ. ጷႁ ၁ጔၕ ረஔఁఋ. ܜǹƤࢶޜǢੂǕ݃ڊڑੂ࠵ސၵ࿕લၦ ຮൢዽ ၡ ၵ࿕ၔ ຫધਜ਼ ෧ແዾ ၁ጔၦ ைཀఁఋ. ܜǹƤިǧޜǮєੂ ݃ڊڑ႖ લૐ ཀዽ ၿ ிᆖዻხ ൠཊགྷ. ವዽ ၵ࿕ લၡ Ⴎၕ 250~300ഴ༺ ႜച ၉ხዻཊགྷ. ႖ લૐ ၨጷමჲၦ ਜ਼༺ਜ਼ ၰ௴ ၿ ຫဧዻხ ൠཊགྷ. ܓҡޭƢߡȸੂ࠵өੂΌѢੂ݃ڊڑ࿌൚ၦ౹ၦ લૐ ၿ ᇬ ൢხხ ජዻഛ ዻཊགྷ. ਜ਼ዻඓ ၵ࿕ લ ྤඳ ႚ૱ዻხ ජዻഛ ዻཊགྷ. ܤܜ۰ҳޛզ߆݃ڊڑੂݮޜጒഃዽ ဆၦ ၿཅૐ ᅎဧዻხ ൠཊགྷ. ဆၦ ၿཅૐਜ਼ ၵิึ ઃ൛ ༘ ၰၒාച ၡዻཊགྷ. ဘ ၵ࿕ዻ௴ ઠဨ௴ ધඳၿ ු୪ ෮ხဧ ཅ෧ ᅎဧၕ ၿጁఁఋ. ૼ ൽ൘ ఎႜᎁ ዻૺ ၁ጄ௴ ක෧ พጭဧ ᇑ ᅎဧዻཊགྷ. ۭߝ߆֞җ݃ڊڑੂݮײགྷ พྦઠၕ ᅎဧዻཊགྷ. ఎ༚ዽ พྦઠၔ ᆚગ ෮ხဧ ഇღൢၕ ᅘሳጋၕ ທ ྦ႖ዽ พྦઠၦ ྤఇఁఋ. ൿხ ึჰၦ ෧ແዻ௴ ၵ࿕ ጹઠ௴ ྦඓ ൠ༺ሙ ෮ჰ ൠ༺ሙ ᅎဧዻཊགྷ. ึჰၦ ್ါ ઇၦೡધ ືඓ ෮ ၦይ ᅎဧዻཊགྷ. ၗၦ ཉዽ ઠဨ ౹࿌, ม ໕ ႞གྷዽ ၗྮ 85dB(A) ᅾዽ ઠဨ ᅯഎ พጭ ၿ๗ ຫဧዻཊགྷ. ݮײǹȗ˥ݐӺӇҟϨ࠵ੂݮײ߭ܓҧ݃ڊڑጃື ྦႜౘ ၴໞ ຫဧ ዻཊགྷ. ݃ڊڑੂިࠕၵ࿕ ჵთዻધ ඳ൘ዻ લૐ ຫဧ ዻხ ൠཊགྷ. ዳചዽ ືሲ௴ ႗ఝച લૐ ຫဧዻხ ൠཊགྷ. ܜӿޭۭߝ࠵ޯੂ݃ڊڑሜೱይ ၦ༺ ຫဧዻ ၵ࿕මၕ ધႜགྷሠཊགྷ. ࿅ၕ ຫဧዻ લૐ ၵዻ௴ ઇၦ ྦ႖ጁఁఋ. !ߵߣ१ݐюࣺҗߥdžੂ݃ڊڑલૐၡ ႖ဴၕ ᇣૺ ႖ Ⴎႜဧ ሠဉ ഇᆳਜ਼ લૐ ဋ႖ᎁ ႞࿘௴ხ ጃື ጸၨዻཊགྷ. ۰ҳޛǹȗҗ݃ڊڑੂݮײม લૐ௴ ໕ၡ ஏဧ ྩ൬ ຫဧዻഛ ࿌ ၰཀఁఋ. ม લૐ௴ ᆖધ ૬ગ ྩ൬ၔ ጹઠ ధဩ ྦ႖ዻધ ጎືౘ ၵ࿕ၕ ༘ጌጁఁఋ. લૐ ඳ൘ዽ ᎅၕ ਜ਼ዻხ ൠཊགྷ. ǧǮม ໕ ၿዽ ิዜၕ ຫဧዻხ ྨ ၵ෮ฅၕ ა༘ዻხ ྨၒඓ ཅᅰ ືጄၡ ၁ጔၦ ෧ແዾ ༘ ၰཀఁఋ. ؾΟջਣ݃ڊڑੂޯޜલૐ ຫဧዻૺ ႖ ືౘ ၦ ၰ௴ხ ጸၨዻધ ് ၵዻ௴ხ ጸၨ ዻཊགྷ. ၵ ิึၡ ࿌ஆၦ ุ, ิዜ ኒ ౾ લૐ ၵ ጎၕ ුᆳ௴ ືሲ ጸၨዻཊགྷ. ືౘ ิዜၦ ุ ิዜၔ ხᆹ ಋೡ ༘൘ዻ ોᅰዻཊགྷ. ༺၁ᆳ છጀၦ ၰ௴ ઠဨ લૐ ຫဧዻხ ൠཊགྷ. ື ವ௴ ኒౘ ิዜၔ લၨ ༘൘࿕ၴ ༘൘ ၡദዻཊགྷ. ၵ࿕ၴਜ਼ ჯႚ ༘൘ዻხ ൠཊགྷ. Էҟ০ޜսҟੂ݃ڊڑ໕ઢ ጏဧ ૺა ಋೡ લૐ ຫဧዻხ ྨ௴ ઠဨ ವ௴ લૐၡ ิዜ, ิዜ, ิᅎම ౾ၕ ોᅰዻૺ ႖, ๗༺ ෦ૺ ႖ ሽ൘ ึ൘ዻཊགྷ. ܼɁࣺөƪځфΖ݃ڊڑੂިࠕܤલૐ ဪዾ ಕ ਜ਼ೢၕ ༺၁ᆳ ხ ൠཊགྷ. ವዽ ዯ૯ ାૺ ႖ ༺၁ᆳਜ਼ OFF၁ᆳ ၰ௴ხ ጸၨዻཊགྷ. ळμҗੇջѡ͒Ѻ࠵ҧ݃ڊڑલૐၡ ၦ གྷ ᇬ ຫဧዻ ᇮቼ ᇬ ხച ၼྤ ఙૺხ ൠཊགྷ. ᇬ , ૺ, ຓႯዽ ක൘ ൘ዻཊགྷ. ̻ۯ࠵ੂݮײǹȗ̻եǽੂ݃ڊڑ႖ લૐ ຫဧዻხ ྨၕ ಕ௴ ࿌൚ၦၡ ၦ జხ ྨ௴ ઁႮዽ ၿ ྦ႖ዻ พશዻཊགྷ. ǹȗҗʘࠗૈࠕިɌǕǽҟੂ݃ڊڑႳ ధ ጎືધ ྦ႖ዽ ၵၕ ၁ጄ લૐ ྦ႖ዻધ ᅯછዽ ጹઠ พશዻཊགྷ. ၉ხพ༘ ෟ ิዜ ોᅰ શጄ௴ ໕ ᅒႮዻཊགྷ. લૐၡ ᇬ ႜૺ႕ၒച ႙અዻધ ືౘ ઠဨ௴ લၨ ༘൘࿕ၴ ༘൘ ၡദዻཊགྷ. ၿ ᇬ ႜૺ႕ၒച ႙અዻધ ືౘ ઠဨ ોᅰዻཊགྷ. લૐ ൢჲ ಕ ઁႮዻધ ᅯછዽ ືሲ ၉ხዻધ ૺၦ ૯൘༺ਜ਼ භხ ྨഛ ၉ၡዻཊགྷ. ǹȗ̻ځ֞ؖԬμڊǹޯΟٟҟܤܜǕԭ͈۫͒ੈ܄ม ႖ લૐ௴ શഏ ྦ႖ ༘ᆴၕ ა༘ጁఁఋ. ၁ጔၕ ᆊጷዻඓ གྷ લၨౘ ༘൘࿕ၴ ༘൘ ෦ྤ ጁఁఋ. ԷҟԦ࣡ߝɁࣚƢۭߝ࠵ऀ Էҟ 18. ሽ൘ ႗ఝച ึጄዻხ ൠཊགྷ. 19. මၦ ၰ௴ ၿ ிᆖዻხ ൠཊགྷ. 20. ਜ਼ 40 Cၦືၨ ၿ พશዻხ ൠཊགྷ. 21. ၁ ਜ਼ 4 C~40 Cၨ ၿ ᆚ႖ዻཊགྷ. 22. લૐဉ ጀନ ႞લౘ ᆚ႖ૺ ຫဧዻ ᆚ႖ዻཊགྷ. 23. ሽ൘ ૺዻ௴ ઠဨ, “ጹઠ พጭ” ኻၡ ხᆹၕ ა༘ዻཊགྷ. 24. ችႜ Ⴎઁ ዻ ႖ጄྵၦ ༘ౙ ༘ ၰཀఁఋ. 25~30 Cၡ ༘ຮጷᇀ ဧྵၨ ႖ጄྵၔ ၁ጔዾ ༘ ၰཀఁఋ. ႖ጄྵၦ ዳิ භ࿘ၕ ઠဨ௴, (a)๗ဉ මച ཅዻ ྡྷ (b) അඝ༺ ངᅾဉ ੪ၔ ྾ຮໜ ྵᅰച თጷགྷሠཊགྷ. ႖ጄྵၦ ౹࿌ ઠဨ௴ ᆊ 10ึ ၦື ୳ዽ මച ཅዻ ྡྷ࿌ஏཅ ፎ ၡຫၡ ჰᅑၕ ෦ၒཊགྷ. 25. ጷႁ ၁ጔ! ึ൘ౘ ሽ൘ၡ ႚ႙ၦ ఎೢხ ྨഛ ዻཊགྷ. (, ሽ൘ લૐ ືၴ พશዻ௴ ઠဨ). 26. ሽ൘ ੜዻხ ൠཊགྷ. 27. ືౘ ሽ൘ ᆚ႖ዻხ ൠཊགྷ. O O O O ࣡ߝɁ 28. લૐဉ ጀନ ႞લౘ ሽ൘ ᆚ႖ዻඓ གྷ Black&Deckerᆚ႖ૺ ຫဧጄ ጁఁఋ. ఋ൏ ሽ൘ ᆚ႖ዻඓ ෧ዾ ༘ ၰધ ཅᅰ ືጄ ෟ ືၡ ၁ጔၦ ၰཀఁఋ. 29. ၩፂဧ ሽ൘ ᆚ႖ዻხ ൠཊགྷ. 30. ᇬਜ਼ ືౘ ઠဨ ყགྷ ોᅰዻཊགྷ. 31. මၦ ၰ௴ ၿ ிᆖዻხ ൠཊགྷ. 32. ᆚ႖ૺ ੭෮ዻხ ൠཊགྷ. 33. ᆚ႖ૺ ஏิ ൢხხ ൠཊགྷ. 34. ᆚ႖ૺ௴ ཇஏൢ ຫဧዻཊགྷ. ࣚƢۭߝٟࣻ 35. ႗ఎ લૐച ၵ࿕ዾ ಕ௴ ༝ખჰ ႖໓ၦ લૐၡ ᇬ జၕხ ක്ఁ લૐၡ ႗ ၼၦ ၼၒཊགྷ. ႖ૺਜ਼ ፯്௴ ໓ ႚᅿዻඓ ၵთၨ લૐၡ ิึ ႖ૺਜ਼ ፯് ધ ຫဧၴਜ਼ ႖ౙ ༘ ၰཀఁఋ. ႖ ົಉ, ჲ, ૯ೡၨಉ, ൛ ෟ ૺረ ઁ໕ ၵ࿕ თ ෧ແዻ௴ ึჰ ხ႕ၒച ிᆖხ ྨഛ ዻཊགྷ. ෮ጭฟၕ ᅎဧዻધ ிᆖౘ ิ၁ ๗ဉ මച ၒཊགྷ. ൿხਜ਼ ၮ, ౹࿌ਜ਼ ዳิ జၒඓ ၉ጄ ጷዼමჲၦ ༱ ፷༘ౙ ༘ ၰཀఁఋ. ሽ൘ ኟၦ ႞ఝച ᆚ႖ხ ྨၔ ઠဨ-(i)ೱይ ఋ൏ ૺૺ ྤ ሽ൘ ᇡၡ ႖ ጸၨዻཊགྷ. (ii)ೡၦቼ ୪ඓ ႖ဴၦ ଞხ௴ ೡၦቼ ༺၁ᆳ ሽ൘ ᇡၦ છ࿌ ၰ௴ხ ጸၨዻཊགྷ. (iii)ᆚ႖ૺ ෟ ሽ൘ ኟၕ ၁ ఝૺ ਜ਼ 4 C 40 C ຫၦၨ ၿച ခૺཊགྷ. (iv) ሽ൘ ᇡ බ႞ਜ਼ ࿖ၒ ႞ఝച ᆚ႖ხ ྨၒඓ ሽ൘ ኟ ᆚ႖ૺ ਜ਼ଆဪ Black&Decker ๗༺ሽ ൭ૺཊགྷ. ሽ൘ ༘ၕ ၿዻඓ ሽ൘ ኟၕ ᆚ႖ ືሲച ၿૺ(ຫဧዻხ ྨၔ ᅘ 30ၩ ၦື)෮ᆳዻხ ൠཊགྷ. ᆚ႖ၦ ྦ႖ શഏౘ බ႞௴ ྤఁხൢ ሽ൘ ኟၡ ༘ၦ ጢ႔ᎁ ዾ ༘ ၰཀఁఋ. લૐ ຫဧዻૺ ႖ ᆚ႖ૺ ዯ૯ ຐધ ᆚ႖ૺ લૐ ึ൘ዻཊགྷ. લૐ ᆚ႖ૺ ึ൘ዻ௴ ઠဨ, ൿ႔ ᆚ႖ૺ ዯ૯ਜ਼ ᇡ ึ൘࿘௴ხ ጸၨዽ ఋၗ ᆚ႖ૺ ᇬ લૐ ึ൘ዻཊགྷ. લૐਜ਼ ᆚ႖ૺ છ࿌ ၰ௴ ྦ௴ લૐ ຫဧዻხ ൠཊགྷ. O O ઉߝԵॺؚȶң) ႜፂ႖/ፂ႖ ᇓቼഝ ༽ೡၦధ(2)௴ લૐၡ ፂ႖ ෮ጎၕ છႜዾ ທ ྤఁೡ ၻ ጄ႞ ૺ ጁఁఋ. ൛ ၵ࿕ၕ ዻ ຫ Ⴎၦ௴ ઠဨ, ႜፂ႖(གྷઢ ෮ጎ)ၕ ຫဧዻཊགྷ. ຫ ዚ ࿙ሢ ൛ ๗ቼ ዚ ઠဨ, ፂ႖(གྷઢఝ ෮ጎ)ၕ ຫဧዻཊགྷ. ႜ෮ጎ ፂ႖ၕ ໓ሳዻඓ ႜ෮ጎ/෮ጎ ༽ೡၦధ(2) ယᄠၒച ്ཊགྷ. ෮ጎ ፂ႖ၕ ໓ሳዻඓ ႜ෮ጎ/෮ጎ ༽ೡၦధ ൏ᄠၒച ്ཊགྷ. લૐ ၻ૯ඓ ႜ෮ጎ/෮ጎ ༽ೡၦధ თྱ ၒཊགྷ. Ζӡμॺؚϼ̻ছॠߵߣȶң- ม લૐ௴ ၵ ක ໓ሳዻધ ຫ Ⴎၦૺ ၁ጄ ቔሙ ໕ႜዾ ༘ ၰ௴ ᇀೡਜ਼ ၰཀఁఋ. ማ ຫ ವ௴ ఎఎዽ ၵ࿕මၡ ઠဨ, ၵၔ ຫ ವ௴ ໜ ၵ࿕ම ๗ጄ ைၔ ቔሙਜ਼ ዶဠጁఁఋ. ᇀೡ ၚဧ ึ ྩ൬ഛ ఋ࿅ዻ ໕ႜዾ ༘ ၰཀఁఋ. ඛႁ, ᅪႁ ෟ ዯೡ༺ኋၕ ൛ൟዻ௴ ઠဨ, ૺጭ ዑགྷ(17) ൬ᆛ ᇀೡ(3) ൛ ၵ࿕ ၁ᆳ ཊགྷ. ༺ሙೡၦၡ ઠဨ, ᇀೡ ྩ൬ ໕ႜዻཊགྷ. ྩ൬ၔ ໕ႜၕ ක്௴ ઠဨ, ఋၗ ႗ᅍ ಋ്ཊགྷ. ᇀೡ(3) ᆊ႔ ቔሙച ໕ႜዻཊགྷ. ᅭ ᄆ ຫ Ⴎၦཊགྷ. ሜᆳਜ਼ ဴዻ௴ ༘ა ఐዻხ ྨၒඓ ᇀೡ ໕ႜၕ ௵ၦધ ຫ ઢ Ⴎၦཊགྷ. ྩ൬ၔ ༘ა ఐዾ ಕଆხ ฟዻཊགྷ. ൽხ ຫ ၦ ໕ႜၕ ຫဧዻཊགྷ. ߝݻ7V7NNȶң) લૐၡ ႖ဴၕ ᇣඓ ႖ဴon/off ༺၁ᆳ(1) ്ཊགྷ. ༺၁ᆳ ະჼ ്ඓ લૐਜ਼ ႔ၒച ၵጁఁఋ. ༺၁ᆳ ്ඓ લૐਜ਼ ધၒച ၵጁఁఋ. લૐၡ ႖ဴၕ ୪ඓ ต ༺၁ᆳ ၒཊགྷ. ޭࠞߞܯ ม લૐ௴ ၦთၒച ႗ၦ ࿌ၰཀఁఋ. ၦઇၔ ဘิ ิึၦ ႖ဴၒചิሽ ႗࿌ ၰၗၕ ၡුጁఁఋ. ႖ૺ ิዜ ૺઢ ิዜ ຫၦ ႗ ൡၦ ၰૺ ಕබ લૐ ႚხ གྷሣ ዶဠਜ਼ ࿖ཀఁఋ. ၡ: ၦთ ႗ၔ લૐ ၵགྷ ხᇣ ዻ௴ ૺม႕ၨ ྦ႖ხᆹၕ ఝཅዻხ ྨཀఁఋ. ႗ གྷ༺ቋၔ લૐ ஏิၡ ႖ૺ႕ බ႞ച ၨጄ ືጄ ၮხ ྨഛ ዻ௴ ᆓਜ਼႕ၨ ෮ Ⴎᆳၮఁఋ. ߝɁۭߝ ႖ૺ කሽ௴ ዽ ਜ਼ხၡ ႖ྮൢ ຫဧዻഛ ໕ઢ࿌ ၰཀఁఋ. ጃື ႖ဴ લၿᆳਜ਼ ႜગን ዑགྷౘ ႖ྮ ྩ൬ၔხ ጸၨዻཊགྷ. ǧǮ: ႖ਜ਼ ፯്௴ ໓(L)ವ௴ თໜ ໓(N)ၕ ವ௴ Eዑགྷਜ਼ ၰ௴ ႚხድ છዻხ ൠཊགྷ. ߆ܯढޭ֚ݮײ ၿ ᇛၦ๓ၔ ଶ ዶဠዽ ઠဨ ႞ဘዻધ௴ ຫဧዻხ ൠཊགྷ. ၿ ᇛၦ๓ၕ ิ႕႗ዻ ຫဧዻඓ ጷႁဉ ႖ ຫધਜ਼ ෧ແዾ ၁ጔၦ ၰཀఁఋ. ิၦዻ ၿ ᇛၦ๓ၕ ຫဧጄ ዻ௴ ઠဨ௴ གྷ શዾ ႜิૺશ གၨዽ ႞ዜၕ ຫဧዻཊགྷ. ຫဧ ႖ གྷ ၿ໓ၡ ືሲ ጸၨዻཊགྷ. གྷ ᆚ႖ૺၡ ၮഎ ႖ྮ ྩ൬ၔ ᇬ ຫဧዻཊགྷ.(ንၡ ૺ༜ ၴഭ ᅒႮዻཊགྷ.) ᇛၦ๓ ൛ၕ ຫဧዾ ಕ௴ ၿ ᇛၦ๓ၕ ဋ႖ᎁ ዚ࿌ ຫဧዻཊགྷ. Ɂ͂Ӟȶң) 1. 2ఎ ON/OFF ༺၁ᆳ 2. ႜፂ႖/ፂ႖ ༽ೡၦధ 3. ක ໓ሳၴ/ቔሙ Ⴎႜ ᇀೡ 4. ᅨ 5. ሽ൘ 6. ሽ൘ ൛൘༺ ቾ 7. ๗ቼ ጰధ 8. ᆚ႖ૺ ᇑஐሽ 9. ᆚ႖ૺ ዯ૯ 10. ᆚ႖ૺ 11. ሽ൘ ᇊ ǧǮ"൛ၔ (ิዻਜ਼ ઃ൘ ၹජ ຫဧዻඓ) ႜხ࿌ ౪ኀ൜ ጢືၦ ෧ແዾ ༘ ၰཀఁఋ. ጃື ႜხ ၉ၡዻཊགྷ. ႞࿌ዻხ ජዻඓ ཅᅰ ືጄ ၉෧ዾ ༘ ၰၒාച ൛ၕ ఎఎᎁ ၼྤ ౪ኀ൜ ጢືၕ ႞࿌ዻཊགྷ.(૯൜ F ᅒႮ) ႜხ ጢືၦ ෧ແዻඓ ყགྷ ቼ൘ ၕ ಪધ ఋགྷ གྷၵዻૺ ႖ ႜხౘ ဴၨၕ ະኺพཊགྷ. ႜხౘ ၕ ၵዻૺ ၁ጄ ൛ၡ ႖ဴၕ ୪ ᇣხ ൠཊགྷ. ൛ၦ ືౙ ༘ ၰཀఁఋ. ጃື ൛ ๗ቼဉ ၩჯ໓ၦ ഛ ዻ ਜ਼ณဪ ྮഎၕ ਜ਼ዻཊགྷ. ൛ ๗ቼਜ਼ ૐඅ ු୪Ⴆ ხ ྨၕ ಕଆხ ਜ਼ณဪ ྮഎၕ ਜ਼ዻ ൛ၕ ൯ဨ ᅩᅩᎁ ၵዻཊགྷ. ඳ Ⴎੜၕ ຫဧዻ ၵ࿕මၦ ᄟ੭ხხ ྨഛ ෦ᆳཊགྷ. ඛႁ ஏิ ჯઠၦ ማ ૐඅၕ ೃၒඓ ༺ኲၦ ๗ቼ ຫဧዻཊགྷ. ᅪႁ ൛ൟዻ௴ ઠဨ HSS൛ ๗ቼ ຫဧዻཊགྷ. ᅪၦ ጼၦ ྤః ᅪႁ ൛ൟዻ௴ ઠဨ ။ጺ၉ ຫဧዻཊགྷ. ႜጸ ைၦඓ თྱ ካᆳ ຫဧዻ ൛ ၵ࿕ዻધၴ ዻ௴ ૐඅၡ თྱ ዑགྷ ጄཊགྷ. ๗ቼ ೃ൚ ૐඅ ௴ ྦ ઢ කሽ ၵዻཊགྷ. ၦ௴ ๗ቼਜ਼ ࿙ሠ௴ ઇၕ ෮ხጁఁఋ. ځॠҌμШޭ֦ܜ ྩ൬ၔ Ⴖဉ ሙૺၡ ༺ሙೡၦ ๗ቼ ຫဧዻཊགྷ. ຫ Ⴎၦૺ ᎅ౹ඓ, ၡ ໞඓ႞ ๗ භᎁཊགྷ. લૐဉ ༺ሙೡၦ ๗ቼ ຫဉ ၩჯ໓ၦ ഛ ၼၒཊགྷ. ࠵ސǽҟ Black&Decker ႖ લૐ௴ ೯ ຫဧ ૺ ྦ ᆊዽၡ શ൘ൢ ዶဠዻഛ ໕ઢ࿘ཀఁఋ. ხ႕ၒച ൢႯ༺ဪ ၵၕ ဴዻགྷඓ ྩ൬ၔ લૐ શ൘ဉ ၿૺ႕ၨ ሙ൘ఉၕ ዻ ጁఁఋ. ႜૺ႕ၨ ሙ൘ఉ ၦဘၡ ఋ൏ ᆚ႖ૺ ၉ხ શ൘௴ ዶဠዻხ ྨཀఁఋ. ิဪ ๐གྷ ൠ൏ ઌၒച લૐၡ ቛዟૐ ႜૺ႕ၒച ᅯዻཊགྷ. ႝၔ ઌၒച කሽ ဘၿၕ ႜૺ႕ၒച ၒཊགྷ. ൠ႞ ซቼਜ਼ ౹࿌ ၰ௴ ሙ൘ஞ ືဠዻხ ൠཊགྷ. ႜૺ႕ၒച ᅨၕ ધ ஏิၡ ൿხ ႞ዻཊགྷ. ၦ લૐ௴ ၵ࿕ၴਜ਼ ჯႚ ༘൘ዾ ༘ ࿖ཀఁఋ. લૐ લၨ Black&Decker ༘൘࿕ၴ ൭ૺཊགྷ. ႜૺ႕ၨ ሙ൘ఉ ၦဘ ถച ᆚ႖ૺ ၉ხશ൘ዻხ ྨྤ ఁఋ. ߵҤԦߵߣ Ⴎ൝ ෟ Ⴎႜ ႖ གྷ ሽ൘ ኟၕ ึ൘ዻཊགྷ. Էҟ০ࣺԦսҟȶң* ሽ൘(5) ၿᅎዻඓ ሽ൘ၡ ࿅૰ લૐၡ ሽ൘ ᇡ ዑགྷౘ ࿅૰ၕ ൬ᆓཊགྷ. ሽ൘ ሽ൘ ᇡ ෘ࿌ பၔ ఋၗ ಎଇ ൘ਜ਼ ஃ ಕଆხ ്ཊགྷ. ሽ൘ ึ൘ዻඓ ൛൘༺ ቾ(6)2੭ གྷ ്ધ ሽ൘ ሽ൘ ᇡ ၼྤ ཊགྷ. ሽ൘ พશጀ ෟ ဪဧ ᇊ(11)ၔ ሽ൘ લૐ ᆚ႖ૺ ึ൘ዽ ፎ ຫဧ ዻཊགྷ. ሽ൘ ᆚ႖ૺ લૐ ၿᅎዻૺ ႖ ᇊၕ ึ൘ዻཊགྷ. ǧǮ මჲၦ ிᆖౘ ሽ൘ ႚ႙ జၕ ༘ ၰၒාച ሽ൘ ྤඳ พશዻ ਜ਼ხધ ఋఁხ ൠཊགྷ. ౹࿌, ሽ൘ ᇊၕ ဨხ ྨၔ ᅘ ሽ൘ ජ, ຫ, ༊ ౾ ጀନ ླᆳൠ, ൽఁ, લૐ ືၴ, ႞ዜ ሠቼ ືၴ, ೦ ౾ ხ ൠཊགྷ. ሽ൘ ᇊၕ ဨხ ྨၒඓ ሽ൘ਜ਼ ఎೢ࿌ ጷႁਜ਼ ෧ແዻ ሽ൘ਜ਼ ືౙ ༘ ၰཀఁఋ. μҢ֞ৃϼ̻ځॠҌμШޭՅ֞ৃ߆Ԧսҟȶң+ ၡ ม ໕ ࿎ዽ ิዜၦ ኞሠხ ዅጀ࿌ ၰხ ྨၕ ༘ ၰཀఁఋ. ๗ቼ ોᅰਜ਼ ဧၦዻഛ ม લૐ௴ ሠഅ༺ ᅨၦ ၿᅎ࿌ ၰཀఁఋ. ǧǮ ൿ႔ લૐ ሽ൘ ึ൘ዻཊགྷ. ႜፂ႖/ፂ႖ ༽ೡၦధ(2) თྱ ၁ᆳച ခખ લૐ ၻ૯ཊགྷ.(૯൜A) ዽ ၒച ླิึ(12)ၕ ൘ધ ఋ൏ ዽ ၒച ౮ิึ(13)ၕ ၼྤ ᅨ(4)ၕ ཊགྷ. ๗ቼ ແሙ(14) ᅨ ິၮዻཊགྷ. ዽ ၒച ౮ ิึ(13)ၕ ၼધ ఋ൏ ၒച ླ ิึ(12)ၕ ᅨၕ ጸཇᎁ Ⴎၦཊགྷ. ๗ቼ ึ൘ዻඓ ၁ၡ ႗ᅍ ༚ၒച ዻඓ ఁఋ. ሙ൘ఉዻૺ ႖ ᆚ႖ૺ ዯ૯ ຐၒཊགྷ. ࠞ "ݧ႞ዜၡ ྦ႖ ႜື ၵၕ ၁ጄ ༘൘, ၉ხ ෟ Ⴎႜ(ม ໕ གྷౘ ຫጃၕ ႞ဘዽ)ၔ གྷ લၨౘ ๗༺ ሽ ૺረ ๗༺ ࿕ᅰ ቛጄ ዻགྷધ ਜ਼ၿ ႕ጁዽ ોᅰ ิዜၕ ຫဧዻഛ ዻཊགྷ. ႞ዜ ஏิ௴ ધ੮ၦ ჯႚ ༘൘ዾ ༘ ၰ௴ ิዜၦ ࿖ཀఁఋ. ջਣ ႖ લૐၡ ໜၔ ຫဧ௴ ิዜ ಋೡ ఐೡჵఁఋ. Black&Deckerิዜၔ ધዜჲၡ ዑაၕ ቛጄ ႞Ⴎ࿘ၒඑ ႖ લૐၡ ໜၦ ᆊఝዽ ෧፠ഛ ໕ઢ࿘ཀఁఋ. Black&Deckerิዜၕ ຫဧዻඓ Black&Decker ႖ લૐ ᆊືၡ ືሲച ຫဧዾ ༘ ၰཀఁఋ. ᆓਜ਼ ๗ဧၕ ხุዻඓ ਜ਼ଆဪ ఝ൘႙ၦ લၨ ๗༺ ሽ ఋ࿅ዽ BLACK&DECKERຫၡ ิዜၕ ૐၮዾ ༘ ၰཀఁఋ. ǧǮ" ၿ ิዜ ဘၡ ઇၕ ຫဧዻඓ ၁ጔዾ ༘ ၰཀఁఋ. ǧեੴ ࣡ߝݮԷҟ০ ม ႞ዜၔ ఁᇞ ᆽ(NiCd) ႖ხ ವ௴ ᆚ႖ዻ ྒྷ ༘ ၰધ ༘ၦ ૾එ ઢጄ ᆊఝၡ ᎅၕ ෧፠ዾ ༘ ၰ௴ ႁᆚ႖/ႁጺဧ ሽ൘ ኟၕ ຫဧጁఁఋ. ၦ ዑགྷ௴ ม ႞ዜ ዅጀౘ ఁᇞᆽ ሽ൘ ႕႗ዽ ጀၕ ၡුዻඑ ၩ ਜ਼ႜဧ ම ૐึዻ ხႜౘ ၿ ૺགྷᇣ ጁఁఋ. ఁᇞᆽ ሽ൘௴ ጹઠ ၉ጄዻඑ ุ ෧ၡ ၁ጔၦ ၰཀఁఋ. ႗ఝ ੜዻ ಓ භხ ൠཊགྷ. ጹઠ พጭၡ ᆬඓၕ ધጄ གྷૺ ೦ఁఋ. ሽ൘ၡ ༘ၦ ୵உၒඓ લૐ ஏ ႁጺဧጄ ጁఁఋ. Black&Decker ຫ௴ ఋၗ ຫጃၕ ၿጁఁఋ. લૐ ၵགྷᇣ ሽ൘ၡ ஞხ ဋ႖ᎁ ෮႖གྷሢ ፎ ሽ൘ લૐ ึ൘ዻཊགྷ. ሽ൘ ႕ఙዽ ዅၿဧૺ ப࿌ ఎၴਜ਼ ఎೢხ ྨഛ ዻཊགྷ. ሽ൘ ኟၔ ੜ ხၡ ႁጺဧ ሽച พஏཊགྷ. ዶဠዽ ઠဨ ਜ਼ଆဪ ხ શᅯ ૺ શഏ ႜพ බၡዻཊགྷ. ༘ౘ ሽ൘௴ ႕႗ዽ ૺ ጹઠ พጭ ඛ႕ၒച ႁጺဧఁఋ. ม ႞ዜ௴ ࿅ඓ ༺ሙೡၦ ๗ቼਜ਼ ๗ቼ ጰధ ஏၿ࿌ ၰཀఁఋ(7)(૯൜ A). ๗ቼ ጰధ ༺ሙೡၦ ๗ቼ ඓ, ጲ ๗ቼ ౹࿌ ൘ཊགྷ. ๗ቼ พશዻඓ, ጰధ ໞ ෘ࿌ பၒཊགྷ. ࢯ߆Ԧսҟȶң, ᅨ ਜ਼ዽ ዽ ൣၦ ཊགྷ. ༺ሙೡၦ ᅨ ິၮዻધ ૯൜ ੪ၦ ᅨ෦ၦ ຫ(15) གྷઢ ෮ጎၒച ึ൘ዻཊགྷ. ྷ ሠ(16)(ถ൯)ച ᅨၕ Ⴎၦધ ૯൜ ੪ၦ ጄൽച ൘ཊགྷ. གྷઢఝ ෮ጎၒച ᅨၕ ึ൘ዻཊགྷ. ᅨၕ ఋགྷ ၿᅎዻඓ ༺ድ౹ၡ ຫ Ⴎၦધ ᅨ ხხ ຫ Ⴎၦཊགྷ. ࢙ߵ"ႁᆚ႖ဧ ሽ൘ဉ લૐၡ ᅧึၦ ႁጺ ၨჭ ෦ၔ ૺ༜ၴ౹ၕ พ၉ዻધ ၰၒඑ, ધ੮ ፉ၌႕ၦધ ၕൢዽ ๗༺ ႞લጁఁఋ. ǹȗਈɁ લૐ ોᅰዻ ຫဧၦ ุਜ਼ዻఋધ ንఎౙ ઠဨ௴ ጹઠ พጭ ધዻ ཊགྷ. BLACK&DECKERຫ௴ ხ ૺશၕ ቛዻ ૺ શዽ ႜพ ࿐ၕ ઇၕ ၿጁఁఋ. ऀ࠵ݮײ གྷ ྦ႖ ხᆹ શഏ ฅ૬ ა༘ዻཊགྷ. ิዻਜ਼ ઃ൘ხ ྨഛ ዻཊགྷ. གྷ Black&Deckerሽ൘ ኟ ᆚ႖ૺൢ ຫဧዻཊགྷ. ߣځ֞ؖե Էҟ࣡ߝȶң) ᆊᅾ ሽ൘ ຫဧዻૺ ႖ၦ ၦ႖พఋ ໜၦ ႔ዻ࿘ఋધ ንఎዾ ಕൠఋ ሽ൘ ᆚ႖ጄ ጁఁఋ. ູ ሽ൘ ၿགྷ ຫဧዻხ ྨၔ ሽ൘௴ ྾ 5གྷၡ ᆚ႖ ෟ ෮႖ ႜၕ ᅸ ဋดዽ ໜၕ ෧፠ጁఁఋ. ᆚ႖ თ ሽ൘ਜ਼ ್ဲ ჲ ༘ ၰၒ ၦઇၔ ႜື႕ၦඑ බ႞ਜ਼ ࿖ཀఁఋ. 4 Cၦዻ ವ௴ 40 C ၦືၨ ጹઠ ሽ൘ ᆚ႖ዻხ ൠཊགྷ. ၿዻ௴ ᆚ႖ ௴ ྾ 24 C ၮఁఋ. ม લૐဉ ጀନ ႞લౘ ᆚ႖ૺച ఋ൏ લૐ ሽ൘ ᆚ႖ዻხ ൠཊགྷ. ሽ൘ ᆚ႖ዻඓ ൿ႔ ሽ൘ਜ਼ લૐ ് ၿᅎ࿘௴ხ ጸၨዻཊགྷ. ᆚ႖ૺ ዯ૯(9) ᇑሽ(8) ິၮዻཊགྷ. ᆚ႖ૺ(10)ၡ ዯ૯ ୶ဨཊགྷ. ᆚ႖ૺၡ ႖ဴၕ ᇣཊགྷ. ሽ൘ ኟၔ લၿ ᆖધ གྷ ᆚ႖ხ ྨၔ ືሲച ఁఋ. ຫဧዻૺ ႖ ᆊ 6གྷ ႜ ᆚ႖ጄ ጁఁఋ. ႜື႕ၒച ຫဧዽ ፎ௴ 3~6གྷ ႜ ᆚ႖ጄൢ ሽ൘ ኟၦ ဋ႖ᎁ ᆚ႖ఁఋ. ሽ൘ ኟၦ ဋ႖ᎁ ෮႖ඓ ఋགྷ ဋ႖ᎁ ᆚ႖௴వ ᆊఝ 6གྷ ႜ ဠఁఋ. O ߣݮސե μҢܜ O O BLACK&DECKERຫ௴ ྤགྷྤ ႖ ઃᅸ ၴຫ ၉ ෟ ၴຫ གၨ ๗༺ ሽၡ ဋ႖ዽ ቼဲሙ ૐໜዻધ ၰཀఁఋ. ੜੜၡ BLACK&DECKER ๗༺ ሽ௴ ၨჭ ෦ၔ ૺ༜ၴ౹ၕ พ၉ዻધ ၰၒඑ, ધ੮ ፉ၌႕ၦધ ၕൢዽ ๗༺ ႞લጁఁఋ. ૺ༜ શഏ ხဴ, ༘൘, ವ௴ ႜዜ ોᅰ ิዜၦ ዶဠዻགྷඓ ਜ਼ଆဪ BLACK&DECKER ๗༺ ሽ බၡዻཊགྷ. ࢙ߵ BLACK&DECKERຫၡ ႜᅙၔ ႞ዜၡ ხ႕ၨ ጎື ၰၒඑ, ຫ႖ ધხ ࿖ၦ ႞ዜ ຫ࿅ၕ ตઠዾ ዽၦ ၰཀఁఋ. ዑა ၿ๗ ෟ ิዜၔ ೡൠఋ ఋ ༘ ၰཀఁఋ. ႞ዜ ຫ࿅ ವዽ ਜ਼ ಋೡ ᅍၦਜ਼ ၰၕ ༘ ၰཀఁఋ. ක౷ ਜ਼ ႖ ႞ዜၕ ૐၮዾ ༘ ၰ௴ ઇၔ ྤఇఁఋ. ૐၮ ਜ਼ ิ௴ ੜ ხ BLACK&DECKER ఝ൘႙ බၡዻཊགྷ.