1
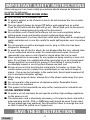
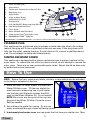
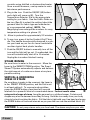
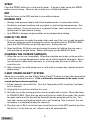
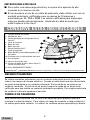
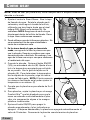
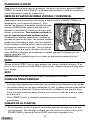
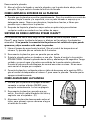
SAVE THIS USE AND CARE BOOK
LEASE ESTE INSTRUCTIVO ANTES DE USAR EL PRODUCTO
Premium Iron (English, see page 2)
Plancha de primera (Español, consulte la página 7)
Model/Modelo 8 62984
Sears, Roebuck and Co. Hoffman Estates, IL 60179
IMPORTANT SAFETY INSTRUCTIONS
When using your iron, basic safety precautions should always be followed,
including the following:
READ ALL INSTRUCTIONS BEFORE USING.
■ Use iron only for its intended use.
■ To protect against a risk of electric shock, do not immerse the iron in water
or other liquid.
■ The iron should always be turned Off before unplugging from an outlet.
Push the I/0 button and the light will go out. Never yank cord to disconnect
from outlet; instead grasp plug and pull to disconnect.
■ Do not allow cord to touch hot surfaces. Let iron cool completely before
putting away. Loop cord loosely around cordwrap when storing.
■ Always disconnect iron from electrical outlet when filling with or emptying of
water and when not in use. Be careful to avoid spilling water over iron when
filling.
■ Do not operate iron with a damaged cord or plug or if the iron has been
dropped or damaged.
■ To avoid the risk of electric shock, do not disassemble the iron; instead, take
it to an authorized service center for examination and repair. Incorrect
reassembly can cause a risk of electric shock when the iron is used.
■ Close supervision is necessary for any appliance being used by or near children. Do not leave iron unattended while connected or on an ironing board.
Always position iron carefully to prevent it from falling if ironing board is
accidentally moved or cord is pulled. Always use heel rest.
■ Burns can occur from touching hot metal parts, hot water, or steam. Use
caution when you turn a steam iron upside down or use vertical surge of
steam – there may be hot water in the water tank. Avoid rapid movement of
iron to minimize hot water spillage.
■ When using surge of steam, always direct the steam vents away from your
body.
■ Do not operate in the presence of explosive and/or flammable fumes.
■ Do not use iron outdoors.
■ This product is for household use only not for commercial or industrial use.
SPECIAL INSTRUCTIONS
■ To avoid a circuit overload, do not operate another high-wattage appliance
on the same circuit.
■ If an extension cord is absolutely necessary, a 10-ampere rated cord with a
polarized plug and UL, CSA, or NOM approval should be used. Cords rated
for less amperage may overheat. Care should be taken to arrange the cord
so that it cannot be pulled on or tripped over.
SAVE THESE INSTRUCTIONS
2
Cover
1.
Water Fill Hole Cover
2.
Spray Nozzle
3.
Temperature Selector/Smart Steam™ Dial
4.
Magnifying Lens
5.
Spray Button
6.
Surge of Steam Button
6
5
8
7
4
3
9
10
2
7.
Comfort-Grip™ handle
8.
Pivoting Cord
9.
Push I/0 (ON/OFF) Button and Auto-Off Light
1
10. Cord Wrap/Stable Heel Rest
11. Fabric Guide
12. Water Window with FULL Mark
13. 2-Way Steam CleanTM/Steam/Dry Lever
14
13
12
11
14. MAGNAGLIDE INOX Soleplate
TM
*MAGNAGLIDETM and MAGNAGLIDE INOXTM are trademarks of General Magnaplate Corp. and used under license.
POLARIZED PLUG
This appliance has a polarized plug (one blade is wider than the other). As a safety
feature, this plug will fit into a polarized outlet only one way. If the plug does not fit
fully into the outlet, reverse the plug. If it still does not fit, contact a qualified electrician. Do not attempt to defeat this safety feature.
TAMPER-RESISTANT SCREW
This appliance is equipped with a tamper-resistant screw to prevent removal of the
outer cover. To reduce the risk of fire or electric shock, do not attempt to remove the
outer cover. There are no user serviceable parts inside. Repair should be done only
by authorized service personnel.
How To Use
NOTE: Before first use, remove any labels, stickers, or tags which may be attached
to the body or soleplate of the iron.
1. Move the Lever to Smart Steam. Flip open the
Water Fill Hole cover. Tilt the iron slightly forward and use a measuring cup to pour water
into the hole until the level reaches the FULL
mark on the Water Window (A). Do not overfill.
NOTE: Be sure to aim the spout of the cup into
the slot of the Water Fill Hole. Close the cover.
Refill as needed.
2. Use ordinary tap water for ironing. Do not use
water processed through a home softening system.
A
3. In extremely hard water areas, use tap water the first time you use the iron. Then
Cover
3
consider using distilled or demineralized water.
Once a month however, use tap water to maintain steam performance.
4. Plug in the iron. Push the ON/OFF (I/0) button
and a light will come on (B). Turn the
Temperature Selector Dial to the appropriate
setting for your fabric. Use the Fabric Guide on
the iron (See A) to select the setting (check the
garment label for fabric type and manufacturer's recommended setting). NOTE: The
Magnifying Lens enlarges the numbers for easy
temperature setting at a glance. (C)
B
5. Allow to preheat for approximately 2-3 minutes.
6. To use iron, grasp it by the Comfort-Grip™ handle. This handle was specially designed to cushion your hand as you iron for more comfortable
use than typical hard plastic handles.
7. Push the ON/OFF button to manually turn off the
iron and the light will go out. If unattended, the
iron will automatically shut off in 10 minutes.
Unplug the iron when finished ironing.
STEAM IRONING
C
Be sure there is water in the reservoir. Move the
Lever to the SMART STEAM position. The Smart
Steam™ System automatically adjusts and delivers
the right amount of continuous steam at any temperature setting.
VERTICAL & HORIZONTAL
SURGE OF STEAM
Be sure there is water in the reservoir, the Lever is
in the SMART STEAM position, and the Dial is set
to at least setting 4. To remove tough wrinkles,
pump the SURGE button a few times at 5-second
D
intervals for a powerful blast of concentrated steam. For best results when
using vertical surge of steam, hang the garment on a clothes hanger. Curtains and
drapes may also be steamed once they’re hung. Hold the iron away from your body
close to but not touching the fabric. Pull the fabric tight with your free hand and pump
the SURGE button at 5-second intervals as you pass the iron over the wrinkled fabric. (D)
CAUTION: Do not pump steam onto your free hand. The steam may burn your skin.
Cover
4
SPRAY
Push the SPRAY button for a fine mist of water. If spray is light, pump the SPRAY
button several times. Check to be sure the iron is filled with water.
DRY
Move the Lever to the DRY position to iron without steam.
IRONING TIPS
• Always read garment labels and follow manufacturer's ironing instructions.
• Synthetics are heat-sensitive and may glaze or melt at high temperatures. Use
lower settings. If you are unsure of a garment's fiber, test a small area (on an
inside seam or hem) before ironing.
• Use SPRAY to dampen tough wrinkles at any temperature setting.
CARE OF THE IRON
1. It is not necessary to empty the water after each use if the iron is used frequently.
However, when you want to empty the water, move the lever to STEAM CLEAN,
press the ON/OFF button so the light goes out. Unplug the iron.
2. Open the Water Fill Hole cover and empty the water by holding the iron over a
sink with the tip angled down. Water will empty out the Water Fill Hole.
CLEANING THE OUTSIDE SURFACES
1. Allow the iron to cool completely. Wipe the soleplate and outer surfaces with a
soft cloth or sponge dampened in water and a mild household detergent. Never
use abrasives, heavy duty cleansers, or scouring pads that may scratch or discolor the iron.
2. After cleaning, iron with steam over an old cloth to remove any residue from the
steam vents.
2-WAY STEAM CLEAN™ SYSTEM
About once a month, use the 2-Way Steam Clean™ System to clean the steam valve
and flush out minerals and lint. If lint is allowed to accumulate in the vents, it can
scorch and cause brown spotting.
1. Fill the reservoir about half full. Turn the Temperature Dial to setting 7 and heat
for 3-4 minutes.
2. Unplug the iron and do not allow it to cool.
3. Hold the iron in the ironing position over an empty sink or basin. Move the Lever
to STEAM CLEAN. Rock the iron back and forth for about 30 seconds. Be careful
because water and lint that will be flushed from the soleplate will be hot. You
may hear hissing and spitting while iron is self cleaning. This is normal. It is not
necessary to completely empty the reservoir.
4. Plug the iron in. Sit it on its heel rest, move the Lever to the DRY position and turn
the dial to 7 to dry the iron out. Allow to shut off automatically.
Cover
5
STORING THE IRON
1. Allow the iron to shut off automatically or
press the ON/OFF button to turn it off manually.
The light will go out.
2. Unplug the iron and allow it to cool. Wrap the
cord around the heel rest and secure it with
the cord clip. (E)
3. Store the iron on its heel rest to prevent water
leaking from the Soleplate.
E
Need Help?
IRON WON'T HEAT?
Is the iron plugged in? Is the Power Light on? If not, press the ON/OFF(l/0) button.
If the light does not come on, will a lamp plugged into the outlet turn on? If it does,
there is a problem with the iron.
IRON WON'T START STEAMING?
1.
2.
3.
4.
Check to see if there is enough water in the water reservoir.
Is the Lever in the SMART STEAM position? If not, move it there.
If steaming doesn't start, tap the Soleplate on the ironing board once or twice.
NOTE: If steaming doesn’t stop, move the Lever to DRY.
WATER DROPLETS COMING FROM STEAM VENTS?
1. Is the Lever in the STEAM CLEAN position? If so, move it to SMART STEAM.
2. Move the Lever to DRY and allow the iron to heat 2-3 minutes before ironing.
SHUTS OFF AUTOMATICALLY WHILE IRONING?
1. Has the iron been on but not moved for 10 minutes? Automatic shut-off models
will shut off after 10 minutes if not used.
2. Push the ON/OFF button to restart the iron.
FULL ONE-YEAR WARRANTY ON KENMORE IRON
If this Kenmore iron fails due to a defect in material or workmanship within one
year from the date of purchase, Sears will replace it free of charge.
WARRANTY SERVICE
To obtain replacement under this warranty, return this Kenmore iron to the nearest Sears store in the United States.
This warranty applies only while this Kenmore iron is used in the United States.
This warranty gives you specific legal rights, and you may also have other
rights which vary from state to state.
Sears, Roebuck and Co., Dept 817WA, Hoffman Estates, IL 60179
Cover
6
INSTRUCCIONES DE SEGURIDAD
Cuando use su plancha, siempre debe tomar algunas precauciones
básicas, incluyendo las siguientes:
POR FAVOR LEA TODAS LAS INSTRUCCIONES ANTES DE USAR
■ Utilice la plancha únicamente para planchar.
■ Para evitar el riesgo de un choque eléctrico, no sumerja la plancha en
agua o cualquier otro líquido.
■ La plancha siempre debe de estar apagada antes de desconectarla de
un tomacorriente. Oprima el botón l/0 y se apagará la luz. Nunce tire del
cable para desconectario del tomacorriente; sujete el enchufe y
desconéctelo.
■ No permita que el cable entre en contacto con superficies calientes.
Permita que la plancha se enfríe antes de guardarla. Enrolle el cable
holgadamente alrededor de la plancha.
■ Siempre desconecte la plancha cuando la llene o la vacíe y cuando no
esté en uso. Evite derramar agua sobre la plancha cuando la llene.
■ No opere la plancha si el cable y/o el enchufe han sido dañados o si la
plancha se ha dejado caér.
■ Para evitar el riesgo de choque eléctrico, no desarme la plancha; llévela
a un centro de servicio o de reparaciones autorizado, para que la examinen, reparen o ajusten. El armarla incorrectamente puede ocasionar
choque eléctrico al planchar.
■ La supervisión de un adulto es necesaria cuando la plancha sea usada
cerca de o por un niño. No desatienda la plancha mientras esté
conectada o sobre el planchador. Siempre colóquela en su talón de
descanso, para evitar que se caiga al mover el planchador o al tirar del
cable accidentalmente.
■ Pueden ocurrir quemaduras al tocarse las partes metálicas de la
plancha, el agua caliente o el vapor. Tenga cuidado al invertir la plancha;
pueda que haya agua caliente en el tanque. Evite los movimientos bruscos para que no se derrame el agua.
■ Al hacer uso del vapor, siempre mantenga las salidas de vapor alejadas
de su cuerpo.
■ No opere en presencia de gases explosivos y/o inflamables.
■ No use la plancha a la intemperie.
■ Este producto ha sido diseñado solamente para uso doméstico y no para
uso industrial o comercial.
Cover
7
INSTRUCCIONES ESPECIALES
■ Para evitar una sobrecarga eléctrica, no opere otro aparato de alto
consumo en el mismo circuito.
■ Si es nacesario el uso de un cable de extensión, debe utilizar uno con un
enchufe polarizado, calificadao para no menos de 10 amperes y
autorizado por UL, CSA o NOM. Los cables calificados para amperajes
menores pueden sobrecalentarse. Acomode el cable de modo que
nadie tropiece ni tire de él.
CONSERVE ESTAS INSTRUCCIONES
1. Tapa del orificio de llenado
2. Rociador de agua
3. Control de temperatura/regulador Smart
Steam™
4
4. Lente de aumento
3
5. Botón de rocío
6. Botón de vapor
2
7. Mango Comfort-Grip™
1
8. Cable maniobrable
9. Botón ON/OFF (encendido/apagado) y luz
indicadora
10. Enrollado para el cable/talón de descanso
11. Guía de tejidos
12. Ventana de nivel de agua
13. Sistema de doble limpieza, Steam Clean™/
control de vapor/seco
14. Suela MAGNAGLIDE™ INOX™
6
8
7
5
9
10
14
13
12
11
*MAGNAGLIDETM y MAGNAGLIDE INOX™ son marcas registradas y usadas con licencia de General Magnaplate Corp.
ENCHUFE POLARIZADO
Se utilizan enchufes polarizados (con un contacto más ancho que el otro) para
reducir los riesgos de choque eléctrico. Cuando el cable tiene este tipo de enchufe,
se ajusta únicamente a un contacto polarizado. Si el enchufe no se ajusta en su
contacto, inviértalo. Si aún así no se ajusta, busque la ayuda de un electricista
calificado para que instale un contacto polarizado apropiado. Por ningún punto trate
de modificar o hacerle cambios al enchufe.
TORNILLO DE SEGURIDAD
Esta unidad está equipada con un tornillo de seguridad para prevenir que se le
remueva la cubierta exterior. Para reducir el riesgo de incendio o choque eléctrico,
no intente quitar esta cubierta. La unidad no contiene partes reparables por dentro.
Cover
8
Como usar
NOTA: Antes de usar por primera vez, retire cualquier sello o etiqueta adherida a la
plancha o a la suela.
1. Ajuste el control a Smart Steam. Alce la tapa
de llenado de agua. Sujete la plancha verticalmente y vierta agua a través del orificio,
utilizando una taza limpia, hasta que el nivel
indique FULL (lleno), en la ventana (A). No
sobrellene. NOTA: Asegúrese de vertir el agua
directament dentro del orificio de llenado. Cierre
la tapa. Llene conforme sea necesario.
2. Puede utilizarce agua de la llave para planchar. No
se recomienda el uso de agua neutralizada a
través de un sistema en casa.
A
3. En las áreas donde el agua es demaciado
cruda, use agua de la llave la primera vez que
use la plancha. Después considere usar agua
desmineralizada o destilada. Sin embargo, use
agua de la llave una vez por mes para mantenere
el rendimiento del vapor.
4. Conecte la plancha. Oprima el botón ON/OFF
(1/0) y se encenderá una luz (B). Ajuste el control a la temperatura apropiada para el tejido
de su prenda. Use la guia de tejidos en la
plancha (A). Para determinar la temperatura
lea la etiqueta de la prenda y siga las indicaciones del fabricante. NOTA: El lente aumenta
los números facilitando asi el poder ajustar la
temperatura a un vistazo. (C)
B
5. Permita que la plancha se precalienta de 2 a 3
minutos.
6. Para planchar, sujete la plancha por el mango
Comfort-GripTM que fué diseñado para que la
mano se acomode confortablemente al planchar, sin comparación alguna a los mangos
plásticos tradicionales.
7. Oprima el botón ON/OFF para apagar la
plancha manualmente y la luz indicadora se
apagará. Al dejarse desatendida, la plancha se apagará automáticamente al
cabo de 10 minutos. Desconecte la plancha cuando termine de planchar.
Cover
9
C
PLANCHADO A VAPOR
Asegúrese de que haya agua en el tanque. Ajuste el control a la posición SMART
STEAM. El sistema Smart Steam™, automáticamente ajusta y emite la cantidad de
vapor adecuada a cualquier temperatura.
EMISION DE VAPOR EN FORMA VERTICAL Y HORIZONTAL
Asegúrese de que haya agua en el tanque, ajuste el control a SMART STEAM y la
temperatura, por lo menos al número 4. Para
eliminar las arrugas persistentes, bombée el botón
de vapor SURGE varias veces a intervalos de 5
segundos, para obtener un impacto de vapor más
fuerte y concentrado. Para un mejor resultado, al
usar el vapor de la plancaha en forma vertical
(solamente en modelos específicos), cuelgue las
prendas en ganchos de ropa. Las cortinas también
pueden ser planchadas a vapor una vez colgadas.
Sujete la plancha alejada de su cuerpo, cerca pero
no haciendo contacto con la tela. Tire con fuerza
de la tela con su otra mano y bombée el botón de
vapor SURGE a intervalos de 5 segundos, a medida que pasa la plancha por las
arrugas de la tela. (D)
PRECAUCION: No bombée vapor en su mano ya que puede quemarse la piel.
D
ROCIO
Oprima el botón SPRAY (rocío), para obtener una mínima cantidad de agua. Si es
poco el rocío, bombée el botón SPRAY varias veces. Asegúrese de que haya agua
en el tanque.
SECO
Ajuste el control a la posición DRY (seco), para planchar sin vapor.
CONSEJOS PARA PLANCHAR
• Consulte y siga siempre las indicaciones de cuidado en las etiquetas de las prendas.
• Los tejidos sintéticos son poco resistentes al calor y pueden derretirse fácilmente
a temperaturas elevadas. Si tiene duda del tipo de tejido de una prenda, haga
una prueba en una área pequeña (sobre una costura o ruedo de adentro), antes
de plancharla.
• Use el SPRAY (rocío), a cualquier temperatura, para eliminar las arrugas
persistentes.
CUIDADO DE LA PLANCHA
1. No es necesario vaciar el agua de la plancha después de cada uso si se usa
con frecuencia. Sin embargo, si desea vaciarla, ajuste el control a la posición
STEAM CLEAN, y oprima el botón ON/OFF para que se apague la luz.
Cover
10
Desconecte la plancha.
2. Abra el orificio de ilenado y vacíe la plancha, con la punta hacia abajo, sobre
una pila. El agua saldrá a través del orificio de llenado.
COMO LIMPIAR EL EXTERIOR DE LA PLANCHA
1. Permita que la plancha se enfríe completamente. Para los modelos con suela de
alumino, limpie la suela y la superficie, con un paño húmedo o esponja y un
detergente suave. Nunca use abrasivos, limpiadores fuertes, o fibras que
puedan rayar o descolorar la plancha.
2. Después de limpiarla, planche a vapor sobre un paño viejo para eliminar
cualquier residuo acumulado en las salidas de vapor.
SISTEMA DE DOBLE LIMPIEZA STEAM CLEAN™
Por lo menos una vez al mes, haga uso del sistema de doble limpieza Steam
Clean™, para limpiar la válvula del vapor y eliminar así la peluza y los depósitos
minerales. Si se permite la acumulación de peluza en las salidas de vapor, puede
quemarse y dejar manchas café sobre las prendas.
1. Llene el tanque de agua hasta la mitad. Gire el control de temperatura al
número 7 y permita que se caliente de 3-4 minutos.
2. Desconecte la plancha, pero no permita que se enfríe.
3. Sujete la plancha sobre un lavadero o una pila. Ajuste el control a la posición
STEAM CLEAN. Mueva la plancha hacia atrás y adelante por 30 segundos. Tenga
cuidado, ya que el agua y la peluza que saldrán de la suela estarán calientes.
Durante el proceso de autolimpieza, es normal escuchar un siseo. No es necesario vaciar el tanque por completo.
4. Conecte la plancha y colóquela sobre su talón de descanso en la posicion DRY y
gire el control de temperatura al número 7, para secar la plancha. Permita que se
apague automáticamente.
COMO ALMACENAR LA PLANCHA
1. Permita que la plancha se apague automáticamente u oprima el botón ON/OFF, para
apagarla manualmente. La luz se apagará.
2. Desconecte la plancha y permita que se
enfríe. Enrolle el cable alrededor del talón y
segúrelo con el sujetador. (E)
3. Almacene la plancha descansando sobre el
talón, para prevenir que se derrame el agua
a través de la suela.
E
11
Cover
¿Necesita ayuda?
¿LA PLANCHA NO CALIENTA?
1. ¿Está conectada la plancha? ¿Está encendida la luz del interruptor? Sino, oprima
el botón ON/OFF(l/0). Si la luz no se enciende, ¿funciona una lámpara al enchufarla al mismo tomacorriente? Si funciona, entonces existe un problema con la plancha.
¿LA PLANCHA NO PRODUCE VAPOR?
1. Asegúrese de que haya suficiente agua en el tanque.
2. ¿Está la guía ajustada a la posición SMART STEAM? No, ajústela a esa posición.
3. Si no comienza a producir vapor, dé un leve toque a la suela contra el
planchador una o dos veces.
4. NOTA: Si el vapor sale continuamente sin parar, coloque la guía en la posición
DRY.
¿EMITEN AGUA LAS SALIDAS DE VAPOR?
1. ¿Está la guía en la posición STEAM CLEAN? Si lo está ajústela a la posición
SMART STEAM.
2. Ajuste la guía a la posición DRY y permita que la plancha se caliente de 2-3
minutos antes de planchar.
¿ SE APAGA AUTOMATICAMENTE MIENTRAS PLANCHA?
1. ¿Ha estado encendida la plancha pero no se ha movido por 10 minutos? En los
modelos con apagado automático, la plancha se apaga al cabo de 10 minutos si
no se ha usado.
2. Oprima el botón ON/OFF para encender la plancha nuevamente.
UN AÑO COMPLETO DE GARANTIA EN LA PLANCHA KENMORE
Si la plancha Kenmore llegara a fallar debido a un defecto de material o de fabrica,
por un año a partir de la fecha de compra. Sears la repondrá libre de costo.
SERVICIO BAJO GARANTIA
Para obtener reemplazo bajo esta garantÌa, devuelva esta plancha Kenmore a la
tienda Sears mas cercana dentro de los Estados Unidos.
La garantía es valida únicamente mientras esta plancha Kenmore sea usada dentro
de los Estados Unidos. Esta garantía le otorga derechos legales especÌficos, y Ud.
talvez tenga otros derechos que pueden variar de un estado a otro.
Sears, Roebuck and Co., Dept 817WA, Hoffman Estates, IL 60179
Listed by Underwriters Laboratories Inc. (UL)
Copyright © 1997 Sears, Roebuck and Co.
Pub. No. 174243-00-RV00
Printed in Mexico
Cover
Enlistado por Underwriters Laboratories, Inc. (UL)
Impreso en México
12