1
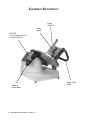
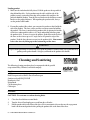
OWNER/OPERATOR
MANUAL
MODELS
X13 & X13A
SLICERS
NOTICIA IMPORTANTE
Este manual contiene importantes instrucciones
de seguridad que deben ser seguidas el pie de la
letra cuando utilice esta maquina.
16 • X13 & X13A OWNER/OPERATOR MANUAL
IMPORTANT NOTICE
This manual contains Important Safety
Instructions which must be strictly
followed when using this equipment.
BEFORE USING THIS EQUIPMENT
Berkel’s slicers are designed to slice meat and other food products safely and
efficiently. However, unless the operator is properly trained and supervised,
there is the possibility of a serious injury. It is the responsibility of the owner
to ensure that this slicer is used properly and safely, strictly following the
instructions contained in this manual and any requirements of local law.
No one should use or service this slicer without proper training and supervision. All operators should be thoroughly familiar with the procedures contained in this manual. Even so, Berkel cannot anticipate every circumstance or
environment in which its slicers will be used. You, the owner and/or operator,
must remain alert to the hazards posed by the function of a slicer—particularly the sharp rotating blade and moving table. No one under 18 years of age
should operate this equipment. If you are uncertain about a particular task, ask
your supervisor.
This manual contains a number of safe practices in the General Safety Instruction Section. Additional warnings are placed throughout this manual. WARNINGS RELATED TO YOUR PERSONAL SAFETY ARE INDICATED
BY:
WARNING
If any warning label, wall chart or manual becomes misplaced, damaged or
illegible, please contact your nearest distributor or Berkel directly, for a free
replacement.
Remember, however, THIS MANUAL OR THE WARNING LABELS DO
NOT REPLACE THE NEED TO BE ALERT AND TO USE YOUR
COMMON SENSE WHEN USING THIS SLICER.
X13 & X13A OWNER/OPERATOR MANUAL • 15
TABLE OF CONTENTS
Page
General Safety Instructions ...................................................................................................................... 2
Equipment Description ............................................................................................................................ 4
Intended Uses and Characteristics ........................................................................................................... 6
Unpacking and Installation ...................................................................................................................... 6
Operation ............................................................................................................................................... 7
Cleaning and Sanitizing ............................................................................................................................ 8
Sharpening ........................................................................................................................................... 10
Repair Parts/Repair Service .................................................................................................................. 11
Troubleshooting .................................................................................................................................... 11
Specifications ....................................................................................................................................... 12
Optional Accessories ............................................................................................................................ 13
Warranty .............................................................................................................................................. 14
The Berkel Company • World’s Leading Manufacturer of Slicers and Food Processing Equipment
BERKEL COMPANY
4406 Technology Drive · South Bend, Indiana 46628-9770
574/232-8222 · Fax 888/888-2838
(800) 348-0251
Form No. OMGX-0206N
Printed in USA
Berkel Company
Part No. 3175-00942
X13 & X13A OWNER/OPERATOR MANUAL • 1
PELIGRO
CUCHILLA FILOSA
para evitar serios accidentes a su
persona siga las instrucciones de este
manual y
1.
NUNCA utlice esta mçquina sin previa instrucciùn y autorizaciùn de su
supervisor.
2.
LA MçQUINA DEBE apoyarse sobre un nivel solido y plano.
3.
LOS PROTECTORES deben colocarse ANTES de enchufar y operar la
mçquina.
4.
SIEMPRE utilice el enchufe original proveido por el fabricante.
5.
SIEMPRE utilice el utensillo para empujar la
comida - nunca su mano.
6.
NUNCA TOQUE LA CUCHILLA CON
LA MANO.
7.
MANTENGA manos, brazos, cabello y
ropa suelta LEJOS de toda parte en movimiento
de la mçquina.
8.
EN CASO DE QUE LA MÇQUINA SE TRABE,
apague y desconecte ANTES de sacar lo que la obstruye.
9.
APAGUE Y DESCONECTE LA MçQUINA antes de limpiar,
sanitizar, o arreglar.
10.
UTILIZE UNICAMENTE los repuestos provistos por el fabricante.
11.
EN CASO de que los membretes de ‘PELIGRO’ se desprendan
de la mçquina o sean illegibles, llame al fabricante o a su
representante de service Berkel para que lo reemplace sin cargo.
2 • X13 & X13A OWNER/OPERATOR MANUAL
WARNING
SHARP KNIFE BLADE
to avoid serious personal injury
follow all the instructions in this manual
and
1.
NEVER touch this machine without training and authorization by your
supervisor.
2.
MACHINE MUST BE on solid level support.
3.
GUARDS MUST BE in place before plugging in and turning on machine.
4.
ALWAYS use three pronged plug provided.
5.
ALWAYS use food pusher not your hand.
6.
NEVER TOUCH ROTATING KNIFE.
7.
KEEP hands, arms, hair and loose clothing
clear of all moving parts.
8.
SHOULD MACHINE JAM, turn off and unplug
before removing obstruction.
9.
TURN OFF AND UNPLUG machine from power source before cleaning,
sanitizing or servicing.
10.
USE ONLY the attachments provided by the manufacturer.
11.
SHOULD any warning label on a machine come off or become unreadable,
contact the manufacturer or your Designated Berkel Service Location for a free
replacement.
X13 & X13A OWNER/OPERATOR MANUAL • 3
EQUIPMENT DESCRIPTION
Pusher
Slide Bar
Pusher
Handle
ON/OFF
Switch (and speed/stroke
selection on X13A)
Thickness
Control Knob
4 • X13 & X13A OWNER/OPERATOR MANUAL
Product Table
Handle
EQUIPMENT DESCRIPTION
Center Plate
Locking Knob
Center Plate
Pusher
Gauge Plate
Product Table
Locking Knob
Center Plate
Mounting Stud
Support Arm
Product Table
Automatic
Engage Knob
(X13A only)
X13 & X13A OWNER/OPERATOR MANUAL • 5
Intended Uses and Characteristics
Intended Uses
The model X13 and X13A slicers are designed for cutting the following types of products:
• Meat (without bones)
• Cheese
• Vegetables
The following types of items are NOT suitable for slicing on the Model X13 or X13A slicers:
• Non-food products
• Frozen foods
• Bone in products
Special Features/Characteristics
Reduced seams and joints for better sanitation
Gauge plate interlock for aid in cleaning
Left hand thickness adjustment for easier cleaning and better user interface
Kick stand for cleaning under the slicer
3 slicing speeds (automatic only)
3 slicing stroke lengths (automatic only)
Automatic return to home at the end of the cutting cycle (automatic only)
Unpacking and Installation
Note: Immediately after unpacking, check the slicer for shipping damage. If the equipment is
found to be damaged, save everything! Notify the carrier within 5 days of delivery.
1. Carefully remove the cardboard carton from around the slicer.
2. Slide the product table off the guage plate. It is in the cardboard box on the gauge plate.
3. Get assistance from another individual and place the slicer on a solid, level surface that is free of any
obstructions.
4. Make sure to unpack the sharpener, fence and brush. They are located in pockets in the cardboard
base.
5. Slide the product table onto the support arm and secure using the red product table locking knob.
111
11
123456789012345678901234567890121234567890123456789012345678901212345678901234567890123456789012123456789012345678901234567890121234567890123456789012
WARNING
To eliminate a potential shock hazard, a properly grounded outlet using the three-pronged plug provided
must power this unit. Before plugging the slicer in, check your outlet voltage to be sure it complies with the
voltage specified on the serial number plate on the slicer.
Note: The model/serial number plate is located on the back of the slicer.
6 • X13 & X13A OWNER/OPERATOR MANUAL
Operation
General
1. Check to see that the center plate and product table are in place on the slicer and the gauge plate is
completely closed. The holes in the bottom of the center plate fit over the bottom mounting studs in the
ring guard and the center plate locking knob at the top of the center plate fits over the top edge of the
ring guard. The product table slides completely onto the support arm and is secured with the red
product table locking knob. The table can only be removed if the thickness control knob is closed and
the product table is pulled to the front of the slicer.
2. If the slicer is an automatic, then make sure the automatic engage knob on the right side of the table
support arm is pushed in, towards the left.
3. Plug the slicer in. The pilot light, between the start and stop buttons will illuminate.
4. Push the green ON button and the slicer blade will start to turn. Press the red STOP button to stop the
knife.
Automatic Operation
5. If you have an automatic slicer, with the slicer stopped, pull the automatic engage knob fully out on the
right side of the machine. This will put the slicer in the automatic mode.
6. Push the speed selection button to change the speed:
One illuminated LED indicates 20 slices per minute (slow speed)
Two illuminated LED’s indicates 40 slices per minute (medium speed)
Three illuminated LED’s indicates 60 slices per minute (high speed)
7. Pushing the stroke length selection button changes the length of the stroke. This allows smaller products
to be sliced quicker, without the table moving any faster. Make sure the stroke length is longer than the
width of the product.
One illuminated LED indicates 1/3 of the total possible stroke length
Two illuminated LED’s indicates 2/3 total possible stroke length
Three illuminated LED’s indicates full stroke length
8. Press the green START button and the product table will slowly come to its forward position to find its
home position. Once it gets back to the home position, then it will start to go back and forth at the
preset speed and stroke length.
9. Push the red STOP button and the table will complete its stroke and stop in the home position.
10. As long as the slicer remains in the automatic mode it will remember its home position and always start
right up when the green START button is pushed. It will always start slow and gradually build up to its
full speed. This is the “soft start” feature.
11. Each time you take the slicer out of the automatic mode, and then back into the automatic mode, it will
always find its home position before it starts to run (as indicated in step #8).
12. Each time you active the slicer into automatic mode, the last speed and stroke length settings will be
remembered until power is disrupted from the slicer (i.e. disconnecting the power cord from the outlet).
Once power is reconnected to the slicer, the default for automatic is slow speed and full stroke length.
X13 & X13A OWNER/OPERATOR MANUAL • 7
Loading product
1. Make sure the index knob is fully closed. Pull the pusher to the top and let it
drop behind the table. Set the product onto the table with the side of the
product securely against the front edge of the product table and place the
pusher behind the product. Turn the slicer on and rotate the thickness control
knob to set the proper thickness. When pushing the product table, always
use the product table handle.
2. For smaller products like salami, you can rotate the pusher so that it holds the
side of the product. The fence can be used for even more control in holding
the product. The fence is attached to the product table by placing the bottom
of the fence underneath the table at a 45° angle and pushing it down against
the product table. To move it next to the product, push down on the back of
the fence so that it rises up to a 45° angle and set it against the edge of the
product. Push the fence down to secure it to the product table. You can not
release the fence by lifting up on the bottom edge of the fence.
WARNING
To prevent the possibility of serious cuts, never push the product toward the knife with your hands or by
pushing on the pusher handle. Only put your hands on the product table handle.
Cleaning and Sanitizing
The following cleaning procedures have been prepared with the grateful
cooperation of Kay Chemical, an Ecolab company.
Supplies:
Dish Detergent such as KAY® Pot & Pan Detergent
Sanitizer such as KAYQUAT® II
Nonabrasive Pad
Nylon Brush
Cut-Resistant gloves
Cloth wipes
Procedure:
CAUTION: Use extreme care when cleaning blade.
1.
2.
3.
Close the slicer thickness control knob.
Turn the slicer off and unplug power cord from the wall outlet.
Pull the product table to the front of the slicer. If it is an automatic slicer, make sure the engagement
knob is in the manual position before pulling the product table to the front of the slicer.
8 • X13 & X13A OWNER/OPERATOR MANUAL
4.
5.
6.
7.
8.
9.
10.
11.
12.
13.
14.
15.
16.
17.
18.
19.
20.
Loosen the product table locking knob and remove the table. The product table cannot be removed unless it is fully forward and the index knob is completely closed.
Remove the center plate by lifting the center plate locking knob on the top of the center plate and lift
from the slicer.
Pre-scrape food from removable product table and center plate.
Wash product table and center plate in hot detergent solution. Remember to unscrew the red handle
from the pusher on the product table when washing. The pusher arm should also be slid up and down
on the shaft during washing, rinsing and sanitizing to ensure the total shaft is properly washed, rinsed
and sanitized. The sharpener can be submerged in the hot detergent solution for cleaning.
Rinse the product table, center plate, and sharpener in fresh hot potable water.
Submerge the product table, center plate, and sharpener in sanitizer solution. Follow sanitizer
manufacturer’s registered label instructions for dilution and application. Set parts to the side on a
sanitized surface and allow to air dry.
Put on cut resistant gloves. Pre-scrape food from slicer
Using fresh detergent solution, clean the front side of the knife with a non-abrasive pad, nylon brush,
and/or cloth wipes. Always wipe from the center of the blade to the outer edge.
Clean the backside of the knife with the fresh detergent solution, non-abrasive pad, nylon brush, and/
or cloth wipes.
Fold a cloth wipe that has been submerged in fresh detergent solution and work it between the knife
guard, starting at the base of the ring guard. Carefully work the cloth around the knife, cleaning the
edge of the knife, edge of the ring guard and edge of the gauge plate. Use extreme caution.
Clean the rest of the slicer base and other components with the fresh detergent solution and a nonabrasive pad.
Lift up the front of the slicer about 6 inches. A spring loaded kick stand will drop down to the table
surface and hold the front of the slicer up. This will allow you to pre-scrape food and clean the table
surface under the slicer with fresh detergent solution.
Using a fresh cloth wipe, rinse slicer and area under slicer with fresh hot potable water.
Spray slicer and area under slicer with fresh sanitizer solution from a sanitizer spray bottle and allow to
air dry. Follow sanitizer manufacturer’s registered label instructions for dilution and application.
Remove cut-resistant gloves.
Once the table surface under the slicer has been washed, rinsed and sanitized, lift the front edge of the
slicer and push the kick stand back under the slicer. Slowly lower the slicer back to the table.
Screw the red handle back to the pusher on the product table. Reinstall the center plate and the
product table to the slicer. After assembly, spray with sanitizer solution and allow to air dry.
Plug in slicer. Place sharpener in proper storage location.
X13 & X13A OWNER/OPERATOR MANUAL • 9
Sharpening
Sharpen only when necessary. Too frequent or prolonged sharpening will prematurely wear the knife and/or stones. The knife should be sharpened when you
notice wavy slices or excessive scrap. Only sharpen the knife after it has
been cleaned. You cannot effectively sharpen a dirty knife.
1. If it is an automatic slicer, make sure the engagement knob is in the manual
position, by pushing in (to the left) the knob on the right side of the support
arm.
2. Make sure the product table is pulled all the way to the front of the slicer and
the thickness control knob is completely closed.
3. Place the top tab of the sharpener into the slot of the product table. Clip the
bottom clip of the sharpener over the end of the product table.
4. Open the thickness control knob as far as it will go, fully exposing the knife.
5. Turn the slicer on and gently push the product table towards the knife just as if
you were slicing product. Once both the sharpening and deburring stones
make contact with the knife, remain there for 2-3 seconds and then pull the
product table back to the home position.
6. Turn off the slicer and close the thickness control knob.
7. Unclip the sharpener from the product table using the bottom clip. It can be
cleaned in the sink and then stored in a drawer.
8. After sharpening, clean the slicer as outlined on page 8.
Repair Parts/Repair Service/Exploded Views
Please contact your Designated Berkel Service Location (DBSL) for any repair parts/repair service required on your Berkel slicer. For the nearest DBSL, please visit www.berkel.com and place cursor over the
service tab. Click on U.S. and then on your state. Exploded views of the slicer can also be found at the
web site. Under the service tab, click on exploded views and then on your model number. Additional
information may be obtained from:
Service Support Center
Berkel Company
4406 Technology Drive
South Bend, IN 46628
Phone (574) 232-8222
Fax (888) 888-2838
www.berkel.com
10 • X13 & X13A OWNER/OPERATOR MANUAL
Troubleshooting
Electrical Failure
1. Is the pilot light illuminated? If not:
• Is the power cord completely plugged into the wall outlet?
• Check the power cord for cuts or breaks.
• Are you getting electricity from the wall outlet? Check by plugging in another piece of equipment
with the same electrical requirements.
2. Is the pilot light illuminated but blinking? If so, then push the stop button and then the start button. If the
light is still blinking, then contact your nearest Designated Berkel Service Location. If you do not know
your nearest Designated Berkel Service Location, then see page 10 for details on whom to contact.
3. If the correction of any of the above conditions does not result in a functional slicer, call your Designated
Berkel Service Location.
Can’t remove product table
1. Make sure the gauge plate is closed by turning the thickness control knob to 0, and the product table is
fully to the front of the slicer
Product table doesn’t move freely
1. Check to make sure the slicer is not in the automatic mode.
Note: The mechanism in the undercarriage should not be oiled or greased.
Pusher is not sliding easily on the rod
1. Check that the rod is clean and apply Berkel oil to the rod.
Thickness Control Knob not Advancing Gauge Plate
1. Is the product table properly attached to the support arm? If not, then the gauge plate cannot be
opened.
2. If the correction of the above condition does not result in a functional slicer, call your nearest Designated
Berkel Service Location.
Knife not sharpening
1. Are sharpening procedures being followed exactly as shown in this manual?
2. Are sharpening stones clean? If not, then remove them from the assembly and clean them thoroughly
with water and a stiff bristled brush. They are left hand threaded nuts.
3. Are sharpening stones worn and not making contact with the knife? If so, then replace them.
4. Is the knife clean? If coated with food fats, the sharpening stones won’t sharpen the knife. Clean the
knife and stones.
X13 & X13A OWNER/OPERATOR MANUAL • 11
Specifications
Machine Dimensions:
Width
Length
Height
Diameter of Knife:
Slice Thickness:
Slicing Speed (automatic):
Low
Medium
High
Stroke Length (automatic):
Short
Medium
Full
Slicing Capacity:
Square
Round
Rectangle
Net Weight:
Manual
Automatic
Shipping Weight:
Manual
Automatic
Voltage/Amperage:
Horsepower:
26-3/4” (680mm)
30-1/2” (770mm)
25-1/4” (640mm)
13” (330mm)
0 to 1-5/16” (33mm)
20 slices per minute
40 slices per minute
60 slices per minute
5 inches
9 inches
13 inches
7-1/2” x 7-1/2” (190mm x 190mm)
8-1/2” (220mm)
10-1/2” x 6-3/4” (265mm x 170mm)
88 lbs.
98 lbs.
118 lbs.
128 lbs.
115/60/1; 5.5 amps
(208-230/60/1; 3.5 amps optional motor)
1/2hp
12 • X13 & X13A OWNER/OPERATOR MANUAL
Optional Accessories
VEGETABLE CHUTE (4975-00463)
A vegetable chute is available that fits on the product table. The vegetable chute is used for quantity slicing of
various size fruit, meats or vegetables.
SKEWER ASSEMBLY (4975-00464)
The fence and product skewer are designed to fit on the upper edge of the slicing table.
The product fence and skewer assemblies are used for uniform crosscut on tomatoes, onions, peppers and
similar round products.
TRAYS
SLAW TRAY (3875-00241)
The slaw tray is a deep tray to receive a large quantity of product and retain the juices.
JUICE CUP (3875-00242)
The juice cup is designed to fit onto the back lip at the receiving area of the slicer where it will catch the juice
(tomatoes, for example) while allowing the product to drop freely on the receiving area.
X13 & X13A OWNER/OPERATOR MANUAL • 13
Warranty
Effective: February 14, 2002
Berkel Company (“Berkel”) warrants to the Buyer of new equipment that said equipment, when
installed in accordance with our instructions and subjected to normal use, is free from defects
in material or workmanship for a period of one (1) year from the date of sale.1
BERKEL SPECIFICALLY DISCLAIMS ANY IMPLIED WARRANTY OF
MERCHANTABILITY OR EXPRESS OR IMPLIED WARRANTY OF FITNESS FOR A PARTICULAR PURPOSE.
Berkel’s obligation and liability under this warranty is expressly limited to repairing or replacing equipment that proves to be defective in material or workmanship within the applicable
warranty period. Berkel or a Designated Berkel Service Location will perform all repairs
pursuant to this warranty. Berkel expressly excludes responsibility for incidental or consequential damages to buyer or any third party, including, without limitation, damages arising
from personal injuries, lost profits, loss of business opportunity, loss of property, economic
losses, or statutory or exemplary damages, whether in negligence, warranty, strict liability or
otherwise.
This warranty does not apply to: periodic maintenance of equipment including but not limited
to lubrication, replacement of worn blades, knives, stones, knobs, accessories, and miscellaneous expendable supply items, and other adjustments required due to installation set-up or
normal wear.
These warranties are given only to the first purchaser from a Berkel Authorized Channel of
Distribution. No warranty is given to subsequent transferees.
The foregoing warranty provisions are a complete and exclusive statement of the warranty
between the buyer and seller. Berkel neither assumes nor authorizes any persons to assume any
other obligation or liability connection with said equipment. This warranty supersedes any and
all prior warranties to the subject hereof.
1
Model 180 slicers carry a 90-day warranty.
14 • X13 & X13A OWNER/OPERATOR MANUAL