1
2:1(523(5$725
0$18$/
02'(/6
3030
0,;(56
NOTICIA IMPORTANTE
Este manual contiene importantes instrucciones
de seguridad que deben ser seguidas el pie de la
letra cuando utilice esta maquina.
16 • PM10 & PM20 OWNER/OPERATOR MANUAL
IMPORTANT NOTICE
This manual contains Important Safety
Instructions which must be strictly
followed when using this equipment.
BK46701 (November 2003)
B ()25(86,1*7+,6(48,30(17
Berkel’s mixers are designed to mix bakery and deli type food products
safely and efficiently. However, unless the operator is properly trained and
supervised, there is the possibility of a serious injury. It is the responsibility
of the owner to ensure that this mixer is used properly and safely, strictly
following the instructions contained in this manual and any requirements of
local law.
No one should use or service this mixer without proper training and supervision. All operators should be thoroughly familiar with the procedures
contained in this manual. Even so, Berkel cannot anticipate every circumstance or environment in which its mixers will be used. You, the owner and
operator, must remain alert to the hazards posed by the function of a
mixer—particularly the rotating tools. No one under 18 years of age should
operate this equipment. If you are uncertain about a particular task, ask
your supervisor.
This manual contains a number of safe practices in the General Safety Instruction Section. Additional warnings are placed throughout this manual.
WARNINGS RELATED TO YOUR PERSONAL SAFETY ARE INDICATED BY:
WARNING
If any warning label, wall chart or manual becomes misplaced, damaged or
illegible, please contact your nearest distributor or Berkel directly, for a
free replacement.
Remember, however, THIS MANUAL OR THE WARNING LABELS
DO NOT REPLACE THE NEED TO BE ALERT AND TO USE
YOUR COMMON SENSE WHEN USING THIS MIXER.
PM10 & PM20 OWNER/OPERATOR MANUAL • 15
T $%/(2)&217(176
Page
General Safety Instructions ............................................................................................................... 2-3
Equipment Description ........................................................................................................................ 4
The Basics............................................................................................................................................ 5
Installation ........................................................................................................................................... 5
Operating Instructions ......................................................................................................................... 6
Product Suggestions ............................................................................................................................ 7
Bowl Accessories ................................................................................................................................. 8
Attachments ......................................................................................................................................... 9
Taper Hub Attachments ....................................................................................................................... 9
Cleaning and Sanitizing ..................................................................................................................... 10
Troubleshooting ................................................................................................................................. 10
Repair Parts/Repair Service ................................................................................................................ 11
Specifications..................................................................................................................................... 12
Capacity Chart ................................................................................................................................... 13
Warranty............................................................................................................................................. 14
The Berkel Company • World’s Leading Manufacturer of Slicer and Food Processing Equipment
%(5.(/&203$1<
4406 Technology Drive · South Bend, Indiana 46628-9700
574/232-8222 · Fax 574/232-8116
(800) 348-0251
Form No. OMPM10/20-1103N
Printed in USA
Printed
in USA
Berkel Company
Berkel
Company
Part No. 3175-00935
Part
No. 3175-00935
PM10 & PM20 OWNER/OPERATOR MANUAL • 1
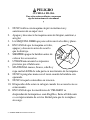
PELIGRO
CUCHILLA FILOSA
Para evitar serios accidentes a su persona
siga las instrucciones de este manual
y
1.
NUNCA utlice esta maquina sin previa instruccion y
autorizacion de su supervisor.
2. Apague y desconecte la maquina antes de limpiar, sanitizar, o
arreglar.
3. LA MáQUINA DEBE apoyarse sobre un nivel solido y plano.
4. EN CASO de que la maquina se trabe,
apague y desconcte antes de sacar lo
que la obstruye.
5. SIEMPRE apague la batidora antes de
colocar los accessorios.
6. UTILIZE unicamente los repuestos
provistos por el fabricante.
7. MANTENGA manos, brazos, cabello y
ropa suelta LEJOS de toda parte en movimiento de la máquina.
8. NUNCA ponga las manos en el tazon cuando la batidora esta
operando.
9. NUNCA toque los utensilios en rotacion.
10. El tapacubo debe estar en su lugar cuando los accesorios no se
estan usando.
11. EN CASO de que los membretes de ‘PELIGRO’ se
desprendan de la máquina o sean illegibles, llame al fabricante
o a su representante de service Berkel para que lo reemplace
sin cargo.
2 • PM10 & PM20 OWNER /OPERATOR MANUAL
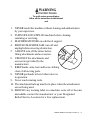
WARNING
ROTATING TOOLS
To avoid serious personal injury
follow all the instructions in this manual
and
1. NEVER touch this machine without training and authorization
by your supervisor.
2. TURN OFF AND UNPLUG machine before cleaning,
sanitizing or servicing.
3. MACHINE MUST BE on solid level support.
4. SHOULD MACHINE JAM, turn off and
unplug before removing obstruction.
5. ALWAYS turn off the mixer before
fitting attachments and accessories.
6. USE ONLY the attachments and
accessories provided by the
manufacturer.
7. KEEP hands, arms, hair and loose clothing
clear of all moving parts.
8. NEVER put hands in bowl when mixer is
in operation.
9. Never touch rotating tools.
10. The attachment hubcap must be in place when the attachments
are not being used.
11. SHOULD any warning label on a machine come off or become
unreadable contact the manufacturer or your Designated
Berkel Service Location for a free replacement.
PM10 & PM20 OWNER /OPERATOR MANUAL • 3
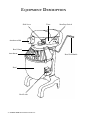
E 48,30(17'(6&5,37,21
Shift Lever
Attachment Hub
Timer
Start/Stop Switch
PM20
92/7
+=
3+$6(
6(5,$/12
Bowl Guard
Attachment
Bowl Lift Handle
Bowl
Bowl Locks
4 • PM10 & PM20 OWNER /OPERATOR MANUAL
T +(%$6,&6
The models PM10 and PM20 planetary mixers are designed for mixing doughs, cremes, potatoes, mixes, sauces and toppings. They have bowl guards, no-volt release and 3 fixed speeds. In
addition, the PM20 has a 15-minute timer. The PM20 comes equipped with a #12 taper hub for
accepting any #12 attachment, while the PM10 has a #8 taper hub, for accepting any #8 attachment.
On the PM20, the optional VSPH can be used for slicing shredding and grating, while the FCMC can
be used for chopping and grinding.
REVIEW THIS MANUAL COMPLETELY BEFORE USING YOUR MIXER.
I167$//$7,21
SAFE OPERATION REQUIRES PROPER
INSTALLATION AND AN ADEQUATE WORK AREA.
*HQHUDO
1. Berkel suggests having an Authorized Berkel Service Technician install your mixer. A list of
Designated Berkel Service Locations (DBSL) can be found at www.berkel.com. This technician
will demonstrate the operation of the mixer.
2. On the PM20, loosen and remove the 4 lag bolts holding the mixer to the shipping skid. On the
PM10, simply open the box, remove the Styrofoam and lift the mixer out of the box.
3. Install the mixer in a well-lighted area with adequate, unobstructed space so the operator can
move about freely. This location must also be solid and level.
4. For 110-volt mixers, plug into a grounded wall outlet. Never by-pass the mixer’s electrical
switches or circuits. Never activate the mixer using a wall switch. A licensed electrician, according to local codes, should wire 220-volt mixers.
WARNING
To prevent the possibility of electrical shock, the mixer must be grounded.
5. Before attaching any accessories/attachments to the mixer, refer to the operating instructions on
page 6 and turn on the mixer in low speed. Check that the rotation of the planetary matches the
sticker on the front of the mixer. If the rotation does not match the sticker, then turn off immediately and contact a qualified electrician to check the wiring. The direction must match the label.
Make sure the mixer is running smoothly with no obstruction.
PM10 & PM20 OWNER /OPERATOR MANUAL • 5
6. Make sure the warning labels supplied with the mixer are in place. The warning labels are:
a. Read Owners Manual (3175-00755) above the start/stop switch on the right side of the
machine
b. Keep Hands Clear (3175-00777) on the left side of the machine
7. Put the dough hook on the planetary and turn on the mixer in low speed. Check to see that there
is clearance between the bowl and the dough hook at all times. The clearance between the dough
hook and the bowl has been preset at the factory and should be approximately ¼”.
8. The gearbox in your mixer is permanently lubricated and will require no additional lubrication by
the customer.
O 3(5$7,1*,16758&7,216
1.
2.
3.
Rotate the bowl guard as far to the left as possible.
Lower the bowl yoke to its lowest position using the bowl lift handle.
Install mixing bowl onto bowl yoke pins. Make sure the pin on the rear of the bowl properly
engages with rear of bowl yoke. Rotate the two clips on the yoke to lock the bowl to the yoke.
4. Slip the desired attachment to the beater shaft and rotate to the left to lock it in place.
5. Refer to the capacity chart on page 13 and then fill the mixing bowl with the ingredients.
6. Raise the bowl to its fully up position. The mixer will not start until the bowl is fully up.
7. Rotate the bowl guard fully to the right. The mixer will not start until the bowl guard is fully
to the right.
8. Your PM20 mixer is equipped with a 15-minute timer. If the mixing sequence is timed, then do
one of the following:
• If the desired time is less than 10 minutes, then turn the timer past 10 then return to the
desired mixing time.
• If the desired time is more than 10 minutes, then simply turn the knob to the desired time.
If the mixing sequence is not timed, then the timer must be rotated to the “hold” position.
The mixer will not start if left at “0”.
9. Put the mixer in position 1 (low speed) and start with the toggle switch (PM20). The toggle
switch should be moved to the left. It is a momentary position and when you release the switch,
it will move back into its center position.
10. Check to see that there is clearance between the bowl and the dough hook at all times. The
clearance between the dough hook and the bowl has been preset at the factory and should be
approximately ¼”. If not, then contact you nearest DBSL.
11. Your mixer is supplied with an electrical overload. The condition that caused the overload
should be rectified before the mixer is restarted. Three signs that the motor may be overloaded
are:
A. The attachment may rotate considerably slower.
B. The attachment does not rotate at a uniform speed.
C. The overload circuit breaker is popped out.
6 • PM10 & PM20 OWNER /OPERATOR MANUAL
Overloading can be avoided by:
A. Using the product capacity chart for recommended speeds and batch sizes.
B. Selecting a slower speed.
C. Reducing the ingredient batch size.
SPEED SELECTIONS
SPEED
Speed 1 (Low)
Speed 2 (Medium)
Speed 3 (High)
MIXTURES
Heavy mixture (bread dough, heavy batters and potatoes)
Lighter mixtures (light dough, which must rise quickly, cake batters and
some whipping operations)
Light work (shipping cream, beating eggs and mixing thin batters)
P52'8&768**(67,216
1. WHIPPING CREAM
The wire whip should be used for whipping cream. Cream to be whipped should be 24 hours
old, should contain 30% butter fat and should be well chilled, in fact near freezing temperature is
desirable, since the cooler the cream, the better the whipping. Warm cream may turn into butter
instead of whipped cream. To prevent splashing out of the bowl, start whipping the cream at
slow speed and increase the speed as the cream thickens.
2. EGG WHITES
Use the wire whip and be sure that the eggs are at room temperature and that both the mixing
bowl and wire whip are free from all traces of fat or oil, or the egg whites won’t whip. In some
installations one bowl will be kept and used exclusively for beating egg whites. Another bowl
will be used exclusively for the oily type mixes. Start beating the eggs at low speed and gradually increase the speed.
3. MERINGUES
Use the wire whip. Meringues can be made perfect by the gradual addition of sugar to eggs that
have not been beaten too stiffly.
4. MAYONNAISE
Use the wire whip. Depending on the quantity of mayonnaise to be made, a commercially
purchased 1 gallon, 2 gallon or 6 gallon oil dropper attachment should be used. This oil dropper
attachment is attached to the mixer and automatically adds oil to the batch at a controlled rate of
flow. Most mayonnaise recipes contain whole eggs, corn or cottonseed oil, vinegar, sugar, salt,
mustard and white pepper. The eggs should be placed in the mixing bowl first and beaten for
approximately five minutes at high speed. The speed should then be reduced to slow speed and
add the dry ingredients that have already been mixed together. Mix at high speed for approximately five minutes. Then the oil dropper should be turned on so that the oil is gradually added to
the batch for 10 to 20 minutes, after which time the vinegar is poured in slowly. The mixing
should be discontinued after the vinegar has been thoroughly mixed into the batch. The last
PM10 & PM20 OWNER /OPERATOR MANUAL • 7
operation in making mayonnaise involves stopping the mixer, scraping the upper part of the bowl
with a spatula or bowl scraper to make sure that every portion will be evenly mixed into the
recipe. Mayonnaise becomes a thicker and more stable product when the oil is added very
slowly.
5. MASHING POTATOES
Use the batter beater and pre-heat the bowl and beater. Start the operation on low speed. When
the potatoes have been broken up, stop the mixer and add the milk or cream, butter and seasoning. Many operators like to change to the wire whip or to the four wing whip for whipping in the
milk or cream since more of a whipping action is obtained to produce a fluffier mashed potato.
6. CAKE BATTERS AND COOKIE DOUGH
Use the batter beater. Butter or shortening can be thoroughly creamed in about 10 minutes. The
butter or shortening should be at room temperature. Sugar should be added to recipes at a medium speed. When all of the sugar has been added, stop the mixer and scrape down the sides of
the mixing bowl with a spatula, or bowl scraper, to insure a smooth mix. Be careful not to add
sugar until the butter or shortening has been thoroughly creamed. Some recipes call for yolks and
whites to be beaten separately. This is not necessary with your mixer, as the mechanical mixing
is efficient enough to allow the addition of whole eggs. When adding dry ingredients, stop the
mixer occasionally and scrape the upper part of the bowl with a spatula or bowl scraper to make
sure that every portion will be efficiently mixed into the recipe. Always operate the mixer on
slow speed while adding dry ingredients. Do most of the beating before the flour and milk are
added. Over beating after addition of these two ingredients causes a sub-standard mixture.
7. MIXING DOUGH
Always use the dough hook for mixing heavy dough mixtures. Do not overload the mixer with
batches that are too large. (See the capacity chart for capacities of the various size bowls.)
Remember - an increased mixing time means a decreased fermentation time. Weighing ingredients each time you mix will ensure a standard product. Stop the mixer occasionally to lower the
dough mass from the hook and to scrape the bowl.
Important - In mixing heavy dough be sure to use the spiral dough hook, be sure not to overload
the mixer (see the capacity chart), and be sure to start the mixer on low speed.
8. BISCUIT MIX
Use the wire whip. Mix shortening and dry ingredients until shortening is blended and mixture is
granular in appearance. Turn off mixer. Scrape bowl down with bowl knife. Store in covered
can until ready for use. (Use beater or dough hook when adding liquid; start mixing on slow
speed. Do not over mix.)
B 2:/$&&(6625,(6
1. Bowl Dollies – This device is a low profile cart used for transporting a bowl that is loaded with
product from one place to another.
8 • PM10 & PM20 OWNER /OPERATOR MANUAL
A 77$&+0(176
1. ALUMINUM SPIRAL DOUGH HOOK
Used for mixing bread or roll dough of standard consistency, biscuits, meat loaf, etc. The aluminum spiral dough hook is a special dough hook for mixing heavy doughs such as white, graham
or rye bread, noodles, pretzels, Italian bread and pizza. Dough hooks should always be operated
at slow speed only. Do not use other types of beaters for dough work; doing so will result in
damage to either the beaters or to the mixer itself. Never exceed capacities as listed.
2. ALUMINUM BATTER BEATER
Furnished as part of the standard equipment. Used for mixing batters such as cake and muffin
batters, creaming butter, mashing potatoes and vegetables, light cakes, icings and the average run
of light work. Never use this beater for heavy dough work. When mashing potatoes, etc., it is
advisable to start with the bowl at its lowest position and then as the potatoes or other ingredients
break up, the bowl should be gradually raised to its working position. This procedure eliminates
severe strain to the beater and to the mixer proper and consequently adds to their life and efficiency.
3. SS WIRE WHIP
Used for whipping, creaming, beating eggs, meringues, small amounts of mayonnaise, icings,
and for whipping milk or cream into mashed potatoes after they have been broken up with batter
beater.
T $3(5+8%$77$&+0(176
The mixer has an attachment hub located on the front. A cover must be removed before the attachment
can be set into place. Once in place, a locking knob secures the attachment to the mixer.
1. VSPH (4975-00103)
The VSPH (VEGETABLE SHREDDER PLATE HOLDER) vegetable cutter attachment provides fast
cutting, grating and shredding of an abundant variety of food products. The high polished all
aluminum housing features (5) available stainless steel plates for grating or shredding and an
optional knife for cutting. Very helpful for volume cutting and grating for such products as
lettuce, tomatoes, cheese, cabbage, carrots, cucumbers, etc. The recommended speed would be
low.
2. FCMC (4975-00452)
The FCMC (FOOD CUTTER MIXER CHOPPER) is a grinder attachment used for small grinding
processes. It is very durable and easy to clean. The recommended speed would be low or
medium, not high.
PM10 & PM20 OWNER /OPERATOR MANUAL • 9
C /($1,1* $1'6$1,7,=,1*
The Models PM10 and PM20 mixers have been designed for a minimal amount of owner maintenance.
After use, thoroughly clean the bowl and attachments with hot soapy water. The mixer housing can
be wiped down with a damp cloth. Rinse, sanitize and allow to air dry.
When sanitizing be sure to use only an approved sanitizing solution. This will help kill germs and
bacteria.
If accessories have been used (example: VSPH) apply some Berkel USDA approved food equipment
oil to the auxiliary drive socket and accessory shafts for lubrication.
WARNING
Use only USDA-authorized Berkel oil or grease to prevent possible food contamination.
For your convenience, this oil is supplied in the following quantities: 2 oz. (part # 4675-00182),
16 oz. (part # 4675-00183), or one gallon (part # 4675-00184) containers.
The grease is supplied in a pack of three 3-ounce tubes (part # 4675-00185).
T 528%/(6+227,1*
If your mixer should fail to function, there are a few things you can check before calling a service
technician. If you do need service, visit our web site at www.berkel.com. Pull down the service tab
and click on your state. A list of the Designated Berkel Service Locations will be shown.
Motor will not operate when “start” toggle button is moved
•
•
•
•
The mixer is overloaded, activating the thermal overload switch. Correct the situation causing
the overload by reducing the load or reducing mixing speed. See the product capacity chart on
page 13.
Turn the timer past “0” or to the “hold” position for manual operation. The mixer will not
operate when the timer is at the “0” position.
The bowl guard is not in place. Rotate the bowl guard fully to the right.
The bowl is not fully up and in place. Lift the bowl to its fully up position.
Motor operates, but planetary does not turn in any of the 3 speeds
•
Internal drive or transmission linkage is inoperative. Contact your nearest Designated Berkel
Service Location.
Hard to shift speeds
•
Make sure the shift lever is fully engaged.
10 • PM10 & PM20 OWNER /OPERATOR MANUAL
•
•
Turn the timer to “hold” position, shift to the desired speed and then move the start toggle button.
Transmission adjustment may be necessary. Contact your nearest Designated Berkel Service
Location.
Overload circuit breaker tripped
•
Mixer is overloaded causing the circuit breaker to trip. See the Product Capacity Chart on page
13.
Mixer slips out of gear under load
•
•
Make sure the shift lever is adequately engaged.
If mixer shift lever is adequately engaged and slipping still exists, then contact your nearest
Designated Berkel Service Location
Product not being properly mixed at the bottom of the bowl
•
•
Inadequate water to product ratio (AR)
Excessive clearance at the bottom of the bowl and attachment. Contact your nearest Designated
Berkel Service Location.
R (3$,53$5765(3$,56(59,&(
Please contact your nearest Designated Berkel Service Location for any repair parts and/or
repair service required on your Berkel slicer. A list of DBSL’s can be found on the website at
www.berkel.com. Pull down the service tab and then click on your start for the nearest DBSL.
Additional information may be obtained from:
Technical Service Support Center
Berkel Company
4406 Technology Drive
South Bend, IN 46628-9700
(574) 232-8222
(800) 348-0251
PM10 & PM20 OWNER /OPERATOR MANUAL • 11
S3(&,),&$7,216
30
30
10-qt. (9.5 l.)
20-qt. (18.9 l.)
15-1/2" (395mm)
15-1/2" (395 mm)
24" (610 mm)
36-3/4" (933mm)
22" (558mm)
30-1/4" (768mm)
40 rpm
80 rpm
143 rpm
46 rpm
85 rpm
155 rpm
97 rpm
191 rpm
344 rpm
106 rpm
196 rpm
357 rpm
1(7:(,*+7
74 lb. (34 kg)
225 lb. (102 kg)
*5266:(,*+7
83 lb. (38 kg)
248 lb. (112 kg)
92/7$*(
115/60/1
115/60/1
+256(32:(5
1/2 HP
3/4 HP
$03667$57581
1.1 A
8.5/1.5 A
%2:/&$3$&,7<
',0(16,216
Height
Width
Depth
3/$1(7$5<63(('6 Low
Medium
High
$8;+8%63(('6 Low
Medium
High
12 • PM10 & PM20 OWNER /OPERATOR MANUAL
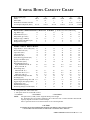
M
,;,1*%2:/&$3$&,7<&+$57
Bowl Capacity (Qt.)
Model
Motor (HP)
Small Bowls Available as Extras
Overall Space Required (Floor)
10
PM10
1/2
14 X 18
20
PM20
3/4
10
15 X 22
30
PM30
1
20
24 X 25
40
PM40
1.5
30
24 X 25
60
PM60
4
30, 40
32 X 44
80
PM80
5
30, 40, 60
32 X 44
.,7&+(10$7(5,$/6&$3$&,7<&+$57),1,6+('0$7(5,$/6
Egg Whites (Qt.)
Mashed Potatoes (Lb.)
Mayonnaise (Qt. of Oil)
Meringue (Qty. of Water)
Waffle or Hot Cake Batter (Qt.)
Whipped Cream (Qt.)
1/2
11
8
1/4
4
2
1
15
10
1½
8
4
1½
23
12
1
12
6
1½
28
13
1¼
15
9
2
40
18
2
24
12
2½
50
22
3
30
16
30
15
20
22
20
21
5
12
35
22
30
33
30
30
8
18
50
24
33
40
34
34
11
22
55
45
50
70
60
55
30
36
100
60
80
90
80
80
30
54
115
10 *
5*
25 *
15 *
45 *
30 *
50 +
40 +
75 +
65 +
80 +
70 +
4½ *
15 *
10 *
10
12
4½ +
4
9*
20 *
27 *
20
18
9+
8
12
2
15
14 *
32 *
40 *
40
27
15 +
12
18
3
24
25 *
60 *
55 +
55
30
17 +
13
20
3
26
40 *
70 *
70 +
70
50
30 #
24
36
5
48
40 *
70 *
70 +
70
60
40 #
36
45
6½
55
%$.(6+230$7(5,$/6
Angel Food (8 - 10 oz. Cake) (Lb.)
Box or Slab Cake (Lb.)
Cup Cakes (Doz.)
Layer Cake (Lb.)
Pound Cake (Lb.)
Pasta: Basic Egg Noodle (Lb.)
Sponge Cake Batter (Lb.)
Sugar Cookies (Doz.)
Bread/Roll Dough (Lb.)
Light–Medium 60% AR @
Heavy 50% AR @
Pizza Dough (Lb.)
Thin 40% AR @ ¢
Med. 50% AR @ ¢ 7½ *
Thick 60% AR @ ¢
Whole Wheat Dough 70% AR
Pie Dough (Lb.)
Raised Doughnut Dough 65% AR
Eggs & Sugar (For Sponge Cake)
Fondant Icing (Lb.)
Marshmallow Icing (Lb.)
Shortening & Sugar, Creamed (Lb.)
7½
10
18
16
15
3
6
6
1
8
@ If hi-gluten flour, reduce batch 10%
¢ 2nd speed, do not use at 50% AR or lower
* 1ST SPEED
+ 2ND SPEED
# 3RD SPEED
NOTE:
Absorption ratio (% AR) = water weight divided by flour weight
Ex: Absorption ratio of a mixture containing 6 lbs. of flour and 3 lbs. of water 3lbs/6lbs=.50=50% AR
Capacity depends on moisture content of dough
Above capacities based on 12% flour moisture at 70° water temperature
CAUTION:
IF HIGHER THAN RECOMMENDED SPEEDS ARE EMPLOYED AND/OR LISTED
CAPACITIES ARE EXCEEDED, OVERLOAD CONDITION WILL RESULT.
PM10 & PM20 OWNER /OPERATOR MANUAL • 13
Warranty
Effective: February 14, 2002
Berkel Company (“Berkel”) warrants to the Buyer of new equipment that said equipment,
when installed in accordance with our instructions and subjected to normal use, is free from
defects in material or workmanship for a period of one (1) year from the date of sale.1
BERKEL SPECIFICALLY DISCLAIMS ANY IMPLIED WARRANTY OF MERCHANTABILITY OR EXPRESS OR IMPLIED WARRANTY OF FITNESS FOR A
PARTICULAR PURPOSE.
Berkel’s obligation and liability under this warranty is expressly limited to repairing or replacing equipment that proves to be defective in material or workmanship within the applicable warranty period. Berkel or a Designated Berkel Service Location will perform all
repairs pursuant to this warranty. Berkel expressly excludes responsibility for incidental or
consequential damages to buyer or any third party, including, without limitation, damages
arising from personal injuries, lost profits, loss of business opportunity, loss of property,
economic losses, or statutory or exemplary damages, whether in negligence, warranty, strict
liability or otherwise.
This warranty does not apply to: periodic maintenance of equipment including but not limited
to lubrication, replacement of worn blades, knives, stones, knobs, accessories, and miscellaneous expendable supply items, and other adjustments required due to installation set-up or
normal wear.
These warranties are given only to the first purchaser from a Berkel Authorized Channel of
Distribution. No warranty is given to subsequent transferees.
The foregoing warranty provisions are a complete and exclusive statement of the warranty
between the buyer and seller. Berkel neither assumes nor authorizes any persons to assume
any other obligation or liability connection with said equipment. This warranty supersedes
any and all prior warranties to the subject hereof.
1
Model 180 slicers carry a 90-day warranty.
BK46701 (November 2003)