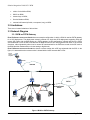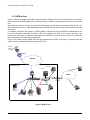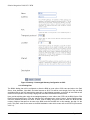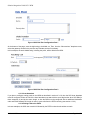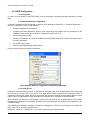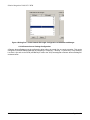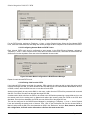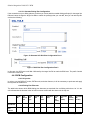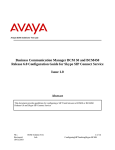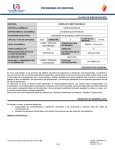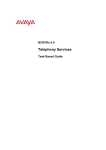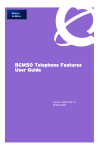
1
Solution Integration Guide for SCS / Business Communication Manager 2009-00002304 Document status: Standard Document version: 01.00 Document date: 30 November 2009 Copyright © 2009, Nortel Networks All Rights Reserved. LEGAL NOTICE While the information in this document is believed to be accurate and reliable, except as otherwise expressly agreed to in writing NORTEL PROVIDES THIS DOCUMENT "AS IS" WITHOUT WARRANTY OR CONDITION OF ANY KIND, EITHER EXPRESS OR IMPLIED. The information and/or products described in this document are subject to change without notice. Nortel, the Nortel logo, and the Globemark are trademarks of Nortel Networks. Microsoft, MS, and Windows are trademarks of Microsoft Corporation. All other trademarks are the property of their respective owners. Sourced in Canada Solution Integration Guide SCS / BCM 2009-00002304 Page 2 of 24 Solution Integration Guide SCS / BCM Table of Contents TABLE OF CONTENTS .......................................................................................................................................................... 3 1.0 INTRODUCTION ............................................................................................................................................................... 4 1.1 PARTNER QUESTIONS......................................................................................................................................................... 4 1.2 TROUBLE REPORTING ........................................................................................................................................................ 4 1.3 DOCUMENT CHANGE HISTORY .......................................................................................................................................... 4 1.4 DOCUMENT FEEDBACK ...................................................................................................................................................... 4 2.0 SPECIAL NOTES ............................................................................................................................................................... 5 3.0 OVERVIEW......................................................................................................................................................................... 6 3.1 CAPABILITIES..................................................................................................................................................................... 6 3.1.1 BCM as PSTN Gateway ............................................................................................................................................ 6 3.1.2 BCM as Peer ............................................................................................................................................................. 6 3.2 LIMITATIONS: .................................................................................................................................................................... 7 3.3 NETWORK DIAGRAM ......................................................................................................................................................... 7 3.3.1 BCM as PSTN Gateway ............................................................................................................................................ 7 3.3.2 BCM as Peer ............................................................................................................................................................. 8 4.0 CONFIGURATION GUIDE............................................................................................................................................... 9 4.1 SCS SOFTWARE VERSIONS ................................................................................................................................................ 9 4.2 BCM SOFTWARE VERSIONS .............................................................................................................................................. 9 4.3 BCM AS PSTN GATEWAY ................................................................................................................................................. 9 4.3.1 SCS Configuration..................................................................................................................................................... 9 4.3.2 BCM Configuration................................................................................................................................................. 12 4.4 BCM AS PEER .................................................................................................................................................................. 17 4.4.1 SCS Configuration................................................................................................................................................... 17 4.4.2 BCM Configuration................................................................................................................................................. 19 REFERENCES ........................................................................................................................................................................ 24 2009-00002304 Page 3 of 24 Solution Integration Guide SCS / BCM 1.0 Introduction This document does not describe procedures to configure the SCS or BCM for advanced functionality. For more information and procedures, please refer to the Nortel technical documentation found on the Nortel website. 1.1 Partner Questions Section 3 of this guide provides screen shots and instructions for the configuration of your IP PBX. Should you require Support assistance regarding these instructions, please have the following information available: Company name Company location Administrator name and phone number IP PBX model and software version Customer Configuration Guide – Issue number and date 1.2 Trouble Reporting Nortel will make every effort to quickly resolve reported troubles. The time required for trouble shooting can be reduced if the customer has the necessary detailed information available when reporting a problem. 1.3 Document Change History Issue 01.00 Draft 00.01 November 30, 2009, issued version October 30, 2009, original version 1.4 Document Feedback 2009-00002304 Page 4 of 24 Solution Integration Guide SCS / BCM 2.0 Special Notes None 2009-00002304 Page 5 of 24 Solution Integration Guide SCS / BCM 3.0 Overview 3.1 Capabilities The following are capabilities provided by this solution: 3.1.1 BCM as PSTN Gateway Basic call to and from sets on SCS to and from PSTN via the BCM including: • hold and retrieve on both ends; • CLID and CPND display; • call redirection including blind transfer, consultative transfer, call forward, and conference, with appropriate CLID/CPND; • hold and retrieve of redirected calls; • codec and ptime negotiation; • DTMF in both directions; • hunt groups; • ACD; • call park. 3.1.2 BCM as Peer Basic call to and from sets on SCS to and from sets on the BCM including: • calls to hunt groups on each system; • calls to SCS ACD; • overflow calls to prime set of BCM; • CLID and CPND display; • calls to fax machines on each system; • call forward (all calls, no response, busy); • calls to BCM AA or CCR; • calls to BCM Contact Center; • BCM conference; • BCM Meet-Me Conference; • tandem calls through PSTN to another BCM or a PSTN user; • call transfer on BCM; • hold and retrieve on both ends; • call park on BCM; • call camp on BCM; • codec/ptime negotiation; • DTMF in both directions; • Silent Monitor and Silent Record-A-Call on BCM; • Find Me/Follow Me on BCM; 2009-00002304 Page 6 of 24 Solution Integration Guide SCS / BCM • calls to Voice Mail on BCM; • SWCA on BCM; • answer keys on BCM; • Service Modes on BCM; • external call forward (all calls, no response, busy) on BCM. 3.2 Limitations: There are no known limitations of this solution. 3.3 Network Diagram 3.3.1 BCM as PSTN Gateway Error! Reference source not found.shows an example configuration in which a BCM is used as PSTN gateway for a SCS deployment. The deployment scenario consists of a single site SCS deployment supporting local and remote SIP clients with the BCM acting as a PSTN gateway. In this configuration, inbound calls from the PSTN are tandemmed out via the SIP trunk between the BCM and SCS to SIP sets registered with SCS. In the reverse directions, calls originated by either local or remote SIP sets destined for the PSTN are routed via the SIP trunk to the BCM and then tandemmed out via the analog or digital trunk. Error! Reference source not found.also shows a remote worker with a SIP set registered with the SCS. In the figure, it is assumed that the remote worker is located behind a SIP-unaware NAT router. Remote Worker with Softphone BSR222 Internet Customer Site PSTN BES switch Analog/Digital Trunk SIP Trunk PC with Softphone SIP Set SIP Set SCS Figure 1 BCM as PSTN Gateway 2009-00002304 Page 7 of 24 Solution Integration Guide SCS / BCM 3.3.2 BCM as Peer Figure 2 shows an example configuration in which a BCM is used as a peer for a SCS deployment. In this figure, BCM is also used as PSTN gateway for a SCS deployment in addition to providing PSTN connectivity for its own sets. The deployment scenario consists of a single site SCS deployment supporting local and remote SIP clients. The BCM supports sets as well. Calls between BCM sets and SCS sets are routed via the SIP trunk between the two call servers. If in addition, the BCM is also acting as a PSTN gateway, inbound calls from the PSTN are tandemmed out via the SIP trunk between the BCM and SCS to SIP sets registered with SCS. In the reverse directions, calls originated by either local or remote SIP sets destined for the PSTN are routed via the SIP trunk to the BCM and then tandemmed out via the analog or digital trunk. Figure 2 also shows a remote worker with a SIP set registered with the SCS. In the figure, it is assumed that the remote worker is located behind a SIP-unaware NAT router. Remote Worker with Softphone BSR222 Internet Customer Site TDM Set IP Set PSTN BES switch Analog/Digital Trunk SIP Trunk PC with Softphone FAX SIP Set SIP Set SCS Figure 2 BCM as Peer 2009-00002304 Page 8 of 24 Solution Integration Guide SCS / BCM 4.0 Configuration Guide 4.1 SCS Software Versions SCS software versions should be at the following levels: o SCS Release 3.0 4.2 BCM Software Versions This Solution Configuration Guide is applicable to the following BCM Releases: • BCM50 rls 3.0 - The patch indicated below is required. o • at BCM450 Rls 1.0 – The smart update indicated below is required. The required functionality will also be contained in subsequent smart updates. o • The patch BCM050.R300.CORE-TELEPHONY-DSP-208-1 is available http://support.nortel.com/go/main.jsp?cscat=SWDETAIL&id=973412&poid=15181 The system smart update BCM450.R100.SU.System_009_BCM450_R1 is available at http://support.nortel.com/go/main.jsp?cscat=SWDETAIL&id=970487&poid=19781 BCM Rls 5.0 – The required functionality is available in the Major Release. Additional patches or smart updates are not required at this time. This applies to both the BCM50 and BCM450 hardware platforms. 4.3 BCM as PSTN Gateway 4.3.1 SCS Configuration In order to use the Nortel SCS connected to a Nortel BCM do the following: 4.3.1.1 Gateway Configuration To configure SCS SIP trunks to reach the BCM, first add the BCM as an unmanaged gateway. In the SCS Administration System, select “Gateways” from the Devices menu. From the “Add new gateway” dropdown menu, select “Unmanaged gateway”. Configure the gateway name and the IP address, and click OK. 2009-00002304 Page 9 of 24 Solution Integration Guide SCS / BCM Figure 3 Gateway - Unmanaged Gateway Configuration on SCS 4.3.1.2 Dialing Plan The BCM’s dialing plan will be configured to allow the BCM to route calls to SCS users and also to the Park Server, Auto Attendant, Voice Mail, and other features on SCS. This will be much simpler if all of the user DNs and feature DNs on the SCS start with the same digit. In the following examples, on the SCS, all user DNs as well as DNs for the Operator, Hunt Groups, Paging DNs, and Call Park Extension all start with 6. Now, provide a dialing plan using the unmanaged gateway to route calls to the PSTN via the BCM. Select “Dial Plans” from the System menu. From the “Add new rule” dropdown menu, select “Custom”. On the Dial Rule page, check the Enabled checkbox and enter a name. Enter a dialing string prefix that will reach the BCM and the number of digits of that prefix to be sent to the BCM, and click the Add link. In this example, the digit 3 is the prefix. This prefix must be the same as the BCM destination code which routes calls to the PSTN (see section 4.3.2.3.1). 2009-00002304 Page 10 of 24 Solution Integration Guide SCS / BCM Figure 4 SCS Dial Plan Configuration Part 1 At the bottom of the page, enter the digit string to be dialed out. Then, from the “More actions” dropdown menu, select the gateway created in the previous step. Restart services if necessary. In this example, the entire dialed string, including the prefix, will be dialed to the BCM. Figure 5 SCS Dial Plan Configuration Part 2 4.3.1.3 Auto Attendant If you plan to configure analog trunks on the BCM as described in section 4.3.2.6, then the SCS Auto Attendant must be configured. Either the DN of the Auto Attendant must start with the same digit as the other SCS DNs (in these examples, 6) and be the same length, or else the BCM must be configured with an additional destination code and Public Network DN Length in order to route calls from the PSTN correctly (see section 4.3.2.2). 4.3.1.4 Dialing Calls to the PSTN In these examples, the SCS user must dial 3 followed by the PSTN number that he wishes to reach. 2009-00002304 Page 11 of 24 Solution Integration Guide SCS / BCM 4.3.2 BCM Configuration 4.3.2.1 Keycodes In order to use the BCM’s IP and PSTN trunks, it will be necessary to purchase and apply keycodes to enable them. 4.3.2.2 Remote Gateway Configuration A remote IP gateway must be configured to reach the SCS. Navigate to Resources -> Telephony Resources -> and click on Internal IP Trunks. In the dialog box: • provide a description for the gateway; • configure the leading destination digits to route calls through the gateway (this will correspond to the destination code to reach the SCS system configured in section 4.3.2.3.1); • set the VoIP protocol to SIP; • provide the IP address or Fully Qualified Domain Name (FQDN) of the SCS. If FQDN is provided, ensure that this is resolvable; • set the GW Type to Other; • leave the other fields with their default values. Figure 6 below provides an example configuration. Figure 6 Remote Gateway Configuration in BCM Element Manager 4.3.2.3 Dialing Plan Destination codes must be configured on the BCM. A destination code is the leading digit(s) of the digit string received either from the SCS or the PSTN. The BCM places certain restrictions on destination codes. A destination code may not conflict with set or hunt group DNs, the direct dial digit, the park retrieve prefix, line pool codes, public or private target line DNs, the public or private auto DN, or the public or private DISA DN. When the BCM acts only as a PSTN gateway, most of these elements of the numbering plan are not needed. Deconfiguring conflicting but unnecessary elements of the numbering plan may simplify the configuration of the destination codes. In the BCM Element Manager, navigate to Telephony -> Dialing Plan -> General. For “Park prefix” and “Direct Dial digit”, select “None” from the drop down menu. Navigate to Telephony -> Dialing Plan -> Line Pools. Clear any line pool access codes. 2009-00002304 Page 12 of 24 Solution Integration Guide SCS / BCM Navigate to Telephony -> Lines -> Target Lines. Clear any numbers under the “Pub. Received #” and “Priv. Received #” columns. Navigate to Telephony -> Dialing Plan -> Public Network. Clear the “Public Auto DN” and “Public DISA DN”. Navigate to Telephony -> Dialing Plan -> Private Network. Clear the “Private Auto DN” and “Private DISA DN”. 4.3.2.3.1 Route and Destination Code Configuration On the BCM, a route must be added for routing calls from the SCS to the PSTN and another route for routing calls from the PSTN to the SCS. This can be configured in the BCM Element Manager by navigating to Telephony -> Dialing Plan -> Routing and selecting the Routes tab. In the example below, route 002 is configured to route calls to the PSTN using Pool A, and route 003 is configured to route calls to the SCS using BlocA. The DN Type of both routes should be set to Public. Figure 7 Dialing Plan - Route Configuration in BCM Element Manager Then destination codes must be added. Select the Destination Codes tab. Configure a destination code consisting of one or more digits and associate it with the route routing to the PSTN. Configure another destination code and associate it with the route routing to the SCS. In this example, the destination code 3 routes calls to the PSTN, and the leading 3 will not be dialed out on the PSTN (all destination code digits will be absorbed). The destination code 6 routes calls to the SCS, and the leading 6 will be dialed to the SCS (0 destination code digits will be absorbed). Figure 8 Dialing Plan - Destination Code Configuration in BCM Element Manager Finally, the Public Network DN Length must be configured. This tells the BCM how many digits to expect when a call arrives on an inbound PSTN trunk. Navigate to Telephony -> Dialing Plan -> Public Network. Under the panel labeled “Public Network DN Lengths”, click the Add button to add a new DN Prefix and click OK. Then doubleclick on the default DN Length and change it to the appropriate value. In this example, the prefix 6 is added, with a length of 4 (the DN length on the SCS system). 2009-00002304 Page 13 of 24 Solution Integration Guide SCS / BCM Figure 9 Dialing Plan - Public Network DN Length Configuration in BCM Element Manager 4.3.2.4 Remote Access Package Configuration A Remote Access Package must be configured to allow calls to be routed from one trunk to another. This can be configured in the BCM Element Manager by navigating to Telephony -> Routing -> Call Security. In this example, Line Pool A (for calls to the PSTN) and BlocA (for calls to the SCS) are assigned to Remote Access Package 01 as shown below. 2009-00002304 Page 14 of 24 Solution Integration Guide SCS / BCM Figure 10 Remote Access Package Configuration in BCM Element Manager Next, assign the Remote Access Package to the IP and PSTN trunks. This can be configured in the BCM Element Manager by navigating to Telephony -> Lines -> Active VoIP Lines. Select the first VoIP trunk. Then, click on the Restrictions tab. Enter the package number in the field labelled “Use remote package”. 2009-00002304 Page 15 of 24 Solution Integration Guide SCS / BCM Figure 11 Remote Access Package Assignment in BCM Element Manager For the PSTN trunks, navigate to Telephony -> Lines -> Active Physical Lines. Select the first inbound PSTN trunk, select the Restrictions tab, and assign the remote package as above. Repeat for each inbound PSTN trunk. 4.3.2.5 Configuring Answer Mode on PSTN Trunks Each inbound PSTN trunk must be configured as auto answer. In the BCM Element Manager, navigate to Telephony -> Lines -> Active Physical Lines. Select the first inbound PSTN trunk, and select the Preferences tab. Select Auto from the dropdown menu next to the field labelled “Answer mode”. Figure 12 Answer Mode Configuration in BCM Element Manager Repeat for each inbound PSTN trunk. 4.3.2.6 Dialing Calls from the PSTN If the inbound PSTN trunks are digital (for example, PRI), typically the caller can dial a single digit string which includes the target SCS DN. The trunk will deliver the SCS DN as part of a Dialed Number Identification Service, or DNIS, number, which the BCM can use to route the call to the SCS. Analog trunks typically do not provide DNIS. In this case, a caller from the PSTN will be presented with a second dial tone. From here, the caller can then dial the target SCS DN. A workaround to allow calls from the PSTN to be routed to the SCS without presenting a second dial tone is to set the answer mode for the analog trunk to Manual and redirect the incoming calls from PSTN to the SCS Auto Attendant. From the Auto Attendant, the PSTN user can dial the DN of the target SCS set. This can be configured in the BCM Element Manager by navigating to Telephony -> Lines -> Active Physical Lines and selecting the analog trunk of interest. Then, click on the Preferences tab. Set the Answer Mode to Manual, and provide the DN of the Auto Attendant on SCS in the “Redirect to” text box. Note, however, that with this configuration, CLID will not be delivered on calls from this trunk to the SCS. 2009-00002304 Page 16 of 24 Solution Integration Guide SCS / BCM The figure below illustrates how this is configured on the BCM. In this example, the DN of the SCS Auto Attendant is 6200. Figure 13 Alternate Analog Trunk Configuration in BCM Element Manager 4.4 BCM as Peer In order to use the SCS and BCM systems as peers, it will be necessary to coordinate their dialing plans. To coordinate the two dialing plans, you must decide how many set DNs you will need on each system and what they will be. For example, you may choose 80 set DNs on the BCM system, starting with DN 221. This means that some of the DNs will start with the digit 2 and some with the digit 3, which then restricts the available space for destination codes on the BCM system. You must also decide which features of each system you wish to use, since many of the features have dialing plan implications; for example, using the Park feature on the BCM suggest that you will need to configure the Park Retrieve prefix, which then limits the space in the numbering plan available for other elements. 4.4.1 SCS Configuration 4.4.1.1 General Configuration Configure the set and feature DNs so as not to conflict with target line DNs (and the PSTN destination code, if used) on the BCM. The BCM’s dialing plan will be configured to allow the BCM to route calls to SCS users and also to the Park Server, Auto Attendant, Voice Mail, and other features on SCS. This will be much simpler if all of the user DNs and feature DNs on the SCS start with the same digit. 4.4.1.2 Gateway Configuration See section 4.3.1.1. 2009-00002304 Page 17 of 24 Solution Integration Guide SCS / BCM 4.4.1.3 Dialing Plan In the following examples, on the SCS, all user DNs as well as DNs for the Operator, Hunt Groups, Paging DNs, and Call Park Extension all start with 6. Now, provide a dialing plan using the unmanaged gateway to route calls to the BCM. Select “Dial Plans” from the System menu. From the “Add new rule” dropdown menu, select “Custom”. On the Dial Rule page, check the Enabled checkbox and enter a name. Enter a dialing string prefix that will reach the BCM and the number of digits of that prefix to be sent to the BCM, and click the Add link. In this example, the digit 2 is the prefix. This prefix must be the same as the first digit of the target line DNs on the BCM (see section 4.4.2.4). If some target line DNs start with a different digit, then add another rule for that digit. Figure 14 SCS Dial Plan Configuration Part 1 At the bottom of the page, enter the digit string to be dialed out. Then, from the “More actions” dropdown menu, select the gateway created in the previous step. Restart services if necessary. In this example, the entire dialed string, including the prefix, will be dialed to the BCM. Figure 15 SCS Dial Plan Configuration Part 2 2009-00002304 Page 18 of 24 Solution Integration Guide SCS / BCM 4.4.1.3.1 Alternate Dialing Plan Configuration If the constraints on your dialing plan are such that you cannot add the needed dialing prefix(es) for the target line DNs and cannot change the target line DNs to match the prefix(es) that you can add, then you can add a prefix such as the following. Figure 16 Alternate SCS Dial Plan Configuration Part 1 Figure 17 SCS Dial Plan Configuration Part 2 In this case, the SCS user would dial 9 followed by the target line DN to reach the BCM user. The prefix 9 would not be sent to the BCM. 4.4.2 BCM Configuration 4.4.2.1 Keycodes In order to use the BCM’s IP trunks, PSTN trunks, and other features, it will be necessary to purchase and apply the keycodes to enable them. 4.4.2.2 Dialing Plan Elements The table below shows which BCM dialing plan elements are restricted from conflicting with others. An X in the cell indicates that the element in the left column cannot conflict with the element in the top row. Set/HG DNs Park Retrieve Code Direct Dial Digit External Code Line Pool Codes Destination Codes Set/HG DNs X X X X X X Park Retrieve X X X X X 2009-00002304 Target Line DNs (public) Auto/DISA DNs (public) Target Line DNs (private) Auto/DISA DNs (private) Page 19 of 24 Solution Integration Guide SCS / BCM Target Line DNs (public) Auto/DISA DNs (public) Target Line DNs (private) Auto/DISA DNs (private) X X X X X X X X X X X Target Line DNs (public) X X X X Auto/DISA DNs (public) X X X X Target Line DNs (private) X X X X Auto/DISA DNs (private) X X X X Direct Dial Digit External Code Line Pool Codes Destination Codes X X X Set/HG DNs Park Retrieve Code Direct Dial Digit X X External Code X X X Line Pool Codes X X X X Destination Codes X X X Code X Table 1 - BCM Dialing Plan Elements 4.4.2.3 Dialing Plan – Dialing SCS DNs from BCM Sets This is accomplished by configuring routes and destination codes on the BCM system. 4.4.2.3.1 Remote Gateway Configuration Please see section 4.3.2.2. 4.4.2.3.2 Route and Destination Code Configuration On the BCM, a route must be added for routing calls from the BCM to the SCS. This can be configured in the BCM Element Manager by navigating to Telephony -> Dialing Plan -> Routing and selecting the Routes tab. In the example below, route 003 is configured to route calls to the SCS using BlocA. The DN Type of both routes should be set to Public. 2009-00002304 Page 20 of 24 Solution Integration Guide SCS / BCM Figure 18 Dialing Plan - Route Configuration in BCM Element Manager Then a destination code must be added. Select the Destination Codes tab. Configure a destination code, and associate it with the route routing to the SCS. In this example, the destination code 6 routes calls to the SCS, and the leading 6 will be dialed to the SCS (0 destination code digits will be absorbed). Figure 19 Dialing Plan - Destination Code Configuration in BCM Element Manager Finally, the Public Network DN Length must be configured. This tells the BCM how many digits to expect when a BCM user dials a call to an SCS DN. Navigate to Telephony -> Dialing Plan -> Public Network. Under the panel labeled “Public Network DN Lengths”, click the Add button to add a new DN Prefix and click OK. Then doubleclick on the default DN Length and change it to the appropriate value. In this example, the prefix 6 is added, with a length of 4 (the DN length on the SCS system). Figure 20 Dialing Plan - Public Network DN Length Configuration in BCM Element Manager 2009-00002304 Page 21 of 24 Solution Integration Guide SCS / BCM 4.4.2.3.3 Alternate Destination Code Configuration If the constraints on your dialing plan are such that you cannot add the needed destination code(s) for the SCS DNs and cannot change the SCS DNs to match the destination code(s) that you can add, then you can add a prefix such as the following. Figure 21 Alternate Destination Code Configuration in BCM Element Manager In this case, the BCM user would dial 9 followed by the SCS DN to reach the SCS user. The prefix 9 would not be sent to the SCS (all destination code digits will be absorbed). 4.4.2.4 Dialing Plan – Dialing BCM DNs from SCS Sets This is accomplished through the use of target lines on the BCM system. The target line DNs are the numbers that SCS users will dial to reach BCM sets. First, the length of the target line DNs must be configured. In the BCM Element Manager, navigate to Telephony -> Dialing Plan -> Public Network. In the panel labelled “Public Network Settings”, select the desired length from the dropdown menu labelled “Public Received number length”. Figure 22 Selecting Target Line DN Length in BCM Element Manager Now the target line DNs themselves can be configured. In the BCM Element Manager, navigate to Telephony -> Lines -> Target Lines. Select the first target line, and click the “Assigned DNs” tab. Assign the first BCM set to this target line. Under the “Pub. Received #” column, assign a target line DN. The target line DN can be the same as the DN of the BCM set to which it is assigned, but that is not required. Configure each BCM set with an individual target line and target line DN. 2009-00002304 Page 22 of 24 Solution Integration Guide SCS / BCM Figure 23 Configuring Target Lines in BCM Element Manager 2009-00002304 Page 23 of 24 Solution Integration Guide SCS / BCM References The following are useful references to assist in this solution: SCS 3.0 Task Based Guides: http://www.nortelscs.com/scs/sites/default/files/scsr3_docs/home.html SCS 3.0 Online Help (available in the SCS Web UI directly). Can be viewed here also: http://www.nortelscs.com/scs/sites/default/files/scs3help/start.htm BCM 450 Release 1.0 Task Based Guides: http://support.nortel.com/go/main.jsp?cscat=DOCDETAIL&id=955922&poid=19781 BCM 450 Release 5.0 Task Based Guides: http://support.nortel.com/go/main.jsp?cscat=DOCDETAIL&id=972992&poid=19781 BCM50 Release 3.0 Task Based Guides: http://support.nortel.com/go/main.jsp?cscat=DOCDETAIL&id=955750&poid=15181 BCM50 Release 5.0 Task Based Guides: http://support.nortel.com/go/main.jsp?cscat=DOCDETAIL&id=973713&poid=15181 2009-00002304 Page 24 of 24