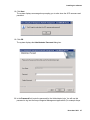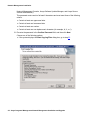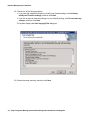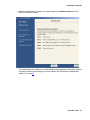
1
Avaya Integrated Management
Release 6.0
Network Management
Installation and Upgrade
Issue 2
November 2010
© 2010 Avaya Inc.
All Rights Reserved.
Notice
While reasonable efforts have been made to ensure that the information in this
document is complete and accurate at the time of printing, Avaya assumes no
liability for any errors. Avaya reserves the right to make changes and
corrections to the information in this document without the obligation to notify
any person or organization of such changes.
Documentation disclaimer
Avaya shall not be responsible for any modifications, additions, or deletions to
the original published version of this documentation unless such modifications,
additions, or deletions were performed by Avaya.
End User agree to indemnify and hold harmless Avaya, Avaya's agents,
servants and employees against all claims, lawsuits, demands and judgments
arising out of, or in connection with, subsequent modifications, additions or
deletions to this documentation, to the extent made by End User.
Link disclaimer
Avaya is not responsible for the contents or reliability of any linked Websites
referenced within this site or documentation(s) provided by Avaya. Avaya is not
responsible for the accuracy of any information, statement or content provided
on these sites and does not necessarily endorse the products, services, or
information described or offered within them. Avaya does not guarantee that
these links will work all the time and has no control over the availability of the
linked pages.
Warranty
Avaya provides a limited warranty on this product. Refer to your sales
agreement to establish the terms of the limited warranty. In addition, Avaya’s
standard warranty language, as well as information regarding support for this
product, while under warranty, is available to Avaya customers and other
parties through the Avaya Support Website: http://www.avaya.com/support.
Please note that if you acquired the product from an authorized Avaya reseller
outside of the United States and Canada, the warranty is provided to you by the
said Avaya reseller and not by Avaya.
Licenses
The software license terms available on the Avaya Website,
http://support.avaya.com/licenseinfo/ are applicable to anyone who downloads,
uses and/or installs Avaya software, purchased from Avaya Inc., any Avaya
affiliate, or an authorized Avaya reseller (as applicable) under a commercial
agreement with Avaya or an authorized Avaya reseller. Unless otherwise
agreed to by Avaya in writing, Avaya does not extend this license if the
software was obtained from anyone other than Avaya, an Avaya affiliate or an
Avaya authorized reseller, and Avaya reserves the right to take legal action
against you and anyone else using or selling the software without a license. By
installing, downloading or using the software, or authorizing others to do so,
you, on behalf of yourself and the entity for whom you are installing,
downloading or using the software (hereinafter referred to interchangeably as
“you” and “end user”), agree to these terms and conditions and create a
binding contract between you and Avaya Inc. Or the applicable Avaya affiliate
(“Avaya”).
Avaya grants End User a license within the scope of the license types
described below. The applicable number of licenses and units of capacity for
which the license is granted will be one (1), unless a different number of
licenses or units of capacity is specified in the Documentation or other
materials available to End User. “Designated Processor” means a single
stand-alone computing device. “Server” means a Designated Processor that
hosts a software application to be accessed by multiple users. “Software”
means the computer programs in object code, originally licensed by Avaya and
ultimately utilized by End User, whether as stand-alone products or
pre-installed on Hardware. “Hardware” means the standard hardware originally
sold by Avaya and ultimately utilized by End User.
License types
•
Designated System(s) License (DS):
End User may install and use each copy of the Software on only
one Designated Processor, unless a different number of
Designated Processors is indicated in the Documentation or other
materials available to End User. Avaya may require the Designated
Processor(s) to be identified by type, serial number, feature key,
location or other specific designation, or to be provided by End
User to Avaya through electronic means established by Avaya
specifically for this purpose.
•
Concurrent User License (CU):
End User may install and use the Software on multiple Designated
Processors or one or more Servers, so long as only the licensed
number of Units are accessing and using the Software at any given
time. A “Unit” means the unit on which Avaya, at its sole discretion,
bases the pricing of its licenses and can be, without limitation, an
agent, port or user, an e-mail or voice mail account in the name of a
person or corporate function (e.g., webmaster or helpdesk), or a
directory entry in the administrative database utilized by the
•
•
Software that permits one user to interface with the Software. Units
may be linked to a specific, identified Server.
Named User License (NU):
End User may: (i) install and use the Software on a single
Designated Processor or Server per authorized Named User
(defined below); or (ii) install and use the Software on a Server so
long as only authorized Named Users access and use the
Software. “Named User” means a user or device that has been
expressly authorized by Avaya to access and use the Software. At
Avaya's sole discretion, a “Named User” may be, without limitation,
designated by name, corporate function (for example, webmaster
or helpdesk), an e-mail or voice mail account in the name of a
person or corporate function, or a directory entry in the
administrative database utilized by the Software that permits one
user to interface with the Software.
Shrinkwrap License (SR):
Customer may install and use the Software in accordance with the
terms and conditions of the applicable license agreements, such as
“shrinkwrap” or “clickthrough” license accompanying or applicable
to the Software (“Shrinkwrap License”). (See Third-party
Components for more information).
Copyright
Except where expressly stated otherwise, no use should be made of materials
on this site, the Documentation(s) and Product(s) provided by Avaya. All
content on this site, the documentation(s) and the product(s) provided by
Avaya including the selection, arrangement and design of the content is owned
either by Avaya or its licensors and is protected by copyright and other
intellectual property laws including the sui generis rights relating to the
protection of databases. You may not modify, copy, reproduce, republish,
upload, post, transmit or distribute in any way any content, in whole or in part,
including any code and software. Unauthorized reproduction, transmission,
dissemination, storage, and or use without the express written consent of
Avaya can be a criminal, as well as a civil, offense under the applicable law.
Third Party Components
Certain software programs or portions thereof included in the Product may
contain software distributed under third party agreements (“Third Party
Components”), which may contain terms that expand or limit rights to use
certain portions of the Product (“Third Party Terms”). Information regarding
distributed Linux OS source code (for those Products that have distributed the
Linux OS source code), and identifying the copyright holders of the Third Party
Components and the Third Party Terms that apply to them is available on the
Avaya Support Website: http://support.avaya.com/Copyright.
Preventing toll fraud
“Toll fraud” is the unauthorized use of your telecommunications system by an
unauthorized party (for example, a person who is not a corporate employee,
agent, subcontractor, or is not working on your company's behalf). Be aware
that there can be a risk of toll fraud associated with your system and that, if toll
fraud occurs, it can result in substantial additional charges for your
telecommunications services.
Avaya fraud intervention
If you suspect that you are being victimized by toll fraud and you need technical
assistance or support, call Technical Service Center Toll Fraud Intervention
Hotline at +1-800-643-2353 for the United States and Canada. For additional
support telephone numbers, see the Avaya Support Website:
http://www.support.avaya.com/.
Suspected security vulnerabilities with Avaya products should be reported to
Avaya by sending mail to:[email protected].
Trademarks
Avaya® and Avaya Aura™ are trademarks of Avaya Inc.
The trademarks, logos and service marks (“Marks”) displayed in this site, the
documentation(s) and product(s) provided by Avaya are the registered or
unregistered Marks of Avaya, its affiliates, or other third parties. Users are not
permitted to use such Marks without prior written consent from Avaya or such
third party which may own the Mark. Nothing contained in this site, the
documentation(s) and product(s) should be construed as granting, by
implication, estoppel, or otherwise, any license or right in and to the Marks
without the express written permission of Avaya or the applicable third party.
All non-Avaya trademarks are the property of their respective owners.
Downloading documents
For the most current versions of documentation, see the Avaya Support
Website: http://www.avaya.com/support.
Contact Avaya Support
Avaya provides a telephone number for you to use to report problems or to ask
questions about your product. The support telephone number is
1-800-242-2121 in the United States. For additional support telephone
numbers, see the Avaya Website: http://www.avaya.com/support.
Contents
Introduction . . . . . . . . . . . . . . . . . . . . . . . . . . . .
3
Purpose . . . . . . . . . . . . . . . . . . . . . . . . . . . . . . . . . . . . 3
Prerequisites
. . . . . . . . . . . . . . . . . . . . . . . . . . . . . . . . .3
Intended audience
. . . . . . . . . . . . . . . . . . . . . . . . . . . . . . .3
Conventions used in this book . . . . . . . . . . . . . . . . . . . . . . . . . . 4
Support resources . . . . . . . . . . . . . . . . . . . . . . .
Avaya Professional Services . . . . . . . . . . . . . . . . .
Avaya Global Services Delivery . . . . . . . . . . . . . . . .
Avaya Global Technical Services . . . . . . . . . . . . . . . .
Customized Management Solutions for Avaya Integrated Management
Avaya Contact Information . . . . . . . . . . . . . . . . . .
.
.
.
.
.
.
.
.
.
.
.
.
.
.
.
.
.
.
.
.
.
.
.
.
.
.
.
.
.
.
.
.
.
.
.
.
.
.
.
.
.
.
.4
.4
.5
.5
.6
.6
Product Documentation . . . . . . . . . . . . . . . . . . . . . . . . . . . . . 7
How to access books on the web . . . . . . . . . . . . . . . . . . . . . . . . . 7
Overview. . . . . . . . . . . . . . . . . . . . . . . . . . . . . .
9
Network Management . . . . . . . . . . . . . . . . . . . . . . . . . . . . . . 9
Pre-Installation Tasks . . . . . . . . . . . . . . . . . . . . . . . . . . . . . 10
Ensuring that browser settings allow active scripting . . . . . . . . . . . . . . . . 11
Network Management Installation . . . . . . . . . . . . . . . . . . . 13
Overview . . . . . . . . . . . . . . . . . . . . . . . . . . . . . . . . . . 13
Windows Server Requirements . . . . . . . . . . . . . . . . . . . . . . . . . 14
Windows Client PC Requirements . . . . . . . . . . . . . . . . . . . . . . . . 16
Installing the software
. . . . . . . . . . . . . . . . . . . . . . . . . . . . 17
Opening the firewall between the Network Management
Console Server and a Remote Client PC . . . . . . . . . . . . . . . . . . . . . 39
Upgrading the software . . . . . . . . . . . . . . . . . . . . . . . . . . . . 41
Uninstalling the software
. . . . . . . . . . . . . . . . . . . . . . . . . . . 42
Changing an application link on the Avaya Integrated
Management Launch Page . . . . . . . . . . . . . . . . . . . . . . . . . . 43
Issue 2 November 2010
1
Contents
Issue 2 November 2010
2
Chapter 1: Introduction
Purpose
The purpose of this book is to provide the following information:
●
Hardware and software requirements for Microsoft® Windows® servers and Windows
client PCs.
●
Pre-installation tasks that must be completed prior to installation.
●
Procedures to install the products in the Avaya Integrated Management Network
Management offer. If any of the products included in this offer are already installed on your
system, those products will be upgraded during this installation.
Prerequisites
System administrators who install the Network Management software should be experienced in
installing software on Windows operating systems in a converged network environment.
Intended audience
This book is written for system administrators who are responsible for installing software on
Windows servers and clients.
November 2010
3
Introduction
Conventions used in this book
The following typographical conventions are used:
●
Bold type is used to indicate selections from menus, dialog box, window, tabs in a window,
and the Enter key on the keyboard. It is also used for emphasis.
●
Courier bold font is used to indicate commands that you type.
●
Courier bold italic font is used to indicate variable information within the
commands that you type.
●
Courier font is used to indicate information that appears as command results, or ouput.
●
Arrows indicate options that you select from cascading menus; for example,
Select File > Open means choose the Open option from the File menu.
Support resources
Avaya provides a variety of planning, consulting, and technical services. The following sections
describe the resources and services that are available.
Avaya Professional Services
The Avaya Professional Services (APS) team of Avaya Integrated Management (AIM)
consultants offers customers the following services:
●
Platform-readiness verification
●
AIM architectural planning, design, and overview
●
Remote turnkey implementation and installation
●
AIM server configuration
●
Customer acceptance verification
●
Custom on-site services
●
Onsite and remote knowledge transfer
The APS Data Group consists of the following teams:
●
Avaya Integrated Management Consultants
The Avaya Integrated Management (AIM) consulting team offers planning, design,
implementation, consulting, and knowledge transfer services for the entire Avaya Integrated
Management Suite. This includes Site Administration, Network Management Console with
4 Avaya Integrated Management Network Management Installation and Upgrade
Support resources
Software Update Manager, MultiSite Administration, and Fault and Performance Manager.
The thrust of the APS team is to bring the correct methodology to these complex application
deployments that span various regions, and to provide continuity to the overall project.
Through proper integration and consulting, our customer can leverage the AIM suite to
lower total cost of ownership, and proactively manage their VoIP network comfortably and
confidently.
●
Data Network Implementation Engineering
The Data Network Implementation Engineering (formerly RNIS) team implements and
upgrades or upgrades existing or new data networks. This team analyzes the network
design requirements and performance expectations of the customer. The team then creates
the hardware and software installation specification used to implement data devices that
include Network Management Console, VPN, Wireless LAN, Secure Gateways, Extreme,
Juniper, and multivendor data equipment.
The APS Data Group provides support on a contract basis. Contact your local Avaya Account
Team or Business Partner to purchase any implementation offer from the team. For more
information, refer to Table 1: Customer-Accessible Resources on page 6, or contact Jon
Machak at 248-213-3788 or [email protected].
Avaya Global Services Delivery
Avaya Global Services Delivery (GSD) provides support to the Avaya Integrated Management
client teams, field technicians, and customers. Ensure that the following conditions are met:
●
You provide remote access.
●
You have a current maintenance agreement.
●
You procure and install the required systems and software as defined in the Integrated
Management Services Support Plan.
●
You do not request support that is outside the purchase agreement.
The GSD will bill you for support on a time and materials basis if the above requirements are not
met. The GSD does not support hardware or software that you purchase from third-party
vendors.
Avaya Global Technical Services
Avaya Global Technical Services answers customer calls about products in Avaya Integrated
Management. They will either answer your questions directly or connect you with an associate
who can answer questions about the products.
November 2010
5
Introduction
Customized Management Solutions for Avaya Integrated
Management
The Integrated Management Product Team understands your needs and is focused on
customer satisfaction. For contact information, see Table 1: Customer-Accessible
Resources on page 6. The Product Team will assist you with Avaya Integrated Management
projects and will provide:
●
Project Management — An Integrated Management project person will work with you to
access configuration and customization requirements for any or all applications within
each Avaya Integrated Management offer. If custom work is required, the evaluation will
include a proposed statement of work and price. Note that this offer is not intended to
provide installation for those that choose to implement Integrated Management
applications using Avaya Services or third-party implementation services.
●
Training — Basic training can be performed remotely using an interactive medium to
display the applications and a conference bridge for audio. On-site training can be
customized to meet your needs. Customized training will focus on application functionality
that is relevant to you and provide focused knowledge transfer to facilitate
application-specific training.
Avaya Contact Information
Table 1 provides contact information that you may use if you need assistance during the
process of installing and setting up Avaya Integrated Management.
Table 1: Customer-Accessible Resources
Resource
Contact Information
Avaya Support Center
http://www.avaya.com/support
Avaya Global
Technical Services
+1 800 242-2121, extension 15921
Avaya Professional
Services (APS)
Consulting
+1 800 730-9108, prompt 3
Integrated
Management Product
Team
Send email to: [email protected]
Toll Fraud Intervention
+1 800 643-2353, prompt 1
6 Avaya Integrated Management Network Management Installation and Upgrade
Product Documentation
Product Documentation
The latest version of the Avaya Integrated Management product documentation, including this
book, is available on the Avaya Support Web site. To view or download these books from the
Web, you must have access to the Internet, an Internet browser, and the Adobe Reader. The
Adobe Reader is available from http://www.adobe.com. For instructions on how to view or
download these books, see How to access books on the web.
How to access books on the web
To view or download books from the Avaya Support Web site, follow these steps:
1. Access http://www.avaya.com/support.
2. Click Documentation on the left hand pane.
3. Click the desired item from the drop down list under which your book is classified.
4. Click I for Integrated Management (All Offers).
5. Locate the Integrated Management (All Offers) name and click the corresponding link.
6. Select desired release number from the Release drop down list.
7. Select the required document.
November 2010
7
Introduction
8 Avaya Integrated Management Network Management Installation and Upgrade
Chapter 2: Overview
Network Management
Network Management is a Windows solution for the Avaya Integrated Management. It is
designed for small-to-medium size networks that run on Windows platforms. It provides a
complete converged solution that helps you manage your network through a common
web-based user interface. The VoIP SystemView provides the ability to see your whole voice
system structure and hierarchy. With this offer, you can administer and manage the Avaya voice
systems and Avaya converged devices (such as gateways and switches).
Network Management includes Avaya Provisioning and Installation Manager, which enables
you to remotely configure Avaya media gateways on a network-wide basis. The Avaya
Provisioning and Installation Manager provides integrated network system views that ease
centralized configuration tasks, especially provisioning and installing large numbers of
gateways simultaneously.
Note:
Note:
This product includes software developed by the Apache Software Foundation
(http://www.apache.org/).
The Network Management offer provides one server license for the Avaya Network
Management Console and the provisioning tools including the Software Update Manager.
Note:
Note:
The Avaya Integrated Management Release 6.0 applications are tested with
DEFINITY Release 9.5 up to the Avaya Aura™ Communication Manager
Release 6.0. There is no guarantee that the Avaya Integrated Management
Release 6.0 applications will function properly with the Communication Manager
releases subsequent to the Communication Manager Release 6.0. It is
recommended that Integrated Management be upgraded whenever the
Communication Manager software is upgraded to ensure proper support.
November 2010
9
Overview
Pre-Installation Tasks
Before installing the Avaya Integrated Management products, you must complete the following
pre-installation tasks.
1. Check the minimum hardware and software requirements for the following:
Note:
●
For Windows server configuration, see Windows Server Requirements on page 14.
●
For Windows client PC configuration, see Windows Client PC Requirements on page 16.
Note:
The Network Management Release 6.0 supports VMWare based installations.
The versions supported are VMware ESX 3.0, and VMware ESX 3.5. This allows
you to use the same hardware with multiple virtual machines to install the
Network Management on one of the virtual machines. The system resources of
the virtual machine must meet the minimum system requirements as described in
Table 2: Microsoft Windows Server Minimum Requirements on page 14.
2. Make sure you are logged in as "administrator" on the server on which you want to install
the Avaya Integrated Management Release 6.0 Network Management. The "administrator"
should be a local user on the server. The Windows Domain Account user (administrator or
otherwise) should not be used for installing this software.
3. You must deactivate the Check for Updates Automatically option from the Java Control
Panel. To do this:
1. Select Start > Control Panel.
2. Double-click the Java icon in the control panel. The system displays the Java Control
Panel.
3. Click Update.
4. Clear the Check for Updates Automatically check box.
5. Click OK.
4. Carefully review the Avaya Integrated Management Implementation Guidelines document.
This document is available from the Avaya Support Web site. This document describes
server configuration requirements and provides pre-installation forms that must be
completed before you begin installing the Avaya Integrated Management products. The
pre-installation forms contain information that you will need to install the products, such as
IP addresses, server domain names, and port addresses.
5. If you want to access other applications from the Avaya Integrated Management Launch
Page, you will need the IP addresses of the servers on which the following optional
applications reside:
●
Avaya Fault and Performance Manager
●
MultiSite Administration
10 Avaya Integrated Management Network Management Installation and Upgrade
Ensuring that browser settings allow active scripting
●
Integrated Management Database
●
Avaya easy Management
6. Carefully review this entire book before you start the installations on the servers and client
PCs.
Note:
Note:
If you are installing the Network Management applications on a Windows 2003
server, ensure that the browser security settings are set to allow active scripting.
For more information, see Ensuring that browser settings allow active
scripting on page 11.
7. Network Management Installer cleans the Java cache for the local administrator account.
You must still clean the Java cache on the client machine.
Ensuring that browser settings allow active scripting
If you are installing the Network Management applications and Device Managers on a Windows
2003 server, be sure the server’s browser security settings are set to allow active scripting. You
must enable active scripting to allow all components in the Avaya Provisioning and Installation
Manager graphical user interface (GUI) to appear when you launch the application.
To ensure that browser settings are set to allow active scripting, follow these steps:
1. From the toolbar In your browser window, select Tools > Internet Options.
2. Click the Security tab, and then click Custom Level.
Note:
Note:
When launching the Network Management applications using Microsoft Internet
Explorer 7 and above, a warning page opens claiming that the certificate
provided by the server is self-signed. This page contains a link to the Network
Management launch page. You can either click the link to continue using the
applications, or install a customer-provided certificate for the Apache web server.
November 2010
11
Overview
12 Avaya Integrated Management Network Management Installation and Upgrade
Chapter 3: Network Management Installation
Overview
This chapter describes the minimum hardware requirements for a Windows server and a
Windows client PC and provides the procedure to install the Network Management onto a
Windows server.
November 2010
13
Network Management Installation
Windows Server Requirements
Table 2 provides the minimum requirements for the Windows server.
Table 2: Microsoft Windows Server Minimum Requirements
Component
Operating
System
Required
●
Microsoft Windows 2003 R2
Standard or Enterprise Edition with
Service Pack 2
●
Microsoft Windows XP Professional
with Service Pack 3
●
Microsoft Windows 2008 Business
or Enterprise Edition (32-bit and
64-bit editions) without Hyper-V
with Service Pack 2
●
Microsoft Windows 7 Professional
(32-bit and 64-bit editions)
●
Microsoft Windows 2008 R2
Standard or Enterprise Edition only
on Intel processor hardware
Comments
Only English operating
systems are supported.
Note:
You can install Network Management on
VMWare (supported versions are VMware
ESX 3.0, and VMware ESX 3.5) running
one of the supported operating systems.
Processor
3.0 GHz Pentium® 4 or Equivalent AMD
Processor unless otherwise stated
Hard Drive
10 GB
Memory
2.0 GB RAM
Network
Connectivity
TCP/IP 100 Mbit Network Card
Only one network interface
is supported. Dual network
interface cards (NICs) or
additional software
network interfaces, such
as a VPN interface, are not
supported.
Modem
56K modem for remote access
Optional
A maximum of two
processors is supported.
1 of 2
14 Avaya Integrated Management Network Management Installation and Upgrade
Windows Server Requirements
Table 2: Microsoft Windows Server Minimum Requirements (continued)
Component
Required
Monitor
SVGA 1024 X 768 display
SNMP Agent
The Simple Network Management
Protocol (SNMP) Agent is the Windows
Service that runs on your computer. It is
provided with the Windows operating
system CD.
Web Browser
Internet Explorer 6.0 with Service Pack 1
or Service Pack 2, Internet Explorer 7.0
with Service Pack 1, Internet Explorer 8,
and Mozilla Firefox 3.5 or Mozilla Firefox
3.6.
Comments
Required for access to the
Integrated Management
Launch Page and
web-based clients.
2 of 2
November 2010
15
Network Management Installation
Windows Client PC Requirements
Once the Network Management is installed on the Windows server, you can access the
applications from the Windows server or from a Windows client PC using a Web browser. The
client PC must meet the minimum requirements provided in Table 3.
Table 3: Microsoft Windows Client PC Minimum Requirements
Component
Operating
system
Required
●
Microsoft Windows 2003 R2
Standard or Enterprise Edition with
Service Pack 2
●
Microsoft Windows XP Professional
with Service Pack 3
●
Microsoft Windows 2008 Business
or Enterprise Edition (32-bit and
64-bit editions) without Hyper-V
with Service Pack 2
●
Microsoft Windows 7 Professional
(32-bit and 64-bit editions)
●
Microsoft Windows 2008 R2
Standard or Enterprise Edition only
on Intel processor hardware
●
Microsoft Windows Vista (32-bit &
64-bit editions) with Service Pack 2
Processor
1.5 GHz Pentium
Hard Drive
5 GB
Memory
1 GB RAM
Comments
Required to install all of the
client components.
For Microsoft Windows 2008, Microsoft
Windows 2008R2, and Windows
Professional 7 operating systems, the
minimum memory requirement is
2 GB RAM.
Monitor
SVGA 1024 X 768 display
Network
Connectivity
TCP/IP 10/100 Network Card
1 of 2
16 Avaya Integrated Management Network Management Installation and Upgrade
Installing the software
Table 3: Microsoft Windows Client PC Minimum Requirements (continued)
Component
Required
Comments
Modem
56K Modem
Optional. May be required
for remote access to the
client PC.
Other Software
Internet Explorer 6.0 with Service Pack 1
or Service Pack 2, Internet Explorer 7.0
with Service Pack 1, Internet Explorer 8.0,
and Mozilla Firefox 3.5 or Mozilla Firefox
3.6, Java Runtime Environment 1.6.0.16,
or later (as provided in Network
Management Service Packs, if any)
Required to access the
Integrated Management
Launch Page and
web-based clients.
2 of 2
Installing the software
Use this procedure to install the Network Management applications and the Device Managers
on the Windows server.
Note:
Note:
During the installation, COPSSH SCP Server is installed. If OpenSSH server is
already installed on the server, a dialog box opens prompting you to uninstall
OpenSSH. Click Yes in this dialog box, for the installer to uninstall OpenSSH and
then install COPSSH SCP Server.
This procedure also provides steps to help you configure your VoIP Media Servers and gather
information required to properly discover and manage your voice network with this network
management station.
1. Make sure you are logged in as "administrator" on the server on which you want to install
the Avaya Integrated Management Release 6.0 Network Management. The "administrator"
should be a local user on the server.
Note:
Note:
You should not use your Windows Domain Account user identification
(administrator or otherwise) for installing this software.
2. Ask all users to log off the system.
3. Close all open windows and applications.
4. Download the self extractable file and run it.
November 2010
17
Network Management Installation
Note:
Note:
If you are installing Network Management application on a server running on any
Microsoft Windows operating system that supports User Account Control (UAC),
then, if UAC is enabled, you must start the installation as mentioned below.
Right-click on the installer exe and select "Run as administrator" from the drop
down. If you do not run it as administrator, the Network Management application
might not install or function properly under UAC mode of the operating system.
The above procedure of installing Network Management application is also
applicable while you install Network Management Service Packs. For more
information on User Account Control (UAC) visit the Microsoft website.
The system displays the Avaya Integrated Management Network Management 6.0 window.
It provides the main menu.
5. Click Install Network Management.
The system displays the Welcome dialog box.
6. Click Next.
The system displays the License Agreement dialog box.
7. Read the license agreement. If you accept the license agreement, click the I accept the
terms of the license agreement option, and then click Next.
18 Avaya Integrated Management Network Management Installation and Upgrade
Installing the software
Note:
Note:
You must accept the terms of the license agreement in order to continue with the
installation.
The system displays the Choose Destination Location dialog box. By default, the files will
be installed in C:\Program Files\Avaya.
8. Choose one of the following options:
●
Click Next to install the files in the default folder.
●
Click Change to change the folder where you want to install the files.
The system displays the Choose Folder dialog box.
a. Specify the folder you want to use, and then click OK.
November 2010
19
Network Management Installation
b. Click Next.
The system displays the Self extractor dialog box.
●
Click Setup.
Depending on your configuration, the system displays one of the following dialog box:
20 Avaya Integrated Management Network Management Installation and Upgrade
Installing the software
●
If IIS (Microsoft’s Web Server) is detected on the server, the system displays the IIS
Installation Detected dialog box.
Enter the new port number on which IIS should run, and then click Next. By default, the
new port number is 8989.
The system displays the Apache Server Information dialog box.
November 2010
21
Network Management Installation
By default, the system installs the Apache HTTP server programs and short cuts for all
users. You can specify to install Apache HTTP server programs and short cuts for the
current user only. Go to Step 9.
●
If IIS is not detected on the server, the system displays the Apache Server Information
dialog box. Go to Step 9.
9. In the Domain field, enter the domain.
10. In the Server field, enter the name of the server on which you are installing this software.
11. In the Admin field, enter the e-mail address of the person to whom the system will send
email messages if problems occur during the Apache installation.
22 Avaya Integrated Management Network Management Installation and Upgrade
Installing the software
12. Click Next.
13. Enter the IP address of the Avaya Integrated Management Launch Page server, Fault and
Performance Manager server, MultiSite Administration server, Integrated Management
Database server, SIP Enablement Services server, and then click Next.
The system displays the Enter IP Addresses dialog box.
November 2010
23
Network Management Installation
Note:
Note:
You are not required to enter the IP address of the Avaya Integrated
Management Launch Page Server. However, if you leave this blank and click
Next, no link to the launch page will be provided on the server.
24 Avaya Integrated Management Network Management Installation and Upgrade
Installing the software
14. Enter the IP address of the Avaya easy Management server, Message Networking server,
and Polycom GMS server, and then click Next.
The system displays the Enter IP Address and Port dialog box.
November 2010
25
Network Management Installation
15. Enter the IP address and port number of the Extreme EPICenter server, and then click
Next. Leave these fields blank if you do not have an Extreme EpiCenter server.
The system displays the SCP Server User Creation dialog box. You can use this dialog
box to create a Windows user on the SCP server. Avaya Software Update Manager uses
this Windows user to exchange files with devices in your network.
By default, the installer generates a user name and password automatically. You can
change the user name and password.
Note:
Note:
Be sure to write down the user name and password.
16. If you want to change the automatically generated user name for SCP, enter the new user
name in the Username box. The new user name must consist of 1 to 10 characters. No
spaces are allowed between characters.
17. If you want to change the automatically generated password for SCP, enter the new
password in the Password box. The password must consist of 8 to 16 alphanumeric
characters and must contain at least one uppercase character, one lowercase character,
and one numeric character.
26 Avaya Integrated Management Network Management Installation and Upgrade
Installing the software
18. Click Next.
The system displays a message box prompting you to write down the SCP username and
password.
19. Click OK.
The system displays the Administrator Password dialog box.
20. In the Password field, enter the password for the Administrator login. You will use this
password to log into the Avaya Integrated Management applications (For example Avaya
November 2010
27
Network Management Installation
Network Management Console, Avaya Software Update Manager, and Avaya Secure
Access Administration).
This password must consist of at least 8 characters and must meet three of the following
criteria:
●
Contain at least one uppercase letter.
●
Contain at least one lowercase letter.
●
Contain at least one number.
●
Contain at least one non-alphanumeric character (for example, #, %, or ^).
21. Re-enter the password in the Confirm Password field, and then click Next.
Choose one of the following options:
●
If the system displays the Start Copying Files dialog box, go to step 23.
28 Avaya Integrated Management Network Management Installation and Upgrade
Installing the software
●
If the Windows firewall is activated, the system displays the Modifying Firewall dialog
box. Go to step 22.
November 2010
29
Network Management Installation
22. Choose one of the following options:
●
If you want the installation program to modify your firewall settings, click Let Setup
modify the Firewall’s settings, and then click Next.
●
If you do not want to make any changes to your firewall settings, click Do not make any
changes, and then click Next.
The system displays the Start Copying Files dialog box.
23. Review the setup summary, and then click Next.
30 Avaya Integrated Management Network Management Installation and Upgrade
Installing the software
●
When the installation is complete, the system displays the Welcome Screen for the
Network Discovery Wizard.
This wizard helps you configure your VoIP media servers and gather information required
to properly discover and manage your voice network with this network management
station. Go to step 24
November 2010
31
Network Management Installation
24. Click Next.
The system displays the Configure CM Servers dialog box.
25. In the Configure CM Servers dialog box, perform the following steps:
32 Avaya Integrated Management Network Management Installation and Upgrade
Installing the software
a. Click Add CM to add the Communication Manager servers you want to manage. The
system displays the Configure CM Servers dialog box.
b. Enter the IP Address and login for the Communication Manager server.
c. Do one of the following:
●
Click Password, and then enter the password.
●
Click ASG key, and then enter the ASG key.
d. Select the appropriate protocol from the menu.
e. Click Next.
f. Choose one of the following options:
●
If you want of use an existing SNMPv3 user to communicate with the Communication
Manager server, click Existing SNMPv3 User, and then select the user from the
associated drop-down box.
●
If you want to create a new SNMPv3 user to communicate with the Communication
Manager server, click New SNMPv3 User, and then choose one of the following options:
1. In the User Name field, enter the name of the new SNMPv3 user.
November 2010
33
Network Management Installation
2. In the Authentication Password field, enter the password. This password must
consist of 8 to 32 characters.
3. In the Verify Authentication Password field, re-enter the password.
4. From the Authentication Scheme box, select the type of authentication.
5. In the Privacy Password field, enter the privacy password. This password must
consist of 8 to 32 characters.
6. In the Verify Privacy Password field, re-enter the privacy password.
g. Click Next.
h. Validate the server certificate, and then click Yes.
The system displays the new Communication Manager server in the Configure CM
Servers dialog box.
34 Avaya Integrated Management Network Management Installation and Upgrade
Installing the software
i. Repeat Steps a through h for each Communication Manager server you want to add.
When you are finished adding Communication Manager servers, click Next.
The system displays the Configure Global SNMP Parameters dialog box. You can add
one or more sets of SNMP parameters to be used for network discovery and
management access to your network devices.
26. To add one or more sets of SNMP parameters:
a. Click Add SNMP Rule, and choose one of the following options:
●
If the SNMP parameters are for an existing user, click Existing SNMPv3 User, and then
select the user from the Select User menu.
●
If the SNMP parameters are for a new user, click New SNMPv3 User, and then choose
one of the following options:
1. In the User Name field, enter the user name.
2. In the Authentication Password field, enter the password.
3. In the Verify Authentication Password field, re-enter the password.
4. From the Authentication Scheme field, select the scheme.
November 2010
35
Network Management Installation
5. In the Privacy Password field, enter the privacy password.
6. In the Verify Privacy Password field, re-enter the privacy password.
●
If you want to configure SNMPv1 Community, click the SNMPv1 Community option, and
then choose one of the following options:
1. In the Read Community field, enter the Read Community string.
2. In the Read/Write Community field, enter the Read/Write Community string.
b. Click Next.
The system displays the new SNMP parameters in the Configure Global SNMP
Parameters dialog box.
c. Repeat steps a and b for each set of SNMP parameters you want to add.
d. When you are finished configuring the global SNMP parameters, click Next.
The system displays the Configure Network Subnet to Discover dialog box. You will
see the subnet details associated with the Communication Manager server you selected
in step 27 already populated. If you want to add an additional subnet to discover then go
to step 27.
36 Avaya Integrated Management Network Management Installation and Upgrade
Installing the software
27. In the Configure Network Subnet to Discover dialog box, perform the following steps:
a. Click Add Subnet to add the IP network you want to discover.
b. In the Subnet IP field, enter the subnet IP Address.
c. Choose one of the following options:
●
Click the Subnet Mask option, and then enter the subnet mask.
●
Click the Router option, and then enter the router for this subnet.
d. Click Next.
The system displays the new IP network in the Configure Network Subnet to Discover
dialog box.
e. Repeat Steps a through d for each IP network you want to discover. When you are
finished adding IP networks, click Next.
The system displays the Configuration Complete dialog box.
November 2010
37
Network Management Installation
28. Click Finish.
The system displays the InstallShield Wizard Complete dialog box.
29. Click Yes, I want to restart my computer now option, and then click Finish. The computer
will reboot and the network discovery will automatically begin when the computer restarts.
If you performed the Network Management configuration tasks during the installation, you can
access the products by selecting Start > Programs > Avaya > Network Management. For
more information about an Avaya Integrated Management product, access the online help after
you start the application.
If you did not perform the Network Management configuration tasks using the Avaya Network
Management Configuration wizard during the installation, see Avaya Integrated Management
Release 6.0, Network Management Configuration.
Note:
Note:
Check the Avaya Support Web site regularly for software updates.
38 Avaya Integrated Management Network Management Installation and Upgrade
Opening the firewall between the Network Management Console Server and a Remote Client PC
Opening the firewall between the Network Management
Console Server and a Remote Client PC
You can access the Network Management Console server from a remote client PC using an
Internet browser. When there is a firewall between the Network Management Console server
and the remote client PC, you must ensure that the ports required for the remote session are
open.
The client and server software communicate using Java Remote Method Invocation (RMI). For
initial access to the server, the remote client PC must open an HTTP session on port 80 of the
server. After the HTTP session is established, the client and server open bi-directional RMI
sessions to enable interaction between Java applets running on the client and server.
The ports that must be open for the bi-directional RMI sessions are listed in the cv.prop file,
which is located in the installation directory. The default installation directory is C:\Program
Files\Avaya\Network Management\private\gen on the server.
A sample cv.prop file is shown below. Review the cv.prop file on your server to determine the
exact list of ports for your installation. RMI sessions work over TCP connections and the ports
should be open for bi-directional traffic.
November 2010
39
Network Management Installation
Figure 1: Sample cv.prop File
cmse.pim.port=2665
backupserver.rmi.port=2414
#Conguring the proxy host and proxy port for use with Avaya Software
Update Manager is no longer done in this file.
#It is possible to configure these parameters using the Avaya Software
Update Manager user interface
web.server.protocol=https
#web.server.port=80
cv.jum.rmi.port=2843
nm.web.protocol=https
windows.snmptrap.port=162
.rmiport.min=2900
.rmiport.max=2950
CMutil.socket.port=1980
CMutil.process.max=2
//cv.trap.port=2400
cv.launcher.port=2401
llm.clients.port=2402
fileaccess.rmi.port=2403
userver.rmi.port=2404
llm.servers.port=2405
userver.socket.port=2406
service.smuserdb.port=2407
service.snmpinfo.port=2408
smon.rmi.port=2409
nmlogin.local.port=2410
nmlogin.remote.port=2411
nmlogin.rmi.port=2412
llm.fileaccess.port=2413
cv.jre = ..\\jre\\
java.naming.factory.initial=org.jnp.interfaces.NamingContextFactory
java.naming.provider.url=jnp://localhost:62099
java.naming.factory.url.pkgs=org.jboss.naming:org.jnp.interfaces
client.paging.size=1000
cv.jum.rmi.ip=135.27.162.184
fileaccess.rmi.ip=135.27.162.184
smServer.rmi.port=2500
smServer.ipo.security.port=50812
smServer.ipo.config.port=50804
amServer.rmi.port=2330
amProcess.rmi.port=2331
llm.amClient.port=2332
trapManipServer.rmi.port=6169
Note:
Note:
In order for changes to the cv.prop file to take effect, you must restart Avaya
Services.
40 Avaya Integrated Management Network Management Installation and Upgrade
Upgrading the software
Upgrading the software
You can upgrade to the Network Management Release 6.0 from the Network Management
Release 5.2 or the Network Management Release 5.2 (with 5.2 service pack 4 or earlier). Use
this procedure to upgrade the Network Management applications.
Note:
Note:
During the installation, COPSSH SCP Server is installed. If OpenSSH server is
already installed on the server, a dialog box opens and prompts you to uninstall
OpenSSH. Click Yes in this dialog box, for the installer to uninstall OpenSSH and
then install COPSSH SCP Server.
For upgrade installations, check that all previous sequential upgrades and/or major
releases of the Avaya Integrated Management products were installed before
installing this release. If the wizard detects a software upgrade that is not sequential,
the wizard will stop and display a message to install the skipped releases. The wizard
will then abort the installation.
Before running the Upgrade, start Windows Task Manager, and make sure that all of
the Avaya Network Management services are either completely started or completely
stopped. The Network Management applications may not be upgraded properly if any
of the Avaya Network Management services are in the starting mode.
1. Make sure you are logged in as "administrator" for the server on which you want to upgrade
the Avaya Integrated Management Release 6.0 Network Management. The "administrator"
should be a local user on the server.
2. Ask all users to log off the system.
3. Close all open windows and applications.
4. Download the self extractable file and run it.
Note:
Note:
If you are installing Network Management application on a server running on any
Microsoft Windows operating system that supports User Account Control (UAC),
then, if UAC is enabled, you must start the installation as mentioned below.
Right-click on the installer exe and select "Run as administrator" from the drop
down. If you do not run it as administrator, the Network Management application
might not install or function properly under UAC mode of the operating system.
The above procedure of installing Network Management application is also
applicable while you install Network Management Service Packs. For more
information on User Account Control (UAC) visit the Microsoft website.
5. The Avaya Integrated Management Network Management window provides the main menu.
Click Install Network Management.
The system displays the Welcome dialog box.
November 2010
41
Network Management Installation
6. Click Next.
The system displays a messaging prompting you to enter a new password.
7. Click OK to open the Administrator Password dialog box, and then enter the new
password.
Note:
Note:
All the users (including admin and other users) created in previous releases need
to use this password for their next login.
8. Click Next.
The system displays the Application Detected for Upgrade dialog box with the list of
applications currently installed. All the listed applications will be upgraded.
9. Click Next.
The system displays the Setup Status message box showing the status of the upgrade.
When the upgrade is complete, the Update Complete dialog box opens.
10. Click the Yes, I want to restart my computer now option.
11. Click Finish. The computer will reboot.
Uninstalling the software
Use this procedure to uninstall the Network Management applications and Device Managers
from the Windows server.
1. Select Start > Control Panel.
The system displays the Control Panel window.
2. Click Add or Remove Programs.
The system displays the Add or Remove Programs window.
3. Click Avaya Integrated Management Network Management.
4. Click Remove.
The system displays a dialog box prompting you to confirm that you want to remove the
applications.
Note:
Note:
If you want to Repair the Network Management applications and Device
Managers from the Windows server click Change, and then select the Repair
option.
When you choose the Repair option, the installShield reinstalls Network Management
applications with the settings selected during the first installation.
42 Avaya Integrated Management Network Management Installation and Upgrade
Changing an application link on the Avaya Integrated Management Launch Page
5. Click Yes.
The system displays the Modifying Firewall dialog box.
6. Select the appropriate option, and then click Next.
You are prompted to uninstall Apache.
7. Click Yes.
If IIS is installed, you are prompted to set IIS back to port 80. Click Yes.
The system prompts you to uninstall PostgreSQL.
8. Click Yes.
The system prompts you to uninstall IP Office Manager.
9. Click Yes.
The status bar appears while files are uninstalled. When finished, the system displays the
Uninstall Complete dialog box.
10. Click Yes, I want to restart my computer now option, and then click Finish.
Changing an application link on the Avaya Integrated
Management Launch Page
A server configuration tool is available that allows you to change an application link on the
Avaya Integrated Management Launch Page after an application has been installed. To do this,
follow these steps:
1. Select Start > Programs > Avaya > Tools > Configure Integrated Management.
The system displays the Configure Utility dialog box.
2. To change the link of an Integrated Management application, click the AIM Information tab
and change the IP address of the application.
3. If you want the application links for Avaya Site Administration and Voice Announcement
Manager to appear on the Avaya Integrated Management Launch Page, select the check
box for those applications.
4. Click Save.
5. To change the link of an adjunct application, click the Adjunct Management Information
tab and change the IP address of the application.
6. If you want the application link for Mailbox Manager to appear on the Avaya Integrated
Management Launch Page, select the check box for that application.
7. Click Save.
8. Click Exit when finished.
November 2010
43
Network Management Installation
44 Avaya Integrated Management Network Management Installation and Upgrade
Index
Index
Symbols
>, meaning of in text . . . . . . . . . . . . . . . . . 4
A
Avaya
support resources . . . . . . . . . . . . . . . . 4
support Web site . . . . . . . . . . . . . . . . . 7
support web site . . . . . . . . . . . . . . . . . 7
Windows server . . . . . . . . . . . . . . . . . 14
resources
Avaya Global Services Delivery (GSD) . . . . . . . 5
Avaya Global Technical Services . . . . . . . . . . 5
Customized Management Solutions for Avaya Integrated
Management . . . . . . . . . . . . . . . . . . 6
S
Simple Network Management Protocol Agent. . . . . 15
T
B
typographical conventions . . . . . . . . . . . . . . . 4
bold text, meaning of . . . . . . . . . . . . . . . . . 4
C
contact information for Avaya . . .
courier bold font, meaning of . . .
courier bold italic font, meaning of .
courier font, meaning of . . . . .
.
.
.
.
.
.
.
.
.
.
.
.
.
.
.
.
.
.
.
.
.
.
.
.
.
.
.
.
.
.
.
.
.
.
.
.
.
.
.
.
6
4
4
4
E
Enterprise Network Management
defined . . . . . . . . . . . . . . . . . . . . . . 9
network discovery wizard . . . . . . . . . . . . 31
pre-installation tasks . . . . . . . . . . . . . . 10
I
installation CD
Network Management . . . . . . . . . . . . . . 17
IP address
changing launch page links after application is installed
43
P
prerequisites, for installing . . . . . . . . . . . . . . 3
Provisioning and Installation Manager
defined . . . . . . . . . . . . . . . . . . . . . . 9
R
requirements
Windows client . . . . . . . . . . . . . . . . . 16
November 2010
45
Index
46 Avaya Integrated Management Network Management Installation and Upgrade