1
Title page
Nortel Communication Server 1000
DECT Handset 4060
User Guide
Revision history
Revision history
January 2009
Standard 01.02. This document is up-issued to support
Nortel Networks DECT Handset 4060.
December 2007
Standard 01.01. This document is up-issued to support Nortel
Communication Server 1000 Release 5.5.
September 2004
Standard 2.00. This document is up-issued to support
Nortel Networks DECT Handset 4060.
July 2004
Standard 1.00. This document is issued to support the
Nortel Networks DECT Handset 4060.
3
Revision history
4
Contents
Contents
Safety precautions . . . . . . . . . . . . . . . . . . . . . . . . . . . . . . . . . 9
Set up the DECT Handset 4060 . . . . . . . . . . . . . . . . . . . . . . 11
Install the batteries . . . . . . . . . . . . . . . . . . . . . . . . . . . . . . . . . 11
Before you begin . . . . . . . . . . . . . . . . . . . . . . . . . . . . . . . 11
Insert the batteries . . . . . . . . . . . . . . . . . . . . . . . . . . . . . . 12
Charge the batteries . . . . . . . . . . . . . . . . . . . . . . . . . . . . . . . . 13
Charging guidelines . . . . . . . . . . . . . . . . . . . . . . . . . . . . . 13
How to charge the batteries . . . . . . . . . . . . . . . . . . . . . . . 13
Charging and operating times . . . . . . . . . . . . . . . . . . . . . 13
Register the handset . . . . . . . . . . . . . . . . . . . . . . . . . . . . . . . 14
About the DECT Handset 4060 . . . . . . . . . . . . . . . . . . . . . . 17
Basic features . . . . . . . . . . . . . . . . . . . . . . . . . . . . . . . . . . . . . 17
Handset controls . . . . . . . . . . . . . . . . . . . . . . . . . . . . . . . . . . . 18
Illumination . . . . . . . . . . . . . . . . . . . . . . . . . . . . . . . . . . . . 20
Keypad . . . . . . . . . . . . . . . . . . . . . . . . . . . . . . . . . . . . . . . 20
Handset display . . . . . . . . . . . . . . . . . . . . . . . . . . . . . . . . . . . 21
Icon/text line . . . . . . . . . . . . . . . . . . . . . . . . . . . . . . . . . . . 21
Text lines . . . . . . . . . . . . . . . . . . . . . . . . . . . . . . . . . . . . . 22
Soft key line . . . . . . . . . . . . . . . . . . . . . . . . . . . . . . . . . . . 23
Powering up your handset . . . . . . . . . . . . . . . . . . . . . . . . . . . 24
Security functions . . . . . . . . . . . . . . . . . . . . . . . . . . . . . . . . . . 25
Change the PIN . . . . . . . . . . . . . . . . . . . . . . . . . . . . . . . . 25
Read-only . . . . . . . . . . . . . . . . . . . . . . . . . . . . . . . . . . . . . 27
Reset the handset . . . . . . . . . . . . . . . . . . . . . . . . . . . . . . 28
Configure options on the DECT Handset 4060 . . . . . . . . . 30
Key Lock . . . . . . . . . . . . . . . . . . . . . . . . . . . . . . . . . . . . . . . . . 30
Ringer Settings . . . . . . . . . . . . . . . . . . . . . . . . . . . . . . . . . . . . 32
5
Contents
Melody . . . . . . . . . . . . . . . . . . . . . . . . . . . . . . . . . . . . . . . 32
Ringer Type . . . . . . . . . . . . . . . . . . . . . . . . . . . . . . . . . . . 34
Device . . . . . . . . . . . . . . . . . . . . . . . . . . . . . . . . . . . . . . . 35
Volume Settings . . . . . . . . . . . . . . . . . . . . . . . . . . . . . . . . 38
Volume Settings . . . . . . . . . . . . . . . . . . . . . . . . . . . . . . . . . . . 40
Telephone Options . . . . . . . . . . . . . . . . . . . . . . . . . . . . . . . . . 41
User Name . . . . . . . . . . . . . . . . . . . . . . . . . . . . . . . . . . . . 42
Language . . . . . . . . . . . . . . . . . . . . . . . . . . . . . . . . . . . . . 43
Emergency Call . . . . . . . . . . . . . . . . . . . . . . . . . . . . . . . . 45
Voice Box . . . . . . . . . . . . . . . . . . . . . . . . . . . . . . . . . . . . . 49
Attention Tones . . . . . . . . . . . . . . . . . . . . . . . . . . . . . . . . 51
Silent Charging . . . . . . . . . . . . . . . . . . . . . . . . . . . . . . . . . 52
Charger Answer . . . . . . . . . . . . . . . . . . . . . . . . . . . . . . . . 55
Auto Quick Hook . . . . . . . . . . . . . . . . . . . . . . . . . . . . . . . 57
Auto Answer . . . . . . . . . . . . . . . . . . . . . . . . . . . . . . . . . . . 59
Disp. Contrast . . . . . . . . . . . . . . . . . . . . . . . . . . . . . . . . . 61
Menu Shortcuts . . . . . . . . . . . . . . . . . . . . . . . . . . . . . . . . . . . 63
Make a Call . . . . . . . . . . . . . . . . . . . . . . . . . . . . . . . . . . . . . . 64
Option 1 - On-hook dialing . . . . . . . . . . . . . . . . . . . . . . . . . . . 64
Option 2 - Off-hook dialing . . . . . . . . . . . . . . . . . . . . . . . . . . . 64
Option 3 - Handsfree dialing . . . . . . . . . . . . . . . . . . . . . . . . . . 65
Make an SOS call . . . . . . . . . . . . . . . . . . . . . . . . . . . . . . . . . . 65
Answer or reject a call . . . . . . . . . . . . . . . . . . . . . . . . . . . . . 66
Answer a call . . . . . . . . . . . . . . . . . . . . . . . . . . . . . . . . . . . . . 66
Reject a call . . . . . . . . . . . . . . . . . . . . . . . . . . . . . . . . . . . . . . 67
Mute the handset ringer . . . . . . . . . . . . . . . . . . . . . . . . . . . . . 69
While on an active call . . . . . . . . . . . . . . . . . . . . . . . . . . . . . 71
Place a call on hold . . . . . . . . . . . . . . . . . . . . . . . . . . . . . . . . 71
Retrieve a call on hold . . . . . . . . . . . . . . . . . . . . . . . . . . . . . . 71
6
Contents
Transfer a call . . . . . . . . . . . . . . . . . . . . . . . . . . . . . . . . . . . . . 72
Use Handsfree . . . . . . . . . . . . . . . . . . . . . . . . . . . . . . . . . . . . 72
Mute a call . . . . . . . . . . . . . . . . . . . . . . . . . . . . . . . . . . . . . . . 73
Talk with more than one person . . . . . . . . . . . . . . . . . . . . . 76
Set up a conference call . . . . . . . . . . . . . . . . . . . . . . . . . . . . . 76
Create a Telephone Book . . . . . . . . . . . . . . . . . . . . . . . . . . 79
Add, edit, and delete entries . . . . . . . . . . . . . . . . . . . . . . . . . . 79
Make a call using the Telephone Book . . . . . . . . . . . . . . . . . . 86
Use the Caller List . . . . . . . . . . . . . . . . . . . . . . . . . . . . . . . . 88
Caller List symbols . . . . . . . . . . . . . . . . . . . . . . . . . . . . . . . . . 88
Access and use the Caller List . . . . . . . . . . . . . . . . . . . . . . . . 89
Use the Redial List . . . . . . . . . . . . . . . . . . . . . . . . . . . . . . . . 97
Access and use the Redial List . . . . . . . . . . . . . . . . . . . . . . . 97
Use Quick Call . . . . . . . . . . . . . . . . . . . . . . . . . . . . . . . . . . 104
Use Caller Filter . . . . . . . . . . . . . . . . . . . . . . . . . . . . . . . . . 108
List of numbers . . . . . . . . . . . . . . . . . . . . . . . . . . . . . . . . 108
Filter Options . . . . . . . . . . . . . . . . . . . . . . . . . . . . . . . . . 118
Wild Cards . . . . . . . . . . . . . . . . . . . . . . . . . . . . . . . . . . . 120
System Settings . . . . . . . . . . . . . . . . . . . . . . . . . . . . . . . . . 125
Access Meridian PBX features . . . . . . . . . . . . . . . . . . . . . 135
Use Voicemail . . . . . . . . . . . . . . . . . . . . . . . . . . . . . . . . . . . 137
Use Text message . . . . . . . . . . . . . . . . . . . . . . . . . . . . . . . 140
Urgent text messages . . . . . . . . . . . . . . . . . . . . . . . . . . . . . . 141
Confirm receipt of urgent text message(s) . . . . . . . . . . . 146
Normal text messages . . . . . . . . . . . . . . . . . . . . . . . . . . . . . 147
7
Contents
Confirm receipt of normal text message(s) . . . . . . . . . . 149
Store and delete text messages . . . . . . . . . . . . . . . . . . . . . . 150
Read text messages . . . . . . . . . . . . . . . . . . . . . . . . . . . . . . . 155
Send a text message . . . . . . . . . . . . . . . . . . . . . . . . . . . . . . 158
Accessories . . . . . . . . . . . . . . . . . . . . . . . . . . . . . . . . . . . . 164
Battery . . . . . . . . . . . . . . . . . . . . . . . . . . . . . . . . . . . . . . 164
Desktop Charger . . . . . . . . . . . . . . . . . . . . . . . . . . . . . . 164
Charger Rack . . . . . . . . . . . . . . . . . . . . . . . . . . . . . . . . . 164
Belt Clip . . . . . . . . . . . . . . . . . . . . . . . . . . . . . . . . . . . . . 165
Data cable . . . . . . . . . . . . . . . . . . . . . . . . . . . . . . . . . . . 165
Headset . . . . . . . . . . . . . . . . . . . . . . . . . . . . . . . . . . . . . 166
IBM-compatible PC . . . . . . . . . . . . . . . . . . . . . . . . . . . . 166
DECT Handset 4060 software CD . . . . . . . . . . . . . . . . . 166
PC connection . . . . . . . . . . . . . . . . . . . . . . . . . . . . . . . . 167
Index . . . . . . . . . . . . . . . . . . . . . . . . . . . . . . . . . . . . . . . . . . 169
8
Safety precautions
Safety precautions
Read the following information before using the Nortel Networks DECT
Handset 4060.
CAUTION
Do not rely on a cordless phone to make emergency calls.
The handset uses radio signals and does not guarantee a
connection in all circumstances.
The
symbol on the product certifies its conformity with the technical
guidelines concerning user safety and electro-magnetic compatibility valid
at the time of approval; in accordance with European directive
No. 91\263\EEC.
This product complies with IP50 according to IEC 529 / EN 60 529. Use
only in countries where authorized.
Never use your handset in:
•
the vicinity of electrical detonators
•
shielded rooms
•
areas where radio transmission is forbidden
•
aircraft
Do not place your handset near:
•
water, moisture, or damp areas
•
heat sources, direct sunlight, or unventilated areas
•
devices that generate strong magnetic fields such as electrical
appliances, fluorescent lamps, computers, radios, televisions, or fax
machines
•
areas where the handset will be covered, thereby impairing
ventilation
•
near liquid or chemicals
•
areas with dust, vibration, shock, or temperature extremes
9
Safety precautions
Observe the following:
WARNING
Do not open the handset or charger as doing so could
expose you to high voltages. Have all repairs carried out
by authorized service personnel.
WARNING
Do not store or locate flammable liquids, gases, or
explosive materials in the same compartment or vicinity
as the cordless handset, its parts or accessories.
WARNING
Do not use the handset in a vehicle or hazardous
location.
CAUTION
Do not let small metal objects come into contact with the
handset. This can deteriorate audio quality and damage
the handset.
CAUTION
• Use only the plug-in AC adapter and battery type
supplied.
10
•
Ensure the adapter voltage is the same as the
electrical outlet voltage.
•
Do not use visibly-damaged AC adapters.
Set up the DECT Handset 4060
Set up the DECT Handset 4060
Before you use the handset, perform the following:
1. Read the battery safety information and follow the procedure to install
the batteries.
2. Charge the batteries.
3. Register your handset with the DECT system.
Install the batteries
Before you begin
The handset uses a rechargeable AAA NiMh of typical 800mAh, 1.2V
battery.
WARNING
Do not replace the batteries in potentially explosive
environments, such as rooms where flammable liquids
or gases are present.
WARNING
Do not dispose of the batteries in a fire.
CAUTION
Do not use disposable AAA 1.5 V batteries.
11
Set up the DECT Handset 4060
CAUTION
Do not charge the batteries unless you use the supplied
charger and the proper batteries.
CAUTION
Do not let the battery or the charger come into contact
with conductive metal objects.
Insert the batteries
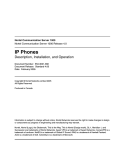
Figure 1 illustrates how to insert batteries in the DECT Handset 4060.
Figure 1: Insert the batteries
1
2
3
Steps
1. Lift the back cover of the handset as shown in the diagram.
2. Insert the batteries in the battery compartment, ensuring that the
polarity is correct. The + - poles of the batteries must correspond to
the + - markings in the battery compartment.
3. Replace the cover by placing it on the compartment at a slight angle
and pressing it down until it clicks into place.
12
Set up the DECT Handset 4060
Charge the batteries
CAUTION
The batteries can become hot during the first charge
cycle. If the fully-charged batteries are removed from the
handset and inserted again, they can become
overcharged when the handset is placed in the charger.
Charging guidelines
•
Charge the battery for at least six to seven hours before using the
handset for the first time.
•
Charge the handset on a regular basis.
•
Do not leave the handset connected to the charger longer than one
month without using.
How to charge the batteries
1. Plug the charger into an electrical outlet.
2. Place the handset in the charger. The handset display shows
Charging.
Charging and operating times
•
Batteries require 6 to 7 hours to fully charge.
•
When a fully-charged handset is switched off, it discharges in
approximately one week.
•
When batteries are fully charged, the handset has approximately 20
hours of talk time and between 200 and 300 hours of standby time.
The handset display screen shows the batteries’ charge status. See
Figure 2 for battery charge statuses.
13
Set up the DECT Handset 4060
Figure 2: Battery charge status
Fully charged - 80% to 100%
Partially Charged - 60% to 80%
Partially Charged - 40% to 60%
Partially Charged - 20% to 40%
No Charge - 0% to 20%.
Batteries are empty.
An alert tone sounds and the icon (frame) flashes.
Note: When new batteries are inserted, or the firmware on the
handset has been upgraded, a charge status icon will not display until
a complete charge cycle has been completed. However, when
partially charged batteries are inserted, then the charge status icon
will be shown immediately.
Register the handset
Before you can use the DECT Handset 4060, the handset must be
registered with the system. A system ID and handset registration code
may be required to complete the registration process. Contact your
system administrator for proper codes.
To register the handset with the DECT system:
x
[
Nortel 5260
Robert Reid
Menu
14
b
M r
1. Press the Menu soft key.
Set up the DECT Handset 4060
2. Press the arrow keys to scroll and
highlight the System option.
Menu
System
Telephone Options
Security
OK
a
Esc
3. Press the OK soft key.
OK
4. Press the arrow keys to scroll and
highlight the Subscriptions option.
System
IPEI
Subscriptions
OK
a
Esc
5. Press the OK soft key.
OK
6. Press the arrow keys to scroll and
highlight the New option.
Subscriptions
New
OK
a
OK
Esc
7. Press the OK soft key.
15
Set up the DECT Handset 4060
8. Choose one of the following:
d
OK
OK
d
OK
d
OK
d
OK
16
— if you are at a location where two
DECT systems overlap, use the
keypad to enter the system
identification number at the PARK
prompt and press the OK soft key.
— if you are at a location where there is
only one DECT system, press the
OK soft key.
9. Use the keypad to enter the
authentication code at the Auth.Code
prompt and press the OK soft key.
10. Use the keypad to enter the system
name at the System Name prompt and
press the OK soft key.
11. Use the keypad to enter the local
number at the Local Number prompt
and press the OK soft key.
About the DECT Handset 4060
About the DECT Handset 4060
The DECT Handset 4060 is a feature-rich DECT handset that brings a
high level of user functionality to in-building mobile workers.
Basic features
The DECT Handset 4060 supports the following features:
•
multi-field LCD display
•
illuminated keypad
•
volume control
•
connector for a headset
•
connector for a PC adapter
•
loudspeaker for on-hook dialing or on-hook listening
•
two soft keys (self-labeled) providing access to handset features
•
two specialized fixed keys:
— R (Recall) key
— Info key
•
three Call processing fixed keys:
— C (Cancel) key
— Handsfree key
— Hook key
17
About the DECT Handset 4060
Handset controls
Figure 3: DECT Handset 4060
Use the C (Cancel) key to:
18
•
power On/Off
•
delete characters or entire entries
•
edit characters
About the DECT Handset 4060
Use the R (Recall) key to:
•
access Meridian PBX features
•
Emergency/SOS calls
•
place a call on hold
•
retrieve a call on hold
•
transfer a call
•
set up a conference call
Use the Hook key to:
•
make a call
•
answer a call
•
end a call
Use the Info key to:
•
access Caller List
•
access Voicemail
•
access Text message
Press the Handsfree key to activate
handsfree.
Use the soft keys to control handset
functions and features.
Press the arrow (up/down) keys to select
menu items and to access the Telephone
Book.
19
About the DECT Handset 4060
Illumination
The handset keys are illuminated and the display backlight is activated
when there is an incoming call, or if a key is pressed. The lights switch off
after 10 seconds.
Keypad
Use the keypad to:
•
enter the telephone number
•
add or edit Telephone Book entries
•
create or edit text messages
To enter a character, press a key from 0 to 9. For example, press the 4
key twice to enter the character H. Press * to toggle between upper- and
lower-case letters. See Table 1 for handset keypad references.
Table 1: Handset keypad reference
Keypad
Alphabet equivalent
1
?!1-+*/=()%¿i
?!1-+*/=()%¿i
2
ABC2ÄÅÀÁÆÇ
abc2äåàáæç
3
DEF3ËÈÉÊ
def3ëèéê
4
GHI4ÏÌÍÎ
ghi4ïìíî
5
JKL5
jkl5
6
MNO6ÖÒÓÔÕØ
mno6öòóôõø
7
PQRS7ß
pqrs7ß
8
TUV8ÜÙÚÛ
tuv8üùúû
9
WXYZ9
wxyz9
0
(space) , . 0 : ; _ “ ‘ ^ ~
(space) , . 0 : ; _ “ ‘ ^ ~
*
A -> a
a -> A
#
# @ € $ £ ¥ § < > {|} [\]
# @ € $ £ ¥ § < > {|} [\]
20
About the DECT Handset 4060
Handset display
The handset has three major display areas:
•
Icon / text line
•
Text lines (3)
•
Soft key line
Figure 4: Handset display
x
[
Nortel 5260
Robert Reid
b
Menu
Icon line
Text lines
M
r
Soft key line
Icon/text line
The Icon/text line displays the current status of the handset during a
telephone call or while in idle mode.
When using the menus, this line displays the name of the active menu.
When the handset is in an idle state, this line is replaced with an icon line.
Refer to Table 2 for handset status symbols.
Table 2: Symbols indicating handset status (Part 1 of 2)
Symbol
Status
n
Ringer deactivated
t
Caller filter active
x
At least 2 bars: Good radio link
21
About the DECT Handset 4060
Table 2: Symbols indicating handset status (Part 2 of 2)
Symbol
Status
w
Steady: handset has a connection
Flashing: handset has an incoming call
=
Steady: Handsfree is activated
V
Flashing: Message in voice box
l
Steady: One or more unread messages in the memory
Flashing: Message memory full
[
Charge status of the batteries
q
Steady: Keypad is locked
Text lines
The three text lines are used to display menu lists, text messages, or
information about the current connection status. Additionally, your system
name, programmed name, and the telephone number of the handset are
displayed on these lines. Figure 5 illustrates a menu list appearing in the
handset screen display.
Figure 5: Menu appearing in handset screen display
TelBook
Miller
Newman
Peters
Options
Esc
A feature menu’s (for example, TelBook) selection list (for example,
Miller, Newman, Peters) is displayed as a three-line excerpt. The lines
can be moved up or down using the arrow keys. A selectable entry is
shown inversely with a dark background.
22
About the DECT Handset 4060
Soft key line
Soft keys are located below the handset display screen.The functions
allocated to the keys are shown on the bottom line of the display. The key
functions change automatically according to the operation state of the
handset.
Figure 6: Soft key line
x
[
Nort
el 5260
Rober
t Reid
b
Menu
Menu
Icon line
Text lines
M
r
Soft key line
Use the Menu soft key to access the Menu
list.
Use the Telephone Book soft key to access
the Telephone Book.
b
r
Use the Redial soft key to access the Redial
List.
OK soft key
Use the OK soft key to confirm the selected function. The OK soft key is
used to switch between two options in a function. In the display area, only
active settings are indicated by a check mark (o).
Options soft key
Use the Options soft key to perform actions on the selected item in the
current menu.
23
About the DECT Handset 4060
Esc soft key
Use the Esc soft key to quit the current menu selection. The selection of
the previous menu branch or the current idle/connection display is shown.
Press the Esc soft key for approximately two seconds to quit the present
menu and return to the idly display.
Arrow soft keys
Symbols displayed above the arrow keys (up and down keys) identify the
respective functionality of the arrow keys.
s
If continuous text is displayed (such as a
message), the text can be scrolled up/down
using the arrow keys.
a
When a selection list (such as Telephone
Book of Menu) is displayed, the arrow keys
move the cursor to the desired entry.
c
When entering telephone numbers and
names, move the cursor keys left or right
using the arrow keys.
Powering up your handset
Press and hold the C key for one second to
turn the handset power on/off.
24
About the DECT Handset 4060
Security functions
The security functions are protected by a four-digit Personal Identification
Number (PIN). The PIN is only necessary when the Read-only feature is
active. The Security option enables you to change the PIN, set the
handset to Read-only, and Reset the handset.
Change the PIN
The default setting for the PIN is 0 0 0 0. The PIN acts as the user’s
signature to protect personal settings.
To change the PIN:
x
[
1. Press the Menu soft key.
Nortel 5260
Robert Reid
Menu
b
M
r
2. Press the arrow keys to scroll and
highlight the Security option.
Menu
System
Telephone Options
Security
OK
a
Esc
OK
3. Press the OK soft key.
d
4. Enter your PIN.
25
About the DECT Handset 4060
5. Press the OK soft key.
OK
6. Press the arrow keys and scroll to
highlight the Change PIN option.
Security
Change PIN
Read-only
Reset
OK
26
a
Esc
OK
7. Press the OK soft key.
d
8. Enter the old PIN.
OK
9. Press the OK soft key.
d
10. Enter the new PIN.
OK
11. Press the OK soft key.
d
12. Re-enter the new PIN.
OK
13. Press the OK soft key.
About the DECT Handset 4060
Read-only
The Read-only feature is used to prevent other users from making
changes to the handset settings. All menu features are activated, but
personal settings are protected.
Note: When the Read-only feature is turned on, it is also impossible
to delete text messages manually. To be able to receive new
messages when the message list becomes full, the Overwrite feature
must be enabled prior to turning on the Read-only feature. See “Store
and delete text messages” on page 150 for a description of the
Overwrite feature.
To activate Read-only:
x
[
1. Press the Menu soft key.
Nortel 5260
Robert Reid
Menu
b
M
r
2. Press the arrow keys to scroll and
highlight the Security option.
Menu
System
Telephone Options
Security
OK
a
Esc
OK
3. Press the OK soft key.
d
4. Enter the PIN.
27
About the DECT Handset 4060
5. Press the OK soft key.
OK
6. Press the arrow keys to scroll and
highlight the Read-only option.
Security
Change PIN
Read-only
Reset
OK
a
Esc
7. Press the OK soft key.
OK
Reset the handset
All settings, with the exception of the Telephone Book, the PIN, and the
system registration are reset to the default settings.
To reset the handset:
x
[
Nortel 5260
Robert Reid
Menu
28
b
M
r
1. Press the Menu soft key.
About the DECT Handset 4060
2. Press the arrow keys to scroll and
highlight the Security option.
Menu
System
Telephone Options
Security
a
OK
Esc
OK
3. Press the OK soft key.
d
4. Enter the PIN.
OK
5. Press the OK soft key.
Security
6. Press the arrow keys to scroll and
highlight the Reset option.
Change PIN
Read-only
Reset
OK
a
OK
OK
Esc
7. Press the OK soft key.
8. At the Sure? prompt, choose one of the
following:
— Press the OK soft key to accept
— Press the Esc soft key to decline
ESC
29
Configure options on the DECT Handset 4060
Configure options on the DECT
Handset 4060
The Menu option enables you to configure the following handset
preferences:
•
Key Lock
•
Ringer Settings
•
Volume Settings
•
Telephone Options
Key Lock
Use the Key Lock feature to disable key input. The keypad can be locked
to prevent any accidental operation. Calls can be answered when the key
lock is active. Once the call is terminated, the key lock is reactivated.
To lock the keypad Option 1:
x
[
1. Press the Menu soft key.
Nortel 5260
Robert Reid
Menu
b
M
r
2. Press the
30
# key.
Configure options on the DECT Handset 4060
To lock the keypad Option 2:
x
[
1. Press the Menu soft key.
Nortel 5260
Robert Reid
b
Menu
M
r
2. Press the arrow keys to scroll and
highlight the Key Lock option.
Menu
Key Lock
Ringer Settings
Volume Settings
OK
a
ESC
3. Press the OK soft key.
OK
To unlock the keypad:
x
[
1. Press the Key Lock soft key.
Key Lock
Robert Reid
5260
!
2. Press the
#key.
31
Configure options on the DECT Handset 4060
Ringer Settings
Use the Ringer Settings feature to configure the following options:
•
Melody
•
Type
•
Device
•
Volume Settings
Melody
Use the Melody option to set the ringer melody for different types of calls.
To select the ringer melody:
x
[
1. Press the Menu soft key.
Nortel 5260
Robert Reid
Menu
b
M
r
2. Press the arrow keys to scroll and
highlight the Ringer Settings option.
Menu
Key Lock
Ringer Settings
Volume Settings
OK
a
OK
32
Esc
3. Press the OK soft key.
Configure options on the DECT Handset 4060
4. Press the arrow keys to scroll and
highlight the Melody option.
Ringer Settings
Melody
Type
Device
OK
a
Esc
5. Press the OK soft key.
OK
6. Press the arrow keys to scroll and
highlight one of the following options:
Melody
Incoming calls
— Incoming calls
VIP
Normal message
— VIP
OK
a
— Normal message
Esc
— Urgent message
7. Press the OK soft key.
OK
8. Press the arrow keys to scroll and
highlight the melody number.
Melody
Incoming calls
12
OK
a
Esc
33
Configure options on the DECT Handset 4060
9. Choose one of the following:
— Press the arrow keys to increase or
decrease the melody number.
— Use the keypad to enter the melody
number.
d
Note: Enter a number between 1 and 60
to set the melody for each type of call.
10. Press the OK soft key.
OK
Ringer Type
Use the Ringer Type option to set the ringer to play a full melody or a
short melody for an incoming call.
To select the ringer to play a full melody:
x
[
1. Press the Menu soft key.
Nortel 5260
Robert Reid
Menu
b
M
r
2. Press the arrow keys to scroll and
highlight the Ringer Settings option.
Menu
Key Lock
Ringer Settings
Volume Settings
OK
34
a
Esc
Configure options on the DECT Handset 4060
3. Press the OK soft key.
OK
4. Press the arrow keys to scroll and
highlight the Type option.
Ringer Settings
Melody
Type
Device
OK
a
Esc
5. Press the arrow keys to scroll and
highlight one of the following options:
Type
Full Melody
— Full Melody
Chirp
— Chirp
OK
a
OK
Esc
6. Press the OK soft key.
Note: After pressing the OK soft key, a
check mark “o” appears to the left of the
activated option.
Device
Use the Device menu option to select the ringer device.
35
Configure options on the DECT Handset 4060
To select the device ringer:
x
[
1. Press the Menu soft key.
Nortel 5260
Robert Reid
Menu
b
M
r
2. Press the arrow keys to scroll and
highlight the Ringer Settings option.
Menu
Key Lock
Ringer Settings
Volume Settings
OK
a
Esc
3. Press the OK soft key.
OK
4. Press the arrow keys to scroll and
highlight the Device option.
Ringer Settings
Type
Device
Volume Settings
OK
a
OK
36
Esc
5. Press the OK soft key.
Configure options on the DECT Handset 4060
6. Press the arrow keys to scroll and
highlight one of the following:
Device
Buzzer
— Buzzer
Vibrator
Headset
— Vibrator
OK
— Headset
a
OK
Esc
7. Press the OK soft key.
Note: A check mark “o” indicates the
selected option is activated.
37
Configure options on the DECT Handset 4060
Volume Settings
Use the Volume Settings option to set the volume for the ringer.
To set the volume for the ringer:
x
[
1. Press the Menu soft key.
Nortel 5260
Robert Reid
b
Menu
M
r
2. Press the arrow keys to scroll and
highlight the Ringer Settings option.
Menu
Key Lock
Ringer Settings
Volume Settings
OK
a
Esc
3. Press the OK soft key.
OK
Ringer Settings
4. Press the arrow keys to scroll and
highlight the Volume Settings option.
Type
Device
Volume Settings
OK
a
OK
38
Esc
5. Press the OK soft key.
Configure options on the DECT Handset 4060
6. Press the arrow keys to increase or
decrease the volume.
OK
7. Press the OK soft key.
39
Configure options on the DECT Handset 4060
Volume Settings
Use the Volume Settings menu option to set the volume for the speaker
phone and the ear piece.
To adjust the volume:
x
[
1. Press the Menu soft key.
Nortel 5260
Robert Reid
b
Menu
M
r
2. Press the arrow keys to scroll and
highlight the Volume Settings option.
Menu
Key Lock
Ringer Settings
Volume Settings
a
OK
Esc
3. Press the OK soft key.
OK
4. Press the arrow keys to scroll and
highlight one of the following:
Volume Settings
Earpiece
— Ear piece
Handsfree
— Handsfree
OK
40
a
Esc
Configure options on the DECT Handset 4060
OK
5. Press the OK soft key.
6. Press the arrow keys to increase or
decrease the volume.
OK
7. Press the OK soft key.
Telephone Options
Use the Telephone Options menu to activate the following functions on
your handset:
•
User Name
•
Language
•
Emergency Call
•
Voice Box
•
Attention Tones
•
Silent Charging
•
Charger Answer
•
Auto Quick Hook
•
Auto Answer
•
Message Options
•
Disp.Contrast
41
Configure options on the DECT Handset 4060
User Name
Use the User Name feature to store a name which appears on the idle
display. The name can consist of a maximum 16 characters. See Table 1,
“Handset keypad reference,” on page 20 for information about using the
keypad to enter characters.
To enter a user name:
x
[
1. Press the Menu soft key.
Nortel 5260
Robert Reid
b
Menu
M
r
2. Press the arrow keys to scroll and
highlight Telephone Options.
Menu
System
Telephone Options
Secutrity
OK
a
Esc
3. Press the OK soft key.
OK
4. Press the arrow keys to scroll and
highlight the User Name option.
Telephone Options
User Name
Language
Emergency Call
OK
42
a
Esc
Configure options on the DECT Handset 4060
5. Use the key pad to enter the user name
characters.
d
6. Press the OK soft key.
OK
Language
Use the Language feature to set the display language. English is the
default language.
To set the language:
x
[
1. Press the Menu soft key.
Nortel 5260
Robert Reid
Menu
b
M
r
2. Press the arrow keys to scroll and
highlight the Telephone Options.
Menu
System
Telephone Options
Secutrity
OK
a
OK
Esc
3. Press the OK soft key.
43
Configure options on the DECT Handset 4060
4. Press the arrow keys to scroll and
highlight the Language option.
Telephone Options
Language
Emergency Call
Voice Box
a
OK
ESC
5. Press the OK soft key.
OK
6. Press the arrow keys to scroll and
highlight the preferred language.
Language
English
OK
a
OK
44
ESC
7. Press the OK soft key.
Configure options on the DECT Handset 4060
Emergency Call
Note: If you wish to use the SOS Emergency Voice Call feature
ONLY, do not configure an Emergency Call message.
Only configure an Emergency Call Message if your DECT system
supports Messaging.
Use the Emergency Call feature to store an emergency message
(maximum of 160 characters) and the number to dial in the event of an
emergency.
To store an Emergency Call message:
x
[
1. Press the Menu soft key.
Nortel 5260
Robert Reid
Menu
b
M
r
2. Press the arrow keys to scroll and
highlight Telephone Options.
Menu
System
Telephone Options
Secutrity
OK
a
OK
Esc
3. Press the OK soft key.
45
Configure options on the DECT Handset 4060
4. Press the arrow keys to scroll and
highlight the Emergency Call option.
Telephone Options
Emergency Call
Voice Box
Attention Tones
a
OK
Esc
5. Press the OK soft key.
OK
6. Press the arrow keys to scroll and
highlight the Messages option.
Emergency Call
Messages
SOS number
OK
a
OK
d
Esc
7. Press the OK soft key.
8. Use the keypad to enter the text of the
message.
Note: Refer to Table 1 on page 20 for
information about using the keypad to
enter text.
OK
46
9. Press the OK soft key.
Configure options on the DECT Handset 4060
To store an SOS number:
x
[
1. Press the Menu soft key.
Nortel 5260
Robert Reid
Menu
b
M
r
2. Press the arrow keys to scroll and
highlight Telephone Options.
Menu
System
Telephone Options
Secutrity
OK
a
Esc
3. Press the OK soft key.
OK
4. Press the arrow keys to scroll and
highlight the Emergency Call option.
Telephone Options
Emergency Call
Voice Box
Attention Tones
OK
a
OK
Esc
5. Press the OK soft key.
47
Configure options on the DECT Handset 4060
6. Press the arrow keys to scroll and
highlight the SOS number option.
Emergency Call
Messages
SOS number
OK
a
OK
d
OK
48
Esc
7. Press the OK soft key.
8. Use the keypad to enter the SOS
number.
9. Press the OK soft key.
Configure options on the DECT Handset 4060
Voice Box
For automated access to your voicemail messages, Nortel Networks
recommends you pre-configure the:
•
voicemail access number
•
voice box number
•
voice box password
Pre-configuration automatically dials the voicemail access number,
automatically enters your voice box number, and automatically enters
your voice box password.
To pre-configure the voicemail access number, your voice box
number, and your password:
x
[
1. Press the Menu soft key.
Nortel 5260
Robert Reid
Menu
b
M
r
2. Press the arrow keys to scroll and
highlight Telephone Options.
Menu
System
Telephone Options
Secutrity
OK
a
OK
Esc
3. Press the OK soft key.
49
Configure options on the DECT Handset 4060
4. Press the arrow keys to scroll and
highlight the Voice Box option.
Telephone Options
Voice Box
Attention Tones
Silent Charging
OK
a
OK
Esc
5. Press the OK soft key.
6. Enter the following:
d
a. Voicemail access number
b. P (long pause) — hold down “0” key
for longer than 2 seconds
c.
Voice box number
d.
#
e. Voice box password (optional)
followed by #
OK
50
7. Press the OK soft key.
Configure options on the DECT Handset 4060
Attention Tones
Use the Attention Tones feature to configure the handset to emit an
acoustic warning when a key is pressed, when there is a danger of losing
the radio link, when the battery charge is too low, when a setting is
confirmed, and when the end of a menu is displayed.
To configure Attention Tones:
x
[
1. Press the Menu soft key.
Nortel 5260
Robert Reid
Menu
b
M
r
2. Press the arrow keys to scroll and
highlight Telephone Options.
Menu
System
Telephone Options
Secutrity
OK
a
Esc
3. Press the OK soft key.
OK
4. Press the arrow keys to scroll and
highlight the Attention Tones option.
Telephone Options
Attention Tones
Silent Charging
Charger Answer
OK
a
Esc
51
Configure options on the DECT Handset 4060
5. Press the OK soft key.
OK
6. Press the arrow keys to scroll and
highlight one of the following:
Attention Tones
Key click
— Key click
Coverage warn
Battery alarm
— Coverage warn
OK
— Battery alarm
a
Esc
— Confirm tones
— End of menu
7. Press the OK soft key.
OK
Note: A check mark “o” indicates the
selected option is activated.
Silent Charging
Use the Silent Charging feature to automatically turn off the ringer while
the handset is charging.
To activate Silent Charging:
x
[
Nortel 5260
Robert Reid
Menu
52
b
M
r
1. Press the Menu soft key.
Configure options on the DECT Handset 4060
2. Press the arrow keys to scroll and
highlight Telephone Options.
Menu
System
Telephone Options
Secutrity
OK
a
Esc
3. Press the OK soft key.
OK
4. Press the arrow keys to scroll and
highlight the Silent Charging option.
Telephone Options
Silent Charging
Charger Answer
Auto Quick Hook
OK
a
OK
Esc
5. Press the OK soft key.
Note: A check mark “o” indicates the
selected option is activated.
53
Configure options on the DECT Handset 4060
To deactivate Silent Charging:
x
[
1. Press the Menu soft key.
Nortel 5260
Robert Reid
Menu
b
M
r
2. Press the arrow keys to scroll and
highlight Telephone Options.
Menu
System
Telephone Options
Secutrity
a
OK
Esc
3. Press the OK soft key.
OK
4. Press the arrow keys to scroll and
highlight the Silent Charging option.
Telephone Options
Silent Charging
Charger Answer
Auto Quick Hook
OK
a
OK
Esc
5. Press the OK soft key.
Note: A check mark “o” indicates the
selected option is activated.
54
Configure options on the DECT Handset 4060
Charger Answer
Use the Charger Answer feature to answer an incoming call by lifting the
handset out of the charger. The call is ended again by pressing the h key
or by placing the handset on the charger.
To activate Charger Answer:
x
[
1. Press the Menu soft key.
Nortel 5260
Robert Reid
Menu
b
M
r
2. Press the arrow keys to scroll and
highlight Telephone Options.
Menu
System
Telephone Options
Secutrity
OK
a
Esc
3. Press the OK soft key.
OK
4. Press the arrow keys to scroll and
highlight the Charger Answer option.
Telephone Options
Charger Answer
Auto Quick Hook
Auto Answer
OK
a
Esc
55
Configure options on the DECT Handset 4060
5. Press the OK soft key.
OK
Note: A check mark “o” indicates the
selected option is activated.
To deactivate Charger Answer:
x
[
1. Press the Menu soft key.
Nortel 5260
Robert Reid
Menu
b
M
r
2. Press the arrow keys to scroll and
highlight Telephone Options.
Menu
System
Telephone Options
Secutrity
OK
a
Esc
3. Press the OK soft key.
OK
4. Press the arrow keys to scroll and
highlight the Charger Answer option.
Telephone Options
Charger Answer
Auto Quick Hook
Auto Answer
OK
56
a
Esc
Configure options on the DECT Handset 4060
5. Press the OK soft key.
OK
Auto Quick Hook
Use the Auto Quick Hook feature to enable a Quick Call number to be
dialed automatically.
To activate Auto Quick Hook:
x
[
1. Press the Menu soft key.
Nortel 5260
Robert Reid
Menu
b
M
r
2. Press the arrow keys to scroll and
highlight Telephone Options.
Menu
System
Telephone Options
Secutrity
OK
a
OK
Esc
3. Press the OK soft key.
57
Configure options on the DECT Handset 4060
4. Press the arrow keys to scroll and
highlight the Auto Quick Hook option.
Telephone Options
Auto Quick Hook
Auto Answer
Message Options
a
OK
Esc
5. Press the OK soft key.
OK
Note: A check mark “o” indicates the
selected option is activated.
To deactivate Auto Quick Hook:
x
[
1. Press the Menu soft key.
Nortel 5260
Robert Reid
Menu
b
M
r
2. Press the arrow keys to scroll and
highlight Telephone Options.
Menu
System
Telephone Options
Secutrity
OK
a
OK
58
Esc
3. Press the OK soft key.
Configure options on the DECT Handset 4060
4. Press the arrow keys to scroll and
highlight the Auto Quick Hook option.
Telephone Options
Auto Quick Hook
Auto Answer
Message Options
a
OK
Esc
5. Press the OK soft key.
OK
Auto Answer
Use the Auto Answer feature to configure the handset to automatically
answer an incoming call after one ringer alert signal. The Auto Answer
function only works when the headset is connected.
To activate Auto Answer:
x
[
1. Press the Menu soft key.
Nortel 5260
Robert Reid
Menu
b
M
r
2. Press the arrow keys to scroll and
highlight Telephone Options.
Menu
System
Telephone Options
Secutrity
OK
a
Esc
59
Configure options on the DECT Handset 4060
3. Press the OK soft key.
OK
4. Press the arrow keys to scroll and
highlight the Auto Answer option.
Telephone Options
Auto Answer
Message Options
Disp.Contrast
a
OK
Esc
5. Press the OK soft key.
OK
Note: A check mark “o” indicates the
selected option is activated.
To deactivate Auto Answer:
x
[
1. Press the Menu soft key.
Nortel 5260
Robert Reid
Menu
b
M
r
2. Press the arrow keys to scroll and
highlight Telephone Options.
Menu
System
Telephone Options
Secutrity
OK
60
a
Esc
Configure options on the DECT Handset 4060
3. Press the OK soft key.
OK
4. Press the arrow keys to scroll and
highlight the Auto Answer option.
Telephone Options
Auto Answer
Message Options
Disp.Contrast
OK
a
Esc
5. Press the OK soft key.
OK
Disp. Contrast
Use the Disp.Contrast feature to adjust the display contrast.
To adjust the display contrast:
x
[
1. Press the Menu soft key.
Nortel 5260
Robert Reid
Menu
b
M
r
61
Configure options on the DECT Handset 4060
2. Press the arrow keys to scroll and
highlight Telephone Options.
Menu
System
Telephone Options
Secutrity
OK
a
Esc
3. Press the OK soft key.
OK
4. Press the arrow keys to scroll and
highlight Disp.Contrast option.
Telephone Options
Auto Answer
Message Options
Disp.Contrast
OK
a
OK
Esc
5. Press the OK soft key.
6. Press the arrow keys to increase or
decrease the display contrast.
OK
62
7. Press the OK soft key.
Configure options on the DECT Handset 4060
Menu Shortcuts
To use a menu shortcut on an idle handset, press one of the key
combinations displayed in Table 3.
Table 3: Key combinations
Feature
Key
Description
Ringer on/off
1
Menu 2
Ringer off
3
Menu 4
Silent Charging on
Silent Charging on/off
User Name
Caller Filter Accept
List
Caller Filter Block List
Caller Filter Off
Buzzer
Key Lock
Menu
Menu
Ringer on
Silent Charging off
Menu
5
Change the User Name
Menu
7
Caller Filter Accept List
activated.
Menu
8
Caller Filter Block List
activated.
Menu
9
Caller Filter off
Menu
*
Buzzer on/off
Menu
#
Key lock on/off
63
Make a Call
Make a Call
Press and hold the C key to turn the handset
on and off.
Option 1 - On-hook dialing
1. Press the Hook key.
d
2. Enter the number.
3. Press the Hook key to end the call.
Option 2 - Off-hook dialing
d
1. Enter the number.
2. Press the Hook key.
64
Make a Call
3. Press the Hook key to end the call.
Option 3 - Handsfree dialing
1. Press the Handsfree key.
d
2. Enter the number.
3. Press the Hook key to end the call.
Make an SOS call
You can make an SOS Emergency Voice call or send a previously stored
Emergence Call Text message to a certain telephone number.
If an Emergency Call Message has been configured (as on page 45), this
will take priority over an SOS Emergency Voice Call.
If you wish to use the SOS Emergency Voice Call feature only, do not
configure an Emergency Call message.
Press and hold the R (Recall) key for longer
than two seconds.
65
Answer or reject a call
Answer or reject a call
This section describes how to:
•
answer a call
•
reject a call
•
mute the handset ringer
Answer a call
When you have an incoming call, your DECT Handset 4060:
•
emits an audible signal (for example, short or full melody, vibrate or
buzzer)
•
displays an incoming caller’s name and number (if listed in the
Telephone Book)
•
displays a flashing handset icon
•
handsfree button flashes
g
To answer a call:
Choose one of the following:
— Press the Hook key.
— Press the Handsfree key.
Charger Answer
66
— Charger Answer
Remove the handset from the
charger (if Charger Answer is
active).
Answer or reject a call
Reject a call
Use the Reject feature to decline an incoming call.
To reject a call – Option 1:
x
g
[
1. Press the Silence soft key.
External
Peters
Options
Silence
2. Press the Reject soft key.
Options
Silence
Add To
OK
a
RR
Reject
To reject a call – Option 2:
x
g
[
1. Press the Options soft key.
External
Peters
Options
Silence
67
Answer or reject a call
2. Press the arrow keys to scroll and
highlight the Reject option.
Options
Reject
Silence
Add To
OK
a
OK
68
Esc
3. Press the OK soft key.
Answer or reject a call
Mute the handset ringer
Use the Mute feature to turn off the handset ringer.
To mute the ringer – Option 1:
x
g
[
Press the Silence soft key.
External
Peters
Options
Silence
To mute the ringer – Option 2:
x
g
[
1. Press the Options soft key.
External
Peters
Options
Silence
69
Answer or reject a call
2. Press the arrow keys to scroll and
highlight the Silence option.
Options
Reject
Silence
Add To
OK
a
OK
70
Esc
3. Press the OK soft key.
While on an active call
While on an active call
During and active call, you can:
•
place a call on hold
•
retrieve a call on hold
•
transfer a call
•
use handsfree
•
mute a call
Place a call on hold
To place a call that is on hold:
Press the R (Recall) key.
Retrieve a call on hold
To retrieve a call that is on hold:
Press the R (Recall) key.
71
While on an active call
Transfer a call
To use the Transfer feature to redirect a call to a third party
1. Press the R (Recall) key.
d
2. Enter the number to which the call is to
be transferred.
Note: You can speak to the third party
before transferring the call.
3. Press the R (Recall) key to transfer the
call to the third party.
Note: If the third party does not answer,
press the R (Recall) key again to
reconnect to the original call.
4. Press the Hook key to disconnect from
the call.
Note: You can disconnect from the call
before the third party answers (Blind
transfer).
Use Handsfree
Use the Handsfree feature to communicate with the call party while you
work. Before using the optional headset, activate Handsfree.
Place the handset upright on a smooth, flat surface, leaving the
microphone and loudspeaker free of obstruction. Maintain a maximum
distance of 0.5 m between you and the handset when speaking.
72
While on an active call
To activate Handsfree:
Press the Handsfree key.
To end a handsfree call:
Press the Hook key.
To switch from handsfree to handset:
Press the Handsfree key.
Mute a call
Use the Mute feature to listen to the receiving party without transmitting.
To mute an active call – Option 1:
k
g
[
Press the Mute soft key.
01:05
Peters
Options
Q
73
While on an active call
To mute an active call – Option 2:
x
g
[
1. Press the Options soft key.
01:05
Peters
W
Options
2. Press the arrow keys to scroll and
highlight the Mute option.
Options
Silent
Mute
Reject
OK
a
Esc
3. Press the OK soft key.
OK
To return to a two-way conversation – Option 1:
x
g
[
01:05
Peters
Options
74
W
Press the Unmute soft key.
While on an active call
To return to a two-way conversation – Option 2:
k
g
[
1. Press the Options soft key.
01:05
Peters
Q
Options
2. Press the arrow keys to scroll and
highlight the Unmute option.
Options
Silent
Unmute
Reject
OK
a
OK
Esc
3. Press the OK soft key.
75
Talk with more than one person
Talk with more than one person
This section describes the conference feature that enables conversation
between a maximum of three conferees.
Set up a conference call
Use a conference call to enable a conversation between three people.
One caller initiates the conference call and connects the other conferees.
When the conference call initiator ends the call, all parties are
disconnected from the conference call.
To set up a conference call – Option 1:
1. Press the Hook key.
d
2. Enter the number.
3. Press the R (Recall) key.
d
76
4. Enter the number.
Talk with more than one person
5. Press the R (Recall) key.
Note: If the person you attempted to add
to the conference is unavailable, press
the R (Recall) key again to return to a
two-way conference.
6. Press the Hook key to end the
conference call.
To set up a conference call – Option 2 (Pre-dial):
d
1. Enter the number.
2. Press the Hook key.
3. Press the R (Recall) key.
d
4. Enter the number.
5. Press the R (Recall) key.
Note: If the person you attempted to add
to the conference is unavailable, press
the R (Recall) key again to return to a
two-way conference.
77
Talk with more than one person
6. Press the Hook key to end the call.
To set up a conference call – Option 3 (Handsfree):
1. Press the Handsfree key.
d
2. Enter the number.
3. Press the R (Recall) key.
d
4. Enter the number.
5. Press the R (Recall) key.
Note: If the person you attempted to add
to the conference is unavailable, press
the R (Recall) key again to return to a
two-way conference.
6. Press the Hook key to end the call.
78
Create a Telephone Book
Create a Telephone Book
The Telephone Book feature allows you to store a maximum of 100
alphabetized entries consisting of names and telephone numbers. Each
entry can have a maximum of 16 characters in the name, and a maximum
of 32 digits in the telephone number.
While creating a Telephone Book, please consider the following
information:
•
a telephone number cannot be stored without a name
•
a name can be entered only once
•
a duplicate telephone number can only be stored using different
names
•
a dashed line indicates the beginning and end of the Telephone Book
list
Add, edit, and delete entries
Use the following procedures to add, edit, and delete Telephone Book
entries.
To add a name and number:
x
[
1. Press the Telephone Book soft key.
Nortel 5260
Robert Reid
Menu
b
M
r
79
Create a Telephone Book
2. Press the Options soft key.
Telephone Book
Note: The directory shows the first three
names in the Telephone Book.
Alex Scott
Andrew Aulenback
Art Peters
Options
a
Esc
3. Press the arrow keys to scroll and
highlight the New option.
a
OK
4. Press the OK soft key.
d
5. Enter the telephone number to be
stored.
OK
6. Press the OK soft key.
d
7. Use the keypad to enter the name. For
more information about using the keypad
to enter text, refer to Table 1 on page 20.
Note: Adding an exclamation mark in
front of a Telephone Book entry indicates
a VIP entry. VIP entries can have a
different melody. See “Ringer Settings”
on page 32.
80
Create a Telephone Book
8. Press the OK soft key.
OK
To edit an entry:
x
[
1. Press the Telephone Book soft key.
Nortel 5260
Robert Reid
b
Menu
M
r
2. Press the arrow keys to scroll and
highlight the name.
Telephone Book
Note: The directory shows the first three
names in the Telephone Book.
Alex Scott
Andrew Aulenback
Art Peters
Options
a
Esc
3. Press the Options soft key.
Options
4. Press the arrow keys to scroll and
highlight the Edit option.
Options
New
Edit
Delete
OK
a
Esc
81
Create a Telephone Book
5. Press the OK soft key.
OK
6. Press the arrow keys to move the cursor
to the letter to be edited.
Edit
Geor_
OK
a
OK
82
Esc
7. Press the OK soft key.
Create a Telephone Book
To delete a name and number:
x
1. Press the Telephone Book soft key.
[
Nortel 5260
Robert Reid
b
Menu
M
r
2. Press the arrow keys to scroll and
highlight the name.
Telephone Book
Alex Scott
Note: The directory shows the first three
names in the Telephone Book.
Andrew Aulenback
Art Peters
Options
a
Esc
Options
3. Press the Options soft key.
4. Press the arrow keys to scroll and
highlight the Delete option.
a
83
Create a Telephone Book
5. At the Sure? prompt, choose one the
following:
Delete
— Press the OK soft key to accept.
Sure?
— Press the Esc soft key to decline.
a
OK
Esc
To delete all entries in the Telephone Book:
x
[
1. Press the Telephone Book soft key.
Nortel 5260
Robert Reid
Menu
b
M
r
2. Press the Options soft key.
Telephone Book
Note: The directory shows the first three
names in the Telephone Book.
Alex Scott
Andrew Aulenback
Art Peters
Options
84
a
Esc
Create a Telephone Book
3. Press the arrow keys to scroll and
highlight the Delete All option.
a
4. At the Sure? prompt, choose one of the
following:
Delete All
— Press the OK soft key to accept.
Sure?
OK
a
— Press the Esc soft key to decline.
Esc
85
Create a Telephone Book
Make a call using the Telephone Book
Use one of the following options to make a call using the Telephone
Book.
To search for a name and make a call – Options 1:
x
[
1. Press the Telephone Book soft key.
Nortel 5260
Robert Reid
Menu
b
M
r
2. Press the arrow keys to scroll and
highlight the name to be dialed.
Telephone Book
Alex Scott
Andrew Aulenback
Art Peters
Options
a
Esc
3. Press the Hook key.
86
Create a Telephone Book
To search for a name and make a call – Option 2:
x
[
1. Press the Telephone Book soft key.
Nortel 5260
Robert Reid
b
Menu
M
r
2. Use the keypad to enter a single letter,
(for example “A”, or several letters such
as “ART”. See Table 3, “Key
combinations,” on page 63).
d
Search:_
3. Press the arrow keys to scroll and
highlight the name.
A
Alex Scott
Andrew Aulenback
Art Peters
Options
a
Esc
4. Press the Hook key.
87
Use the Caller List
Use the Caller List
The Caller List automatically stores up to a maximum of 20 accepted and
missed calls. Consider the following information:
•
after 20 entries have been stored to the Caller List, each additional
accepted or missed call overwrites the oldest entry
•
when a call back is successfully executed for a Caller List entry, the
entry is removed from the Caller List
•
multiple calls from the same telephone number appear only once in
the Caller List with the time stamp of the last call
•
when calls have been missed, the text “Missed Calls” is shown in the
display
•
each call is marked with a time stamp (if supported on your system);
you can monitor the time stamp for each call using the Details soft
key
Use the Caller List to:
•
display details about accepted or missed calls (for example, name
and telephone number of caller, type of call)
•
dial accepted or missed calls
•
transfer telephone numbers to the Telephone Book
Caller List symbols
The following table defines symbols that appear in front of Caller List
entries to indicate the type of call:
Table 4: Caller List symbols (Part 1 of 2)
Symbol
88
Type of call
?
Missed call
o
Accepted call
Use the Caller List
Table 4: Caller List symbols (Part 2 of 2)
Symbol
t¿
Type of call
Filtered call
Note: For details on Filtered calls, refer “Filter
Options” on page 118
/Œ
Rejected call
Note: For details on Rejected calls, refer to “To
reject a call – Option 1:” on page 67.
Answered call using the Auto Answer feature.
Access and use the Caller List
This section describes how to:
•
access the Caller List
•
dial a telephone number using the Caller List
•
delete a Caller List entry or delete all entries
•
transfer a Caller List entry to the Telephone Book
To access the Caller List:
1. Press the Info key.
89
Use the Caller List
2. Press the arrow keys to scroll and
highlight the Caller List option.
Info
Caller List
Messages
Voice Box
OK
a
Esc
OK
3. Press the OK soft key.
Esc
4. Press the Esc soft key to exit the Caller
List.
To dial a telephone number using the Caller List:
1. Press the Info key.
2. Press the arrow keys to scroll and
highlight the Caller List option.
Info
Caller List
Messages
Voice Box
OK
a
OK
90
Esc
3. Press the OK soft key.
Use the Caller List
4. Press the arrow keys to scroll and
highlight a telephone number.
Caller List
Number
Number
Number
a
Options
Esc
5. Press the Hook key to dial the number.
To delete an entry from the Caller List:
1. Press the Info key.
2. Press the arrow keys to scroll and
highlight the Caller List option.
Info
Caller List
Messages
Voice Box
OK
a
OK
Esc
3. Press the OK soft key.
91
Use the Caller List
4. Press the arrow keys to scroll and
highlight a telephone number.
Caller List
Number
Number
Number
a
Options
Esc
Options
5. Press the Options soft key.
Caller List
6. Press the arrow keys to scroll and
highlight the Delete option.
Add To
Details
Delete
OK
a
ESC
7. Press the OK soft key.
OK
8. At the Sure? prompt, choose one of the
following:
Delete
— Press the OK soft key to accept.
Sure?
OK
92
a
— Press the Esc soft key to decline.
Esc
Use the Caller List
To delete all entries in the Caller List:
1. Press the Info key.
2. Press the arrow keys to scroll and
highlight the Caller List option.
Info
Caller List
Messages
Voice Box
a
OK
Esc
3. Press the OK soft key.
OK
4. Press the arrow keys to scroll and
highlight a telephone number.
Caller List
Number
Number
Number
Options
a
Options
Esc
5. Press the Options soft key.
93
Use the Caller List
6. Press the arrow keys to scroll and
highlight the Delete All option.
Caller List
Details
Delete
Delete All
OK
a
Esc
7. Press the OK soft key.
OK
8. At the Sure? prompt, choose one of the
following:
Delete All
— Press the OK soft key to accept.
Sure?
OK
94
a
— Press the Esc soft key to decline.
Esc
Use the Caller List
To transfer a number from the Caller List to the Telephone Book:
1. Press the Info key.
2. Press the arrow keys to scroll and
highlight the Caller List option.
Info
Caller List
Messages
Voice Box
a
OK
Esc
3. Press the OK soft key.
OK
4. Press the arrow keys to scroll and
highlight a telephone number.
Caller List
Number
Number
Number
Options
a
Options
Esc
5. Press the Options soft key.
95
Use the Caller List
6. Press the arrow keys to scroll and
highlight the Add To option.
Caller List
Add To
Details
Delete
a
OK
Esc
OK
7. Press the OK soft key.
Add To
8. Press the arrow keys to scroll and
highlight the Telephone Book option.
Predial
Telephone Book
Caller Filter
a
OK
96
Esc
OK
9. Press the OK soft key.
d
10. Use the keypad to edit the telephone
number.
OK
11. Press the OK soft key.
d
12. Use the keypad to enter the name
associated with the telephone number.
OK
13. Press the OK soft key.
Use the Redial List
Use the Redial List
A maximum of 20 previously dialed telephone numbers are automatically
stored in the Redial List.
Use the Redial List to:
•
display details about previously dialed telephone numbers (for
example, telephone numbers dialed)
•
redial previously dialed telephone numbers
•
transfer telephone numbers to the Telephone Book
Access and use the Redial List
To access the Redial List:
x
[
1. Press the Redial soft key.
Nortel 5260
Robert Reid
Menu
b
M
r
97
Use the Redial List
2. Press the arrow keys to scroll and
highlight the number.
Redial
Number
Number
Number
Options
a
Esc
3. Press the Esc soft key to exit the Redial
list.
Esc
To dial a telephone number from the Redial List:
x
[
1. Press the Redial soft key.
Nortel 5260
Robert Reid
Menu
b
M
r
2. Press the arrow keys to scroll and
highlight a telephone number.
Redial
Number
Number
Number
Options
98
a
Esc
Use the Redial List
3. Press the Hook key.
To delete an entry from the Redial List:
x
[
1. Press the Redial soft key.
Nortel 5260
Robert Reid
Menu
b
M
r
2. Press the arrow keys to scroll and
highlight a telephone number.
Redial
Number
Number
Number
a
Options
Esc
Options
3. Press the Options soft key.
Redial
4. Press the arrow keys to scroll and
highlight the Delete option.
Add To
Details
Delete
OK
a
Esc
99
Use the Redial List
OK
5. Press the OK soft key.
Delete
6. At the Sure? prompt, choose one of the
following:
— Press the OK soft key to accept.
Sure?
— Press the Esc soft key to decline.
a
OK
Esc
To delete all entries in the Redial list:
x
[
1. Press the Redial list soft key.
Nortel 5260
Robert Reid
Menu
b
M
r
2. Press the arrow keys to scroll and
highlight a telephone number.
Redial
Number
Number
Number
Options
a
OK
100
Esc
3. Press the OK soft key.
Use the Redial List
4. Press the arrow keys and scroll to
highlight the Delete All option.
Redial
Details
Delete
Delete All
OK
a
Esc
5. Press the OK soft key.
OK
6. At the Sure? prompt, choose one of the
following:
Delete All
— Press the OK soft key to accept.
Sure?
OK
a
— Press the Esc soft key to decline.
Esc
101
Use the Redial List
To transfer a number from the Redial List to the Telephone Book:
x
[
1. Press the Redial soft key.
Nortel 5260
Robert Reid
Menu
b
M
r
2. Press the arrow keys to scroll and
highlight a telephone number.
Redial
Number
Number
Number
a
Options
Esc
3. Press the Options soft key.
Options
4. Press the arrow keys to scroll and
highlight the Add To option.
Redial
Add To
Details
Delete
OK
a
OK
102
Esc
5. Press the OK soft key.
Use the Redial List
6. Press the arrow keys to scroll and
highlight the Telephone Book option.
Add To
Predial
Telephone Book
Caller Filter
a
OK
OK
d
Esc
7. Press the OK soft key.
8. Edit the number.
OK
9. Press the OK soft key.
d
10. Edit the name
OK
11. Press the OK soft key.
103
Use Quick Call
Use Quick Call
Use the Quick Call feature to place calls by dialing a one-digit code. You
can create a maximum of nine Quick Call numbers.
To create a Quick Call number:
x
[
1. Press the Telephone Book soft key.
Nortel 5260
Robert Reid
Menu
b
M
r
2. Press the arrow keys to scroll and
highlight an entry in the Telephone
Book.
Telephone Book
Alex Scott
Andrew Aulenback
Art Peters
Options
a
Esc
Options
3. Press the Options soft key.
Telephone Book
4. Press the arrow keys to scroll and
highlight the Quick Call option.
Delete All
Add To Filter
Quick Call
OK
104
a
Esc
Use Quick Call
OK
d
OK
5. Press the OK soft key.
6. Enter a digit from 1 to 9 as the Quick
Call number.
7. Press the OK soft key.
Note: The Telephone Book entry
shows the assigned Quick Call number
in front of the name.
To make a call using Quick Call:
d
Press and hold the assigned Quick Call
number key.
Note: The above scenario depends on
the settings in the Telephone Option >
Auto.Quick Hook menu.
105
Use Quick Call
To delete a Quick Call number assignment:
x
[
1. Press the Telephone Book soft key.
Nortel 5260
Robert Reid
b
Menu
M
r
2. Press the arrow keys to scroll and
highlight the entry.
Telephone Book
Alex Scott
Andrew Aulenback
Art Peters
a
Options
Esc
3. Press the Options soft key.
Options
4. Press the arrow keys to scroll and
highlight the Quick Call option.
Telephone Book
Delete All
Add To Filter
Quick Call
OK
a
OK
106
Esc
5. Press the OK soft key.
Use Quick Call
6. Press the
number.
OK
e to delete the Quick Call
7. Press the OK soft key.
107
Use Caller Filter
Use Caller Filter
Use the Caller Filter feature to accept or block incoming calls. Numbers
must be stored in the Caller Filter before using the filter functions. A
maximum of 10 telephone numbers can be assigned to the Caller Filter
list.
Note: Caller Filter does not work for forwarded calls. This feature is
not available for Text Messaging.
List of numbers
If you select the List of numbers option, a list of the numbers you have
already filtered is displayed. If the list of numbers is empty, then the word
“Empty” is displayed.
Use the List of numbers feature to:
•
add a new entry
•
edit an existing entry
•
delete an entry
•
delete the entire Caller Filter list
To add an entry to the Caller Filter list when the list is empty:
x
[
Nortel 5260
Robert Reid
Menu
108
b
M
r
1. Press the Menu soft key.
Use Caller Filter
2. Press the arrow keys to scroll and
highlight the Caller Filter option.
Menu
Caller Filter
System
Telephone Options
OK
a
Esc
3. Press the OK soft key.
OK
4. Press the arrow keys to scroll and
highlight the List of numbers option.
Caller Filter
Filter Options
List of numbers
a
OK
Esc
Caller Filter
Note: When there are no numbers
stored in the List of numbers, Empty
appears on the display and there is a
New soft key option.
Empty
Disp.Contrast
New
a
5. Press the New soft key.
Esc
d
6. Enter the number.
OK
7. Press the OK soft key.
109
Use Caller Filter
d
8. Enter the name.
OK
9. Press the OK soft key.
To add an entry to the Caller Filter list when there is an existing entry
in the list:
x
[
1. Press the Menu soft key.
Nortel 5260
Robert Reid
Menu
b
M
r
Menu
Caller Filter
2. Press the arrow keys to scroll and
highlight the Caller Filter option.
System
Telephone Options
OK
a
Esc
OK
110
3. Press the OK soft key.
Use Caller Filter
4. Press the arrow keys to scroll and
highlight the List of numbers option.
Caller Filter
Filter Options
List of numbers
a
OK
Esc
5. Press the OK soft key.
OK
6. Press the Options soft key.
Caller Filter
Name
Name
a
Options
Esc
7. Press the arrow keys to scroll and
highlight the New option.
Caller Filter
New
Edit
Delete
a
OK
OK
d
Esc
8. Press the OK soft key.
9. Enter the number.
111
Use Caller Filter
10. Press the OK soft key.
OK
d
11. Enter the name.
12. Press the OK soft key.
OK
To edit an entry:
x
[
1. Press the Menu soft key.
Nortel 5260
Robert Reid
Menu
b
M
r
2. Press the arrow keys to scroll and
highlight the Caller Filter option.
Menu
Caller Filter
System
Telephone Options
OK
a
OK
112
Esc
3. Press the OK soft key.
Use Caller Filter
4. Press the arrow keys to scroll and
highlight the List of numbers option.
Caller Filter
Filter Options
List of numbers
a
OK
Esc
5. Press the OK soft key.
OK
6. Press the Options soft key.
Caller Filter
Name
Name
a
Options
Esc
7. Press the arrow keys to scroll and
highlight the Edit option.
Caller Filter
New
Edit
Delete
OK
a
d
OK
Esc
8. Edit the number.
9. Press the OK soft key.
113
Use Caller Filter
10. Edit the name.
d
11. Press the OK soft key.
OK
To delete an entry:
x
[
1. Press the Menu soft key.
Nortel 5260
Robert Reid
Menu
b
M
r
2. Press the arrow keys to scroll and
highlight the Caller Filter option.
Menu
Caller Filter
System
Telephone Options
OK
a
OK
114
Esc
3. Press the OK soft key.
Use Caller Filter
4. Press the arrow keys to scroll and
highlight the List of numbers option.
Caller Filter
Filter Options
List of numbers
a
OK
Esc
5. Press the OK soft key.
OK
6. Press the Options soft key.
Caller Filter
Name
Name
Options
a
Esc
7. Press the arrow keys to scroll and
highlight the Delete option.
Caller Filter
New
Edit
Delete
OK
a
OK
Esc
8. Press the OK soft key.
115
Use Caller Filter
9. At the Sure? prompt, choose one of the
following:
Delete
— Press the OK soft key to accept.
Sure?
OK
— Press the Esc soft key to decline.
a
Esc
To delete all entries:
x
[
1. Press the Menu soft key.
Nortel 5260
Robert Reid
Menu
b
M
r
Menu
Caller Filter
2. Press the arrow keys to scroll and
highlight the Caller Filter option.
System
Telephone Options
OK
a
Esc
OK
116
3. Press the OK soft key.
Use Caller Filter
4. Press the arrow keys to scroll and
highlight the List of numbers option.
Caller Filter
Filter Options
List of numbers
a
OK
Esc
5. Press the OK soft key.
OK
6. Press the arrow keys to scroll and
highlight the Delete All option.
Caller Filter
Edit
Delete
Delete All
OK
a
Esc
7. Press the OK soft key.
OK
8. At the Sure? prompt, choose one of the
following:
Delete All
— Press the OK soft key to accept.
Sure?
OK
a
— Press the Esc soft key to decline.
Esc
117
Use Caller Filter
Filter Options
Use the Filter Options feature to choose one of the following:
•
Accept list — indicates those calls you will accept
•
Block list — indicates those calls you will not accept
•
Filter off — indicates that Caller Filter is inactive
To select Filter options:
x
[
1. Press the Menu soft key.
Nortel 5260
Robert Reid
Menu
b
M
r
Menu
Caller Filter
2. Press the arrow keys to scroll and
highlight the Caller Filter option.
System
Telephone Options
OK
a
Esc
OK
118
3. Press the OK soft key.
Use Caller Filter
4. Press the arrow keys to scroll and
highlight Filter Options.
Caller Filter
Filter Options
List of numbers
OK
a
Esc
5. Press the OK soft key.
OK
6. Choose one of the following options:
Caller Filter
Accept list
Block list
Filter off
OK
a
OK
— Accept list
— Block list
— Filter off
Esc
Note: If the filter mode is set to accept
and the caller filter is activated, the
numbers in the Caller filter are the only
ones that will be received by the
handset.
7. Press the OK soft key.
Note: The selected item is indicated by a
check mark and a confirmation tone.
119
Use Caller Filter
Wild Cards
When entering numbers in the Caller Filter, a wild card feature is
provided, so that a group of numbers can be selected as entries in the
Caller Filter.
For example, if the characters 0* are entered as a number in the Caller
Filter, all numbers beginning with the digit 0 (external numbers) are
selected as entries in the Caller Filter. If only the character * is entered as
a number in the Caller Filter, then all numbers are selected as entries in
the Caller Filter.
When using the wild card function, the * character must always be the
last character entered in the number.
Transfer a number to the Caller Filter from the Caller List:
1. Press the Info key.
2. Press the arrow keys to scroll and
highlight the Caller List option.
Info
Caller List
Messages
Voice Box
OK
a
OK
120
Esc
3. Press the OK soft key.
Use Caller Filter
4. Press the arrow keys to scroll and
highlight the number.
Caller List
Number
Number
Number
a
Options
Esc
5. Press the Options soft key.
Options
6. Press the arrow keys to scroll and
highlight the Add To option.
Caller List
Add To
Details
Delete
a
OK
Esc
7. Press the OK soft key.
OK
8. Press the arrow keys to scroll and
highlight the Caller Filter option.
Add To
Predial
Telephone Book
Caller Filter
OK
a
OK
Esc
9. Press the OK soft key.
121
Use Caller Filter
10. Edit the number.
d
11. Press the OK soft key.
OK
d
12. Edit the name.
13. Press the OK soft key.
OK
To transfer a number to the Caller Filter from the Telephone Book:
x
[
1. Press the Telephone Book soft key.
Nortel 5260
Robert Reid
Menu
b
M
r
2. Press the arrow keys to scroll and
highlight the entry.
Telephone Book
Alex Scott
Andrew Aulenback
Art Peters
Options
Options
122
a
Esc
3. Press the Options soft key.
Use Caller Filter
4. Press the arrow keys to scroll and
highlight the Add To Filter option.
Telbook
Delete
Delete All
Add To Filter
a
OK
Esc
5. Press the OK soft key.
OK
Note: A confirmation tone sounds.
To transfer a number to the Caller Filter from the Redial List:
x
[
1. Press the Redial soft key.
Nortel 5260
Robert Reid
Menu
b
M
r
2. Press the arrow keys to scroll and
highlight the entry.
Redial
Number
Number
Number
Options
a
Options
Esc
3. Press the Options soft key.
123
Use Caller Filter
4. Press the arrow keys to scroll and
highlight the Add To option.
Redial
Add To
Details
Delete
a
OK
Esc
5. Press the OK soft key.
OK
6. Press the arrow keys to scroll and
highlight the Caller Filter option.
Add To
Predial
Telephone Book
Caller Filter
a
OK
124
Esc
OK
7. Press the OK soft key.
d
8. Edit the number.
OK
9. Press the OK soft key.
d
10. Edit the name.
OK
11. Press the OK soft key.
System Settings
System Settings
The handset can be operated with a maximum of ten DECT systems.
Before you can make a telephone call using the DECT system, the
handset must be registered. A system ID and registration code may be
necessary for the registration process. Contact your system administrator
for the code. When the handset is not yet subscribed to the system, the
display shows “No Subscription”.
The System menu sets the following options of the handset:
•
register the handset
•
select the DECT system
•
search automatically for a system
•
delete a system
•
change a system’s name and telephone number
•
set equipment ID
To select a DECT system manually:
x
[
1. Press the Menu soft key.
Nortel 5260
Robert Reid
Menu
b
M
r
125
System Settings
2. Press the arrow keys to scroll and
highlight the System option.
Menu
System
Telephone Options
Security
OK
a
Esc
OK
3. Press the OK soft key.
System
4. Press the arrow keys to scroll and
highlight the Subscriptions option.
IPEI
Subscriptions
a
OK
Esc
5. Press the OK soft key.
OK
6. Press the arrow keys to scroll and
highlight the system name.
Subscriptions
o System name
System name
Auto.Search
Options
Options
126
a
Esc
7. Press the Options soft key.
System Settings
8. Press the arrow keys to scroll and
highlight the Select option.
Subscriptions
New
Select
Edit
OK
a
Esc
9. Press the OK soft key.
OK
Note: A check mark “o” indicates the
selected option is activated.
To select a DECT system automatically:
x
[
1. Press the Menu soft key.
Nortel 5260
Robert Reid
Menu
b
M
r
Menu
System
Telephone Options
Security
OK
a
Esc
2. Press the arrow keys to scroll and
highlight the System option.
127
System Settings
OK
3. Press the OK soft key.
System
4. Press the arrow keys to scroll and
highlight the Subscriptions option.
IPEI
Subscriptions
a
OK
Esc
5. Press the OK soft key.
OK
6. Press the arrow keys to scroll and
highlight the Auto.Search option.
Subscriptions
System name
System name
Auto.Search
a
Options
Esc
Options
7. Press the Options soft key.
System
8. Press the arrow keys to scroll and
highlight the Select option.
New
Select
OK
128
a
Esc
System Settings
9. Press the OK soft key.
OK
Note 1: The selected item is indicated by
a check mark and a confirmation tone.
Note 2: Your handset automatically
selects the most appropriate DECT
system to use. If you move out of the
range of one system, the handset
automatically selects a system within
range.
To delete a DECT system:
x
[
1. Press the Menu soft key.
Nortel 5260
Robert Reid
Menu
b
M
r
Menu
2. Press the arrow keys to scroll and
highlight the System option.
System
Telephone Options
Security
OK
a
Esc
OK
3. Press the OK soft key.
129
System Settings
4. Press the arrow keys to scroll and
highlight the Subscriptions option.
System
IPEI
Subscriptions
a
OK
Esc
5. Press the OK soft key.
OK
6. Press the arrow keys to scroll and
highlight the system name.
Subscriptions
o System name
System name
Auto.Search
a
Options
Esc
7. Press the Options soft key.
Options
8. Press the arrow keys to scroll and
highlight the Delete option.
Subscriptions
Add To
Details
Delete
OK
a
OK
130
Esc
9. Press the OK soft key.
System Settings
10. At the Sure? prompt, choose one of the
following:
Delete
— Press the OK soft key to accept.
Sure?
— Press the Esc soft key to decline.
a
OK
Esc
Note: You can delete a DECT system only when the handset is out of
range or when the handset is not registered to any system. The
handset must be registered before use.
To change a system’s name and telephone number:
x
[
1. Press the Menu soft key.
Nortel 5260
Robert Reid
Menu
b
M
r
Menu
System
2. Press the arrow keys to scroll and
highlight the System option.
Telephone Options
Security
OK
a
Esc
OK
3. Press the OK soft key.
131
System Settings
4. Press the arrow keys to scroll and
highlight the Subscriptions option.
System
IPEI
Subscriptions
a
OK
Esc
5. Press the OK soft key.
OK
6. Press the arrow keys to scroll and
highlight the system name.
Subscriptions
o System name
System name
Auto.Search
a
Options
Esc
7. Press the Options soft key.
Options
8. Press the arrow keys to scroll and
highlight the Edit option.
Subscriptions
New
Select
Edit
a
OK
d
132
Esc
9. Edit the name.
System Settings
10. Press the OK soft key.
OK
d
11. Edit the number.
12. Press the OK soft key.
OK
To read equipment identification:
x
[
1. Press the Menu soft key.
Nortel 5260
Robert Reid
Menu
b
M
r
Menu
System
2. Press the arrow keys to scroll and
highlight the System option.
Telephone Options
Security
OK
a
Esc
OK
3. Press the OK soft key.
133
System Settings
4. Press the arrow keys to scroll and
highlight the IPEI option.
System
IPEI
Subscriptions
OK
a
OK
134
Esc
5. Press the OK soft key.
Access Meridian PBX features
Access Meridian PBX features
Use Flexible Feature Codes (FFC) and Special Prefix (SPRE) to access
the Meridian PBX features.
Dial an FFC to access some of the handset features.
Dial a SPRE code plus a one- or two-digit number to access some of the
handset’s features. The SPRE codes are unique to your handset;
however, the digits following the SPRE code are fixed. For example, dial
SPRE + 74 to forward all your calls to another number.
To access Meridian PBX features:
d
1. Enter the FFC while the handset is idle.
2. Press the hook key.
3. Press the hook key.
Note: Contact the system administrator for the FFC and SPRE
codes.
135
Access Meridian PBX features
Use Table 5 to list the FFCs or the SPRE codes assigned by your system
administrator.
Table 5: FFCs and SPRE codes
Code
Feature
Call Forward – to activate
Call Forward – to deactivate
Call Park – to park a call
Call Park – to retrieve a call
136
Use Voicemail
Use Voicemail
Use the Voicemail feature to listen to voice messages left by calling
parties. New voicemails are indicated by:
— the V (voicemail) symbol flashes on the display screen (the
symbol disappears after the voice message is played)
— the flashing Info key
— Voice Message text is displayed on the display screen
Note: When the handset is switched OFF, or is out of the coverage
zone, the Info and Loudspeaker keys flash and the V (voicemail)
symbol appears when the handset is turned ON, or re-enters the
coverage zone.
For automated access to your voicemail messages, Nortel Networks
recommends you pre-configure the:
•
voicemail access number
•
voice box number
Pre-configuration automatically dials the voicemail access number,
automatically enters your voice box number, and automatically enters
your voice box password.
To pre-configure the voicemail access number, your voice box
number, and your password:
x
[
1. Press the Menu soft key.
Nortel 5260
Robert Reid
Menu
b
M
r
137
Use Voicemail
2. Press the arrow keys to scroll and
highlight Telephone Option.
Menu
System
Telephone Option
Security
OK
a
Esc
3. Press the OK soft key.
OK
4. Press the arrow keys to scroll and
highlight the Voice Box option.
Telephone Options
Voice Box
Attention Tones
Silent Charging
a
OK
OK
Esc
5. Press the OK soft key.
6. Enter the following:
d
a. Voicemail access number
b. P (long pause) — hold down “0” key
for longer than 2 seconds
c.
Voice box number
d.
#
e. Voice box password (optional)
followed by #
OK
138
7. Press the OK soft key.
Use Voicemail
To automatically access voicemail messages using a pre-configured
voicemail access number, voice box number, and password:
1. Press the Info key.
2. Press the arrow keys to scroll and
highlight Voice Box option.
Info
Caller List
Note: The Voice Box option does not
appear as a menu item if you did not preconfigure the voicemail access number
and voice box number and password.
Messages
Voice Box
a
OK
Esc
3. Choose one of the following:
OK
— Press the OK soft key.
— Press the Hook key.
The voicemail access number is
automatically dialed, and your voice box
number and password are automatically
entered.
Note: Press the Esc key at any time to
abort this procedure.
139
Use Text message
Use Text message
Use the Text message feature to send and receive text messages. New
text messages are indicated by:
— user-configured melody (can be configured to distinguish
between normal and urgent messages)
— the l (text message) icon flashes on the display screen
— the flashing Info key
Note 1: Messages can be sent and received while on a telephone
call. However, messages cannot be sent or received if the handset is
out of the system’s range. If a message cannot be sent, an error tone
is generated.
Note 2: If a message is received while making a menu selection, the
menu is aborted and all entries not saved are lost.
The following table indicates text message symbols and the statuses that
can appear on the handset display screen.
Table 6: Message status
Symbol
m
140
Status
Urgent Message
Normal message read
l
Normal message unread
o
Transmitted message confirmed
.
Message was not transmitted successfully
Use Text message
Urgent text messages
Urgent text messages are indicated by:
— the -symbol and “New Message” displayed on the screen (if
automatic message Display function is disabled), or the text
message displayed on the screen (if automatic message Display
function is enabled)
— the urgent message melody (if the ringer is turned ON); the
volume increases to maximum during the signaling process
— the flashing Info key
— a repeating melody while on a call
This section describes how to:
•
configure an urgent text message melody
•
configure the handset so urgent text messages are automatically
displayed
To configure an urgent text message melody:
x
[
1. Press the Menu soft key.
Nortel 5260
Robert Reid
Menu
b
M
r
141
Use Text message
2. Press the arrow keys to scroll and
highlight Ringer Settings.
Menu
Key Lock
Ringer Settings
Volume Settings
a
OK
ESC
3. Press the OK soft key.
OK
4. Press the arrow keys to scroll and
highlight the Melody option.
Ringer Settings
Melody
Type
Device
OK
a
Esc
OK
5. Press the OK soft key.
Melody
6. Press the arrow keys to scroll and
highlight the Urgent Message option.
VIP
Normal message
Urgent message
OK
a
OK
142
Esc
7. Press the OK soft key.
Use Text message
8. Press the arrow keys to scroll and
highlight the melody number.
Melody
Incoming calls
12
OK
a
Esc
9. Choose one of the following:
— Press the arrow keys to increase or
decrease the melody number.
— Use the keypad to enter the melody
number.
d
Note: Enter a number between 1 and 30
to set the melody number for each type
of call.
10. Press the OK soft key.
OK
To enable automatic text message Display function:
x
[
1. Press the Menu soft key.
Nortel 5260
Robert Reid
Menu
b
M
r
143
Use Text message
2. Press the arrow keys to scroll and
highlight the Telephone Option menu.
Menu
System
Telephone Options
Secutrity
a
OK
Esc
3. Press the OK soft key.
OK
4. Press the arrows keys to scroll and
highlight the Message Options option.
Telephone Options
Auto Quick Hook
Auto Answer
Message Options
a
OK
Esc
5. Press the OK soft key.
OK
6. Press the arrow keys to scroll and
highlight the Display option.
Message Options
Display
OK
144
a
Esc
Use Text message
OK
7. Press the OK soft key. A check mark (o))
indicates the automatic text message
display function is enabled.
Note 1: A text message cannot be
received while the handset is ringing.
The sender receives an error message.
Note 2: If a text message is received
while menu changes are being made on
a handset, all unsaved menu changes
are lost. This includes telephone
numbers being entered, and message
text being entered.
145
Use Text message
Confirm receipt of urgent text message(s)
You must confirm receipt of an urgent text message. All key functions
are blocked until you confirm an urgent text message.
Note: An activated key lock is temporarily deactivated when receiving
an urgent text message so that its receipt can be confirmed.
To confirm receipt of an urgent text message:
x
[
MEETING HAS BEEN
POSTPONED UNTIL
11:00
OK
146
s
Choose one of the following:
— Press the OK soft key.
— Press the Delete soft key to confirm
receipt and to delete the text
message.
Delete
Note: Press the arrow keys to scroll
through the text message.
Use Text message
Normal text messages
Normal text messages are indicated by:
— the l symbol and “New Message” displayed on the screen (if
automatic text message Display function is disabled), or the text
message displayed on the screen (if automatic text message
Display function is enabled)
— the normal text message melody (if the ringer is turned ON)
— the flashing Info key
— a short melody while on a call
This section describes how to:
•
configure a normal text message melody
•
configure the handset so normal text messages are automatically
displayed
To configure a normal text message melody:
x
[
1. Press the Menu soft key.
Nortel 5260
Robert Reid
Menu
b
M
r
147
Use Text message
2. Press the arrow keys to scroll and
highlight Ringer Settings.
Menu
Key Lock
Ringer Settings
Volume Settings
a
OK
ESC
3. Press the OK soft key.
OK
4. Press the arrow keys to scroll and
highlight the Melody option.
Ringer Settings
Melody
Type
Device
OK
a
Esc
OK
5. Press the OK soft key.
Melody
6. Press the arrow keys to scroll and
highlight the Normal Message option.
VIP
Normal message
Urgent message
OK
a
OK
148
Esc
7. Press the OK soft key.
Use Text message
8. Press the arrow keys to scroll and
highlight the melody number.
Melody
Incoming calls
12
OK
a
Esc
9. Choose one of the following:
— Press the arrow keys to increase or
decrease the melody number.
d
— Use the keypad to enter the melody
number.
Note: Enter a number between 1 and 30
to set the melody number for each type
of call.
OK
10. Press the OK soft key.
Confirm receipt of normal text message(s)
Normal text messages do not need to be confirmed.
149
Use Text message
Store and delete text messages
The handset automatically stores up to a maximum of 10 text messages,
indicating the date and time received (if supported) and the caller’s
identification. Each stored text message is located in the message list
with the first few words of the message displayed.
When the message list contains 10 text messages, the flashing l symbol
on the display screen and the flashing Info key indicates the message list
is full. Delete messages to free-up storage space, or enable the overwrite
feature.
This section describes how to:
•
enable the Overwrite option
•
delete text messages
To enable the Overwrite feature:
x
[
1. Press the Menu soft key.
Nortel 5260
Robert Reid
Menu
b
M
r
2. Press the arrow keys to scroll and
highlight the Telephone Option menu.
Menu
System
Telephone Options
Secutrity
OK
150
a
Esc
Use Text message
3. Press the OK soft key.
OK
4. Press the arrow keys to scroll and
highlight the Message Options option.
Telephone Options
Auto Quick Hook
Auto Answer
Message Options
a
OK
Esc
5. Press the OK soft key.
OK
6. Press the arrow keys to scroll and
highlight the Overwrite option.
Message Options
Display
Overwrite
OK
a
OK
Esc
7. Press the OK soft key. A check mark (o)
and confirmation tone (if configured)
indicates the automatic Overwrite
function is enabled. The oldest text
message is deleted to free-up storage
space.
CAUTION
If the Overwrite function is not enabled, new text
messages are not stored. It is necessary to regularly
delete messages to free-up storage space.
151
Use Text message
To delete a text message:
1. Press the Info key.
2. Press the arrow keys to scroll and
highlight the Messages option.
Info
Caller List
Messages
Voice Box
a
OK
Esc
3. Press the OK soft key.
OK
4. Press the arrow keys to scroll through
the message list and highlight the text
message to be deleted.
Messages
Messages 1
Message 2
Options
a
Options
152
Esc
5. Press the Options soft key.
Use Text message
6. Press the arrow keys to scroll and
highlight the Delete option.
Messages
Send
New
Delete
a
Options
Esc
7. Press the OK soft key.
OK
8. At the Sure? prompt, choose one of the
following:
Delete
— Press the OK soft key to accept.
Sure?
OK
a
— Press the Esc soft key to decline.
Note: A confirmation tone sounds (if
configured).
Esc
To delete all text messages:
1. Press the Info key.
2. Press the arrow keys to scroll and
highlight the Messages option.
Info
Caller List
Messages
Voice Box
OK
a
Esc
153
Use Text message
3. Press the OK soft key.
OK
[
x
Message 1
4. Press the arrow keys to scroll through
the message list and highlight the text
message to be deleted.
Message 2
s
Options
Delete
5. Press the Options soft key.
Options
6. Press the arrow keys to scroll and
highlight the Delete All option.
Messages
Delete
Delete All
OK
a
Esc
7. Press the OK soft key.
OK
8. At the Sure? prompt, choose one of the
following:
Delete All
— Press the OK soft key to accept.
Sure?
OK
154
a
— Press the Esc soft key to decline.
Esc
Note: A confirmation tone sounds (if
configured).
Use Text message
Read text messages
This section describes how to read a text message.
To read a text message (automatic text message Display enabled):
Press the arrow keys to scroll through the
x
[ message.
MEETING HAS BEEN
POSTPONED UNTIL
11:00
s
OK
Delete
To read a text message (automatic text message Display disabled):
1. Press the Info key.
2. Press the arrow keys to scroll and
highlight the Messages option.
Info
Caller List
Messages
Voice Box
OK
a
OK
Esc
3. Press the OK soft key.
155
Use Text message
[
x
Message 1
Note: The first few words of each text
message are displayed.
Message 2
Options
156
4. Press the arrow keys to scroll through
the message list and highlight the
message to be read.
s
Delete
Use Text message
5. Choose one of the following:
Messages
— If the text message is unread:
Message 1
a. Press the Read soft key.
Message 2
a
Read
Esc
b. Press the arrow keys to scroll
through the message if message is
larger than handset display screen.
— If the text message has been
previously read:
Messages
Message 1
a. Press the Options soft key.
Message 2
b. Press the arrow keys to highlight the
Read option.
a
Options
Esc
c.
Press the OK soft key.
d. Press the arrow keys to scroll
through the message if message is
larger than handset display screen.
Messages
Details
Read
Send
OK
a
Esc
157
Use Text message
Send a text message
For handset-to-handset messaging, a new text message can be written or
an existing message can be sent or edited and sent.
This section describes how to:
•
send a new text message
•
send an existing text message
•
view text message details
CAUTION
1. To send a text message, the stored message list
cannot be full. If the list is full, delete one or more
messages.
2. If you edit an existing message and send it, it will
replace/overwrite the original message received.
To send a new text message:
1. Press the Info key.
2. Press the arrow keys to scroll and
highlight the Messages option.
Info
Caller List
Messages
Voice Box
OK
a
OK
158
Esc
3. Press the OK soft key.
Use Text message
4. Choose one of the following:
Messages
— If there are no text messages in the
menu:
a. Press the New soft key.
a
New
Esc
— If there are text messages appearing
in the message list:
Messages
Messages 1
a. Use the Options soft key.
Message 2
b. Press the arrow keys to scroll and
highlight the New option.
a
Options
Esc
Note: For information on using the
keypad to enter a new text message,
see “Handset keypad reference” on
page 20.
6. When you have completed entering the
new text message, press the Options
soft key.
Options
7. Press the arrow keys to scroll and
highlight one of the following:
Messages
Normal message
Urgent message
a
Press the OK soft key.
5. Enter the new text message.
d
OK
c.
— Normal Message option
— Urgent Message option
Esc
159
Use Text message
OK
8. Press the OK soft key.
d
9. Enter the telephone number to where
the text message is to be sent.
OK
10. Press the OK soft key.
To send an existing text message:
1. Press the Info key.
2. Press the arrow keys to scroll and
highlight the Messages option.
Info
Caller List
Messages
Voice Box
a
OK
Esc
3. Press the OK soft key.
OK
[
x
Message 1
Message 2
Options
160
s
Delete
4. Press the arrow keys to scroll through
the message list and highlight the
message to be sent.
Use Text message
5. Press the Options soft key.
Options
6. Press the arrow keys to scroll and
highlight the Send option.
Messages
Details
Read
Send
a
OK
Esc
7. Press the OK soft key.The original text
message is displayed. You can edit the
message.
Edit: Text
THE MEETING HAS BEEN
POSTPONED UNTIL
1:00
s
Options
Esc
Options
8. Press the Options soft key.
Messages
9. Press the arrow keys to scroll and
highlight one of the following:
Normal message
Urgent message
OK
a
OK
— Normal Message option
— Urgent Message option
Esc
10. Press the OK soft key.
161
Use Text message
d
11. Enter the new number where the text
message is to be sent by editing the
original telephone number.
OK
12. Press the OK soft key.
Note: A confirmation tone is generated
(if configured).
To view text message details:
1. Press the Info key.
2. Press the arrow keys to scroll and
highlight Messages option.
Info
Caller List
Messages
Voice Box
OK
a
Esc
3. Press the OK soft key.
OK
[
x
Message 1
Message 2
Options
162
s
Delete
4. Press the arrow keys to scroll through
the message list and highlight the
desired message for details.
Use Text message
5. Press the Options soft key.
Options
6. Press the arrow keys to scroll and
highlight the Details option.
Messages
Delete
Delete AllAll
Details
OK
a
OK
Esc
7. Press the OK soft key. Message details
are displayed.
Note: At this point, you can press the
arrow keys to scroll through the
message list to display details of all
messages. Press the Esc key to exit.
163
Accessories
Accessories
The following accessories are available for use with your handset.
Battery
The DECT Handset 4060 requires a rechargeable AAA NiMh of typical
800mAh, 1.2V battery.
Desktop Charger
Figure 7: Desktop Charger
Charger Rack
A maximum of eight handsets can be charged simultaneously. The
charger rack is designed for desktop use and for wall mounting.
Figure 8: Charger rack
553-A0085
164
Accessories
Belt Clip
The adapter is clipped to the handset and is removable without any
remains or damages.
Figure 9: The belt clip and adapter for the handset.
Data cable
The data cable connects the PC to the handset.
Figure 10: Cable to connect the handset with a PC.
165
Accessories
Headset
The headset, in conjunction with the belt clip, makes handsfree telephone
calls possible. This is optimized by the handset feature “Auto Answer”.
Figure 11: Headset
553-A0086
IBM-compatible PC
The following lists minimum PC requirements:
•
IBM or 100% compatible personal computer
•
Pentium 133 MHz or higher processor
•
Minimum 16 MB RAM
•
Microsoft Windows 95/98/NT44/2000/XP
•
COM port
•
CD-ROM drive
DECT Handset 4060 software CD
The software CD contains the following two applications:
•
Telephony Application Programmer’s Interface (TAPI) — an
interface that enables remote control of the handset.
•
Configuration — used to configure the handset from the PC.
Upon installation, the Start menu of your PC contains a folder called
C4060. In this directory you can find the configuration program and the
Readme.txt file.
166
Accessories
PC connection
Use the data cable to connect the COM port (V.24 port) of the PC to the
USB port found on the side of the handset.
Figure 12: PC connection
167
Accessories
168
Index
Index
A
Delete a text message 150
About the handset 17
Desktop charger 164
Accessories 164
Device 35
Add entries in phone book 79
Disp. Contrast 61
Answer a call 66
Arrow soft keys 24
Attention Tones 51
Auto Answer 59
Auto Quick Hook 57
B
Basic features 17
Battery 164
Before you begin 11
Belt clip 165
C
Callers List 89
Callers List symbols 88
Change the PIN 25
Charge the batteries 13
Charger Answer 55
Charger rack 164
Charging and operating times 13
Charging guidelines 13
Conference call 76
Confirm urgent text message 146
Create a Telephone Book 79
D
Data cable 165
E
Emergency Call 45
Esc soft key 24
F
Filter Options 118
H
Handset controls 18
Handset display 21
Handsfree dialing 65
Headset 166
I
IBM compatible PC 166
Icon / text line 21
Illumination 20
Insert the batteries 12
Install the batteries 11
K
Key lock 30
Keypad 20
L
Language 43
List of numbers 108
169
Index
M
Security functions 25
Make a call 64
Send text message 158
Make and SOS call 65
Set up the handset 11
Melody 32
Silent Charging 52
Mute a call 73
Soft key line 23
Mute the ringer 69
Store a text message 150
System Settings 125
N
Normal text message 147
T
Telephone Options 41
O
Text lines 22
Off-hook dialing 64
OK soft key 23
U
On-hook dialing 64
Urgent text message 141
Options soft key 23
Use Caller Filter 108
Use handsfree 72
P
Use Quick Call 104
PBX features 125, 135
Use Text message 140
PC connection 167
Use the Callers List 88
Place a call on hold 71
Use the Redial List 97
Power up your handset 24
Use the Telephone Book 86
Use Voice Mail 137
R
User name 42
Read text message 155
Read-only 27
V
Redial List 97
Voice Box 49
Register the handset 14
Volume 35
Reject a call 67
Volume settings 40
Reset the handset 28
Ringer settings 32
W
Ringer type 34
Wild Cards 120
S
Safety precautions 9
170
Nortel Communication Server 1000
Nortel Networks DECT Handset 4060
User Guide
Copyright © 2007–2009 Nortel Networks
All Rights Reserved.
LEGAL NOTICE
While the information in this document is believed to be accurate and
reliable, except as otherwise expressly agreed to in writing, NORTEL
PROVIDES THIS DOCUMENT “AS IS” WITHOUT WARRANTY OR
CONDITION OF ANY KIND EITHER EXPRESS OR IMPLIED. The
information and/or products described in this document are subject to
change without notice.
Nortel, the Nortel logo, and the Globemark are trademarks of
Nortel Networks. All other trademarks are the property of their respective
owners.
Publication Number: NN43120-105
Document Release: Standard 01.02
Date: January 2009
Sourced in Canada
To provide feedback or report a problem in this document, go to
www.nortel.com/documentfeedback
www.nortel.com