1
CallPilot Message Networking Set Up and
Operation Guide
BCM50 2.0
CallPilot
Document Status: Standard
Document Number: NN40090-301
Document Version: 02.01
Date: September 2006
Copyright © 2005–2006 Nortel Networks, All Rights Reserved
The information in this document is subject to change without notice. The statements, configurations, technical data, and
recommendations in this document are believed to be accurate and reliable, but are presented without express or implied
warranty. Users must take full responsibility for their applications of any products specified in this document. The
information in this document is proprietary to Nortel Networks.
Trademarks
Nortel, the Nortel logo, and the Globemark are trademarks of Nortel Networks.
Microsoft, MS, MS-DOS, Windows, and Windows NT are trademarks of Microsoft Corporation.
All other trademarks and registered trademarks are the property of their respective owners.
3
Task List
Getting started . . . . . . . . . . . . . . . . . . . . . . . . . . . . . . . . . . . . . . . . . . . . . . . . . 7
Setting up Digital Networking . . . . . . . . . . . . . . . . . . . . . . . . . . . . . . . . . . . 15
To set the Digital Networking properties........................................................................16
To configure BCM to use IP addresses .........................................................................18
To check that BCM is not configured to use DNS .........................................................19
To check that a Host Name is entered on the BCM ......................................................19
To configure CallPilot 100/150 to use domain names or IP addresses .........................19
To configure DNS on CallPilot 100/150 .........................................................................20
To create and install hosts files on CallPilot 100/150 ....................................................20
To change your local CallPilot Host name or IP address ..............................................22
Setting up AMIS . . . . . . . . . . . . . . . . . . . . . . . . . . . . . . . . . . . . . . . . . . . . . . . 23
To set up AMIS networking properties ..........................................................................24
To set up AMIS Call Blocking times ..............................................................................27
To build a Dialing Translation Table ..............................................................................32
To review Dialing Translation Table entries ..................................................................33
To change an entry in the Dialing Translation Table .....................................................34
To delete an entry in the Dialing Translation Table .......................................................35
To send a test network message using the
AMIS Loopback mailbox — Norstar Voice Mail .............................................................38
To send a test network message using the AMIS Loopback mailbox — CallPilot ........38
Creating network sites . . . . . . . . . . . . . . . . . . . . . . . . . . . . . . . . . . . . . . . . . 41
To set the general networking properties ......................................................................41
To create a network site ................................................................................................44
To change the properties of a network site ...................................................................45
To record a site name....................................................................................................47
To delete a site ..............................................................................................................49
Network Delivery Mailboxes . . . . . . . . . . . . . . . . . . . . . . . . . . . . . . . . . . . . . 53
To create a Network Site mailbox..................................................................................55
To create a Network AMIS mailbox ...............................................................................57
To change Network Delivery Mailbox parameters .........................................................60
To delete a Network Delivery Mailbox ...........................................................................62
Troubleshooting Non Delivery Notification messages . . . . . . . . . . . . . . . 63
Message Networking programming record . . . . . . . . . . . . . . . . . . . . . . . . 69
CallPilot Message Networking Set Up and Operation Guide
4
Task List
NN40090-301
5
Contents
Chapter 1
Getting started . . . . . . . . . . . . . . . . . . . . . . . . . . . . . . . . . . . . . . . . . . . . . . . . . 7
About this Guide . . . . . . . . . . . . . . . . . . . . . . . . . . . . . . . . . . . . . . . . . . . . . . . . . . . . . . 7
About CallPilot Message Networking . . . . . . . . . . . . . . . . . . . . . . . . . . . . . . . . . . . 7
Requirements for setting up Message Networking . . . . . . . . . . . . . . . . . . . . . . . . . 7
Digital and AMIS networking . . . . . . . . . . . . . . . . . . . . . . . . . . . . . . . . . . . . . . . . . . 7
Setting up BCM and M1CallPilot for VPIM broadcast messages . . . . . . . . . . . . . . 9
About AMIS . . . . . . . . . . . . . . . . . . . . . . . . . . . . . . . . . . . . . . . . . . . . . . . . . . . . . . . 9
Ways of sending network messages . . . . . . . . . . . . . . . . . . . . . . . . . . . . . . . . . . . . 9
Site-Based Addressing . . . . . . . . . . . . . . . . . . . . . . . . . . . . . . . . . . . . . . . . . . . . . 10
Network Delivery Mailboxes . . . . . . . . . . . . . . . . . . . . . . . . . . . . . . . . . . . . . . . . . 10
Direct Addressing . . . . . . . . . . . . . . . . . . . . . . . . . . . . . . . . . . . . . . . . . . . . . . . . . 10
Assigning Message Networking to subscribers . . . . . . . . . . . . . . . . . . . . . . . . . . . 10
Audience . . . . . . . . . . . . . . . . . . . . . . . . . . . . . . . . . . . . . . . . . . . . . . . . . . . . . . . . . . . 11
Acronyms . . . . . . . . . . . . . . . . . . . . . . . . . . . . . . . . . . . . . . . . . . . . . . . . . . . . . . . . . . . 11
Symbols and text conventions . . . . . . . . . . . . . . . . . . . . . . . . . . . . . . . . . . . . . . . . . . . 12
Related Publications . . . . . . . . . . . . . . . . . . . . . . . . . . . . . . . . . . . . . . . . . . . . . . . . . . 13
Chapter 2
Setting up Digital Networking . . . . . . . . . . . . . . . . . . . . . . . . . . . . . . . . . . . . 15
Setting the Digital Networking properties . . . . . . . . . . . . . . . . . . . . . . . . . . . . . . . . . . 15
Configuring your system network properties . . . . . . . . . . . . . . . . . . . . . . . . . . . . . . . . 17
Configuring your system if you do not use DNS . . . . . . . . . . . . . . . . . . . . . . . . . . 17
Chapter 3
Setting up AMIS . . . . . . . . . . . . . . . . . . . . . . . . . . . . . . . . . . . . . . . . . . . . . . . 23
Setting up AMIS . . . . . . . . . . . . . . . . . . . . . . . . . . . . . . . . . . . . . . . . . . . . . . . . . . . . . . 23
AMIS networking properties . . . . . . . . . . . . . . . . . . . . . . . . . . . . . . . . . . . . . . . . . . . . 23
About Call Blocking . . . . . . . . . . . . . . . . . . . . . . . . . . . . . . . . . . . . . . . . . . . . . . . . . . . 26
Call Blocking periods . . . . . . . . . . . . . . . . . . . . . . . . . . . . . . . . . . . . . . . . . . . . . . . 26
Setting up Call Blocking times . . . . . . . . . . . . . . . . . . . . . . . . . . . . . . . . . . . . . . . . . . . 27
About Dialing Translation . . . . . . . . . . . . . . . . . . . . . . . . . . . . . . . . . . . . . . . . . . . . . . 28
How the Dialing Translation Table works . . . . . . . . . . . . . . . . . . . . . . . . . . . . . . . 28
Examples of Dialing Translation Tables . . . . . . . . . . . . . . . . . . . . . . . . . . . . . . . . 29
Setting the Dialing Translation properties . . . . . . . . . . . . . . . . . . . . . . . . . . . . . . . . . . 31
Building a Dialing Translation Table . . . . . . . . . . . . . . . . . . . . . . . . . . . . . . . . . . . . . . 32
Reviewing entries in the Dialing Translation Table . . . . . . . . . . . . . . . . . . . . . . . . . . . 33
Changing an entry in the Dialing Translation Table . . . . . . . . . . . . . . . . . . . . . . . . . . . 34
Deleting a Dialing Translation Table entry . . . . . . . . . . . . . . . . . . . . . . . . . . . . . . . . . . 35
CallPilot Message Networking Set Up and Operation Guide
6
Contents
Testing network message capability . . . . . . . . . . . . . . . . . . . . . . . . . . . . . . . . . . . . . . 36
Before you test network message capability . . . . . . . . . . . . . . . . . . . . . . . . . . . . . 36
Sending a test network message . . . . . . . . . . . . . . . . . . . . . . . . . . . . . . . . . . . . . . . . 37
Chapter 4
Creating network sites. . . . . . . . . . . . . . . . . . . . . . . . . . . . . . . . . . . . . . . . . . 41
Setting the general networking properties . . . . . . . . . . . . . . . . . . . . . . . . . . . . . . . . . . 41
Creating a network site . . . . . . . . . . . . . . . . . . . . . . . . . . . . . . . . . . . . . . . . . . . . . . . . 43
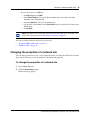
Changing the properties of a network site . . . . . . . . . . . . . . . . . . . . . . . . . . . . . . . . . . 45
Recording a site name . . . . . . . . . . . . . . . . . . . . . . . . . . . . . . . . . . . . . . . . . . . . . . . . . 47
Deleting a site . . . . . . . . . . . . . . . . . . . . . . . . . . . . . . . . . . . . . . . . . . . . . . . . . . . . . . . 49
Disabling Network Messaging . . . . . . . . . . . . . . . . . . . . . . . . . . . . . . . . . . . . . . . . . . . 50
Enabling Broadcast and Group List Messages . . . . . . . . . . . . . . . . . . . . . . . . . . . . . . 51
Chapter 5
Network Delivery Mailboxes . . . . . . . . . . . . . . . . . . . . . . . . . . . . . . . . . . . . . 53
About Network Delivery Mailboxes . . . . . . . . . . . . . . . . . . . . . . . . . . . . . . . . . . . . . . . 53
About creating Network Delivery Mailboxes . . . . . . . . . . . . . . . . . . . . . . . . . . . . . . . . 54
Creating a Network Site mailbox . . . . . . . . . . . . . . . . . . . . . . . . . . . . . . . . . . . . . . . . . 55
Creating a Network AMIS mailbox . . . . . . . . . . . . . . . . . . . . . . . . . . . . . . . . . . . . . . . . 57
Changing Network Delivery Mailbox parameters . . . . . . . . . . . . . . . . . . . . . . . . . . . . 60
Deleting a Network Delivery Mailbox . . . . . . . . . . . . . . . . . . . . . . . . . . . . . . . . . . . . . . 61
Chapter 6
Troubleshooting Non Delivery Notification messages. . . . . . . . . . . . . . . . 63
Non Delivery Notification messages . . . . . . . . . . . . . . . . . . . . . . . . . . . . . . . . . . . . . . 63
Chapter 7
Message Networking programming record . . . . . . . . . . . . . . . . . . . . . . . . . 69
Glossary . . . . . . . . . . . . . . . . . . . . . . . . . . . . . . . . . . . . . . . . . . . . . . . . . . . . . 75
Index . . . . . . . . . . . . . . . . . . . . . . . . . . . . . . . . . . . . . . . . . . . . . . . . . . . . . . . . 79
NN40090-301
7
Chapter 1
Getting started
About this Guide
The CallPilot Message Networking Set Up and Operation Guide describes how to set up Message
Networking on a Business Communications Manager (BCM) or CallPilot 100/150 system.
About CallPilot Message Networking
Message Networking links your voice mail system with voice mail systems at different locations.
Message Networking uses Digital Networking and Audio Message Interchange Specification
(AMIS) to let subscribers exchange messages with subscribers at other locations.
You must apply the Message Networking keycode before your system can receive or send network
messages. Contact your vendor to purchase or trial a keycode for Message Networking.
Requirements for setting up Message Networking
To use Message Networking you need to know:
•
•
how to use the telephones on your system. If you use Nortel Business Series Terminals see the
CallPilot Reference Guide, CallPilot Manager Set Up and Operation Guide or the CallPilot
Quick Reference Cards.
if you use BCM, which mailbox interface you use.
See the CallPilot Reference Guide for information on how to check which interface you use.
•
how to start CallPilot Manager and use the CallPilot Manager interface.
For information see “Starting CallPilot Manager” and “About the CallPilot Manager
interface” in Chapter 2 of the CallPilot Manager Set Up and Operation Guide.
•
if you use a BCM system, how to start Element Manager and use the Element Manager
Interface.
Refer to the BCM Administration Guide.
•
specific addressing information about CallPilot and other voice messaging sites on your
network. It is recommend that you work with the Network Administrator when you set up
Message Networking.
Digital and AMIS networking
Message Networking uses two types of networking:
CallPilot Message Networking Set Up and Operation Guide
8
Chapter 1 Getting started
•
Digital Networking — transfers messages using an Internet or intranet connection using
Voice Profile for Internet Mail (VPIM) to support interconnection to equipment from Nortel
and other vendors
•
AMIS — supports an analog transfer protocol that does not require any formal data
networking arrangements
About Digital Networking
Digital Networking links CallPilot and other voice mail systems at different locations. Digital
Networking lets users at different sites exchange voice messages on a network connected by
Transmission Control Protocol/Internet Protocol (TCP/IP). Digital Networking uses Simple Mail
Transfer Protocol (SMTP) to exchange the messages.
BCM Fax is not available on CallPilot 100/150.
Note: Any voice message that you send over the Internet using Digital Networking can
be subject to interception by unauthorized parties.
How Digital Networking works
Digital Networking provides voice messaging to mailboxes at different sites on a network. Each
CallPilot site on the network must have Digital Networking installed to send, receive or reply to
network messages.
Network voice messaging occurs between mailboxes at different sites. For example, a message
recorded at an office in Miami, Florida can be transferred directly to the appropriate mailbox in
Vancouver, British Columbia.
Each site on a network is assigned a unique Fully Qualified Domain Name (FQDN). The FQDN
distinguishes a site from every other site on the network. An FQDN is the full name of the site,
including all subdomain and domain names, separated by periods. For example,
arabians.horse.com is an FQDN.
If you use Digital Networking and you do not use DNS to resolve domain names, you can
configure your system and client computers to use an IP address only. How to do this is explained
in Chapter 2.
Note: CallPilot for BCM will accept network wide and site specific VPIM
broadcast messages from M1 CallPilot. Upon acceptance, CallPilot for BCM
delivers the network wide broadcast message to all local recipients as if the
administrator had used F981, compose and send, to send the message.
CallPilot also accepts site specific VPIM broadcast messages for delivery, if the
VPIM prefix in the message address matches the local mailbox prefix (defined in
CallPilot Manager Digital Networking Properties Page).
You cannot send network wide or site specific VPIM broadcast messages.
NN40090-301
Chapter 1 Getting started
9
Setting up BCM and M1CallPilot for VPIM broadcast messages
To set up the BCM so remote M1 Callpilot broadcast messages are accepted and delivered to
BCM's local subscribers:
•
Enable Network Receive. If not enabled, the remote M1 site will receive a Service Not
Available (SMTP reply 421) nondelivery notification upon attempting to send a broadcast
message to the BCM.
•
Add the M1 site to the site list on the BCM. You need to know the FQDN of the M1 site, and
its site prefix in the network. If you do not add the M1 site to the BCM, the remote M1 site will
receive a Service Not Available (SMTP reply 421) nondelivery notification when attempting
to send a broadcast message to the BCM. Also, the BCM can only receive G726 voice
encoded messages from M1 CallPilot.
To set up M1 CallPilot to send network and site specific broadcast messages:
•
Ensure you have M1 Callpilot version 2.0 or above. Versions prior to 2.0 do not support
network wide and site specific broadcast to BCMs. For additional information, see the
CallPilot Network Planning Guide (555-7101-102).
About AMIS
Audio Messaging Interchange Specification (AMIS) provides voice messaging to mailboxes at
different sites on a communication network. A network is a collection of offices, locations or sites
connected by telecommunication links. Each site on the network must have AMIS to send, receive
and reply to network messages. Direct AMIS addressing lets local subscribers send a voice
message to any subscriber inside or outside the company who has an AMIS voice mail address.
Network voice messaging occurs between mailboxes at different sites. For example, a message
recorded at an office in Cleveland, Ohio can be transferred directly to the appropriate mailbox at
an office in Toronto, Ontario.
AMIS networking uses ordinary telephone lines to exchange voice messages. An AMIS address
consists of a telephone number and a mailbox number.
Note: AMIS calls can incur long distance charges.
Ways of sending network messages
With Message Networking subscribers can send network messages to any supported site on the
network. Sites must have Network Receive enabled to receive network messages.
Subscribers can send network messages using:
•
Site-Based Addressing
•
Network Delivery Mailboxes
CallPilot Message Networking Set Up and Operation Guide
10
Chapter 1 Getting started
•
Direct Addressing
Note: For information about sending messages using Site-Based Addressing, Network
Delivery Mailboxes or Direct Addressing see the CallPilot Message Networking User
Guide.
Site-Based Addressing
Use site-based addressing to set up a formal network of sites. Site-Based Addressing lets callers
send a message to other locations. Local subscribers can send messages to subscribers at a remote
site using an address that is the same as the recipient’s phone number. Your site-based addressing
can match your organization’s telephone network addressing.
Network Delivery Mailboxes
Network Delivery Mailboxes let local subscribers send a voice message to another subscriber
using what appears to be a local mailbox. Each Network Delivery Mailbox has a local mailbox
number and the destination site subscriber’s name appears in the local company directory.
When callers send a message to Network Delivery Mailboxes, they record a message and select
the Network Delivery Mailbox number. CallPilot sends the message to the specified network
address and mailbox.
For example, you can set up mailbox 5656 as a Network Delivery Mailbox. You add the Network
Delivery Mailbox to your CallPilot system and specify the site prefix and destination mailbox 450
at the destination site. Each time a CallPilot subscriber accesses mailbox 5656 at your site,
CallPilot knows it is a message intended for mailbox 450 at another location and automatically
delivers it.
Network Delivery Mailboxes can also appear in the Company Directory, although only a
subscriber can select a Network Delivery Mailbox. Callers who are not subscribers on your
CallPilot system cannot access Network Delivery Mailboxes.
Direct Addressing
With Direct Addressing subscribers can send a voice message to a mailbox at a different location
on a network. To use Direct Addressing you must know the destination site’s phone number and
the mailbox number of the person you want to send a message to. Direct Addressing is available
for AMIS only.
Assigning Message Networking to subscribers
You assign Message Networking to subscribers through the mailbox Class of Service. Any
subscriber with an initialized mailbox, and the appropriate Class of Service, can use Message
Networking. For information on Class of Service values see the CallPilot Manager Set Up and
Operation Guide.
NN40090-301
Chapter 1 Getting started
11
Audience
This is guide is for system administrators you maintain and configure CallPilot on a Business
Communications Manager or CallPilot 100/150 system. To use this guide you must be an
authorized system administrator.
Acronyms
The following is a list of acronyms used in this guide.
Table 1
Acronym
Description
AMIS
Audio Messaging Interchange Specification
BCM
Business Communications Manager
CCR
Custom Call Routing
DNS
Domain Name System
FQDN
Fully Qualified Domain Name
SMTP
Simple Mail Transfer Protocol
VPIM
Voice Profile Internet Mail
CallPilot Message Networking Set Up and Operation Guide
12
Chapter 1 Getting started
Symbols and text conventions
These symbols are used to Highlight critical information for the BCM system:
Caution: Alerts you to conditions where you can damage the equipment.
Danger: Alerts you to conditions where you can get an electrical shock.
Warning: Alerts you to conditions where you can cause the system to fail or work
improperly.
Note: A Note alerts you to important information.
Tip: Alerts you to additional information that can help you perform a task.
!
Security note: Indicates a point of system security where a default should be changed,
or where the administrator needs to make a decision about the level of security required
for the system.
Warning: Alerts you to ground yourself with an antistatic grounding
strap before performing the maintenance procedure.
Warning: Alerts you to remove the BCM main unit and expansion unit
power cords from the ac outlet before performing any maintenance
procedure.
NN40090-301
Chapter 1 Getting started
13
These conventions and symbols are used to represent the Business Series Terminal display and
dialpad.
Convention
Example
Used for
Word in a special font (shown in
the top line of the display)
Pswd:
Command line prompts on display telephones.
Underlined word in capital letters
(shown in the bottom line of a two
line display telephone)
PLAY
Display button option. Available on two-line display
telephones. Press the button directly below the
option on the display to proceed.
Dialpad buttons
£
Buttons you press on the dialpad to select a
particular option.
These text conventions are used in this guide to indicate the information described.
Convention
Description
bold Courier
text
Indicates command names and options and text that you need to enter.
Example: Use the info command.
Example: Enter show ip {alerts|routes}.
italic text
Indicates book titles
plain Courier
text
Indicates command syntax and system output (for example, prompts
and system messages).
Example: Set Trap Monitor Filters
FEATURE
HOLD
RELEASE
Indicates that you press the button with the coordinating icon on
whichever set you are using.
Related Publications
This section provides a list of additional documents referred to in this guide.
CallPilot Manager Set Up and Operation Guide (NN40090-300)
CallPilot Reference Guide (NN40090-100)
CallPilot Message Networking User Guide (NN40090-101)
CallPilot Quick Reference Card - CP Interface (NN40090-102)
CallPilot Quick Reference Card - NVM Interface (NN40090-103)
CallPilot Quick Reference Card - Remote Users (CP Interface) (NN40090-104)
CallPilot Quick Reference Card - Remote Users (NVM Interface) (NN40090-105)
CallPilot Message Networking Set Up and Operation Guide
14
Chapter 1 Getting started
How to get Help
This section explains how to get help for Nortel products and services.
Getting Help from the Nortel Web site
The best way to get technical support for Nortel products is from the Nortel Technical Support
Web site:
http://www.nortel.com/support
This site provides quick access to software, documentation, bulletins, and tools to address issues
with Nortel products. More specifically, the site enables you to:
•
download software, documentation, and product bulletins
•
search the Technical Support Web site and the Nortel Knowledge Base for answers to
technical issues
•
sign up for automatic notification of new software and documentation for Nortel equipment
•
open and manage technical support cases
Getting Help over the phone from a Nortel Solutions Center
If you don’t find the information you require on the Nortel Technical Support Web site, and have a
Nortel support contract, you can also get help over the phone from a Nortel Solutions Center.
In North America, call 1-800-4NORTEL (1-800-466-7835).
Outside North America, go to the following Web site to obtain the phone number for your region:
http://www.nortel.com/callus
Getting Help from a specialist by using an Express Routing Code
To access some Nortel Technical Solutions Centers, you can use an Express Routing Code (ERC)
to quickly route your call to a specialist in your Nortel product or service. To locate the ERC for
your product or service, go to:
http://www.nortel.com/erc
Getting Help through a Nortel distributor or reseller
If you purchased a service contract for your Nortel product from a distributor or authorized
reseller, contact the technical support staff for that distributor or reseller.
NN40090-301
15
Chapter 2
Setting up Digital Networking
Setting the Digital Networking properties
Setting up Network properties involves entering your site’s:
•
•
•
SMTP proxy name, if applicable
local prefix
Fully Qualified Domain Name (FQDN) or IP address
SMTP proxy name
Before you can use Digital Networking, you must find out from the Network Administrator
whether the network has an SMTP proxy. SMTP proxies restrict access to a company’s internal
network from the Internet. A proxy provides network security and prevents unauthorized access.
If your network has a direct connection to the internet or intranet, it does not have an SMTP proxy
and you do not have to enter an SMTP proxy name. If your network has an SMTP proxy, you must
enter the domain name of the SMTP proxy of your site. Contact your Network Administrator for
more information.
The FQDN of the SMTP proxy can be a maximum of 128 alphanumeric characters. The domain
name cannot have any spaces or punctuation except for characters such as periods, dashes or
underscores that are part of the name.
Local prefix
Before your site can receive messages from other sites, you must enter a local prefix for your site.
The local prefix is the sequence of digits that must be prefixed to local mailbox numbers to make
them unique across your network. The prefix is usually the same as your site prefix in the network
numbering plan.
The local prefix is a number from one to nine digits. This prefix can be the same as your site’s area
code and three-digit exchange prefix. For example, if customers dial 403-246-xxxx to reach your
site, 403246 can be your local prefix.
You must give your local prefix number to the Network Administrator and System Administrator
at each digital site. If you change it, give them your new prefix. They can update your local prefix
in their Site Tables.
FQDN
The FQDN is the domain name used for referring to your site, and is added to all outgoing
messages. For example, nortel.com is a domain name.
CallPilot Message Networking Set Up and Operation Guide
16
Chapter 2 Setting up Digital Networking
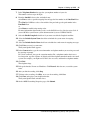
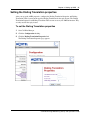
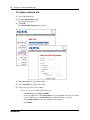
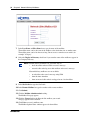
To set the Digital Networking properties
1
Start CallPilot Manager.
2
Click the Networking heading.
3
Click the Digital Networking Properties link.
The Digital Networking Properties page appears.
4
In the Local Prefix box type the local prefix.
5
In the SMTP Proxy Name box type the SMTP Proxy Name.
6
The IP Address and Domain Name are read-only. If you use a DNS your system displays the
domain name and IP address. If you do not use a DNS the IP address is displayed.
7
Click Submit.
NN40090-301
Chapter 2 Setting up Digital Networking
17
Configuring your system network properties
Configuring your system network properties involves setting up message networking according to
whether you use a DNS server, host names or IP addresses.
Note: It is recommend that you use a DNS server. If you use a BCM system and all of the
digital sites in your network use DNS, go to “Creating a network site” on page 43.
If you use a CallPilot system and all of the digital sites in your network use DNS, go to
“To configure DNS on CallPilot 100/150” on page 20, and then go to “Creating a network
site” on page 43.
When you send a digital networking message, the internet uses the Domain Name System (DNS)
to translate domain names into IP addresses. Domain names, such as www.example.com, are
alphabetic, so they are easy for subscribers to remember. However, the internet is based on IP
addresses, which are numbers such as 198.105.232.4. Every time you use a domain name, a DNS
server translates the name into the corresponding IP address. For example, the domain name
www.example.com can translate to 198.105.232.4.
If you do not use domain names, the internet uses IP addresses. If you use IP addresses your
system does your name mapping for you. Some businesses do not use DNS servers, for example, if
they have a private network.
Configuring your system if you do not use DNS
Digital networking requires consistent name mapping throughout the network of digital sites. The
best way to provide name mapping is by using a DNS server. If you do not use a DNS server you
can use either a hosts file or IP addresses.
If your network contains only BCM or CallPilot 100/150 systems you can use IP addresses and do
not have to use hosts files.
If your network contains sites other than BCM or CallPilot 100/150 digital sites, you must use
hosts files if you do not use a DNS server.
If you use BCM as a gateway to an internet service provider and DNS servers cannot provide name
resolution for the BCM or other digital sites, you must use hosts files to provide consistent name
mapping throughout the network.
You must do your system network configuration before you can add network sites. You can test
your system’s name mapping with ping and nslookup commands. On CallPilot 100/150 you can
test your system’s name mapping by adding a network site.
CallPilot Message Networking Set Up and Operation Guide
18
Chapter 2 Setting up Digital Networking
If DNS is not available you must do one of the following:
•
If your digital network contains sites with sites other than BCM and CallPilot 100/150, you
must use a hosts file to provide consistent name mapping throughout the VPIM network. If
you use CallPilot 100/150, see “To create and install hosts files on CallPilot 100/150” on page
20.
Note: You can use a hosts file in combination with DNS in situations where DNS
is not available in all branch locations.
•
If your digital network contains, and will only contain, BCM or CallPilot 100/150 sites, you
can use IP addresses to create network sites. Refer to “To configure BCM to use IP addresses”
on page 18 or “To configure CallPilot 100/150 to use domain names or IP addresses” on page
19 to create network sites using IP addresses.
Note: The DNS servers must provide constant name mapping throughout the network.
Host files can be used to augment DNS if necessary. An instance where both hosts files
and DNS may be required is when a BCM is used as a gateway between a private
network and an ISP.
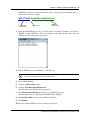
To configure BCM to use IP addresses
1
Ensure no DNS servers are currently configured. Refer to “To check that BCM is not
configured to use DNS” on page 19.
2
Enter the host name on the Business Communications Manager system. Refer to “To check
that a Host Name is entered on the BCM” on page 19.
3
Configure computers running Message Networking with the IP address of the Business
Communications Manager system.
Note: If you are using a Business Communications Manager system system, you can
view the IP addresses of your system in Element Manager on the Domain Name Service
screen.
NN40090-301
Chapter 2 Setting up Digital Networking
19
To check that BCM is not configured to use DNS
Note: Ensure the BCM is using a static IP address and DHCP is disabled.
1
Start Element Manager.
2
On the Configuration tab, choose the Data Services folder.
The system tasks appear.
3
Choose the DNS task.
The Domain Name Service tab appears.
4
Ensure that the Enable DNS box is not selected.
5
Ensure that the Primary (& Sec.) Server IP Addr field is empty. If it is not, delete any
entries.
To check that a Host Name is entered on the BCM
1
Start Element Manager.
2
On the Configuration tab, choose the System folder.
The system tasks appear.
3
Choose the Identification task.
The System Identification tab appears.
4
Enter a system name in the System Name box, if one is not entered.
A system name can be any name (for example, myCompany).
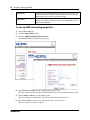
To configure CallPilot 100/150 to use domain names or IP
addresses
If you do not have a DNS you can configure your CallPilot host to recognize the domain names of
other CallPilot sites on your system. For example, a bank can create domain names for each branch
that has a CallPilot site on their system, with the names “Downtown”, “South Side” and “West
End”, so that an employee who wants to send a message to another branch can just use its domain
name, and does not have to know the IP addresses of the branch.
1
Start CallPilot Manager.
2
Click the Configuration heading.
3
Click the Unit Address/Identification link.
The Unit Address and Identification page appears.
4
In the Host name or IP Address box enter your IP address.
5
Leave the Primary DNS and Secondary DNS boxes empty.
6
Click Submit.
7
You must reboot CallPilot for the new settings to take effect.
CallPilot Message Networking Set Up and Operation Guide
20
Chapter 2 Setting up Digital Networking
To configure DNS on CallPilot 100/150
1
Start CallPilot Manager.
2
Click the Configuration heading.
3
Click the Unit Address/Identification link.
The Unit Address and Identification page appears.
4
In the Host name or IP Address box enter your CallPilot’s Host name.
It must be a Fully Qualified Domain Name (FQDN.)
Warning: The FQDN must be in the same subnet that is specified by the Subnet
Mask and the Default Gateway IP address. If you enter an FQDN that is not in the
same subnet, you can cause the CallPilot to continuously reboot. To correct this
problem, use the serial interface to change the IP address of the CallPilot. For more
information, see “Changing the IP address using a serial cable” in the CallPilot
Installation and Maintenance Guide.
5
In the Primary DNS box enter the IP address of the external DNS server.
6
In the Secondary DNS box enter the IP address of secondary DNS server if you use one.
7
Click Submit.
8
You must reboot CallPilot for the new settings to take effect.
To create and install hosts files on CallPilot 100/150
1
In a text editor such as Notepad, create a hosts file that contains the IP address and the hosts
name/FQDN of your CallPilot and the other CallPilot sites on your system. Make sure that the
name of your local CallPilot system comes first in the list. List the addresses in the form IP
address followed by the name/FQDN of the units, and type a line break by pressing the
NN40090-301
Chapter 2 Setting up Digital Networking
21
ENTER key after the last entry in the hosts file. Type a single space between the IP address
and the hosts name. For example:
204.171.64.2 headoffice.callpilot.com
IP address of
CallPilot host
FQDN of
CallPilot host
single space
2
Name the file HOSTS and save it as a text file with no extension, for example, save the file as
“HOSTS” and not “HOSTS.txt”. This is an example of a hosts file. The first entry is the main
CallPilot unit. The other entries are branches.
3
FTP the HOSTS file to your CallPilot’s 7.0/ST directory.
Caution: You must FTP the file using the ASCII format, NOT binary.
If you use binary the hosts file will not work.
4
Start CallPilot Manager.
5
Click the Configuration heading.
6
Click the Unit Address/Identification link.
The Unit Address and Identification page appears.
7
In the Host name or IP Address box enter your CallPilot’s host name.
Your host name must be a Fully Qualified Domain Name (FQDN).
8
In the Primary DNS box enter your CallPilot’s IP address.
9
Click Submit.
10 You must reboot CallPilot for the new settings to take effect.
CallPilot Message Networking Set Up and Operation Guide
22
Chapter 2 Setting up Digital Networking
To change your local CallPilot Host name or IP address
1
Make the change to the host name or IP address first.
2
Create a hosts file, making sure that the new host name is the first entry in the hosts file.
3
FTP the hosts file to your CallPilot’s 7.0/ST directory. You must FTP the file using the ASCII
format, NOT binary. If you use binary the hosts file will not work.
4
Reboot CallPilot for the new settings to take effect.
NN40090-301
23
Chapter 3
Setting up AMIS
Setting up AMIS
AMIS provides your site with network voice messaging features. This chapter describes how to set
up and test AMIS on your Business Communications Manager or CallPilot 100/150 system.
Note: Make sure that your Company Greetings are 15 seconds or longer. For
information about recording Company Greetings see the CallPilot Manager Set Up and
Operation Guide.
AMIS Networking properties are not available if you have a CallPilot 100 that is
connected to a Compact 3X8 ICS.
AMIS networking properties
AMIS networking properties are as follows.
International Access code
This code identifies the country where your site is. This code allows
international calling capability. In Canada and the United States, the
International Access code is 011. This number can have a maximum of four
digits.
Country code
This code is assigned to the country where your site is located. In Canada
and the United States, the Country code is 1. This code can have a
maximum of four digits. This information is used to generate the return
address of your location.
Area code
This code is assigned to your calling area. For example, the area code for
Kansas City is 816 and the area code for Calgary is 403. Each province,
state, and, sometimes city has a specific area code. This number can have
a maximum of six digits. This information is used to generate the return
address of your location.
Telephone number
The system telephone number at your site is the number assigned to the
Auto Attendant. This number can have a maximum of 16 digits. This
information is used to generate the return address of your location.
Outdial route
The numbers your site uses to access Line, Pool or Route codes. The
Outdial route is the Line or Pool number that AMIS uses to make an
outgoing call or the Route code used to call a specific site.
Enable Loopback mailbox
You use a Loopback Mailbox to test if two sites are communicating. When
a Loopback mailbox receives a message, it sends it back to the originating
mailbox. Before you can test network message capability, you must enable
the Loopback Mailbox.
The Loopback mailbox is not enabled by default. Enable the Loopback
mailbox while you set up and test your network. Disable the Loopback
mailbox after you know that it is working.
CallPilot Message Networking Set Up and Operation Guide
24
Chapter 3 Setting up AMIS
System name
You can record a system name. When you include the system name, the
recorded system name is added to all messages sent from your site. The
system name plays as part of the recorded message.
Sender name
The sender’s recorded name can be attached to each message sent from
your site. The sender’s name plays as part of the recorded message. The
default setting is disabled.
To set up AMIS networking properties
1
Start CallPilot Manager.
2
Click the Networking heading.
3
Click the AMIS Networking Properties link.
The AMIS Networking Properties page appears.
4
In the Int’l Access Code box type the International Access code.
The code can have up to four digits. The International Access code for North America is 011.
5
In the Country Code box type the Country code.
The code can have up to four digits. The Country code for North America is 1.
6
In the Area Code box type the area code for your city, state or province.
The area code can have up to six digits.
NN40090-301
Chapter 3 Setting up AMIS
25
7
In the Telephone Number box type the system phone number of your site.
This number can have up to 16 digits.
8
From the Outdial list box select an Outdial route:
select Line to select a specific outgoing line and type the line number in the Line/Pool # box
or
select Pool for CallPilot to select a line within a line pool and type the pool number in the
Line/Pool # box
or
select Route to outdial using routing codes.
For more information about routing codes, see the BCM Networking Configuration Guide if
you use BCM, or your Norstar system documentation if you use CallPilot 100/150.
9
Select the Enable Loopback check box if you want to enable the Loopback mailbox.
10 Select the Include System Name check box to include the system name in outgoing
messages.
11 Select the Include Sender Name check box to include the sender name in outgoing messages.
12 Click Voice to record a system name.
The System Spoken Name appears.
13 In the Connect to box, type the extension number or telephone number you are using to record
the greeting or prompt.
For a local extension, just type the extension number. For a telephone number that is not a
local extension, type the sequence of digits that dial the telephone number from the voice mail
system. For example, you might need to dial 9, the area code, and then the telephone number.
14 Click Dial.
The telephone rings.
15 Pick up the handset. Do not use Handsfree. Click Record. After the tone, record the system
name.
16 After you finish recording, click Stop.
17 To listen to the recording, click Play, or to save the recording, click Save.
18 Click Close and replace your telephone handset.
The System Spoken Name window closes.
19 On the AMIS Networking Properties page, click Submit.
CallPilot Message Networking Set Up and Operation Guide
26
Chapter 3 Setting up AMIS
About Call Blocking
After you create AMIS sites you can set up call blocking. Call Blocking establishes times when
AMIS Network Delivery Messages are prohibited. You can limit non-urgent calls during peak
periods or when long distance rates are highest. You can establish Call Blocking for every day of
the week.
Note: If you want Call Blocking to continue past midnight, you must create two Call
Blocking periods. The first Call Blocking period ends at midnight and the second Call
Blocking period begins at midnight of the next day.
Decide the maximum amount of time a non-urgent AMIS message must wait before being
delivered during a typical business day. Ensure that no call blocking period exceeds this limit.
Call Blocking periods
There are four Call Blocking periods per day. For example, you can establish a period on Monday
from 08:00 to 11:00 a.m., and from noon until 4:00 p.m. The available time for network calls to
occur is before 08:00 a.m., between 11:00 a.m. and 12:00 p.m., and any time after 4:00 p.m. The
following table shows an example of the Call Blocking periods for Monday.
Example of Call Blocking periods for one day
Day
Period
Call Blocking time from
Call Blocking time to
Monday
1
08:00 a.m.
11:00 a.m.
Monday
2
12:00 p.m.
4:00 p.m.
Monday
3
Monday
4
:
:
:
:
In the table Example of Call Blocking periods for one day, the hours available for network
messaging are before 08:00 a.m., between 11:00 a.m. and noon and after 4:00 p.m.
Note: Call Blocking applies to outgoing messages. Incoming messages are received at
any time. Call Blocking does not apply to urgent messages.
NN40090-301
Chapter 3 Setting up AMIS
27
Setting up Call Blocking times
Set AMIS call blocking periods to block AMIS delivery calls when long-distance rates are
expensive or private networks are congested. If network congestion is a concern, set call blocking
for the peak traffic times.
To set up AMIS Call Blocking times
1
Start CallPilot Manager.
2
Click the Networking heading.
3
Click the AMIS Call Blocking Periods link.
The AMIS Call Blocking Periods page appears.
4
Select the day you want to set up call blocking times for.
5
In the From box type the time call blocking begins and select AM or PM.
Any single-digit hour or minute must be preceded by a zero. For example, type 8:00 as 08:00.
CallPilot Message Networking Set Up and Operation Guide
28
Chapter 3 Setting up AMIS
6
In the To box type the time of day call blocking ends and select AM or PM.
Any single-digit hour or minute must be preceded by a zero. For example, type 8:00 as 08:00.
7
You can select the Same As Previous Day check box if you want to use the previous day's
settings for the call blocking period.
8
Click Submit.
Note: If there is an overlap in the call blocking periods established for the same day,
AMIS determines the time band from the earliest and latest times of the overlapping
time bands and treats the times as one call blocking period.
About Dialing Translation
There are situations when CallPilot generates an outbound call; for example, a mailbox owner
replies to a Calling Line Identification (CLID) message. In this situation, CallPilot generates a
phone number to be dialed by the central office (CO).
Another example is when Network Reply or the Loopback mailbox is used. In these cases, the
phone number that is replied to is taken from information transmitted with the original message.
In both situations several changes must occur before the number is dialed through the local
telephone network. You must set up the Dialing Translation properties and create the Dialing
Translation Table to determine these changes if your network requires dialing translations for the
reply feature. Dialing Translation properties and the Dialing Translation Table are not necessary
for AMIS to function.
How the Dialing Translation Table works
A phone number is derived from information attached to an incoming Caller ID message. The
number is then searched for in the Dialing Translation Table. If the leading digits of the telephone
number match a Dialing Translation Table Input value, the Output value is substituted for the
Input value. This change results in a telephone number that can be dialed on the local network.
Changing the number usually involves removing an area code or inserting an access code, based
on the dialing rules of the local network. For example, if a local number is prefixed with the long
distance code 1, it is removed by the Dialing Translation Table.
The Dialing Translation process is immediate so calls do not take any longer to dial. Some
telephone numbers do not need to be changed before dialing. CallPilot can function without a
Dialing Translation Table except that the Reply feature cannot be used.
Phone number Translation
The Dialing Translation Table must define each possible case where a change is needed to allow
the number to be dialed on the local network.
NN40090-301
Chapter 3 Setting up AMIS
29
The Dialing Translation Table changes Network extensions into numbers that can be dialed on the
local network. The Network extension form of a phone number is the usual form in which the
number appears. For example, the phone number 403-555-5050, in its Network extension form,
must be translated into a number that can be dialed on the local telephone network. The Dialing
Translation Table follows the rules required to make the call.
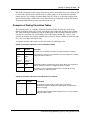
Examples of Dialing Translation Tables
The following tables are examples of Dialing Translation Tables and how they work. Every
Dialing Translation Table entry consists of an Input value column and an Output value column.
The values in the Input column represent the leading digits of the Network extensions which, if
matched, are replaced by the corresponding value in the Output column. The * after a value
signifies any digits in the telephone number that remain to be dialed. CallPilot automatically adds
the * after every Input and Output value.
A telephone number either matches or does not match a specific Input value.
A Dialing Translation Table from a site in metropolitan Toronto
INPUT
OUTPUT
Explanation
011*
011*
The Table does not attempt to translate international telephone numbers.
905206*
90527*
etc.
(135 more
entries)
905206*
90527*
etc.
(135 more
entries)
These telephone exchanges can be dialed as local (no long distance charges)
10 digit calls from the 416 area.
905*
1905*
All other 905 numbers not listed in the Input column above are long distance
numbers and must be dialed as 11 digit long distance numbers.
*
1*
Any numbers that start with digits other than 011, 416 and 905 are long
distance, and have 1 added as a prefix.
A Dialing Translation Table from a site in Mountainview, California
INPUT
OUTPUT
Explanation
The Dialing Translation Table is empty. The local network in
Mountainview supports 10 digit national dialing with recognized long
distance charging.
In situations like the Mountainview example, there is no need to build a
Dialing Translation Table.
CallPilot Message Networking Set Up and Operation Guide
30
Chapter 3 Setting up AMIS
A Dialing Translation Table from a site with area code 206 near a border with area code 360
INPUT
OUTPUT
Explanation
011*
011*
The Table does not attempt to translate international telephone numbers.
20644*
206626*
etc.
(40 more
entries)
44*
626*
etc.
(40 more
entries)
Due to the site location, some calls can be dialed as local 7 digit numbers.
206*
1206*
All other 206 numbers require 11 digit long distance dialing.
360224*
360227*
360472*
360224*
360227*
360472*
These 360 numbers can be dialed as 10 digit local numbers...
360*
1360*
... but all other 360 numbers are 11 digit long distance numbers.
*
1*
All numbers starting with other than 011, 206 and 360 are long distance and
have 1 added as a prefix.
Network Access
Dialing Table Translation results in a number that can be dialed on the local network. The final
step is to prefix any digits required to reach the local network from your Business
Communications Manager system or CallPilot 100/150 system. For systems that are behind a PBX
or PABX, typically in North America · must be prefixed to the telephone number. For systems
attached to Central Office (CO) lines no digits need to be prefixed.
NN40090-301
Chapter 3 Setting up AMIS
31
Setting the Dialing Translation properties
After you set up the AMIS properties, configure the Dialing Translation Properties and Dialing
Translation Table if your network requires Dialing Translation for the reply feature. The Dialing
Translation Properties and Dialing Translation Table are not necessary for AMIS to function. They
are only used for the reply feature.
To set the Dialing Translation properties
1
Start Call Pilot Manager.
2
Click the Configuration heading.
3
Click the Dialing Translation Properties link.
The Dialing Translation Properties page appears.
CallPilot Message Networking Set Up and Operation Guide
32
Chapter 3 Setting up AMIS
4
Set the Dialing Translation properties:
Long Distance Access Code This prefix is removed from any numbers that do not require it to make
the call. This simplifies creating the Dialing Translation Table. For
North America, set the long distance access code to 1. The default for
this property is none. The length of this property is a maximum of two
digits.
5
Area Code
The system prefixes an area code to a phone number if the caller who
entered the number did not enter an area code. If the addressing
information attached to a message is missing an area code, the area
code is prefixed to the number. The system considers the area code
missing if the number has fewer than 10 digits. The default for this
property is none. The maximum length of this property is 6 digits.
Access Code
After Dialing Translation, this number prefixes all numbers, to access
the local telephone network. The access code is required if CallPilot is
installed behind a PBX. In North America, the access code is usually
9. If CallPilot is connected directly to CO lines, set the Access Code to
none. The default for this property is none. The maximum length of
this property is 16 digits.
Enable Reply Translation
If Enable Reply Translation is selected, then the reply feature uses the
dialing translation table to dial the call.
If you want to enable reply translation, select this box.
The default for this property is not enabled.
Click Submit.
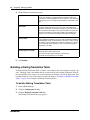
Building a Dialing Translation Table
To build a Dialing Translation Table, you must enter an Input value and an Output value for each
entry. The Input value is the number that the system looks up in the Dialing Translation Table. If
the corresponding entry matches, the system substitutes the Output value for the Input value. The
resulting number is ready to dial on the local network. Refer to “Examples of Dialing Translation
Tables” on page 29 for examples of Dialing Translation Tables.
To build a Dialing Translation Table
1
Start CallPilot Manager.
2
Click the Configuration heading.
3
Click the Dialing Translation Table link.
The Dialing Translation Table page appears.
NN40090-301
Chapter 3 Setting up AMIS
4
Click Add
The Dialing Translation Setup page appears.
5
In the Input Value box type the input value.
6
In the Output Value box type the output value.
7
Click Submit.
33
Reviewing entries in the Dialing Translation Table
You can review the entries in the Dialing Translation Table at any time.
To review Dialing Translation Table entries
1
Start CallPilot Manager.
2
Click the Configuration heading.
3
Click the Dialing Translation Table link.
The Dialing Translation Table page appears.
4
After you review the Dialing Translation Table entries, click Main.
CallPilot Message Networking Set Up and Operation Guide
34
Chapter 3 Setting up AMIS
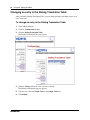
Changing an entry in the Dialing Translation Table
After you build a Dialing Translation Table, you can change the Input and Output values of an
entry at any time.
To change an entry in the Dialing Translation Table
1
Start CallPilot Manager.
2
Click the Configuration heading.
3
Click the Dialing Translation Table.
The Dialing Translation Table page appears.
4
Click the Change link for the value you want to change.
The Dialing Translation Setup page appears.
5
Type the new value in the Input Value or the Output Value box.
6
Click Submit.
NN40090-301
Chapter 3 Setting up AMIS
35
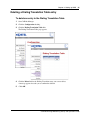
Deleting a Dialing Translation Table entry
To delete an entry in the Dialing Translation Table
1
Start CallPilot Manager.
2
Click the Configuration heading.
3
Click the Dialing Translation Table link.
The Dialing Translation Table page appears.
4
Click the Delete link for the Dialing Translation entry you want to delete.
A message appears that asks you to confirm the deletion.
5
Click OK.
CallPilot Message Networking Set Up and Operation Guide
36
Chapter 3 Setting up AMIS
Testing network message capability
Use the AMIS Loopback Mailbox to test your network message capability. The Loopback
Mailbox is a test mailbox that lets you determine whether AMIS messages are being sent over the
network. Each site in a network has a Loopback Mailbox.
To test AMIS using the Loopback Mailbox, record a message and send it to the Loopback Mailbox
of another site in the network. The Loopback Mailbox sends the message back to the mailbox you
use at your location. This lets you see if your site’s network identification number is properly set
up and if your site can receive messages from other sites in the network.
Before you test network message capability
For your local and destination sites
1
Check that you have Network Delivery, Network Reply and Network Receive enabled in your
General Networking settings. For more information see “Setting the general networking
properties” on page 41.
2
Check that there is no Call Blocking during the time that you want to test the Loopback
Mailbox. For more information, see “Setting up Call Blocking times” on page 27.
For your local sites
Check that the mailbox you use to send the network message from has a Class of Service that has
networking enabled. For more information, see the CallPilot Manager Set Up and Operation
Guide.
For your destination sites
Make sure that in the destination site’s AMIS Network Properties that Loopback is enabled. For
more information, see “To set up AMIS networking properties” on page 24.
Note: The Loopback Mailbox is created automatically when AMIS is installed. If the
mailbox number length is 2 digits, the Loopback Mailbox number is 13. If the mailbox
number length is 4 digits, the Loopback Mailbox number is 1003. If the Group List
leading digit is 1, then the leading digit of the Loopback Mailbox is 2 instead of 1. The
following table shows you how to determine your Loopback Mailbox number.
NN40090-301
Chapter 3 Setting up AMIS
37
Loopback mailbox numbers
If the mailbox extension
length is:
The Loopback
mailbox number is:
If the Group List leading digit is 1,
the Loopback mailbox number is:
2 digits
13
23
3 digits
103
203
4 digits
1003
2003
5 digits
10003
20003
6 digits
100003
200003
7 digits
1000003
2000003
You cannot open the Loopback mailbox or perform any mailbox functions from it.
Sending a test network message
To test network message capability you must send a message from your site to the Loopback
mailbox at a site on the AMIS network. When the Loopback mailbox at the destination site
receives the message, it automatically returns the message to the mailbox used at the originating
site. If you use the System Administrators Mailbox, the test message you record is left as a
message in your System Administrator Mailbox. If you receive the message, it indicates Network
Messaging is operating properly. If you do not receive the message or if a protocol error occurs,
see “Troubleshooting Non Delivery Notification messages” on page 63.
Use the procedure that corresponds to your mailbox interface. For information on determining
which mailbox interface you use, see the CallPilot Reference Guide.
CallPilot Message Networking Set Up and Operation Guide
38
Chapter 3 Setting up AMIS
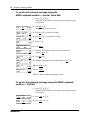
To send a test network message using the
AMIS Loopback mailbox — Norstar Voice Mail
1
Press ≤·°⁄.
Follow the voice prompts or the display button options to open
your mailbox.
0 new 0 saved
PLAY REC
ADMIN
2
Press REC or ‹.
After the tone, record a message.
Record message:
RETRY PAUSE
OK
3
Press OK or £ to end the recording.
Accept rec?
RETRY
PLAY
4
Press OK or £ to accept the recording.
5
Press ££.
6
Press AMIS.
7
Enter the system phone number of the destination site
and press OK or £.
8
Press OK or £.
9
Enter the Loopback mailbox number and press OK or £.
Mbox:
DIR
OK
QUIT
Address Type?
NETW
AMIS
Dest Ph:
RETRY
OK
<phone #>
ADD
OK
Dest mb:
RETRY
OK
AMIS msg:
OPTS
CC
OTHR
Network msg:
VIEW
SEND
10 Press OTHR or £.
11 Press SEND.
12 Press ® to end the programming session.
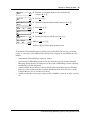
To send a test network message using the AMIS Loopback
mailbox — CallPilot
No messages
COMP MBOX
EXIT
To:
NAME
CNCL
NN40090-301
SPEC
1
Press ≤·°⁄.
Follow the voice prompts or the display button options to open
your mailbox.
2
Press COMP or ‡fi.
3
Press SPEC or ⁄·.
Chapter 3 Setting up AMIS
Dest ph:
RETRY
OK
<phone #>
ADD
OK
Dest mb:
RETRY
OK
To:
NAME
SPEC
DONE
Empty
REC
Recording...
REREC
Rec stopped
PLAY DEL
OK
SEND
4
Enter the system phone number of the destination site
and press OK or £.
5
Press OK or £.
6
Enter the Loopback mailbox number and press OK or £.
7
Press DONE or £.
8
Press REC or fi.
9
Record your message and then press OK or £.
39
10 Press SEND or ‡·.
11 Press ® to end this programming session.
To determine if Network Messaging is working, open your mailbox. The message you record
returns as a message to your mailbox. If the message does not appear in your mailbox after five
minutes:
•
•
•
•
ensure that the Network Delivery option is enabled.
ensure that the Call Blocking periods at your site and at the receiving site allow Network
Messaging during the time you attempt to test the system. Call Blocking prevents calls being
made during a specific time period.
consider whether the test message is delayed by the period of the Retry interval. The Retry
interval is a Class of Service feature. For more information about Class of Service, see the
CallPilot Manager Set Up and Operation Guide.
consider whether the test message is subject to line availability at your site or at the receiving
site.
CallPilot Message Networking Set Up and Operation Guide
40
Chapter 3 Setting up AMIS
NN40090-301
41
Chapter 4
Creating network sites
The procedures in this chapter are for Digital and AMIS networking. If you use digital networking
you must have configured name mapping by DNS or hosts files on your system before you can add
network sites. See “Setting the Digital Networking properties” on page 15 for more information.
You can test your system’s name mapping with ping and nslookup commands. On CallPilot 100/
150 you can test your system’s name mapping by adding a network site.
Setting the general networking properties
The general networking properties control how your site interacts with other networking sites.
When you install Message Networking all of the properties are enabled except for Network
Broadcast Messaging and Network Group List Messaging.
To set the general networking properties
1
Start CallPilot Manager.
2
Click the Networking heading.
CallPilot Message Networking Set Up and Operation Guide
42
Chapter 4 Creating network sites
3
Click General Properties link.
The General Networking Properties page appears.
General Networking properties
Enable Network Receive
Lets your site receive messages from other sites on the network. The
default setting is enabled.
Enable Network Delivery
Lets your site send messages to other sites on the network. The
default setting is enabled.
Enable Network Reply
Lets your site reply to messages sent from other sites on the network.
The default setting is enabled.
Enable Network Broadcast
Lets you send Broadcast Messages to Network Delivery Mailboxes at
your site. The default setting is disabled.
Enable Network Group List
Lets you add Network Mailboxes to a Group List. The default setting is
disabled. When you send a message to a Group List all of the network
delivery mailboxes on the Group List receive it.
NN40090-301
Chapter 4 Creating network sites
4
43
Number of Network Retries
1-9, default 3. Sets the maximum number of times the system
attempts to send a network message before abandoning it and
sending a Non Delivery Notification.
Network Delay
1-60 minutes, default 10. Sets the period between delivery attempts of
the same network message.
Click Submit.
Creating a network site
Before local subscribers can send messages to another site using Site-Based Addressing, you must
add the site to your network.
To add a site to your network, you must know these parameters:
Site name
The Site Name is a text name for the site that can be up to 16 characters.
This name is shown to local subscribers when they address a message or
review message envelope information. The site name is optional but
recommended.
Site prefix
The Site Prefix is a number one to nine digits long that identifies the site on
the network. This number must be unique. Make the Site Prefix a number
that is easy for users to recognize and remember. The Site Prefix is usually
the same as the sequence of digits that local users dial to place a
telephone call to the site. For example, if local users dial 403-123-4567 to
call someone at the target site, then 403123 is an easily remembered Site
Prefix.
The Site Prefix cannot overlap any other Site Prefix in your Network Site
Table. For example, if you use Site Prefix 403123, it overlaps with prefixes
40312 and 4031234.
Host name/IP address
(for digital networking sites
only)
If you use a DNS the host name setting appears. The host name is the
FQDN text name for the host site. It can be up to 128 characters long.
If you do not use a DNS the IP address setting appears.
Mailbox prefix
(for digital networking sites
only)
The Mailbox Prefix is the Local Mailbox Prefix of the target site. Message
Networking ensures that all messages sent to the target site are prefixed
with this number. The Mailbox Prefix ensures uniqueness for the receiving
proxy or networking equipment.
The mailbox prefix can be the same as the remote site prefix.
Phone number
(for AMIS sites only)
The phone number is the phone number of the destination site. The phone
number can be a maximum of 30 digits.
Outdial route
(for AMIS sites only )
The numbers your site uses to access Line, Pool or Route codes. The
Outdial route is the Line or Pool number that AMIS uses to make an
outgoing call or the Route code used to call a specific site.
CallPilot Message Networking Set Up and Operation Guide
44
Chapter 4 Creating network sites
To create a network site
1
Start CallPilot Manager.
2
Click the Networking heading.
The Site List page appears.
3
Click Add.
The Network Site Properties page appears.
4
In the Site Name box type the Site Name.
5
In the Site Prefix box type the Site Prefix.
6
Choose the type of site you are adding.
If you want to create a Digital Networking site:
•
•
•
•
NN40090-301
from Site Type select Digital (VPIM)
if you use a DNS server, in the Host Name box type the FQDN of the site, or if you do
not use a DNS server, in the IP Address box type the IP address of the site
in the Mailbox Prefix box type the mailbox prefix of the site
click Submit
Chapter 4 Creating network sites
45
If you want to create an AMIS site:
•
•
•
•
•
from Site Type select AMIS
in the Phone Number box type the phone number that is answered by the Auto
Attendant at the destination site.
from the Outdial list box select an Outdial route.
type the Line or Pool number in the Line/Pool # box if you select Line or Pool as the
Outdial route.
click Submit
Note: You must create a site before you can record a site name for it. To record a site
name, follow the procedure for “Recording a site name” on page 47.
You can record the parameters of the sites you create in:
•
•
“Network AMIS mailbox table” on page 73
“AMIS site table” on page 70
Changing the properties of a network site
You can change properties of a site, except for the Site Prefix. To change the Site Prefix you must
delete the site and create a new site with a new Site Prefix and properties.
To change the properties of a network site
1
Start CallPilot Manager.
2
Click the Networking heading.
The Site List page appears.
CallPilot Message Networking Set Up and Operation Guide
46
Chapter 4 Creating network sites
3
Select the site you want to change and click Change.
The Network Site Properties page appears for the site you select.
4
Change the site properties and click Submit.
NN40090-301
Chapter 4 Creating network sites
47
Recording a site name
The recorded site name is a voice recording of the Site Name. This name plays to local users when
they address a message or review message envelope information. If you do not record the site
name, the voice prompt says “Unknown site”.
Note: You must create a site before you can record a site name for the site.
For best results, use a telephone that is attached to the same switch as your voice mail system.
Avoid using wireless telephones.
To record a site name
1
Start CallPilot Manager.
2
Click the Networking heading.
The Site List page appears.
3
Select the site you want to record a name for and click Change.
The Network Site Properties page appears for the site you select.
4
Click Voice.
The page you can record from appears.
CallPilot Message Networking Set Up and Operation Guide
48
Chapter 4 Creating network sites
5
In the Connect to box, type the extension number or telephone number you are using to record
the greeting or prompt. For a local extension, just type the extension number. For a telephone
number that is not a local extension, type the sequence of digits that dials the telephone
number from the voice mail system. For example, you might need to dial 9, the area code, and
then the telephone number.
6
Click Dial.
The telephone rings.
7
Pick up the handset. Do not use Handsfree. Click Record. After the tone, record the site name.
8
After you finish recording, click Stop.
9
To listen to the recording, click Play
or
to save the recording, click Save. Your recording will not be saved if you hang up the
telephone before you click Save.
10 Click Close and replace your telephone handset.
The next time you play or record, the phone number shown in the Connect to box is dialed. You do
not need to hang up each time. The connection remains for several minutes, even if you close the
window. You can access another greeting or prompt without having to re-answer your telephone.
The connection disconnects after several minutes of inactivity, or if you log off CallPilot Manager.
NN40090-301
Chapter 4 Creating network sites
49
Deleting a site
You cannot delete a site if it is in use or if Network Delivery Mailboxes use the Site Prefix. You
must delete the Network Delivery Mailboxes that use the Site Prefix before you delete the site.
To delete a site
1
Start CallPilot Manager.
2
Click the Networking heading.
The Site List page appears.
3
Click the Delete link for the site you want to delete.
A message appears asking you to confirm the deletion.
4
Click OK.
The Site List page appears with the site deleted.
CallPilot Message Networking Set Up and Operation Guide
50
Chapter 4 Creating network sites
Disabling Network Messaging
Part of administering Network Messaging is ensuring that the network operates smoothly. There
can be times when it is necessary to limit network message capabilities. Message Networking lets
you specify whether your site can receive, send or reply to network messages.
Sometimes it is necessary to disable Network Messaging. You can disable Network Messaging
system-wide by:
•
•
•
disabling Network Receive
disabling Network Delivery
disabling Network Reply
You can disable Network Messaging for an individual mailbox by changing its class of service.
You can also disable Network Messaging for a set of mailboxes that belong to the same class of
service by updating the class of service.
Disabling Network Receive
Network Receive lets your site receive messages from other sites on the network. If you do not
want your site to receive network messages, disable Network Receive.
Disabling Network Delivery
Network Delivery lets your site send network messages. Sometimes it is necessary to disable this
feature. For example, you may want to stop the sending of network messages when your company
is closed.
If Network Delivery is disabled, a mailbox owner who tries to send a network message will
receive a Non-Delivery Notification message.
Disabling Network Reply
Network Reply lets people at your site reply to network messages left in their mailboxes from
other sites.
Note: You disable these properties in the general networking properties. For
information about the general networking properties, see “Setting the general
networking properties” on page 41.
Disabling Network Messaging through a Class of Service setting
You can restrict Network Messaging for individual mailboxes. You do this by changing or editing
the Class of Service for a mailbox.
Note: For information about changing a mailbox Class of Service, see the CallPilot
Manager Set Up and Operation Guide.
NN40090-301
Chapter 4 Creating network sites
51
Enabling Broadcast and Group List Messages
Network Messaging involves sending messages across the network from one site to another.
Message Networking provides full network messaging capabilities, including Broadcast Messages
and Network Group List Messages.
The Broadcast Message feature lets you record Broadcast Messages and send them to all Network
Delivery Mailboxes.
For information about recording and sending Broadcast Messages, see the CallPilot Manager Set
Up and Operation Guide.
Enabling Broadcast Messages
Before you can send Broadcast Messages over the network, you must enable the Broadcast
Message parameter in the general networking parameters. Refer to “Setting the general
networking properties” on page 41 for information on setting the general networking parameters.
Enabling Network Group Lists
Enabling Group Lists lets you add Network Mailboxes to a Group List. Any messages sent to a
Group List go to all members, including the Network Mailboxes. You enable the Group Lists
parameter in the general networking parameters. Refer to “Setting the general networking
properties” on page 41 for information on setting the general networking parameters.
For information about creating a Network Delivery Mailbox, see “About Network Delivery
Mailboxes” on page 53. For more information about setting up a Group List, see the CallPilot
Manager Set Up and Operation Guide.
Note: If you do not enable Group Lists, messages are not sent to the Network
Mailboxes in a Group List.
CallPilot Message Networking Set Up and Operation Guide
52
Chapter 4 Creating network sites
NN40090-301
53
Chapter 5
Network Delivery Mailboxes
About Network Delivery Mailboxes
A Network Delivery Mailbox makes it convenient for local subscribers to send messages to remote
subscribers. The remote subscriber has a local mailbox number and the remote subscriber’s name
appears in the local directory.
A Network Delivery Mailbox connects to a mailbox at a remote site by using a local mailbox
number that you can access from your site. The Network Delivery Mailbox contains all the
information necessary to transfer a message to a mailbox at another location. This information
includes the destination site prefix and the mailbox number at the destination site.
There are two types of Network Delivery Mailboxes:
•
•
Network Site
Network AMIS
The number of subscribers on your network and the type of network messaging you use determine
how many Network Delivery Mailboxes you need. If you use BCM, you can have up to 998
mailboxes on your system. If you use CallPilot 100/150, you can have up to 300 Subscriber
mailboxes on your system. The mailboxes can include any combination of Subscriber and Guest
mailboxes.
Network Delivery Mailboxes simplify network messaging because mailbox owners must
remember only the Network Delivery Mailbox numbers. CallPilot uses the mailbox number to find
the destination site address and the mailbox at the destination site that receives the message.
CallPilot automatically delivers messages sent through the Network Delivery Mailbox.
For example, a bank has a main office with many branches throughout the city. Sometimes the
main office receives messages for people at the branches. The people at the branch offices can
receive their messages through their Network Delivery Mailboxes at the main office.
CallPilot Message Networking Set Up and Operation Guide
54
Chapter 5 Network Delivery Mailboxes
About creating Network Delivery Mailboxes
Before you create a Network Delivery mailbox you must:
•
•
•
•
know what leading digit you want to assign to all Network Delivery Mailboxes. This is
optional. You can assign the same leading digit to mailboxes to help you to identify the
different types of CallPilot mailboxes. For example, all Subscriber mailboxes can start with 4,
Guest mailboxes with 5, and Network Delivery Mailboxes with 6.
know the mailbox length of the mailboxes on your system. The Network Delivery Mailbox
length must be the same length as the other mailboxes on the system; if the mailbox length is
three digits, the Network Delivery Mailbox must also be three digits.
know the destination site prefix and the destination mailbox number.
add the site for which you are creating the Network Delivery Mailbox. For information on
creating a site see “Creating a network site” on page 43.
Note: After you create a Network Delivery Mailbox you must initialize it.
Take these precautions if you set up a remote Group List as a target for a Network
Delivery Mailbox:
• Do not send messages to a Group List that includes a Network Delivery Mailbox
whose target is the mailbox you sent the message from.
•
Make sure that you do not have any Group Lists that send messages to each
other through a Network Delivery Mailbox. For example, a Group List that
contains a Network Delivery Mailbox that forwards the message to another
Group List. This Group List also contains a Network Delivery Mailbox, and this
Network Delivery Mailbox forwards the message back to the original Group
List.
If you set up a Group List where either situation happens, a loop occurs where a single
message can generate many copies of the message.
NN40090-301
Chapter 5 Network Delivery Mailboxes
55
Creating a Network Site mailbox
Use the “Network Site Mailbox table” on page 72 to record the details of the Network Site
mailboxes you create. You can create a Network Site mailbox for an AMIS or VPIM network site.
To create a Network Site mailbox
1
Start CallPilot Manager.
2
Click the Mailbox Administration heading.
3
Click the Add Mailbox link.
The Add Mailbox page appears.
4
In the Mailbox box type a valid mailbox number.
Use a mailbox number that does not conflict with existing or potential extensions.
Use the same first digit for all Network Site mailboxes so they are easy to identify.
5
From the Mailbox Type list box select Network (Site).
6
Click Submit.
The Network (Site) Mailbox page appears.
CallPilot Message Networking Set Up and Operation Guide
56
Chapter 5 Network Delivery Mailboxes
7
In the Last Name and First Name boxes type the name of the mailbox.
The mailbox name can be the name of the mailbox at the destination site or another name.
The mailbox name can be 16 characters long. Do not create a name that starts with 1, for
example "1Calgary".
8
Select the Display in Directory check box if you want the name of the mailbox to appear in
the Company Directory.
Note: Network delivery mailboxes are accessible only to:
• local subscribers who use F981 to record a message
• external callers who log on to their mailbox and record a message.
Network delivery mailboxes are not available:
• to subscribers who record a message using F980
• from the Auto Attendant
• from an external caller who is not logged on to a local mailbox.
9
In the Site Prefix box type the Site Prefix.
10 In the Remote Mailbox box type the number of the remote mailbox.
11 Click Submit.
12 Click the Mailbox Administration heading.
The Mailbox List page appears.
13 Click the Change link for the Network Site mailbox you created.
The page appears for the mailbox.
14 Click Voice to record a mailbox name.
The Mailbox Spoken Name window appears for the mailbox.
NN40090-301
Chapter 5 Network Delivery Mailboxes
57
15 In the Connect to box, type the extension number or telephone number you are using to record
the mailbox name.
For a local extension, just type the extension number. For a telephone number that is not a
local extension, type the sequence of digits that dial the telephone number from the voice mail
system. For example, you might need to dial 9, the area code, and then the telephone number.
16 Click Record.
The telephone rings.
17 Pick up the handset. Do not use Handsfree. After the tone, record the Network Site mailbox
name.
18 After you finish recording, click Stop.
19 To listen to the recording, click Play, or to save the recording, click Save.
20 Click Close and replace your telephone handset.
21 On the Network Site Mailbox page, click Submit.
Creating a Network AMIS mailbox
Use the “Network AMIS mailbox table” on page 73 to record the details of the Network AMIS
mailboxes you create.
To create a Network AMIS mailbox
1
Start CallPilot Manager.
2
Click the Mailbox Administration heading.
CallPilot Message Networking Set Up and Operation Guide
58
Chapter 5 Network Delivery Mailboxes
3
Click the Add Mailbox link.
The Add Mailbox page appears.
4
In the Mailbox box, type a valid mailbox number.
Use a mailbox number that does not conflict with existing or potential extensions.
Use the same first digit for all Network AMIS mailboxes so they are easy to identify.
5
From the Mailbox Type list box, select Network (AMIS).
6
Click Submit.
The Network (AMIS) Mailbox page appears.
NN40090-301
Chapter 5 Network Delivery Mailboxes
59
7
In the Last Name and First Name boxes type the name of the mailbox.
The mailbox name can be the name of the mailbox at the destination site or another name. The
mailbox name can be 16 characters long. Do not create a name that starts with 1, for example
"1Calgary".
8
Select the Display in Directory check box if you want the mailbox to be listed in the
Company Directory.
Note: Network delivery mailboxes are accessible only to:
• local subscribers who use F981 to record a message
• external callers who log on to their mailbox and record a message.
Network delivery mailboxes are not available:
• to subscribers who record a message using F980
• from the Auto Attendant
• from an external caller who is not logged on to a local mailbox.
9
From the Outdial list box select Line, Pool or Route as the outdialing option.
10 If you use a line or pool, enter a number in the Line/Pool# box.
11 In the Remote Phone Number box type the remote phone number.
12 In the Remote Mailbox box type the remote mailbox number.
13 Click Submit.
14 Click the Mailbox Administration heading.
The Mailbox List page appears.
15 Click the Change link for the AMIS mailbox.
The Network AMIS page appears for the mailbox.
CallPilot Message Networking Set Up and Operation Guide
60
Chapter 5 Network Delivery Mailboxes
16 Click Voice to record a mailbox name.
The Mailbox Spoken Name window appears for the mailbox.
17 In the Connect to box, type the extension number or telephone number you are using to record
the mailbox name.
For a local extension, just type the extension number. For a telephone number that is not a
local extension, type the sequence of digits that dial the telephone number from the voice mail
system. For example, you might need to dial 9, the area code, and then the telephone number.
18 Click Record.
The telephone rings.
19 Pick up the handset. Do not use Handsfree. After the tone, record the Network Site mailbox
name.
20 After you finish recording, click Stop.
21 To listen to the recording, click Play, or to save the recording, click Save.
22 Click Close and replace your telephone handset.
23 On the Network AMIS Mailbox page, click Submit.
Changing Network Delivery Mailbox parameters
You can change any parameter assigned to a Network Delivery Mailbox except the mailbox
number. If you want to change a mailbox number, you must first delete the mailbox and create a
new Network Delivery Mailbox. For instructions on creating a Network Delivery Mailbox, see
“About creating Network Delivery Mailboxes” on page 54. For instructions on deleting a Network
Delivery Mailbox, see “Deleting a Network Delivery Mailbox” on page 61.
To change Network Delivery Mailbox parameters
1
Start CallPilot Manager.
2
Click the Mailbox Administration heading.
The Mailbox List page appears.
NN40090-301
Chapter 5 Network Delivery Mailboxes
3
Click the Change link for the Network Delivery Mailbox you want to change.
The page for the mailbox appears.
4
Change the parameters for the mailbox.
5
Click Submit.
61
Deleting a Network Delivery Mailbox
You can delete a Network Delivery Mailbox at any time. After you delete a Network Delivery
Mailbox, you cannot access it from the Company Directory or deliver network messages to that
particular site.
CallPilot Message Networking Set Up and Operation Guide
62
Chapter 5 Network Delivery Mailboxes
To delete a Network Delivery Mailbox
1
Start CallPilot Manager.
2
Click the Mailbox Administration heading.
The Mailbox List page appears.
3
Click the Delete link for the Network Delivery Mailbox you want to delete.
A message appears asking you to confirm your deletion.
4
Click OK.
NN40090-301
63
Chapter 6
Troubleshooting Non Delivery Notification messages
This chapter describes some problems that can occur while using Message Networking.
If you think there is a problem with the network, contact your Network Administrator.
Non Delivery Notification messages
If a network message cannot be delivered, the sender receives a Non Delivery Notification voice
prompt. This section lists the Digital Networking and AMIS Non Delivery Notification messages,
their meanings and possible solutions.
The destination site is not accepting messages
This error can occur if:
•
•
•
•
the destination site has not entered your site in their Network Site list
the destination site does not have Message Networking enabled
the destination site is busy receiving other messages
the destination site has the Network Receive feature disabled
The system attempts to resend the message, but is unsuccessful.
Solution:
•
•
•
Ensure the destination site has entered your site in their Network Site list.
Ensure the destination site has Message Networking and the Network Receive feature enabled.
Try resending the message. If you receive the same Non Delivery Notification message,
contact your Network Administrator.
The destination mailbox is not accepting messages
This error can occur if the destination mailbox:
•
•
is not initialized
is programmed not to accept messages when its owner is away from the office
The system does not attempt to resend the message.
Solution:
•
Contact the destination site or the Network Administrator
CallPilot Message Networking Set Up and Operation Guide
64
Chapter 6 Troubleshooting Non Delivery Notification messages
A protocol error occurred while delivering the message
For AMIS, this error can occur if:
•
•
•
a DTMF tone signals the wrong digits
someone tries to send an AMIS message that is too long. There is a limit of 8 minutes for
AMIS messages. Do not send AMIS messages that are longer than 8 minutes.
the line disconnects before AMIS sends or receives all the DTMF tones.
A message can still go through even though not all DTMF tones are sent. In these cases, the
protocol error indicates that DTMF signaling was not completed.
Solution:
•
•
Resend the message.
If this error happens repeatedly, the DTMF setting on your system needs to be adjusted.
Contact your customer service representative.
There is a protocol mismatch with the remote site
This error can occur if:
•
•
the destination site is not a Message Networking site (VPIM)
the remote site is not a Voice Messaging site (AMIS)
The system does not attempt to resend the message
Solution:
•
•
Ensure the destination site is a Message Networking site.
Contact your Network Administrator.
Message transfer was interrupted
This error can occur if a system processing error takes place at the destination site during message
processing. The system does not attempt to resend the message.
Solution:
•
Contact your Network Administrator.
The domain name of the remote site is not valid
This error can occur if:
•
•
•
the domain name of the destination site is incorrect
the domain name is deleted from the Network Site List
the HOSTS file or Domain Name Server is not configured with the site’s domain name
The system does not attempt to resend the message.
Solution:
•
Contact your Network Administrator.
NN40090-301
Chapter 6 Troubleshooting Non Delivery Notification messages
65
A connection to the remote site could not be established
This error can occur if your site cannot connect to the destination site. The problem is likely a lack
of Internet Protocol (IP) connectivity. The system does not attempt to resend the message.
Solution:
•
Contact the destination site or the Network Administrator and verify that the site is on the
network.
The media is not supported at the destination
This error can occur if you send a fax message to a destination site that does not have the Fax
option installed. The Fax option is not available for CallPilot 100/150. The system does not
attempt to resend the message.
Solution:
•
•
Contact the destination site and verify that it has the Fax option installed and enabled
Contact your Network Administrator
The network is experiencing problems
This error can occur if:
•
•
your site is busy sending other network messages and cannot send your message
a system error has occurred
The system attempts to resend the message:
•
If you receive the same Non Delivery Notification voice prompt, contact your Network
Administrator
The destination site mailbox is full
This error can occur if the destination site’s mailbox is full. The system does not attempt to resend
the message.
Solution:
•
Contact your Network Administrator.
CallPilot Message Networking Set Up and Operation Guide
66
Chapter 6 Troubleshooting Non Delivery Notification messages
The destination site mailbox does not exist
This error can occur if:
•
•
•
•
the destination mailbox is deleted
the System Administrator entered the wrong mailbox number while creating the Network
Delivery Mailbox
the Network Delivery Mailbox was deleted before the message was sent
the mailbox number entered for site-based addressing is incorrect
The system does not attempt to resend the message.
Solution:
•
•
Verify the destination site mailbox number.
Contact your Network Administrator.
The destination site did not answer the call
This error can occur if:
•
•
•
the destination site disables the Auto Attendant
the Auto Attendant did not answer the call
a busy signal was received at the destination site
Solution:
•
•
Ensure the destination site has the Auto Attendant assigned to answer the Central Office (CO)
line designated for network calls. Resend the message. For instructions about assigning the
Auto Attendant to answer lines, see the CallPilot Manager Set Up and Operation Guide.
AMIS cannot deliver a network message if the destination site does not answer the call using
the Auto Attendant.
The destination site could not be reached because an outside line or routing resources
were not available
This error can occur if all retry attempts encounter no lines available or access denied.
This can happen if:
•
•
•
•
•
•
•
the line is busy
the line does not exist
an unexpected dial tone pause occurs
if you use a BCM or CallPilot 100/150 system, you entered an incorrect line or pool number
the outside line selected is not available
no dial tone is detected on the selected line
an unexpected dial tone is received
NN40090-301
Chapter 6 Troubleshooting Non Delivery Notification messages
67
Solution:
•
•
•
Ensure that the correct line number is assigned and resend the message.
Assign a different line for outdialing.
Contact your customer service representative. If this error occurs frequently because of a busy
line, your system’s channel configuration needs to be upgraded.
A data transmission error was detected while attempting to deliver the message
A delay between DTMF tones causes this error. The destination site receives the transmit tone and
perhaps some other digits, but the pause between the tones is too long.
Solution:
•
•
Resend the message.
Contact your customer service representative if this happens repeatedly.
Timeout occurred while attempting to deliver the message
This error occurs if:
•
•
•
•
•
the destination site is not enabled to answer the lines. Make sure the destination site is set up to
answer the lines.
the destination site does not receive the first digit in the transmission sequence. A timeout
error occurs if the destination site does not receive a transmission signal within 10 seconds.
the remote site’s line is not answered by the Auto Attendant and the number of network retries
is exceeded
there is a long pause in the dialed number, which can be caused by multiple timed pauses, and
the number of network retries is exceeded
the remote site’s line is busy and the number of network retries is exceeded
Solution:
•
•
Resend the message
Contact your customer service representative if this happens repeatedly. The DTMF setting on
you system needs to be adjusted.
A Network Delivery Mailbox could not receive your Broadcast Message
This message plays if your site has disabled the Message Delivery Feature, or if the receiving site
has the Network Receive Feature disabled.
The following message could not be delivered to (mailbox owner's name or mailbox
number)
This message plays if a message cannot be received at a site. This can occur if:
•
•
•
•
the destination site cannot answer the call
the destination site does not accept network messages
the destination site mailbox does not exist
the destination site mailbox is full
CallPilot Message Networking Set Up and Operation Guide
68
Chapter 6 Troubleshooting Non Delivery Notification messages
•
•
•
•
an outside line is not available
a protocol error occurs during transmission
a data transmission error occurs during transmission
a timeout error occurs during transmission
The destination telephone number does not appear to be a network site
This message occurs if:
•
•
•
•
a person answers a ringing line and presses a key when an AMIS message is coming through
on the same line
an AMIS call is answered by a private answering machine
an AMIS call is answered by a voice mail prompt, for example a set that is forwarded to voice
mail with F984
an AMIS call is answered by a Home Transfer node or a Home Mailbox node on a CCR Tree
You receive a protocol error for an AMIS message that is longer than 8 minutes
There is a limit of 8 minutes for AMIS messages. Do not send AMIS messages that are longer than
8 minutes.
Callers do not receive Off-Premise Message Notification and when you try to record a
greeting, prompt or name using CallPilot Manager your telephone does not ring
If you use AMIS networking, make sure that you have more than one outcalling channel set in
CallPilot Manager. For how to set outcalling channels, see the CallPilot Manager Set Up and
Operation Guide. If you have one channel set for outcalling, it is possible that while AMIS calls
are in progress, Off-Premise Message Notification does not occur and you cannot use CallPilot
Manager for recording greetings, prompts or names.
NN40090-301
69
Chapter 7
Message Networking programming record
Note: You can photocopy these pages.
General Networking Properties
IP address or Host name
Enabled
Disabled
Network Receive
Enabled
Disabled
Network Delivery
Enabled
Disabled
Network Reply
Enabled
Disabled
Network Broadcast
Enabled
Disabled
Network Group List
Enabled
Disabled
Number of Network Retries (1-9)
Network Delay (1-60 minutes)
Digital Networking site table
Use this table to record the properties for the Digital Networking sites you create.
Site name
Site prefix
Host name (FQDN)
Mailbox prefix
Site name recorded
Y
N
Y
N
Site name
Site prefix
Host name (FQDN)
Mailbox prefix
Site name recorded
Site name
Site prefix
Host name (FQDN)
CallPilot Message Networking Set Up and Operation Guide
70
Chapter 7 Message Networking programming record
Mailbox prefix
Site name recorded
Y
N
AMIS site table
Use this table to record the properties for the AMIS sites you create.
Site name
Site prefix
Site name recorded
Y
N
Destination site phone number
Outdial route
Line number
Pool number
Route code
Site name
Site prefix
Site name recorded
Y
N
Destination site phone number
Outdial route
Line number
Pool number
Route code
Site name
Site prefix
Site name recorded
Y
N
Destination site phone number
Outdial route
Line number
Pool number
Route code
Site name
Site prefix
Site name recorded
Y
N
Destination site phone number
Outdial route
NN40090-301
Line number
Pool number
Route code
Chapter 7 Message Networking programming record
71
Call Blocking periods table
Use this table to record your Call Blocking periods.
Day
Monday
Tuesday
Wednesday
Thursday
Friday
Saturday
Sunday
Period
Call Blocking time from
Call Blocking time to
1
____ : ____
____ : ____
2
____ : ____
____ : ____
3
____ : ____
____ : ____
4
____ : ____
____ : ____
1
____ : ____
____ : ____
2
____ : ____
____ : ____
3
____ : ____
____ : ____
4
____ : ____
____ : ____
1
____ : ____
____ : ____
2
____ : ____
____ : ____
3
____ : ____
____ : ____
4
____ : ____
____ : ____
1
____ : ____
____ : ____
2
____ : ____
____ : ____
3
____ : ____
____ : ____
4
____ : ____
____ : ____
1
____ : ____
____ : ____
2
____ : ____
____ : ____
3
____ : ____
____ : ____
4
____ : ____
____ : ____
1
____ : ____
____ : ____
2
____ : ____
____ : ____
3
____ : ____
____ : ____
4
____ : ____
____ : ____
1
____ : ____
____ : ____
2
____ : ____
____ : ____
3
____ : ____
____ : ____
4
____ : ____
____ : ____
CallPilot Message Networking Set Up and Operation Guide
72
Chapter 7 Message Networking programming record
Network Site Mailbox table
Use this table to record the details of the Network Site Mailboxes you create.
Network Site Mailbox number
Network Site Mailbox name
Include in Directory
Y
N
Mailbox Name recorded
Y
N
Include in Directory
Y
N
Mailbox Name recorded
Y
N
Include in Directory
Y
N
Mailbox Name recorded
Y
N
Include in Directory
Y
N
Mailbox Name recorded
Y
N
Destination Site Prefix
Destination Remote Mailbox number
Network Site Mailbox number
Network Site Mailbox name
Destination Site Prefix
Destination Remote Mailbox number
Network Site Mailbox number
Network Site Mailbox name
Destination Site Prefix
Destination Remote Mailbox number
Network Site Mailbox number
Network Site Mailbox name
Destination Site Prefix
Destination Remote Mailbox number
NN40090-301
Chapter 7 Message Networking programming record
73
Network AMIS mailbox table
Use this table to record the details of the Network AMIS mailboxes you create.
Network AMIS mailbox number
Network AMIS mailbox name
Include in Directory
Y
N
Mailbox name recorded
Y
N
Outdial
Line number
Pool number
Route code
Destination site phone number
Remote mailbox number
Network AMIS mailbox number
Network AMIS mailbox name
Include in Directory
Y
N
Mailbox name recorded
Y
N
Outdial
Line number
Pool number
Route code
Destination site phone number
Network AMIS mailbox number
Network AMIS mailbox name
Include in Directory
Y
N
Mailbox name recorded
Y
N
Outdial
Line number
Pool number
Route code
Destination site phone number
CallPilot Message Networking Set Up and Operation Guide
74
Chapter 7 Message Networking programming record
NN40090-301
75
Glossary
Administration
The tasks involved in maintaining CallPilot mailboxes, greetings and set up configuration.
AMIS
Audio Message Interchange Specification, which enables different voice messaging
systems to interact.
Area Code
A code assigned to a calling area within an area.
Auto Attendant
The CallPilot answering service that answers incoming calls with a Company Greeting,
plays a list of options to a caller, and performs call routing functions in response to a
caller's selections.
Broadcast Message
A message that can be sent only by the System Administrator. This type of message plays
in all initialized Personal Mailboxes.
Call Blocking Periods
Periods of time you establish when network delivery messaging is prohibited.
Channel configuration
The number of channels on your system that you designate for outdialing.
Class of Service
A predetermined number designation that specifies the options for a mailbox.
Company Directory
An internal voice list that contains the names of subscribers with initialized mailboxes
who are in the Company Directory.
Configuring CallPilot Lines
The tasks involved in determining which incoming telephone lines of a business are
answered by CallPilot and which Greeting Table is assigned.
Conventions
The way certain information is described. For example, using underlined text to represent
the second line of the display prompt information.
Country Code
A code for long distance calling assigned to a country.
CallPilot Message Networking Set Up and Operation Guide
76
Designated Operator
The person in a company who is assigned to answer the CallPilot operator request option.
Direct Addressing
The ability to send a message directly to a remote site by specifying the line, pool or route
number, phone number and destination mailbox.
Display
A one or two line screen on a Nortel Business Series Terminal that shows CallPilot
commands and options.
Display Buttons
The three buttons on a Nortel Business Series Terminals two line display telephone. When
pressed, these buttons select the specified CallPilot option.
Display Options
The choices that appear on Nortel Business Series Terminals two line displays. Callers
select display options by pressing the display buttons.
DTMF telephone
A push button telephone that emits DTMF tones.
Fully Qualified Domain Name (FQDN)
An FQDN is the complete domain name for a specific computer on the Internet. Each site
on a network has a unique FQDN. The FQDN distinguishes a site from every other site on
the network. An FQDN is the full name of the site, including all subdomain and domain
names, separated by periods. For example, pvt.nortel.com is an FQDN.
Group Lists
A collection of mailbox numbers that are assigned a special “Group” number by CallPilot.
When a message is sent to a Group List, mailboxes in the List receive the same message.
Member mailboxes can be located at the same site or at different locations within a
network.
Initialize a mailbox
Preparing a mailbox to receive messages, which includes changing the mailbox default
password and recording a Company Directory name.
International Access Code
A code identifying the digits dialed to access international calling.
Long Distance Access Code
The code used to access direct dial long distance calling services in a country.
NN40090-301
77
Loopback mailbox
The mailbox you use to test whether a site can transmit and receive network messages.
The Loopback mailbox default number is 103 if the extension length is three digits. Refer
to “Loopback mailbox numbers” on page 37 for how to determine the Loopback mailbox
number. The length of the Loopback Mailbox number depends on the mailbox number
length.
Mailbox
A storage place for messages on the system.
Network Delivery
The feature that, when enabled, lets a site send messages to other sites within a network.
Network Delivery Mailboxes
Mailboxes you add that allow access to an assigned mailbox at a destination site within a
network. Network Delivery Mailboxes can be set up with either a Direct Address or a
Site-Based Address.
Network Dialing Parameters
The values that determine how many times the system attempts to contact a destination
site within a network. The dialing parameters also include a retry interval.
Network Messaging
The ability to send, receive and reply to messages sent between remote locations within a
network.
Network Receive feature
The feature that lets a site receive messages from other locations within a network.
Network Reply feature
The feature that lets a site reply to messages sent from other locations within a network.
Outdial route
The parameter that specifies how an outdial call is routed. The outdial route can be a line,
pool number or route code.
Password
A four to eight digit number that is entered on the dialpad. A password is used to open
mailboxes or perform configuration tasks.
Personal mailboxes
Mailboxes that are assigned to subscribers as a place to store messages.
Resetting CallPilot
Returning the CallPilot voice module to its original default settings.
CallPilot Message Networking Set Up and Operation Guide
78
Retry interval
The amount of time the system waits before making another attempt to contact a
destination site when a failure to connect occurs.
Site-based Addressing
The ability to send a message to a remote site by specifying the destination site’s prefix
and the mailbox number of the person you want to send the message to.
Special Mailboxes
The two mailboxes used by the System Administrator and designated CallPilot operator:
the System Administrator Mailbox and the General Delivery Mailbox.
Subscriber
A mailbox owner.
System Administrator
The person responsible for configuring, updating and maintaining the CallPilot system.
System Administrator Mailbox
The mailbox used by the System Administrator for sending Broadcast Messages.
This is the System Administrator’s personal mailbox.
Voice prompts
The prerecorded voice messages that are played when accessing the different CallPilot
features and options.
VPIM
Voice Profile for Internet Mail. VPIM is based on existing Internet Mail specifications. It
wraps encoded voice messages in MIME message parts, and uses SMTP to transport them
over TCP/IP networks. The VPIM profile requires that these multi-part messages be
formatted and used according to a specific set of Internet conventions and rules, and its
predictability enables voice mail servers to automatically and correctly handle messages
and their constituent parts.
NN40090-301
79
Index
A
Network Reply feature 50
Non Delivery Notification messages 63
overview 8, 9
prerequisites 7
setting properties 41
TCP/IP 8
using 10
AMIS error messages 67
AMIS networking properties
Area code 23
Country code 23
International access code 23
Loopback mailbox 23
Outdial route 23
Sender name 24
System name 24
Telephone number 23
Area code 23
Domain Name 8
Domain Name System (DNS), configuring
environments without a DNS 17
E
B
Entering
domain name (IP address only) 19
Broadcast Message Feature, enabling 51
Error messages 63
C
F
Calling Blocking, setting up 26
FQDN 8
Changing 60
G
Configuring environments without a DNS 17, 18
Delivering messages 50
General Networking properties
Network Broadcast 42
Network Delay 43
Network Delivery 42
Network Group List 42
Network Receive 42
Network Reply 42
Number of Network Retries 43
Dialing Table Translation, network access 30
Greeting, recording 47
Dialing Translation 28
how it works 28
overview 28
phone number translation 28
table 28
Group Lists, Network 51
copyright 2
Country code 23
D
Deleting a Network Site 49
Dialing Translation properties
setting 31
Dialing Translation Table
building 32
changing an entry 34
changing entries 34
deleting entries 35
example 29
reviewing entries 33
Digital Networking
Network Group Lists 51
Network Receive 50
H
Host name/IP address 43
I
International access code 23
Internet, and security 8
IP address 17
L
Loopback
test message 37, 38
Loopback mailbox 23, 36
numbers 37
CallPilot Message Networking Set Up and Operation Guide
80
Index
M
Mailbox, maximum number 53
Message Networking
Network Deliver 50
restricting messages 50
N
Prerequisites 7
Prompt, recording 47
Properties, General Networking 41
R
Receiving messages 50
Network Broadcast 42
Recording
greeting 47
prompt 47
Network Delay 43
regulatory information 2
Network Deliver, disabling 50
Remote Group List precautions 54
Network Delivery 42
Remote Mailbox number 72
Network Delivery Mailbox 10
adding 55
changing parameters 60
creating 55
deleting 61
maximum number of mailboxes 53
overview 53
parameter summary 55
precautions 54
Reply restrictions 50
Network Group List 42, 51
Setting up outdialing channel configuration 28
Network Mailbox name 72
Network Mailbox number 72
Site
changing 45
deleting 49
Network Messaging, disabling 50
Site name 43
Network Receive 42
disabling 50
Site prefix 43
Network Reply 42
disabling 50
System name 24
Network Access 30
S
Sender name 24
Sending network messages 9
Setting General Networking properties 41
Setting the Dialing Translation Parameters 31
Setting up AMIS 23
Site-Based Addressing 10
Network Send 50
System prerequisites 7
Network Site
changing 45
deleting 49
T
Network site parameters
Host name/IP address 43
Outdial route 43
Phone number 43
Site name 43
Site prefix 43
Non Delivery Notification messages 63
Telephone number 23
Telephone number Translation 28
Network extension numbers 28
Test network message
sending 37
Testing network message capability 36
trademarks 2
Number of Network Retries 43
Transmission Control Protocol/Internet Protocol
(TCP/IP) 8
O
V
Outdial route 23, 43
Voice messages, security of 8
P
Voice Messaging 7
Phone number 43
NN40090-301