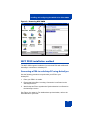
1
Business Communications Manager
Nortel Mobile Voice Client 2050
User Guide
Revision history
Revision history
March 2007
Standard 01.01. This document is issued to support Nortel Mobile
Voice Client 2050 Version 2.1.202 for Business Communications
Manager (BCM). It is renumbered to NN40110-112 and contains
information previously contained in the following legacy document, now retired: N0035508.
March 2005
Standard 2.00. This document is issued to support Nortel Mobile
Voice Client 2050 Version 2.00.0161 for Business Communications Manager (BCM).
August 2004
Standard 1.00. This document is issued to support Business
Communications Manager (BCM) Release 3.6.
3
Revision history
4
Contents
Contents
About this guide . . . . . . . . . . . . . . . . . . . . . . . . . . . . . . . . . . . 7
Mobile Voice Client 2050 overview . . . . . . . . . . . . . . . . . . . . 8
Software dependencies . . . . . . . . . . . . . . . . . . . . . . . . . . . . . . 9
Communication servers . . . . . . . . . . . . . . . . . . . . . . . . . . . . . . 9
Supported PDAs . . . . . . . . . . . . . . . . . . . . . . . . . . . . . . . . . . . . 9
Headsets . . . . . . . . . . . . . . . . . . . . . . . . . . . . . . . . . . . . . . . . 10
MVC 2050 menus and screen features . . . . . . . . . . . . . . . . . 11
Installing and configuring the Mobile Voice Client 2050 . 14
Removing a previous version of MVC 2050 . . . . . . . . . . . . . . 14
MVC 2050 installation method . . . . . . . . . . . . . . . . . . . . . . . . 15
MVC 2050 configuration . . . . . . . . . . . . . . . . . . . . . . . . . . . . . 17
MVC 2050 Call Handling screen . . . . . . . . . . . . . . . . . . . . . 19
Starting the MVC 2050 . . . . . . . . . . . . . . . . . . . . . . . . . . . . . . 19
Navigation . . . . . . . . . . . . . . . . . . . . . . . . . . . . . . . . . . . . . . . . 20
Appearance . . . . . . . . . . . . . . . . . . . . . . . . . . . . . . . . . . . . . . 20
MVC 2050 graphical interface (skins) components . . . . . . . . 21
Menus . . . . . . . . . . . . . . . . . . . . . . . . . . . . . . . . . . . . . . . . . . . 24
Icons . . . . . . . . . . . . . . . . . . . . . . . . . . . . . . . . . . . . . . . . . . . . 32
Menu and icon summaries . . . . . . . . . . . . . . . . . . . . . . . . . . . 36
Managing calls with Mobile Voice Client 2050 . . . . . . . . . . 38
Making a telephone call . . . . . . . . . . . . . . . . . . . . . . . . . . . . . 38
Answering a call . . . . . . . . . . . . . . . . . . . . . . . . . . . . . . . . . . . 39
Holding a call . . . . . . . . . . . . . . . . . . . . . . . . . . . . . . . . . . . . . 39
Retrieving a call . . . . . . . . . . . . . . . . . . . . . . . . . . . . . . . . . . . 39
5
Contents
Ending a call . . . . . . . . . . . . . . . . . . . . . . . . . . . . . . . . . . . . . . 39
Maintaining call quality . . . . . . . . . . . . . . . . . . . . . . . . . . . . . . 39
Managing Contacts with Mobile Voice Client 2050 . . . . . . 40
Editing the Contacts list . . . . . . . . . . . . . . . . . . . . . . . . . . . . . 41
Accessing Contacts Help . . . . . . . . . . . . . . . . . . . . . . . . . . . . 41
Accessing the PDA Contacts list . . . . . . . . . . . . . . . . . . . . . . 41
Dialing a number from the Contacts list . . . . . . . . . . . . . . . . . 42
Dialing formats . . . . . . . . . . . . . . . . . . . . . . . . . . . . . . . . . . . . 43
Mobile Voice Client 2050 settings . . . . . . . . . . . . . . . . . . . . 52
Sounds . . . . . . . . . . . . . . . . . . . . . . . . . . . . . . . . . . . . . . . . . . 52
Profiles . . . . . . . . . . . . . . . . . . . . . . . . . . . . . . . . . . . . . . . . . . 55
Server . . . . . . . . . . . . . . . . . . . . . . . . . . . . . . . . . . . . . . . . . . . 60
Macros . . . . . . . . . . . . . . . . . . . . . . . . . . . . . . . . . . . . . . . . . . 61
Mobile Voice Client 2050 for expert users . . . . . . . . . . . . . 65
Client diagnostics . . . . . . . . . . . . . . . . . . . . . . . . . . . . . . . . . . 65
Audio quality . . . . . . . . . . . . . . . . . . . . . . . . . . . . . . . . . . . . . . 66
Listener IP . . . . . . . . . . . . . . . . . . . . . . . . . . . . . . . . . . . . . . . 69
Hardware ID . . . . . . . . . . . . . . . . . . . . . . . . . . . . . . . . . . . . . . 70
Connection history . . . . . . . . . . . . . . . . . . . . . . . . . . . . . . . . . 72
WiFi . . . . . . . . . . . . . . . . . . . . . . . . . . . . . . . . . . . . . . . . . . . . 73
6
About this guide
About this guide
This User Guide provides information about the Nortel Mobile Voice
Client (MVC) 2050.
The Nortel Mobile Voice Client (MVC) 2050 is designed to add wireless
voice communication to the Personal Digital Assistant (PDA).
7
Mobile Voice Client 2050 overview
Mobile Voice Client 2050
overview
Designed to work with your personal digital assistant (PDA) and IP-based
telephone systems, the Mobile Voice Client (MVC) 2050 provides realtime voice service over the Internet.
The MVC 2050 supports several features, including the following:
•
six programmable line/feature keys
•
four soft keys (self-labeled)
•
12-button dialpad
•
multifield display
•
end user-selectable skins
To make a call from your PDA using the MVC 2050, you can dial with
your dialpad, use a macro, or copy and paste a number from another
application. You also can use one of the methods on your PDA System
Input Panel.
If you are using Microsoft® Windows Mobile™ 2003 Second Edition or
Microsoft® Windows Mobile™ 5.0 for Pocket PC as your operating
system, the MVC 2050 can also coexist with a secure Virtual Private
Network (VPN) client for connection to a business network.
8
Mobile Voice Client 2050 overview
Software dependencies
The following are the MVC 2050 primary software dependencies:
•
Windows Mobile 5.0 for Pocket PC
•
Windows Mobile 2003 for Pocket PC
•
Windows Mobile 2003 Second Edition for Pocket PC
Note: Windows Mobile 2003 SE AKU1 is not supported (Version
4.21.1088 (Build 14132)). AKU1 has a bug which makes it impossible
for third parties to use Settings applets. This is resolved with WM2003
SE AKU2 (Version 4.21.1088 (Build 14260.2.0.5)).
•
GIPS NetEQ (included with the MVC 2050 software)
•
VPN client (for secure access to a network)
For secure (VPN) access to a network, a VPN client is required.
Communication servers
The following Business Communications Manager (BCM) servers support
the MVC 2050:
•
BCM 200 Release 3.6 (with patch) or above
•
BCM 400 Release 3.6 (with patch) or above
Supported PDAs
The PDA industry evolves at a rapid pace. Refer to Nortel's web site
(www.nortel.com/mvc2050) to determine the latest PDA models tested
and any known issues.
Alternatively, follow the links on www.nortel.com to > Products > Phones,
Clients, and Accessories > IP Phones and Clients > Mobile Voice Client
2050 > Technical Specifications.
For Nortel Technical Support use this link: http://www.nortel.com/support
9
Mobile Voice Client 2050 overview
PDA processor models, speed, and amount of memory vary. To maintain
audio quality, do not overload the processor with intensive tasks while
using the MVC 2050. For example, Nortel does not recommend using
your PDA Internet browser while using the MVC 2050.
MVC 2050 requires that PDAs meet the following minimum technical
specifications:
•
screen resolution of 240x320
•
CPU speed of 624 MHz
•
64 MB RAM
PDA vendors offer two types of rechargeable battery: standard and
extended-life. The extended-life battery is recommended to provide
longer call duration and increased call volume.
Headsets
A headset is required in order to send and receive telephone calls using
the MVC 2050 and your PDA. The headset is an important part of audio
quality.
PDAs that support stereo headphones with microphones are
recommended.
The Dell specific headset with a button on the wire, when used with the
X51v, allows the MVC 2050 to answer an incoming call or release an
active call by pressing the button.
Note: Bluetooth and 802.11b operate on the same frequency band
and use the same WLAN hardware on the PDA. Therefore, the use of
Bluetooth accessories with MVC 2050 can lead to poor call quality.
Contact your PDA vendor to obtain headset recommendations.
For more information about Automatic Gain Control, see “MVC 2050
configuration” on page 17.
10
Mobile Voice Client 2050 overview
MVC 2050 menus and screen features
The MVC 2050 software provides menus and screen features for your
PDA. Table 1 lists the MVC 2050 menus and their selections.
Table 1: MVC 2050 menus
Menu
Selections
File
Run in background, Paste, Contacts, Settings,
Exit
Keys
Answer, Release, Hold, Features, Macros
Help
Diagnostics, Contents, About
Note: Keys > Features and Keys > Macros selections in Table 1 also
provide pop-up menus.
The MVC 2050 supports both portrait and landscape modes. See “Call
Handling screen (portrait)” on page 12 and “Call Handling screen
(landscape)” on page 12. This landscape sample has the message
waiting lamp displayed.
11
Mobile Voice Client 2050 overview
Figure 1: Call Handling screen (portrait)
Call handling icons
Black_Toolbar_BCM_1.bmp
Display
Soft keys
(self-labeled)
Programmable
Line/Feature keys
Dialpad
Toolbar
Menu Bar
Figure 2: Call Handling screen (landscape)
Call
handling
icons
Display
Soft keys
(self-labeled)
Programmable
Line/Feature keys
Dialpad
Menu Bar
Toolbar
12
Mobile Voice Client 2050 overview
Table 2 describes the MVC 2050 screen features.
Table 2: MVC 2050 screen features
Screen features
Selections
Call Handling icons
Hold, Answer, Release
Toolbar (portrait)
The retractable toolbar is present only on the
portrait skin. It contains keys that are not
present on the remainder of the display.
They are: Directory, Messages, Shift,
Services, Expand, Copy, and Exit
The toolbar can be shown or retracted using
the Toolbar icon on the menu bar. See
Figure 6 on page 20.
Mute, Volume Up, and Volume Down icons
are also present on the Toolbar, and appear
on the skin when the Toolbar is retracted.
Toolbar (landscape)
The landscape skin has most of the
retractable buttons on the normal (nonretractable) toolbar, some on the skin (Mute,
Volume Up, and Volume Down) and the
remainder (Settings, Contacts, and Paste)
available from menu items. See Figure 2 on
page 12.
Toolbar icons
Directory, Messages, Shift, Services, Expand,
Copy, and Quit
Menu Bar icons
Paste, Contacts, Settings, Toolbar
Navigation
The up, down, left, and right cursor control
arrow keys are mapped to the hardware
navigation buttons on the PDA hardware.
These buttons are used for cursor control.
13
Installing and configuring the Mobile Voice Client 2050
Installing and configuring the
Mobile Voice Client 2050
To install the MVC 2050 on your PDA:
1. If you have an older version of the MVC 2050 installed on your PDA,
you must remove it prior to installing a newer version. See “Removing
a previous version of MVC 2050” on page 14.
2. Place your PDA in its cradle.
3. Synchronize your PDA with a desktop PC running Microsoft
ActiveSync®. See “Connecting a PDA to a desktop PC using
ActiveSync” on page 15.
4. Install the MVC 2050 from a desktop PC. See “Installing the
MVC 2050 from a desktop PC using ActiveSync” on page 16.
Removing a previous version of MVC 2050
If a previous version of the MVC 2050 is installed on your PDA, delete the
old version before installing the new one, or the installation fails. See
Figure 3 on page 15.
Use the following procedure to remove the MVC 2050 from your PDA:
1. Select Start from the Main Application screen. A drop-down menu
appears.
2. Select Settings. The Settings dialog box appears.
3. Select the System tab. The System dialog box appears.
4. Select Remove Programs. A list of programs appears.
5. Select Mobile Voice Client 2050.
6. Select Remove. A dialog box appears, asking you to confirm this
decision.
7. Select Yes. A brief pause occurs while the PDA removes the
MVC 2050. After the pause, a dialog box appears asking if you want
to perform a soft reset.
8. Select Yes. Your PDA restarts.
14
Installing and configuring the Mobile Voice Client 2050
Figure 3: Removing MVC 2050
MVC 2050 installation method
The MVC 2050 supports installation from a docked PDA with a Microsoft
ActiveSync connection to a desktop PC.
Connecting a PDA to a desktop PC using ActiveSync
Use the following procedure to synchronize your PDA to your
desktop PC:
1. Place your PDA in its cradle.
2. Ensure that ActiveSync is running. Connection is confirmed on the
ActiveSync screen.
3. Wait for the two PCs to synchronize. Synchronization is confirmed on
the ActiveSync screen.
See Figure 4 on page 16. For details about synchronization, refer to the
User Manual for your PDA.
15
Installing and configuring the Mobile Voice Client 2050
Figure 4: ActiveSync connected
AAA1185.bmp
Installing the MVC 2050 from a desktop PC using
ActiveSync
Use the following procedure to install the MVC 2050 using the CD:
1. Insert the MVC 2050 CD into the CD-ROM drive of your desktop PC.
2. Go to your desktop, and double-click My Computer.
3. Select the CD Drive.
4. Select Setup.
5. Follow the instructions on the screen. The Install Wizard displays a
message asking you if you want to modify, install, or remove the
MVC 2050.
6. Select Install. The Install Wizard installs the MVC 2050. When the
installation finishes, a message appears on the PC’s display
requesting that you attend to your device (PDA), and a message
appears on the PDA’s display asking you if you want to perform a soft
restart.
7. Select Yes. Your PDA restarts with the new version of the MVC 2050.
16
Installing and configuring the Mobile Voice Client 2050
MVC 2050 configuration
Enable ClearType
The MVC 2050 uses a special screen font, which requires that
ClearType® be enabled on your PDA.
To enable ClearType:
1. From the PDA’s Main Application screen, select Start.
2. Select Settings.
3. Select Screen.
4. Select Enable Clear Type.
Automatic Gain Control
Since the MVC 2050 requires a headset to operate properly, disabling
Automatic Gain Control is sometimes necessary to attain optimum audio
quality.
Note: When the PDA is used in handsfree mode, without a headset,
the PDA microphone picks up sounds from the speaker, creating a
feedback loop. Automatic Gain Control is used in this instance to
avoid feedback. For further information about device hardware
settings, see your PDA Help system.
To disable Automatic Gain Control:
1. Select Start.
2. Select Settings.
3. Select System.
4. Select one of the following, depending on the PDA you are using:
a.
Audio
b.
Advanced Sounds
c.
Microphone
5. Select Automatic Gain Control.
17
Installing and configuring the Mobile Voice Client 2050
6. Select Disable.
7. Select Yes.
For further information about MVC 2050 configuration and settings, see
the MVC 2050 Help system.
18
MVC 2050 Call Handling screen
MVC 2050 Call Handling screen
Starting the MVC 2050
To start the MVC 2050 from your PDA:
1. From your PDA Main Application screen, select Start.
2. Select Programs. See Figure 5.
3. Select Mobile Voice Client 2050. The Call Handling screen appears.
See Figure 6 on page 20.
Figure 5: Starting the MVC 2050 from the Main Application
screen
AAA1211a.bmp
AAA1211b.bmp
19
MVC 2050 Call Handling screen
Figure 6: Call Handling screen
Call handling
icons
Hold
Answer
Message Lamp
Release
Black_Toolbar_Msg Lamp_BCM_1.bmp
Display
Soft keys
(self-labeled)
Programmable
Line/Feature keys
Dialpad
Messages
Directory
Volume Up
Volume Down
Mute
Shift
Services
Expand
Copy
Quit
Toolbar
Menu Bar
System Input
Paste
Contacts
Toolbar Toggle
Settings
Navigation
You can use the up, down, left, and right cursor control arrow keys on
your PDA as navigation buttons to move around the display of MVC 2050.
Appearance
The appearance of the Call Handling Screen differs with each available
skin. For more information about skins, see “MVC 2050 graphical
interface (skins) components” on page 21.
The MVC 2050 uses a special screen font, which requires that
ClearType® be enabled on your PDA. ClearType software improves the
appearance and readability of text on liquid crystal displays (LCDs),
20
MVC 2050 Call Handling screen
pocket PC screens, and flat panel monitors. See “MVC 2050
configuration” on page 17 for information about enabling ClearType.
MVC 2050 graphical interface (skins)
components
The MVC 2050 skins are the graphical representation of the MVC 2050.
The dialpad, menu, and icon buttons are located on the skin. Skins come
in several colors and arrangements.
To select a skin:
1. Select Settings.
2. Select Skin.
3. Select a skin from the list.
All skins share the following common components.
•
programmable line/feature keys
•
soft keys (self-labeled)
•
dialpad
•
display
•
Call Handling icons
•
Toolbar icons
•
Menu Bar icons
•
retractable toolbar
•
System Input Panel icon
See the following examples of the MVC 2050 skins: Figures 7 to 9 starting
on page 22 and Figure 16 on page 32.
21
MVC 2050 Call Handling screen
Figure 7: Black skin
Figure 8: Blue skin
22
MVC 2050 Call Handling screen
Figure 9: Lime skin
Display
The display is located in the central area of the skin. See Figure 6 on
page 20.
Programmable line/feature keys
Six programmable line/feature keys are located on the right side of the
skin. They are aligned vertically and are the same color as the display.
See Figure 6 on page 20.
Soft keys (self-labeled)
Four soft keys (self-labeled) are located in the bottom row of the display
area. See Figure 6 on page 20.
Note 1: The label on the key changes, based on the active feature.
Note 2: A triangle before a key label indicates that the key is active.
23
MVC 2050 Call Handling screen
Dialpad
The 12-button dialpad is located on the left-hand side of the portrait skin.
See Figure 6 on page 20. The dialpad is located on the right-hand side of
the landscape skin. See Figure 2 on page 12.
Message Lamp
The Message Lamp lets you know if you have voicemail waiting. See
Figure 6 on page 20.
Mute Indication Lamp
The color of the Mute button changes to red when the call is muted. The
Toolbar must be retracted to see this indicator, because the Toolbar icon
for Mute does not change color when the microphone is muted. See
Figure 16 on page 32.
Menus
The MVC 2050 provides the following menus:
•
File
•
Keys
•
Help
File
The following items are available from the File menu:
•
Run in background
•
Paste
•
Contacts
•
Settings
•
Exit
See Figure 10 on page 25.
24
MVC 2050 Call Handling screen
Figure 10: File menu
Run in background
Select Run in Background to close the MVC 2050 and to keep it running
in the background so that incoming calls can ring on your PDA.
To accept an incoming call while the MVC 2050 is running in the
background:
1. From the Main Application screen, select Start.
2. Select Recently Used Application.
Note: You can also select Start > Today or Start > Home,
depending on your PDA. When you select Start > Today or
Start > Home, the MVC 2050 icon appears in the lower right corner
of this screen.
After you have completed your call, press the “X” in the upper right-hand
corner of the PDA display to close the application. See Figure 10. This
returns the MVC 2050 to Run In Background mode.
25
MVC 2050 Call Handling screen
Paste
Select Paste to paste a telephone number, copied from another
application, into the MVC 2050. You can do this to place a call rather than
entering it through your Call Handling screen dialpad.
Contacts
Select Contacts to launch the Contacts dialog box. The Contacts
application reads a list of contacts from the PDA Contacts list. The PDA
Contacts List application normally can be synchronized with Outlook on
your desktop PC.
Settings
The following items are available on the File > Settings submenu:
•
Profiles
•
Server
•
Skin
•
Features
•
Macros
•
Audio
•
About
•
Language
•
Hardware ID
•
Advanced Audio
•
Listener IP
•
Sounds
For more information about Settings, see “Mobile Voice Client 2050
settings” on page 52.
Exit
Select Exit to close the MVC 2050. Once you select Exit, you cannot
place or receive calls until you restart the application. For more
information, see “Run in background” on page 25.
26
MVC 2050 Call Handling screen
Note: Selecting Exit frees up PDA processing resources.
Keys
The following items are available from the Keys menu:
•
Answer
•
Release
•
Hold
•
Features
•
Macros
Figure 11: Keys menu
Answer
Select Answer to answer an incoming call, or to obtain a dial tone to
place a call. See also the Answer icon, top center in the Call Handling
screen.
27
MVC 2050 Call Handling screen
Release
Select Release to end your call. See also the Release icon, top right in
the screen.
Hold
Select the Hold menu item to place a call on hold. See also the Hold
icon, top left in the Call Handling screen.
Features
Select Features for access to a menu of interface keys. The defaults vary
depending on which type of communication server you are connected to.
The Business Communications Manager (BCM) provides the following
default menu of features:
•
Inbox
•
Outbox
•
Directory
•
Services
•
Expand
•
Copy
•
Quit
Additional items can be added to this list using the Settings > Features
tab. When selected, these extra items send BCM-specific feature codes
to the BCM server. Items can be reorganized, added, or removed from
the list. See IP Phone 2004 User Guide for descriptions of these
additional features.
See Figure 12 on page 29 for access to the Features submenu from the
Keys screen. Figure 12 is an example of a customized menu. See
Figure 13 on page 29 for access to the Features menu from the Settings
screen.
28
MVC 2050 Call Handling screen
Figure 12: Keys > Features screen
Figure 13: Settings > Features screen
29
MVC 2050 Call Handling screen
Macros
Select Macros from the Keys menu to access macros available through
the Settings > Macros dialog box. You can use macros to make speed
dial calls, access voicemail, and perform routine functions faster and
easier (see “Macros” on page 61).
Help
The following items are available from the Help menu:
•
Contents
•
Diagnostics
•
About MVC 2050
MVC 2050 offers a PDA-specific version of Help, shown in Figure 14.
Figure 14: Help menu
Contents
Select Contents to access the MVC 2050 Help system.
30
MVC 2050 Call Handling screen
Diagnostics
Diagnostics provides access to a list of methods to determine server
connection state.
To access Diagnostics:
1. Select Help.
2. Select Diagnostics to see the following items in the drop-down list.
— Ping
— Trace Route
— RUDP Ping
About MVC 2050
Select About MVC 2050 to see the MVC 2050 system product name,
version number, copyright indication, Nortel name and logo, and Global
IP Sound® name and logo. The MVC 2050 uses packet loss concealment
provided by Global IP Sound NetEQ™ software.
Figure 15: About screen
31
MVC 2050 Call Handling screen
Icons
See Figure 16 to view the icons available in the MVC 2050.
Icons can be divided into three types:
•
Call Handling icons
•
Toolbar icons
•
Menu Bar icons
Figure 16: Call Handling screen
Call handling
icons
Hold
Answer
Message Lamp
Release
Display
Black_Toolbar_Msg Lamp_BCM_1.bmp
Soft keys
(self-labeled)
Programmable
Line/Feature keys
Dialpad
Messages
Directory
Volume Up
Volume Down
Mute
Shift
Services
Expand
Copy
Quit
Toolbar
Menu Bar
System Input
Paste
Contacts
32
Toolbar Toggle
Settings
MVC 2050 Call Handling screen
Call Handling icons
The Call Handling icons are:
•
Hold
•
Answer
•
Release
These Call Handling icons are located at the top of the skin. See
Figure 16 on page 32.
Hold
Use the Hold icon to place calls on Hold and to remove them from Hold.
Answer
Use the Answer icon to receive and to place calls.
Release
The Release icon is used to terminate calls.
Toolbar icons
The Toolbar icons are:
•
Directory
•
Messages
•
Shift
•
Services
•
Expand
•
Copy
•
Quit
The Toolbar icons are visible when the Toolbar is retracted. See
Figure 16 on page 32.
33
MVC 2050 Call Handling screen
Note 1: Select Keys > Features to view menu items that are exact
equivalents to tapping these Toolbar icons.
Note 2: Volume Up, Volume Down, and Mute (which are covered
when the Toolbar is shown) also are repeated on the Toolbar.
Directory
Select the Directory icon, depending on how your system administrator
has set up this service, to access a local directory or some other serverbased directory service.
You can use the Directory to place a call. Directory accessibility
depends on the system you are connected to.
Inbox/Messages
Select the Inbox icon to access your messages, or to return a call.
Outbox/Shift
Select the Outbox icon to shift between sets of programmable line/
feature keys.
Services
Select the Services icon to access a list of BCM services.
Expand
Select the Expand icon to access additional services, depending on the
system to which you are connected.
Copy
Copy is reserved for future use.
Quit
Select the Quit icon to exit a network service or feature.
34
MVC 2050 Call Handling screen
Menu Bar icons
The Menu Bar icons are:
•
Paste
•
Contacts
•
Settings
•
Toolbar toggle
•
System Input
Paste
Use the Paste icon to paste a number from another application to the
MVC 2050.
Contacts List
Use the MVC 2050 Contacts List icon to view, select, and dial contacts.
The MVC 2050 Contacts List is a read-only list available from the PDA
Contacts List. To add, modify, or delete entries, use the PDA Contacts
application. The PDA Contacts List can also be updated by
synchronizing it with your deskptop’s Outlook directory, using Microsoft®
ActiveSync. See your PDA user guide for a description of this feature.
Settings
Select the Settings icon to view the Settings screens. See “Mobile Voice
Client 2050 settings” on page 52.
Toolbar
Select the Toolbar icon to toggle the Toolbar display on and off.
System Input
The System Input icon in the system tray at the bottom right-hand corner
of the PDA, shown in Figure 16 on page 32, provides access to the
System Input Panel. Consult your PDA documentation for a description
of the System Input Panel.
You can use the System Input Panel to enter data for the MVC 2050 and
other applications.
35
MVC 2050 Call Handling screen
The following are three methods you can use to input data on your PDA:
•
Keyboard
•
Letter Recognizer
•
Block Recognizer
Using the MVC 2050 application, the PDA keyboard can act like a
dialpad. For instance, the alphabetical J, K, or L is interpreted as a
number five (5). Keys that are not alphanumeric are ignored.
Menu and icon summaries
File menu
Table 3 summarizes the File menu selections.
Table 3: File menu
Selection
Description
Run in Background
Closes the MVC 2050 application, but leaves it
running in the background to allow incoming
calls to be received.
Paste
Pastes a telephone number into the call
interface to place a call (also available as a
Menu Bar icon).
Contacts
Opens the Contacts List (also available as a
Menu Bar Icon).
Settings
Provides access to the Settings dialog boxes
(also available as a Menu Bar Icon).
Exit
Shuts down the MVC 2050 application (also
available as a Menu Bar Icon).
36
MVC 2050 Call Handling screen
Keys menu
Table 4 summarizes the Keys menu selections.
Table 4: Keys menu
Selection
Description
Answer
Answers an incoming call or provides a dial tone so
you can make a call (also available as the Answer
icon located at the top center of the display).
Release
Releases the call.
Hold
Places the current call on hold (also available as the
Hold icon at the top left of the display).
Features
Presents a menu of available features.
Macros
Presents a menu of the programmed macros.
Help menu
Table 5 summarizes the Help menu selections.
Table 5: Help menu
Selection
Description
Contents
Accesses the Help system.
Diagnostics
Provides access to MVC 2050 diagnostics.
About
Provides information about your MVC 2050 system.
37
Managing calls with Mobile Voice Client 2050
Managing calls with
Mobile Voice Client 2050
Making a telephone call
Use the following procedure to make a call from your PDA using the
MVC 2050:
1. Plug the headset into the PDA, and put the headset on.
2. Select Mobile Voice Client 2050 from the Start > Settings/System
menu or Start > Programs menu.
3. Open the line by selecting one of the following:
— Answer icon
— Answer key from the Keys menu
— a line key
4. Dial the number by using one of the following:
— dialpad
— macro
— Contacts within the MVC 2050 interface
— network Directory
— Personal Directory
— Paste icon or menu item to paste a number copied from another
application
— a PDA System Input Panel such as the keyboard, block
recognizer, or letter recognizer
38
Managing calls with Mobile Voice Client 2050
Answering a call
Use the following procedure to answer a call from your PDA:
1. Select one of the following:
— Answer icon
— Answer key from the Keys menu
— ringing line key
2. Speak into your headset microphone.
Holding a call
Select the Hold icon, or select Hold from the Keys menu, to place a call
on hold.
Retrieving a call
Select the line key to retrieve a call from Hold.
Ending a call
Select the Release icon, or select Release from the Keys menu, to end
your call.
Maintaining call quality
If you are experiencing poor quality during a call on the MVC 2050, move
closer to the WLAN access point. Distance from the access point reduces
the throughput/data rate.
Using MVC 2050 on a PDA in a closed area or indoors also reduces the
throughput, compared to open space.
Bluetooth and 802.11b operate on the same frequency band and use the
same WLAN hardware on the PDA. Therefore, the use of Bluetooth
accessories with MVC 2050 can lead to poor call quality.
39
Managing Contacts with Mobile Voice Client 2050
Managing Contacts with
Mobile Voice Client 2050
You can place a call from your list of contacts in the PDA Contacts
application using Mobile Voice Client (MVC) 2050. See Figure 17.
Use the Contacts application to do the following:
•
add or modify entries on the PDA
•
download entries from the Outlook contacts on your PC
•
use the infrared ports on two PDAs to transfer entries between them
(beam)
Figure 17: Starting Contacts and the Contacts application
AAA1218a.bmp
40
AAA1218b.bmp
Managing Contacts with Mobile Voice Client 2050
Editing the Contacts list
See the Contacts Help on your PDA for information about adding,
deleting, and editing Contacts.
See the appropriate Help screen for information on editing the Contacts
in Outlook on your desktop PC.
Accessing Contacts Help
Use the following procedure to access your PDA Contacts Help system:
1. Select Start. A drop-down list appears.
2. Select Contacts. The Contacts screen appears.
3. Select the word Contacts at the top of the screen. The drop-down list
appears.
4. Select Help. The Contacts Help screen appears.
Accessing the PDA Contacts list
Use the following procedure to access your PDA Contacts list:
1. Open the PDA Today or Home screen.
2. Select Start > Contacts. The Contacts read-only screen appears.
Note: To view the Contacts list within the MVC 2050, select
File > Contacts. See Figure 18 on page 42.
41
Managing Contacts with Mobile Voice Client 2050
Figure 18: MVC 2050 Contacts screen
Dialing a number from the Contacts list
Use the following procedure to dial a number from the MVC 2050 using
the Contacts list:
1. Select File > Contacts. The Contacts list appears.
2. Double-tap the name or number you want to dial. The Phone details
dialog box appears. See Figure 19 on page 44.
3. Use the Phone details dialog box to modify the number to be dialed,
as needed.
4. To dial the number, press the check mark in the lower left-hand
corner of the display. See Figure 19 on page 44.
42
Managing Contacts with Mobile Voice Client 2050
Dialing formats
Numbers must be in the canonical dialing format in order for your PDA to
use them for dialing.
The canonical address format is a universal telephone number format
recognized by the WIndows Telephony Application Interface (TAPI).
The canonical format identifies the components of a telephone number,
which TAPI translates according to a country’s or region’s dialing rules.
The canonical format is:
+ Country/Region Code (Area Code) Subscriber number
Note: For further information on canonical dialing, refer to the
Microsoft web site.
When you select File > Contacts and double-tap a number to dial from
the contacts list, the Phone details dialog box appears, shown in
Figure 19 on page 44. The dialog box provides options for the criteria to
properly route your call.
Use the Phone details dialog box to:
•
modify the number being dialed
•
select or deselect canonical dialing rules
•
interpret the number as a private network (ESN) number
43
Managing Contacts with Mobile Voice Client 2050
Figure 19: Phone details dialog box
553-AAA1529a
The following are the components for creating and using canonical dialing
numbers:
•
area code, in the Contacts application
•
dialing properties, called Dialing Locations (see Figure 20 on
page 45)
Note: Information in the Dialing Locations tab indicates the origin of
the call.
44
Managing Contacts with Mobile Voice Client 2050
Figure 20: Dialing locations
45
Managing Contacts with Mobile Voice Client 2050
Set the patterns for local, long-distance, and international dialing using
Dialing Patterns. See Figure 21.
Figure 21: Dialing patterns
553-AAA1534
Area code
Set the Area code to provide the default area code for dialed numbers.
To establish the default Area code:
1. Select the PDA Contacts > Tools > Options.
2. Assign the correct value to the Country/Region and Area code.
See Figure 20 on page 45.
46
Managing Contacts with Mobile Voice Client 2050
The Contacts application prefixes the default area code to numbers you
enter in your Contacts application. The PDA attempts to interpret the
numbers as canonical.
For example: enter a seven-digit number. Contacts assumes that the
number is in your area code, and the software adds the area code as a
prefix to the seven-digit number to create a canonical number.
In North America, if you enter a default area code of “415” in your
Contacts and then enter the number “555-1212”, the following occurs:
•
Contacts prefixes the area code to the number
•
the displayed number changes to “(415) 555-1212”
This number is interpreted as a canonical number that the PDA can use
for dialing.
Dialing Locations
Dialing Locations describe the dialing rules to be applied when you dial a
number. The dialing rules allow you to enter prefixes to access local and
long-distance numbers. Use the location of your server. See Figure 20 on
page 45.
To establish the dialing rules:
•
Select Start > Settings > Connections > Dialing Locations.
•
Enter your server’s Area Code.
•
Enter your server’s Country Code.
•
Specify Tone dialing.
•
Select Dialing Patterns.
•
Enter or modify the dialing patterns for local calls, long-distance calls,
and international calls.
47
Managing Contacts with Mobile Voice Client 2050
Example
An end user has a DN on a server located in Atlanta and another DN on a
server located in New York. The end user has set up two dialing
locations: one named “Atlanta”’, with an area code of 404, and another
named “New York”, with an area code of 646. The end user also has
entered ‘646’ as the default area code in the Contacts application.
The end user also has programmed Dialing Patterns as follows:
•
for local calls, dial: 9,G
•
for long-distance calls, dial: 6,1FG
•
for international calls, dial: 6,011,EFG
Note: According to the Dialing Patterns dialog, E means insert
country code, F means insert area code, and G means insert the
number. Insertion of “,” (a comma) indicates a one half-second
pause.
— With the location of New York selected, the end user enters
information for a contact whose business number is 555-1212.
The Contacts application uses the Contacts Area code to
determine the area code default (646).
— With the location of New York selected, the end user enters
information for a contact whose business number is 416-5551212. The end user enters all ten digits to record the number in
Contacts as (416) 555-1212.
— With the location of New York selected, when the end user
selects 555-1212 in the MVC 2050 Contacts list, and selects Dial
Business, the Phone details dialog box appears and displays the
number to be dialed as 9,5551212.
— With the location of New York selected, when the end user
selects 416-555-1212 in the MVC 2050 Contacts list, and selects
Dial Business, the Phone details dialog box appears and displays
the number to be dialed as 6,4165551212.
— With the location of Atlanta selected, when the end user selects
555-1212 in the MVC 2050 Contacts list, and selects Dial
Business, the Phone details dialog box appears and displays the
number to be dialed as 9,16465551212.
48
Managing Contacts with Mobile Voice Client 2050
See your PDA Help system for a description of the values used in dialing
patterns.
ESN numbers
To enter ESN numbers in Contacts, enter the ESN prefix followed by the
number.
Note: PDA Contacts does not accept the ‘~’ character to express
ESN numbers. You can provide a ‘~’ character to your PDA Contacts
application by storing a ‘~’ character prefix digit in your PC Outlook
Contacts. Then use ActiveSync to synchronize your PDA with your
PC Outlook. This transfers the ‘~’ to your PDA.
To assign the ESN prefix:
1. Dial a number using the Contacts list.
2. When the Phone details dialog box appears, select ESN, and enter
or modify the ESN prefix in the box.
See Figure 22 on page 50.
49
Managing Contacts with Mobile Voice Client 2050
Figure 22: ESN dialing
553-AAA1532
Extension numbers
The PDA Contacts application dials extension numbers only if they do not
satisfy Microsoft criteria for numbers that require an area code.
The following three methods can be used to manage dialing extension
numbers:
1. Select Extension in the Phone details dialog box. See Figure 23 on
page 51.
2. Enter extension numbers in your PC Outlook Contacts application,
and ActiveSync your PC Outlook with your PDA Contacts.
3. Select Keys > Macros, and enter the direct dial extension number in
a macro. See “Macros” on page 61 for information about macros.
50
Managing Contacts with Mobile Voice Client 2050
Figure 23: Extension number
553-AAA1531
51
Mobile Voice Client 2050 settings
Mobile Voice Client 2050 settings
Use the MVC 2050 Settings to select choices for the appearance,
behavior, and operation of your PDA. The Settings tab provides access
to the following selections:
•
“Sounds” on page 52
•
“Profiles” on page 55
•
“Server” on page 60
•
“Macros” on page 61
•
Skin
•
Features
•
Audio
•
About
•
Language
•
Hardware ID
•
Advanced Audio
•
Listener IP
This section provides information about setting sounds to accompany
events, profiles creation and use, server assignment, and macro creation
and use.
Sounds
The Mobile Voice Client (MVC) 2050 can make sounds to indicate server
connection or disconnection.
Sound files and sound settings are not saved or transmitted between
device infrared ports (beamed) when profiles are saved or beamed.
Therefore, the sounds must be programmed by the user.
52
Mobile Voice Client 2050 settings
Audible notification of server connection or
disconnection
You can program sounds to accompany notification of server connection
or disconnection events.
To program up to three sounds for use with audible notification of server
connection or disconnection:
1. Select File.
2. Select Settings.
3. Select Sounds.
Figure 24: Sounds - server connected
AAA3292
Sounds are used for the following events (See Figure 25 on page 54):
•
Server unreachable
•
Server unresponsive
•
Server connected
53
Mobile Voice Client 2050 settings
Server unreachable
The sound you select for this event plays when MVC 2050 loses contact
with the server. The message “Server unreachable” displays on the PDA
screen.
Server unresponsive
The sound you select for this event plays if MVC 2050 fails to connect to
the server. The message “Server unresponsive” displays on the PDA
screen.
Server connected
The sound you select for this event plays when MVC 2050 connects to a
server. The message “Server connected” displays on the PDA screen.
Figure 25: Events list
54
Mobile Voice Client 2050 settings
Profiles
Each profile is a named file that contains a combination of servers and
other attributes that control the connection, behavior, and appearance of
the MVC 2050.
A number of profiles can be created and saved to allow easy switching
among different servers, feature programming, and audio programming.
Profiles can be created, selected, or deleted. Once selected, the name of
the profile can be modified.
When a profile is selected, all other Settings tabs refer to the selected
profile.
The name of the selected profile is shown in the lower-right corner on
each tab. See Figure 26.
Figure 26: Profiles screen
AAA1189.bmp
55
Mobile Voice Client 2050 settings
The profiles screen enables you to:
•
create profiles
•
delete profiles
•
modify a profile name
•
change the profile used by the application
•
export profiles
•
import profiles
Creating a new profile
Use the following procedure to create a new profile:
1. Select New. A screen appears with an empty text box labeled Name.
2. Enter the new profile name.
3. Select OK.
The Profiles screen reappears. The new profile is created and selected.
The values on all the other tabs is set to their defaults for this profile. Any
value modified on any of the other tabs is associated with this profile, until
another profile is selected. To change settings on other tabs for this
profile, select the tab you wish to change. For example, select the Server
tab from the Settings screen to modify the default server settings. See
Figure 27 on page 57.
56
Mobile Voice Client 2050 settings
Figure 27: Selecting a profile
AAA1190.bmp
Removing a profile
Use the following procedure to remove a profile:
1. From the drop-down list on the Profiles tab, select the profile you
want to remove. See Figure 27.
Note: “My Server” is a built-in profile name that cannot be deleted.
2. Select Remove.
The profile disappears from the list.
Modifying the name of a profile
Use the following procedure to modify the name of a profile:
1. Select the profile you want to change from the drop-down list on the
Profiles tab. See Figure 27.
2. Select Modify. The profile name appears highlighted.
3. Enter the new profile name.
57
Mobile Voice Client 2050 settings
4. Select OK.
The Profiles screen reappears. The new profile is selected.
Changing the current profile
Use the following procedure to select the profile for your MVC 2050:
1. Select the name of the profile you want to change from the drop-down
list at the top of the Profiles screen.
2. Choose one of the following:
a. If MVC 2050 is running, press Reset. The application
disconnects from the current server, and attempts to connect to
the server defined by the newly selected profile.
b. If MVC 2050 is not running, press OK. The next time the
application starts, it uses the selected profile.
Note 1: To modify the profile itself, select the profile, and select the
tabs you wish to change.
Note 2: The application briefly indicates which profile is in use as it
starts up.
Exporting profiles
Use the following procedure to export a profile to a file:
1. Select Export. A dialog box appears.
2. To save as a file, select “Export to a file”.
3. Select OK.
4. Enter a file name.
5. Use the folder object to select a directory.
6. Select OK.
Note: To keep the profile as a backup, copy the profile to your
desktop PC using ActiveSync.
58
Mobile Voice Client 2050 settings
Use the following procedure to export a profile to another device:
1. Select Export. A dialog box appears.
2. To export to another device, select “Export to another device”.
3. Select OK.
4. Align the infrared ports of the two devices. The profile is exported to
the other device.
Note: When exporting a profile, the Hardware ID is also included with
the profile information and must be cleared when the profile is
imported to another device. For more information on Hardware IDs,
see “Hardware ID” on page 70.
Importing profiles
Use the following procedure to import a profile from a file:
1. Select Import. A dialog box appears.
2. To Import from a file, select “Import from a file”.
3. Select OK.
4. Use the file explorer to locate the file containing the profile.
5. Select Cancel or Select.
6. Select OK.
7. Select the profiles to import.
8. Select Cancel or Select.
9. Select OK.
Use the following procedure to import (beam) a profile from another
device:
1. Select Import. A dialog box appears.
2. To Import from another device, select “Import from another device”.
3. Select OK.
4. Align the infrared ports of the two devices.
5. Select the profiles to be imported.
59
Mobile Voice Client 2050 settings
Server
The Server tab contains all of the settings that enable MVC 2050 to
contact a communication server. See Figure 28 on page 60.
Your system administrator sets up your LAN server to direct your
MVC 2050 to the communication server.
Figure 28: Server screen
AAA1191.bmp
When you want to connect to your home office communication server
rather than the local office server, if you are not using a Dynamic Host
Configuration Protocol (DHCP) server, you can create a profile to manage
the connection.
This profile contains the IP address of the server to which you want to
connect, as well as the server port number and type. For more
information about creating and selecting a profile, see “Profiles” on
page 55.
60
Mobile Voice Client 2050 settings
If your system is set up with DHCP, the primary and secondary server
addresses both are assigned by way of DHCP, and no action is required.
See Figure 29 on page 61.
Figure 29: DHCP Setting on the Server screen
Macros
The Mobile Voice Client (MVC) 2050 Macros tab enables you to record
and use macros. A macro is a recorded sequence of steps that saves you
keystrokes.
For example, you can create a macro that selects a particular line, and
then dials that telephone number automatically. Another example of
macro use is programming voicemail access numbers and codes for
faster access. See Figure 30 and Figure 31 on page 63.
61
Mobile Voice Client 2050 settings
Figure 30: Keys > Macros menu
Macro screen
To enter a new macro name, or to select an existing macro to modify or
delete, select the New icon to the right of the list box. See Figure 31.
To select an existing macro, tap the down arrow in the Macro list box, and
make your selection.
To delete a selected macro, tap the Delete icon, the button to the right of
the list box.
62
Mobile Voice Client 2050 settings
Figure 31: Macro screen
New
Delete
Dialpad
AAA1204.bmp
Keys
Once you have selected a macro name, tap the down arrow in the Keys
drop-down list to select a key to add to the macro. Press the Add button
to add the key.
The Pause key is used to insert a short pause in the macro. A pause
introduces a delay, which is required to access some Interactive Voice
Response (IVR) applications and the voicemail systems.
Contents
A list of the macro contents appears in the Contents list box. When two
or more entries are in this box, the keystrokes can be moved around by
using the up and down navigation buttons, which appear to the right of the
box.
You can remove keystrokes from the Contents box by selecting a
keystroke, and pressing the Remove button.
63
Mobile Voice Client 2050 settings
Preview
You can preview your macro in a single view by viewing the Read-only
field under the Contents box.
Dialpad
You can select the Keys list box and press the Add button, or you can
use the numbers on the dialpad, to enter numbers into your macro.
64
Mobile Voice Client 2050 for expert users
Mobile Voice Client 2050 for
expert users
This section discusses the selections used to diagnose or correct error
conditions, and are not used during normal operation of Mobile Voice
Client 2050.
Client diagnostics
Client diagnostics are used to determine the connection status of the
MVC 2050. Access client diagnostics from the Help > Diagnostics
screen. See Figure 14 on page 30.
Diagnostics include:
•
Ping
•
TraceRoute
•
RUDP Ping
Ping tests whether the network destination in online.
TraceRoute is an operation for sending trace packets to trace the route of
user datagram protocol (UDP) from local host to remote host.
RUDP Ping tests if the IP port is responding as a terminal proxy server
(TPS).
See also “Profiles” on page 55 for information on changing, importing,
and exporting profiles to assist in troubleshooting.
65
Mobile Voice Client 2050 for expert users
Audio quality
Audio quality of voice transmission depends on many factors, such as
codec characteristics, echo canceller, jitter buffer size, and listener
perception.
Audio quality is controlled from two screens:
•
Audio, the quality slider tab
•
Advanced Audio (for expert users)
Audio quality slider
You can control audio quality by using the slider tab to reduce audio delay
and increase audio clarity. See Figure 32. The slider controls the number
of audio buffers the PDA uses to smooth out incoming audio streams.
Audio delay
If you experience audio delay, you can decrease the number of buffers,
and reduce the delay, by adjusting the slider on the Audio screen.
Figure 32: Audio quality screen
66
Mobile Voice Client 2050 for expert users
Audio clarity
If you experience breakups in the receive audio stream, adjust the setting
towards Higher Quality. This increases the number of audio buffers used
to process incoming audio. If the delay is too large, you can decrease this
setting.
If you experience broken or choppy speech at either end of the call, or if
the dial tone sounds choppy, avoid using your PDA volume control.
Instead, use the volume controls on the MVC 2050 toolbar to adjust the
volume of your call.
Note: QoS 802.11 p/q is not supported due to device constraints.
Advanced Audio
Advanced audio settings are recommended for use only by advanced
users. See Figure 33.
Figure 33: Advanced Audio screen
NetEQ software, included with the MVC 2050 software, provides loss
concealment and compensation; NetEQ is the default setting. You cannot
adjust the MVC 2050 Advanced Audio settings.
67
Mobile Voice Client 2050 for expert users
Items on the Advanced Audio screen
Table 6 describes the selections available on the Advanced Audio screen.
Table 6: Advanced Audio screen
Selection
Description
NetEQ (Global IP Sound)
NetEQ packet loss concealment
software is the default mode of
operation.
Jitter Buffer
The rate of arrival of voice frames is
variable. A jitter buffer is used to
minimize this variability by sending voice
frames to your PDA sound system at a
fixed rate. The value of “jitter” is the
number of voice frames the application
has in its jitter buffer.
Highwater Mark
Highwater mark indicates the maximum
number of voice frames the application
can have in its jitter buffer, before it starts
discarding packets. Set this value to at
least 2.5 times the value of jitter.
Early Packet and Late
Packet Resync
Early Packet Resync and Late Packet
Resync indicate the points at which
MVC 2050 discards and restarts the jitter
buffer contents. Set this value to at least
5 times the highwater mark.
68
Mobile Voice Client 2050 for expert users
Listener IP
See Figure 34. This screen is for expert users only. It can be used to
override the port assignments when a conflicting application is on the
PDA.
Figure 34: Listener IP screen
AAA1209a.bmp
AAA1209b.bmp
Items on the Listener IP screen
Table 7 describes selections available on the Listener IP screen.
Table 7: Listener IP screen
Selection
Description
Use a specific
address
The MVC 2050 normally listens to all IP
addresses on the device for communication
server-to-terminal (UNIStim) messaging on all the
Network Interface Cards (NIC) on the device. This
is the default mode of operation. To override this
behavior, select the check box, and enter a
specific IP address.
69
Mobile Voice Client 2050 for expert users
Table 7: Listener IP screen
Selection
Description
Use a specific
port
The MVC 2050 listens to IP port 5000 on the
device for communication server-to-terminal
(UNIStim) messaging.
Hardware ID
The Hardware ID screen is for expert users and system administrators. It
can be used to select the Media Access Control (MAC) address that the
MVC 2050 reports to the communication server.
The Hardware ID being used by MVC 2050 can be viewed on the
MVC 2050 Settings > Hardware ID tab. See Figure 35.
Figure 35: Hardware ID screen
AAA1207.bmp
The Hardware ID is generated by reading MAC addresses from the PDA
NIC. When the MVC 2050 is used with most server types, the Hardware
ID it uses must be unique. Some software, such as VPN client software,
creates artificial network interfaces with MAC addresses that are common
70
Mobile Voice Client 2050 for expert users
to all installations of the software. As a result, the MAC address is the
same on many different computers.
Without a unique MAC address, users sometimes are unable to connect
to a server, or will connect to a server, and subsequently cause another
device with the same Hardware ID to be disconnected from the server. If
the MVC 2050 is disconnected from the server, it automatically attempts
to reconnect, and the resulting conflicts will prevent a stable connection
from being made.
Select the Auto-Create button on the Settings > Hardware ID screen to
prevent conflict with another device. Auto-Create fabricates a random
value, which is unlikely to be repeated by another device.
Table 8 describes items on the Hardware ID screen.
Table 8: Hardware ID screen
Selection
Description
Hardware ID
This box contains the MAC address for the Ethernet
hardware installed in your device. MVC 2050 uses the
MAC address of the Ethernet hardware as its
Hardware ID. You can change this value if there is
more than one MAC address, or if the device is using
an Extranet client that hides the true MAC address.
For example, the Nortel Contivity Extranet Switch
uses a single MAC address for all clients. This can
cause connection problems with your communication
server.
Auto-Create
This changes the MAC address that appears in the
Hardware ID box. If your device has more than one
MAC address, press the Auto-Create button to cycle
through the set of MAC addresses on your computer.
Auto-Create also makes up random Hardware IDs, in
case the Ethernet hardware addresses are not unique
to the communication server.
Firmware
Version
Shows the build number of MVC 2050 installed on
your device. This value is the version number of the
application last reported by the server.
71
Mobile Voice Client 2050 for expert users
Connection history
Connection history writes indication messages to the registry key
“\HKCU\Software\Nortel Networks\MVC2050\Log” for connection or
disconnection events. This is a circular queue of 29 entries.
Each time a connection or disconnection event occurs, a log entry is
written. The entries contain a date and time, and a description of the
connection or disconnection event.
The following section describes connection and disconnection events.
Soft reset, server n
This message indicates that the server has instructed the MVC 2050 to
reset and connect to a server n, where the value of n is determined, and
possibly written, by the server. This maps directly to a UNIStim message.
Server connected
This message indicates that the MVC 2050 has connected successfully to
the server. It means that the MVC 2050 received the “AssignTerminalID”
UNIStim message, which is the last message received by the MVC 2050
before a normal session commences.
Recovering: Server unreachable
This message is generated when the MVC 2050 has lost its connection
with the server. It indicates that the UNIStim “watchdog timer” has
expired. This indicates loss of network connection.
Hard Reset
This message indicates that the server has instructed the MVC 2050 to
reset and clear its UNIStim-related memory. This maps directly to a
UNIStim message.
72
Mobile Voice Client 2050 for expert users
WiFi
You can ActiveSync your PDA with your PC using WiFi.
WiFi use for a cradled PDA
If you do not want to lose the MVC 2050 connection to the server when
you return the PDA to its cradle, deactivate ActiveSync. Otherwise, the
connection is lost, because ActiveSync uses Point-to-Point Protocol
(PPP). This causes the PDA connection to the network to be dropped,
and then connected to the PC.
73
Mobile Voice Client 2050 for expert users
74
Business Communications Manager
Nortel Mobile Voice Client 2050
User Guide
Copyright © 2007, Nortel Networks. All Rights Reserved.
The information in this document is subject to change without notice. The
statements, configurations, technical data, and recommendations in this
document are believed to be accurate and reliable, but are presented
without express or implied warranty. Users must take full responsibility for
their applications of any products specified in this document. The
information in this document is proprietary to Nortel Networks.
Nortel, Nortel (Logo), the Globemark, SL-1, Meridian 1, and
Succession are trademarks of Nortel Networks.
Document Number: NN40110-112
Document Release: Standard 01.01
Date: March 2007
Produced in Canada
To provide feedback or report a problem in this document, go to
www.nortel.com/documentfeedback.
www.nortel.com