1
Intelligent Contact Center Telephone
Administration Guide
Avaya Business Communications Manager
Release 6.0
Document Status: Standard
Document Number: NN40170-600
Document Version: 02.02
Date: October 2010
© 2010 Avaya Inc.
All Rights Reserved.
Notices
While reasonable efforts have been made to ensure that the information in this document is complete and accurate at the time of printing,
Avaya assumes no liability for any errors. Avaya reserves the right to make changes and corrections to the information in this document
without the obligation to notify any person or organization of such changes.
Documentation disclaimer
Avaya shall not be responsible for any modifications, additions, or deletions to the original published version of this documentation
unless such modifications, additions, or deletions were performed by Avaya. End User agree to indemnify and hold harmless Avaya,
Avaya’s agents, servants and employees against all claims, lawsuits, demands and judgments arising out of, or in connection with,
subsequent modifications, additions or deletions to this documentation, to the extent made by End User.
Link disclaimer
Avaya is not responsible for the contents or reliability of any linked Web sites referenced within this site or documentation(s) provided by
Avaya. Avaya is not responsible for the accuracy of any information, statement or content provided on these sites and does not
necessarily endorse the products, services, or information described or offered within them. Avaya does not guarantee that these links will
work all the time and has no control over the availability of the linked pages.
Warranty
Avaya provides a limited warranty on this product. Refer to your sales agreement to establish the terms of the limited warranty. In
addition, Avaya’s standard warranty language, as well as information regarding support for this product, while under warranty, is
available to Avaya customers and other parties through the Avaya Support Web site: http://www.avaya.com/support
Please note that if you acquired the product from an authorized reseller, the warranty is provided to you by said reseller and not by Avaya.
Licenses
THE SOFTWARE LICENSE TERMS AVAILABLE ON THE AVAYA WEBSITE, HTTP://SUPPORT.AVAYA.COM/LICENSEINFO/
ARE APPLICABLE TO ANYONE WHO DOWNLOADS, USES AND/OR INSTALLS AVAYA SOFTWARE, PURCHASED FROM
AVAYA INC., ANY AVAYA AFFILIATE, OR AN AUTHORIZED AVAYA RESELLER (AS APPLICABLE) UNDER A
COMMERCIAL AGREEMENT WITH AVAYA OR AN AUTHORIZED AVAYA RESELLER. UNLESS OTHERWISE AGREED TO
BY AVAYA IN WRITING, AVAYA DOES NOT EXTEND THIS LICENSE IF THE SOFTWARE WAS OBTAINED FROM ANYONE
OTHER THAN AVAYA, AN AVAYA AFFILIATE OR AN AVAYA AUTHORIZED RESELLER, AND AVAYA RESERVES THE
RIGHT TO TAKE LEGAL ACTION AGAINST YOU AND ANYONE ELSE USING OR SELLING THE SOFTWARE WITHOUT A
LICENSE. BY INSTALLING, DOWNLOADING OR USING THE SOFTWARE, OR AUTHORIZING OTHERS TO DO SO, YOU,
ON BEHALF OF YOURSELF AND THE ENTITY FOR WHOM YOU ARE INSTALLING, DOWNLOADING OR USING THE
SOFTWARE (HEREINAFTER REFERRED TO INTERCHANGEABLY AS "YOU" AND "END USER"), AGREE TO THESE
TERMS AND CONDITIONS AND CREATE A BINDING CONTRACT BETWEEN YOU AND AVAYA INC. OR THE
APPLICABLE AVAYA AFFILIATE ("AVAYA").
Copyright
Except where expressly stated otherwise, no use should be made of the Documentation(s) and Product(s) provided by Avaya. All content
in this documentation(s) and the product(s) provided by Avaya including the selection, arrangement and design of the content is owned
either by Avaya or its licensors and is protected by copyright and other intellectual property laws including the sui generis rights relating
to the protection of databases. You may not modify, copy, reproduce, republish, upload, post, transmit or distribute in any way any
content, in whole or in part, including any code and software. Unauthorized reproduction, transmission, dissemination, storage, and or
use without the express written consent of Avaya can be a criminal, as well as a civil offense under the applicable law.
Third Party Components
Certain software programs or portions thereof included in the Product may contain software distributed under third party agreements
("Third Party Components"), which may contain terms that expand or limit rights to use certain portions of the Product ("Third Party
Terms"). Information regarding distributed Linux OS source code (for those Products that have distributed the Linux OS source code),
and identifying the copyright holders of the Third Party Components and the Third Party Terms that apply to them is available on the
Avaya Support Web site: http://support.avaya.com/Copyright.
Trademarks
The trademarks, logos and service marks ("Marks") displayed in this site, the documentation(s) and product(s) provided by Avaya are the
registered or unregistered Marks of Avaya, its affiliates, or other third parties. Users are not permitted to use such Marks without prior
written consent from Avaya or such third party which may own the Mark. Nothing contained in this site, the documentation(s) and
product(s) should be construed as granting, by implication, estoppel, or otherwise, any license or right in and to the Marks without the
express written permission of Avaya or the applicable third party. Avaya is a registered trademark of Avaya Inc. All non-Avaya
trademarks are the property of their respective owners.
Downloading documents
For the most current versions of documentation, see the Avaya Support. Web site: http://www.avaya.com/support
Contact Avaya Support
Avaya provides a telephone number for you to use to report problems or to ask questions about your product. The support telephone
number is 1-800-242-2121 in the United States. For additional support telephone numbers, see the Avaya Web site: http://
www.avaya.com/support
3
Task List
Getting started . . . . . . . . . . . . . . . . . . . . . . . . . . . . . . . . . . . . . . . . . . . . . . . . 13
About Contact Center telephone administration . . . . . . . . . . . . . . . . . . . . 25
To determine the Feature Codes...................................................................................28
To program a memory button ........................................................................................29
Contact Center general properties . . . . . . . . . . . . . . . . . . . . . . . . . . . . . . . 33
To enable the Contact Center keycode .........................................................................33
To set Contact Center general properties .....................................................................37
To set Caller ID..............................................................................................................38
To set the Supervisor Help request timeout ..................................................................39
To select skillsets ..........................................................................................................40
To configure lines for Contact Center ............................................................................42
To set the Answer Lines status .....................................................................................43
Contact Center greetings . . . . . . . . . . . . . . . . . . . . . . . . . . . . . . . . . . . . . . . 45
To record a Contact Center greeting .............................................................................46
Setting up skillsets . . . . . . . . . . . . . . . . . . . . . . . . . . . . . . . . . . . . . . . . . . . . 49
To set up a skillset.........................................................................................................53
To enable a skillset........................................................................................................57
To disable a skillset .......................................................................................................58
To change a skillset.......................................................................................................60
To unconfigure a skillset:...............................................................................................64
Setting up skillset mailboxes . . . . . . . . . . . . . . . . . . . . . . . . . . . . . . . . . . . . 67
To determine a skillset’s mailbox number and Message Waiting Indication telephone.68
To check which CallPilot interface you use ...................................................................69
To initialize a skillset mailbox ........................................................................................70
To open a skillset mailbox - Avaya Norstar™ Voice Mail ..............................................71
To open a skillset mailbox - CallPilot .............................................................................71
To open a skillset mailbox from an outside telephone...................................................72
To open a skillset mailbox directly from an outside telephone ......................................72
To change a skillset mailbox password .........................................................................74
To reset a skillset mailbox password .............................................................................75
To record a Primary or Alternate skillset mailbox greeting ............................................77
To choose a Primary or Alternate skillset mailbox greeting...........................................78
To record a Personalized skillset mailbox greeting .......................................................80
To delete a Personalized mailbox greeting ...................................................................82
To play skillset mailbox messages - Avaya Norstar™ Voice Mail .................................84
To play skillset mailbox messages - CallPilot ................................................................86
To retrieve an erased message - Avaya Norstar™ Voice Mail......................................87
To retrieve an erased message - CallPilot ....................................................................87
To reply to an internal caller - Avaya Norstar™ Voice Mail ...........................................88
To reply to an internal caller - CallPilot ..........................................................................89
To reply to an external caller - Avaya Norstar™ Voice Mail ..........................................90
To reply to an external caller - CallPilot .........................................................................90
Intelligent Contact Center Telephone Administration Guide
4
Task List
Off-premise Message Notification . . . . . . . . . . . . . . . . . . . . . . . . . . . . . . . . 91
To assign an outdial method to a skillset mailbox .........................................................93
To set up Off-premise Message Notification to a telephone number ............................95
To set up Off-premise Message Notification to an extension ........................................97
To set up Off-premise Message Notification to a pager ................................................99
To set up Off-premise Message Notification to more than one destination .................101
To change the time range or type of message parameters .........................................104
To change the destination from telephone to another destination...............................106
To change the destination from pager to telephone or extension ...............................108
To change the destination from telephone or extension to pager ...............................110
To delete a destination number ...................................................................................112
To add a destination number.......................................................................................114
To turn Off-premise Message Notification on or off .....................................................115
Setting up agents . . . . . . . . . . . . . . . . . . . . . . . . . . . . . . . . . . . . . . . . . . . . 117
To add an agent ..........................................................................................................118
To change agent properties.........................................................................................121
To add multiple agents ................................................................................................122
To assign an agent to a skillset ...................................................................................124
To assign several agents to a skillset..........................................................................126
Configuring automatic log in ........................................................................................127
To remove agents from a skillset.................................................................................128
To view agents in a skillset..........................................................................................129
To log an agent off.......................................................................................................130
To delete an agent.......................................................................................................130
To reset an agent password ........................................................................................132
To change an agent priority .........................................................................................133
Intelligent Overflow Routing . . . . . . . . . . . . . . . . . . . . . . . . . . . . . . . . . . . 135
To add Overflow rules .................................................................................................142
To change and view Overflow rules ............................................................................144
To delete Overflow rules..............................................................................................146
Routing table administration . . . . . . . . . . . . . . . . . . . . . . . . . . . . . . . . . . . 149
To set up DID routing for Avaya Business Communications Manager........................149
To add a Greeting step................................................................................................154
To add a Distribute for step .........................................................................................157
To add a Goto step......................................................................................................158
To add a Transfer step ................................................................................................161
To add a disconnect step ............................................................................................163
To set up the Day Routing Table example ..................................................................165
To set up the Night Routing Table example ................................................................169
To review Routing Table steps ....................................................................................172
To modify Routing Table steps....................................................................................173
To set the Service Mode for a skillset..........................................................................177
Monitoring call activity . . . . . . . . . . . . . . . . . . . . . . . . . . . . . . . . . . . . . . . . 179
To set up Silent Monitor on an Avaya Business Communications Manager ...............180
To monitor skillsets......................................................................................................182
To monitor calls using a one or two line telephone .....................................................183
To use Not Ready........................................................................................................184
To log off......................................................................................................................185
NN40170-600
Task List
5
To change your password ...........................................................................................185
To handle Supervisor help requests ............................................................................188
Tips for operating Contact Center . . . . . . . . . . . . . . . . . . . . . . . . . . . . . . . 191
Troubleshooting Contact Center . . . . . . . . . . . . . . . . . . . . . . . . . . . . . . . . 195
To reset the Operator password ..................................................................................195
Contact Center Programming Record . . . . . . . . . . . . . . . . . . . . . . . . . . . . 199
Glossary . . . . . . . . . . . . . . . . . . . . . . . . . . . . . . . . . . . . . . . . . . . . . . . . . . . . 209
Intelligent Contact Center Telephone Administration Guide
6
Task List
NN40170-600
7
Contents
Chapter 1
Getting started . . . . . . . . . . . . . . . . . . . . . . . . . . . . . . . . . . . . . . . . . . . . . . . . 13
About this guide . . . . . . . . . . . . . . . . . . . . . . . . . . . . . . . . . . . . . . . . . . . . . . . . . . . . . . 13
About Contact Center . . . . . . . . . . . . . . . . . . . . . . . . . . . . . . . . . . . . . . . . . . . . . . 13
Contact Center Update . . . . . . . . . . . . . . . . . . . . . . . . . . . . . . . . . . . . . . . . . . . . . 13
What you can administer through a telephone . . . . . . . . . . . . . . . . . . . . . . . . . . . 17
About this guide . . . . . . . . . . . . . . . . . . . . . . . . . . . . . . . . . . . . . . . . . . . . . . . . . . . . . . 19
Audience . . . . . . . . . . . . . . . . . . . . . . . . . . . . . . . . . . . . . . . . . . . . . . . . . . . . . . . . . . . 19
Acronyms . . . . . . . . . . . . . . . . . . . . . . . . . . . . . . . . . . . . . . . . . . . . . . . . . . . . . . . . . . . 19
Symbols and text conventions . . . . . . . . . . . . . . . . . . . . . . . . . . . . . . . . . . . . . . . . . . . 20
Related publications . . . . . . . . . . . . . . . . . . . . . . . . . . . . . . . . . . . . . . . . . . . . . . . . . . 22
Customer Service . . . . . . . . . . . . . . . . . . . . . . . . . . . . . . . . . . . . . . . . . . . . . . . . . . . . 22
Navigation . . . . . . . . . . . . . . . . . . . . . . . . . . . . . . . . . . . . . . . . . . . . . . . . . . . . . . . 22
Getting technical documentation . . . . . . . . . . . . . . . . . . . . . . . . . . . . . . . . . . . . . . 22
Getting product training . . . . . . . . . . . . . . . . . . . . . . . . . . . . . . . . . . . . . . . . . . . . . 23
Getting help from a distributor or reseller . . . . . . . . . . . . . . . . . . . . . . . . . . . . . . . 23
Getting technical support from the Avaya Web site . . . . . . . . . . . . . . . . . . . . . . . 23
Chapter 2
About Contact Center telephone administration . . . . . . . . . . . . . . . . . . . . 25
Setting up Contact Center with a two line display telephone . . . . . . . . . . . . . . . . . . . . 25
System timeout . . . . . . . . . . . . . . . . . . . . . . . . . . . . . . . . . . . . . . . . . . . . . . . . . . . . . . 25
Using the dialpad . . . . . . . . . . . . . . . . . . . . . . . . . . . . . . . . . . . . . . . . . . . . . . . . . . . . . 26
Symbols and conventions used in this guide . . . . . . . . . . . . . . . . . . . . . . . . . . . . . . . . 27
About telephone buttons . . . . . . . . . . . . . . . . . . . . . . . . . . . . . . . . . . . . . . . . . . . . . . . 27
Feature codes . . . . . . . . . . . . . . . . . . . . . . . . . . . . . . . . . . . . . . . . . . . . . . . . . . . . . . . 28
Programming a memory button with a Feature Code . . . . . . . . . . . . . . . . . . . . . . . . . 29
Feature Codes used by Contact Center supervisors . . . . . . . . . . . . . . . . . . . . . . . . . 30
Feature Codes used by Contact Center agents . . . . . . . . . . . . . . . . . . . . . . . . . . . . . 32
Agent Feature Codes . . . . . . . . . . . . . . . . . . . . . . . . . . . . . . . . . . . . . . . . . . . . . . 32
Chapter 3
Contact Center general properties . . . . . . . . . . . . . . . . . . . . . . . . . . . . . . . . 33
To enable Contact Center using F9*8 . . . . . . . . . . . . . . . . . . . . . . . . . . . . . . . . . . 33
Setting Contact Center general properties . . . . . . . . . . . . . . . . . . . . . . . . . . . . . . . . . 36
Reserved channels . . . . . . . . . . . . . . . . . . . . . . . . . . . . . . . . . . . . . . . . . . . . . . . . 36
Setting Caller ID . . . . . . . . . . . . . . . . . . . . . . . . . . . . . . . . . . . . . . . . . . . . . . . . . . 37
Setting the Supervisor Help request timeout . . . . . . . . . . . . . . . . . . . . . . . . . . . . . 38
Selecting skillsets supervisors can receive help requests from . . . . . . . . . . . . . . 40
Intelligent Contact Center Telephone Administration Guide
8
Contents
Configuring lines . . . . . . . . . . . . . . . . . . . . . . . . . . . . . . . . . . . . . . . . . . . . . . . . . . . . . 41
Setting the Answer Lines status . . . . . . . . . . . . . . . . . . . . . . . . . . . . . . . . . . . . . . . . . 43
Resetting the Contact Center Administrator password . . . . . . . . . . . . . . . . . . . . . . . . 43
Chapter 4
Contact Center greetings . . . . . . . . . . . . . . . . . . . . . . . . . . . . . . . . . . . . . . . 45
About Contact Center greetings . . . . . . . . . . . . . . . . . . . . . . . . . . . . . . . . . . . . . . . . . 45
Types of Contact Center greetings . . . . . . . . . . . . . . . . . . . . . . . . . . . . . . . . . . . . . . . 45
Recording a Contact Center greeting . . . . . . . . . . . . . . . . . . . . . . . . . . . . . . . . . . . . . 46
Chapter 5
Setting up skillsets . . . . . . . . . . . . . . . . . . . . . . . . . . . . . . . . . . . . . . . . . . . . 49
About skillsets . . . . . . . . . . . . . . . . . . . . . . . . . . . . . . . . . . . . . . . . . . . . . . . . . . . . . . . 49
How incoming calls are sent to a skillset . . . . . . . . . . . . . . . . . . . . . . . . . . . . . . . . . . . 49
Skillset properties . . . . . . . . . . . . . . . . . . . . . . . . . . . . . . . . . . . . . . . . . . . . . . . . . . . . 50
Setting up a skillset . . . . . . . . . . . . . . . . . . . . . . . . . . . . . . . . . . . . . . . . . . . . . . . . . . . 53
Enabling a skillset . . . . . . . . . . . . . . . . . . . . . . . . . . . . . . . . . . . . . . . . . . . . . . . . . . . . 57
Disabling a skillset . . . . . . . . . . . . . . . . . . . . . . . . . . . . . . . . . . . . . . . . . . . . . . . . . . . . 58
Changing skillset properties . . . . . . . . . . . . . . . . . . . . . . . . . . . . . . . . . . . . . . . . . . . . 59
Unconfiguring a skillset . . . . . . . . . . . . . . . . . . . . . . . . . . . . . . . . . . . . . . . . . . . . . . . . 63
Chapter 6
Setting up skillset mailboxes . . . . . . . . . . . . . . . . . . . . . . . . . . . . . . . . . . . . 67
About skillset mailboxes . . . . . . . . . . . . . . . . . . . . . . . . . . . . . . . . . . . . . . . . . . . . . . . 67
Determining a skillset mailbox number . . . . . . . . . . . . . . . . . . . . . . . . . . . . . . . . . . . . 68
Checking which telephone mailbox interface you use . . . . . . . . . . . . . . . . . . . . . . . . . 69
Initializing a skillset mailbox . . . . . . . . . . . . . . . . . . . . . . . . . . . . . . . . . . . . . . . . . . . . . 70
Opening a skillset mailbox . . . . . . . . . . . . . . . . . . . . . . . . . . . . . . . . . . . . . . . . . . . . . . 71
Opening a skillset mailbox remotely . . . . . . . . . . . . . . . . . . . . . . . . . . . . . . . . . . . 72
Skillset mailbox password . . . . . . . . . . . . . . . . . . . . . . . . . . . . . . . . . . . . . . . . . . . . . . 73
Changing a skillset mailbox password . . . . . . . . . . . . . . . . . . . . . . . . . . . . . . . . . 73
Resetting a skillset mailbox password . . . . . . . . . . . . . . . . . . . . . . . . . . . . . . . . . 74
Recording skillset mailbox greetings . . . . . . . . . . . . . . . . . . . . . . . . . . . . . . . . . . . . . . 76
Examples of Primary and Alternate greetings . . . . . . . . . . . . . . . . . . . . . . . . . . . . 76
Choosing a Primary or Alternate skillset mailbox greeting . . . . . . . . . . . . . . . . . . . . . 78
Recording a Personalized skillset mailbox greeting . . . . . . . . . . . . . . . . . . . . . . . . . . 80
Deleting a Personalized mailbox greeting . . . . . . . . . . . . . . . . . . . . . . . . . . . . . . . . . . 82
Checking skillset mailboxes for messages . . . . . . . . . . . . . . . . . . . . . . . . . . . . . . . . . 83
Playing skillset mailbox messages . . . . . . . . . . . . . . . . . . . . . . . . . . . . . . . . . . . . . . . 84
Retrieving erased messages . . . . . . . . . . . . . . . . . . . . . . . . . . . . . . . . . . . . . . . . . . . . 87
Replying to messages . . . . . . . . . . . . . . . . . . . . . . . . . . . . . . . . . . . . . . . . . . . . . . . . . 88
Replying to an internal caller . . . . . . . . . . . . . . . . . . . . . . . . . . . . . . . . . . . . . . . . . 88
Using the Reply feature to reply to an external caller . . . . . . . . . . . . . . . . . . . . . . 90
NN40170-600
Contents
9
Chapter 7
Off-premise Message Notification . . . . . . . . . . . . . . . . . . . . . . . . . . . . . . . . 91
About Off-premise Message Notification . . . . . . . . . . . . . . . . . . . . . . . . . . . . . . . . . . . 91
Assigning an outdial method to a skillset mailbox . . . . . . . . . . . . . . . . . . . . . . . . . . . . 92
Off-premise Message Notification parameters . . . . . . . . . . . . . . . . . . . . . . . . . . . . . . 93
Setting up Off-premise Message Notification . . . . . . . . . . . . . . . . . . . . . . . . . . . . . . . 94
About setting up Off-premise Message Notification to a pager number . . . . . . . . 99
Changing Off-premise Message Notification . . . . . . . . . . . . . . . . . . . . . . . . . . . . . . . 104
Deleting a destination number . . . . . . . . . . . . . . . . . . . . . . . . . . . . . . . . . . . . . . . . . . 112
Adding a destination number . . . . . . . . . . . . . . . . . . . . . . . . . . . . . . . . . . . . . . . . . . . 113
Turning Off-premise Message Notification on or off . . . . . . . . . . . . . . . . . . . . . . . . . 114
Chapter 8
Setting up agents . . . . . . . . . . . . . . . . . . . . . . . . . . . . . . . . . . . . . . . . . . . . . 117
About adding agents . . . . . . . . . . . . . . . . . . . . . . . . . . . . . . . . . . . . . . . . . . . . . . . . . 117
Agent properties . . . . . . . . . . . . . . . . . . . . . . . . . . . . . . . . . . . . . . . . . . . . . . . . . . . . 117
Changing an agent . . . . . . . . . . . . . . . . . . . . . . . . . . . . . . . . . . . . . . . . . . . . . . . . . . 120
Adding multiple agents . . . . . . . . . . . . . . . . . . . . . . . . . . . . . . . . . . . . . . . . . . . . . . . 122
Assigning an agent to a skillset . . . . . . . . . . . . . . . . . . . . . . . . . . . . . . . . . . . . . . . . . 124
Dynamic Agent Priority . . . . . . . . . . . . . . . . . . . . . . . . . . . . . . . . . . . . . . . . . . . . 124
Assigning several agents to a skillset . . . . . . . . . . . . . . . . . . . . . . . . . . . . . . . . . . . . 126
Assigning agents to a skillset using Auto Login . . . . . . . . . . . . . . . . . . . . . . . . . . . . . 127
Removing agents from a skillset . . . . . . . . . . . . . . . . . . . . . . . . . . . . . . . . . . . . . . . . 127
Changing an agent priority . . . . . . . . . . . . . . . . . . . . . . . . . . . . . . . . . . . . . . . . . . . . 132
Chapter 9
Intelligent Overflow Routing . . . . . . . . . . . . . . . . . . . . . . . . . . . . . . . . . . . . 135
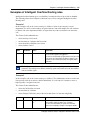
Examples of Intelligent Overflow Routing rules . . . . . . . . . . . . . . . . . . . . . . . . . . . . . 137
Chapter 10
Routing table administration . . . . . . . . . . . . . . . . . . . . . . . . . . . . . . . . . . . 149
Setting up DID routing . . . . . . . . . . . . . . . . . . . . . . . . . . . . . . . . . . . . . . . . . . . . . . . . 149
Fax Detection . . . . . . . . . . . . . . . . . . . . . . . . . . . . . . . . . . . . . . . . . . . . . . . . . . . . . . 150
About types of Routing Table steps . . . . . . . . . . . . . . . . . . . . . . . . . . . . . . . . . . . . . . 151
Adding a Greeting step . . . . . . . . . . . . . . . . . . . . . . . . . . . . . . . . . . . . . . . . . . . . . . . 152
Greeting step parameters . . . . . . . . . . . . . . . . . . . . . . . . . . . . . . . . . . . . . . . . . . 152
Adding a Goto step . . . . . . . . . . . . . . . . . . . . . . . . . . . . . . . . . . . . . . . . . . . . . . . . . . 158
Adding a Transfer step . . . . . . . . . . . . . . . . . . . . . . . . . . . . . . . . . . . . . . . . . . . . . . . 160
Adding a Disconnect step . . . . . . . . . . . . . . . . . . . . . . . . . . . . . . . . . . . . . . . . . . . . . 163
Example of a Day Routing Table . . . . . . . . . . . . . . . . . . . . . . . . . . . . . . . . . . . . . . . . 165
Example of a Night Routing Table . . . . . . . . . . . . . . . . . . . . . . . . . . . . . . . . . . . . . . . 169
Changing a routing table . . . . . . . . . . . . . . . . . . . . . . . . . . . . . . . . . . . . . . . . . . . . . . 171
To erase a Routing Table . . . . . . . . . . . . . . . . . . . . . . . . . . . . . . . . . . . . . . . . . . 175
Intelligent Contact Center Telephone Administration Guide
10
Contents
Setting the Service Modes for skillsets . . . . . . . . . . . . . . . . . . . . . . . . . . . . . . . . . . . 176
Chapter 11
Monitoring call activity . . . . . . . . . . . . . . . . . . . . . . . . . . . . . . . . . . . . . . . . 179
Monitoring agent calls with Silent Monitor . . . . . . . . . . . . . . . . . . . . . . . . . . . . . . . . . 179
Using Silent Monitor with Answer DN . . . . . . . . . . . . . . . . . . . . . . . . . . . . . . . . . 180
Monitoring tips . . . . . . . . . . . . . . . . . . . . . . . . . . . . . . . . . . . . . . . . . . . . . . . . . . . . . . 180
Monitoring skillsets . . . . . . . . . . . . . . . . . . . . . . . . . . . . . . . . . . . . . . . . . . . . . . . . . . 181
An example of monitoring skillsets . . . . . . . . . . . . . . . . . . . . . . . . . . . . . . . . . . . 182
Using a memory button to monitor calls waiting in skillsets . . . . . . . . . . . . . . . . 183
Taking some Not Ready time . . . . . . . . . . . . . . . . . . . . . . . . . . . . . . . . . . . . . . . . . . 184
Programming Not Ready to a memory button . . . . . . . . . . . . . . . . . . . . . . . . . . . 184
Logging off . . . . . . . . . . . . . . . . . . . . . . . . . . . . . . . . . . . . . . . . . . . . . . . . . . . . . . . . . 185
Changing your password . . . . . . . . . . . . . . . . . . . . . . . . . . . . . . . . . . . . . . . . . . . . . . 185
Supervisor Help . . . . . . . . . . . . . . . . . . . . . . . . . . . . . . . . . . . . . . . . . . . . . . . . . . . . . 186
How Supervisor Help works . . . . . . . . . . . . . . . . . . . . . . . . . . . . . . . . . . . . . . . . 186
Configuring Supervisor Help . . . . . . . . . . . . . . . . . . . . . . . . . . . . . . . . . . . . . . . . . . . 188
How to handle missed requests . . . . . . . . . . . . . . . . . . . . . . . . . . . . . . . . . . . . . . . . 189
An example of retrieving an escalated request . . . . . . . . . . . . . . . . . . . . . . . . . . 189
Chapter 12
Tips for operating Contact Center . . . . . . . . . . . . . . . . . . . . . . . . . . . . . . . 191
Agent administration . . . . . . . . . . . . . . . . . . . . . . . . . . . . . . . . . . . . . . . . . . . . . . 191
Skillset administration . . . . . . . . . . . . . . . . . . . . . . . . . . . . . . . . . . . . . . . . . . . . . 191
Contact Center greetings . . . . . . . . . . . . . . . . . . . . . . . . . . . . . . . . . . . . . . . . . . 191
Routing Table administration . . . . . . . . . . . . . . . . . . . . . . . . . . . . . . . . . . . . . . . 192
Contact Center general parameters . . . . . . . . . . . . . . . . . . . . . . . . . . . . . . . . . . . . . 192
How to calculate the longest time a caller can be on hold . . . . . . . . . . . . . . . . . . . . . 193
Tips to improve the efficiency of Contact Center . . . . . . . . . . . . . . . . . . . . . . . . . . . . 194
Chapter 13
Troubleshooting Contact Center . . . . . . . . . . . . . . . . . . . . . . . . . . . . . . . . 195
Resetting passwords . . . . . . . . . . . . . . . . . . . . . . . . . . . . . . . . . . . . . . . . . . . . . . . . . 195
Resetting the Operator password . . . . . . . . . . . . . . . . . . . . . . . . . . . . . . . . . . . . 195
Agent problems . . . . . . . . . . . . . . . . . . . . . . . . . . . . . . . . . . . . . . . . . . . . . . . . . . . . . 196
Agent log on problems . . . . . . . . . . . . . . . . . . . . . . . . . . . . . . . . . . . . . . . . . . . . 196
Important considerations about how agents use features . . . . . . . . . . . . . . . . . . 196
Skillset problems . . . . . . . . . . . . . . . . . . . . . . . . . . . . . . . . . . . . . . . . . . . . . . . . . . . . 198
Problems changing skillset properties . . . . . . . . . . . . . . . . . . . . . . . . . . . . . . . . . 198
Chapter 14
Contact Center Programming Record . . . . . . . . . . . . . . . . . . . . . . . . . . . . 199
Feature Codes . . . . . . . . . . . . . . . . . . . . . . . . . . . . . . . . . . . . . . . . . . . . . . . . . . . . . . 200
NN40170-600
Contents
11
General Contact Center parameters . . . . . . . . . . . . . . . . . . . . . . . . . . . . . . . . . . . . . 200
Operator/Business Status. . . . . . . . . . . . . . . . . . . . . . . . . . . . . . . . . . . . . . . . . . . . . . 201
Contact Center skillsets . . . . . . . . . . . . . . . . . . . . . . . . . . . . . . . . . . . . . . . . . . . . . . . 202
Contact Center agents . . . . . . . . . . . . . . . . . . . . . . . . . . . . . . . . . . . . . . . . . . . . . . . . 204
Skillset assignments . . . . . . . . . . . . . . . . . . . . . . . . . . . . . . . . . . . . . . . . . . . . . . . . . . 205
Skillset mailboxes . . . . . . . . . . . . . . . . . . . . . . . . . . . . . . . . . . . . . . . . . . . . . . . . . . . 206
Routing Tables . . . . . . . . . . . . . . . . . . . . . . . . . . . . . . . . . . . . . . . . . . . . . . . . . . . . . 207
Line answering . . . . . . . . . . . . . . . . . . . . . . . . . . . . . . . . . . . . . . . . . . . . . . . . . . . . . 208
Glossary . . . . . . . . . . . . . . . . . . . . . . . . . . . . . . . . . . . . . . . . . . . . . . . . . . . . 209
Index . . . . . . . . . . . . . . . . . . . . . . . . . . . . . . . . . . . . . . . . . . . . . . . . . . . . . . . 215
Intelligent Contact Center Telephone Administration Guide
12
Contents
NN40170-600
13
Chapter 1
Getting started
About this guide
The Intelligent Contact Center Telephone Administration Guide describes how to set up and
configure Contact Center on an Avaya Business Communications Manager (Avaya BCM) using
telset based administration.The information in this document applies to both the BCM50 and the
BCM450 platforms running Avaya BCM Release 6.0.
About Contact Center
Contact Center is an application that handles incoming calls as efficiently and economically as
possible. Contact Center answers calls, then routes the calls to agents in a skillset that most closely
matches the needs of the caller. Contact Center routes calls based on the origin of the call, the
destination of the call, or the information entered by the caller. Callers can be given high or low
priorities. Callers can overflow to different groups or skillsets of agents, transfer out of the system,
leave a message, and hear announcements and informative messages.
You can program Contact Center using any two-line display telephone on your telephone system.
You can also use the web-based CallPilot Manager to set up and operate Contact Center.
For information about Contact Center features, see the Intelligent Contact Center Set Up and
Operation Guide (NN40040-301).
Contact Center Update
Intelligent Contact Center is the evolution of the existing Call Center capability on Avaya BCM.
Intelligent Contact Center offers additional functionality, such as Reporting for Contact Center
and Multimedia Contact Center. You can also choose the specific number of agents and skillsets
that your business requires.
You purchase Intelligent Contact Center and then purchase the number of agents, skillsets,
Reporting, and Multimedia as required. Intelligent Contact Center has increased maximum
capacities, for example 80 active agents and 50 skillsets for BCM450, and 50 active agents and 30
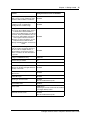
skillsets for BCM50. Table 1 shows the capacities available for the BCM450 system. Table 2
shows the capacities available for the BCM50 system.
Intelligent Contact Center Telephone Administration Guide
14
Chapter 1 Getting started
Table 1 Intelligent Contact Center Capacities for BCM450
Features
Intelligent Contact Center for BCM450
Skillsets
Default 1, maximum 50
Configured agents (available agent IDs)
Maximum 250
Active agents (includes supervisors)
Active agents are agents who are logged
in to one skillset or a combination of
skillsets.
Default 2, maximum 80
Dynamic agent priority levels
20
Dynamic call priority levels
20
Active calls in all skillsets
100
Maximum active calls per skillset
100
Maximum lines configured for Contact
Center
100
Voice ports (shared with CallPilot or
dedicated)
Minimum 2, default 10, maximum 32
Voice ports with CEC
63
Voice ports without CEC
35
Voice ports for fax with CEC
8
Voice ports for fax without CEC
4
Routing tables per skillset
2
Greetings
150
Maximum time per greeting
1000 mins
Maximum time for all greetings
>370 hours / Gigabyte
Steps per routing table
20
Skillset mailboxes
One mailbox is created for each
configured skillset. No skillset mailbox is
configured by default and a maximum 50
skillset mailboxes can be configured
Default 0, Maximum 50
Supervisor functionality, including call
monitoring
Silent monitor
Supervisor Help
Available with Silent Monitor.
Maximum simultaneous monitoring
sessions
6
Caller Input Tables
50
NN40170-600
Chapter 1 Getting started
Features
Intelligent Contact Center for BCM450
Basic Intelligent Caller Input Routing: the
ability to route a call to an Operator, Auto
Attendant, skillset mailbox or CCR Tree.
Available
Advanced Intelligent Caller Input Routing:
the ability to route a call based on
multi-digit fixed or variable strings
Available
15
Delegated Contact Center Administration:
If you use an Avaya BCM system, there is
no dedicated or default CallPilot or
Contact Center Administrator user ID and
password. The System Administrator can
create users with CallPilot and Contact
Available
Center rights in Business Element
Manager. For more information, see the
Avaya Business Communications
Manager 6.0 Administration and Security
Guide.
Intelligent Overflow Routing: rules you
create to overflow, change the priority of,
and move calls to multiple skillsets, a
skillset mailbox, an internal or external
number, a mailbox, the Auto Attendant or
an operator.
Available
Intelligent CLID/DNIS Routing
1000 rules
Overflow rules per skillset
20
Overflow skillsets
Default 0, maximum 49
Service Mode: you specify the start and
end times for the day and night skillset for
each day of the week
Available
Limited Feature 983 telephone
administration
Available
CallPilot Manager
Available
Reporting for Contact Center
Available
Must be enabled with keycode
Expected Wait Time
20 tables
Activity Codes
2,000 entries
Reporting for Contact Center must be enabled
to configure Activity Codes
Multimedia Contact Center
Available
Must be enabled with keycode
Intelligent Contact Center Telephone Administration Guide
16
Chapter 1 Getting started
Table 2 Intelligent Contact Center Capacities for BCM50
Features
Intelligent Contact Center for BCM50
Skillsets
Default 1, maximum 30
Configured agents (available agent IDs)
Maximum 100
Active agents (includes supervisors)
Active agents are agents who are logged
in to one skillset or a combination of
skillsets.
Default 2, maximum 50
Dynamic agent priority levels
20
Dynamic call priority levels
20
Active calls in all skillsets
30
Maximum active calls per skillset
30
Maximum lines configured for Contact
Center
30
Voice ports (shared with CallPilot or
dedicated)
Minimum 2, default 10, maximum 15
Routing tables per skillset
2
Greetings
50
Maximum time per greeting
30 mins
Maximum time for all greetings
1500 mins
Steps per routing table
20
Skillset mailboxes
Default 0, Maximum 30
Supervisor functionality, including call
monitoring
Silent monitor
Supervisor Help
Available with Silent Monitor.
Maximum simultaneous monitoring
sessions
6
Caller Input Tables
30
Basic Intelligent Caller Input Routing: the
ability to route a call to an Operator, Auto
Attendant, skillset mailbox or CCR Tree.
Available
Advanced Intelligent Caller Input Routing:
the ability to route a call based on
multi-digit fixed or variable strings
Available
NN40170-600
Chapter 1 Getting started
Features
17
Intelligent Contact Center for BCM50
Delegated Contact Center Administration:
If you use an Avaya BCM system, there is
no dedicated or default CallPilot or
Contact Center Administrator user ID and
password. The System Administrator can
create users with CallPilot and Contact
Available
Center rights in Business Element
Manager. tact Center rights in Business
Element Manager. For more information,
see the Avaya Business Communications
Manager 6.0 Administration and Security
Guide
Intelligent Overflow Routing: rules you
create to overflow, change the priority of,
and move calls to multiple skillsets, a
skillset mailbox, an internal or external
number, a mailbox, the Auto Attendant or
an operator.
Available
Intelligent CLID/DNIS Routing
1000 rules
Overflow rules per skillset
20
Overflow skillsets
Default 0, maximum 29
Service Mode: you specify the start and
end times for the day and night skillset for
each day of the week
Available
Limited Feature 983 telephone
administration
Available
CallPilot Manager
Available
Reporting for Contact Center
Available
Must be enabled with keycode
Expected Wait Time
20 tables
Activity Codes
2,000 entries
Reporting for Contact Center must be enabled
to configure Activity Codes
Multimedia Contact Center
Available
Must be enabled with keycode
What you can administer through a telephone
Contact Center properties
Keycode
Reserved Channels
“To enable the Contact Center keycode” on page 33
“Reserved channels” on page 36
Intelligent Contact Center Telephone Administration Guide
18
Chapter 1 Getting started
Supervisor Help
“Setting the Supervisor Help request timeout” on page 38
“Selecting skillsets supervisors can receive help requests
from” on page 40
Caller ID display settings
“Setting Caller ID” on page 37
Lines
“Configuring lines” on page 41
Answer lines status
“Setting the Answer Lines status” on page 43
Reset Administrator password
“Resetting the Contact Center Administrator password” on
page 43
Contact Center greetings
“Recording a Contact Center greeting” on page 46
NOTE: You must use CallPilot Manager to add Greeting
captions.
Skillsets
Parameters: name, number, control DN,
Message Waiting Indicator DN, Method of
Distribution, Break Time, Delay Answer,
Activity Code and Expected Wait Time
settings, service mode, prompt language,
attendant extension.
“Setting up a skillset” on page 53
Monitor skillsets
“Monitoring skillsets” on page 181
Skillset mailboxes
initialize a skillset mailbox
change a skillset mailbox password
record skillset mailbox greetings
play skillset mailbox messages
“About skillset mailboxes” on page 67
“Initializing a skillset mailbox” on page 70
“Skillset mailbox password” on page 73
“Recording skillset mailbox greetings” on page 76
“Playing skillset mailbox messages” on page 84
Off-premise message notification
“About Off-premise Message Notification” on page 91
“Setting the Service Modes for skillsets” on page 176
Agents
Agent ID, name, supervisor, automatic
answer, missed call options, Activity Code
entry type
“To add an agent” on page 118
Assign agents to skillsets
“Assigning an agent to a skillset” on page 124
Log an agent off
“To log an agent off” on page 130
Reset an agent password
“To reset an agent password” on page 132
Monitor agents
“Monitoring agent calls with Silent Monitor” on page 179
Routing
Intelligent Overflow Routing
“To add Overflow rules” on page 142
Greeting step
Distribute for step
Goto step
Transfer step
Disconnect step
“Adding a Greeting step” on page 152
“To add a Distribute for step” on page 157
“Adding a Goto step” on page 158
“Adding a Transfer step” on page 160
“Adding a Disconnect step” on page 163
CLID/DNIS routing
NOTE: You must use CallPilot Manager. You cannot
administer CLID/DNIS routing via telephone
NN40170-600
Chapter 1 Getting started
Expected Wait Time tables
NOTE: You must use CallPilot Manager. You cannot
administer EWT Tables via telephone.
Activity Codes
NOTE: You must use CallPilot Manager. You cannot
administer Activity Codes via telephone.
Caller Input Rule Tables
NOTE: You must use CallPilot Manager. You cannot
administer Caller Input Rule Tables via telephone.
Advanced Intelligent Caller Input Routing
NOTE: You must use CallPilot Manager. You cannot
administer Advanced Intelligent Caller Input Routing via
telephone.
19
About this guide
Audience
This guide is for system administrators who configure, and maintain Contact Center on an Avaya
BCM. To use this guide you must:
•
•
be an authorized system administrator
be knowledgeable of CallPilot and Contact Center
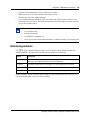
Acronyms
The following is a list of acronyms used in this guide.
Table 1
Acronym
Description
BCM
Business Communications Manager
CCR
Custom Call Routing
CDN
Control Directory Number
CFAC
Call Forward All Calls
CFB
Call Forward on Busy
CFNA
Call Forward No Answer
CLID
Calling Line Identification
CO
Central Office
COS
Class of Service
DID
Direct Inward Dialing
DN
Directory Number
DND
Do Not Disturb
DTMF
Dual Tone Multi-Frequency
EWT
Expected Wait Time
Intelligent Contact Center Telephone Administration Guide
20
Chapter 1 Getting started
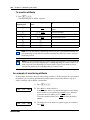
Table 1
Acronym
Description
MWI
Message Waiting Indication
NVM
Avaya Norstar™ Voice Mail
Symbols and text conventions
These symbols are used to highlight critical information for the Avaya BCM system:
Caution: Alerts you to conditions where you can damage the equipment.
Danger: Alerts you to conditions where you can get an electrical shock.
Warning: Alerts you to conditions where you can cause the system to fail or work
improperly.
Note: A Note alerts you to important information.
Tip: Alerts you to additional information that can help you perform a task.
!
Security note: Indicates a point of system security where a default should be changed,
or where the administrator needs to make a decision about the level of security required
for the system.
Warning: Alerts you to ground yourself with an antistatic grounding
strap before performing the maintenance procedure.
NN40170-600
Chapter 1 Getting started
21
Warning: Alerts you to remove the Avaya BCM main unit and
expansion unit power cords from the ac outlet before performing any
maintenance procedure.
These conventions and symbols are used to represent the Business Series Terminal display and.
Convention
Example
Used for
Word in a special font (shown in
the top line of the display)
Pswd:
Command line prompts on display telephones.
Underlined word in capital letters
(shown in the bottom line of a two
line display telephone)
PLAY
Display option. Available on two line display
telephones. Press the button directly below the
option on the display to proceed.
Dialpad buttons
£
Buttons you press on the dialpad to select a
particular option.
These text conventions are used in this guide to indicate the information described.These text
Convention
Description
bold Courier
text
Indicates command names and options and text that you need to enter.
Example: Use the info command.
Example: Enter show ip {alerts|routes}.
italic text
Indicates book titles
plain Courier
text
Indicates command syntax and system output (for example, prompts
and system messages).
Example: Set Trap Monitor Filters
FEATURE
HOLD
RELEASE
Indicates that you press the button with the coordinating icon on
whichever set you are using.
conventions are used in this guide to indicate the information described:
Convention
Description
bold Courier
text
Indicates command names and options and text that you need to enter.
Example: Use the info command.
Example: Enter show ip {alerts|routes}.
italic text
Indicates book titles
Intelligent Contact Center Telephone Administration Guide
22
Chapter 1 Getting started
Convention
Description
plain Courier
text
Indicates command syntax and system output (for example, prompts
and system messages).
Example: Set Trap Monitor Filters
FEATURE
HOLD
RELEASE
Indicates that you press the button with the coordinating icon on
whichever set you are using.
Related publications
This section provides a list of additional documents referred to in this guide.
CallPilot Manager Set Up and Operation Guide (NN40170-300)
CallPilot Telephone Administration Guide (NN40170-601)
Intelligent Contact Center Set Up and Operation Guide (NN40170-301)
Intelligent Contact Center Agent Guide (NN40040-101)
Intelligent Contact Center Supervisor Guide (NN40040-102)
Keycode Installation Guide (NN40010-301)
Avaya Business Communications Manager 6.0 Administration and Security Guide
(NN40170-603)
Avaya Business Communications Manager 6.0 Configuration—Devices Guide (NN40170-500)
Customer Service
Visit the Avaya Web site to access the complete range of services and support that Avaya
provides. Go to www.avaya.com or go to one of the pages listed in the following sections.
Navigation
•
•
•
•
“Getting technical documentation” on page 22
“Getting product training” on page 23
“Getting help from a distributor or reseller” on page 23
“Getting help from a distributor or reseller” on page 23
Getting technical documentation
To download and print selected technical publications and release notes directly from the Internet,
go to www.avaya.com/support.
NN40170-600
Chapter 1 Getting started
23
Getting product training
Ongoing product training is available. For more information or to register, you can access the Web
site at www.avaya.com/support. From this Web site, you can locate the Training contacts link on
the left-hand navigation pane.
Getting help from a distributor or reseller
If you purchased a service contract for your Avaya product from a distributor or authorized
reseller, contact the technical support staff for that distributor or reseller for assistance.
Getting technical support from the Avaya Web site
The easiest and most effective way to get technical support for Avaya products is from the Avaya
Technical Support Web site at www.avaya.com/support.
Intelligent Contact Center Telephone Administration Guide
24
Chapter 1 Getting started
NN40170-600
25
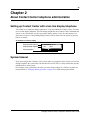
Chapter 2
About Contact Center telephone administration
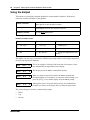
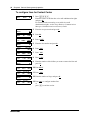
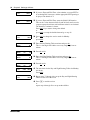
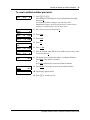
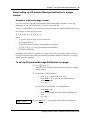
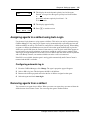
Setting up Contact Center with a two line display telephone
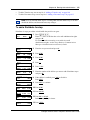
You cannot use a single line display telephone to set up and administer Contact Center. You must
use a two line display telephone. Two line display telephones show Contact Center commands and
options. A two line display can show up to three display options at once. In some instances, an
option does not have a corresponding display button, and you must select the option by pressing
buttons on the dia.
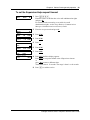
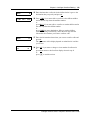
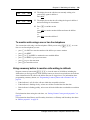
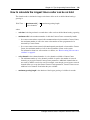
An example of a two line display
Display command line
Display button options
Skillset 1: Enabled
SKILL
NEXT
Display buttons
System timeout
If you pause longer than 2 minutes (120 seconds) when you program Contact Center on a two line
display telephone, the system times out and ends the session. This is a safety feature that prevents
unauthoried use of the system.
For example, if the system times out before you enter all the settings for a skillset, you must use
the procedures in “Changing skillset properties” on page 59 to finish setting up the skillset.
Intelligent Contact Center Telephone Administration Guide
26
Chapter 2 About Contact Center telephone administration
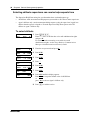
Using the dialpad
The buttons on your display telephone dialpad act as both numbers and letters. Each button
represents a number and letters of the alphabet.
To enter a character
press the dialpad button that represents the letter or number. Press the
button again to see the next letter or number.
To accept a character
press £ or press another . When you press another , the cursor advances
and the display shows the first character on the new .
To delete a character
press the BKSP display button.
Numbers and letters on the .
⁄
¤
1 ’ -
ABC2abc
‹ DEF3def
› GHI4ghi
fi J KL5jkl
fl MNO6mno
‡ PQRS7pqrs
° TUV8tuv
· WXYZ9wxyz
• Quit
‚ Q Z Zero q z
£ Accepts the displayed letter and “,”
(comma)
The display can show up to 16 characters. Whether the prompt remains on the display depends on
the type of prompt that is displayed.
This is an example of a display with fewer than 16 characters, where
the command line prompt remains on the display.
Pswd:1111
OTHR
RETRY
OK
Name:
RETRY
BKSP
OK
P
RETRY
BKSP
OK
When you begin to enter the last name, the Name: command line
prompt disappears. For example, if you enter the name Partridge, you
press the pad ‡ for P, and the display drops the Name: prompt.
PARTRIDGE
RETRY
BKSP
OK
Although the name is only nine characters long, the command line
prompt is not shown on the display after you enter the entire name.
This display shows the Name: command line prompt.
The prompt disappears for these command line prompts:
•
•
•
Name:
Log:
Dest ph:
NN40170-600
Chapter 2 About Contact Center telephone administration
27
Symbols and conventions used in this guide
These conventions and symbols are used to represent the Business Series Terminal display and.
Convention
Example
Used for
Word in a special font (in the top
line of the display)
Pswd:
Command line prompts on display telephones.
Underlined word in capital letters
(on the bottom line of a two line
display telephone)
PLAY
Display option. Available on two line display
telephones. Press the button directly below the
option on the display to proceed.
Dialpad buttons
£
Buttons you press on the dialpad to select a
particular option.
About telephone buttons
This table shows the Business Series Terminal buttons. Use the buttons that pertain to the type of
telephone you use.
Button name
Avaya 7100 Digital
Deskphone, Avaya
7208 Digital
Deskphone, T7316
M7100, M7208, M7310,
M7324
M7100N, M7208N,
M7310N, M7324N
ƒ
Feature
Handsfree
Bottom right-hand
button
©
Hold
≥
˙
Volume Control
√
√
Release
®
®
You can enter ≤, ƒ or
≤·°⁄ to access your mailbox.
and the code to use a feature. For example, press
The Avaya 7100 Digital Deskphone works differently from other telephones on your system
because it does not have line buttons. Where other telephones require that you select a line button
to answer a call, on the Avaya 7100 Digital Deskphone terminal you pick up the handset. Where
other telephones require you to select a line button to take a call off hold, you press ≥ on the
Avaya 7100 Digital Deskphone terminal.
On Avaya 7100 Digital Deskphone terminals, you can answer a second call by pressing ≥.
Your active call is put on hold and you connect to the waiting call. You can have no more than two
active calls at one time.
Intelligent Contact Center Telephone Administration Guide
28
Chapter 2 About Contact Center telephone administration
Feature codes
You use Feature Codes to perform Contact Center functions on your telephone.
Feature Codes are assigned during installation. This guide shows the default Feature Codes.
Contact Center can also use custom Feature Codes. If the default Feature Codes are used by
another application, your system automatically assigns custom Feature Codes. If your System
Administrator has assigned custom Feature Codes, you can use the table “Feature Codes” on page
200 to record the Custom Feature Codes.
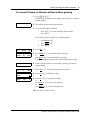
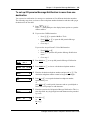
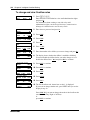
To determine the Feature Codes
Login/out:
Ready Mode:
NN40170-600
F9xx
NEXT
F9xx
NEXT
1
Press ≤·•⁄.
2
The display shows the name and number of the Log In/Log Out
Feature Code. xx represents a number between 00 and 99.
3
Press NEXT.
4
The display shows the name and number of the Ready Mode Feature
Code.
5
Press NEXT to see more Feature Codes.
6
When the display shows QUIT you have seen all the Feature Codes.
7
Press ® to end the session.
Chapter 2 About Contact Center telephone administration
29
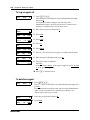
Programming a memory button with a Feature Code
Each Feature Code can be programmed to a memory button. Avaya recommends that you use
memory buttons with indicators to program the Feature Codes. A memory button indicator is the
triangle next to a memory button.
You can use memory buttons to monitor call activity, and view the Login/Logout and Not Ready
status of agents. For information about how the status appears, see the Intelligent Contact Center
Agent Guide (NN40040-101).
For information about using programmed memory buttons to monitor call activity, see Primary
and Secondary alert times in “Skillset properties” on page 50.
To program a memory button
1
Press ≤•‹.
Do not lift your handset.
Program Features
2
The display shows Program Features.
Press a button
QUIT
3
Press a memory button with an LCD indicator.
Feature Code:
QUIT
4
Press ≤.
F__
QUIT
5
Enter the Feature Code number that you want to program.
For example, enter ·‚· to program the Display Waiting Calls
Feature Code. See the tables “Feature Codes used by Contact Center
agents” on page 32 and “Agent Feature Codes” on page 32 for the
Feature Codes.
CLEAR
Repeat steps 1 through 5 for each Feature Code you want to
program.
Programmed
6
The display shows that the button is programmed, and then ends the
session.
Use the paper labels that come with your telephone to identify the programmed button. To use the
Feature Code, press the labeled button.
Intelligent Contact Center Telephone Administration Guide
30
Chapter 2 About Contact Center telephone administration
Feature Codes used by Contact Center supervisors
Use this Feature Code
To...
Open Mailbox
•
•
•
≤ ·°⁄
Operator Settings
≤ ·°¤
Voicemail DN
≤ ·°fi
Display Waiting Calls
Skillset Status
≤ ·‚·
Log on/Log off
• set or change the operator extension
• indicate whether the operator is available
• select the day and night service modes for skillsets
• change the password for Operator Settings
For more information about the Operator Feature Code, see “Setting the Service
Modes for skillsets” on page 176 and “Resetting the Operator password” on page
195.
• display the skillset mailbox number (Control DN) for each skillset
• display the extension for Message Waiting Indication for the skillset mailbox
• reset the passwords of the Contact Center Administrator and the operator
For more information about the Control DN, see “Determining a skillset mailbox
number” on page 68.
For more information about resetting the Operator and Contact Center
Administrator passwords, see “Resetting the Contact Center Administrator
password” on page 43 and “Resetting the Operator password” on page 195.
•
view real-time status information about skillsets. You can see how busy your
contact center is so that you can adjust skillset staffing
• view whether a skillset is enabled or disabled
• view the number of agents logged on to the skillset
• view the number of calls waiting
• view the longest wait time of a call
To provide easy, one-button access to the this feature, program a memory button
that has an indicator with ≤ ·‚·.
Refer to “Programming a memory button with a Feature Code” on page 29.
•
log agents off if they forget to log off.
For information, see “To log an agent off” on page 130.
•
lets you monitor agents
•
lets you take agents’ help requests
≤·‚›
Monitor agents
≤·‚fi
Supervisor Help
≤·‚fl
NN40170-600
open skillset mailboxes
record skillset mailbox greetings
listen to messages in the skillset mailbox
Chapter 2 About Contact Center telephone administration
Not Ready
•
≤·‚°
•
31
activate or cancel the Not Ready feature on their telephone. If the work
resulting from a call requires extra time to complete, an agent can use the Not
Ready Feature Code to prevent Contact Center from routing another call to
them. If an agent makes a telephone call, or if a supervisor is monitoring a
call, they first use the Not Ready Feature Code to activate the Not Ready
feature. When the agent is ready to receive calls, they use this Feature Code
to cancel the Not Ready feature and receive calls again.
If an agent does not answer a call within a certain number of rings, the call is
returned to the skillset and the agent telephone is automatically placed into
Auto Busy Mode or Auto Logout Mode. The agent must manually cancel the
Auto Busy Mode feature by using the Not Ready Feature Code to continue to
receive calls.
Note: You can use The Log on/Log off and the Not Ready Feature Codes, but they are used
primarily by agents. For information about the Feature Codes used by agents, see “Feature
Codes used by Contact Center agents” on page 32.
Note: While you use a feature, if you press the Feature ≤ button your present feature session
ends. Do not press ≤ unless you want to end your current feature session.
Intelligent Contact Center Telephone Administration Guide
32
Chapter 2 About Contact Center telephone administration
Feature Codes used by Contact Center agents
If you have Custom Feature Codes, record them in the table “Feature Codes” on page 200.
Agent Feature Codes
For more information about Agent Feature Codes, see the Intelligent Contact Center Agent Guide
(NN40040-101). For more information about Feature Codes used by supervisors, see the “Feature
Codes used by Contact Center supervisors” on page 30.
Agents use this Feature Code To...
Open Mailbox
≤ ·°⁄
•
access messages in a skillset mailbox
Log on/Log off
Monitor skillsets
•
•
log on when they are in the office
view the status of the skillsets they are logged on to. Agents can
program a memory button with the Log on/Log off Feature Code. The
status of the calls waiting in the skillset is shown by the flash rate of
the indicator. For more information, see “Skillset properties” on page
50.
•
requests help from a supervisor
•
start a session where they can enter Activity Codes
•
activate or cancel the Not Ready feature on their telephone. If the
work resulting from a call requires extra time to complete, an agent
can use the Not Ready Feature Code to prevent Contact Center from
routing another call to them. If an agent makes a telephone call, or if a
supervisor is monitoring a call, they first use the Not Ready Feature
Code to activate the Not Ready feature. When the agent is ready to
receive calls, they use this Feature Code to cancel the Not Ready
feature and receive calls again.
If an agent does not answer a call within a certain number of rings, the
call is returned to the skillset and the agent telephone is automatically
placed into Auto Busy Mode or Auto Logout Mode. The agent must
manually cancel the Auto Busy Mode feature by using the Not Ready
Feature Code to continue to receive calls.
≤·‚›
Supervisor Help
≤·‚fl
Activity Codes
≤·‚‡
Not Ready
≤·‚°
•
Display Waiting Calls
≤ ·‚·
NN40170-600
•
see, during peak call periods, which skillsets have the most call
activity.
33
Chapter 3
Contact Center general properties
To set the Contact Center general properties:
•
•
•
•
•
•
set the number of Reserved channels
set the CLID parameter
set the Supervisor Help request timeout value
select from which skillsets a supervisor can receive help requests
configure the lines to be answered by Contact Center
set the line answering status
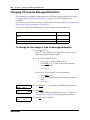
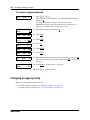
To enable Contact Center using F9*8
If you do not have Contact Center as your primary application, you must enable the Contact Center
keycode. You enable the Contact Center keycode using Feature 9*8 or through Business Element
Manager. See the Keycode Installation Guide for more information about obtaining and enabling a
keycode through Business Element Manager.
To enable the Contact Center keycode
1
Press ≤·•°.
2
Log in by following the voice prompts or the display
button options.
3
Enter your password and press OK.
The Features Codes are displayed.
Features Codes
NEXT
OK
4
Press OK to continue.
The system ID (SID) is displayed.
SID:
NEXT
BACK
5
Press NEXT.
Sequence ID
NEXT CHNGE
BACK
6
Enter your sequence ID, and press NEXT.
The Manufacturing Software Version is displayed.
MfgSwVer:
NEXT CHNGE
BACK
7
Press NEXT.
8
Press SHOW to scroll through the Features List and select
the feature you want.
User ID:_
RETRY
OK
Password:_
RETRY
OK
Features List
NEXT
SHOW BACK
Intelligent Contact Center Telephone Administration Guide
34
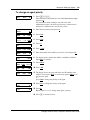
Chapter 3 Contact Center general properties
VM Seat
NEXT CHNGE
BACK
Data:_
CHNGE
BACK
9
In this example, the feature is VM Seats. Press CHNGE to
enter the feature data value.
The current feature data value is displayed.
10 Press CHNGE to enter the new feature data value. For
example, if you have two voice mail seats, enter 2.
OK
11 Enter the new feature data value. Press OK to accept the
data feature value.
CHNGE
BACK
12 The new feature data value are displayed. Press BACK to
return to the feature.
VM Seat
NEXT CHNGE
BACK
VM Seat
NEXT CHNGE
BACK
Data:2
CANCL RETRY
Data:2
13 Press NEXT to scroll through the feature list and select the
feature you want. Repeat steps above to add more features.
Add all features and feature data values before you enter
the keycode.
14 After you add all of the features you have purchased, press
BACK.
The Features List is displayed.
Features List
NEXT
SHOW
BACK
15 Press NEXT to continue to the Keycode display.
Entitlement Code
NEXT
SHOW
BACK
16 Press SHOW to enter the keycode.
The keycode is a 24-digit code. Enter the keycode in three
8-digit sets.
1st:
NEXT
17 Press CHNGE to enter the first eight digits of the keycode.
1st:
CANCL
2nd:
NEXT
2nd:
CANCL
3rd:
NEXT
3rd:
CANCL
CHNGE
RETRY
CHNGE
RETRY
CHNGE
RETRY
BACK
OK
BACK
OK
BACK
OK
1st:12345678
NEXT CHNGE
BACK
NN40170-600
18 Enter the first eight digits of the keycode and press OK.
19 Press CHNGE to enter the second set of eight digits of the
keycode
20 Enter the second set of eight digits of the keycode, and
press OK.
21 Press CHNGE to enter the third set of eight digits of the
keycode, and press OK.
22 Enter the third set of eight digits of the keycode, and press
OK.
23 The first eight digits are displayed. Press BACK to continue.
Chapter 3 Contact Center general properties
Entitlement Code
NEXT
SHOW
BACK
24 Entitlement code (Keycode) is displayed. Press BACK to
continue.
Activate?
YES
25 Activate? is displayed. Press YES to activate the features.
Activated
NO
35
26 Activated is displayed.
Intelligent Contact Center Telephone Administration Guide
36
Chapter 3 Contact Center general properties
Setting Contact Center general properties
When you set up Contact Center you must assign values for the general properties. The following
procedures are for the general Contact Center properties.
Reserved channels
Reserved channels are voice channels that are reserved for use by Contact Center. If you reserve
channels for Contact Center, you ensure that callers are played skillset announcements, and
CallPilot does not use all of the voice channels.
A reserved channel is used when:
•
•
a Contact Center greeting plays to a caller
Off-premise Message Notification notifies you that there is a message in a skillset mailbox
NN40170-600
Chapter 3 Contact Center general properties
37
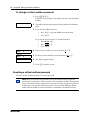
To set Contact Center general properties
1
Press ≤·°‹.
Enter the telset User ID that has voice mail administration rights
and press OK.
For information about creating a user with voice mail
administration rights, see the Avaya Business Communications
Manager 6.0 Administration and Security Guide.
2
Enter the user password and press OK.
3
Press OTHR.
4
Press OTHR.
Admin
FAX
CC
CC Admin
AGENT
SKILL OTHR
5
Press CC.
6
Press OTHR.
CC Admin
GRTG
PARM
7
Press PARM.
Reserve chans: 1
CHNG
NEXT
8
Press CHNG if you want to change the number of reserved channels
(0 - 46) and press NEXT
or
press NEXT.
CLID:
CHNG
9
Press CHNG if you want to change how CLID information is
displayed.
Num Only displays the caller's number for 3 seconds and then the
skillset name. No CLID only displays the skillset name.Name/Num
displays the caller's number for 3 seconds and then the skillset
name - if the caller's name is not available, the caller's number is
shown instead.
or
Press NEXT
Log:
QUIT
RETRY
OK
Pswd:
RETRY
OK
Admin
MBOX
AA
OTHR
Admin
GLIST
CCR
OTHR
NEXT
CC Admin
GRTG
PARM
10 Press ® to end the session.
Setting Caller ID
You can select how you want caller information to be displayed on agent telephones:
•
•
Name and number: the display shows the caller's name for 3 seconds and then the skillset
name. If the caller's name is not available, the caller's number is shown.
Number only: the display shows the caller's number for 3 seconds and then the skillset name.
Intelligent Contact Center Telephone Administration Guide
38
Chapter 3 Contact Center general properties
•
No Caller ID: the display shows the skillset name.
To set Caller ID
1
Press ≤·°‹.
Enter the telset User ID that has voice mail administration rights
and press OK.
For information about creating a user with voice mail
administration rights, see the Avaya Business Communications
Manager 6.0 Administration and Security Guide.
2
Enter the user password and press OK.
3
Press OTHR.
4
Press OTHR.
Admin
FAX
CC
CC Admin
AGENT
SKILL OTHR
5
Press CC.
6
Press OTHR.
CC Admin
GRTG
PARM
7
Press PARM.
8
Press NEXT until this display appears.
Press NEXT to select no CLID
or
press CHNG to select Number Only or Name and Number.
9
Press ® to end the session.
Log:
QUIT
RETRY
Pswd:
RETRY
OK
OK
Admin
MBOX
AA
OTHR
Admin
GLIST
CCR
OTHR
CLID: No CLID
CHNG
NEXT
Setting the Supervisor Help request timeout
The Supervisor Help Request Timeout is when to escalate a request if the chosen supervisor does
not answer the help request. You can enter a value between 1 and 60 seconds. The default is 12
seconds.
NN40170-600
Chapter 3 Contact Center general properties
39
To set the Supervisor Help request timeout
1
Press ≤·°‹.
Enter the telset User ID that has voice mail administration rights
and press OK.
For information about creating a user with voice mail
administration rights, see the Avaya Business Communications
Manager 6.0 Administration and Security Guide.
2
Enter the user password and press OK.
3
Press OTHR.
4
Press OTHR.
Admin
FAX
CC
CC Admin
AGENT
SKILL OTHR
5
Press CC.
6
Press OTHR.
CC Admin
GRTG
PARM
7
Press PARM.
8
Press NEXT until this display appears.
Press NEXT to accept the default value of Supervisor timeout
or
press CHNG to enter a different value.
The default value is 12 seconds. The range is from 1 to 60 seconds.
9
Press ® to end the session.
Log:
QUIT
RETRY
Pswd:
RETRY
OK
OK
Admin
MBOX
AA
OTHR
Admin
GLIST
CCR
OTHR
Sup Timeout:
CHNG
NEXT
Intelligent Contact Center Telephone Administration Guide
40
Chapter 3 Contact Center general properties
Selecting skillsets supervisors can receive help requests from
The Supervisor Help From setting lets you determine where escalated requests go.
•
•
All skillsets: sends an unanswered help request system-wide to all Contact Center supervisors.
Agent’s skillsets only: sends an unanswered help request to only the supervisors logged in to
skillsets that the agent is assigned to. From the Supervisor Help From options select all
skillsets or agent’s skillsets only.
To select skillsets
1
Press ≤·°‹.
Enter the telset User ID that has voice mail administration rights
and press OK.
For information about creating a user with voice mail
administration rights, see the Avaya Business Communications
Manager 6.0 Administration and Security Guide.
2
Enter the user password and press OK.
3
Press OTHR.
4
Press OTHR.
Admin
FAX
CC
CC Admin
AGENT
SKILL OTHR
5
Press CC.
6
Press OTHR.
CC Admin
GRTG
PARM
7
Press PARM.
8
Press NEXT until this display appears.
Press NEXT to accept the default value of All Skillsets
or
press CHNG to choose Agent’s skillsets only.
9
Press ® to end the session.
Log:
QUIT
RETRY
Pswd:
RETRY
OK
OK
Admin
MBOX
AA
OTHR
Admin
GLIST
CCR
OTHR
Sup Help:
CHNG
NN40170-600
NEXT
Chapter 3 Contact Center general properties
41
Configuring lines
Before Contact Center can answer an incoming line, you must assign the line to be answered by a
Contact Center skillset.
For each line that you want Contact Center to answer, you assign:
•
•
•
the line to be answered by Contact Center
the skillset that calls on this line go to
the number of rings before the line is answered
You can record your line answering information in the table “Line answering” on page 208.
You must disable a skillset and wait until there are no calls in the skillset before you can add lines
to it. You cannot add lines to a skillset while it is in use. For information about disabling a skillset,
see “Disabling a skillset” on page 58.
Lines that are programmed to be answered by Contact Center must not be programmed to be
answered by another peripheral or application.
To delay calls being answered, you can assign Contact Center to answer incoming calls after a
specified number of rings. The number of rings ranges from zero to 12. If the number of rings is
zero, Contact Center answers immediately.
For analog lines equipped with Caller ID, you must set the number of rings to two or more. Caller
ID information is not provided until just prior to the second ring, so if you set the number of rings
to zero or one, Caller ID information is not relayed.
Long distance charges start when a call is answered by Contact Center. To minimize long distance
charges, set the ring count higher than 0 so that calls spend more waiting time in a ringing state.
Intelligent Contact Center Telephone Administration Guide
42
Chapter 3 Contact Center general properties
To configure lines for Contact Center
1
Press ≤·°‹.
Enter the telset User ID that has voice mail administration rights
and press OK.
For information about creating a user with voice mail
administration rights, see the Avaya Business Communications
Manager 6.0 Administration and Security Guide.
2
Enter the user password and press OK.
3
Press AA.
Auto Atdt Admin
GRTG TABLE LINES
4
Press LINES.
Line number:
RETRY
5
Enter the line number and press OK.
Ans: No
NEXT
6
Press CHNG.
Line: x
Ans: AA
CHNG TABLE NEXT
7
Press CHNG.
Line: x
Ans: CC
CHNG SKILL NEXT
8
Press SKILL.
Skill number:
RETRY
9
Enter the number of the skillset you want to answer the line and
press OK.
Log:
QUIT
RETRY
Pswd:
RETRY
Admin
MBOX
OK
OK
AA
Line: x
CHNG
OTHR
OK
OK
Line: x
SS: 1
CHNG RINGS NEXT
10 Press RINGS.
Line: x Rings: 0
CHNG
ANS
NEXT
11 Press CHNG.
No of rings:
RETRY
12 Enter the number of rings and press OK.
OK
Line: x Rings: x
CHNG
ANS
NEXT
NN40170-600
13 Press NEXT to configure another line
or
press ® to end the session.
Chapter 3 Contact Center general properties
43
Setting the Answer Lines status
The Answer Lines status determines whether Contact Center answers the assigned lines. If the
Answer Line status is set to Yes, Contact Center answers the lines assigned as Contact Center and
CallPilot answers the lines assigned as AA. If the Answer Line status is set to No, neither Contact
Center nor CallPilot answers lines.
To set the Answer Lines status
1
Press ≤·°¤.
Enter the Operator password, and then press OK.
The default Operator password is fl‡‹‡¤°fl‡
(Operator). To change the Operator password, see “Resetting the
Operator password” on page 195.
Choose option
OPER
MODE
2
Press OPER.
Atdt avail: x
CHNG
3
Press NEXT
Business open: x
CHNG
NEXT
4
Press NEXT.
Answer lines? N
CHNG
NEXT
5
Press CHNG.
If you set Answer Lines to N the display shows Disabling...
If you set Answer Lines to Y the display shows Enabling...
6
Press ® to end the session.
Pswd:
RETRY
OK
NEXT
Resetting the Contact Center Administrator password
If you use an Avaya Business Communications Manager (Avaya BCM) system, there is no
dedicated or default CallPilot or Contact Center Administrator user ID and password. For Avaya
BCM, you can create users with CallPilot and Contact Center rights in Business Element Manager.
You can also change the users' passwords in Business Element Manager. For information about
creating a user with voice mail administration rights, see the Avaya Business Communications
Manager 6.0 Administration and Security Guide.
Intelligent Contact Center Telephone Administration Guide
44
Chapter 3 Contact Center general properties
NN40170-600
45
Chapter 4
Contact Center greetings
About Contact Center greetings
Contact Center greetings encourage callers to stay on the line until an agent is available. You can
record greetings in different languages and change them as often as you like. You can record up to
150 greetings in BCM450. You can record up to 50 greetings in BCM50.
You can include information in your greetings such as:
•
•
•
•
•
•
your hours of service
a request for callers to have their account number ready
how to leave a message
an announcement of a sale
product lists
upcoming special events
Types of Contact Center greetings
You can record different types of greetings for Contact Center. Before you record your greeting,
determine what information the greeting includes. When you prepare your greeting, include
important times and dates. Keep greetings as short and concise as possible. Use the following
examples of greetings as a reference.
General company greeting
The general company greeting tells callers they have reached the correct
company. It can also include the location and business hours of your
company.
“Thank you for calling Bridgestone Computers. We are located at 52 Main
Street. Our hours of service are Monday to Friday from 8:00 until 5:00.
Please stay on the line and an agent will be with you as soon as possible.
Or press 0 to leave a message and one of our agents will return your call.”
Please wait greeting
Please wait greetings encourage callers to stay on the line.
“All our agents at Bridgestone Computers are currently busy, but please
hold as your call is very important to us.“
Information greeting
An information greeting provides messages and announcements to callers.
“Thank you for calling Bridgestone Computers. This week we have
extended our hours until we sell all spring merchandise. We will be open
until 9:00 pm Monday through Thursday, and we will be open until midnight
on Friday! Please come in and see us at 52 Main Street.”
Intelligent Contact Center Telephone Administration Guide
46
Chapter 4 Contact Center greetings
A transfer greeting lets a caller transfer their call.
“Please press 1 to leave a message and one of our agents will return your
call. Press 2 to return to the previous choices.”
Transfer greeting
Non-business hours greeting Your non-business hours greeting will be played after your business is
closed:
“You have reached Bridgestone Computers. Our hours of service are
Monday to Friday from 8:00 until 12:00 and 1:00 until 5:00. To leave a
message, please press 0. An agent will return your call when we re-open.
Thank you for calling.”
Recording a Contact Center greeting
Before you record a greeting, write the greeting out so that you include everything that you want to
say.
We recommend that you record greetings that are a maximum of 20 seconds long. If your
greetings are longer than 20 seconds, callers must wait in a skillset a longer time before they hear
another greeting.
To record a Contact Center greeting
1
Press ≤·°‹.
Enter the telset User ID that has voice mail administration rights
and press OK.
For information about creating a user with voice mail
administration rights, see the Avaya Business Communications
Manager 6.0 Administration and Security Guide.
2
Enter the user password and press OK.
3
Press OTHR.
4
Press OTHR.
Admin
FAX
CC
CC Admin
AGENT
SKILL OTHR
5
Press CC.
6
Press OTHR.
CC Admin
GRTG
PARM
7
Press GRTG.
8
Enter the number of the greeting you want to record and press OK.
9
Lift the handset and press REC.
Log:
QUIT
RETRY
Pswd:
RETRY
OK
OK
Admin
MBOX
AA
OTHR
Admin
GLIST
CCR
OTHR
CC greeting:
RETRY
OK
CC greeting: x
RETRY PLAY
REC
NN40170-600
Chapter 4 Contact Center greetings
Record greeting:
RETRY
OK
10 Record your greeting using the telephone handset.
Do not use handsfree.
When you are finished press OK.
Accept greeting?
RETRY PLAY
OK
11 Press PLAY to listen to the greeting
or
press RETRY to re-record the greeting
or
press OK to save the greeting.
CC greeting:
RETRY
12 Enter another greeting number and press OK to record another
greeting
or
press ® to end the session.
OK
47
Intelligent Contact Center Telephone Administration Guide
48
Chapter 4 Contact Center greetings
NN40170-600
49
Chapter 5
Setting up skillsets
About skillsets
Contact Center skillsets answer and distribute calls to agents as they become available. Skillsets
hold calls for different contact center departments, such as sales and technical support.
For BCM450, you can have a maximum of 50 skillsets for Contact Center.
For BCM50, you can have a maximum of 30 skillsets for Contact Center.
You cannot change the properties of a skillset while it is enabled. You must disable the skillset. If
you want to change the CDN, disable the skillset and wait until there are no calls in the skillset
before you change the CDN.
How incoming calls are sent to a skillset
Incoming calls are sent to a skillset in one of the following ways:
•
You assign a line to be answered directly by a skillset. For information about configuring
lines, see “Configuring lines” on page 41.
•
A receptionist, agent or subscriber receives a call and transfers the call to a skillset.
They can transfer the call to a skillset by pressing ≤‡‚ or TRANSFER and entering the
CDN of the skillset. The receptionist, agent or subscriber must not use the Call Pickup feature.
•
The Automated Attendant or a CCR Tree answers the call and the caller makes a selection that
routes them to the CDN of the skillset.
•
Calls can be forwarded to the Voicemail extension of the skillset by Call Forward All Calls
(CFAC), Call Forward No Answer (CFNA) or Call Forward On Busy (CFB). For information
about these features, see the Avaya Business Communications Manager 6.0 Configuration—
Device Guide.
Note: Agents are restricted in how they can use CFAC, CFNA and CFB. For more
information, see “Important considerations about how agents use features” on page 196.
Intelligent Contact Center Telephone Administration Guide
50
Chapter 5 Setting up skillsets
Skillset properties
Skillset number
Number of the skillset in BCM450: 1 to 50.
Number of the skillset in BCM50: 1 to 30.
Control DN
The Control Directory Number is the extension associated with the skillset.
Incoming calls transfer to the CDN of each skillset from extensions, the
Automated Attendant or Custom Call Routing. The CDN is the skillset
mailbox number.
Do not plug telsets into the extension associated with the CDN.
When you assign a CDN to a skillset:
• If a telephone or any other device uses the same extension the contact
center will not answer calls.
• The system assigns a skillset mailbox that uses the CDN as its mailbox
number. You must initialize the mailbox before you can use the skillset
or the mailbox.
• Do not rename a telephone DN to a telephone DN used by Contact
Center.
• It is possible for i2004 devices to be assigned to the DN used by
Contact Center. The user does not receive an error message if this
happens, even though i2004 devices usually warn a user if there are
conflicting telephone DNs. Therefore, it is imperative that the i2004
programming record contains a list of CDNs used by Contact Center.
Name
The skillset name is displayed:
• on Contact Center displays to identify the skillset
• in reports
• as the skillset mailbox name
The skillset name can be a maximum of 16 characters. If you do not enter a
name, the skillset name defaults to SKILLx where x is the skillset number.
The name for each skillset is the same as the skillset mailbox name.
MWI ext
(Message Waiting Indication
extension)
The Message Waiting Indication extension is an optional telephone number
that indicates that a skillset mailbox has messages waiting. The MWI
extension that you assign shows Message for you on the telephone display
when there are new messages in the skillset mailbox. The MWI DN defaults
to None. If you forget the MWI extensions for a skillset mailbox, you can
view the MWI extensions by using the procedure “Determining a skillset
mailbox number” on page 68.
Note: If you plan to use Attendant Extension, you must enter an MWI DN.
You can use MWI DN without an attendant extension, but you cannot
configure an attendant extension without an MWI DN.
The MWI DN must be a different number than the attendant extension.
Method of Call Distribution
NN40170-600
The method of call distribution determines to which of several available
agents to route the call. There are two methods of call distribution: Longest
Idle and Preferred. Longest Idle routes the call to the agent who has been
available the longest. Preferred routes the call to the agent with the highest
priority (best qualified agent is 1). If there are several agents with the
highest priority, the agent available longest with that priority is selected. The
default method of call distribution is Longest Idle.
Chapter 5 Setting up skillsets
51
Break Time
Break Time is a time period for agents to complete paperwork after they
finish a call. After an agent completes a call, they are taken out of the
skillset for the Break Time. The agent can extend or cancel the Break Time
by using the Not Ready Feature Code. For more information, see “Not
Ready” on page 31. The Break Time period can last from zero to 59
minutes, 59 seconds. The Break Time defaults to 30 seconds. You can
change the Break Time period to zero if an agent does not need a Break
Time.
The Agent Configurable Break Time feature is used to configure Break
Time on a per-agent basis, as opposed to a skillset-wide basis. In the
CallPilot UI, click the agent configuration. The administrator will have the
option of specifying a break time for the agent. This new break time will
override the break time specified in the skillsets for that particular agent. If
no agent-specific break time is necessary, the administrator can also select
the default skillset Break Time option to use the skillset-wide break time.
The Agent Configurable Break Time feature is only available using CallPilot
Manager.
Delay Answer
Delay Answer is a toll-saving feature that prevents Contact Center from
answering calls and playing greetings when there are no agents available.
When a call comes in on a line belonging to a skillset that has no free
agents, the call is not answered until either the Delay Answer time elapses
or an agent becomes available, whichever happens first. During the Delay
Answer time, the waiting callers hear ringback.
To activate the Delay Answer feature, enter a time for Delay Answer. The
Delay Answer time can be a minimum of zero seconds and a maximum of
10 minutes. The default Delay Answer time is 00:00.
Primary Alert
Secondary Alert
Alert times are time limits for calls waiting in skillsets. You can set the alert
time for all calls for each skillset.
When the alert time has passed, it produces a flash on a memory button
indicator. A slowly flashing indicator alerts you that a call has exceeded the
Primary alert time. A quickly flashing indicator alerts you that a call has
exceeded the Secondary alert time. The indicator stops flashing when the
calls are handled.
You assign alert times in minutes and seconds. There is no default value
for alert times. Secondary alerts must be greater than primary.
Agents do not have to be logged on to see the Display Waiting Calls
memory button flashing. A memory button must be programmed with the
Display Waiting Calls Feature Code and the Primary alert time must be set
up for the memory button to show waiting calls status.
Attendant extension
The attendant extension is the extension used if a caller presses the
Operator key during a greeting step, a transfer step, or while listening to a
mailbox greeting. The attendant extension is optional. If you do not assign
an attendant extension, the call is sent to the system attendant extension.
Note: You must enter an MWI DN, before you enter an attendant extension.
If you enter an attendant extension without an MWI DN assigned, you
receive an error message prompting you to enter the MWI DN
The attendant extension must be different than the MWI DN.
Language preference
Language preference can be either Primary or Alternate. The language
preference is the language choice used for prompting callers who transfer
to the Automated Attendant or CCR. You can choose a language
preference only if your system is configured as bilingual.
Intelligent Contact Center Telephone Administration Guide
52
Chapter 5 Setting up skillsets
Activity Codes
Activity Code entry types are Prompted and Optional. Optional is the default.
If you select Optional, an Activity Code session is not automatically
displayed on the agent’s telephone, but they can press F907 and enter
Activity Codes.
If you select Prompted, the agent is prompted to enter Activity Codes on
their telephone.
If you do not have Reporting for Contact Center enabled on your system,
this setting does not appear.
Expected Wait Time
Expected Wait Time parameters are:
EWT sample: How many previous calls are used to calculate EWT. You
can enter a number between 2 and 256 calls.
EWT Increase Allowed: Enabled by default, which means that EWT is
recalculated if it increases, and the appropriate EWT greeting is played. If
not enabled, callers do not hear recalculated expected wait times if the wait
time increases. Whether enabled or not, callers hear the appropriate EWT
greeting if the wait time decreases.
Initial Call Duration: The Initial Call Duration is used to compute expected
wait time until sufficient call statistics are obtained. The average call
duration is updated whenever a call is released from an agent. This can be
a value between 00:01:00 and 24:00:00. The default is 00:03:00.
Service Mode
The service modes are: Auto, Day, Night, 24 Hour.
The default is 24 hour operation.
For more information about Service Mode see “Setting the Service Modes
for skillsets” on page 176.
Note: Although you can set Activity Code and Expected Wait Time parameters through
≤·°‹, you must use CallPilot Manager to create Activity Codes and Expected
Wait Time tables. For more information, see the Intelligent Contact Center Set Up and
Operation Guide or CallPilot Manager online help.
NN40170-600
Chapter 5 Setting up skillsets
53
Setting up a skillset
You can record skillset properties in the table “Contact Center skillsets” on page 202.
To set up a skillset
1
Press ≤·°‹.
Enter the telset User ID that has voice mail administration rights
and press OK.
For information about creating a user with voice mail
administration rights, see the Avaya Business Communications
Manager 6.0 Administration and Security Guide.
2
Enter the user password and press OK.
3
Press OTHR.
4
Press CC.
5
Press SKILL.
6
Enter the number of the skillset you want to set up and press OK.
Status: uninit
SETUP
QUIT
7
Press SETUP.
SKILLx
CHNG
8
Press CHNG to assign a name to the skillset
or
press NEXT if you do not want to assign a name to the skillset and
go to step 10.
If you do not enter a skillset name the skillset name defaults to
SKILLx, where x is the skillset number, as shown here.
9
Enter the skillset name and press OK. For information about
entering characters on the dialpad, see “Using the dialpad” on page
26.
Log:
QUIT
RETRY
Pswd:
RETRY
Admin
MBOX
Admin
GLIST
OK
OK
AA
OTHR
CCR
CC
CC Admin
AGENT SKILL
OTHR
Skillset:
RETRY
QUIT
Skillset name:
RETRY
BKSP
xxxx
CHNG
CDN:
RETRY
CDN: xx
CHNG
OK
NEXT
OK
NEXT
OK
NEXT
10 The skillset name is displayed.
Press NEXT.
11 Enter the CDN of the skillset and press OK.
12 Press NEXT.
Intelligent Contact Center Telephone Administration Guide
54
Chapter 5 Setting up skillsets
MWI ext: xx
CHNG
Ext:
RETRY
MWI ext: xx
CHNG
NEXT
OK
NEXT
13 If you want to assign an MWI extension, press CHNG
or
if you do not want to assign an MWI extension, press NEXT and go
to step 15.
You must assign an MWI extension, if you plan to assign an
attendant extension.
14 Enter the extension of the telephone you want to use for MWI and
press OK.
15 Press NEXT.
Method: Least busy
CHNG
NEXT
16 Press CHNG to change the method of call distribution to Preferred
(Prefer) and press NEXT
or
press NEXT to accept the default of Longest idle (Least busy).
Break: 00:30
CHNG
NEXT
17 Press CHNG if you want to change the default Break time
or
press NEXT to accept the default time 00:30 and go to step 19.
Break mmss:
RETRY
18 Enter the Break time and press OK.
This is a four digit field. Add a zero to any single digit hour or
minute.
Break: xx:xx
CHNG
OK
NEXT
19 Press NEXT.
Delay ans: 00:00
CHNG
NEXT
20 Press CHNG to set up a Delay Answer time
or
press NEXT and go to step 22.
Delay ans mmss:
RETRY
21 Enter a Delay Answer time and press OK.
This is a four digit field. Add a zero to any single digit hour or
minute.
OK
Pri alert: xx:xx
CHNG
NEXT
22 Press CHNG to set a Primary Alert time
or
press NEXT and go to step 28.
Pri alert mmss:
RETRY
23 Enter the Primary Alert time.
This is a four digit field. Add a zero to any single digit hour or
minute.
Pri alert: xx:xx
CHNG
NEXT
24 The display shows the Primary Alert time.
Press NEXT.
NN40170-600
Chapter 5 Setting up skillsets
Sec alert: xx:xx
CHNG
NEXT
25 Press CHNG to set a Secondary Alert time
or
press NEXT and go to step 28.
Sec alert mmss:
RETRY
26 Enter the Secondary Alert time.
This is a four digit field. Add a zero to any single digit hour or
minute.
Sec alert: xx:xx
CHNG
NEXT
27 The display shows the Secondary Alert time.
Press NEXT.
Atdt: (none)
CHNG
NEXT
28 Press CHNG to assign an attendant to the skillset
or
press NEXT and go to step 30.
You must enter an MWI DN, before you enter an attendant
extension.
Ext:
RETRY
QUIT
Atdt: xx
CHNG
NEXT
55
29 Enter the extension number of the attendant set.
30 Press NEXT.
Prompt lang: pri
CHNG
NEXT
31 Press CHNG to use the alternate language prompts and press NEXT
or
press NEXT to use the primary language prompts.
AC Entry: OPT
OPT
PRMPT
32 Press NEXT if your Contact Center does not use Activity Codes and
go to step 33
or
if your Contact Center uses Activity Codes, select the Activity
Code entry type: OPT for Optional, PRMPT for Prompted and press
NEXT.
This prompt appears only if you have Reporting for Contact Center
enabled on your system.
NEXT
NOTE: Although you can set this Activity Code parameter by
telephone, you must use CallPilot Manager to create Activity
Codes. For more information, see the Intelligent Contact Center
Set Up and Operation Guide or CallPilot Manager online help.
EWT sample: 10
CHNG
NEXT
33 If you use Expected Wait Time, enter how many calls you want to
use to calculate ETW. The range is 2 to 256 calls. The default is
10.
If you do not use Expected Wait Time, go so step 36.
Intelligent Contact Center Telephone Administration Guide
56
Chapter 5 Setting up skillsets
EWT allow incr: Y
CHNG
NEXT
34 If you use Expected Wait Time, select whether you want EWT to
be recalculated if it increases, and the appropriate EWT greeting to
be played. The default is Y.
EWT ICD: 00:03:00
CHNG
NEXT
35 If you use Expected Wait Time, enter the Initial Call Duration.
This can be a value between 00:01:00 and 24:00:00, and is used to
compute expected wait time until sufficient statistics are obtained
The default of 3 minutes is shown.
Press CHNG if you want to change the default
or
press NEXT to accept the default time and go to step 36.
Mo: 24 hour
CHNG
36 Press CHNG to change the service mode for Monday
or
press NEXT.
NEXT
Day start: hhmm
RETRY
OK
Day hhmm: xxxx
RETRY
AM
PM
37 Enter the Day Routing Table start time and press OK.
This is a four digit field. Add a zero to any single digit hour or
minute.
38 Press AM or PM.
Night start: hhmm
RETRY
OK
39 Enter the Night Routing Table start time and press OK.
This is a four digit field. Add a zero to any single digit hour or
minute.
Night hhmm: xxxx
RETRY
AM
PM
40 Press AM or PM.
Mo: xxxxa-xxxxp
CHNG
24HR NEXT
41 The start times for the Day and Night Routing Tables for Monday
are shown.
Press NEXT.
Tu: 24 hour
CHNG
42 Repeat steps 37 through 41to set up the Day and Night Routing
Tables for the rest of the week.
NEXT
43 Press ® to end the session
or
repeat steps 4 through 42 to set up another skillset.
NN40170-600
Chapter 5 Setting up skillsets
57
Enabling a skillset
After you set up a skillset, calls will not be answered until you enable it. If you disable a skillset,
no new calls are accepted in the skillset. Calls that are in the skillset are distributed until the calls
are ended.
Before you can enable a skillset you must:
•
•
•
set up the skillset using the procedure “To set up a skillset” on page 53
initialize and record a greeting for the skillset mailbox using the procedure “Initializing a
skillset mailbox” on page 70
set up the Day and Night Routing Tables using the procedures in Chapter 10, “Routing table
administration,” on page 149.
To enable a skillset
1
Press ≤·°‹.
Enter the telset User ID that has voice mail administration rights
and press OK.
For information about creating a user with voice mail
administration rights, see the Avaya Business Communications
Manager 6.0 Administration and Security Guide.
2
Enter the user password and press OK.
3
Press OTHR.
4
Press CC.
5
Press SKILL.
6
Enter the number of the skillset you want to enable and press OK.
Status: Disabled
NEXT
CHNG
7
Press CHNG to change the status from disabled to enabled.
Status: Enabled
CHNG
NEXT
8
The display shows that the skillset is enabled.
Skill mbox pswd
RESET
NEXT
9
Press RESET to reset the password for the skillset mailbox
or
press NEXT to continue.
Log:
QUIT
RETRY
Pswd:
RETRY
Admin
MBOX
Admin
GLIST
OK
OK
AA
OTHR
CCR
CC
CC Admin
AGENT SKILL
OTHR
Skillset:
RETRY
QUIT
OK
10 Press ® to end the session.
Intelligent Contact Center Telephone Administration Guide
58
Chapter 5 Setting up skillsets
Disabling a skillset
You must disable a skillset if you want to change the skillset properties or administer the lines.
If you disable a skillset, no new calls go to the skillset. Any calls that are in the skillset are
distributed until the calls are ended.
To disable a skillset
1
Press ≤·°‹.
Enter the telset User ID that has voice mail administration rights
and press OK.
For information about creating a user with voice mail
administration rights, see the Avaya Business Communications
Manager 6.0 Administration and Security Guide.
2
Enter the user password and press OK.
3
Press OTHR.
4
Press CC.
5
Press SKILL.
6
Enter the number of the skillset you want to disable and press OK.
Status: Enabled
CHNG
NEXT
7
Press CHNG to change the status from enabled to disabled.
Status: Disabled
CHNG
NEXT
8
The display shows that the skillset is disabled.
9
Press ® to end the session.
Log:
QUIT
RETRY
Pswd:
RETRY
Admin
MBOX
Admin
GLIST
OK
OK
AA
OTHR
CCR
CC
CC Admin
AGENT SKILL
OTHR
Skillset:
RETRY
QUIT
NN40170-600
OK
Chapter 5 Setting up skillsets
59
Changing skillset properties
You cannot change the properties of a skillset while it is enabled. You must disable the skillset. If
you want to change the CDN, disable the skillset and wait until there are no calls in the skillset
before you change the CDN.
Intelligent Contact Center Telephone Administration Guide
60
Chapter 5 Setting up skillsets
To change a skillset
1
Press ≤·°‹.
Enter the telset User ID that has voice mail administration rights
and press OK.
For information about creating a user with voice mail
administration rights, see the Avaya Business Communications
Manager 6.0 Administration and Security Guide.
2
Enter the user password and press OK.
3
Press OTHR.
4
Press OTHR.
Admin
FAX
CC
CC Admin
AGENT SKILL OTHR
5
Press CC.
6
Press SKILL.
Skillset:
RETRY
QUIT
7
Enter the number of the skillset you want to change and press OK.
Status: xxxxxxx
CHNG
NEXT
8
The display shows whether the skillset is enabled or disabled.
You must disable the skillset before you make changes to it. To
disable the skillset Press CHNG and press NEXT to continue.
Skillset Admin
PARM AGENT ROUTE
9
Press PARM.
<xxxxxxxxx>
CHNG
10 Press CHNG if you want to change the name of the skillset
or
press NEXT and go to step 11.
Log:
QUIT
RETRY
Pswd:
RETRY
OK
OK
Admin
MBOX
AA
OTHR
Admin
GLIST
CCR
OTHR
Skillset name:
RETRY
BKSP
OK
NEXT
OK
<xxxxxxxxx>
CHNG
NEXT
CDN: <xxx>
CHNG
NEXT
CDN:
RETRY
CDN: <xxx>
CHNG
NN40170-600
OK
NEXT
11 Enter the new skillset name and press OK.
For how to enter characters on the dialpad, see “Using the dialpad”
on page 26.
12 Press NEXT.
13 The skillset’s CDN is displayed.
Press CHNG to change the CDN
or
press NEXT and go to step 14.
14 Enter the CDN and press OK.
15 Press NEXT.
Chapter 5 Setting up skillsets
MWI ext: <none>
CHNG
NEXT
16 Press CHNG to assign or change an MWI ext
or
press NEXT to accept the default of no MWI and go to step 17.
Ext:
RETRY
17 Enter the extension for MWI and press OK.
OK
MWI ext: <xxx>
CHNG
NEXT
18 Press NEXT.
Method: xxxx
CHNG
NEXT
19 Press CHNG to change the method of call distribution
or
press NEXT.
Break: xx:xx
CHNG
NEXT
20 Press CHNG to change the Break time
or
press NEXT and go to step 21.
Break: mmss:
RETRY
OK
21 Enter the Break time and press OK.
This is a four digit field. Add a zero to any single digit hour or
minute.
Delay ans: xx:xx
CHNG
NEXT
22 Press CHNG to change the Delay Answer time
or
press NEXT and go to step 24.
Delay ans mmss:
RETRY
23 Enter the Delay answer time and press OK.
This is a four digit field. Add a zero to any single digit hour or
minute.
OK
61
Pri alert: xx:xx
CHNG
NEXT
24 Press CHNG to set a Primary Alert time
or
press NEXT and go to step 25.
Pri alert mmss:
RETRY
25 Enter the Primary Alert time.
This is a four digit field. Add a zero to any single digit hour or
minute.
Pri alert: xx:xx
CHNG
NEXT
26 The display shows the Primary Alert time.
Press NEXT.
Sec alert: xx:xx
CHNG
NEXT
27 Press CHNG to set a Secondary Alert time
or
press NEXT and go to step 28.
Sec alert mmss:
RETRY
28 Enter the Secondary Alert time.
This is a four digit field. Add a zero to any single digit hour or
minute.
Sec alert: xx:xx
CHNG
NEXT
29 The display shows the Secondary Alert time.
Press NEXT.
Intelligent Contact Center Telephone Administration Guide
62
Chapter 5 Setting up skillsets
Atdt: (xxxx)
CHNG
NEXT
Ext:
RETRY
QUIT
Atdt: xx
CHNG
NEXT
30 The display shows whether the skillset has an attendant extension
assigned.
Press CHNG to change the attendant extension
or
press NEXT and go to step 33.
31 Enter the attendant extension.
32 Press NEXT.
Prompt lang: xxx
CHNG
NEXT
33 Press CHNG to change the prompt language
or
press NEXT.
AC Entry: OPT
OPT
PRMPT
34 Press NEXT if your Contact Center does not use Activity Codes or
if you do not want to change the Activity Code entry type and go to
step 36
or
if your Contact Center uses Activity Codes, select the Activity
Code entry type: OPT for Optional, PRMPT for Prompted and press
NEXT.
This prompt appears only if you have Reporting for Contact Center
enabled on your system.
NEXT
NOTE: Although you can set this Activity Code parameter by
telephone, you must use CallPilot Manager to create Activity
Codes. For more information, see the Intelligent Contact Center
Set Up and Operation Guide (NN40040-301) or CallPilot Manager
online help.
EWT sample: 10
CHNG
NEXT
35 If you use Expected Wait Time, enter how many calls you want to
use to calculate EWT. The range is 2-256 calls. The default is 10.
If you do not use Expected Wait Time, go so step 39.
EWT allow incr: Y
CHNG
NEXT
36 If you use Expected Wait Time, select whether you want EWT to
be recalculated if it increases, and the appropriate EWT greeting to
be played. The default is Y.
If you do not want to change this setting
EWT ICD: hh:mm:ss
CHNG
NEXT
37 If you use Expected Wait Time, enter the Initial Call Duration.
This can be a value between 00:01:00 and 24:00:00, and is used to
compute expected wait time until sufficient statistics are obtained.
NN40170-600
Chapter 5 Setting up skillsets
Mo: 24 hour
CHNG
NEXT
Day start: hhmm
RETRY
OK
Day hhmm: xxxx
RETRY
AM
PM
63
38 The display shows the Monday Routing Table method.
In this example the Routing Table is in 24 hour mode.
Press CHNG to change the Routing Table method
or
press NEXT and go to step 48.
39 Enter the Day Routing Table start time and press OK.
This is a four digit field. Add a zero to any single digit hour or
minute.
40 Press AM or PM.
Night start: hhmm
RETRY
OK
41 Enter the Night Routing Table start time and press OK.
This is a four digit field. Add a zero to any single digit hour or
minute.
Night hhmm: xxxx
RETRY
AM
PM
42 Press AM or PM.
Mo: xxxxa-xxxxp
CHNG
24HR NEXT
43 The display shows the Monday Routing Table start times.
Press CHNG to change the start times and follow steps 40 through
43
or
press 24HR to use 24 hour service for Monday
or
press NEXT to continue.
Tu: xxxxa-xxxxp
CHNG 24HR
NEXT
44 The display shows the Tuesday Routing Table method.
In this example the Routing Table has Day and Night Routing
Table start times programmed.
Tu: xxxxa-xxxxp
CHNG 24HR
NEXT
45 Press CHNG to change Day or Night Routing Table start times
or
press 24HR to use 24 Hour mode for Tuesday
or
press NEXT to continue.
Mo: 24 hour
CHNG
46 The display shows the Wednesday Routing Table method.
Continue to change the Routing Tables start times for each day of
the week.
NEXT
47 Press ® to end the session.
Unconfiguring a skillset
If you unconfigure a skillset, you erase the programming for the skillset. You can then reprogram
the skillset.
Intelligent Contact Center Telephone Administration Guide
64
Chapter 5 Setting up skillsets
When you unconfigure a skillset, the system:
•
•
•
•
erases the skillset Routing Table
unassigns the skillset agents
erases the skillset mailbox and all the messages in it
makes the CDN available so it can be used by another skillset or device
To unconfigure a skillset:
1
First disable the skillset and wait until all the calls are distributed. See “Disabling a skillset” on
page 58.
2
Unassign the lines assigned to the skillset. See “To configure lines for Contact Center” on
page 42.
3
Follow the procedure below to unconfigure the skillset.
1
Press ≤·°‹.
Enter the telset User ID that has voice mail administration rights
and press OK.
For information about creating a user with voice mail
administration rights, see the Avaya Business Communications
Manager 6.0 Administration and Security Guide.
2
Enter the user password and press OK.
3
Press OTHR.
4
Press OTHR.
Admin
FAX
CC
CC Admin
AGENT SKILL OTHR
5
Press CC.
6
Press SKILL.
Skillset:
RETRY
QUIT
7
Enter the number of the skillset you want to change and press OK.
Status: xxxxxxx
CHNG
NEXT
8
The display shows whether the skillset is enabled or disabled.
You must disable the skillset before you make changes to it. To
disable the skillset Press CHNG and press NEXT to continue.
Skill mbox pswd
RESET
NEXT
9
Press NEXT to continue.
Skillset Admin
PARM AGENT OTHR
10 Press OTHR.
Skillset Admin
ROUTE OVFLW UNCF
11 Press UNCF.
Log:
QUIT
RETRY
Pswd:
RETRY
OK
OK
Admin
MBOX
AA
OTHR
Admin
GLIST
CCR
OTHR
NN40170-600
OK
Chapter 5 Setting up skillsets
Unconfigure?
YES
NO
65
12 Press YES to unconfigure the skillset.
Skillset
Unconfigured
13 This display appears momentarily.
CC Admin
AGENT SKILL OTHR
14 Press ® to end the session.
Intelligent Contact Center Telephone Administration Guide
66
Chapter 5 Setting up skillsets
NN40170-600
67
Chapter 6
Setting up skillset mailboxes
About skillset mailboxes
Each skillset has a mailbox that stores messages left by callers. A skillset mailbox is created
automatically when you set up a skillset. There is one skillset mailbox for each skillset. The
skillset mailbox number is the same as the Control Directory Number (CDN) of the skillset.
Skillset mailboxes have these Class of Service settings:
•
•
•
•
•
•
•
•
•
•
•
•
•
•
use the primary prompt language
maximum message time is 15 minutes
maximum message length is three minutes
maximum message retention is 30 days
maximum greeting length of one minute
Off-premise message notification enabled with a retry interval of five minutes and three
attempts
Outbound Transfer is disabled
maximum number of incorrect password attempts is nine
password expires in 90 days
Networking is enabled if you have the Message Networking option enabled
Personal Target Attendant is enabled
Record Call is not enabled
prompt language is Primary
user interface is Avaya Norstar™ Voice Mail
The default Class of Service for skillset mailboxes is 1.
To prepare a skillset mailbox to receive messages:
•
•
•
Know the skillset mailbox number (CDN) of each skillset mailbox.
If you do not know the skillset mailbox number, see “Determining a skillset mailbox number”
on page 68
Initialize the skillset mailbox. Refer to “Initializing a skillset mailbox” on page 70.
Record the skillset mailbox greetings. Refer to “Recording skillset mailbox greetings” on page
76.
You can use the table “Skillset mailboxes” on page 206 to record the skillset mailboxes you set up.
Intelligent Contact Center Telephone Administration Guide
68
Chapter 6 Setting up skillset mailboxes
Determining a skillset mailbox number
You must know a skillset mailbox number before you can set up the skillset mailbox. The skillset
mailbox number is the mailbox’s Control DN. If you know the skillset mailbox number, you can
initialize the mailbox. Refer to “Initializing a skillset mailbox” on page 70.
To determine a skillset’s mailbox number and Message Waiting
Indication telephone
Set xxxx
NEXT
CDN 1: xx
GOTO SKILL
NEXT
Ext 1: xx
GOTO SKILL
NEXT
1
Press ≤·°fi.
2
Press NEXT.
3
The skillset mailbox number for skillset 1 is displayed.
If None appears the skillset is not configured.
Press NEXT to continue.
4
The Message Waiting Indication (MWI) extension is displayed.
If there are messages in the skillset 1 mailbox, MWI appears at this
extension. You assign the MWI extension when you set up the
skillset. If Unavail appears you have not set up an MWI extension.
5
Press NEXT to view the skillset mailbox number and MWI extension
for the next skillset
or
press GOTO to view another skillset and enter the skillset number.
6
Press ® to end the session.
While you use ≤·°fi you can:
•
•
•
•
•
•
press ⁄ for GOTO to enter the number of the skillset you want to monitor
press ¤ for SKILL to monitor the next enabled skillset
press ‹ or fl for NEXT
press › for PREV to go to previous menu
press £ to go to the next menu
press • to cancel the session
NN40170-600
Chapter 6 Setting up skillset mailboxes
69
Checking which telephone mailbox interface you use
CallPilot supports two interfaces: Avaya Norstar™ Voice Mail and CallPilot.
The Contact Center Administrator determines which interface is assigned to the mailbox.
To change your mailbox interface, see:
•
•
the CallPilot Manager Set Up and Operation Guide for how to change your interface using
CallPilot Manager
the CallPilot Telephone Administration Guide for how to change your interface using a
telephone
Follow the procedures that apply to the interface you use.
Some procedures apply to both interfaces.
To check which CallPilot interface you use
1. Press ≤·°⁄.
Follow the voice prompts or the display button options to open
your mailbox.
2. Check the display to see which interface you use:
0 new 0 saved
PLAY
REC
ADMIN
This is the Avaya Norstar™ Voice Mail interface.
No messages
COMP
MBOX
This is the CallPilot interface.
EXIT
3. Press ® to end the session.
Intelligent Contact Center Telephone Administration Guide
70
Chapter 6 Setting up skillset mailboxes
Initializing a skillset mailbox
You must initialize a skillset mailbox before you can retrieve or listen to messages that are left in
it, and before you can enable its skillset.
Choose a password for the skillset mailbox that is between four to eight digits long and does not
start with zero. Give the skillset mailbox passwords to the agents who are responsible for
retrieving messages.
Initializing a skillset mailbox involves:
•
•
•
choosing a password from four to eight digits long that does not start with zero
changing the skillset mailbox default password to the new password
recording the skillset mailbox name in the Company Directory
To initialize a skillset mailbox
Must change pswd
Pswd:
RETRY
OK
Again:
RETRY
OK
Record name:
RETRY
OK
Accept name?
RETRY
PLAY
OK
<Skillset name>
NN40170-600
1
Press ≤·°⁄.
2
Log on by following the voice prompts.
Use the skillset mailbox number and ‚‚‚‚, the default
password.
3
This display appears briefly to indicate that you must change the
password.
4
Enter a new skillset mailbox password from four to eight digits long
that does not start with zero.
Press OK or £.
5
Reenter the skillset mailbox password and press OK or £.
6
At the tone, record the skillset mailbox name in the Company
Directory. Do not use handsfree.
Include the skillset mailbox number in the recording, For example,
“Sales, mailbox 5813.”
Press OK or £ to end the recording.
7
Press OK or £ to accept the recording
or
press PLAY or ⁄ to listen to the recording
or
press RETRY or ¤ to re-record your name.
8
The recorded name plays and the skillset mailbox name is displayed.
The skillset mailbox name is the name you entered when you set up
the skillset properties.
9
Press ® to end the session.
Chapter 6 Setting up skillset mailboxes
71
Opening a skillset mailbox
You can open an initialized skillset mailbox from:
•
•
•
your extension
another extension
an outside tone dial telephone
To open a skillset mailbox - Avaya Norstar™ Voice Mail
1. Press ≤·°⁄.
Pswd:
OTHR
RETRY
OK
2. Enter the skillset mailbox password and press OK or £
or
if you are at another extension, or if you are using a Guest
mailbox, press OTHR or • to display the Log: prompt. When
this prompt appears, enter the skillset mailbox number and
password.
1 new 1 saved
PLAY REC
ADMIN
3. After you open the skillset mailbox, the telephone display shows
how many new and saved messages are in the mailbox.
To open a skillset mailbox - CallPilot
1. Press ≤·°⁄.
Mbox:
RETRY
OK
2. Press £
or
if you are at another extension, enter the skillset mailbox number
and then press OK or £.
Pswd:
RETRY
OK
3. Enter the skillset mailbox password and press OK or £.
Intelligent Contact Center Telephone Administration Guide
72
Chapter 6 Setting up skillset mailboxes
Opening a skillset mailbox remotely
To open a skillset mailbox from an outside telephone
•
If a skillset mailbox is a Mailbox node in a CCR Tree, enter the digits and you automatically
transfer to the skillset mailbox
or
•
•
•
Call an Operator, receptionist or subscriber and ask them to transfer you to the skillset mailbox
number using ≤·°fl.
After you reach the skillset mailbox, press •• during the greeting to open the skillset
mailbox. If you are in Europe or Australia press °°.
At the voice prompt, enter the skillset mailbox number and password and press £. Follow the
voice prompts.
To open a skillset mailbox directly from an outside telephone
Follow either procedure to open a skillset mailbox remotely.
1
Call a telephone line that is answered by the Automated Attendant.
2
Press •• during the Automated Attendant Menu prompt.
If you are in Europe or Australia press °°.
3
Enter the skillset mailbox number and password, and then press £.
4
Follow the voice prompts.
or
1
Call your extension number.
2
Press •• during your personal greeting.
If you are in Europe or Australia press °°.
3
Enter the skillset mailbox number and password, and then press £.
4
Follow the voice prompts.
NN40170-600
Chapter 6 Setting up skillset mailboxes
73
Skillset mailbox password
To decrease the chances of unauthorized access to a skillset mailbox, change its password
regularly, Avaya suggests every 30 days.
Keep a written copy of the skillset mailbox passwords in “Skillset mailboxes” on page 206.
Give the skillset mailbox passwords only to the agents who retrieve messages at your contact
center. For security reasons, choose an uncommon password, not a predictable password like 1234
or 1111. If someone knows a skillset mailbox password, they can access the skillset mailbox and
play or delete messages. They can also access CallPilot and use it fraudulently or disrupt service.
Changing a skillset mailbox password
You can change a skillset mailbox password at any time. A password must be from four to eight
digits long and cannot start with zero.
Intelligent Contact Center Telephone Administration Guide
74
Chapter 6 Setting up skillset mailboxes
To change a skillset mailbox password
<Skillset name>
1
Press ≤·°⁄.
Follow the voice prompts or the display buttons to open the skillset
mailbox.
2
The skillset mailbox name appears briefly and the recorded name
plays.
3
If you use the CallPilot interface:
•
•
Press °› to open the Mailbox Password menu
Go to step 4
If you use the Avaya Norstar™ Voice Mail interface:
•
•
•
Pswd:
RETRY
OK
Again:
RETRY
OK
Password OK
Press ADMIN or °
Press PSWD or ›
Go to step 4
4
Enter your new mailbox password and press OK or £.
5
Re-enter your new mailbox password and press OK or £.
6
This display appears briefly.
7
Press ® to end the session.
Resetting a skillset mailbox password
You must disable the skillset before you reset the password.
Note: Reset a password if the agent who accesses the skillset mailbox forgets the
password or is “locked-out”. The password for the reset mailbox is 0000. The agent who
accesses the skillset mailbox cannot retrieve messages until they create a new password.
Tell the agent to change the default password as soon as possible. While the skillset
mailbox has the default password, the mailbox is vulnerable to unauthorized access.
NN40170-600
Chapter 6 Setting up skillset mailboxes
75
To reset a skillset mailbox password
1
Press ≤·°‹.
Enter the telset User ID that has voice mail administration rights
and press OK.
For information about creating a user with voice mail
administration rights, see the Avaya Business Communications
Manager 6.0 Administration and Security Guide.
2
Enter the user password and press OK.
3
Press OTHR.
4
Press OTHR.
Admin
FAX
CC
CC Admin
AGENT SKILL OTHR
5
Press CC.
6
Press SKILL.
Skillset:
RETRY
QUIT
7
Enter the number of the skillset whose mailbox password you want
to reset and press OK.
Status: xxxxxxx
CHNG
NEXT
8
The display shows whether the skillset is enabled or disabled.
Press NEXT if the skillset is disabled
or
press CHNG and then press next if the skillset is enabled.
Skill mbox pswd
RESET
NEXT
9
Press RESET to reset the password for the skillset mailbox.
Password reset
10 This display appears briefly.
Log:
QUIT
RETRY
Pswd:
RETRY
OK
OK
Admin
MBOX
AA
OTHR
Admin
GLIST
CCR
OTHR
OK
11 Press ® to end the session.
Intelligent Contact Center Telephone Administration Guide
76
Chapter 6 Setting up skillset mailboxes
Recording skillset mailbox greetings
After you initialize a skillset mailbox, record the greetings for it.
You can record Primary, Alternate and Personalized greetings for each skillset mailbox. You
record a Primary skillset mailbox greeting for everyday use. The Alternate skillset mailbox
greeting is an optional greeting you can record for special circumstances. If your contact center
subscribes to Caller ID, you can record Personalized skillset mailbox greetings.
If you record Primary and Alternate skillset mailbox greetings, you must choose which greeting
plays to callers who reach the skillset mailbox.
You can also record greetings in an Alternate Language. Callers can press · while the greeting is
playing to listen to the voice prompts in the Alternate Language. Remember to inform callers in
the Primary skillset mailbox greeting that they can press · to hear the Alternate Language.
If the Operator Status is set to Yes, and a caller presses ‚ during the skillset mailbox greeting, the
caller transfers to the receptionist or Operator. For information about Operator Status, see the
CallPilot Manager Set Up and Operation Guide (NN40090-300). Inform callers in the skillset
mailbox greetings that they can press ‚ to speak to the receptionist or Operator.
If the Operator Status is set to No, a caller who presses ‚ during the skillset mailbox greeting is
informed the Operator is not available, and is transferred to the skillset mailbox.
Examples of Primary and Alternate greetings
You must record a Primary greeting for each skillset mailbox. In the Primary greeting include the
skillset mailbox name that is listed in the Company Directory. For example:
“Hello. You have reached the Sales Department at Bridgestone Computers. At the sound of the
tone, please leave your name, telephone number and a brief message. One of our agents will
return your call as soon as possible. Thank you.”
You can record an Alternate greeting for each skillset mailbox. Use an Alternate greeting for
special circumstances. In the Alternate skillset mailbox greeting include the skillset mailbox name
that is listed in the Company Directory.
For example:
“Season’s Greetings! You have reached the Sales Department at Bridgestone Computers. At the
sound of the tone, please leave your name, telephone number and a brief message. One of our
agents will return your call when we re-open on December 27. Thank you.”
NN40170-600
Chapter 6 Setting up skillset mailboxes
77
To record a Primary or Alternate skillset mailbox greeting
<Skillset name>
1
Press ≤·°⁄.
Follow the voice prompts or the display button options to open the
skillset mailbox.
2
The skillset mailbox name appears briefly.
3
If you use the CallPilot interface:
•
•
Press °¤ to open the Greetings Options menu
Go to step 4
If you use the Avaya Norstar™ Voice Mail interface:
•
•
•
Press ADMIN or °
Press GREET or ¤
Go to step 4
Greeting options
REC CHOOSE CFWD
4
Press REC or ⁄.
Greeting:
PRIME
ALT
5
Press PRIME or ⁄ to record the Primary greeting
or
press ALT or ¤ to record the Alternate greeting.
If you are changing a greeting, the current greeting starts to play.
6
If this is the first time you are recording a greeting, this display
appears briefly.
7
Press YES or ⁄ and record your greeting at the tone.
Record greeting:
RETRY
OK
8
Press OK or £ to end the recording.
Accept greeting?
RETRY
PLAY
OK
9
Press OK or £ to accept the recording
or
press PLAY or ⁄ to listen to the greeting
or
press RETRY or ¤ to rerecord the greeting.
PERS
Not recorded
Record new?
YES
NO
QUIT
10 Press ® to end the session.
Intelligent Contact Center Telephone Administration Guide
78
Chapter 6 Setting up skillset mailboxes
Choosing a Primary or Alternate skillset mailbox greeting
If you record a Primary and an Alternate skillset mailbox greeting, you must choose which
greeting plays. You can change the selection at any time and as often as needed. If you do not
choose a greeting, the Primary skillset mailbox greeting plays.
If you choose the Alternate mailbox greeting, you must set whether the mailbox accepts messages.
If you choose Yes the skillset mailbox receives messages in the normal way.
If you choose No:
•
•
•
•
messages cannot be left in the skillset mailbox
the Alternate mailbox greeting takes precedence over all other greetings
if a caller presses a to fast forward the message, they hear a voice prompt that says this is a
special greeting
if a caller presses a to send a fax, the fax goes to the General Delivery Mailbox, not the skillset
mailbox.
If you choose the Alternate mailbox greeting, remember to change back to the Primary mailbox
greeting at the appropriate time.
To choose a Primary or Alternate skillset mailbox greeting
<Skillset name>
1
Press ≤·°⁄.
Follow the voice prompts or the display button options on your
telephone to open the skillset mailbox.
2
The skillset mailbox name appears briefly.
3
If you use the CallPilot interface:
•
•
Press °¤ to open the Greetings Options menu
Go to step 4
If you use the Avaya Norstar™ Voice Mail interface:
•
•
•
Press ADMIN or °
Press GREET or ¤
Go to step 4
Greeting options
REC CHOOSE CFWD
4
Press CHOOSE or ¤ to select a greeting.
Use greeting:
PRIME ALT
QUIT
5
Press PRIME or ⁄ to select the Primary mailbox greeting and
go to step 7
or
press ALT or ¤ to select the Alternate mailbox greeting and
go to step 6.
NN40170-600
Chapter 6 Setting up skillset mailboxes
Accept msgs:Y
CHNG
OK
6
If you choose the Alternate mailbox greeting, you are asked
whether the mailbox can accept messages.
Press CHNG or ⁄ to toggle from yes to no
or
press OK or £ to accept.
7
Press ® to end the session.
79
Intelligent Contact Center Telephone Administration Guide
80
Chapter 6 Setting up skillset mailboxes
Recording a Personalized skillset mailbox greeting
If your contact center subscribes to Caller ID, you can record a maximum of three Personalized
greetings for each skillset mailbox. For Personalized skillset mailbox greetings, you program
Contact Center to recognize a specific telephone number. The Personalized skillset mailbox
greeting plays only for a call from the specific telephone number.
If you record a Personalized greeting, program the skillset mailbox to receive messages and
choose an Alternate mailbox greeting, the Personalized greeting takes precedence over any other
greetings. If you program the skillset mailbox not to receive messages and choose an Alternate
mailbox greeting, the Alternate mailbox greeting takes precedence over any other greeting,
including Personalied mailbox greetings.
In the Personalized skillset mailbox greeting include the skillset mailbox name that is listed in the
Company Directory. For example:
“Hi John. You have reached the Sales Department at Bridgestone Computers. At the sound of the
tone, please leave your order. One of our agents will return your call if you need to speak to
someone directly. Thank you.”
To record a Personalized skillset mailbox greeting
<Skillset name>
1
Press ≤·°⁄.
Follow the voice prompts or the display button options on your
telephone, to open the skillset mailbox.
2
The skillset mailbox name appears briefly.
3
If you use the CallPilot interface:
•
•
Press °¤ to open the Greetings Options menu
Go to step 4
If you use the Avaya Norstar™ Voice Mail interface:
•
•
•
Press ADMIN or °
Press GREET or ¤
Go to step 4
Greeting options
REC CHOOSE CFWD
4
Press REC or ⁄.
Greeting:
PRIME ALT
5
Press PERS or ‹ to record a Personalized greeting.
6
Enter a Personalized greeting number of 1, 2 or 3.
7
Press CHNG or ⁄.
PERS
Greeting:
RETRY
OK
Ph:
CHNG
OK
NN40170-600
Chapter 6 Setting up skillset mailboxes
Ph: <xxxxxxxxxx>
RETRY
OK
8
Enter the telephone number (maximum 10 digits) that you are
assigning the Personalied mailbox greeting to.
Press OK or £ to accept the telephone number.
Record greeting:
RETRY
OK
9
Lift your handset.
At the tone, record your greeting.
Press OK or £ to end the recording.
Accept greeting?
RETRY
PLAY
OK
10 Press OK or £ to accept the greeting,
or
press PLAY or⁄ to listen to the greeting
or
press RETRY or ¤ to re-record the greeting.
81
11 Press ® to end the session.
Intelligent Contact Center Telephone Administration Guide
82
Chapter 6 Setting up skillset mailboxes
Deleting a Personalized mailbox greeting
If you no longer need a Personalized mailbox greeting, you can delete it.
To delete a Personalized mailbox greeting
<Skillset name>
1
Press ≤·°⁄.
Follow the voice prompts or the display button options on your
telephone, to open the skillset mailbox.
2
The skillset mailbox name appears briefly.
3
If you use the CallPilot interface:
•
•
Press °¤ to open the Greetings Options menu
Go to step 4
If you use the Avaya Norstar™ Voice Mail interface:
•
•
•
Press ADMIN or °
Press GREET or ¤
Go to step 4
Greeting options
REC CHOOSE CFWD
4
Press REC or ⁄.
Greeting:
PRIME
ALT
5
Press PERS or ‹ to choose a Personalied mailbox greeting.
6
Enter the Personalied greeting number that you want to delete.
7
Press DEL or ¤ to delete the greeting.
8
Press ® to end the session.
PERS
Greeting:
RETRY
OK
Ph: XXXXXXX
CHNG DEL
OK
NN40170-600
Chapter 6 Setting up skillset mailboxes
83
Checking skillset mailboxes for messages
Frequently check the skillset mailboxes for messages. Only one agent can retrieve messages from
each skillset mailbox at a time.
If different agents access the messages in the skillset mailbox throughout the day, each agent
should:
•
•
•
•
listen to the message
write down what the message says
erase the message
return the caller’s telephone call
If the caller is not available, the agent can try again later or pass the message on to another agent.
If the agent who listens to the message erases the message after writing down what it says:
•
•
•
the next agent does not waste time listening to the same message
the next agent knows if the callback was successful or not
only one agent contacts the caller
If only one agent is responsible for retrieving messages at your contact center, this agent does not
need to transcribe and delete each message before callback. This agent handles messages and
knows the status of the old messages.
Intelligent Contact Center Telephone Administration Guide
84
Chapter 6 Setting up skillset mailboxes
Playing skillset mailbox messages
Use the procedure for playing messages that correspond to the interface you use:
•
•
“To play skillset mailbox messages - Avaya Norstar™ Voice Mail” on page 84
“To play skillset mailbox messages - CallPilot” on page 86
To play skillset mailbox messages - Avaya Norstar™ Voice Mail
Use this procedure if you use the Avaya Norstar Voice Mail interface.
2 new 0 saved
PLAY REC
ADMIN
1
Press ≤·°⁄.
Follow the voice prompts or the display button options on your
telephone to open the skillset mailbox.
2
Press PLAY or ¤ to listen to your messages.
For other options, see the table “Playing skillset mailbox messages
- Avaya Norstar Voice Mail” on page 84.
3
Press ® to end the session.
The table “Playing skillset mailbox messages - Avaya Norstar Voice Mail” shows the message
options available to you during and after playing messages.
Playing skillset mailbox messages - Avaya Norstar Voice Mail
Option
Back up
Available Available Description
while
after
playing
playing
⁄
or
Rewinds the message three seconds and resumes
playing it.
4
< <<
Copy
fi
or
4
4
COPY
End of
Message
‹‹
Envelope
‡
or
> >> > >>
Goes to the end of the message.
4
4
Erase
ERASE
NN40170-600
4
Plays the information in the message envelope. Envelope
information includes the date and time the message was
sent and, if the message is internal, the directory name of
the sender.
4
Deletes the message currently playing. If no messages
are playing, deletes the last message played. Deleted
messages remain in the skillset mailbox until the session
ends. (Refer to Notes 1 and 2 on page 85.)
°
or
Sends a copy of the message to one or more mailboxes.
If you record an introduction, it must be longer than three
seconds.
4
Chapter 6 Setting up skillset mailboxes
85
Playing skillset mailbox messages - Avaya Norstar Voice Mail
Option
Forward
Available Available Description
while
after
playing
playing
‹
or
> >>
Next
Advances the message three seconds and continues
playing from that point.
4
fl
or
4
4
££
Pause/
Continue
¤
or
STOP/
PLAY
Previous
›
Quit
•
Replay
⁄⁄
or
< << < <<
Replay
⁄
Reply
·
or
REPLY
Save
Message
Volume
Control
Stops playing the current message and plays the previous
message.
4
Stops playing the message and plays the Mailbox main
menu options.
4
4
4
4
Replays the last message.
Replies to a message. (Refer to Note 3 on page 86)
The reply can be either:
- a message to an internal sender’s mailbox
- a telephone call to an internal or external
party (Refer to Note 4 on page 86.)
4
Saves the message being played. (If you do not delete a
message, it is automatically saved). This option is not
shown on the display unless you erase a message. If you
erase a message and play the message again, you can
press SAVE on a two line display telephone. (Refer to
Note 2 on page 85.)
4
Adjusts the volume of the message that is playing. The
volume increases each time you press •. After four
presses, the volume returns to the lowest level.
or
•
4
Replays the message from the beginning.
‡‡
SAVE
Temporarily stops a message. When you stop the
message, you can play the previous message, continue
playing the current message, or skip to the next message.
4
4
Plays the next message in the skillset mailbox. If you use
this while a message is playing, it stops playing the
current message and plays the next message in the
skillset mailbox.
Notes:
1
Because the skillset mailbox has limited message storage space, delete any messages you no
longer need. After a certain time period, your saved messages are erased automatically. Ask
your System Administrator about this.
2
You can retrieve a deleted message only if you have not quit the session in which you deleted
it. For information about retrieving deleted messages, see “Retrieving erased messages” on
page 87”.
Intelligent Contact Center Telephone Administration Guide
86
Chapter 6 Setting up skillset mailboxes
3
Applies only if the Reply feature is enabled.
4
You can reply to an outside caller by dialing them back if your company subscribes to service.
For more information about replying to an outside caller, see “Using the Reply feature to reply
to an external caller” on page 90.
To play skillset mailbox messages - CallPilot
Use this procedure if you use the CallPilot interface.
Press ≤·°⁄.
Follow the voice prompts or the display button options to open the
skillset mailbox.
1
A voice prompt announces the number of new and saved messages
that you have.
No messages
COMP
MBOX
EXIT
2
You can play any message that you want to listen to.
Press ¤ to play the current message.
For other message commands, see the table “Playing skillset
mailbox messages - CallPilot”.
3
Press ® to end the session.
The table “Playing skillset mailbox messages - CallPilot” shows the message options that are
available to you during and after playing messages.
Playing skillset mailbox messages - CallPilot
Available
during and
after
playing
Description
Option
Skip Back
⁄
Skip
Forward
‹
Previous
Message
›
4
Rewinds the message five seconds and resumes playing it at that
point.
4
Advances the message five seconds and continues playing from that
point.
4
Stops playing the current message and plays the previous message.
Plays the next message in the skillset mailbox. If you use this while a
message is playing, it stops playing the current message and plays
the next message in the skillset mailbox.
Next
Message
fl
Call
Sender
·
4
Places a call to the sender of a message.
Help
•
4
Offers a Help menu.
Reply
‡⁄
4
Replies to a message.
NN40170-600
4
Chapter 6 Setting up skillset mailboxes
87
Playing skillset mailbox messages - CallPilot
Available
during and
after
playing
Description
Option
Envelope
‡¤
4
Plays the information in the message envelope. Envelope information
includes the date and time the message was sent and, if the
message is internal, the directory name of the sender.
Forward
Message
‡‹
4
Forwards the message to one or more mailboxes. You can record an
introduction to the forwarded message.
Reply
All
‡›
4
Replies to a message and all recipients of the message. (Refer to
Note 3 on page 86.)
‡fl
4
Deletes the current message. Deleted messages remain in the
skillset mailbox until the session ends. (Refer to Notes1 and 2 on
page 85.)
Delete
Retrieving erased messages
After you play your messages and end your skillset mailbox session, any messages that you do not
erase are saved. Since message storage space is limited, we recommend that you erase messages
that are no longer needed.
You can retrieve an erased message if you are still in the skillset mailbox session. An erased
message remains in the skillset mailbox until you end the current session.
To retrieve an erased message - Avaya Norstar™ Voice Mail
After you erase a new or saved message, the number of new or saved messages shown on the
display is decreased by one. Even though the display shows 0 new 0 saved, you can still play and
retrieve any erased skillset mailbox messages. Press PLAY or ¤ to listen to the erased message.
To retrieve an erased message - CallPilot
You can retrieve a deleted message. A deleted message remains in the skillset mailbox until you
end the current session. Locate the deleted message. Then press ‡fl to restore the message.
After you play the erased message, you can restore it. If you end the current session without
restoring the erased message, it is permanently erased from the skillset mailbox.
Intelligent Contact Center Telephone Administration Guide
88
Chapter 6 Setting up skillset mailboxes
Replying to messages
You can reply to internal and external callers. You can reply to an external caller if your company
subscribes to .
The messages you record must be longer than three seconds. The system times out after five
seconds of silence.
Use the procedure for replying to messages that applies to the interface you use:
• “To reply to an internal caller - Avaya Norstar™ Voice Mail” on page 88
• “To reply to an internal caller - CallPilot” on page 89
Replying to an internal caller
If you use
and you want to
use
Avaya Norstar™
Voice Mail
reply to the caller’s
extension
CALL to transfer to the internal caller’s extension.
leave a message in the
caller’s mailbox
MSG to record and send a reply to the internal caller’s
mailbox.
reply to the caller’s
extension
Call Sender · to transfer to the internal caller’s
leave a message in the
caller’s mailbox
Reply ‡⁄ to record and send a reply to the
CallPilot
extension.
internal caller’s mailbox.
To reply to an internal caller - Avaya Norstar™ Voice Mail
1
Press ≤·°⁄.
Follow the voice prompts or the display button options to open
the skillset mailbox.
1 new 0 saved
PLAY
REC
ADMIN
2
Press PLAY or¤.
End of message
REPLY ERASE NEXT
3
After you listen to the message, press REPLY or ·.
Reply to msg
MSG
CALL
4
Press CALL or ¤ to call the caller
or
press MSG or ⁄ to record and send a reply.
NN40170-600
QUIT
Chapter 6 Setting up skillset mailboxes
89
To reply to an internal caller - CallPilot
1
Press ≤·°⁄.
Follow the voice prompts or the display button options on your
telephone to open the skillset mailbox.
2
A mailbox summary is announced.
While you are in your message list, you can play any message.
3
Press ¤ to play the current message.
4
Press · to call the caller
or
press ‡⁄ to record and send a reply.
Intelligent Contact Center Telephone Administration Guide
90
Chapter 6 Setting up skillset mailboxes
Using the Reply feature to reply to an external caller
You can reply to an external caller using the Reply feature if your company subscribes to a Caller
ID service and the skillset mailbox has an outdial method assigned to it. To assign an outdial
method to a skillset mailbox, see “Assigning an outdial method to a skillset mailbox” on page 92.
Before you use the Reply feature you must play the message.
To reply to an external caller - Avaya Norstar™ Voice Mail
1
Press ≤·°⁄.
Follow the voice prompts or the display button options to open the
skillset mailbox.
1 new 0 saved
PLAY
REC
ADMIN
2
Press PLAY or ¤.
End of message
REPLY ERASE NEXT
3
After you listen to the message, press REPLY or ·.
CallPilot dials the external number directly.
To reply to an external caller - CallPilot
NN40170-600
1
Press ≤·°⁄.
Follow the voice prompts or the display button options to open the
skillset mailbox.
2
A mailbox summary is announced.
While you are in the message list you can play any message.
3
Press ¤ to play the current message.
4
Press · to call the caller.
CallPilot dials the external number directly.
91
Chapter 7
Off-premise Message Notification
About Off-premise Message Notification
Off-premise Message Notification notifies you or a designated agent when there are new or urgent
messages in a skillset mailbox. You can receive Off-premise Message Notification at any tone dial
telephone number, pager or extension.
Note: Set up Off-premise Message Notification for non-business hours. Then
Off-Premise Message Notification does not consume a Reserved or voice channel during
busy periods.
You can receive notification of a message at a maximum of five different destination numbers.
When the number of retry attempts is reached for each destination number, the next number in the
series is called. For example, Contact Center can call your car telephone first when there is a
message in the skillset mailbox. If there is no answer, Contact Center waits five minutes and calls
your car telephone again. If there is still no answer, Contact Center calls your car telephone a third
time. If there is no answer after three calls, Contact Center calls your home telephone. Contact
Center continues to call at five minute intervals until the call is answered or all of the destinations
are called three times.
Off-premise Message Notification, the Retry Intervals and Maximum Number of Attempts for
skillset mailboxes are assigned through the Class of Service settings in CallPilot Manager. Skillset
mailboxes have a default Class of Service of 1.
Class of Service 1 has these default settings for Off-premise Message Notification:
•
•
•
Off-premise Message Notification enabled
a Retry Interval of five minutes
a Maximum Number of Attempts of 3
For information about changing Class of Service settings, see the CallPilot Manager Set Up and
Operation Guide (NN40090-300).
You must assign start and stop times for telephone and destinations. Off-premise Message
Notification begins when the start time is reached. Set the start time for a time when you are at the
destination number so that you are there to receive calls.
A person who receives an Off-premise Message Notification call can cancel Off-premise Message
Notification to their destination number. This is useful if a destination is incorrectly programmed
and a wrong party receives the calls.
The recipient of an Off-premise Message Notification call hears the following voice prompt:
“Message for (name of mailbox owner). To log on press ⁄. If you have received this call by
mistake, please press ¤.
Intelligent Contact Center Telephone Administration Guide
92
Chapter 7 Off-premise Message Notification
After you set the Off-premise Message Notification parameters, Off-premise Message Notification
is enabled automatically.
Assigning an outdial method to a skillset mailbox
The outdial method determines which line, line pool or route code the system uses for Off-premise
Message Notification. The default for outdial method is None. You must assign an outdial method
before you can use an external telephone or a pager as an Off-premise Message Notification
destination.
For more information about line pools and route codes, see your system documentation.
Warning: Do not change the extension number assigned to the skillset mailbox. If this
extension number is changed, callers in the skillset cannot access the skillset mailbox
and you cannot change the Skillset general parameters. To correct a wrong extension
number, change the extension number to the Control DN of the skillset.
NN40170-600
Chapter 7 Off-premise Message Notification
93
To assign an outdial method to a skillset mailbox
1
Press ≤·°‹.
Enter the telset User ID that has voice mail administration rights and
press OK.
For information about creating a user with voice mail administration
rights, see the Avaya Business Communications Manager 6.0
Administration and Security Guide.
2
Enter the user password and press OK.
3
Press MBOX.
Mailbox Admin
4
ADD
DEL
CHNG
Press CHNG.
Mbox:
DIR
Enter the skillset mailbox number or press DIR to use the Company
Directory.
Log:
QUIT
RETRY
OK
Pswd:
RETRY
Admin
MBOX
OK
AA
OTHR
QUIT
5
Outdial: <none>
6
CHNG
NEXT
Press NEXT until you see this display.
Press CHNG.
Outdial: <line>
7
CHNG
NEXT
Press NEXT if you want to use a line as the outdial method
or
press CHNG if you want to use a line pool as the outdial method and
then press NEXT.
xxxx:
RETRY
OK
8
Enter the Line or Pool number and press OK.
Line numbers must be between 1 and 500. Although line pools have
a letter such as A, B or C, Contact Center accepts only numbers. If
you enter a line pool use 1 for A, 2 for B, 3 for C, and so on.
Accept: x
RETRY
OK
9
Press OK.
10 Press ® to end the session.
Off-premise Message Notification parameters
You can set up the parameters for Off-premise Message Notification from any .
The parameters are:
•
•
•
destination type (phone, extension or pager)
destination number (phone, extension or pager)
time range for receiving calls at telephone numbers or extension (Pagers are notified any time
there is a qualifying message.)
Intelligent Contact Center Telephone Administration Guide
94
Chapter 7 Off-premise Message Notification
•
types of message you want to receive (all new messages or just urgent messages)
Note: The restrictions that apply to your telephone line also apply to Off-premise
Message Notification numbers. For example, if you cannot dial long distance telephone
numbers from your telephone, you cannot have a long distance Off-premise Message
Notification destination number.
Setting up Off-premise Message Notification
Follow these instructions if you have not set up Off-Premise Message Notification and are setting
it up for the first time. If you have set up Off-Premise Message Notification, see the section on
“Changing Off-premise Message Notification” on page 104.
To set up Off-premise Message Notification to
see
a telephone number
page 95
an extension
page 97
a pager
page 99
NN40170-600
Chapter 7 Off-premise Message Notification
95
To set up Off-premise Message Notification to a telephone
number
1
Press ≤·°⁄.
Follow the voice prompts or the display button options to open the
skillset mailbox.
2
If you use the CallPilot interface:
•
•
•
Press °fi to open the Mailbox Tools
Press NOTIF or ¤ to open the Off-premise Message
Notification menu
Go to step 3
If you use the Avaya Norstar™ Voice Mail interface:
•
•
•
Press ADMIN or °
Press fl to open the Off-premise Message Notification
menu
Go to step 3
Msg notify
ADMIN SELECT
3
Press ADMIN or ⁄ to set up Off-premise Message Notification.
Destination:
PHONE EXT PAGER
4
Press PHONE or ⁄ to choose a telephone number destination.
Ph:
RETRY
OK
5
Enter the destination telephone number and press OK or £. The
destination telephone number is a maximum of 30 digits.
<x>
ADD
OK
6
Press OK or £ to accept the destination telephone number
represented by <x>
or
press ADD or ¤ to add special characters and use your dialpad or
follow the voice prompts to add characters.
After you add special characters, press OK or £ to accept the
destination number.
Start hhmm:
RETRY
OK
<start time>
RETRY
AM
PM
7
Enter the start time for Off-premise Message Notification. This is a
four-digit field. Any single-digit hour and minute must be preceded
by a zero.
8
Press AM or ⁄
or
PM or ¤.
Intelligent Contact Center Telephone Administration Guide
96
Chapter 7 Off-premise Message Notification
Press OK or £ to accept the start time.
<start time>
RETRY
OK
Stop hhmm:
RETRY
OK
10 Enter the time when Off-premise Message Notification is to stop.
This is a four digit field. Any single-digit hour and minute must be
preceded by a zero.
<stop time>
RETRY
AM
PM
11 Press AM or ⁄
or
PM or ¤.
<stop time>
RETRY
OK
9
12 Press OK or £ to accept the stop time.
More dest?
YES
NO
13 Press YES or ⁄ if you want to set up another destination number
or
press NO or £ if you do not want to set up another destination
number.
Start:<start time>
CHNG
NEXT
14 Press NEXT or £ to accept the start time that you entered
or
press CHNG or ⁄ to change the start time.
Stop:<stop time>
CHNG
NEXT
15 Press NEXT or £ to accept the stop time that you entered
or
press CHNG or ⁄ to change the stop time.
Msg type: new
CHNG
16 Press OK or £ if you want to be notified when the skillset mailbox
receives a new message
or
press CHNG or ⁄ if you want to be notified only when the skillset
mailbox receives an urgent message.
Msg notify
ADMIN SELECT
NN40170-600
OK
17 Press ® to end the session.
Chapter 7 Off-premise Message Notification
97
To set up Off-premise Message Notification to an extension
1
Press ≤·°⁄.
Follow the voice prompts or the display button options to open the
skillset mailbox.
2
If you use the CallPilot interface:
•
•
•
Press °fi to open the Mailbox Tools
Press NOTIF or ¤ to open the Off-premise Message
Notification menu
Go to step 3
If you use the Avaya Norstar™ Voice Mail interface:
•
•
•
Press ADMIN or °
Press fl to open the Off-premise Message Notification
menu
Go to step 3
3
Press ADMIN or ⁄ to set up Off-premise Message Notification.
Destination:
PHONE EXT PAGER
4
Press EXT or ¤ to choose an extension as the destination.
Ext:
RETRY
OK
5
Enter the destination number and press OK or £.
Accept:<x>
RETRY
OK
6
Press OK or £ to accept the destination extension.
The <x> represents the extension.
Start hhmm:
RETRY
OK
7
Enter the start time for Off-premise Message Notification. This is a
four-digit field. Any single-digit hour and minute must be preceded
by zero.
<start time>
RETRY
AM
PM
8
Press AM or ⁄
or
PM or ¤.
<start time>
RETRY
OK
9
Press OK or £ to accept the start time.
Stop hhmm:
RETRY
OK
Msg notify
ADMIN
SELECT
10 Enter the time when Off-premise Message Notification is to stop.
This is a four digit field. Any single-digit hour and minute must be
preceded by a zero.
Intelligent Contact Center Telephone Administration Guide
98
Chapter 7 Off-premise Message Notification
<stop time>
RETRY
AM
PM
<stop time>
RETRY
OK
11 Press AM or ⁄
or
PM or ¤.
12 Press OK or £ to accept the stop time.
More dest?
YES
NO
13 Press YES or ⁄ if you want to set up another destination number
or
press NO or £ if you do not want to set up another destination
number.
Start:<start time>
CHNG
NEXT
14 Press NEXT or £ to accept the start time that you entered
or
press CHNG or ⁄ to change the start time.
Stop:<stop time>
CHNG
NEXT
15 Press NEXT or £ to accept the stop time that you entered
or
press CHNG or ⁄ to change the stop time.
Msg type: new
CHNG
16 Press OK or £ if you want to be notified when the skillset mailbox
receives a new message
or
press CHNG or ⁄ if you want to be notified only when the skillset
mailbox receives an urgent message.
Msg notify
ADMIN SELECT
NN40170-600
OK
17 Press ® to end the session.
Chapter 7 Off-premise Message Notification
99
About setting up Off-premise Message Notification to a pager
number
Example of a destination pager number
If you are assigning a pager destination number from behind a PBX, remember to insert a ·
(depending on your system) before the £ to access an outside line.
There is a combined limit of 30 characters for the pager telephone number and the pager message.
For example, to reach your pager, enter:
£›¤fififi⁄¤‹›£‹
where:
•
•
•
•
•
£ specifies the next digits are special characters
› recognies dial tone
¤ specifies that the next digits are the numbers to be dialed
fififi⁄¤‹› is the pager telephone number dialed
‹ inserts a timed pause
Depending on the company supplying your paging service, the programming sequence can vary.
For more information about setting the destination telephone number parameters for your pager,
contact your pager company.
To set up Off-premise Message Notification to a pager
1
Press ≤·°⁄.
Follow the voice prompts or the display button options to open the
skillset mailbox.
2
If you use the CallPilot interface:
•
•
•
Press °fi to open the Mailbox Tools
Press NOTIF or ¤ to open the Off-premise Message
Notification menu
Go to step 3
If you use the Avaya Norstar™ Voice Mail interface:
•
•
•
Msg notify
ADMIN SELECT
3
Press ADMIN or °
Press fl to open the Off-premise Message Notification
menu
Go to step 3
Press ADMIN or ⁄ to set up Off-premise Message Notification.
Intelligent Contact Center Telephone Administration Guide
100
Chapter 7 Off-premise Message Notification
Destination:
PHONE EXT PAGER
4
Press PAGER or ‹ to select a pager number destination.
Pager:
RETRY
OK
5
Enter the destination pager number and press OK or £.
<x>
ADD
OK
6
Press OK or £ to accept the destination pager number represented
by <x>
or
press ADD or ¤ to add special characters and use your dialpad or
follow the voice prompts to add characters.
After you add special characters, press OK or £.
Show:<xxxx>
CHNG
NEXT
More dest?
YES
NO
Msg type: new
CHNG
Msg notify
ADMIN SELECT
NN40170-600
OK
7
Press NEXT or £ to accept the default pager message represented
by <xxxx>. The default pager message sent by CallPilot is the
CallPilot extension. This is the sequence of digits that is sent after
the pager service is dialed, to notify you of who is paging you
or
press CHNG or ⁄ to change the pager message.
The combined limit is 30 characters for the pager telephone
number and the pager message.
8
Press YES or ⁄ if you want to set up another destination number
or
press NO or £ if you do not want to set up another destination
number.
9
Press OK or £ to be notified when the skillset mailbox receives a
new message
or
press CHNG or ⁄ to change the message type to be notified only
when the skillset mailbox receives an urgent message.
10 Press ® to end the session.
Chapter 7 Off-premise Message Notification
101
To set up Off-premise Message Notification to more than one
destination
You can receive notification of a message at a maximum of five different destination numbers.
The following steps show you how to enter a telephone number destination and then add a pager
destination for the first time.
1
Press ≤·°⁄.
Follow the voice prompts or the display button options to open the
skillset mailbox.
2
If you use the CallPilot interface:
•
•
•
Press °fi to open the Mailbox Tools
Press NOTIF or ¤ to open the Off-premise Message
Notification menu
Go to step 3
If you use the Avaya Norstar™ Voice Mail interface:
•
•
•
Press ADMIN or °
Press fl to open the Off-premise Message Notification
menu
Go to step 3
Msg notify
ADMIN SELECT
3
Press ADMIN or ⁄ to set up Off-premise Message Notification.
Destination:
PHONE EXT PAGER
4
Press PHONE or ⁄ to choose a destination telephone number.
Ph:
RETRY
OK
5
Enter the destination telephone number and press OK or £. The
destination telephone number cannot be longer than 30 digits.
<x>
ADD
OK
6
Press OK or £ to accept the destination telephone number,
represented by <x>
or
press ADD or ¤ to add special characters and use your dialpad or
follow the voice prompts to add characters.
Start: hhmm:
RETRY
OK
7
Enter the start time for Off-premise Message Notification. This is a
four-digit field. Any single-digit hour and minute must be preceded
by a zero.
<start time>
RETRY
AM
PM
8
Press AM or ⁄
or
PM or ¤.
Intelligent Contact Center Telephone Administration Guide
102
Chapter 7 Off-premise Message Notification
Press OK or £ to accept the start time.
<start time>
RETRY
OK
Stop hhmm:
RETRY
OK
10 Enter the time when Off-premise Message Notification is to stop.
This is a four digit field. Any single digit hour and minute must be
preceded by a zero.
<stop time>
RETRY
AM
PM
11 Press AM or ⁄
or
PM or ¤.
<stop time>
RETRY
OK
9
12 Press OK or £ to accept the stop time.
More dest?
YES
NO
13 Press YES or ⁄ to set up another destination number.
Notify2: none
SETUP
NEXT
14 Press SETUP to set up another destination number.
Destination:
PHONE EXT PAGER
15 Press PAGER or ‹ to select a pager number destination.
Pager:
RETRY
OK
16 Enter the destination pager number and press OK or £.
<xxxx>
ADD
OK
17 Press OK or £ to accept the destination pager number represented
by <x>
or
press ADD or ¤ to add special characters and use your dialpad or
follow the voice prompts to add characters.
After you add special characters, press OK or £.
Show<xxxx>
CHNG
NEXT
18 Press NEXT or £ to accept the default pager message represented
by <xxxx>. The default pager message sent by CallPilot is the
CallPilot extension. This is the sequence of digits that is sent after
the pager service is dialed, to notify you of who is paging you
or
press CHNG or ⁄ to change the pager message.
The combined limit is 30 characters for the pager telephone
number and the pager message.
Notify2: pager
CHNG OTHR
NEXT
19 The display shows that the second destination is a pager.
Press NEXT or £ to continue.
Notify 3: none
SETUP
NEXT
20 Press NEXT or £ to continue
or
press SETUP to add another destination.
NN40170-600
Chapter 7 Off-premise Message Notification
103
Start:<start time>
CHNG
NEXT
21 Press NEXT or £ to accept the start time that you entered
or
press CHNG or ⁄ to change the start time.
Stop:<stop time>
CHNG
NEXT
22 Press NEXT or £ to accept the stop time that you entered
or
press CHNG or ⁄ to change the stop time.
Msg type: new
CHNG
23 Press OK or £ to be notified when the skillset mailbox receives a
new message
or
press CHNG or ⁄ to be notified only when the skillset mailbox
receives an urgent message.
Msg notify
ADMIN SELECT
OK
24 Press ® to end the session.
Intelligent Contact Center Telephone Administration Guide
104
Chapter 7 Off-premise Message Notification
Changing Off-premise Message Notification
You can change the parameters and destinations for Off-Premise Message Notification. Refer to
“Off-premise Message Notification parameters” on page 93 for more information about
parameters.
If you want to change the time or message type parameters, use the procedure “To change the time
range or type of message parameters” on page 104
If you want to change the destination type, see the procedure for the destination type.
To change the destination type
see
from a telephone to an extension, pager or another telephone
number
page 106
from a pager to an extension or telephone
page 108
from a telephone or extension to a pager
page 110
To change the time range or type of message parameters
1
Press ≤·°⁄.
Follow the voice prompts or the display button options on your
telephone to open the skillset mailbox.
2
If you use the CallPilot interface:
•
•
•
Press °fi to open the Mailbox Tools
Press NOTIF or ¤ to open the Off-premise Message
Notification menu
Go to step 3
If you use the Avaya Norstar™ Voice Mail interface:
•
•
•
Msg notify
ADMIN SELECT
Notify:<x>
CHNG
More dest?
YES
NO
NN40170-600
NEXT
Press ADMIN or °
Press fl to open the Off-premise Message Notification
menu
Go to step 3
3
Press ADMIN or ⁄ to set up Off-premise Message Notification.
4
Press NEXT.
If you want to change the destination type, see “To change the
destination type” on page 104 for the appropriate procedure.
5
Press NO or £ to continue.
Chapter 7 Off-premise Message Notification
105
Start:<start time>
CHNG
NEXT
6
Press CHNG or ⁄ to change the start time
or
press NEXT or £ to accept the start time.
Stop:<stop time>
CHNG
NEXT
7
Press CHNG or ⁄ to change the stop time
or
press NEXT or £ to accept the stop time.
Msg type: new
CHNG
8
Press CHNG or ⁄ to change the message type to urgent.
Press OK or £ to accept the new default message. You can choose
to be notified of all new messages or urgent messages only.
Change the message type to urgent to be notified only when the
skillset mailbox receives an urgent message.
9
Press ® to end the session.
Msg notify
ADMIN SELECT
OK
Intelligent Contact Center Telephone Administration Guide
106
Chapter 7 Off-premise Message Notification
To change the destination from telephone to another destination
1
Press ≤·°⁄.
Follow the voice prompts or the display button options to open the
skillset mailbox.
2
If you use the CallPilot interface:
•
•
•
Press °fi to open the Mailbox Tools
Press NOTIF or ¤ to open the Off-premise Message
Notification menu
Go to step 3
If you use the Avaya Norstar™ Voice Mail interface:
•
•
•
Press ADMIN or °
Press fl to open the Off-premise Message Notification
menu
Go to step 3
Msg notify
ADMIN SELECT
3
Press ADMIN or ⁄ to set up Off-premise Message Notification.
Notify: phone
CHNG
NEXT
4
Press CHNG or ⁄ to change the destination.
Destination:
PHONE EXT PAGER
5
Press PHONE or ⁄ to choose another telephone number
destination
or
press EXT or ¤ to choose an extension destination
or
press PAGER or ‹ to choose a pager number destination.
<x>
RETRY
OK
6
Enter the destination number and press OK or £.
The destination telephone number cannot be longer than 30 digits.
Accept:<xxxx>
RETRY
OK
7
Press OK or £ to accept the destination number
or
press RETRY or • to re-enter the destination number.
8
Press NEXT or £ to continue
or
press CHNG or ⁄ to change the destination, and repeat steps 6
through 8.
Notify:<x>
CHNG
NN40170-600
NEXT
Chapter 7 Off-premise Message Notification
107
Press YES or ⁄ if you want to set up another destination number
or
press NO or £ if you do not want to set up another destination
number.
More dest?
YES
NO
9
Start:<start time>
CHNG
NEXT
10 Press CHNG or ⁄ to change the start time
or
press NEXT or £ to accept the start time.
Stop:<stop time>
CHNG
NEXT
11 Press CHNG or ⁄ to change the stop time
or
press NEXT or £ to accept the stop time.
Msg type:new
CHNG
12 If you want to change message notification,
press CHNG or ⁄ if you want to be notified only when the skillset
mailbox receives an urgent message.
Press OK or £.
Msg notify
ADMIN SELECT
OK
13 Press ® to end the session.
Intelligent Contact Center Telephone Administration Guide
108
Chapter 7 Off-premise Message Notification
To change the destination from pager to telephone or extension
1
Press ≤·°⁄.
Follow the voice prompts or the display button options to open the
skillset mailbox.
2
If you use the CallPilot interface:
•
•
•
Press °fi to open the Mailbox Tools
Press NOTIF or ¤ to open the Off-premise Message
Notification menu
Go to step 3
If you use the Avaya Norstar™ Voice Mail interface:
•
•
•
Press ADMIN or °
Press fl to open the Off-premise Message Notification
menu
Go to step 3
3
Press ADMIN or ⁄ to change Off-premise Message Notification.
The displays shows the first destination type and destination
number.
4
Press CHNG or ⁄ to change the destination type and the
destination number.
Destination:
PHONE EXT PAGER
5
Choose the type of destination number:
press PHONE or ⁄ to choose a telephone number destination
or
press EXT or ¤ to choose an extensiondestination.
<xxxx>:
RETRY
6
Enter the destination number you want to set up Off-Premise
Message Notification for.
<x> represents the destination number.
Press OK or £ to accept the destination number
or
press RETRY or • to re-enter the number.
7
Press NEXT or £ to continue.
8
Press YES or ⁄ if you want to set up another destination, and
repeat steps 6 through 8
or
press NO or £ if you do not want to set up another destination.
Msg notify
ADMIN SELECT
Modify:pager
CHNG
Notify:<x>
CHNG
More dest?
YES
NO
NN40170-600
NEXT
OK
NEXT
Chapter 7 Off-premise Message Notification
109
Press CHNG or ⁄ to change the start time
or
press NEXT or £ to accept the start time.
Start:<start time>
CHNG
NEXT
9
Stop:<stop time>
CHNG
NEXT
10 Press CHNG or ⁄ to change the stop time
or
press NEXT or £ to accept the stop time.
Msg type:new
CHNG
11 If you want to change message notification,
press CHNG or ⁄ if you want to be notified only when the skillset
mailbox receives an urgent message.
Press OK or £.
Msg notify
ADMIN
SELECT
OK
12 Press ® to end the session.
Intelligent Contact Center Telephone Administration Guide
110
Chapter 7 Off-premise Message Notification
To change the destination from telephone or extension to pager
1
Press ≤·°⁄.
Follow the voice prompts or the display button options to open the
skillset mailbox.
2
If you use the CallPilot interface:
•
•
•
Press °fi to open the Mailbox Tools
Press NOTIF or ¤ to open the Off-premise Message
Notification menu
Go to step 3
If you use the Avaya Norstar™ Voice Mail interface:
•
•
•
Msg notify
ADMIN SELECT
Notify:<x>
CHNG
Destination
PHONE EXT
NEXT
PAGER
Pager:
RETRY
OK
<x>
ADD
OK
Press ADMIN or °
Press fl to open the Off-premise Message Notification
menu
Go to step 3
3
Press ADMIN or ⁄ to change Off-premise Message Notification.
The displays show a review of the first destination type and
destination number.
4
Press CHNG or ⁄ to change the destination type and the
destination number.
<x> represents the type of destination (phone or extension).
5
Press PAGER or ‹ to choose a pager number destination.
6
Enter the pager number and press OK or £ to continue.
7
Press OK or £ to accept the destination pager number represented
by <x>
or
press ADD or ¤ to add special characters and use your dialpad or
follow the voice prompts to add characters.
After you add special characters, press OK or £.
NN40170-600
Chapter 7 Off-premise Message Notification
111
8
Press NEXT or £ to accept the default pager message represented
by <xxxx>. The default pager message sent by CallPilot is the
CallPilot extension. This is the sequence of digits that is sent after
the pager service is dialed, to notify you of who is paging you
or
press CHNG or ⁄ to change the pager message.
The combined limit is 30 characters for the pager telephone
number and the pager message.
Notify: pager
CHNG
NEXT
9
The display shows notification is set up to a pager.
Press NEXT or £ to continue.
More dest?
YES
NO
10 Press YES if you want to set up another destination number
or
press NO if you do not want to set up another destination number.
Show:<xxxx>
CHNG
Msg type: new
CHNG
Msg notify
ADMIN SELECT
NEXT
OK
11 Press OK or £ if you want to be notified when the skillset mailbox
receives a new message
or
press CHNG or ⁄ if you want to be notified only when the skillset
mailbox receives an urgent message.
12 Press ® to end the session.
Intelligent Contact Center Telephone Administration Guide
112
Chapter 7 Off-premise Message Notification
Deleting a destination number
If you have more than one destination number for Off-premise Message Notification, you can
delete a destination.
To delete a destination number
1
Press ≤·°⁄.
Follow the voice prompts or the display button options to open the
skillset mailbox.
2
If you use the CallPilot interface:
•
•
•
Press °fi to open the Mailbox Tools
Press NOTIF or ¤ to open the Off-premise Message
Notification menu
Go to step 3
If you use the Avaya Norstar™ Voice Mail interface:
•
•
•
Msg notify
ADMIN SELECT
Notify1:<x>
CHNG
OTHR
NEXT
Notify 1:<x>
DEL
INS
QUIT
Notify1:<x>
CHNG
OTHR
NEXT
Msg notify
ADMIN SELECT
NN40170-600
Press ADMIN or °
Press fl to open the Off-premise Message Notification
menu
Go to step 3
3
Press ADMIN or ⁄ to set up Off-premise Message Notification.
4
Press OTHR if you want to delete the first destination
or
press NEXT or £ to view the other destinations until you find the
destination that you want to delete. When you find the destination
that you want to delete, press OTHR.
5
Press DEL to delete the first destination number.
6
The first destination number is deleted. The Notify 2 destination
changes to become the Notify 1 destination number.
To delete more destination numbers, press OTHR and repeat steps 4
and 5.
7
Press ® to end the session.
Chapter 7 Off-premise Message Notification
113
Adding a destination number
Use this procedure if you have set up Off-premise Message Notification and you want to add
another destination number. You can have up to five destination numbers.
Intelligent Contact Center Telephone Administration Guide
114
Chapter 7 Off-premise Message Notification
To add a destination number
1
Press ≤·°⁄.
Follow the voice prompts or the display button options to open the
skillset mailbox.
2
If you use the CallPilot interface:
•
•
•
Press °fi to open the Mailbox Tools
Press NOTIF or ¤ to open the Off-premise Message
Notification menu
Go to step 3
If you use the Avaya Norstar™ Voice Mail interface:
•
•
•
Press ADMIN or °
Press fl to open the Off-premise Message Notification
menu
Go to step 3
3
Press ADMIN or ⁄ to set up Off-premise Message Notification.
4
Press NEXT or £ to continue.
More dest?
YES
NO
5
Press YES or ⁄ to set up another destination number.
Notify2: none
SETUP
NEXT
6
Press SETUP or ⁄ to set up another destination number and follow
the steps in “To set up Off-premise Message Notification to a
telephone number” on page 95
or
“To set up Off-premise Message Notification to an extension” on
page 97
or
“To set up Off-premise Message Notification to a pager” on page
99.
Msg notify
ADMIN SELECT
Notify:<x>
CHNG
NEXT
Turning Off-premise Message Notification on or off
You can turn Off-premise Message Notification on or off at any time. If you turn Off-premise
Message Notification off, you do not affect any of the assigned parameters.
NN40170-600
Chapter 7 Off-premise Message Notification
115
To turn Off-premise Message Notification on or off
1
Press ≤·°⁄.
Follow the voice prompts or the display button options to open the
skillset mailbox.
2
If you use the CallPilot interface:
•
•
•
Press °fi to open the Mailbox Tools
Press NOTIF or ¤ to open the Off-premise Message
Notification menu
Go to step 3
If you use the Avaya Norstar™ Voice Mail interface:
•
•
•
Msg notify
ADMIN SELECT
Notify on
CHNG
TIME
OK
Notify off
CHNG
TIME
OK
Mailbox admin
GREET PSWD QUIT
Press ADMIN or °
Press fl to open the Off-premise Message Notification
menu
Go to step 3
3
Press SELECT or ¤ to set up Off-premise Message Notification.
4
Press CHNG or ⁄ to turn Off-premise Message Notification off if
it is on (as shown).
5
Press OK or •
or
press TIME to review the start and stop time parameters.
6
Press ® to end the session.
Intelligent Contact Center Telephone Administration Guide
116
Chapter 7 Off-premise Message Notification
NN40170-600
117
Chapter 8
Setting up agents
Agents handle the calls in your contact center. Supervisors are agents with additional capabilities.
Supervisors can monitor calls between agents and callers. You can record your agent
programming in the table “Contact Center agents” on page 204.
About adding agents
The maximum number of configured agents depends on the Avaya Business Communications
Manager (Avaya BCM) system you use. For capacities see, “Contact Center Update” on page 13.
Active agents are agents who are logged in to one skillset or a combination of skillsets. For
example: If Agent 1 is logged in to skillset 1, then it is one active agent. If Agent 1 is logged in to
skillset 1 and skillset 2, then there is one active agent. If Agent 1 and Agent 2 are logged in to
skillset 1, then there are 2 active agents. If Agent 1, Agent 2, and Agent 3 are logged in to skillset
1, then there are three active agents.
For more information about Contact Center agents, see the Intelligent Contact Center Agent Guide
(NN40040-101).
Agent properties
Agent ID
Each agent is assigned a unique ID number. Contact Center assigns the
lowest available ID number, but you can assign a different number when
you add the agent. Statistics are collected and reported for each ID
number. For more information about statistics, see the Reporting for
Contact Center Setup and Operations Guide.
Name
The agent name can be a maximum of 13 characters. If you do not enter a
name, a default agent name appears as the word Agent and the ID number,
for example, Agent12.
Supervisor
Super indicates that an agent has supervisor status. A supervisor is an
agent with supervisor status. A supervisor has additional capabilities, such
as the ability to monitor calls between agents and callers. Supervisors can
monitor incoming calls only. Supervisors cannot monitor outgoing calls.
Automatic answer
Automatic Answer is optional. Select Automatic Answer if you want to
force-deliver calls to an agent.
If Automatic Answer is enabled, the agent hears a tone that indicates that a
call is delivered. The agent is automatically in the handsfree mode. It is
important that agents use the Not Ready feature when they are not
available to receive calls.
If Automatic Answer is not enabled, calls ring at the agent's telephone and
the agent must answer calls manually.
Intelligent Contact Center Telephone Administration Guide
118
Chapter 8 Setting up agents
Missed Call Option
The Missed Call Option controls how a call is treated if an agent does not
answer the call. Busy assigns an agent's telephone to respond as it does
with the Not Ready feature enabled. Logout automatically logs an agent out
of their skillset if they do not answer a call.
The default is Busy, which returns the call to the skillset.
Activity Codes
Activity Code entry types are Prompted and Optional. Optional is the
default. If you select Optional, an Activity Code session is not automatically
displayed on the agent’s telephone, but they can press F907 and enter
Activity Codes.
If you select Prompted, the agent is prompted to enter Activity Codes on
their telephone.
If you do not have Reporting for Contact Center enabled on your system,
this setting does not appear.
In addition to these agent properties, you can assign agents Dynamic Priority when you assign
them to a skillset. Refer to “Dynamic Agent Priority” on page 124.
To add an agent
1
Press ≤·°‹.
Enter the telset User ID that has voice mail administration rights
and press OK.
For information about creating a user with voice mail
administration rights, see the Avaya Business Communications
Manager 6.0 Administration and Security Guide.
2
Enter the user password and press OK.
3
Press OTHR.
4
Press OTHR.
5
Press CC.
CC Admin
AGENT SKILL OTHR
6
Press AGENT.
Agent Admin
DEL
ADD
CHNG
7
Press ADD.
Agent ID: x
RANGE CHNG
OK
8
The first available agent number is shown.
Press CHNG to change the agent number and enter a new agent
number
or
press OK to continue.
Log:
QUIT
RETRY
Pswd:
RETRY
OK
OK
Admin
MBOX
AA
OTHR
Admin
GLIST
CCR
OTHR
Admin
FAX
NN40170-600
CC
Chapter 8 Setting up agents
Name: Agentxx
CHNG
OK
Agent name: __
CHNG
BKSP
OK
9
119
Press CHNG to enter the agent’s name
or
press OK to go to step 11.
10 Enter the agent’s name and press OK.
Supervisor: N
CHNG
NEXT
11 Press NEXT to keep the agent at agent status
or
press CHNG and then NEXT to give the agent supervisor status.
Auto answer: N
CHNG
NEXT
12 Press NEXT if you do not want calls to be force-delivered to the
agent
or
press CHNG and then NEXT if you want calls to be force-delivered to
the agent.
Miss call: BUSY
LOGOUT BUSY
13 Press OK to accept BUSY (Make Agent Busy) as the Missed Call
option
or
press LOGOUT to select Automatic Logout and press OK.
OK
AC entry: OPT
OPT
PRMPT
OK
14 Press OK if you want prompting for Activity codes to be optional,
or
press PRMPT if you want agents to be prompted and press OK.
NOTE: This step appears only if you use Reporting for Contact
Center.
Agent Admin
ADD
DEL
15 Press ® to end the session.
CHNG
Intelligent Contact Center Telephone Administration Guide
120
Chapter 8 Setting up agents
Changing an agent
After you add an agent, you can change their properties. You must use this procedure if the system
times out while you are adding an agent.
The properties you can change for an agent are:
•
•
•
•
•
password
supervisor status
auto answer options
missed call options
Activity Codes
NN40170-600
Chapter 8 Setting up agents
121
To change agent properties
1
Press ≤·°‹.
Enter the telset User ID that has voice mail administration rights
and press OK.
For information about creating a user with voice mail
administration rights, see the Avaya Business Communications
Manager 6.0 Administration and Security Guide.
2
Enter the user password and press OK.
3
Press OTHR.
4
Press OTHR.
5
Press CC.
CC Admin
AGENT SKILL OTHR
6
Press AGENT.
Agent Admin
ADD
DEL
CHNG
7
Press CHNG.
Agent ID:
DIR
RETRY
OK
8
Enter the ID number of the agent you want to change and press OK.
If you do not know the agent’s ID number press DIR to search the
directory.
9
Press RESET if you want to reset the agent’s password
or
press NEXT.
Log:
QUIT
RETRY
Pswd:
RETRY
OK
OK
Admin
MBOX
AA
OTHR
Admin
GLIST
CCR
OTHR
Admin
FAX
CC
Login Pswd
RESET
NEXT
xxxx
CHNG
NEXT
Agent name: __
RETRY
BKSP
OK
10 Press CHNG if you want to change the agent’s name
or
press NEXT and go to step 11.
11 Enter the new agent’s name and press OK.
Supervisor: x
CHNG
NEXT
12 Press CHNG and press NEXT if you want to change the agent’s
supervisor status
or
press NEXT.
Auto answer: N
CHNG
NEXT
13 Press NEXT if you do not want calls to be force-delivered to the
agent
or
press CHNG and then NEXT if you want calls to be force-delivered to
the agent.
Intelligent Contact Center Telephone Administration Guide
122
Chapter 8 Setting up agents
Miss call: BUSY
LOGOUT BUSY
OK
AC entry: OPT
OPT
PRMPT
OK
14 Press OK to accept BUSY (Make Agent Busy) as the Missed Call
Option
or
press LOGOUT to select Automatic Logout and press OK.
15 Press OK if you want prompting for Activity codes to be optional,
or
press PRMPT if you want agents to be prompted and press OK.
NOTE: This step appears only if you use Reporting for Contact
Center.
16 Press ® to end the session.
Adding multiple agents
You can save time by adding more than one agent at a time. When you add multiple
agents, the agents have the default agent name and parameters.
To add multiple agents
1
Press
·°‹.
Enter the telset User ID that has voice mail administration rights
and press OK.
For information about creating a user with voice mail
administration rights, see the Avaya Business Communications
Manager 6.0 Administration and Security Guide.
2
Enter the user password and press OK.
3
Press OTHR.
4
Press OTHR.
5
Press CC.
CC Admin
AGENT SKILL OTHR
6
Press AGENT.
Agent Admin
ADD
DEL
CHNG
7
Press ADD.
Agent ID: x
RANGE CHNG
OK
8
The first available agent number is shown.
Press RANGE to add a range of new agents.
Log:
QUIT
RETRY
Pswd:
RETRY
OK
OK
Admin
MBOX
AA
OTHR
Admin
GLIST
CCR
OTHR
Admin
FAX
NN40170-600
CC
Chapter 8 Setting up agents
Start agent:
RETRY
OK
End agent:
RETRY
OK
9
123
Enter the start of the range and press OK.
10 Enter the end of the range and press OK.
Supervisor: N
CHNG
NEXT
11 Press NEXT to keep the agent at agent status
or
press CHNG and then NEXT to give the agent supervisor status.
Auto answer: N
CHNG
NEXT
12 Press NEXT if you do not want calls to be force-delivered to the
agent
or
press CHNG and then NEXT if you want calls to be force-delivered to
the agent.
Miss call: BUSY
LOGOUT BUSY
13 Press OK to accept BUSY (Make Agent Busy) as the Missed Call
option
or
press LOGOUT to select Automatic Logout and press OK.
OK
AC entry: OPT
OPT
PRMPT
OK
14 Press OK if you want prompting for Activity codes to be optional,
or
press PRMPT if you want agents to be prompted and press OK.
NOTE: This step appears only if you use Reporting for Contact
Center.
Agent Admin
ADD
DEL
15 Press ® to end the session.
CHNG
Intelligent Contact Center Telephone Administration Guide
124
Chapter 8 Setting up agents
Assigning an agent to a skillset
You can assign an agent to one or more skillsets. Each agent is responsible for answering calls for
the skillsets they are assigned to.
Note: Before you can add an agent to a skillset, the skillset must be disabled. For how to
disable a skillset see “Disabling a skillset” on page 58.
Dynamic Agent Priority
Agents can have different priorities depending on which skillset they are logged onto. For
example, when an agent is a member of the English skillset, their priority can be 1 because they are
fluent in English. The same agent can have a priority of 3 when they are logged onto the Spanish
skillset, and a priority of 6 when they are logged onto the German skillset.
If the method of call distribution for the skillset is Preferred, the agent with the highest priority
receives the call. The agent priority ranges from 1 to 20. 1 is the highest agent priority for the most
qualified agents. The default value is 10.
To assign an agent to a skillset
1
Press ≤·°‹.
Enter the telset User ID that has voice mail administration rights
and press OK.
For information about creating a user with voice mail
administration rights, see the Avaya Business Communications
Manager 6.0 Administration and Security Guide.
2
Enter the user password and press OK.
3
Press OTHR.
4
Press OTHR.
Admin
FAX
CC
CC Admin
AGENT SKILL OTHR
5
Press CC.
6
Press SKILL.
Skillset:
RETRY
QUIT
7
Enter the number of the skillset you want to add an agent to and
press OK.
8
The display shows whether the skillset is enabled or disabled.
You must disable the skillset before you make changes to it. To
disable a skillset, see “Disabling a skillset” on page 58. Press NEXT
to continue.
Log:
QUIT
RETRY
Pswd:
RETRY
OK
OK
Admin
MBOX
AA
OTHR
Admin
GLIST
CCR
OTHR
OK
Status: xxxxxxx
CHNG
NEXT
NN40170-600
Chapter 8 Setting up agents
Press AGENT.
Skillset Admin
PARM AGENT ROUTE
9
Agent-Skillset
ADD
DEL
VIEW
10 Press ADD.
Add Agent
INDIV RANGE
QUIT
11 Press INDIV.
Agent ID:
DIR
RETRY
OK
xxxx
Priority: 10
CHNG
NEXT
OK
125
12 Enter the ID number of the agent you want to assign and press OK
or
press DIR to search the directory.
13 The display shows the agent’s name.
Press NEXT.
14 This display shows the dynamic priority level of the agent.
Press OK to accept 10 as the agent’s priority level in the skillset
or
press CHNG and enter a priority level from 1to 20.
10 is the default.
15 This display appears briefly.
Agent added
Add Agent
INDIV RANGE
QUIT
16 Press ® to end the session
or
press INDIV to add another agent and follow steps 10 through 13.
Intelligent Contact Center Telephone Administration Guide
126
Chapter 8 Setting up agents
Assigning several agents to a skillset
You can save time by adding several agents to a skillset at once. Agents that are already assigned
to the skillset are not added again.
To assign several agents to a skillset
1
Press ≤·°‹.
Enter the telset User ID that has voice mail administration rights
and press OK.
For information about creating a user with voice mail
administration rights, see the Avaya Business Communications
Manager 6.0 Administration and Security Guide.
2
Enter the user password and press OK.
3
Press OTHR.
4
Press OTHR.
Admin
FAX
CC
CC Admin
AGENT SKILL OTHR
5
Press CC.
6
Press SKILL.
Skillset:
RETRY
QUIT
7
Enter the number of the skillset you want to assign several agents
to and press OK.
Status: xxxxxxx
CHNG
NEXT
8
The display shows whether the skillset is enabled or disabled.
You must disable the skillset before you make changes to it. To
disable a skillset, see “Disabling a skillset” on page 58. Press NEXT
to continue.
Skillset Admin
PARM AGENT ROUTE
9
Press AGENT.
Agent-Skillset
DEL
VIEW
ADD
10 Press ADD.
Add Agent
INDIV RANGE
QUIT
11 Press RANGE.
Start agent:
RETRY
OK
12 Enter the ID number of the first agent you want to assign and press
OK.
End agent:
RETRY
OK
13 Enter the ID number of the last agent you want to assign and press
OK.
Log:
QUIT
RETRY
Pswd:
RETRY
OK
OK
Admin
MBOX
AA
OTHR
Admin
GLIST
CCR
OTHR
NN40170-600
OK
Chapter 8 Setting up agents
Priority: 10
CHNG
OK
14 This display shows the dynamic priority level of the agent.
Press OK to accept 10 as the agent’s priority level in the skillset
or
press CHNG and enter a priority level from 1 - 20.
10 is the default.
15 This display appears briefly.
x added
Add Agent
INDIV RANGE
127
QUIT
16 Press ® to end the session.
Assigning agents to a skillset using Auto Login
Use the Auto Login feature to assign agents to skillsets. This action can only be performed using
CallPilot Manager. Using Auto Login, agents can log in automatically to preconfigured sets and
skillsets and DNs on start-up. The feature is configured as a skillset agent property. When adding
an agent to a skillset, the administrator can choose to have that agent automatically log into the
skillset at a specific DN when the Contact Center starts up. Auto Login is useful when agents are
not assigned to one specific telephone set and move around the contact center as needed. With
Auto Login, all of the telephone sets are able to receive skillset calls and, when used in conjunction
with a Not Ready Timeout, can remain available even after a call is not answered.
If the DN is not available, then the agent is not logged in automatically until Contact Center is
restarted and the DN is available.
Configuring automatic log in
1
From the CallPilot Manager, click Change. The agent’s properties page will appear.
2
Select a DN to log into. This designates the DN for all skillsets.
3
Return to the skillset properties and select the list of skillsets assigned to that agent.
4
Select the agent and check Auto-login.
Removing agents from a skillset
You can remove an agent from a skillset. When you remove an agent, they are removed from the
skillset but not from Contact Center. You can assign the agent to another skillset.
Intelligent Contact Center Telephone Administration Guide
128
Chapter 8 Setting up agents
To remove agents from a skillset
1
Press ≤·°‹.
Enter the telset User ID that has voice mail administration rights
and press OK.
For information about creating a user with voice mail
administration rights, see the Avaya Business Communications
Manager 6.0 Administration and Security Guide.
2
Enter the user password and press OK.
3
Press OTHR.
4
Press OTHR.
Admin
FAX
CC
CC Admin
AGENT SKILL OTHR
5
Press CC.
6
Press SKILL.
Skillset:
RETRY
QUIT
7
Enter the number of the skillset you want to remove an agent from
and press OK.
Status: xxxxxxx
CHNG
NEXT
8
The display shows whether the skillset is enabled or disabled.
The skillset must be disabled before you can delete an agent from
it. To disable a skillset, see “Disabling a skillset” on page 58.
Press NEXT to continue.
Skillset Admin
PARM AGENT ROUTE
9
Press AGENT.
Agent-Skillset
VIEW
ADD
DEL
10 Press DEL.
Agent ID:
DIR
RETRY
11 Enter the ID number of the agent you want to remove and press OK.
Log:
QUIT
RETRY
Pswd:
RETRY
OK
OK
Admin
MBOX
AA
OTHR
Admin
GLIST
CCR
OTHR
xxxx
DEL
Agent deleted
OK
OK
QUIT
12 The display shows the agent’s name.
Press DEL.
13 This display appears briefly.
14 Press ® to end the session.
NN40170-600
Chapter 8 Setting up agents
129
To view agents in a skillset
You can review the agents in a skillset.
1
Press ≤·°‹.
Enter the telset User ID that has voice mail administration rights
and press OK.
For information about creating a user with voice mail
administration rights, see the Avaya Business Communications
Manager 6.0 Administration and Security Guide.
2
Enter the user password and press OK.
3
Press OTHR.
4
Press OTHR.
Admin
FAX
CC
CC Admin
AGENT SKILL OTHR
5
Press CC.
6
Press SKILL.
Skillset:
RETRY
QUIT
7
Enter the number of the skillset you want to view and press OK.
Status: xxxxxxx
CHNG
NEXT
8
The display shows whether the skillset is enabled or disabled.
Press NEXT to continue.
Skill Mbox Pswd:
RESET
NEXT
9
Press NEXT to continue.
Skillset Admin
PARM AGENT OTHR
10 Press AGENT.
Agent-Skillset
ADD
DEL
PRI
11 Press PRI.
x: xxxx
NEXT
PREV
12 The display shows the agent with the lowest ID number in the
skillset and the agent’s current priority.
Press NEXT to see the next agent or PREV to see the previous agent.
Log:
QUIT
RETRY
Pswd:
RETRY
OK
OK
Admin
MBOX
AA
OTHR
Admin
GLIST
CCR
OTHR
OK
VIEW
13 Press ® to end the session.
Intelligent Contact Center Telephone Administration Guide
130
Chapter 8 Setting up agents
To log an agent off
Log:
QUIT
RETRY
Pswd:
RETRY
OK
OK
Admin
MBOX
AA
OTHR
Admin
GLIST
CCR
OTHR
Admin
FAX
CC Admin
AGENT SKILL
Agent Admin
ADD
DEL
Agent ID: xx
DIR
RETRY
xxxx
OUT
1
Press ≤·°‹.
Enter the telset User ID that has voice mail administration rights
and press OK.
For information about creating a user with voice mail
administration rights, see the Avaya Business Communications
Manager 6.0 Administration and Security Guide.
2
Enter the user password and press OK.
3
Press OTHR.
4
Press OTHR.
5
Press CC.
6
Press AGENT.
7
Press °. This option does not appear as a display button option.
8
Enter the agent’s ID number and press OK.
9
The agent’s name is displayed.
Press OUT.
You will see Logged out if the agent is logged in, or Not logged
in if the agent is logged out.
CC
OTH
CHNG
OK
QUIT
10 Press ® to end the session.
To delete an agent
Log:
QUIT
RETRY
Pswd:
RETRY
Admin
MBOX
NN40170-600
OK
OK
AA
OTHR
1
Press ≤·°‹.
Enter the telset User ID that has voice mail administration rights and
press OK.
For information about creating a user with voice mail administration
rights, see the Avaya Business Communications Manager 6.0
Administration and Security Guide.
2
Enter the user password and press OK.
3
Press OTHR.
Chapter 8 Setting up agents
Admin
GLIST
CCR
OTHR
Admin
FAX
CC Admin
AGENT SKILL
OTHR
Agent Admin
ADD
DEL
CHNG
Agent ID:
DIR
RETRY
xxxx:
DEL
Agent deleted
4
Press OTHR.
5
Press CC.
6
Press AGENT.
7
Press DEL.
8
Enter the agent’s ID number and press OK
or
press DIR to search the directory.
9
The agent’s name is displayed. Press DEL.
131
CC
OK
QUIT
10 The display shows the agent is deleted.
11 Press ® to end the session.
Intelligent Contact Center Telephone Administration Guide
132
Chapter 8 Setting up agents
To reset an agent password
1
Press ≤·°‹.
Enter the telset User ID that has voice mail administration rights
and press OK.
For information about creating a user with voice mail
administration rights, see the Avaya Business Communications
Manager 6.0 Administration and Security Guide.
2
Enter the user password and press OK.
3
Press OTHR.
4
Press OTHR.
5
Press CC.
CC Admin
AGENT SKILL OTHR
6
Press AGENT.
Agent Admin
ADD
DEL
CHNG
7
Press CHNG.
Agent ID:
DIR
RETRY
OK
8
Enter the ID number of the agent you want to change and press OK.
If you do not know the agent’s ID number press DIR to search the
directory.
9
Press RESET to reset the agent’s password.
Log:
QUIT
RETRY
Pswd:
RETRY
OK
OK
Admin
MBOX
AA
OTHR
Admin
GLIST
CCR
OTHR
Admin
FAX
Login Pswd
RESET
CC
NEXT
10 Press ® to end the session.
Changing an agent priority
Before you can change an agent's priority:
•
•
the skillset must be disabled. See “Disabling a skillset” on page 58.
the agent must be logged off. See “To log an agent off” on page 130.
NN40170-600
Chapter 8 Setting up agents
133
To change an agent priority
1
Press ≤·°‹.
Enter the telset User ID that has voice mail administration rights
and press OK.
For information about creating a user with voice mail
administration rights, see the Avaya Business Communications
Manager 6.0 Administration and Security Guide.
2
Enter the user password and press OK.
3
Press OTHR.
4
Press OTHR.
Admin
FAX
CC
CC Admin
AGENT SKILL OTHR
5
Press CC.
6
Press SKILL.
Skillset:
RETRY
QUIT
7
Enter the number of the skillset you want to view and press OK.
Status: xxxxxxx
CHNG
NEXT
8
The display shows whether the skillset is enabled or disabled.
Press NEXT to continue.
Skillset Admin
PARM AGENT ROUTE
9
Press AGENT.
Agent-Skillset
ADD
DEL
VIEW
10 Press VIEW.
x: xxxx
NEXT
PREV
11 The display shows the agent with the lowest ID number in the
skillset. You can press NEXT to see the next agent or PREV to see
the previous agent.
or
press VIEW to change the priority of the agent.
Log:
QUIT
RETRY
Pswd:
RETRY
OK
OK
Admin
MBOX
AA
OTHR
Admin
GLIST
CCR
OTHR
OK
VIEW
Priority:
CHNG
OK
Priority:
CHNG
OK
12 Press CHNG to change the priority of the agent.
13 Press OK.
Repeat steps 11 to 13 to change other agent’s priority.
14 Press ® to end the session.
Intelligent Contact Center Telephone Administration Guide
134
Chapter 8 Setting up agents
NN40170-600
135
Chapter 9
Intelligent Overflow Routing
Use Intelligent Overflow Routing to control how calls are handled that are waiting in a skillset for
an agent. You can specify that a waiting call:
•
•
•
•
•
overflows to one or more skillsets and keeps its conditions and original skillset greetings.
Agents from the specified skillsets can answer the call.
moves to another skillset where the call loses its conditions, and takes on the properties of the
new skillset, including skillset greetings. The system tracks the total length of the call from the
time the call enters the system until it is answered.
transfers to the skillset mailbox
transfers to an extension, mailbox, external telephone number, CCR Tree, Automated
Attendant or operator
changes in priority level
Intelligent Overflow Routing handles calls differently depending on the rules that you create.
Each rule is based on a mode, one or more conditions, and one or more actions.
Mode
Intelligent Overflow Routing looks at the mode the skillset is in to determine how to handle a call.
A skillset can be in Day mode, Night mode, or 24 Hour Service. Each mode can have its own rules
for how to handle calls. The default mode is Day.
Condition
After Intelligent Overflow Routing determines what mode the skillset is in, Intelligent Overflow
Routing determines what conditions apply to the call. The two possible conditions are:
•
Whether the timer expires. You set the length of time a call waits for an agent before the call is
sent to the destination that you specify. The maximum time a call can wait is 59:59. When a
call enters a skillset, the timer starts at 00:00. Overflow rules are applied according to the time
a call is in a skillset, not according to the total time a call is in the system. For example, if you
set up skillset 1 to move a call to skillset 2 after five minutes, and you set up skillset 2 to move
a call to skillset 1 after two minutes, a call in skillset 1 will be moved to skillset 2 after five
minutes. The call will move back to skillset 1 after an additional two minutes, then back to
skillset 2 after an additional five minutes.
•
Whether there are agents logged on to the skillset. If there are no agents logged on to the
skillset, the call is sent to the destination that you specify. If you select the Agents Not Logged
In check box, the overflow rule applies if there are no agents logged on to the skillset. If you
do not select the Agents Not Logged In check box, the overflow rule applies if there are agents
logged on to the skillset.
Intelligent Contact Center Telephone Administration Guide
136
Chapter 9 Intelligent Overflow Routing
Note: You can select both conditions within the same rule. The rule applies when both
conditions are met.
Action
When Intelligent Overflow Routing determines that a condition is met for the call, the call goes to
the destination you specify. Possible actions are:
•
•
•
•
•
moving the call to a new skillset.
The caller hears the greetings for the new skillset.
overflowing the call to one or more skillsets.
The caller continues to hear the greetings from the original skillset.
sending the call to the skillset mailbox
transferring the call to an extension, external number, mailbox, skillset mailbox, Automated
Attendant, CCR Tree or operator
changing the priority of the call
Note: If an overflow step is configured for No Agents, the overflow rule executes right
away, and even a forced greeting will not play. If you want to play the greeting, configure
a timer with the No Agents rule.
NN40170-600
Chapter 9 Intelligent Overflow Routing
137
Examples of Intelligent Overflow Routing rules
Intelligent Overflow Routing gives you flexibility in setting the rules for how calls are handled.
The following tables show examples of different ways you can configure Intelligent Overflow
Routing rules.
Example 1
In this example, calls to the contact center go to skillset 1, which is the company’s service
department. If a call is not answered by an agent within two and a half minutes, the call overflows
to skillset 2 the sales department skillset. An agent from any of the two skillsets can answer the
call.
The Contact Center Administrator:
•
•
•
•
selects the Day service mode
sets the timer for 2 minutes and 30 seconds
selects Overflow to Skillset as the action
selects skillsets 2 and 3
Mode
Conditions
Action
Explanation
Day
02:30
Overflow: 2
This Intelligent Overflow Routing rule applies only if there
are one or more agents are logged on.
If a call is not answered by an agent before 2 minutes and
30 seconds, the call overflows to skillset 2. When a call
overflows, it also remains queued at the original skillset
destination.
Note: If you want calls to overflow to multiple skillsets, specify all the skillsets in the
same rule. The call bypasses skillsets with busy agents and overflows to the next skillset
with an available agent.
Example 2
In this example, calls to the contact center go to skillset 1. The Administrator wants to ensure that
lower priority calls do not wait in a skillset indefinitely. If a call waits for 2 minutes or more, a
higher priority is assigned to the call.
The Contact Center Administrator:
•
•
•
selects the 24 Hour Service mode
sets the timer for 2 minutes
selects Change Call Priority only as the action and selects 1 as the new call priority
Mode
Conditions
Action
Explanation
24 Hour
02:00
Change call priority
to 1
This Intelligent Overflow Routing rule applies to any call
that has been waiting in skillset 1 for 2 minutes.
If a call is not answered by an agent when the timer
elapses, the call priority changes to the highest priority.
Intelligent Contact Center Telephone Administration Guide
138
Chapter 9 Intelligent Overflow Routing
Example 3
In this example, calls to the contact center go to skillset 1, which is the company help line. If there
are no agents logged on to the help line, the call moves to skillset 2, which is the company’s
service department. When a call moves to a new skillset, it does not remain queued at the original
skillset destination.
The Contact Center Administrator:
• selects the Day service mode
• selects the Agents not logged in check box
• selects Move to Skillset as the action
• selects skillset 2
Mode
Conditions
Action
Explanation
Day
No Agents
Move to Skillset 2
Intelligent Overflow Routing checks to see
whether agents are logged on to skillset 1, but
does not check the timer.
If there are no agents logged on to skillset 1, the
call moves to skillset 2 and gets the new
greetings for skillset 2. When a call moves to a
new skillset, it does not remain queued at the
original skillset destination.
Example 4
In this example, calls to the contact center go to skillset 1, which is the company help line. If no
agents are logged on to skillset 1, the call immediately moves to skillset 2. If agents are logged on
to skillset 1 and the call is not answered within two and a half minutes, the call transfers to the
skillset mailbox where the caller can leave a message.
The Contact Center Administrator creates two rules. In the first rule the Contact Center
Administrator:
•
•
•
•
selects the 24 Hour service mode
selects the Agents not logged in check box
selects Move to Skillset as the action
selects skillset 2
In the second rule the Contact Center Administrator:
•
•
•
selects the 24 Hour service mode
sets the timer to 2 minutes and 30 seconds
selects the skillset mailbox as the action
Mode
Conditions
Action
Explanation
24 Hour
No Agents
Move to Skillset 2
24 Hour
02:30
Skillset Mailbox
The call moves to skillset 2 if no agents are logged
on. If agents are logged on and the call is not
answered within 2 minutes and 30 seconds, the call
transfers to the skillset mailbox.
NN40170-600
Chapter 9 Intelligent Overflow Routing
139
Example 5
In this example, calls to the contact center go to skillset 1, which is the company’s help line. If the
call is not answered by an agent within 2 minutes and 30 seconds and if there are no agents logged
on to skillset 1, the call overflows to skillset 2, which is the service department. If the call is not
answered within an additional two minutes, the call transfers to the skillset mailbox where the
caller can leave a message.
The Contact Center Administrator creates two rules. In the first rule the Contact Center
Administrator:
•
•
•
•
•
selects the Day service mode
sets the timer to 2 minutes and 30 seconds
selects the Agents not logged in check box
selects Overflow to skillset as the action
selects skillset 2
In the second rule the Contact Center Administrator:
•
•
•
•
selects the Day service mode
sets the timer to 4 minutes and 30 seconds
selects the Agents not logged in check box
selects the skillset mailbox as the action
Mode
Conditions
Action
Explanation
Day
02:30 and No Agents
Overflow: 2
Day
04:30 and No Agents
Skillset Mailbox
The call overflows to skillset 2 after the call is in
skillset 1 for 2 minutes and 30 seconds and if there
are no agents logged on to skillset 1. If the call is
not answered within an additional 2 minutes the
call transfers to the skillset mailbox.
Intelligent Contact Center Telephone Administration Guide
140
Chapter 9 Intelligent Overflow Routing
Example 6
In this example, calls to the contact center go to skillset 1, which is the company’s help line. The
Night Service Mode is set to start at 6:00 pm. After 6:00 pm there are no other skillsets with agents
logged on. If no agents are logged on to skillset 1 or if the call is not answered by an agent within
two and a half minutes, the call transfers to the skillset mailbox.
In this example, the Contact Center Administrator inserts two rules. The Contact Center
Administrator:
•
•
•
•
selects the Night service mode for both rules
sets the timer to 2 minutes and 30 seconds as the condition for the first rule
selects the Agents not logged in check box as the condition for the second rule
selects the skillset mailbox as the action for both rules
Mode
Conditions
Action
Explanation
Night
02:30
Skillset Mailbox
The call transfers to the skillset mailbox if the call is
not answered within 2 minutes and 30 seconds.
Night
No Agents
Skillset Mailbox
The call transfers to the skillset mailbox if there are
no agents logged on to skillset 1.
Example 7
In this example, calls to the contact center go to skillset 1, which is the company’s order desk.
Skillset 1 agents are the company’s experienced sales agents. If no agents are logged on to skillset
1 and if the call is not answered by an agent within two and a half minutes, the call overflows to
skillset 2. Skillset 2 agents are the company’s less experienced sales agents.
The Contact Center Administrator:
• selects the Day service mode
• sets the timer to 2 minutes and 30 seconds
• selects the Agents not logged in check box
• selects Overflow as the action
• selects skillset 2
Mode
Conditions
Action
Explanation
Day
02:30 and No Agents
Overflow: 2
The call overflows to skillset 2 if the call is not
answered within 2 minutes and 30 seconds and if
there are no agents logged on to skillset 1.
NN40170-600
Chapter 9 Intelligent Overflow Routing
141
Example 8
In this example, calls to the contact center are answered by skillset 1, the company’s sales skillset.
If a call is not answered within 10 seconds, it overflows to skillset 2. If the call is not answered
within an additional 20 seconds, the call goes to the skillset 1 mailbox.
The Contact Center Administrator creates two rules.
In the first rule the Contact Center Administrator:
• selects the Day service mode
• sets the timer to 10 seconds
• sets Overflow as the action
• selects skillsets 2
In the second rule the Contact Center Administrator:
• selects the Day service mode
• sets the timer to 30 seconds
• selects the skillset mailbox as the action
Mode
Conditions
Action
Explanation
Day
00:10
Overflow: 2
Day
00:30
Skillset Mailbox
The call overflows to skillset 2 if the call is not
answered within 10 seconds. The call goes to the
skillset mailbox if it is not answered within an
additional 20 seconds.
Intelligent Contact Center Telephone Administration Guide
142
Chapter 9 Intelligent Overflow Routing
To add Overflow rules
1
Press ≤·°‹.
Enter the telset User ID that has voice mail administration rights
and press OK.
For information about creating a user with voice mail
administration rights, see the Avaya Business Communications
Manager 6.0 Administration and Security Guide.
2
Enter the user password and press OK.
3
Press OTHR.
4
Press OTHR.
Admin
FAX
CC
CC Admin
AGENT SKILL OTHR
5
Press CC.
6
Press SKILL.
Skillset:
RETRY
QUIT
7
Enter the number of the skillset you want to change and press OK.
Status: xxxxxxx
CHNG
NEXT
8
The display shows whether the skillset is enabled or disabled.
You must disable the skillset before you make changes to it. To
disable the skillset Press CHNG and press NEXT to continue.
Skill mbox pswd
RESET
NEXT
9
Press NEXT to continue.
Skillset Admin
PARM AGENT OTHR
10 Press OTHR.
Skillset Admin
ROUTE OVFLW UNCF
11 Press OVFLW.
Overflow rules
CHNG
DEL
ADD
12 Press ADD.
<2>: MODE
DAY
NIGHT
24HR
13 The display shows the Overflow rule number
Select whether you want the rule to apply to Day, Night or 24 Hour
mode. Day is the default.
<2>: Method
TIME NOAGNT
BOTH
Log:
QUIT
RETRY
Pswd:
RETRY
OK
OK
Admin
MBOX
AA
OTHR
Admin
GLIST
CCR
OTHR
NN40170-600
OK
14 Select TIME if you want Overflow Routing to time how long the
call waits in the skillset before it goes to the destination that you
specify
or
select NOAGNT if you want Overflow to apply if there are no agents
logged onto the skillset
or
select BOTH if you want Overflow to apply if you want TIME and
NOAGNT to apply.
Chapter 9 Intelligent Overflow Routing
<2>: Timeout:
RETRY
OK
143
15 Enter the time that a call waits in the skillset before it goes to the
destination that you specify and press OK.
2: Overflow To
SSMBX OFLSS OTHR
16 Press SSMBX if you want calls to overflow to the skillset mailbox
and in the next step enter the mailbox number
or
press OFLSS if you want calls to overflow to another skillset and in
the next step enter the skillset number
or
press OTHER for more destinations: Move to another skillset,
Transfer or Change call Priority, and in the next step enter the
information about where you want to overflow calls.
<Data prompt>
RETRY
17 Enter the information about where you want to overflow calls and
press OK.
The appearance of this display depends on what kind of overflow
you choose.
OK
Another rule?
YES
NO
18 Press YES if you want to change or view another Overflow rule
or
press NO to return to the Overflow display shown in step 11
or
press ® to end the session.
Intelligent Contact Center Telephone Administration Guide
144
Chapter 9 Intelligent Overflow Routing
To change and view Overflow rules
1
Press ≤·°‹.
Enter the telset User ID that has voice mail administration rights
and press OK.
For information about creating a user with voice mail
administration rights, see the Avaya Business Communications
Manager 6.0 Administration and Security Guide.
2
Enter the user password and press OK.
3
Press OTHR.
4
Press OTHR.
Admin
FAX
CC
CC Admin
AGENT SKILL OTHR
5
Press CC.
6
Press SKILL.
Skillset:
RETRY
QUIT
7
Enter the number of the skillset you want to change and press OK.
Status: xxxxxxx
CHNG
NEXT
8
The display shows whether the skillset is enabled or disabled.
You must disable the skillset before you make changes to it. To
disable the skillset Press CHNG and press NEXT to continue.
Skill mbox pswd
RESET
NEXT
9
Press NEXT to continue.
Skill mbox pswd
RESET
NEXT
10 Press NEXT to continue.
Skillset Admin
PARM AGENT OTHR
11 Press OTHR.
Skillset Admin
ROUTE OVFLW UNCF
12 Press OVFLW.
Overflow rules
DEL
ADD
CHNG
13 Press CHNG.
1: mode
CHANGE
14 The first Overflow rule, shown here as rule 1, is displayed.
If you want to change another rule, press NEXT until you see the
display in step 19.
Log:
QUIT
RETRY
Pswd:
RETRY
OK
OK
Admin
MBOX
AA
OTHR
Admin
GLIST
CCR
OTHR
OK
NEXT
Press CHANGE if you want to change the mode of the Overflow rule
(mode is either Day, Night or 24 Hour)
or
press NEXT to continue.
NN40170-600
Chapter 9 Intelligent Overflow Routing
1: time
CHANGE
NEXT
1: No agents
CHANGE
NEXT
1: <info>
CHANGE MORE
NEXT
1: Priority
CHANGE
NEXT
Overflow rules
ADD
CHNG
DEL
145
15 Press CHANGE if you want to change the time of the Overflow rule
or
press NEXT to continue.
If you do not have a time set for this Overflow rule this display
does not appear.
16 Press CHANGE if you want to change the agent setting of the
Overflow rule
or
press NEXT to continue.
17 The display shows additional information about the Overflow rule.
What appears depends on the parameters for the rule.
Press CHANGE to change the information displayed
or
press MORE to view more information about the rule
or
press NEXT to continue.
18 Press CHANGE if you want to change the priority of the Overflow
rule
or
press NEXT to continue.
If you do not have a priority setting configured this display does
not appear.
19 Press ® to end the session.
Intelligent Contact Center Telephone Administration Guide
146
Chapter 9 Intelligent Overflow Routing
To delete Overflow rules
1
Press ≤·°‹.
Enter the telset User ID that has voice mail administration rights
and press OK.
For information about creating a user with voice mail
administration rights, see the Avaya Business Communications
Manager 6.0 Administration and Security Guide.
2
Enter the user password and press OK.
3
Press OTHR.
4
Press OTHR.
Admin
FAX
CC
CC Admin
AGENT SKILL OTHR
5
Press CC.
6
Press SKILL.
Skillset:
RETRY
QUIT
7
Enter the number of the skillset you want to change and press OK.
Status: xxxxxxx
CHNG
NEXT
8
The display shows whether the skillset is enabled or disabled.
You must disable the skillset before you make changes to it. To
disable the skillset Press CHNG and press NEXT to continue.
Skill mbox pswd
RESET
NEXT
9
Press NEXT to continue.
Skillset Admin
PARM AGENT OTHR
10 Press OTHR.
Skillset Admin
ROUTE OVFLW UNCF
11 Press OVFLW.
Overflow rules
ADD
CHNG
DEL
12 Press DEL.
Number to erase
SINGLE
ALL
13 Press SINGLE to erase one rule and go to step 15
or
press ALL to erase all the overflow rules for the skillset and go to
the next step.
Erase all rules?
YES
NO
14 Press YES to erase all the overflow rules for the skillset and go to
step 17.
Erase rule:
RETRY
15 Enter the number of the rule you want to delete and press OK.
Log:
QUIT
RETRY
Pswd:
RETRY
OK
OK
Admin
MBOX
AA
OTHR
Admin
GLIST
CCR
OTHR
NN40170-600
OK
OK
Chapter 9 Intelligent Overflow Routing
Erase rule: X
CHNG
OK
147
16 Press OK to confirm the deletion
or
press CHNG and enter the number of the rule you want to delete.
17 Press ® to end the session.
Intelligent Contact Center Telephone Administration Guide
148
Chapter 9 Intelligent Overflow Routing
NN40170-600
149
Chapter 10
Routing table administration
Routing tables determine how the system answers, holds and routes incoming calls to agents in
your contact center. You set up routing tables to handle incoming calls for each skillset. A call in a
skillset receives the treatment specified by the routing table. The treatment can be a combination
of greetings, transfers, and being on hold. If an agent becomes available, the call is sent to the
available agent.
Each skillset has a Day and a Night Routing Table. Set up the Day Routing Table for your business
hours. Set up the Night Routing Table for your non-business hours.
The maximum number of steps you can add to a routing table is 20. You can record the routing
table steps you create in “Routing Tables” on page 207.
Note: You can add and delete steps to a routing table after the initial set up. You must
disable the skillset, and then make necessary changes.
Setting up DID routing
You can route calls based on their Direct Inward Dialing (DID) number. DID is the ability to make
a telephone call directly into an internal extension, without having to go through the operator.
To route DID calls, set up a DID target line and assign the target line to a skillset.
To set up DID routing for Avaya Business Communications
Manager
1
In Business Element Manager, set up a DID target line.
For information about setting up a DID target line, see the Avaya Business Communications
Manager 6.0 Administration and Security Guide
2
In CallPilot Manager, configure the target line number to be answered by Contact Center.
For information about configuring lines, see “Configuring lines” on page 41.
Intelligent Contact Center Telephone Administration Guide
150
Chapter 10 Routing table administration
Fax Detection
Contact Center can detect fax calls and route them to a skillset mailbox. If you want Contact
Center to detect incoming faxes, you must make your first routing table step:
•
•
•
•
a Greeting step
with Forced Play
without a transfer
with a greeting that is a minimum of 11 seconds long
Fax Detection applies only if a fax machine is attempting to transmit a fax at the start of a greeting.
If a fax transmission starts several seconds after the start of a greeting, it is possible for the fax tone
not to be detected.
If you do not set up the routing table to detect a fax call, some fax calls can be routed to agents, and
some fax calls can be routed to the routing table’s skillset mailbox.
To enable a routing table to detect fax calls, change the first step.
NN40170-600
Chapter 10 Routing table administration
151
About types of Routing Table steps
You can add these types of steps to routing tables:
Greeting
A Greeting step plays a greeting to callers waiting in a skillset. You assign
greeting parameters to each greeting. After the greeting plays, the call goes
to the next routing step. If there is no next step, the call ends.
Distribute for
During a distribute for step, calls wait to be distributed to agents. If no
agents are available before the distribution time expires, the call goes to the
next step in the routing table. If there is no next step set up in the routing
table, the call ends.
The minimum distribution time is zero and the maximum distribution time is
59 minutes and 59 seconds. The default distribution time is 30 seconds.
Goto
A Goto step is the last step in a routing table. A Goto step moves the caller
to an earlier routing step.
For example, if a Goto step points to step 1, the call goes back to step 1
and repeats the steps. The steps are repeated until an agent becomes
available or the caller decides to leave a message in the skillset mailbox.
The first step in a routing table cannot be a Goto step because there are no
possible target steps yet.
A Goto step cannot point to itself. A Goto step can only point to any
previously created step.
Transfer
A transfer step can transfer calls to:
• an extension
• a mailbox
• an external number
• the Automated Attendant
• an operator
• a CCR Tree
Disconnect
A Disconnect step releases calls from the skillset. If the first step in a
routing table is a Disconnect, Contact Center does not answer the call.
Intelligent Contact Center Telephone Administration Guide
152
Chapter 10 Routing table administration
Adding a Greeting step
Greeting steps play a message to waiting callers. You must have a greeting recorded before you
can use it in a Greeting step. For information about recording a Contact Center greeting, see
“Recording a Contact Center greeting” on page 46.
Greeting step parameters
You can assign these parameters to greeting steps. If the first step in a routing table is a Greeting
step, it can detect fax calls and route them to the skillset mailbox for the routing table. For more
information, see “Fax Detection” on page 150.
Forced Play
Enable Forced Play for a greeting that contains important information that
you want callers to hear. If an agent becomes available while a caller is
listening to a Forced greeting, the greeting is not interrupted. The caller
must listen to the entire greeting.
If you do not enable Forced Play, when an agent becomes available the
greeting is interrupted and the call goes to the available agent.
Limit the number of Forced Play greetings and keep Forced Play greetings
as short as possible. Long Forced Play greetings increase the transfer time
of calls to agents and cause unpredictable increases in distribution times.
For more information, see “Routing Table administration” on page 192.
Intelligent Caller Input
Routing, Basic (Xfer)
While the greeting plays callers can:
• press ⁄ to transfer to the Automated Attendant
• press ‚ to transfer to the Operator
• press · to leave a message in the skillset mailbox
• press ¤ to transfer to a CCR Tree
These are the default keypad buttons. You can change the keypad buttons.
Ensure that the Non-business hours greetings have Intelligent Call Input
Routing, Basic enabled so that callers can direct how they transfer their
calls.
NN40170-600
Chapter 10 Routing table administration
Intelligent Caller Input
Routing, Advanced
153
Intelligent Caller Input Routing, Advanced uses the Caller Input Rules you
create to change the priority and route calls to other skillsets or locations
based on caller multi-digit DTMF input.
Callers enter a sequence of DTMF digits such as a charge card number or
passcode. The caller input is used to determine call treatment. Based on
the caller input, the call can change in priority and/or be routed to:
• the Automated Attendant
• the Operator
• the skillset mailbox
• a CCR Tree
• a mailbox
• an extension
• an external number
• another skillset
Intelligent Caller Input Routing, Advanced parameters:
• Retries is 0-5, default is 2. This is the number of times a Data Entry step
repeats itself on a caller entry error.
• Number of Caller Input Rule tables is equal to the number of available
skillsets.
No Intelligent Caller Input
Routing (Norm)
While the greeting plays callers cannot press a dialpad button to transfer
their call. Contact Center ignores buttons pressed on the dialpad. The
greeting plays without interruption. This is the default setting. At the end of
the greeting, the caller goes to the next routing step. If there is no next step,
the call ends.
Intelligent Contact Center Telephone Administration Guide
154
Chapter 10 Routing table administration
To add a Greeting step
1
Press ≤·°‹.
Enter the telset User ID that has voice mail administration rights
and press OK.
For information about creating a user with voice mail
administration rights, see the Avaya Business Communications
Manager 6.0 Administration and Security Guide.
2
Enter the user password and press OK.
3
Press OTHR.
4
Press OTHR.
Admin
FAX
CC
CC Admin
AGENT SKILL OTHR
5
Press CC.
6
Press SKILL.
Skillset:
RETRY
QUIT
7
Enter the number of the skillset you want to add a Greeting step to
and press OK.
Status: xxxxxx
CHNG
NEXT
8
If the skillset is enabled, press CHNG to disable it.
Press NEXT.
Skill mbox pswd
RESET
NEXT
9
Press NEXT to continue.
Skillset Admin
PARM AGENT OTHR
10 Press OTHR.
Skillset Admin
ROUTE OVFLW UNCF
11 Press ROUTE.
Route Table
DAY
NIGHT
QUIT
12 Press DAY or NIGHT.
In this example, Day is shown.
Day routing
SETUP
QUIT
Step 1
DIST
GRTG
OTHR
Log:
QUIT
RETRY
Pswd:
RETRY
OK
OK
Admin
MBOX
AA
OTHR
Admin
GLIST
CCR
OTHR
OK
14 Press GRTG.
15 Press NORMAL.
Greeting type
EWT NORMAL
CC greeting: x
RETRY
OK
CC greeting: x
RETRY
PLAY
OK
NN40170-600
13 Press SETUP.
16 Enter the number of the greeting you want to use and press OK.
17 Press OK.
Chapter 10 Routing table administration
Type: Norm
Force
XFER
OK
18 Assign the parameters for the Greeting step:
•
•
•
•
AA Key: 1 Tbl 1
CHNG DISABL NEXT
AA Key: disable
CHNG
NEXT
155
If you want to use Norm, press OK and go to step 34.
If you want the Greeting to be forced, press Force, press OK
and go to step 34.
If you want the Greeting to be forced and callers to be able to
transfer after the greeting, press Force, press XFER and go to
step 19.
If you want callers to be able to transfer during the Greeting,
press XFER and go to step 19.
19 The display shows the default key for the Automated Attendant.
Press CHNG if you want to change the key that callers press to reach
the Automated Attendant and change which greeting table to use
Note: If you do not want to assign a greeting table, enter 0 for Tbl
or
press DISABL if you do not want callers to be able to press a key to
reach the Automated Attendant, press NEXT and go to step 22
or
press NEXT to accept the default key and go to step 22.
Note: If no Automated Attendant is selected, Tbl x is replaced with
None.
AA Key:
RETRY
OK
20 Enter the key you want to assign for the Automated Attendant and
press OK.
AA Key: x
CHNG DISABL NEXT
21 Press NEXT.
Oper Key: 0
CHNG DISABL NEXT
22 The display shows the default key for the Operator.
Press CHNG if you want to change the key that callers press to reach
the Operator
or
press DISABL if you do not want callers to be able to press a key to
reach the Operator, press NEXT and go to step 25
or
press NEXT to accept the default key and go to step 25.
Oper Key:
RETRY
23 Enter the key you want to assign for the Operator and press OK.
OK
Oper Key: x
CHNG DISABL NEXT
24 Press NEXT.
Intelligent Contact Center Telephone Administration Guide
156
Chapter 10 Routing table administration
Mbox Key: 9
CHNG DISABL NEXT
25 The display shows the default key for the skillset mailbox.
Press CHNG if you want to change the key that callers press to reach
the skillset mailbox
or
press DISABL if you do not want callers to be able to press a key to
reach the skillset mailbox, press NEXT and go to step 28
or
press NEXT to accept the default key and go to step 28.
Mbox Key:
RETRY
26 Enter the key you want to assign for the skillset mailbox and press
OK.
OK
Mbox Key: x
CHNG DISABL NEXT
27 Press NEXT.
CCR Key: 2 Tr: 1
CHNG
DISABL
28 The display shows the default key for a CCR Tree.
Press CHNG if you want to change the key that callers press to reach
the CCR Tree
or
press DISABL if you do not want callers to be able to press a key to
reach the skillset mailbox, press NEXT and go to step 32
or
press OK to accept the default key and go to step 33.
OK
Note: You cannot let callers transfer to a CCR Tree unless you
have created a CCR Tree. Refer to the CallPilot Telephone
Administration Guide or the CallPilot Manager Set Up and
Operation Guide.
CCR Key:
RETRY
CCR Key: x
CHNG
OK
NEXT
CCR tree:
RETRY
OK
CCR Key: x Tr: x
CHNG DISABL
OK
29 Enter the key you want to assign for the CCR Tree and press OK.
30 Press NEXT.
31 Enter the number of the CCR Tree you want callers to transfer to
and press OK.
32 Press OK.
Type: Norm Xfer
Force
XFER
OK
33 Press OK.
Another step?
YES
QUIT
34 Press YES to continue to build the table
or
press ® to end the session.
If you want to continue to add steps to the table:
•
•
To add a Distribute for step, start at step 10 of “To add a Distribute for step” on page 157.
To add a Goto for step, start at step 10 of “Adding a Goto step” on page 158.
NN40170-600
Chapter 10 Routing table administration
•
•
157
To add a Transfer step, start at step 10 of “Adding a Transfer step” on page 160.
To add a Disconnect step, start at step 10 of “Adding a Disconnect step” on page 163.
Note: You can add and delete steps to a routing table after the initial set up. You must
disable the skillset, and then make necessary changes.
To add a Distribute for step
Distribute for steps put callers on hold while they wait for an agent.
1
Press ≤·°‹.
Enter the telset User ID that has voice mail administration rights
and press OK.
For information about creating a user with voice mail
administration rights, see the Avaya Business Communications
Manager 6.0 Administration and Security Guide.
2
Enter the user password and press OK.
3
Press OTHR.
4
Press OTHR.
Admin
FAX
CC
CC Admin
AGENT SKILL OTHR
5
Press CC.
6
Press SKILL.
Skillset:
RETRY
QUIT
7
Enter the number of the skillset you want to add a Distribute step to
and press OK.
Status: xxxxxx
CHNG
NEXT
8
If the skillset is enabled, press CHNG to disable it.
Press NEXT.
Skill mbox pswd
RESET
NEXT
9
Press NEXT to continue.
Skillset Admin
PARM AGENT OTHR
10 Press OTHR.
Skillset Admin
ROUTE OVFLW UNCF
11 Press ROUTE.
Route Table
DAY
NIGHT
QUIT
12 Press DAY or NIGHT.
In this example, Day is shown.
Day routing
SETUP
QUIT
Log:
QUIT
RETRY
Pswd:
RETRY
OK
OK
Admin
MBOX
AA
OTHR
Admin
GLIST
CCR
OTHR
OK
13 Press SETUP.
Intelligent Contact Center Telephone Administration Guide
158
Chapter 10 Routing table administration
Step x
DIST
GRTG
OTHR
15 The default hold time is 00:30.
Press CHNG to change the default time
or
press OK to accept the default and go to step 18.
Dist time: 00:30
CHNG
OK
Dist time mmss:
RETRY
14 Press DIST.
OK
16 Enter the hold time and press OK.
Dist time: xx:xx
CHNG
OK
17 Press OK.
Another step?
YES
QUIT
18 Press YES to add another step
or
press ® to end the session.
Adding a Goto step
Goto steps send a caller to a previous step in the routing table. You can add a Goto step only to the
end of a routing table. There must be additional steps in the route you are setting up.
To add a Goto step.
1
Press ≤·°‹.
Enter the telset User ID that has voice mail administration rights
and press OK.
For information about creating a user with voice mail
administration rights, see the Avaya Business Communications
Manager 6.0 Administration and Security Guide.
2
Enter the user password and press OK.
3
Press OTHR.
4
Press OTHR.
Admin
FAX
CC
CC Admin
AGENT SKILL OTHR
5
Press CC.
6
Press SKILL.
Skillset:
RETRY
QUIT
7
Enter the number of the skillset you want to add a Goto step to and
press OK.
Log:
QUIT
RETRY
Pswd:
RETRY
OK
OK
Admin
MBOX
AA
OTHR
Admin
GLIST
CCR
OTHR
NN40170-600
OK
Chapter 10 Routing table administration
Status: xxxxxx
CHNG
NEXT
8
If the skillset is enabled, press CHNG to disable it.
Press NEXT.
Skill mbox pswd
RESET
NEXT
9
Press NEXT to continue.
Skillset Admin
PARM AGENT OTHR
10 Press OTHR.
Skillset Admin
ROUTE OVFLW UNCF
11 Press ROUTE.
Route Table
DAY
NIGHT
QUIT
12 Press DAY or NIGHT.
In this example, Day is shown.
Day routing
SETUP
QUIT
Step x
DIST GRTG
OTHR
Step x
DISC
XFER
GOTO
Goto Step: x
CHNG
OK
Table complete
159
13 Press SETUP.
14 Press OTHR.
15 Press GOTO.
16 Press CHNG until the step is displayed that you want the call to go to
and press OK
or
press OK to accept the step that is shown.
17 This display appears.
After you add a Goto step you cannot add more steps to the table.
18 Press ® to end the session.
Intelligent Contact Center Telephone Administration Guide
160
Chapter 10 Routing table administration
Adding a Transfer step
A transfer step can transfer calls to:
•
•
•
•
•
•
an extension
a mailbox
an external number
the Automated Attendant
an operator
a CCR Tree
If you choose Transfer to Auto Attendant and have a CCR Tree assigned to the Auto Attendant
Greeting Table, the call automatically transfers to the Home node of the CCR Tree. The Contact
Center caller will not hear the Auto Attendant greeting.
If you want the caller to hear the Auto Attendant greeting when you choose Transfer to Auto
Attendant as a step in the greeting table, select one of the following methods:
•
•
•
•
Choose Transfer to Auto Attendant and set the CCR Tree to None in the Auto Attendant
greeting table setup.
Choose Transfer to Auto Attendant and assign a CCR Tree to the Auto Attendant greeting
table. Record the prompt of the CCR Tree Home node so it is the same as the Auto Attendant
company greeting that is skipped when the caller is transferred to Auto Attendant.
Insert a Contact Center greeting step right before the Transfer to Auto Attendant step in the
skillset routing table. This Contact Center greeting would be recorded the same as the Auto
Attendant company greeting.
Create a specific Auto Attendant table and CCR tree for Contact Center callers that transfer to
Auto Attendant.
NN40170-600
Chapter 10 Routing table administration
161
To add a Transfer step
1
Press ≤·°‹.
Enter the telset User ID that has voice mail administration rights
and press OK.
For information about creating a user with voice mail
administration rights, see the Avaya Business Communications
Manager 6.0 Administration and Security Guide.
2
Enter the user password and press OK.
3
Press OTHR.
4
Press OTHR.
Admin
FAX
CC
CC Admin
AGENT SKILL OTHR
5
Press CC.
6
Press SKILL.
Skillset:
RETRY
QUIT
7
Enter the number of the skillset you want to add a Greeting step to
and press OK.
Status: xxxxxx
CHNG
NEXT
8
If the skillset is enabled, press CHNG to disable it.
Press NEXT.
Skill mbox pswd
RESET
NEXT
9
Press NEXT to continue.
Skillset Admin
PARM AGENT OTHR
10 Press OTHR.
Skillset Admin
ROUTE OVFLW UNCF
11 Press ROUTE.
Route Table
DAY
NIGHT
QUIT
12 Press DAY or NIGHT.
In this example, Day is shown.
Day routing
SETUP
QUIT
Step x
DIST
DIST
OTHR
Step x
DISC XFER
GOTO
Log:
QUIT
RETRY
Pswd:
RETRY
OK
OK
Admin
MBOX
AA
OTHR
Admin
GLIST
CCR
OTHR
OK
13 Press SETUP.
14 Press OTHR.
15 Press XFER.
Goto appears only if this is not the first step.
(Continued on next page)
Intelligent Contact Center Telephone Administration Guide
162
Chapter 10 Routing table administration
Step x
EXTN
MBOX
OTHR
16 Add the type of transfer step you want to the Routing Table.
To transfer to an extension:
• Press EXTN
• Enter the extension number and press OK
To transfer to a mailbox:
• Press MBOX
• Enter the mailbox number and press OK
To transfer to an external number:
• Press OTHR
• Press EXTERN
• Press CHNG to select a line, pool or route as the outdial
method
• Press NEXT
• Enter the line or line pool number and press OK
• Press OK
• Enter the telephone number you want to transfer the call to
• Press OK
To transfer to the Automated Attendant:
• Press OTHR
• Press AA
• Press CHNG
• Enter the number of the AA table and press OK
To transfer to the Operator:
• Press OTHR
• Press OTHR
• Press OPER
• Press OK
To transfer to a CCR Tree:
• Press OTHR
• Press OTHR
• Press OTHR
• Press CCR
• Enter the number of the CCR Tree and press OK
• Press OK
Route Table
DAY NIGHT
NN40170-600
QUIT
17 Press YES to add another step
or
press ® to end the session.
Chapter 10 Routing table administration
163
Adding a Disconnect step
Disconnect steps release a call from the skillset it is in. If the first step in a routing table is a
Disconnect step, Contact Center does not answer the line.
To add a disconnect step
1
Press ≤·°‹.
Enter the telset User ID that has voice mail administration rights
and press OK.
For information about creating a user with voice mail
administration rights, see the Avaya Business Communications
Manager 6.0 Administration and Security Guide.
2
Enter the user password and press OK.
3
Press OTHR.
4
Press OTHR.
Admin
FAX
CC
CC Admin
AGENT SKILL OTHR
5
Press CC.
6
Press SKILL.
Skillset:
RETRY
QUIT
7
Enter the number of the skillset you want to add a Disconnect step
to and press OK.
Status: xxxxxx
CHNG
NEXT
8
If the skillset is enabled, press CHNG to disable it.
Press NEXT.
Skill mbox pswd
RESET
NEXT
9
Press NEXT to continue.
Skillset Admin
PARM AGENT OTHR
10 Press OTHR.
Skillset Admin
ROUTE OVFLW UNCF
11 Press ROUTE.
Route Table
NIGHT
DAY
QUIT
12 Press DAY or NIGHT.
In this example, Day is shown.
Day routing
SETUP
QUIT
Step x
DIST
GRTG
OTHR
Log:
QUIT
RETRY
Pswd:
RETRY
OK
OK
Admin
MBOX
AA
OTHR
Admin
GLIST
CCR
OTHR
Step x
DISC
XFER
OK
13 Press SETUP.
14 Press OTHR.
15 Press DISC.
Intelligent Contact Center Telephone Administration Guide
164
Chapter 10 Routing table administration
Disconnect
Table complete
NN40170-600
OK
16 Press OK.
17 Press ® to end the session.
Chapter 10 Routing table administration
165
Example of a Day Routing Table
To set up the routing table steps shown in “Example of Day Routing Table steps”, follow the
procedure “To set up the Day Routing Table example”.
Example of Day Routing Table steps
Step number
Type of step
Step parameters
1
Greeting
Greeting 1, information greeting
Forced
Transfer none enabled
2
Distribute for
1:00 (one minute)
3
Greeting
Greeting 2, general company greeting
Not forced play
Intelligent Call Input Routing, Basic with defaults
4
Distribute for
Accept default - distribute for 00:30 (thirty seconds)
5
Greeting
Greeting 3, please wait greeting
Not forced play
Intelligent Call Input Routing, Basic with operator default
6
Goto
Routing Table step 2
To set up the Day Routing Table example
1
Press ≤·°‹.
Enter the telset User ID that has voice mail administration rights
and press OK.
For information about creating a user with voice mail
administration rights, see the Avaya Business Communications
Manager 6.0 Administration and Security Guide.
2
Enter the user password and press OK.
3
Press OTHR.
4
Press OTHR.
Admin
FAX
CC
CC Admin
AGENT SKILL OTHR
5
Press CC.
6
Press SKILL.
Skillset:
RETRY
QUIT
7
Enter the number of the skillset you want to set up and press OK.
8
If the skillset is enabled, press CHNG to disable it.
Press NEXT.
Log:
QUIT
RETRY
Pswd:
RETRY
OK
OK
Admin
MBOX
AA
OTHR
Admin
GLIST
CCR
OTHR
OK
Status: xxxxxx
CHNG
NEXT
Intelligent Contact Center Telephone Administration Guide
166
Chapter 10 Routing table administration
Press NEXT to continue.
Skill mbox pswd
RESET
NEXT
9
Skillset Admin
PARM AGENT OTHR
10 Press OTHR.
Skillset Admin
ROUTE OVFLW UNCF
11 Press ROUTE.
Route Table
DAY
NIGHT
QUIT
12 Press DAY.
Day routing
SETUP
QUIT
14 Press NORMAL.
Greeting type
EWT
NORMAL
Step 1
DIST
GRTG
13 Press SETUP.
OTHR
CC greeting: x
RETRY
OK
CC greeting: x
RETRY
PLAY
OK
Type: Force
Norm
XFER
OK
Type: Norm
Force
XFER
OK
15 Press GRTG.
16 Enter the number of the greeting you want to use and press OK.
17 Press OK.
18 Press Force and press OK.
19 Press OK.
Another step?
YES
QUIT
20 Press YES to continue to build the table.
Step 2
DIST
GRTG
21 Press DIST.
OTHR
Dist time: 00:30
CHNG
OK
22 Press CHNG.
Dist time mmss:
RETRY
23 Enter 0100 and press OK.
OK
Dist time: 01:00
CHNG
OK
24 Press OK.
Another step?
YES
QUIT
25 Press YES.
Step 3
DIST
GRTG
26 Press GRTG.
OTHR
27 Press NORMAL.
Greeting type
EWT
NORMAL
CC greeting: x
RETRY
OK
CC greeting: x
RETRY
PLAY
OK
Type: Norm
Force
XFER
OK
NN40170-600
28 Enter the number of the greeting you want to use and press OK.
29 Press OK.
30 Press XFER.
Chapter 10 Routing table administration
AA Key: 1
CHNG DISABL NEXT
31 Press NEXT.
Oper Key: 0
CHNG DISABL NEXT
32 Press NEXT.
Mbox Key: 9
CHNG DISABL NEXT
33 Press NEXT.
CCR Key: 2 Tr: 1
CHNG DISABL
OK
34 Press OK.
Type: Norm Xfer
Force
XFER
OK
35 Press OK.
Another step?
YES
QUIT
36 Press YES.
Step 4
GRTG
DIST
37 Press DIST.
OTHR
Dist time: 00:30
CHNG
OK
38 Press OK.
Another step?
YES
QUIT
39 Press YES.
Step 5
DIST GRTG
40 Press GRTG.
OTHR
167
41 Press NORMAL.
Greeting type
EWT
NORMAL
CC greeting:
RETRY
OK
CC greeting: 3
RETRY
PLAY
OK
Type: Norm
Force XFER
OK
42 Press 3 and press OK.
43 Press OK.
44 Press XFER.
AA Key: 1
CHNG DISABL NEXT
45 Press DISABL.
AA Key: disable
CHNG
NEXT
46 Press NEXT.
Oper Key: 0
CHNG DISABL NEXT
47 Press NEXT.
Mbox Key: 9
CHNG DISABL NEXT
48 Press DISABL.
MBox Key: disable
CHNG
NEXT
49 Press NEXT.
CCR Key: 2 Tr: 1
CHNG DISABL
50 Press DISABL.
OK
CCR Key: disable
CHNG
OK
51 Press OK.
Type: Norm Xfer
Force XFER
52 Press OK.
OK
Intelligent Contact Center Telephone Administration Guide
168
Chapter 10 Routing table administration
Another step?
YES
QUIT
53 Press YES.
Step 6
DIST
54 Press OTHR.
GRTG
OTHR
Step 6
DISC
XFER
GOTO
Goto Step: 1
CHNG
OK
Goto Step: 2
CHNG
OK
Table complete
NN40170-600
55 Press GOTO.
56 Press CHNG.
57 Press OK.
58 Press ® to end the session.
Chapter 10 Routing table administration
169
Example of a Night Routing Table
To set up the routing table steps shown in “Example of Night Routing Table steps”, follow the
procedure “To set up the Night Routing Table example”.
Example of Night Routing Table steps
Step number
Type of step
Step parameters
1
Greeting
Greeting 6, non-business hours greeting
Not forced play
Intelligent Call Input Routing, Basic
2
Disconnect
There are no parameters for the Disconnect option.
To set up the Night Routing Table example
1
Press ≤·°‹.
Enter the telset User ID that has voice mail administration rights
and press OK.
For information about creating a user with voice mail
administration rights, see the Avaya Business Communications
Manager 6.0 Administration and Security Guide.
2
Enter the user password and press OK.
3
Press OTHR.
4
Press OTHR.
Admin
FAX
CC
CC Admin
AGENT SKILL OTHR
5
Press CC.
6
Press SKILL.
Skillset:
RETRY
QUIT
7
Enter the number of the skillset you want to set up and press OK.
Status: xxxxxx
CHNG
NEXT
8
If the skillset is enabled, press CHNG to disable it.
Press NEXT.
Skill mbox pswd
RESET
NEXT
9
Press NEXT to continue.
Skill mbox pswd
RESET
NEXT
10 Press NEXT to continue.
Skillset Admin
PARM AGENT OTHR
11 Press OTHR.
Log:
QUIT
RETRY
OK
Pswd:
RETRY
OK
Admin
MBOX
AA
OTHR
Admin
GLIST
CCR
OTHR
OK
Intelligent Contact Center Telephone Administration Guide
170
Chapter 10 Routing table administration
Skillset Admin
ROUTE OVFLW UNCF
12 Press ROUTE.
Route Table
DAY
NIGHT
13 Press NIGHT.
QUIT
Night routing
SETUP
QUIT
14 Press SETUP.
Greeting type
EWT
NORMAL
15 Press NORMAL.
Step 1
DIST
GRTG
OTHR
CC greeting: x
RETRY
OK
CC greeting: x
RETRY
PLAY
OK
Type: Norm
Force XFER
OK
16 Press GRTG.
17 Press 6 and press OK.
18 Press OK.
19 Press XFER.
AA Key: 1
CHNG DISABL NEXT
20 Press NEXT.
Oper Key: 0
CHNG DISABL NEXT
21 Press NEXT.
Mbox Key: 9
CHNG DISABL
22 Press NEXT.
NEXT
CCR Key: 2 Tr: 1
CHNG DISABL
OK
23 Press OK.
Type: Norm Xfer
Force
XFER
OK
24 Press OK.
Another step?
YES
QUIT
25 Press YES.
Step 2
DIST
GRTG
OTHR
26 Press OTHR.
Step 2
XFER
DISC
GOTO
Disconnect
Route Table
DAY
NIGHT
NN40170-600
OK
QUIT
27 Press DISC.
28 Press OK.
29 Press ® to end the session
Chapter 10 Routing table administration
171
Changing a routing table
Note: You can add and delete steps to a routing table after the initial set up. You must
disable the skillset, and then make necessary changes.
You must disable a skillset before you can change its routing table. To disable a skillset, see
“Disabling a skillset” on page 58.
To
Follow the procedure
Review steps
“To review Routing Table steps” on page 172
Modify steps
“To modify Routing Table steps” on page 173
Erasing a routing table
“To erase a Routing Table” on page 175
Intelligent Contact Center Telephone Administration Guide
172
Chapter 10 Routing table administration
To review Routing Table steps
1
Press ≤·°‹.
Enter the telset User ID that has voice mail administration rights
and press OK.
For information about creating a user with voice mail
administration rights, see the Avaya Business Communications
Manager 6.0 Administration and Security Guide.
2
Enter the user password and press OK.
3
Press OTHR.
4
Press OTHR.
Admin
FAX
CC
CC Admin
AGENT SKILL OTHR
5
Press CC.
6
Press SKILL.
Skillset:
RETRY
QUIT
7
Enter the number of the skillset you want to review and press OK.
Status: xxxxxx
CHNG
NEXT
8
Press NEXT.
Skill mbox pswd
RESET
NEXT
9
Press NEXT to continue.
Skillset Admin
PARM AGENT OTHR
10 Press OTHR.
Skillset Admin
ROUTE OVFLW UNCF
11 Press ROUTE.
Route Table
DAY
NIGHT
QUIT
12 Press DAY or NIGHT.
In this example, Day is shown.
Day routing
VIEW
ERASE
INS
Log:
QUIT
RETRY
Pswd:
RETRY
OK
OK
Admin
MBOX
AA
OTHR
Admin
GLIST
CCR
OTHR
OK
1: xxxxx
CHNG
NEXT
End table
ADD
QUIT
Route Table
DAY
NIGHT
QUIT
NN40170-600
13 Press VIEW.
14 Press NEXT to view each remaining step.
15 This display appears when you reach the last step.
16 Press ® to end the session.
Chapter 10 Routing table administration
173
To modify Routing Table steps
1
Press ≤·°‹.
Enter the telset User ID that has voice mail administration rights
and press OK.
For information about creating a user with voice mail
administration rights, see the Avaya Business Communications
Manager 6.0 Administration and Security Guide.
2
Enter the user password and press OK.
3
Press OTHR.
4
Press OTHR.
Admin
FAX
CC
CC Admin
AGENT SKILL OTHR
5
Press CC.
6
Press SKILL.
Skillset:
RETRY
QUIT
7
Enter the number of the skillset you want to modify a step for and
press OK.
Status: xxxxxx
CHNG
NEXT
8
If the skillset is enabled, press CHNG to disable it.
Press NEXT.
Skill mbox pswd
RESET
NEXT
9
Press NEXT to continue.
Skillset Admin
PARM AGENT OTHR
10 Press OTHR.
Skillset Admin
ROUTE OVFLW UNCF
11 Press ROUTE.
Route Table
DAY
NIGHT
QUIT
12 Press DAY or NIGHT.
In this example, Day is shown.
Day routing:
ERASE
VIEW
INS
Log:
QUIT
RETRY
Pswd:
RETRY
OK
OK
Admin
MBOX
AA
OTHR
Admin
GLIST
CCR
OTHR
1: xxxx
CHNG
xxxxxxx:
RETRY
OK
NEXT
OK
13 Press VIEW.
14 The display shows the first step in the routing table.
Press CHNG if this is the step you want to change
or
press NEXT until you find the step you want to change and then
press CHNG.
15 Change the parameters for the step and press OK.
Intelligent Contact Center Telephone Administration Guide
174
Chapter 10 Routing table administration
xxxxxxx:
CHNG
NN40170-600
NEXT
16 The display shows the new parameters for the step.
Press NEXT to view or change the next step
or
press ® to end the session.
Chapter 10 Routing table administration
175
To erase a Routing Table
1
Press ≤·°‹.
Enter the telset User ID that has voice mail administration rights
and press OK.
For information about creating a user with voice mail
administration rights, see the Avaya Business Communications
Manager 6.0 Administration and Security Guide.
2
Enter the user password and press OK.
3
Press OTHR.
4
Press OTHR.
Admin
FAX
CC
CC Admin
AGENT SKILL OTHR
5
Press CC.
6
Press SKILL.
Skillset:
RETRY
QUIT
7
Enter the number of the skillset you want to delete a routing table
from and press OK.
Status: xxxxxx
CHNG
NEXT
8
If the skillset is enabled, press CHNG to disable it.
Press NEXT.
Skill mbox pswd
RESET
NEXT
9
Press NEXT to continue.
Skillset Admin
PARM AGENT OTHR
10 Press OTHR.
Skillset Admin
ROUTE OVFLW UNCF
11 Press ROUTE.
Route Table
DAY
NIGHT
QUIT
12 Press DAY or NIGHT.
In this example, Day is shown.
Day routing
VIEW
ERASE
INS
Erase table?
YES
QUIT
Log:
QUIT
RETRY
Pswd:
RETRY
OK
OK
Admin
MBOX
AA
OTHR
Admin
GLIST
CCR
OTHR
OK
14 Press YES.
15 This display appears briefly.
Table erased
Day routing
SETUP
13 Press ERASE.
QUIT
16 Press SETUP if you want to create a new routing table
or
press ® to end the session.
Intelligent Contact Center Telephone Administration Guide
176
Chapter 10 Routing table administration
Setting the Service Modes for skillsets
You must set the Service Mode the skillset uses so that calls are answered correctly. You must set
the Service Mode using ≤·°¤ before calls are answered correctly.
Before you set the Service Mode you must:
•
•
configure a skillset
set up at least a Day Routing Table for the skillset
The default Contact Center Service Mode is 24 hour operation. You can change the hours of
operation using the Operator Feature Code (≤·°¤). There are six possible Service
Modes:
Auto
The skillset uses the Automatic Service Mode. You must configure both the Day and Night
Routing Tables before you can assign the Automatic Service Mode to the skillset.
Day
The skillset uses the Manual Service mode and the Day Routing Table.
You must configure the Day Routing Table before you can assign the Manual Service Mode
and the Day Routing Table.
Night
The skillset uses the Manual Service mode and the Night Routing Table.
You must configure the Night Routing Table before you can assign the Manual Service Mode
and the Night Routing Table.
24 Hour
The skillset uses the Day Routing Table only.
You must configure the Day Routing Table for 24 hour operation to use this Service Mode.
Uninit
The skillset is not configured.
You must configure the skillset before you can assign the Service Mode.
Invalid
You have only partially configured the skillset. You cannot enable this skillset.
Note: If you originally configure the skillset with a Day Routing Table only and
enable the skillset, Contact Center will recognize the Service Mode as Day.
Afterwards, if you add a Night Routing Table, Contact Center still recognizes the
Service Mode as Day. You must set the Service Mode to Auto to get Contact Center
to function in the Auto Service Mode.
NN40170-600
Chapter 10 Routing table administration
177
To set the Service Mode for a skillset
1
Press ≤·°¤.
Enter the default Operator password fl‡‹‡¤°fl‡,
(Operator) and press OK
or
if you changed the default Operator password, enter the new
password and press OK.
Choose option
OPER
MODE
2
Press MODE.
CC Service
3
This display appears briefly.
4
The display shows the Service Mode for skillset 1.
In this example, skillset 1 is in Auto mode.
Press CHNG if you want to change the Service Mode to Day or Night
or
press VIEW if you want to view the details for the Service Mode
or
press NEXT if you have a Day Routing Table for skillset 2.
5
The display shows the Service Mode for skillset 2.
In this example, skillset 2 is in Day mode.
Press CHNG if you want to change the Service Mode to Auto or
Night
or
press VIEW if you want to view the details for the Service Mode
or
press NEXT.
6
Press ® to end the session.
Pswd:
RETRY
OK
Mode 1: Auto
CHNG VIEW
NEXT
Mode 2: Day
CHNG
NEXT
Note: Remember to manually choose the Day Routing Table or the Automatic Service
Mode when your business returns to regular hours.
Intelligent Contact Center Telephone Administration Guide
178
Chapter 10 Routing table administration
NN40170-600
179
Chapter 11
Monitoring call activity
There are two ways that you and supervisors can monitor call activity at your contact center:
•
•
“Monitoring agent calls with Silent Monitor” on page 179
“Monitoring skillsets” on page 181
You can monitor calls by using memory buttons that you program with the Feature Codes for
monitoring:
•
•
Display calls waiting in skillsets ≤·‚·
Monitor agent calls ≤·‚fi.
NOTE: To use ≤·‚fi, we recommend you program it to a memory button and press
the ≤·‚fi memory button to monitor agent calls.
For more information about monitoring agents, see the Intelligent Contact Center Supervisor
Guide.
Monitoring agent calls with Silent Monitor
When you monitor calls as a Silent Monitor, you are not detected by the agent or callers. You
monitor all of the calls on an agent's telephone, rather than on a call-by-call basis. When the
current call is completed, the monitoring session of the agent continues. You do not have to
reestablish the monitoring session. You must be logged on before you can monitor calls.
Note: While you monitor an agent’s calls you monitor all of their calls, including their
personal calls. Tell agents that if they make a call that they do not want monitored, they
must first log off as an agent, then log on again when they complete the call.
We recommend you program a memory button with ≤·‚fi, and then press the
≤·‚fi memory button to monitor calls. If the memory button you choose has an indicator,
the indicator shows your log on status. You do not have Contact Center calls sent to you while you
use ≤·‚fi.
Intelligent Contact Center Telephone Administration Guide
180
Chapter 11 Monitoring call activity
To set up Silent Monitor on an Avaya Business Communications
Manager
For monitoring to be silent, you must have Silent Monitor set up in Business Element Manager. To
do this, you must be familiar with using the Business Element Manager. If you do not have access
to the Business Element Manager, ask your system administrator to set up Silent Monitor.
1
In Business Element Manager, on the Task Navigation panel, click the Configuration tab.
The configuration folders display.
2
Click the Telephony folder and then click the Global Settings folder.
3
Click the Advanced Features task.
4
Click the Silent Monitor heading.
5
From the Monitoring Mode list box, select Silent.
6
In the Number of SM sets box, enter the number of sets you want as supervisory telephones.
7
In the SM Password box, enter a six digit password.
8
Log off Business Element Manager.
Note: If you are using an Avaya Business Communications Manager (Avaya BCM)
system, see the Avaya BCM Networking Configuration Guide for information about
setting up Silent Monitor.
Note: If the Silent Monitor setting is set to non-silent there is a conference tone at the
start of calls that you monitor, therefore monitoring isn't silent.
In the UK the default for Silent Monitor is non-silent. In North America the default is
silent.
Using Silent Monitor with Answer DN
If you have an Answer DN programmed for your main telephone, and you are using Silent
Monitor from your main telephone, the telephone that you have programmed as your Answer DN
telephone rings briefly when:
•
•
•
you monitor an agent who is not on a call, and the agent answers or places a call
you start to monitor an agent who is on an active call
you monitor an agent who puts a call on hold and answers another call or unholds the original
call.
Monitoring tips
•
More than one supervisor can log on to the same skillset.
NN40170-600
Chapter 11 Monitoring call activity
•
•
•
•
181
An agent can be monitored by only one supervisor at a time.
While you are on a call, do not initiate a monitoring session.
You must use a two line display telephone.
Use a headset rather than handsfree when you monitor calls. This ensures call privacy and
reduces the office noise level. Check the documentation for your telephone to make sure that
you can use a headset with it.
Note: You cannot monitor an agent who is:
• on a conference call
• using an Answer DN
•
on an ISDN or Companion set
•
on any type of call if the maximum number of conference bridges (6) are being used
Monitoring skillsets
Use ≤·‚· (Display Waiting Calls) to view information about skillsets and the calls
waiting in skillsets. The table below describes the information in each display.
Display
Description
Skill 1: Enabled
the skillset number and the status of the skillset.
The status can be Enabled, Disabled or Uninit (uninitialized).
1: 6 agents
the skillset number and how many agents are currently logged on to the skillset
1: 10 calls
the skillset number and the number of calls waiting in the skillset
1: wait 9:45
the skillset number and the longest time a call has been waiting in the skillset.
Display Waiting Calls lets you know when a skillset in your contact center gets very busy. You
can ask qualified agents to log on to the busy skillset.
Intelligent Contact Center Telephone Administration Guide
182
Chapter 11 Monitoring call activity
To monitor skillsets
1
Press ≤·‚·.
The skillset display for skillset 1 appears.
On a one line display
telephone press
On a two line display telephone
To
press
⁄
⁄ or GOTO
enter the number of the skillset you want to
monitor
¤
¤ or SKILL
go to the next skillset
‹ or fl
›
‹ or fl or NEXT
› or PREV
£
£
go to the next menu
•
•
cancel the session
®
®
monitor the next enabled skillset
go to the previous menu
exit
Note: If at any time during a monitoring session you press a programmed memory key
your monitoring session ends. Do not press a memory key unless you want to end your
monitoring session.
Note: If you have the Reporting for Contact Center option enabled, you can monitor and
record call activity from a computer that is running Reporting for Contact Center. You
need a keycode to use Reporting for Contact Center. Contact your vendor if you are
interested in purchasing or trying Reporting for Contact Center.
An example of monitoring skillsets
In the example shown here, there are calls waiting in skillset 1. In this situation, after you monitor
the skillsets, you can ask any qualified and available agents from another skillset to log on to
skillset 1 until the calls in skillset 1 are handled.
1
Press ≤·‚·.
Skill 1: Enabled
GOTO SKILL NEXT
2
Press NEXT to monitor skillset 1.
In this example, skillset 1 is enabled and appears on the display
first. If skillset 1 is not enabled, press NEXT to go to skillset 2.
To monitor the next skillset, press SKILL at any time.
To monitor another skillset, press GOTO and enter the skillset
number.
1: 7 agents
GOTO SKILL
3
The display shows the number of agents logged on to skillset 1.
Press NEXT.
NN40170-600
NEXT
Chapter 11 Monitoring call activity
1: 2 calls
GOTO SKILL
NEXT
1: wait 4:00
GOTO SKILL
NEXT
183
4
The display shows the calls that are currently waiting to be
answered by agents in skillset 1.
Press NEXT.
5
The display shows that the call waiting the longest in skillset 1
has been waiting for four minutes.
6
Press ® to end the session
or
press GOTO to monitor another skillset and enter the skillset
number
or
press NEXT to monitor skillset 2.
To monitor calls using a one or two line telephone
You can monitor calls using a one line telephone. While you are using ≤·‚·, on a one
line or a two line telephone you can:
•
•
•
•
•
•
press ⁄ for GOTO to enter the number of the skillset you want to monitor
press ¤ for NEXT
press ‹ or fl for SKILL to monitor the next enabled skillset
press › for PREV to go to previous menu
press £ to go to the next menu
press • to cancel the session
Using a memory button to monitor calls waiting in skillsets
Program a memory button with ≤·‚· to view the status of all skillsets, including the
skillsets that you are logged on to. If the memory button you choose has an indicator, the indicator
shows information for the calls for the skillset that you are logged on to. For information about
programming a memory button, see “Programming a memory button with a Feature Code” on
page 29.
•
•
•
If the indicator is off, all of the calls are within the acceptable wait time.
If the indicator is flashing slowly, at least one call has exceeded the first alert time.
If the indicator is flashing quickly, at least one call in the skillset has exceeded the second alert
time.
For information about setting the wait times, see “Setting Contact Center general properties” on
page 36.
For information about Primary and Secondary alert times, see Primary and Secondary alert times
in “Skillset properties” on page 50.
Intelligent Contact Center Telephone Administration Guide
184
Chapter 11 Monitoring call activity
Taking some Not Ready time
If you use ≤·‚° (Not Ready), you do not receive Contact Center calls. You can program
a Break Time, which makes Contact Center automatically wait a short time before it routes the
next call to you. You use Break Time to complete any tasks, such as paperwork, required by the
last call. If you need some extra time, use Not Ready to prevent Contact Center from routing
another call to you. Do not use the Do Not Disturb feature. You can use Not Ready while a call is
ringing on your telephone. The call that is ringing on your telephone goes back to the skillset. You
can program a memory button with an indicator instead of pressing ≤·‚°.
For information about programming a memory button, see “Programming a memory button with a
Feature Code” on page 29. For more information about Break Time, see “Break Time” on page 51.
Note: While you use Not Ready, you still receive non-Contact Center, intercom and
transferred calls.
To use Not Ready
1
Press ≤·‚°. Make Not Ready appears on the display.
If you press ≤·‚° and Break canceled appears on the display, you canceled the
Break Time that the Contact Center Administrator programmed for you. You must press
≤·‚° again to activate the Not Ready feature.
If you press ≤·‚° and Agent active appears, the Not Ready feature was on and you
canceled it. Press ≤·‚° again to activate Not Ready.
2
When you are ready to take calls again, cancel the Not Ready feature by pressing
≤·‚°.
If Not ready appears, press ≤·‚° again.
Not Ready is automatically enabled if you do not answer your telephone, and if this option is
configured in Contact Center.
Programming Not Ready to a memory button
You can have convenient, one button access to Not Ready if you program a memory button with
the Not Ready Feature Code. If the memory button you choose has an indicator, the indicator
shows your busy status:
•
•
•
If the indicator is off, Not Ready is off.
If the indicator is on, Not Ready is on.
If the indicator is flashing, the Break Time feature is on.
For information about programming a memory button, see “Programming a memory button with a
Feature Code” on page 29.
NN40170-600
Chapter 11 Monitoring call activity
185
Logging off
Log off when you complete your shift or will be away from your telephone for an extended period.
To log off
1
Press ≤·‚›.
2
Enter your Agent ID and press OK or £.
3
Enter your password and press OK or £.
4
Press OUT. If OUT does not appear, you are not logged on to any skillsets.
5
Press CHNG until the skillset you want to log off from appears on the display. If you are logged
on to only one skillset, that skillset is automatically selected.
6
Press OK.
7
You are logged off from the skillset number displayed, or from all skillsets if ALL is displayed.
8
Press ®.
Changing your password
Keep your password confidential. Change your password regularly, about every 30 days.
To change your password
1
Press ≤·‚›.
2
Enter your Agent or Supervisor ID number and press OK.
3
Enter your password and press OK.
The default password you enter to log on for the first time, or if your password is reset, is
0000. If you use the default password you must change your password.
4
Press ADMIN.
5
Enter a new password from four to eight digits long and press OK.
6
Enter your new password again and press OK.
7
Press ®.
Intelligent Contact Center Telephone Administration Guide
186
Chapter 11 Monitoring call activity
Supervisor Help
With Supervisor Help an agent on a call can request help from a supervisor by pressing a
programmed feature button. The agent can send an urgent request for help without interrupting the
call, and without the caller being aware of the agent’s help request.
Supervisor Help is for situations where an agent is on a call and urgently requires the help of a
supervisor without alerting the caller that a supervisor is being called in. It is not intended for
routine consultations or when the agent is not on a Contact Center call.
A supervisor who receives a help request can accept, deny, or ignore it. A request that is denied or
ignored is escalated, and a larger group of supervisors is notified of the request. A supervisor can
choose to escalate a request so that it is broadcast to other supervisors who may be better able to
handle the request. If a supervisor receives a request while they are not at their set, their
≤·‚fl indicator flashes slowly to inform them of the missed request.
If a help request is escalated to a supervisor, their
·‚fl indicator flashes quickly to
inform them of the request. If the call for an escalated help request is still active, the supervisor can
accept the request by pressing the ≤·‚flfeature key. They do not have to be monitoring
agents at the time, but can be answering Contact Center calls.
Note: Supervisors who use Make Busy
requests.
·‚° are still available for help
When a supervisor accepts an agent’s request for help, a Silent Monitor session starts and the
supervisor begins monitoring the agent’s call. The agent who requested help is informed when the
monitoring session begins. If the supervisor is already monitoring the call of the agent who
requests help, the supervisor is considered to have accepted the request for help.
How Supervisor Help works
To use Supervisor Help supervisors must have a memory button programmed with the Supervisor
Help feature code ≤·‚fl. The programmed key must have an LCD indicator. The memory
button can have a distinct bright color so it can easily be distinguished from the other buttons. For
information about programming a memory button, see “Programming a memory button with a
Feature Code” on page 29.
When a supervisor is selected to answer an agent’s help request, the supervisor’s telephone rings
once with a distinctive tone, and the Supervisor Help LCD indicator lights up and a message
appears on the supervisor’s display to accept or deny the call.
As soon as the supervisor accepts the request, Contact Center starts a Silent Monitor session
between the supervisor and the agent.
If the supervisor denies or ignores a help request, the request is escalated. The
·‚fl
indicator flashes quickly on the sets of all supervisors who are notified of the escalated request.
Active escalated requests take precedence over missed requests, so the Supervisor Help LCD
indicator does not flash slowly if there are active requests that have not been accepted.
NN40170-600
Chapter 11 Monitoring call activity
187
An escalated request goes to supervisors as follows:
No supervisors are available
the request escalates to all potential supervisors. If escalation is system
wide, a potential supervisor is any logged on supervisor. If escalation is
skillset based, a potential supervisor is one who is logged onto the
requesting agent’s skillsets.
The request is denied by the
selected supervisor
the request escalates to all potential supervisors except for the selected
supervisor, unless the selected supervisor is the only potential
supervisor.
The request is ignored
the request escalates to all potential supervisors.
Agents can request Supervisor Help only if they are on an active Contact Center call. They cannot
use Supervisor Help if they are not logged in, not ready, idle, have a call on hold, or are on a
non-Contact Center call. An agent can cancel Supervisor Help at any time before a supervisor
answers the request.
When an agent requests Supervisor Help, Contact Center looks for a single suitable supervisor to
handle the request. If no supervisor is available, or the selected supervisor denies or ignores the
request, the request is escalated. You set up supervisor selection to be either system wide or
skillset based. System wide selection looks for all the available supervisors. Skillset based
selection looks for only the supervisors who are assigned to the skillsets the agent is logged on to.
Intelligent Contact Center Telephone Administration Guide
188
Chapter 11 Monitoring call activity
Configuring Supervisor Help
To set up Supervisor Help you must configure the general Contact Center properties for request
timeout and supervisor selection method.
For information about
Refer to
Supervisor Help settings
“Setting the Supervisor Help request timeout” on page 38
“Selecting skillsets supervisors can receive help requests from” on page 40
To handle Supervisor help requests
Supervisors can program the Supervise feature (F906) onto a memory button of their telephone.
Help xx?
INFO
YES
Help xx:
INFO CANCL
NN40170-600
NO
JOIN
1
Launch Supervisor Help by pressing ≤·‚fl or the F906
memory button on your telephone.
2
The display shows the ID of the agent who is requesting help.
Press YES to accept the agent request for help
or
press NO to escalate the request
or
press INFO to view the agent name, time and date of the request,
caller ID and caller name of the agent’s call.
3
The display shows the ID of the agent you are helping.
While you monitor the agent, you can press the INFO key to view
the time and date of the request, caller ID and caller name of the
agent’s call.
You can press the JOIN softkey or the MUTE button on your
telephone to join in the call.
NOTE: Depending on what system you use, the Join and Mute
softkeys may not appear.
4
When the help session is complete, press ® to end the session.
Chapter 11 Monitoring call activity
189
How to handle missed requests
When a supervisor’s Supervisor Help LCD indicator is flashing, the supervisor can retrieve
escalated or missed Supervisor Help requests.
If there are one or more requests, Contact Center shows all of the requests. Escalated requests for
calls that are still active are shown first, from the oldest to most recent. After that, missed requests
are shown from the oldest to the most recent.
A supervisor can accept the call by pressing the YES softkey. After the supervisor accepts the
request, the request no longer appears to other supervisors who are retrieving help requests. Their
displays show the next escalated request, or the first missed request if there are no more escalated
requests, or “No help requests” if there are no more missed requests.
For a missed request, the prompt “xx:aname asked” appears, and the supervisor can retrieve
information about the call by pressing the INFO softkey, or can move to the next request by
pressing the NEXT softkey.
An example of retrieving an escalated request
The supervisor launches the Supervisor Help feature by pressing the Supervisor Help (F906)
feature key.
Help xx?
INFO
YES
NO
1
Launch the Supervisor Help feature by pressing ≤·‚flor
the F906 memory button on your telephone.
2
The display shows the ID and name of the agent requesting help.
Press YES to accept the help request
or
press INFO to see more information about the request
or
press NO to deny the request. This escalates the request, and the
display shows the next help request, if there is one.
3
When the help session is complete, press ® to end the session.
For a missed request, the prompt “aa asked help” appears”.
After a missed request is viewed by a supervisor, it is not shown to any other supervisor.
Intelligent Contact Center Telephone Administration Guide
190
Chapter 11 Monitoring call activity
NN40170-600
191
Chapter 12
Tips for operating Contact Center
This chapter has tips on improving the operation of Contact Center.
Agent administration
•
Agents can log on to any telephone on the system.
•
Contact Center has an Auto Busy Mode feature that ensures that calls do not ring indefinitely
at an abandoned agent set. If an agent does not answer a call within a specified number of
rings, the call returns to the skillset to be presented to another agent, and the telephone is
placed into Auto Busy Mode by Contact Center. The agent must manually cancel Auto Busy
Mode to resume accepting calls.
Skillset administration
•
If a call comes in on a line that belongs to a skillset with no available agents, the call is not
answered until either the Delay Answer Time elapses or an agent becomes available for the
call.
During the Delay Answer period when the caller hears ringback, the line the call comes in on
still rings on the sets configured to answer this line.
If your contact center has long Delay Answer Times (longer than about 10 seconds), in your
greeting specify to callers that their call is being tracked by Contact Center. Otherwise, it is
possible for callers not to understand the long ringback delay and hang up.
Contact Center greetings
•
Record greetings that are a maximum of 20 seconds long. If your greetings are longer than 20
seconds, waiting callers must wait longer before they hear a greeting. The longest recorded
greeting for a skillset affects the frequency with which callers hear greetings. If your greeting
length times vary a lot, there is a very large variance in how often callers hear greetings.
Therefore it is best to keep greetings similar lengths if possible, about 20 seconds each.
•
Ensure that when you record a greeting that transfers callers to a skillset mailbox you include
in the greeting: “To leave a message in the mailbox press ·” (or the keypad button you
designate for the skillset mailbox).
Intelligent Contact Center Telephone Administration Guide
192
Chapter 12 Tips for operating Contact Center
Routing Table administration
•
Use Forced Play greetings sparingly. If you use Forced greetings, keep them as short as
possible. Many long Forced Play greetings slows transferring calls to agents and causes
unpredictable increases in distribution times. Calls in other skillsets are not affected.
•
When a Forced Play greeting plays for the highest priority call in a skillset, the other lower
priority calls in the skillset have to wait even if agents become available during this time. For
example, the longest waiting call, which is the highest priority call, gets routed to a Forced
Play greeting. Agents become available during the time that the highest priority call is played
a Forced Play greeting. The result is that no calls in this skillset are routed to an agent until the
Forced Play greeting is finished playing to the highest priority call. This guarantees that the
highest priority call is answered before lower priority calls in the skillset.
•
Ensure that an Intelligent Caller Input Routing, Basic transfers calls to a skillset mailbox if you
want callers to be able to press · to leave a message in a skillset mailbox. Remember to
mention in the greeting to press · to leave a message in a mailbox.
•
Program Intelligent Caller Input Routing, Basic to transfer calls to a skillset mailbox for
Non-business hours greetings so that you do not miss any messages.
•
If a Goto step follows a greeting, make a Distribution step the target for the Goto step. If you
make the Goto target step after a Greeting step another Greeting step, callers hear two
greetings in a row.
Contact Center general parameters
•
Do not assign all the available voice channels as reserved channels. Otherwise, there will be
no channels available for voice mail.
•
A reserved or voice channel is used when:
— a Contact Center greeting is played to a caller
— Off-premise Message Notification notifies you of a message in a skillset mailbox
NN40170-600
Chapter 12 Tips for operating Contact Center
193
How to calculate the longest time a caller can be on hold
The formula used to calculate the longest wait time a caller can be on hold without hearing a
greeting is:
maximum calls
Wait Time = ⎛ ------------------------------------⎞ – 1 x maximum greeting length
⎝ voice channels ⎠
where:
•
wait time is the longest time in seconds that a caller can be on hold without hearing a greeting
•
maximum calls is the maximum number of calls that Contact Center can normally handle
— In a contact center where external calls are not transferred or forwarded to Contact Center,
the maximum number of calls is the same as the number of lines programmed to be
answered by Contact Center
— In a contact center where external calls are frequently transferred or forwarded to Contact
Center, the maximum number of calls is the total number of lines on the system.
For information about how calls transfer to a skillset, see “How incoming calls are sent to
a skillset” on page 49.
•
voice channels is the estimated number of voice channels available to Contact Center
— The minimum number of voice channels available is equal to the number of reserved
channels you set up in General Contact Center parameters. Additional channels that are
not used by CallPilot can also be used. For example, even though you assign two reserved
channels when you set up the General Contact Center parameters, Contact Center can use
additional voice channels if and when they are available.
•
maximum greeting length is the duration of the longest greeting of a skillset in seconds
Intelligent Contact Center Telephone Administration Guide
194
Chapter 12 Tips for operating Contact Center
Tips to improve the efficiency of Contact Center
Plan for busy times:
•
when you assign agents to the skillsets, assign as many qualified agents as possible to answer
calls for the skillsets
•
have more agents log on to a skillset when it gets busy
Plan for slow times:
•
for example, if agents are logged on to skillset 1 only, ensure that incoming calls to skillset 2
overflow to skillset 1. When you set up skillset parameters for skillset 2, assign a time to the
Overflow parameter. Then callers can still speak to an agent.
•
When no agents are logged on to any skillset, ensure that the Contact Center greetings you use
for the Routing Table have Transfers set up. If a Contact Center greeting transfers to a skillset
mailbox, callers can press · to leave a message in the skillset mailbox. Ensure that the
greeting includes that callers can press · to leave a message in a mailbox. · is the default
keypad button callers can press to transfer to the skillset mailbox. You can select a different
number.
NN40170-600
195
Chapter 13
Troubleshooting Contact Center
This chapter contains troubleshooting information for problems that can occur while setting up and
operating Contact Center.
Resetting passwords
You can reset passwords if they are lost or forgotten.
To reset
see
the Operator password
page 195
the Contact Center Administrator password
page 43
a skillset mailbox password
page 74
an agent password
page 132
Resetting the Operator password
You can reset the Operator (
·°¤) password if it is lost or forgotten.
·°¤ is used by the receptionist, Operator and Contact Center Administrator.
If you reset the Operator password it is reset to fl‡‹‡¤°fl‡ (Operator).
To reset the Operator password
Set xxx
NEXT
Pswd
RETRY
OK
Reset pswd?
YES
NO
Exit
1
Press
2
Press ‡.
In this example, xxx represents the CDN for skillset 1.
3
Enter ‡‹‡‹°fl‡‹‡‡‡·‹
(Resetoperpswd) and press OK.
4
Press YES.
5
The session ends.
The Operator password is now reset to
fl‡‹‡¤°fl‡
(Operator.)
·°fi.
Intelligent Contact Center Telephone Administration Guide
196
Chapter 13 Troubleshooting Contact Center
Agent problems
Agent log on problems
If an agent cannot log on at their telephone:
•
•
•
ensure the agent ID and password match
check to see if the agent is already logged on to a different telephone
check to see if a different agent is logged on to this telephone
Important considerations about how agents use features
Call Transfer
Agents can use Transfer to transfer a call to another agent, another person such as a subject matter
expert, or send the call back to a skillset.
•
•
•
If the agent wants to send the call to a specific agent or another person, the agent can enter the
Transfer Feature Code (
‡‚) and enter the extension number.
If the agent wants to send the call to a skillset, the agent can enter the Transfer Feature Code (
‡‚) and enter the CDN of a skillset to send the call to a skillset.
If you are monitoring an agent and they transfer a call, you do not continue to hear the call.
Agents who want to transfer a call to a mailbox should use
·°fl.
Multimedia Contact Center agents do not receive Contact Center voice calls, but other Contact
Center agents can transfer voice calls to Multimedia Contact Center agents.
Call Forward
Advise agents not to use Call Forward. An agent who uses Call Forward is automatically logged
out or made auto busy, depending on their agent settings, after the number of rings for transfer
callback elapses. Agents can use Call Forward to the voice mail DN.
Answer DN
If you are doing silent monitoring, the only way agents should use Answer DN is if they program
their portable set to be the Answer DN for their main telephone. This is because you will not be
able to monitor calls that agents answer on their Answer DN. You can only monitor calls that
agents answer from the set they are logged on to.
If an agent uses their Answer DN telephone to answer a call that is transferred to them, Contact
Center does not recognize the agent as being busy, and still sends calls to the agent’s main set.
Agents who log on from a regular telephone and answer Contact Center calls using an answer DN
key from a portable telephone cannot use Supervisor Help.
NN40170-600
Chapter 13 Troubleshooting Contact Center
197
Do Not Disturb
Instead of using Do Not Disturb, agents must use the Not Ready Feature Code (
·‚°).
If agents use Do Not Disturb they are automatically logged out or made not ready after the first
call.
Call Forward No Answer
When an agent’s phone is on Call Forward No Answer to the voice mail extension, the number of
rings for Call Forward No Answer must be less than the number of rings for Transfer Callback
Timeout. If a call is forwarded by CFNA to another agent and is answered by that agent, the
original agent who has CFNA setting is made Not Ready or logged out instead of staying idle.
Preventing calls from ringing at an agent’s set
To prevent agents who are on a Contact Center call from having a second internal call ring on their
phone, set the Call Forward on Busy feature for your set to the voice mail DN.
Hunt groups
Do not program an agent telephone to be a member of a Hunt Group.
Automatic Answer
How Automatic Answer works depends on what type of telephones your contact center uses:
•
•
•
•
WLAN Handset 2210/2211: There are two ways to set up the WLAN Handset 2210/2211 for
the Automatic Answer feature in a Contact Center environment:
• Place the WLAN Handset in the active (idle) state. When the call is received by the
WLAN Handset, the handset automatically switches to the active (off-hook) state and the
call proceeds as normal. Note: In the active (idle) state, WLAN Handset power
consumption increases, which causes a decrease in the life of the battery (the time before a
recharge is required). The handset is not normally left in the active (idle) state except for
special situations.
• Place the WLAN Handset in the standby state. When the call is received by the WLAN
Handset, the handset automatically answers the call, but it cannot maintain the call. You
must press the Power on/Start Call key before the call is dropped (after about 5 seconds)
to maintain the call. If you do not press the Power on/Start Call key in time, the call is
dropped. The user must end every call by pressing the Power off/End Call key to release
the system resources.
Avaya Norstar™ telephones: If you use a headset, calls ring at the telephone and the headset,
but calls go to the headset.
Business Series Terminals: If you connect the headset before you connect the telephone
cable to the phone jack, calls goes to the handsfree speaker. If you plug in the telephone before
you connect the headset, calls go to the headset as long as you have initialized the headset by
pressing the headset button and then the release button. Calls always ring at the set. Every time
you reconnect the headset you must initialize the headset.
Avaya 7316E Digital Deskphone: This type of telephone is safe to use for Automatic
Answer.
Intelligent Contact Center Telephone Administration Guide
198
Chapter 13 Troubleshooting Contact Center
Silent Monitor
If agents answer calls using features like Answer DN or Call Pickup on a set they are not logged
onto, you cannot monitor these calls. You can do monitoring for wireless sets (including
Companion, KIRK and DECT sets), only if the agent logs onto the set.
Skillset problems
Problems changing skillset properties
If you cannot change a skillset’s properties, there are two possible reasons:
•
The Contact Center skillset is enabled.
You must disable the Contact Center skillset before you can change the skillset properties.
•
The skillset mailbox has the wrong extension number.
Refer to “Determining a skillset mailbox number” on page 68 for how to determine a skillset’s
extension number. The extension number of the skillset mailbox must be the same as the
Control DN of the skillset. If the skillset mailbox has the wrong extension, you cannot change
the properties for a skillset mailbox.
NN40170-600
199
Chapter 14
Contact Center Programming Record
For this programming task
see
on page
Record the Feature Codes used by Contact Center
Feature Codes
200
Record the line information for lines answered by Contact Center Line answering
208
Record the Operator and Business Status settings
Operator/Business Status
201
Record the number of reserved channels and the Primary and
Secondary Alert times
General Contact Center
parameters
200
Record agent ID, agent name, Priority, supervisor status and
skillset for each agent
Contact Center agents
204
Record Control DN, skillset name, MWI ext, Method, Break Time
and Delay Answer time limit
Contact Center skillsets
202
Record agents assigned to the skillsets
Skillset assignments
205
Record the skillset mailbox name, skillset mailbox number, MWI
extension and skillset mailbox password
Skillset mailboxes
206
Record the type of step and step parameters for Day and Night
Routing Tables
Routing Tables
207
Record Line Answering details
Line answering
208
Note: Make copies of these pages as required.
Intelligent Contact Center Telephone Administration Guide
200
Chapter 14 Contact Center Programming Record
Feature Codes
Feature code name
Dialpad buttons
Custom Feature Code
Display Waiting Calls
·‚·
· ____ ____
Open Mailbox
·°⁄
· ____ ____
Log on/Log off
·‚›
· ____ ____
Supervise agents
·‚fi
· ____ ____
Not Ready
·‚°
· ____ ____
· ____ ____
Return to skillset on No Answer
Voicemail DN
·°fi
· ____ ____
Operator status
·°¤
· ____ ____
General Contact Center parameters
Number of Reserved channels
CLID Parameter
Supervisor Help request timeout value
Skillsets supervisors can receive help
requests from
Lines answered by Contact Center
NN40170-600
No CLID
Number Only
Name & Number
Chapter 14 Contact Center Programming Record
201
Operator/Business Status
Password OPERATOR (67372867)
Receptionist or Operator available*
Y
N
Business open*
Y
N
Answer trunks
Y
N
Receptionist or Operator extension
Contact Center
Service*
Skillset Number ___
Auto
Manual
Skillset Number ___
Day
Night
Day
Night
Auto
Manual
* These settings are usually changed by the receptionist or Operator on a daily basis.
Intelligent Contact Center Telephone Administration Guide
202
Chapter 14 Contact Center Programming Record
Contact Center skillsets
Skillset
parameter
Rules
Skillset name
Maximum 16 characters.
Default is SKILLn
Control DN (CDN) Extension cannot be used by
another telephone or peripheral
MWI extension
Method
Least Busy (default) or
Preferred
Break Time
Enter as mm:ss
Minimum: 00 min 00 sec
Maximum: 59 min 59 sec
Default: 00:30
Delay answer
Enter as mm:ss
Minimum: 00 min 00 sec
Maximum: 10 min 00 sec
Default: 00:00
Attendant
extension
Language
Activity Codes
Prompted or Optional (default)
You must have Reporting for
Contact Center enabled.
Expected Wait
Time sample
2 - 256
Expected Wait
Time Increase
Allowed
Enabled (default)
or
Disabled
Initial Call
Duration
00:00:01 - 24:00:00.
Default is 00:03:00.
Service Mode
Auto, Day, Night, 24 Hour
(default)
NN40170-600
Skillset #
Chapter 14 Contact Center Programming Record
203
Intelligent Contact Center Telephone Administration Guide
204
Chapter 14 Contact Center Programming Record
Contact Center agents
Agent
ID
Agent name
NN40170-600
Supervisor
status
(y or n)
Name and # of
skillsets agent is
assigned to
Auto
answer
(y or n)
Missed call Priority
option
(Busy or
Logout)
Chapter 14 Contact Center Programming Record
205
Skillset assignments
Skillset name and #
Agent ID and name
Priority
Intelligent Contact Center Telephone Administration Guide
206
Chapter 14 Contact Center Programming Record
Skillset mailboxes
Skillset #
Mailbox name
NN40170-600
Mailbox number
(Control DN)
MWI extension
Mailbox password
Chapter 14 Contact Center Programming Record
207
Routing Tables
Skillset # _______________
Step #
Day or Night _______________
Type of step:
Step parameters
Greeting, Distribution,
Transfer, Disconnect, Go To
Intelligent Contact Center Telephone Administration Guide
208
Chapter 14 Contact Center Programming Record
Line answering
Line #
NN40170-600
Skillset #
# of rings (0 to 12) for Caller ID minimum 2 rings
209
Glossary
AA
See Automated Attendant.
Agent
An agent is a person who is assigned to answer calls for one or more skillsets in your
contact center.
Agent ID
When you add an agent, Contact Center assigns an agent ID number you use to identify
the agent. The agent uses their agent ID number and password to log on when they are
ready to receive calls.
Alert times
Alert times are time limits that you assign for calls waiting in skillsets. If a call exceeds the
Primary or the Secondary alert time limit, a programmed memory button indicator flashes.
A slow flash means that a call has exceeded the Primary alert time. A quick flash means
that a call has exceeded the Secondary alert time.
Attendant
The attendant is the person who you assign to answer an extension number. The attendant
can be a receptionist, operator or target attendant.
Automated Attendant (AA)
The Automated Attendant is an automatic answering service. AA answers incoming calls
with a Company Greeting and a menu of options. AA routes calls in response to a caller’s
dialpad selections. For a greater range of options and services for incoming calls, a
Custom Call Routing (CCR) menu can be assigned to play instead of the Automated
Attendant menu.
Automatic Answer
Automatic Answer is an agent parameter that force delivers calls to an agent. If Automatic
Answer is enabled, the agent hears a tone that indicates that a call is delivered. The agent
is automatically in the handsfree mode.
If Automatic Answer is not enabled, calls ring at the agent's telephone and the agent must
manually answer the calls.
Break Time
Break Time is a time period you set up for agents to complete paperwork or other tasks
after they finish a call. After an agent completes a call, no calls are routed to them for the
Break Time. The agent can extend or cancel the Break Time by using the Not Ready
Feature Code.
Intelligent Contact Center Telephone Administration Guide
210
Glossary
CCR
See Custom Call Routing.
CDN
See Control Directory Number.
Contact Center
Contact Center receives, holds and routes calls to agents in a contact center.
contact center
A contact center is a department or a business that uses Contact Center to handle
numerous incoming calls. A contact center typically employs several agents to answer
calls.
Contact Center Administrator
The Contact Center Administrator sets up, and manages the day-to-day operation of a
contact center. The Contact Center Administrator monitors the overall performance of the
contact center and balances the staffing according to call traffic demands.
Call Forward All Calls (CFAC)
This feature forwards all calls from a telephone to another extension number. For
example, all calls from a telephone can be forwarded to the CDN of a skillset.
Call Forward No Answer (CFNA)
This feature forwards unanswered calls from a telephone to another extension number. A
call is considered unanswered if no one answers the call before a specified number of
rings.
Call Forward On Busy (CFB)
This feature forwards all calls from a telephone to another extension if any of the lines
assigned to the telephone are busy.
Channel
A channel is the voice path that Contact Center uses to play greetings to callers. A voice
channel is also the voice path used when anyone uses a Feature Code to access Contact
Center.
Class of Service
The Class of Service defines the values for mailboxes.
Control Directory Number (CDN)
The Control Directory Number (Control DN or CDN) is the extension number of a
Contact Center skillset. The CDN is the number used to transfer calls to a skillset. The
CallPilot installer is responsible for assigning a CDN to each skillset before the skillset
can be enabled.
NN40170-600
Glossary
211
Custom Call Routing (CCR)
CCR is a routing feature that you can program to present a customized menu of
single-digit choices to callers. CCR automatically answers lines and presents callers with
customized menus. With CCR, callers can listen to pre-recorded messages, leave a
message in a skillset mailbox or transfer to an extension. With CCR you can replace
Automated Attendant menus with a more sophisticated menu that offers callers a wider
range of options.
Delay Answer
Delay Answer is a feature that prevents Contact Center from answering calls and playing
greetings when there are no agents available. When a skillset has Delay Answer activated,
waiting callers hear ringback.
When a call comes in on a line for a skillset that does not have any free agents, the call is
not answered until either the Delay Answer time elapses or an agent becomes available,
whichever comes first.
Display Waiting Calls
Display Waiting Calls is a Feature Code that you and agents can use to display waiting
calls and view real-time information about skillsets. The Display Waiting Calls/Skillset
Status Feature Code shows:
•
•
•
•
the skillset number and whether the skillset is enabled or disabled
number skillset of agents logged into the skillset
number of calls waiting
the longest wait time of a call
DN
DN is a Directory Number or an extension number.
Greeting Table
The Greeting Table determines which recorded greeting is played and which line is
answered according to the time of day.
Indicator
See memory button indicator.
Intelligent Caller Input Routing, Basic
Intelligent Caller Input Routing, Basic lets callers direct their calls to an Operator,
Automated Attendant, skillset mailbox, CCR Tree.
Intelligent CLID/DNIS Routing
CLID/DNIS Routing is the initial routing that Contact Center calls encounter. The CLID/
DNIS Routing you set up lets Contact Center route calls quickly based on their incoming
line number. Callers are routed to skillsets depending on who the caller calls, the line the
call comes in on, or where the caller is calling from.
Intelligent Contact Center Telephone Administration Guide
212
Glossary
Longest idle
Longest idle is a method of call distribution that routes calls to the agent who has been
available the longest. The other method of call distribution is Preferred.
MWI
See Message Waiting Indication.
Memory button indicator
Memory button indicators are the triangular-shaped LCD indicators on a telephone next to
the memory buttons. Memory button indicators can be used to monitor call activity and
view the Login/Logout status and the Not Ready status of agents.
Message Waiting Indication (MWI)
The Message Waiting Indication appears on a telephone display as Message for you when
there are new messages.
Message Waiting Indication extension (MWI extension or MWI DN)
For each skillset mailbox, you can assign a telephone as the designated MWI extension.
The Message Waiting Indication extension is an optional telephone number that indicates
when a skillset mailbox has messages waiting. The MWI extension that you assign shows
Message for you on the telephone display when there are new messages in the skillset
mailbox.
Method of Call Distribution
The method of call distribution determines which of several available agents to route the
call to. There are two methods of call distribution: Least Busy and Preferred. Least Busy
routes calls to an agent who has been available the longest. Preferred routes calls to the
agent with the highest priority (the best qualified agent).
Not Ready
Not Ready is a Feature Code that extends a Break Time if agents need additional time after
a call to do paperwork or other tasks.
Off-premise Message Notification
Off-premise Message Notification is a feature that notifies you at a destination number
when there are new or urgent messages in a skillset mailbox.
Priority
You assign a priority to each agent according to their qualifications. An agent can have a
priority from 1 to 20. 1 is the highest priority. You can assign this priority to your most
experienced agents.
Primary alert time
The Primary alert time is the first time limit that you assign for calls waiting in skillsets.
If a call exceeds the Primary alert time limit, you are given a visual warning on
programmed memory button indicators. The other alert time is Secondary alert time.
NN40170-600
Glossary
213
Make Not Ready (Return to Skillset)
Make Not Ready (Return to Skillset) is a property that controls how a call is treated if an
agent does not answer the call. Make Not Ready assigns an agent's telephone to respond as
it does with the Not Ready feature enabled. Automatic Logout automatically logs an agent
out of their skillset if they do not answer a call.
Real time
Real time is a term for when there is very little response time between when an event
occurs and when the information about the event is displayed. You can monitor the real
time or current situation of agents and call activity by using the Display Waiting Calls
Feature Code.
Reserved channel
Reserved channels are voice channels reserved exclusively for Contact Center. Reserved
channels are used to play greetings to callers waiting in a skillset. These channels ensure
that CallPilot does not use all the voice channels. See also voice channel.
Routing Table
Routing Tables handle incoming calls for each skillset. A Routing Table determines the
order of greetings and hold times for callers while they wait to be routed to an available
agent.
Skillset
Skillsets collect and distribute calls for departments such as “sales” and “technical
support”. If several calls arrive at the same time, the calls are held in a skillset where
callers hear greetings and are put on hold until an agent is available.
Skillset mailbox
A skillset mailbox stores messages left by callers. The calls can be retrieved by designated
agents.
Skillset name
The skillset name is a maximum of 16 characters. A skillset name is the same as the
skillset mailbox name.
Subscriber
A subscriber is a mailbox owner.
Supervisor
A supervisor is an agent with supervisor status. A supervisor has additional capabilities,
such as the ability to monitor calls between agents and callers.
Supervisor monitor
Supervisor monitor is a feature supervisors can use to monitor or participate in calls
between agents and callers.
Voice channel
A voice channel is the voice path that Contact Center uses to play greetings to callers.
Intelligent Contact Center Telephone Administration Guide
214
Glossary
NN40170-600
215
Index
Numerics
24 Hour Service mode, skillset 135
A
Active agents 117
Agent
active 117
Autobusy mode 191
dynamic priority 14, 16, 124
Feature Codes 32
listening to skillset mailbox messages 83
monitor 179
parameters 117
Silent Monitor 179
B
Button
programming a memory button 29
C
Call
Distribution Method 212
monitoring 182
Silent Monitor 179
Call Forward on Busy 197
Call Park 196
Call Pickup 196
Call Transfer 196
Caller Directed Transfer 15, 16
CallPilot mailbox interface 69
CallPilot Manager 15, 17
CFB 197
CFNA 197
Changing
skillset mailbox password 73
Channels
reserved 36
voice 36
Character limit
for Off-premise Message Notification
destination pager number and message 99
for Off-premise Message Notification destination
number 100, 102, 111
Checking the telephone mailbox interface 69
Company Directory 70
Conference calls 181
Contact Center
efficiency tips 194
Feature Codes 28
preventing call congestion 181
reporting 15, 17
Contact Center Administrator
Feature Codes 30
Control DN 50, 67, 68, 198
Conventions, guide 27
angled brackets 27
button options 27
buttons 27
command line 27
Copying a message 84
Customer 22
D
Day mode, skillset 135
Day of Week Service 15, 17
Default mode, skillset 135
Delay Answer feature 191, 211
Deleted messages, retrieving 85
Deleting
messages 84, 87
Destination number
character limit 100, 102, 111
when CallPilot is behind PBX or Centrex 99
Destination pager number
character limit 99
Destination, Off-premise Message Notification numbers
91
Determining
Control DN 68
Feature Codes 28
mailbox interface 69
Message Waiting Indication extension 68
skillset mailbox number 68
DID routing 149
Directory, Company 70
Disabling a skillset 58
Intelligent Contact Center Telephone Administration Guide
216
Index
Display 27
two line 25
Display telephone
entering characters 26
Dynamic agent priority 14, 16, 124
E
Erasing messages 84, 87
H
Highest priority call 192
Hours
Routing Tables 149
Hunt groups 197
I
F
Indicators
Message Waiting 30, 50, 68
Fax Detection 150
Initializing a skillset mailbox 70
Feature 983 telephone administration 15, 17
Intelligent Overflow 15, 17, 135
Feature Codes 28
Activity Codes 32
agent 32
Contact Center Administrator 30
Custom Feature Codes 32
descriptions 30, 32
determining 28
Display Waiting Calls (F909) 30, 31, 32, 182
Log on, Log off (F904) 30, 31, 32
Monitor skillsets (F904) 31, 32
Not Ready (F908) 31, 32
Open Mailbox (F981) 30, 31, 32
Operator Settings (F982) 30
programming memory buttons 29
Skillset Status (F909) 30
Supervisor Help 30, 32
Voicemail DN (F985) 30
Internal messages, replying to 88
Forced Play greetings 152, 192
Memory button
indicator 29, 30
programming 29, 30
Formula for waiting calls 193
Forwarding a message 87
G
Getting 23
Greeting step
Fax Detection 150
Greetings, contact center
examples 45
Forced Play 152
Greeting parameters in Routing Table 152
Greeting step in Routing Table 151
recording 46
Routing Table parameters 192
tips 191
types 45
Greetings, skillset mailbox
example 76, 80
NN40170-600
L
Least Busy method of call distribution 212
Lines
assigned to be answered by skillset 49
M
Mailbox
opening skillset mailbox 71
outdial route 92
skillset mailbox 67
Mailbox interface
CallPilot 69
Norstar Voice Mail 69
Manual call presentation 117
Message Waiting Indication
determining extension 68
extension 212
Messages
copying 84
deleted, retrieving 85
deleting 84, 87
erasing 84, 87
external 88, 90
forwarding 87
internal 88
minimum recording length 88
Off-premise Message Notification 91
playing
envelope, CallPilot interface 87
envelope, Norstar Voice Mail 84
next, CallPilot 86
next, Norstar Voice Mail 85
pausing 85
Index
previous, CallPilot 86
previous, Norstar Voice Mail 85
rewinding 84, 86
skipping forward 85, 86
skipping to end 84
quitting 85
replaying 85
replying, CallPilot 87, 88
replying, Norstar Voice Mail 85, 88
saving 85
silence timeout 88
skillset mailbox 67
Method of Call Distribution 212
Monitoring
example of monitoring 182
Silent Monitor 179
tips 180
MWI extension 212
N
Name
skillset 213
skillset mailbox 70
217
Opening a skillset mailbox 71
Opening the Skillset Mailbox
remotely 71
Opening your mailbox
CallPilot 71
Norstar Voice Mail 71
Operator
resetting password 195
Outdial route, mailbox 92
Overflow, Intelligent 15, 17
P
Parameters
general Contact Center 192
Routing Table Greetings 152
Password
changing skillset mailbox 73
resetting Operator 195
resetting skillset mailbox 74
resetting the Contact Center administrator 43
skillset mailbox 70, 73
Pausing a message 85
Navigation 22
Playing message envelope, CallPilot interface 87
Night mode, skillset 135
Playing message envelope, Norstar Voice Mail 84
Norstar Voice Mail mailbox interface 69
Preferred method of call distribution 212
Notification, Off-premise Message Notification 91
Preventing calls from ringing at an agent’s telephone
197
Number
Control DN 30
skillset mailbox 30
O
Off-premise Message Notification 192
about 91
changing parameters 104
destination number
character limit 100, 102, 111
destination pager number and message
character limit 99
feature restrictions 94
setting up
to a pager number 99
to a telephone number 95
to an extension number 97
to wrong destination 91
Off-premise Message Notification parameters
destination telephone number 93
destination type 93
time range 93
types of message 94
Programming a memory button 29
R
Remotely opening a skillset mailbox 72
Replaying messages 85
Reply feature 86
Replying
to an external message sender 90
using the DIAL option 90
to an internal message sender 88
to messages, CallPilot 87
to messages, Norstar Voice Mail 85
Reporting for Contact Center 15, 17
Reserved channels 36, 193
Resetting
Contact Center administrator password 43
skillset mailbox password 74
Restrictions for using Call Forward No Answer 197
Restrictions for using Call Forward on Busy 197
Retrieving deleted messages 85
Intelligent Contact Center Telephone Administration Guide
218
Index
checking for messages 83
Class of Service 67
determining MWI extension 30
determining number 30
greeting example 76, 80
initializing 70
leaving a message in 192, 194
listening to messages 83
Message Waiting Indication extension 68
messages 83
messages waiting 212
number 50, 67, 68
opening 71
opening remotely 72
password 70, 73
password, changing 73
resetting password 74
retrieving messages 83
tips 192, 194
Retrieving messages from skillset mailbox 83
Rewinding messages 84, 86
Routing
DID 149
Routing Table
examples of 165
Fax Detection 150
Greeting parameters 152
Greeting step 151
hours 149
maximum number of steps 14, 16, 149
parameters of Greeting step 152
Service Modes 176
tips 192
Routing Table steps
Disconnect 151
Distribute for 151
Greeting 151
Transfer 151
Routing Table, about 149
S
Saving messages 85
Service Mode, skillset 135
Service Modes
Routing Table 176
Skillset parameters
Control Directory Number (CDN) 50
Delay answer 211
Message Waiting Indication extension 212
Method of Call Distribution 212
setting up 53
Skillset name 213
Skipping forward in messages 85, 86
Skipping forward to end of messages 84
Setting up
Off-premise Message Notification
to a pager number 99
to a telephone number 95
to an extension number 97
skillset parameters 53
T
Silent Monitor 179
Table, Routing Table 149
Skillset
24 Hour Service mode 135
Day mode 135
default mode 135
disabling 58
how lines are answered 49
maximum greeting length 193
name 213
night mode 135
problems changing general parameters 198
properties 50
Service Mode 135
start and end times 15, 17
Telephone
line display 25
Skillset mailbox
about 67
changing password 73
Troubleshooting
agent log in problems 196
NN40170-600
Steps, Routing Table 151
Supervisor, functionality 14, 16
Symbols 27
Tips
agent administration 191
Contact Center general parameters 192
recording contact center greetings 191
Routing Table administration 192
skillset administration 191
skillset mailbox 192, 194
Transfer 196
Transfer Allowed
enabled 152
Index
219
cannot change the Contact Center Skillset Parameters
198
Two line display
using 25
V
Voice channels 36, 192
Intelligent Contact Center Telephone Administration Guide
220
Index
NN40170-600