1
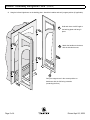
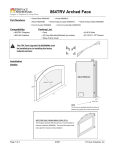
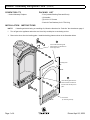
Avalon Hideaway Bungalow Face
COMPATIBILITY
(95700121)
PACKING LIST
• Avalon Hideaway Fireplace
• Face (includes Backing Plate and Doors)
• (2) Handles
• (4) 8-32 x 1/2" Screws
• Push-On Face Brackets (for 21 TRV Only)
INSTALLATION
NOTE:
INSTRUCTIONS
If installing with thick facing or retrofitting tile, follow the directions for “Push-On” face brackets on page 3.
!
Turn off gas to the appliance and make sure it has fully cooled prior to conducting service.
1
Remove the doors from the backing plate. Install the backing plate as shown in the illustration below.
b
Lift and rotate the backing plate
forward until the top brackets lock
into the upper slots.
Backing Plate
35-3/8”
a
Tilt the backing plate back and
insert the bottom brackets into
the lower slots until they lock in
place.
Access Door
21-1/8”
Page 1 of 4
(for accessing controls)
Printed April 16, 2008
Avalon Hideaway Bungalow Face
2
(95700121)
Hang the left and right doors on the backing plate. Attach the handles and verify magnet position (if applicable).
a
Hold each door at a 90°angle to
the backing plate and hang in
place.
b
Attach the handles to the doors
with the included screws.
c
Verify the magnets are in the correct position on
both doors with the felt facing outwards
(contacting the face).
Page 2 of 4
Printed April 16, 2008
Avalon Hideaway Bungalow Face
(95700121)
PUSH-ON FACE BRACKETS
NOTE:
The push-on brackets are only compatible with the 21 TRV (2008 or later).
Overview
The optional push-on brackets allow the face to be installed up to 1” from the front of the fireplace. In addition, the
new brackets allow the face to be installed straight-on to the fireplace. This permits the use of thick facing material
directly above the face (no gap is required to slide the face into place).
Tile Retrofit Installations
If a 21 TRV is already installed into a standard drywall installation with the standard brackets, it is extremely difficult to
install tile behind face (this requires the fireplace location to be moved forward). With the new push-on brackets, the
face may be located up to 1” from the front of the fireplace, allowing tile or other non-combustible to be placed behind
the face.
Bracket Installation
Remove the stock brackets and install the push-on brackets to the back of the face following the directions below.
The upper brackets are installed with the notch
facing to the left (this insures the brackets are
installed right side up)..
Note how the lower
brackets angle inwards.
Page 3 of 4
Printed April 16, 2008
Avalon Hideaway Bungalow Face
(95700121)
Preparing the Fireplace for Thick Facing
The 21 TRV has a sliding heat shield that must be properly positioned when using thick facing. See the directions
below for adjusting the heat shield.
Loosen these two nuts above
Slide the heat shield forward until it is flush with
the firebox (3/8” wrench).
the facing and tighten the nuts to secure.
AAAAA
AAA
AAAAA
AAA
AAAAA
AAAAAAA
AA
AA
AAAAAAAA
AAAAAA
AA
AAAAAA
AAAAAAAA
AA
AA
Face Installation and Removal
Face Attachment
Face Removal
The upper slots have a springtensioned lever that catches the
small teeth on the brackets.
AA
AA
Pull the bottom of the face
out then disengage the face
from the frieplace.
AAA
AAA
Loosen the
lower screws.
Once the face is in place,
open the access door and
tighten this screw (5/16”
wrench). This locks the
face in place.
Page 4 of 4
Printed April 16, 2008