1
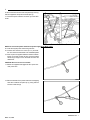
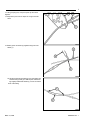
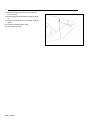
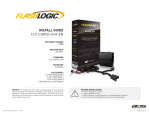
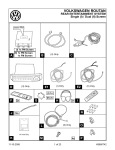
Routan
WiFi Router
MINIVAN
PROCEDURE STEPS:
NOTE: Using a test light, verify the keyed power outlet being used is ignition switched. Power must not be
present with the ignition in the OFF position.
1. Move the passenger seat to the full rearward position.
2. Disconnect the negative battery cable.
3. Remove the four fasteners (2) on both sides of the storage bin.
4. Carefully disengage the two spring clips from the top
center of the bin and pull the lower bin towards the
rear of the vehicle.
5. Route the Wi-Fi power harness (1) under the carpet
from the passenger seat to the instrument panel storage bin (2).
K6860631 Rev. 1
March 24, 2009
2
6. Secure the Wi-Fi Router under the passenger seat (1)
with the supplied tie straps and Velcro® tape (3).
7. Connect the power harness connector (2) to the Wi-Fi
router.
NOTE: Do not use the power outlet for the power supply to the Wi-Fi router.
8. Locate the keyed power outlet wiring harness.
9. Cut each wire and remove 13 mm (0.5 in.) of insulation from each wire that needs to be soldered/spliced.
10. Place a piece of supplied adhesive lined heat shrink
tubing on one side of each cut wire. Insure the tubing
will be long enough to cover and seal the entire soldered area.
CAUTION: Do not use acid core solder.
11. Solder the supplied fused pigtail to Wi-Fi power harness power wire.
12. Place the strands of the power side wires overlapping
each other inside of the splice clip (1 ) along with the
red fuse holder wire(2).
K6860631 Rev. 1
March 24, 2009
3
13. Using crimping tool, crimp the splice clip and wires
together.
14. Repeat the previous two steps for the ground side
wires.
15. Solder (3) the connection (2) together using rosin core
solder (1).
16. Center the heat shrink tubing (2) over the solder joint
and heat using a heat gun. Heat the joint until the tubing is tightly sealed and sealant (1) comes out of both
ends of the tubing.
March 15, 2009
K6860631 Rev. 1
4
17. Position lower bin into place and connect the electrical connectors
18. Seat the storage bin and engage the spring clip retainers.
19. Install the four fasteners (4) on both sides of the storage bin.
20. Connect the negative battery cable.
21. Verify system operation.
March 24, 2009