1
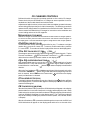
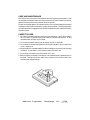
OWNER'S MANUAL
ELECTRONICALLY-TUNED
AM/FM/MPX RADIO WITH
AUTO-REVERSE CASSETTE PLAYER,
CD CHANGER CONTROLS
AND QUARTZ CLOCK
Model
IM-500
OPERATING INSTRUCTIONS
RADIO AND CASSETTE CONTROLS
1
ON-OFF SWITCH/VOLUME CONTROL
2
BASS CONTROL
TREBLE CONTROL (PULL)
Rotate this knob to the right to turn the radio on. Continue rotation until the desired
volume level is obtained.
Turn the knob clockwise to increase bass response, counterclockwise to decrease
bass response. A detent click can be felt at the center of rotation. Similarly, the treble
response can be adjusted by pulling the knob outward until it locks into position and
then rotating it. Push the knob back in to return to the bass control position.
3
LEFT/RIGHT BALANCE CONTROL (PULL)
4
FRONT/REAR FADER CONTROL
Pull this knob outward until it locks into outer position. Rotate it to the left or right to
obtain the desired balance between left and right speakers. Push knob back in to
return to volume control position.
Rotate this knob to the left or right to obtain the desired balance between front and
rear speakers in 4 speaker installations. When used in conjunction with the Left/Right
Balance Control
, you have full 4-way stereo balance capability.
3
5
FM/AM BAND SELECTOR
Each time this button is pressed, the radio band is changed. The indication “AM”,
“FM1” or “FM2” will appear on the display panel according to your selection.
6&7
MANUAL UP/DOWN TUNING
SEEK TUNING
To manually select a radio station, momentarily press the Up Tuning (
) button
to advance the unit one digit higher or the Down Tuning (
) button
to tune
downward. Pressing either button for longer than 0.5 second will activate the Seek
Tuning function and cause the radio to search for stations automatically. The radio
will seek the next station and stop at that frequency. Continuing to hold either button
will cause the radio to tune rapidly in the selected direction until the button is released.
6
8
7
AUTO-STORE TUNING (AS)
PRE-SET SCAN TUNING (PS)
During radio operation, press this button momentarily to scan the six stations pre-set
into the memories of the AM band or the twelve pre-set memories of the FM bands.
The unit will stop at each pre-set station for 5 seconds before continuing to the next
pre-set station (the channel indicator number on the display panel will flash). Press
the button again momentarily to stop the Pre-Set Scan operation and remain on the
selected frequency.
Pressing the button for longer than 1 second will activate the Auto-Store Tuning,
which will automatically scan the band and enter up to six strong stations into the preset memory positions of that band. If you have already set the pre-set memories to
your favorite stations, activating the Auto-Store feature will erase those stations and
enter the new strong stations. This feature is most useful when traveling in a new area
where you are not familiar with the local stations.
9
STATION PRE-SET MEMORIES
To set any of the 6 pre-set memory buttons, use the following procedure:
1. Turn the unit on and select the desired band.
2. Select the first station to be pre-set using the Manual Tuning
functions.
6
&
7
or Seek
3. Press the pre-set button to be set and continue to hold the button in. The volume
will be muted for aproximately 2 seconds and then return. The station is now set
into that pre-set button. To recall that station, press the button momentarily.
4. Repeat the above procedure for the remaining 5 pre-sets on the band and for the
other 2 bands of the unit.
bl LIQUID CRYSTAL DISPLAY PANEL
The Liquid Crystal Display (LCD) panel displays the frequency, time and activated
functions.
NOTE: It is a characteristic of LCD panels that, if subjected to cold temperatures for
an extended period of time, they will take longer to illuminate than under
normal conditions. In addition, the visibility of the numbers on the LCD may
slightly decrease. The LCD read-out will return to normal when the temperature increases to a normal range.
bm CASSETTEDOOR
Hold the cassette with the exposed tape edge to the right and insert into the cassette
door. Depress fully until the cassette is engaged and begins playing. When the
cassette reaches the end of the side of the tape being played, the unit will
automaticvally change direction of play as shown by the arrow indication on the
display panel and play of the other side of the cassette will begin.
NOTE: Observe cassette operation Cautions in Care and Maintenance section of this
manual.
bn FAST-FORWARD BUTTON (FF)
Pushing the Fast-Forward button will cause the tape to move rapidly in the forward
direction of play. To stop Fast-Forward movement, lightly push the Rewind Button
until the Fast-Forward button disengages.
bo
bo REWIND BUTTON (REW)
Pushing the Rewind button will cause the tape to move rapidly in the reverse direction
of play. To stop Rewind movement, lightly press the Fast-Forward button
until
the Rewind button disengages.
bn
bp PROGRAMSELECTOR
To manually reverse tape direction and play the other side of a cassette, lightly press
both the Fast-Forward
and Rewind
buttons at the same time. The change of
direction will be shown by the arrows on the LCD panel.
bn
bo
bq EJECTBUTTON
Tape playback is stopped and the cassette is ejected by pressing this button, which
also has the function of switching over to radio operation.
br MODE SELECTOR
This button is used to select the audio source in play. During tape play, it can be used
to change to radio play without ejecting the cassette. Similarly, it can then be used
to go back to tape operation from radio play.
NOTE:To prevent damage to cassette tape and/or mechanism, it is recommended
that the cassette be ejected if it will not be played for prolonged periods.
bs TIME/FREQUENCY SELECTOR (T/F)
During radio operation, push this button to call the time display on the incorporated
quartz clock. Pressing the button again will return to frequency display.
During CD changer operation, push this button to call the time display or return to the
disc and track number indications.
bt RE-SET BUTTON
A re-set button is located on the front panel which must be activated by a pen tip or
other thin object as it is recessed to prevent accidental engagement. The re-set
circuitry is provided to protect the microprocessor circuitry and should only be
activated under the following circumstances as it will erase the time and station preset memories.
1. Upon initial installation after all wiring is completed.
2. If there is a malfunction of any of the switches on the unit, pressing the re-set button
may clear the system and return to normal operation.
SETTING THE CLOCK
1. Switch the vehicle ignition “on” and the radio “on .
bl
2. If the radio frequency is shown on the LCD panel
, press the Time/Frequency
Selector (T/F)
momentarily so that the time display is shown.
bs
3. With the time display on the LCD panel, press and hold the Time/Frequency
Selector (T/F)
, for approximately 2 seconds until the time display begins
flashing.
bs
4. Within 5 seconds of the display beginning to flash, press the Down Tuning (
)
button to adjust the hours, then the Up Tuning (
) button adjust the minutes
to the correct time.
7
6
5. After setting the correct time, press the Time/Frequency Selector (T/F) again or
wait 5 seconds for the display to stop flashing.
CD CHANGER CONTROLS
Built into this radio are controls to operate an optional 10-disc or 6-disc CD changer.
Please check with your SPS/Audiovox or Prestige car stereo specialist for recommendations of the models that will work with this radio.
Adjustment of audio functions (volume, tone, balance, and fader) operate in the same
manner during CD play as they do for radio/cassette play. The following controls will
operate the CD changer when it is installed and connected to this radio. Refer to the
owner’s manual included with the CD changer for instructions on the installation and
correct loading and use of the CD magazine.
bu MODE SELECTOR (MODE)
With the CD changer connected to the unit, this button is used to select CD changer operation.
To choose CD mode, press the button until the “DISC” and “TRACK” indications appear on
the display panel. Press the Mode button again to change back to radio or tape operation.
cl & cm DISCSELECT(D+)(D-)
These buttons are used to select the desired disc for play. To advance to a higher
number disc, press the “D+” button
. To return to a lower number disc, press the
“ D -” button
. The number of the disc in play will be shown on the display panel.
cl
cm
cn & co TRACK SELECT (TRC
) (TRC
)
These buttons are used to quickly select the beginning of a particular track. Tap the
Forward Track Select (
)
or Backward Track Select ( )
to locate the
desired track as shown by the track number on the display panel.
cn
co
cp & cq CUE/REVIEW FUNCTIONS (
) (
)
High-speed audible search to any section of the disc can be made by the Cue and
Review functions. Press and hold the Cue (
) button
to advance rapidly in
forward direction or the Review ( ) button
to advance rapidly in the backward
direction.
cp
cq
cp
When the Cue (
) button
is held down and the end of the last track on the disc
is reached or the Review ( ) button
is held down until the beginning of the first
track is reached, the unit will enter the Pause mode (
) will flash on the display
panel) until the button is released.
cq
cr PAUSE SELECTOR (PAU)
Pressing this button will temporarily stop play of the disc (the
indication will flash
on the display panel). Press the button again to resume play of the disc from the point
at which it had stopped.
cs TRACK/DISC SCAN (SCAN)
cs
When the Scan button
is pressed, the “SCAN” indication will appear on the display
panel and the first 10 seconds of each track on the disc will be played in order. When
a desired track is reached, press the Scan button
again and play of that track will
continue (“SCAN” will disappear from the display panel). The Track Scan mode will
also be cancelled by activating any other disc function (Select, Cue, Review, Shuffle
or Repeat).
cs
cs
When the Scan button
is pressed and held longer than 2 seconds, the “DISC” and
“SCAN” indications will appear on the display panel and the first 10 seconds of the
first track on each disc will be played. When a desired disc is reached, press the Scan
button
again and play of the disc will continue (“DISC” and “SCAN” will disappear
from the display panel). The Disc Scan mode will also be cancelled by activating any
other disc function (Select, Cue, Review, Shuffle or Repeat).
cs
ct TRACK/DISC REPEAT (RPT)
ct
When the Repeat button
is pressed, the “RPT” indication will appear on the display
panel and play of the selected track will be continually repeated until the Track Repeat
mode is cancelled by pressing the Repeat button
again or by activating the Scan
or Shuffle
functions (“RPT” will disappear from the display panel).
cs
ct
cu
ct
is pressed and held longer than 2 seconds, the “DISC”
When the Repeat button
and “RPT” indications will appear on the display panel and play of the selected disc
will be continually repeated. The Disc Repeat mode can be cancelled by pressing the
Repeat button
again or by activating the Scan
or Shuffle
functions (“ D ISC”
and “RPT” will disappear from the display panel).
ct
cs
cu
cu TRACK/DISC SHUFFLE (SHF)
cu
When the Shuffle button
is pressed, the “SHF” indication will appear on the display
panel and the tracks on the disc will be played in a random, shuffled order. The Track
Select buttons
and
will also select tracks in the shuffled order instead of the
normal progression. The Track Shuffle mode can be cancelled by pressing the
Shuffle button again or by activating the Scan
or Repeat
functions (“ S HF” will
disappear from the display panel).
cn
co
cs
ct
cu
When the Shuffle button
is pressed and held longer than 2 seconds, the “DISC”
and “SHF” indications will appear on the display panel and the discs in the magazine
will be played in a random, shuffled order as well as the tracks on each disc. When
all the tracks on the selected disc have been played, the next disc will be chosen in
shuffled order and its tracks will be played in shuffled order. The Disc Shuffle mode
can be cancelled by pressing the Shuffle button
again or activating the Scan
or Repeat
functions (“DISC” and “SHF” will disappear from the display panel).
cu
ct
cs
ERROR SIGNS
If a problem should develop while operating the CD changer, the following error sign
indications may appear on the display panel.
E:01
Indicates abnormal disc changer function. Consult your car stereo
specialist or service facility for further assistance.
E:02
Indicates excessive temperature conditions. The error sign will go
off and play will resume when the changer temperature returns to the
normal range.
E:07
Indicated disc may be loaded in the magazine upside-down. Reload disc properly if necessary. May also indicate that the disc is
dirty in which case, clean the disc and re-load it. If this does not
restore correct operation, consult your car stereo specialist or
service facility for further assistance.
---
Magazine is not loaded in the changer.
000
No discs are loaded in the magazine.
1:- -
No disc is loaded in magazine tray #1.(2: - - indication for tray #2,etc.)
CARE AND MAINTENANCE
The radio portion of your new sound system does not require any maintenance. We
recommend you keep this manual for future reference on how to set the clock and for
general reference of the many features found in this unit.
As with any cassette player, the cassette section of this sound system does require
a minimum of maintenance to keep it in good working condition. The following simple
care and maintenance suggestions should be followed to prevent malfunctions of the
cassette system.
CASSETTE CARE:
1. Purchase a cassette cleaning kit from your local retail store. Use it! At least every
20 to 30 hours of operation you must clean the cassette mechanism. A dirty
cassette player will have a poor sound.
2. Do not use cassettes that exceed 45 minutes of play on each side.
3. Do not insert a cassette that appears to be broken, twisted or dirty or with loose
or torn labels on it.
4. Always keep your cassettes away from direct sunlight or exposure to sub-freezing
conditions. If a cassette is cold, allow it to warm up before use.
5. Do not keep a cassette in the player when not in use.
6. Before inserting a cassette in the player, check that the tape is tightly wound on
the reels. Take up any excess slack using a pencil to turn the drive hub in the
cassette (see diagram below).
Audiovox Corporation, Hauppauge, N.Y. 11788
Form No. 128-4611