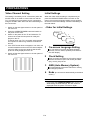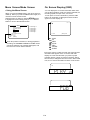
1
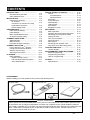
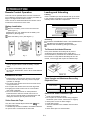
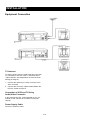
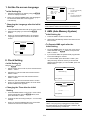
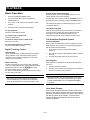
OWNER’S MANUAL
VIDEO CASSETTE RECORDER
VCR-9600
Type Tested
Electrical
Safety
AS/NZS 3250 Lic 4168
Standards Australia
How to Use This Manual
Please read this Owner’s Manual carefully before using the VCR and store it in a safe
place for future reference.
This Owner’s Manual explains how to use your VCR and, in particular, using the remote
control unit keys to control the VCR. Keys on the VCR itself that have the same label as their
counterparts on the remote control unit perform exactly the same functions.
There is an “Identification of Controls” illustration on the back of this page. Use this
if you are unsure of a key operation using the remote control unit or the display. To
use this illustration, unfold this page as indicated in the diagram below and refer to the
illustration while reading the appropriate section of the manual.
Remote control unit
V
Rear Panel
AC Mains cord
CLEAR button
TEST SIGNAL switch
AUDIO OUT Jack
AUDIO IN Jack
RF OUT socket
CH ADJ (RF CHANNEL ADJUSTER)
ANT. IN socket
VIDEO IN Jack
VIDEO OUT Jack
Remote Control Unit
Number buttons (1-9, 0)
0/AUX button
MENU-button
RESET button
CLOCK button
REC button
PLAY button
OPERATE/TIMER button
STOP/EJECT button
PAUSE button
REW button
FF button
SKIP/ZERO RTN button
OSD button
V CH buttons
< SHIFT > buttons
SLOW button (8, 9)
PICTURE CONTROL button (5, 6)
V
Front Panel
REMOTE SENSOR
Multi-display
REC.button (REC/OTR)
CHANNEL V/ buttons
STOP/EJECT button
FF button
PLAY button
REW button
Cassette loading slot
OPERATE/TIMER button
Multi-display
One-touch timer recording indicator [OTR]
Timer set indicator
REC indicator [ - ]
Operation mode indicator
(CH/TIME/COUNTER etc.)
Digital tracking indicator [ATR]
Power indicator [
]
E-1
CAUTION AND CARE
NOTICE:
Unauthorized recording of copyrighted television
programmes, films, video tapes and other materials may infringe on the rights of copyright owners
and be contrary to copyright laws.
WARNING:
TO PREVENT FIRE OR SHOCK HAZARD, DO
NOT EXPOSE THIS EQUIPMENT TO RAIN OR
MOISTURE.
CAUTION:
TO REDUCE THE RISK OF ELECTRIC SHOCK,
DO NOT REMOVE COVER. NO USER-SERVICEABLE PARTS INSIDE. REFER SERVICING
TO QUALIFIED SERVICE PERSONNEL.
CAUTION:
When the VCR is suddenly moved from a cold
environment to a warm environment, some condensation will occur inside the VCR. If the VCR is
operated as it is, the tape may stick to the tape head
and damage to the tape and/or the deck will result.
Under these circumstances, do not operate the
VCR for about 2 hours with the Mains cord
connected so as the VCR will dry out.
MAINTAIN GOOD VENTILATION
There are many ventilation holes on the bottom of the
VCR. For maximum ventilation place the VCR on a
hard level surface only.
DO NOT PLACE ANYTHING ON THE VCR
Heavy objects placed on the VCR will cause damage.
The top of the VCR is also slotted to provide ventilation. Do not obstruct these ventilation slots.
NEVER INSERT ANY OBJECT INTO THE CABINET
Do not insert any kind of foreign object into the VCR.
This not only creates a safety hazard but can also
cause extensive damage to the mechanism.
PROTECT THE MAINS CORD
Do not damage the Mains Cord. Damage to the
Mains Cord may cause a fire or shock hazard. When
unplugging the Mains Cord, please hold by the plug
and remove it carefully.
CABINET CARE
Clean with a soft cloth slightly moistened with a mild
detergent and water. Wipe with a dry cloth.
NEVER USE ANY PETROLEUM BASE SOLUTIONS.
WHEN NOT IN USE
When you finish operating the VCR, always unload
the cassette and turn OFF the OPERATE/TIMER
button.
UNPLUG THE MAINS CORD AND DISCONNECT
THE ANTENNA CABLES DURING A LONG ABSENCE
When you leave your home for a long period of time,
turn OFF the OPERATE/T/MER button, unplug the
Mains Cord and disconnect the antenna cables.
Please note that on your return the calendar. clock
data and channels will have to be reprogrammed.
For your reference, please record the serial number
of your VIDEO CASSETTE RECORDER and the
date you purchased it in the following space:
Serial Number:
Purchase Date:
E-2
CONTENTS
INTRODUCTION...........................................
RemoteControl Operation.......................
Video Cassette Tape...............................
E-4
E-4
E-4
INSTALLATION.............................................
Equipment Connection............................
TV Antenna.........................................
Connection of VCR and TV Using
Audio/Video Connector.......................
Power Supply Cable...........................
E-5
E-5
E-5
E-5
E-5
PREPARATIONS..........................................
Video Channel Setting............................
Initial Settings.........................................
Menu Screen/Mode Screen....................
On Screen Display (OSD).......................
E-6
E-6
E-6
E-8
E-8
CHANNEL PRESETTING.............................
AMS Operation.......................................
Manual Tuning........................................
Automatic Channel Changing.................
CHANNEL SELECTION...............................
Tuning with the V CH Buttons.............
Tuning with the Number Buttons
(Remote Control Only)...........................
Selecting AUX Position..........................
E-9
E-9
E-9
E-9
E-10
E-10
E-10
E-10
PLAYBACK..................................................
Basic Operation......................................
Digital Tracking Control.....................
Full Auto/Auto Playback System.......
Auto Head Cleaner............................
E-11
E-11
E-12
E-11
E-11
SPECIAL EFFECT PLAYBACK...................
Search....................................................
Forward Search..................................
Reverse Search..................................
Still Frame ................................................
Frame Advance.......................................
SlowPlayback..........................................
1 Minute Skip...........................................
Zero Return.............................................
Blueback Function...................................
E-12
E-12
E-12
E-12
E-12
E-12
E-12
E-13
E-13
E-13
RECORDING..................................................
Basic Operation.......................................
Checking the Picture Being Recorded.....
Recording One Programme While
Viewing Another.......................................
Auto Turn on System...............................
Pause Function........................................
REC Review............................................
Recording from Another VCR..................
One-touch Timer Recording (OTR).........
E-14
E-14
E-14
E-14
E-14
E-14
E-14
E-14
E-15
COUNTER FUNCTION..................................
Counter Display.......................................
E-15
E-15
PROGRAMMABLE TIMER RECORDING.....
Before Programming................................
Programming Procedure..........................
Hints on Programming.............................
E-16
E-16
E-16
E-17
OTHERS.........................................................
Specifications...........................................
E-18
E-19
V
ACCESSORIES
Before installing your VCR, please check you have the following items.
Coaxial Cable
Remote Control Unit
Owner’s Manual
Moisture Condensation
Never operate this unit immediately after moving it from a cold location to a warm location. When the VCR
is exposed to such a change in temperature, moisture may condense on the cylinder inside the machine.
If the VCR is operated as it is, the tape may stick to the tape head and cause damage to the tape and/or the
deck. Under these circumstances, do not operate the VCR for about 2 hours. Leave the power cord
connected so that the VCR can dry out.
E-3
INTRODUCTION
Loading and Unloading
Remote Control Operation
This VCR can be operated with the remote control from
up to a distance of about 23 feet (7 meters) and within an
angle of 15 degrees either side of center.
There must be no obstacles between the remote control
unit and the remote sensor of the VCR.
Loading
Insert a cassette tape with its labeled side up as shown
in the cassette compartment. The cassette will be automatically drawn inside the compartment.
Battery Installation
Remove the battery cover on the rear of the unit.
(See Figure 1.)
Install two size “AA” batteries into the battery compartment. (See Figure 2.)
Close the battery cover. (See Figure 3.)
Unloading
Press the STOP/EJECT button. The cassette will be
ejected from the cassette compartment.
Remove the cassette by pulling it toward you.
To Prevent Accidental Erasure
Fig. 1
Fig. 2
Fig. 3
Every video cassette has a safety tab to prevent
accidental erasure. Breaking off the safety tab is
recommended for prevention from accidental erasure of
the contents. If a tape without the safety tab is to be
reused, cover the gap with a piece of adhesive tape.
Notes
.
.
.
Be sure to install batteries properly to match the
polarity diagrams drawn inside the battery compartment.
Do not mix a new battery with an old one.
Do not heat, disassemble, short or throw used batteries
into a fire.
Precautions on Use
.
.
..
.
Pressing two or more function buttons on the remote
control unit at the same time may result in improper
operation or damage.
Do not place the remote control unit in an area where
it may become wet.
Do not place the remote control unit near high heat.
Dropping the remote control unit on a hard surface
may result in damage.
Do not use benzene, thinner or other petroleum
based solvent to clean the remote control unit. To
clean, wipe a soft cloth slightly moistened with a mild
detergent, and then wipe dry with a soft cloth.
Video Cassette Tape
Only the video cassette tapes marked with
can
be used in this VCR.
A cassette tape cannot be loaded or unloaded unless the
AC power cord is connected to the AC outlet.
Tape Speeds and Maximum Recording
Playback Time
TYPE OF THE VIDEO CASSETTE TAPE
TAPE SPEED
SP (Standard Play)
E-300
5hrs
E-180
E-120
3 hrs
2 hrs
E-60
1 hr
Care of the Video Cassette Tape
.
.
.
..
.
E-4
Avoid violent vibration or shock.
Do not place in a location where strong magnetic
fields exist (near a motor, transformer or magnet).
Never place or store in direct sunlight.
Avoid dusty places,
Place the cassette in the cassette case and store
vertically.
Never store tape in a humid location.
INSTALLATION
Equipment Connection
TV Antenna
To watch a picture from the VCR using this connection,
it is necessary to set one of the TV channels as the
"Video channel". See Preparations in Video Channel
Setting (on Page 6).
1. Connect the antenna (or CATV) connector to the
ANT. IN socket.
2. Connect the accessory coaxial cable between the
RF OUT socket and the TV.
Connection of VCR and TV Using
Audio/Video Connector
In this case use the A/V mode specified on your TV,
instead of UHF channel 32 or another unoccupied
channel.
Power Supply Cable
Connect to a wall AC outlet.
E-5
PREPARATIONS
Video Channel Setting
Initial Settings
This setting is necessary for RF connections (when the
SCART cable is not used to connect this unit and the
TV). This setting is not necessary for AV connections
using the SCART cable. Start from the initial Settings in
the next section.
When the video channel setting is complete and you
press the OPERATE/TIMER button to switch on the
power, the on-screen language setting screen appears
as the first of the initial settings. Set the initial settings in
the order below.
1. Switch on the test signal switch on the rear panel of
the main unit.
. Order for initial Settings
1
2. Press the OPERATE/TIMER button and switch on
the power for the VCR.
Language
Clock
3. Switch on the power for the TV and select the TV
channel 32 so that the test picture is clearly displayed on the TV.
If channel 32 of your TV is occupied, select another
unoccupied TV channel eg. between channels 30
and 39.
4. If the TEST screen does not appear or not clear, use
a small screwdriver and turn the RF channel adjustment (CH ADJ) on the rear panel so that the test
picture is clearly displayed on the TV.
5. Switch off the test signal switch on the rear panel of
the main unit.
TEST
TEST
TEST
TEST
TEST
TEST
TEST
TEST
TEST
TEST
TEST
TEST
TEST
TEST
TEST
TEST
TEST
TEST
TEST
TEST
TEST
TEST
TEST
TEST
TEST
TEST
TEST
TEST
TEST
TEST
TEST
TEST
TEST
TEST
TEST
TEST
TEST
TEST
TEST
TEST
TEST
TEST
TEST
TEST
TEST
TEST
TEST
TEST
2
3
AMS
4
Menu
On-screen Language Setting
1
You can select one of five languages (English,
German, French, Italian, Spanish) to be used for
the OSP display.
2
Clock Setting
Timer recording and other such functions require
that the current time (hour and minute) and date
(day, month, year) be set.
3
AMS (Auto Memory System)
This automatically stores the channels in memory
and assigns positions.
4
Ends (the unit returns automatically to the Menu
screen.)
Note
If you press the OPERATE/TIMER button to turn off
while setting the initial settings, the next screen is
displayed when the power is turned on again.
E-6
1. Set the On-screen Language
CLOCK SET
<-(OUT)-> (lN):
. Initial Setting Up
TIME 19 : 57
DATE 31 / 1 TUE
YEAR . 95
Select the language you want by using the
buttons to display it inverted.
Settings
One hour automatically
added to time
(IN)-> (OUT):
One hour automatically
subtracted from time
DATA = [ V ]
SHIFT = [ < > ]
END = [MENU]
2. When you press the MENU button, that language is
set and the CLOCK SET screen appears
automatically.
. Changing the Language after the Initial
( OUT )
V
1.
SUMMER TIME
Notes
..
When setting dates after 29th, set the month first.
The <SHIFT> button can be used to move items.
Press the MENU buttonand call up the menu screen.
1.
2. Select the language you want with the
buttons.
When you press the MENU button, the selected
language is set and the unit returns to the Menu
screen.
3.
LANGUAGE
ENGLISH
DEUTSCH
FRANCAIS
ITALIANO
ESPANOL
V
SELECT = [ V ]
END
=[MENU]
3 AMS (Auto Memory System)
. Initial Setting Up
1. Press the SHIFT> button to start AMS.
2.
AMS ends automatically and the unit returns to the
Menu screen.
. To Execute AMS again after the
Initial Setting
1. Press the MENU button to call up the menu screen,
select AMS with the
buttons, and press the
SHIFT > button.
2. If you execute AMS, the position data programmed
in the initial settings is cleared.
2. Clock Setting
3.
. Initial Setting Up
Using the
To execute AMS, press the SHIFT> button. (The
data previously stored in memory is cleared and
AMS is executed again.) To cancel AMS, press the
MENU button.
buttons
AMS
1. Select summer time in and out, then set this with the
SHIFT > button.
2.
Select the hour and minute and set them with the
SHIFT> button.
3.
Select the day and month and set them with the
SHIFT > button.
4.
Select the year and set it with the SHIFT > button.
5.
When you press the MENU button, the clock starts.
Next the AMS screen appears.
AMS START=[>]
- - - - - - - - - - - - - - - - - - -
QUIT=[MENU]
AMS
AUTO MEMORY SYSTEM
PROCEEDING
. Changing the Time after the Initial
Setting
l l l l l l - - - - - -
1. Press the MENU button to call up the menu screen,
select CLOCK SET with the
buttons, then
press the SHIFT> button.
2.
3.
QUIT=[MENU]
Change the time according to Steps 1.-4 in the initial
settings.
Note
If the power to the unit is cut off because of a power
failure or the plug being unplugged from the socket,
the initial settings must be made again. However, the
channel preset memory is retained.
When you press the MENU button the clock starts
and the unit returns to the Menu screen.
E-7
Menu Screen/Mode Screen
. Using the Menu Screen
When you press the MENU button, the menu screen is
called up. When you press the MENU button again, the
unit returns to the normal screen.
Select the item you want by using the
buttons
to highlight its screen setting, then press the SHIFT>
button to move to the selected screen.
On Screen Display (OSD)
You can display the on-screen information which tells
you the tape operation mode, the channel selected, the
recording speed, the tape count, or the time.
To call up the on-screen information, press the OSD
button. All information is displayed. Press the button
again to turn the display off.
P27
MENU
TIMER PROGRAM
CHANNEL PRESET
AMS
CLOCK SET
LANGUAGE
MODE
<-- See Page 17.
<-- See Page 9.
<-- See Page 9.
<-- See Page 7.
<-- See Page 7.
NOT AVAILABLE NOW
SELECT =[ V ]
ENTER =[>]
END
=[MENU]
-1 36:59
[MON] 23:35
V
: PLAY
: FF
: REW
: STOP
: REC
: PAUSE
: EJECT
When AU position is selected, or during playback or
recording, the CHANNEL PRESET and AMS screen
cannot be selected. This message will appear, and
the normal TV screen will be restored.
Even if the VCR is in OSD off mode, the superimposed
information will appear on the TV screen and multidisplay for a few seconds when you press any tape
operation button or when you select a channel. After a
few seconds, it disappears from the screen. When OSD
is on, the on-screen information remains on the screen
P 08
E-8
CHANNEL PRESETTING
There are two ways to preset channels: Automatic
tuning with AMS and manual tuning.
Automatic Channel Changing
If a channel you have placed at some position already
exists at another position, those channels and their skip
settings are automatically swapped.
AMS Operation
Automatic tuning with AMS is executed during the initial
settings, so normally it is not necessary. AMS is necessary at such times as when you take the unit to another
region. See Initial Settings 3 AMS (Auto Memory System) on Page7.
Example:
If you changed from Channel 022 to Channel 045 at
Position 02, since Channel 045 is already at Position 01
Channel 022 is swapped to Position 01.
Manual Tuning
CHANNEL PRESET
POS
CH
SKIP
01
045
NO
02
022
YES
Manual tuning is used when there is a channel that was
not preset by AMS or when you want to swap the channel
at any position.
1. Press the MENU button to call out the menu screen
Using the
buttons
2.
Select CHANNEL PRESET and press the SHIFT>
button. The channel preset screen appears.
3.
Only five positions are displayed on the screen.
Select the number of the position to be changed and
press the SHIFT> button.
The picture for the selected channel is displayed
while the OSD button is being pressed.
4.
Select the channel and press the SHIFT> button.
5.
Select whether or not this channel is to be skipped
when you move through the channels with the
buttons (yes: skipped; no: not skipped),
then press the SHIFT> button.
6.
To add or change other positions, repeat Steps 3.-5.
CHANNEL PRESET
POS
CH
SKIP
01
045
YES
02
022
NO
CHANNEL PRESET
POS
01
02
03
04
05
CH
002
* 022 *
045
101
121
V
SELECT =[ V ]
ENTER =[>]
END
=[MENU]
SKIP
NO
NO
NO
YES
YES
<-- YES: Skipped
NO: Not Skipped
Display while a channel
is being tuned.
E-9
CHANNEL SELECTION
V
Tuning with the V CH
Buttons
1. Press the OPERATE/TIMER button to turn on the
VCR.
2.
Press the
buttons to select the position
number to which the desired channel has been
preset.
Tuning with the Number Buttons
(Remote Control Only)
For channels preset in single-digit position
Press the 0 button, then the corresponding number
button (1 to 9) within three seconds.
For channels preset in two-digit position
P10
1. First enter the ten’s digit with one of the NUMBER
buttons 1-9
2.
Then enter the one’s digit within 3 seconds with the
NUMBER buttons 1-9 and 0
Notes
.
.
If the
buttons are pressed and immediately
released, the preset position steps up or down and the
corresponding channel is tuned.
If the
buttons are held in for longer than 0.5
second, the position numbers will keep changing until
the button is released.
Notes
.
.
.
If you select a position with no assigned channel, it is
not valid, and the previous channel will reappear.
If you wait more than 3 seconds to enter the second
digit, the first digit will disappear and the previous
position number will reappear.
Even when "SKIP" is set to "NC" on the CHANNEL
PRESET Screen (see page 9) it is possible to select
channels with the NUMBER Button.
Selecting AUX Position
The AUX (auxiliary input) position (displayed as "AU")
may be selected with the 0/AUX button. When the AUX
position is selected, recording from an external A/V
source may be performed with the AUDIO/VIDEO socket.
Press the 0/AUX button twice to select the AUX
position.
.
E-10
PLAYBACK
Basic Operation
1.
Press the OPERATE/TIMER button.
2. Insert a cassette tape into the CASSETTE
LOADING SLOT.
3.
Turn on the TV and select the channel for video
viewing.
4.
Press the PLAY button to start playback.
To stop playback:
Press the STOP/EJECT button.
To rewind a tape in Stop mode:
Press the REW button.
To advance a tape rapidly in Stop mode:
Press the FF button.
Picture Control (Video Enhancer)
During playback, press the NUMBER button 5 or 6 to
obtain desired picture enhancement.
To make the picture softer, press the NUMBER button 5.
To make the picture sharper press the NUMBER button
6.
The enhaticement level is indicated by figures (-9 to 9)
on the Multi-display.
Auto Rewind System
When a tape reaches its end in Playback, Fast Forward
or Record mode except OTR and Programme Timer
Recording, it will be automatically rewound to its
beginning and the unit will be switched to Stop mode.
Full Auto/Auto Playback System
Full Auto Playback
To stop fast forwarding or rewinding:
Press the STOP/EJECT button.
Simply insert a cassette tape without a safety tab into the
VCR while the unit is turned off. The following operations
will be performed automatically:
Digital Tracking Control
1.
The VCR is turned on and the tape starts to
playback.
2.
The tape is rewound to the beginning when it reaches
the end.
3.
The tape is ejected and the VCR is turned off.
Auto tracking
When playback starts or playback speed is changed
during playback, VCR enters Auto tracking mode.
At this time, the indication ATR blinks on the multidisplay for a few seconds.
Auto Playback
Manual tracking
Auto Playback is used when the VCR has already been
turned on.
If video noise appears in the picture after putting the
VCR into Auto tracking mode, use the Manual tracking
adjustment function. Press the
buttons until
the best possible picture is obtained.
To return to Auto tracking mode, press the PLAY button
for more than 2 seconds.
1.
The tape starts to playback.
2.
The tape is rewound to the beginning when it reaches
the end. The VCR is not turned off.
Notes
Notes
The Auto Playback or Full Auto Playback mode will be
released if one of the tape related buttons (FF, REW,
PAUSE, STOP/EJECT, PLAYor OPERATE/TIMER)
is pressed.
The noise on the screen may not be completely
removed depending on the tape used, especially
when the tape has been recorded on another VCR.
Auto Head Cleaner
This VCR is equipped with an Automatic Video Head
Cleaner. This feature will ensure that your VCR always
performs at its best by keeping the video heads clean of
dirt that can distort picture quality. The Auto Head
Cleaner engages automatically each time a tape is
inserted or ejected.
E- 11
SPECIAL EFFECT PLAYBACK
Search
Still Frame
The Picture Search function is a convenient way to
locate a desired portion of the tape quickly.
To freeze the picture
Forward Search:
2. To resume normal playback, press the PLAY button.
1. In the Playback mode, press the PAUSE button to
freeze the picture.
To view high-speed pictures in the forward direction
1. In the Playback mode, press the FF button.
2. Press the FF button again to search faster.
3.
To resume normal playback, press the PLAY button.
Reverse Search:
To view high-speed pictures in the reverse direction
Notes
.
.
.
If the VCR is left in Still mode for longer than five
minutes, it will automatically release Still mode to
prevent damages to the tape.
The audio output is muted in Still mode.
A noise bar will appear during the still frame. Please
note that this is normal.
1. In the Playback mode, press the REW button
2. Press the REW button again to search faster.
Frame Advance
3. To resume normal playback, press the PLAY button
Each time you press the PAUSE button in still mode the
still picture advances one frame.
Notes
.
.
.
The audio output is muted during picture search
operation.
Noise bars may appear on the picture during picture
search. This does not indicate a malfunction of the
VCR.
Press the
buttons in the course of Forward
Search or Reverse Search to move noise bars up and
down for the best screen.
Slow Playback
1. Press the NUMBER 8 button or the NUMBER 9
button to perform slow playback.
2. Each time these buttons are pressed, the playback
speed changes.
buttons during Slow Playback to
3. Press the
move noise bars up and down.
Press the PAUSE button when the screen gets the
best condition to make a still frame.
When the
buttons are continuously held in
such a situation, the shake of the picture screen will
be stopped.
4. To return to normal play, press the PLAY button.
Notes
A noise bar will appear during slow playback.
Please note that this is normal.
E-12
1 Minute Skip
With this feature you can skip over one minute’s worth of
commercials recorded on a tape.
Pressing the SKIP/ZERO RTN button in Play mode to
forward search the tape for 60 seconds, then returns
the VCR to Play mode.
Pressing the SK/P/ZERO RTN button while it is fast
forwarding through the commercials (Skip mode) will
return the VCR to Play mode.
.
.
Zero Return
In Stop mode, this rewinds the tape until the counter
setting is 0:00:00
.
During Play mode, press the RESET button to set the
counter to 0:00:00 at a scene you wish to watch again.
When you have finished watching the tape, pressing
the STOP/EJECT button then the SKIP/ZERO RTN
button causes the VCR to fast forward or rewind until
the counter setting is 0:00:00
Blueback Function
If an empty channel is selected or a blank section of tape
is encountered in Play mode, the TV screen automatically
changes to a solid blue color. The screen will remain blue
until an active channel is selected or a recorded signal is
again detected.
E- 13
RECORDING
Basic Operation
Auto Turn on System
1. Press the OPERATE/TIMER button.
When a cassette tape with a safety tab is inserted with
the VCR turned off, the VCR will be automatically turned
on.
buttons to select a desired
2. Press the
channel to be recorded.
3. Insert a cassette tape with a safety tab.
4. Press the REC button to start recording.
Pause Function
5. To finish recording, press the STOP/EJECTbutton.
To stop recording momentarily
1. Press the PAUSE button during recording.
Checking the Picture Being
Recorded
Turn on the TV and tune to the channel for video viewing.
Notes
.
.
.
If a cassette without a safety tab is inserted, it will
automatically eject when the REC button is pressed.
This protects the recorded contents on tape against
accidental erasure.
If the tape reaches its end during recording, it will be
automatically rewound to its beginning and the unit
will be switched to Stop mode.
In the Pause mode, it is possible to change a channel.
Recording One Programme
While Viewing Another
1. Press the OPERATE/TIMER button.
2. Set the TV for normal TV viewing and select the
channel to be viewed.
3. Select a desired channel to be recorded with the
buttons.
4.
Insert a cassette tape with a safety tab.
5.
Press the REC button to start recording.
6. To finish recording, press the STOP/EJECT button
2. To release the pause mode and resume recording,
press the REC button
REC Review
During normal recording (excluding timer recording and
OTR), pressing the PAUSE button causes the VCR to
rewind and display the last half second of the recording.
This allows you to check a recording while it is being
recorded.
Recording from Another VCR
With this VCR, you can make recordings from an
external source, e.g. copying onto this VCR from a
second VCR.
1. Connect another VCR or an external equipment to
this VCR.
2. Press the 0/AUX button twice so that the line input
indicator "AU" appears.
3. Play the tape on VCR A for playback and press the
REC button on VCR B.
VCR A (another VCR)
VCR B (your VCR)
E- 14
Changing OTR Duration
One-touch Timer Recording
(OTR)
This allows you record for up to 5 hours with automatic
turn-off.
The OTR duration can be changed by pressing the REC
button even after the OTR recording has started.
When the REC button is pressed once, the next recording duration is selected.
1. Press the REC button during recording.
The VCR enters OTR mode.
2. Select the recording duration by pressing the REC
button repeatedly. The OTR indication appears on
the TV screen.
The OTR recording will start immediately.
OTR
1:30
e.g. When the remaining recording time is 13 minutes,
the indication changes:
0:13
0:30
1:00
......
Notes
. If the tape reaches its end during OTR recording, it will
.
P23
2:00
OTR 0:30
OTR 1:00
OTR 1:30
OTR 2:00
O
OTR 5:00
OTR 4:00
OTR 3:00
be automatically stopped and the unit will be turned
Off.
When OTR recording has finished, the VCR will automatically switch to Timer Recording Standby mode if
there is Timer program data.
Notes
If the REC button is pressed during OTR recording,
the remaining recording time is indicated on the TV
screen and is automatically reduced.
COUNTER FUNCTION
Counter Display
When a cassette tape is inserted, the counter display
appears. The counter starts counting up or down when
the PLAY, REC, FF or REW button is pressed.
Notes
CLOCK/COUNTER Display Switching
To change the counter display to the clock display, press
the CLOCK (clock/counter) button.
Counter Display
The counter display automatically reverts to the clock
display when the unit is turned off or a cassette tape
is ejected.
Clock Display
Counter Reset
To reset the counter to "0:00:00", press the RESET button.
E- 15
PROGRAMMABLE TIMER RECORDING
A maximum of 8 events can be programmed within a
period of one month including the present day for
timer recording.
A timer recording can be activated at the same time
on the same day every week, on every day or on
weekdays, as well as on a particular day.
Correcting a programme
Press the SHIFT </> buttons, during programming, to
return to the item to be corrected, then correct it by
selecting the appropriate data again with the
buttons.
Cancelling a programme
Program example
Current time and date August 20, 1995 (Sunday),
10:20 am
This example records Channel 32 stored in memory
at Position 07 on Program Set No. 2 from 7:30 PM
until 8:25 p.m. on August 23rd (Wednesday).
If you press the RESET button during programming, the
data for the program set number being set is cleared.
TIMER PROGRAM
NO. DATE
START
STOP
POS
1
-------------------------------------------------2
23/ 8
19 : 30
20 : 25
04
3
-------------------------------------------------4
-------------------------------------------------12345678
V
SELECT =[ V ]
ENTER =[>]
END
=[MENU]
Before programming
.
.
Check that a tape cassette with the safety tab in place
is inserted in the unit.
Check that the clock is set correctly.
Checking a Programme
.
Programming procedure
1. Press the MENU button to call up the menu screen.
2.
Press the SHIFT > button to call out the timer
program screen.
.
.
The items to set blink inverted. For each item,
press the
buttons to select the appropriate data. When you press the SHIFT> button to
enter that data, the next item blinks. If there is no
need to select that item, press the SHIFT> button
to move to the next item.
3. Set the program set number.
4. Set the date.
5. Set the starting time.
6. Set the ending time.
7.
Set the channel position. When recording an external input source, set AU with the
buttons.
8.
To program for another program set number, repeat
Steps 3.-7.
9.
Press the MENU button to end the program. The
unit returns to the menu screen.
If you hold down the OPERATE/TIMER button for
more than three seconds, the unit goes on timer
standby. Check that the multi display indicator [ q ]
lights up. To cancel this mode, hold the OPERATE/
TIMER button down for three seconds again.
Child lock
During timer standby mode, all button functions are
blocked except MENU button. To cancel this mode, hold
the OPERATE/TlMER button down for three seconds.
E- 16
While the timer is standing by
Press the MENU button. The programme confirmation screen is displayed. After checking the
programme, press the MENU button again to return
to the normal screen.
While the timer is recording
Press the MENU button. The programme confirmation screen is displayed and the programme line
being recorded blinks. After checking the programme,
press the MENU button again to return to the normal
screen.
When two programmes overlap
Hints on Programming
. If the start of the later programme overlaps with the
In Step 4, you can select various "EV" (every week)
recording of the same channel at the same time
modes as well as recording on a particular day.
Press the V button when the current day on the
calendar blinks or press the button, exceeding the
last day of the calendar (the day after one month).
The DATE indication on the data set line will change
in sequence.
recording period of the earlier programme, the earlier programme will be recorded to the end and then
the later programme will be recorded. This means
that the later programme will not be recorded during
the overlapped period.
10:00 p.m.
V
8:00 p.m.
Programme 1
11:00 p.m.
9:30 p.m.
Programme 2
EV-SU...EV-SA:
Recording on every specified day of the week.
MO-FR: Recording every weekday
Not recorded
. If the same start time is set on two or more programmes, the programme with the lowest number
has the priority over the other programmes and will
be recorded to the end. Then the programme with
the next lowest number will be recorded. This means
that the other programmes will not be recorded
during the overlapped period.
V
: changes with button
: changes with V button
The current
day
MO-FR
Other calendar
days
The day after
one month
EV-SA . . . . . . . EV-SU
8:00 p.m.
When a timer recording is executed, the programmed
data except for the everyday or weekly recording is
erased.
9:00 p.m.
Programme 1
8:00 p.m.
9:30 p.m.
Programme 2
Not recorded
If a power failure occurs or the power cord is unplugged, the programmed data will be erased. (However, the programmed data will last for 20 minutes).
Reset the date and clock and re-programme the
timer for recording.
Notes on Timer Settings
. The VCR will turn on 20 seconds prior to the programmed recording start time and enter pause mode.
recording starts on time.
. Timer
If the cassette has no safety tab when you press the
.
OPERATE/TIMER button to put the VCR in timer
recording standby mode, the cassette will be automatically ejected.
TIMER Recording Standby mode will not be activated when the OPERATE/TIMER button is pressed
for three seconds under the following conditions.
* There is not video cassette in the VCR.
* There is no programmed data.
E- 17
OTHERS
Check the following list of problems and remedies before calling service personnel. The problem may be one you can
solve yourself.
SYMPTOM
REMEDY
CAUSE
No power supply to the VCR.
AC Mains Cord is not connected.
Connect the AC Mains cord to the AC
outlet.
Power is on but the VCR does
operate.
Dew condensation inside the VCR.
Leave the VCR with the AC mains
cord connected. (It takes aproxmately 2 hours for the VCR to dry out
Poor picture or no picture on TV
during Playback or recording.
TV channel is not set to the video
channel.
Set the TV channel to the correct one.
The video channel of the TV is not
fine tuned.
Fine tune the video channel of the TV
set.
Connections between the TV and
the VCR are not properly made.
Check these connections and connect them correctly.
The video heads are dirty.
Have the video heads cleaned.
The tracking adjustment is bad.
Adjust thetracking using the
buttons
The cassette tape is old and/or
defective.
Replace with a new one.
Picture shakes No colour
Noise in the picture during
playback.
Noise bars, poor or no colour
on pause mode.
This is normal on PAUSE mode
and is not a fault condition.
The REC button does not
operate.
The safety tab of the cassette is
removed
Place a piece of adhesive tape over
the gap.
The tape has run out.
Replace with another one with
sufficient length.
The tape has run out during
recording.
Replace with a new one.
More than one programme has
has preset within the same
preset
Re-programme the information.
The programmed data is not correct.
Re-programme data correctly.
The active channel is not tuned
with the built-in tuner of VCR.
Select the channel on which the broadcasting programme is aired.
The VCR is not ready for timer
recording.
Hold down the OPERATE/TIMER
button more than 3 seconds to
illuminate timer indicator.
Clock indicates inaccurate time.
Set clock to the current time.
Not operated in the proper
operation range.
Use the remote control unit within the
operation range.
An obstacle exists between the
remote control unit and the VCR.
Remove the obstacle.
Batteries are exhausted or dead.
Replace them with new ones.
Battery polarities are incorrect.
Insert batteries correctly.
Recording does not complete.
No timer recording.
No remote control unit
operation.
Correct indication does not
appear in the display panel.
Clear the data stored in the unit’s
memory with the CLEAR button and
input data again.
E-18
SPECIFICATIONS
GENERAL SECTION
Power Requirements
Power Consumption
Dimensions (W x H x D)
Weight
Operating Temperature
Operating Humidity
Video Recording System
Number of Video Heads
Tape Speed
Tape Format
Record/Playback Time
230V AC ~ 50 Hz
16 Watts
370 x 95.5 x 271 mm
Approx. 3.6 kg.
5°Ct o 40°C
35% to 80% R. H.
2 Rotary Heads, Helical Scanning System
2 Heads
23.39 mm/sec. (SP)
VHS l/2-inch PAL Cassette Tape
Up to 5 Hours with E-300 tape
VIDEO SECTION
Television System
Modulation System
Horizontal Resolution
Input Level
Output Level
Signal-to-Noise Ratio
PAL: 625 Lines, 50 Fields, Colour Signal
Luminance: FM Azimuth Recording
Colour Signal: Converted Subcarrier Phase Shift Recording
Colour : 230 Lines, Nominal
1 Vp-p 75 unbalanced
1 Vp-p 75 unbalanced
More than 43dB
AUDIO SECTION
Input Level
Output Level
Audio Track
Signal-to-Noise Ratio
Frequency Response
300m Vrms, 50K Unbalanced
300m Vrms, 1K Unbalanced
1 Track
More than 36dB
l00 Hz to 6KHz
Design and specifications are subject to change without notice for performance improvement.
E-19
PALSONIC CORPORATION PTY LTD
1 JOYNTON AVENUE
WATERLOO NSW 2017 AUSTRALIA
TEL:(02)9313 7111
FAX:(02)9313 7555
www.palsonic.com.au
PALSONIC CUSTOMER SERVICE
TELEPHONE
AUSTRALIA: 1300 657 888