1
\
.,;~
\
\-=
GOM1\tlUNIGATIONS
GORP.
CORDLESS
.900MHz
TELEPHONE
DIGITAL
""'
IMPORTANT
REVIEW INSTRUCTIONS
BEFORE OPERATION
'-,
-.?,
,-=-"'~... II
'-"1=:
,:~"'
~...",."".C'",
~'.I:1:~C"c"i
\,i"~.~;;';\'Y
&:~:liI.1
.Auto
hang up when returning the
handset to the base cradle
.Extension
In Use indicator
.24
Bit Digital Security Code
.DTMF
and Pulse Dialing
.Low
Battery Detect and Warning
indicator
...
Up to 7.0 hours continuous talk
time. Or 7 days standby time.
.Volume
Adjust on Handset
.REDIAL.
HOLD, PAGE and MUTE
.Hearing-Aid
Compatible Receiver
.Detachabl~
power supply. Nonvolatile storage of security code
and memory dial memories
.Fully
Digital Link between Handset
and Base with ADPCM voice coding
.Digitally-Scrambled
Voice
Communication
.20
location Programmable Memory
for 20 Digit Phone Number
.Special
One- Touch
memory
keys for emergency or frequently
dialled numbers
.10
Channel Operation with auto
channel selection
.Out-of-Range
indication while the
handset is in use or in standby
mode
.
.Programmable
.Removable
handset battery pack
.Spare
battery charger in the base
unit
.Complete
battery back-up in case
of power failure (with optional spare
battery pack installed in Base Unit)
.Easy
answer -When
the phone
rings simply press any key other
than OFF, MUTE, or the Volume
Keys on the handset to answer
.Face
up handset charging
~ I
Ringer Types
This manual is designed to make you
familiar with the AUDIOVOX DT911.
We strongly recommend you read the
manual before using your phone.
I
-~
2
dt9ll.p60
~
2
-~
~
199816122.p~ 06:16
rf
~
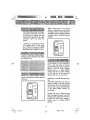
.
LOW BATTERY/MUTE
INDICATOR
PHONE
INDICATOR
HOLO KEY
OFF KEY
TALK KEY
DIALING
TONE
KEYS (0.9)
(Temporary
Tone)
MEMORY
BATTERY
REDIAL
COMPARTMENT
FLASH
MUTE
QUICK
MEMORY
PROGRAM
MEMORY 2
MEMORYI
HANDSET
FEATURES
4
CT911
S/1S/98,10:33AM
~
~
~,,-\L
\JI~
~
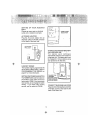
6 o +t-c;,
v I 4-"""
+
-@I
.TTERY
INOICATOR
DICATOR
CHARGE
JNOICATOR
IOICATOR
BASE
UNIT FEATURES
5
DT911
5
5115198.10:33 AM
~
This equipment complies with Parts 15
and 68 of the Federal Communications
Commission (FCC) rules for the United
States.
Operation is subject to the
following two conditions: (1) this device
may not cause interference, and (2)
this
device
must
accept
any
interference, including interference that
may cause undesired operation of the
device.
FCC Part 15
Warning: Changes or modifications to
this unit not expressly approved by the
party responsible for compliances could
void the user's authority to operate the
equipment.
The equipment has been tested and
found to comply with part 15 of the FCC
rules. These limits are designed to
provide reasonable protection against
harmful interference in a residential
installation. This equipment generates,
uses and can radiate radio frequency
energy and, if not installed and used
in accordance with the instructions,
may cause harmful interference
to
radio communications. However,there
is no guarantee that interference will
not occur in a particular installation. If
this equipment does cause harmful
interference
to radio or television
reception, which can be determined by
turning the equipment off and on, the
user is encouraged to try and correct
the interference by one or more of the
following measures:
A label is located on the underside of
the base unit containing either the FCC
registration
number
and Ringer
Equivalence
Number (REN).
You
must, upon request.
provide this
information
to your local telephone
company.
This equipment is compatible with
inductively coupled hearing aids.
+
Should you experience trouble with
this telephone
equipment,
please
contact:
AUDIOVOX
SERVICE
COMMUNICATIONS
DEPT.
at
(800)
229-1235.
-Reorient
or relocate the receiving
antenna.
Increase the separation between
the equipment and receiver.
-Connect
the equipment
into an
outlet or on a circuit different frqm
that to which the receiver
is
connected.
-Consult
the
dealer
or an
experienced
radiofTy technician
for help.
For repair/warranty
information.
The
telephone company may ask you to
disconnect this equipment from the line
network until the problem has been
corrected.
6
DT911
6
~
~
5115/98. 10:33 AM
+
-
FCC Part 68
The FCC requires that you
your cordless
telephone
nationwide telephone network
a modular
telephone
jack
RJ11C,
connect
to the
through
(USOC
service
may
provided
or Party
not be used
by the
on
phone
Lines.
The REN is useful in determining the
number of devices you may connect
to your telephone line and stilI enable
the devices to ring when you receive
a call. The general rule is that the REN
value should not exceed 5.0A total;
however, contact your local telephone
company for the specific number in
your area.
RJ11W).
IC (Industry Canada)
This telephone is registered for use in
Canada.
Occasionally, your telephone company
may make changes in its facilities,
equipme~t, operation, or procedures
that could affect the operation of your
equipment.
If so, you will be given
advance notice of the change to give
you an opportunity
to maintatn
uninterrupted service.
I
equipment
coin
company
Your
telephone
company
may
discontinue
your service
if your
equipment
causes
harm to the
telephone network. They will notify you
in advance of disconnection, if possible.
During notification, you will be informed
of your right to file a complaint with the
FCC.
-@)-
This
Notice:The
REN assigned
to this
device denotes the number of
devices you may connect to
the telephone loop which is
used by the device to prevent
overloading The termination
on a loop may consist of any
combination
of devices
subjected
only
to
the
requirement that the sum of the
REN does not exceed five (5.0)
The base unit contains
no user
serviceable
parts.
The handset
contains a user replaceable battery
pack.
If it is determined that your telephone
equipment is malfunctioning, the FCC
requires that it not be used and that
it be unplugged from the modular jack
until the problem has been corrected.
Repairs to this telephone equipment
can only be made by the manufacturer
or its authorized agents or by others
who may be authorized by the FCC.
For repair procedures,
follow the
instructions
outlined
under
the
AUDIOVOX Limited Warranty.
Notice:The
Industry Canada label
identifies certified equipment.
This certification means that
the equipment meets certain
telecommunications
network
protective,
operational
and
safety
require.ments.
The
Department
does
not
guarantee the equipment will
operate
to
the
user's
satisfaction.
7
DT911
5115198. 10.33 AM
~
+
Before installing this equipment, users
should ensure that it is permissible to
be connected to the facilities of the
local telecommunications
company.
The equipment must also be installed
using
an acceptable
method
of
connection.
The customer should be
aware that compliance with the above
conditions may not prevent degradation
of services in some situations.
Your AUDIOVOX DT911 is designed
to operate at the maximum power
allowed by the FCC. This means your
handset
and
base
unit
can
communicate
only over a certain
distance.
which will depend on the
location of the base unit and handset,
weather, and the constfuction
and
layout of your home or office.
Repairs to certified equipment shof,Jld
be made by an authorized Canadian
maintenance facility designated by the
supplier.
Any repairs or alterations
made by the user to this equipment,
or equipment malfunctions, may give
the telecommunications
company
cause to request the user to disconnect
the eguipment.
Users should ensure for their own
protection that the electrical ground
connections
of the power utility,
telephone lines and internal metallic
water pipe system, if present, are
connected together. This precaution
may be particularly important in rural
areas.
+
~
Caution:
Users should not attempt to
make such connections themselves,
but should contact the appropriate
electrical
inspection
authority,
or
electrician, as appropriate.
8
DT911
8
I
-f§ft-
5/15/98.10;33
AM
--
When
using
your
telephone
equipment, basic safety precautions
should always be followed to reduce
the risk of fire, electric shock and
injury to persons, including the
following:
1
7. This product should be operated
only from the type of power source
indicated on the marking label. If
you are not sure of the type of
power supply to your home, consult your dealer or local power
company.
Read
and
understand
all
8. Do not allow anything to rest on the
power cord. Do not locate this
product where the cord will be
abused by persons walking on it.
instructions.
2.
Follow
all
warnings
and
instructions marked on the product.
3.
Unplug this product from the wall
outlet before cleaning. Do not use
liquid cleaners or aerosol cleaners.
Use a dry cloth for cleaning.
4.
Do not use this product near
water, for example, near a bath
tub, wash bowl, kitchen sink, or
laundry tub, in a wet basement, or
near a swimming pool.
5.
Do not place this product on
unstable cart, stand, or table. The
telephone may fall, causing serious
damage to the telephone.
~
6.
9. Do not overload wall outlets and
extension cords as this can result
in the risk of fire or electric shock.
10.Never push objects of any kind into
this product through cabinet slots
as they may touch dangerous
voltage points or short out parts
that could result in a risk of fire or
electric shock. Never spill liquid of
any kind on the product.
11. To reduce the risk of electric
shock. do not disassemble
this
product. but take it to an Audiovox
.authorized
service
facility.
Opening or removing covers may
expose you to dangerous voltages
or other risks. Incorrect reassembly
can cause electric shock when
the appliance
is subsequently
used.
Slots and openings in the cabinet
and the back or bottom are
provided for ventilation, to protect
it from overheating, these openings
must not be blocked or covered.
The openings should never be
blocked by placing the product on
the bed, sofa, rug, or other similar
surface. This product should never
be placed near or over a radiator
or heat register. This product
should not be placed in a built-in
installation
unless
proper
ventilation is pr6vided.
9
=tl
dt911.p6S
9
-3
~-
199816/23. A.1,t !0:08
tF
~~
12. Unplug this product from the wall
outlet and refer servicing to an
Audicvox
authorized service
facilityunder
the
following
condition:
A.
B.
1. Use only the appropriate type and
size battery pack speciJied in the
instruction manual provided for
this product.
When the power supply cord plug
is damaged or frayed.
If liquid has been spilled into the
product.
2. Do not dispose of the battery pack
in a fire. The cell may explode.
Check with State and local codes
for possible
special
disposal
instructions.
c.
If the product has been exposed
to rain or water.
D.
If the product does not operate
normally by following the operating
instructions.
Adjust only those
controls, that are covered by the
operating
instructions
because
improper
adjustment
of other
controls may result in damage and
will often require extensive work
by an Audiovox
authorized
technician to restore the product
to normal operation.
~
E.
If the product has been dropped
or the cabinet has been damaged.
F.
If the product exhibits a distinct
change in performance.
13. Do not use the telephone
3. Do not open or mutilate the battery
pack. Released electrolyte is
corrosive and may cause damage
to the eyes or skin. It may be toxic
it swallowed.
4. Exercise care in handling battery
in order not to short the battery
with conducting materials such as
rings, bracelets, and keys. The
battery or conductor may overheat
and cause burns.
5. Charge the battery pack provided
with or identified for use with this
product only in accordance with
the instructions and limitations
specified in the instructions manual
provided for this product.
to
report a gas leak in the vicinity of
the leak.
6. Observe proper polarity orientation
between the battery pack and
battery
SAVE
THESE
charger.
INSTRUCTIONS
10
~
dt911.p60
1998/6122,PM 06:59
10
~~
~"').-
III
j1~,
i
~~~f~~l'~ "' ,';;,"..
,,;f~~~
'1;,3.
Charging the handset batteries
The handset of your AUDIOVOX
DT911 cordless telephone is powered by a rechargeable battery pack.
It charges automatically whenever
the handset is in the base. You
should charge the battery pack for
16 hours when you first receive your
phone. You'll know the battery pack
needs charging when:
Alternatively, if you have purchased a
spare battery pack and it has been
charging
in the base unit, simply
exchange the drained handset battery
pack with the fully charged replacement battery pack from the base
charger.
Place the draiQed handset
battery pack into the base charger to
recharge.
The base spare battery charger does
NOT charge a battery pack as quickly
as the handset battery charger. A full
charge requires 24 hours, when using
the spare battery charger.
The phone emits a warning tone
when you press the TALK key.
The MUTE/LO
slowly flashing
BATT LED is
IT'S
The handset seems completely
dead; no lights are evident, and
pressing keys do not generate a
-@-I
IMPOSSIBLE,.
TOc;:'OVERc, ,"
CHARGE THE BA-qE.!:tYP..A;.£K
The battery pack can be recharged
many times, but if you get a low-battery
signal even after 8 hours of maintenance charging in the base cradle (or
24 hours in the base spare battery
charger), the battery pack(s) should be
beep.
I
,=,,~
To Charge The Battery Pack
To charge the battery pack, place the
handset
in the base unit.
The
CHARGE indicator will light to show
the handset is seated properly and
the battery pack is charging.
It is
recommended that the battery pack
be charged for at least 16 hours
initially and 8 hours for maintenance
charging.
You can use your telephone before that with diminished
capacity, but it is best-to charge the
battery pack fully. It will take several
recharge cycles to maximize the
charge capacity of your battery pack.
The maximum battery life between
charges is 7 hours of continuous talk
time or 7 days of stand by.
replaced.
1.1
DT911
-@...
5115/98. 10:33 AM
~
-~ I
,""""'~)~~~
~
R..t::nf~~rA~
"
~r;-.&:;;.Mv
-;;.;
,'f'~'
IN' ~':f[!Ifi+E' H'~"
u;~ttEl
!J .',-",,~
"
II
.~
~..
\i;{'
8
!"" c ~
, -~v~;.',~
~1~lI?A\1;I\;~\.'."
" ,"" .~~r
, ,
..~..
~
-J~s.'ii-~
1~L~~!~
-f~~Q.
:-:~"~~~~!'~,~-~~;0:~y
~JJJg~!~
Your Nicad battery pack recharges
whenever the Handset is returned
to the Base Unit cradle. You may
Place a battery pack in the Spare
Battery charger, Make sure the metal
charging contacts on the underside of
the battery pack are aligned with the
charging contact in the Spare Battery
returned the Handset to its cradle
whenever
you're not using the
charger,
phone,
However, to maximize the life of
your battery pack, do not return
your DT911 Handset to the Base
Unit cradle for recharging until the
MUTE/LO BATT begins to flash.
($~:A:frerif4u,;§B¥!
The DT911 has a built-in Spare Battery
Charger, which is located in the cradle
of the Base Unit.
in the Base Unit, the AUDIOVOX
DT911 uses this battery to provide
operational backup in case of a power
failure. if you have a fully charged
battery pack in the Spare Battery
charger and there is a power outage,
you will still be able to place and
receive calls for up to five hours.
~~
Remove the Spare Battery charger
cover by pressing the release tab and
Replacing
lifting up.
a Drained
Handset
-::s:I~.
bat-
tery
The spare battery pack can also be
used to replace a drained Handset
battery pack to ensure uninterrupted
use. Be sure to put the drained battery
in the Spare Battery charger for
recharging.
Please note that the Spare battery
pack recharges at a slower rate than
a battery pack charging in he Handset.
It takes 24 hours to fully charge a
battery pack in the Spare Battery
charger.
13
=fl
dI911.p60
1998/6/22, PM 06:26
-"""'"
~
rf
~
SETTING
UP YOUR AUDIOVOX
DT911
Choose an area near an electrical
outlet and a telephone wall jack.
J~
~
[ ""1-,j.;
-,
AC POWER ADAPTOR
Plug the AC power adaptor into an
electrical outlet and the DC connector
to the back of the base unit.
"
i ,
'r
J
:..~-.
; :1
TONE PULSE
SELECTION
c:)
CHARGE THE HANDSET
PACK BEFORE USE
BATTERY
'f
;
The
battery
pack
rech'arges
automatically whenever the handset is
in the base unit. The battery pack must
be charged for 16 hours before using
your phone for the first time.
,
-(;))-
+
HANDSET RINGER
The handset ringer is programmed ON
as the factory default setting. Refer to
PROGRAMMING
THE RINGER on
page # for more information.
SErTINGTHETONE/PULSE
SWITCH
The TONE/PULSE switch is located on
the bottom of the base unit and is
factory set to TONE. If you have touch
tone service, do not change the switch
setting.
If you have rotary {Pulse)
service, set the switch to PULSE.
CONNECT TELEPHONE LINE CORD
Plug one end of the telephone cord into
a wall jack, and the other end into the
back of the Base Unit.
14
5115198,10'33 AM
-@I
~R~~~
After charging the battery pack, rotate
the Base Unit antenna to an upright
position. Pick up the Handset, making
sure the Handset antenna is fully
extended~ Now press T ALK , you
should hear dial tone. If not, see 'IN
CASE OF DIFFICULTY'.
Fill in the telephone
the base unit.
number card on
=
=
=
=
FILL IN THE
TELEPHONE
NUMBER
CARD
~
,I
c=
~
\\:;--d)
--.:.~
-::;-'
15
=tl
dt911.p60
IS
1998/6122,PM 06:28
.~~
rF
USING
THE
WALL
MOUNT
ADApTOR
1. Position the wall mount bracket
on the base.
line up the tabs on the wall mount
adaptor
with the holes on the
bottom of the base (Figure 1 }.
Snap the wall mount bracket firmly
in place.
2. Mount the base on the wall.
Position the base so the mounting
studs will fit into the holes on the
bottom of the base. Position the
power cord to extend down the wall
the phone is to be mounted on.
Slide
the base down on the
mounting studs until it locks into
Figure 1
<0<0<0-
place.
3. Connect the telephone line cord.
The telephone
line cord has a
snap-in plug at each end. Insert
one of the plugs into the jack on the
bottom of the base. Insert the other
end of the plug into the wall jack.
I
-fffi'Y
~
4. Plug the AC adaptor
into an
electrical
outlet
and the DC
connector
on the back of the
Base Unit.
Figure 2
16
OT911
,
16
~
5/15/98.
10:33 AM
.
-
SET -UP
.Plug
AC adaptor into a standard
electrical
outlet and connect to
Base Unit.
HANGING
Press
f
or place
Set Dial Mode switch to PULSE or
TONE. The unit is factory set
t() TONE .
TO
PLACE
Let handset battery pack charge
for 16 hours before first use.
.The
PHONE LED will flash to
indicate call is on hold.
Connect telephone line cord to Base
Unit and telephone jack.
.Press
call.
A CALL
.Press
HOLD
on hold.
CALLS .
to hang
up a call.
ON
to place
HolD
an active
.
key
the
will
the
HOLD again to return to the
TO PAGE THE HANDsET
,i
.To
page from the Base Unit, press
PAGE.
.To
cancel the page, either press
PAGE again on the Base Unit or
press OFF on the handset.
17
17
~
~
C?"
TO MUTE A CALL
.Press
MUTE to disable the handset microphone.
.The
MUTE/LO BATT LED will stay
on continuously.
.Press
MUTE again to return to two
way conversation
.Press
the TALK key. When you
hear a dial tone, dial the number.
CT911
in
base
ANSWERING
,~ALLS
.To
answer a call press any
other than OFF, MUTE, or
Volume Keys. The handset
auto-answer
when lifted off
base cradle.
cradle
the handset
the
MAKING
~
~ I
UP
OFF,
5115198.10:33 AM
+
-0 -
STORING MEMORY DIAL NUMBERS
.The
phone should be OFF .
.Press
PROG 0
.Enter
the two digit memory location
(00 0020).
.Enter
the number you wish to
store, up to a maximum
of 20
digits.
.Press
MEM
exit program
QUICK
MEMORY
.Press
the
.Press
.The
aul.
0
number
location
automatically
second
"
key.
MEM
phone
memory
DIALING
TALK
00
dialed
stored
in
will
be
after
a
2
delay.
to store number and
mode.
I
~
~
MEMORY DIALING
.Press
the TALK key.
.Press
MEM .
.Enter
the memory location of the
number you wish to dial (00..20).
.The
number stored in memory will
be automatically dialed.
USING REDIAL
"
.Press
the
TALK
key, then
REDIAL
to automatically
redial
the last number you dialed.
18
CT911
18
I
~.,
5115/98.10:33 AM
-.FLASH
ANSWERING
CALLS.
When the Handset is in the Base Unit
cradle, simply pick up the Handset to
answer an incoming call.
When the Handset is away from the
Base Unit press any key other than
OFF I MUTE or the Volume keys to
answer an incoming call.
MAKING
CALLS
1.
Press
the
a dial
tone.
2.
Then
dial
TALK
the
cordless
you
AUDIOVOX
with services
Simply
press the
as
FLASH
,REDIAL
;
To REDIAL
the last Aumb"er you
dialed, press the TALK
key, then
press REDIAL.
The phone will
automatically dial the number.
HOLD
~
Press HOLD to place an active call
on hold.
The PHONE LED will flash to indicate
call is on hold.
Press
HOLD
again to return to
the call.
want.
OrSCONNECTING
To eiid'a call, either place the handset
back in the Base Unit, or press OFF
MUTE
Press
c
MUTE
EXTENSION IN USE INDICATOR
When another phone is in use on the
same fine, and the AUDIOVOX DT911
is in standby mode, the PHONE LED
will flash slowly.
,::~j
to disable the handset
microphone.
The MUTE/LO
BArT
LED will stay on
continuously.
Press MUTE again to return to two
way conversation.
RINGER
MUTE
c\; ,
;- .~
,c,'.
.
Press MUTE during incoming ringing
to disable the ringer for the duration of
the call.
Extension In Use indication will not
function when the Handset is out of
range.
PAGE,
To page
from
the base,
press
PAGE .
To cancel the page, either press
PAGE
again on the base or press
OFF on the handset.
VOLUME CONTROLS
The volume controls for the handset
are located on the side of the unit.
Press the A or T keys to increase
or decrease the volume. Holding either
key down will continuously change the'
volume setting. The earpiece volume
level wil/ change accordingly. There
are four volume levels.
19
19
DT911
such
key.
If you make a mistake when dialing,
press OFF to hang up, then press the
T ALK key to get the dial tone again.
-4~
phone
Call Waiting.
key and wait for
number
i
You can use your
I
-@-
5115/98, 10'33 AM
~
TEMpORARY
TONE
If you have rotary (dial-pulse) telephone
service (TONE/PULSE switch is set to
PULSE), this feature allows you to
temporarily switch to TONE dialing for
such purposes as remote access to
PROGRAMMING
THE RING~R
The handset ringer is capable of four
different types of ringer tones. The
following section details how to select
different ringer types and how to turn
off the handset ringer.
answering machines, bank-by-phone
services, use of calling cards and other
special services.
To program,
CHANGING
First, dial the call normally.
Then
activate the Temporary Tone feature
by pressing
(TONE key). You
can then press the numbers or symbols
you need, and your phone will send the
proper tones.
To select
following:
.Press
.Press
RINGER
rtPES
the handset
a different
must be OFF.
ringer
type do the
PROG
the
#
key.
.Press:
To end the call, press
OFF or place
the handset back in the base. The
phone will automatically
go back to
rotary '(dial-pulse) service.
1 for ringer
type
1
2 for ringer
type
2
3 for ringer
type
3
4 for ringer
type
4
.Press
PROG
program mode.
r1o:,
or
OFF
to exit
~
~
20
DT911
20
+
5115198.10:33 AM
-=
TURNING OFF THE RINGER
To turn off the ringer do the following:
.Press
PROG
.Press
the # key.
.Press
O
.Press
PROG or OFF to exit
CHE.C,KING
THE RIN"GER TYPE
To hear the present ringer type, do the
~
following:
.Press
.
PROG
.Press
the
#
.Press
#
to test
key
.Press
PROG
the
or
ringer
OFF
to exit
21
DT911
,
21
~
5115198.10.33 AM
-(S~~~8ER~
, ~~
~."
.-""'"-""--
There are two ways to dial using
the QUI.MEM
KEY
.Press
TALK .
.Press
QUI. MEM .
.The
phone
number
stored
in
memory
location
00 will
be
automatically dialed.
M-.~
To program a speed dial location, do
the following:
.The
phone should be OFF .
.Press
PROG .The PHONE LED
will flash quickly to indicate that the
unit is in program mode.
.Enter
the memory location (00..20)
you wish to store the number in.
.Enter
the phone number to be
stored, up to a maximum of 20
digits.
.Press
MEM to store the number
and exit program mode. The unit
will emit a happy tone (a short
series of beeps) to confirm
successful programming ~nd exit
program mode.
.If
programming is unsuccessful,
the unit will generate an error tone.
OR
.With
the Handset
OFF.
press
QUI. MEM .
.The
phone
number
stored
in
memory
location
00 will
be
automatically
dialed after a 2
second delay.
To store the last number dialed into a
permanent memory location, do the
following:
~~
~.
.The
phone should be OFF.
.Press
PROG .The PHONE LED
will flash quickly to indicate the unit
is in program mode.
~aolC~MoRWDrmNG:~"
'
,f3
~~ ;..D"'\'
'~...;.=,'~,~"v
The QUI. MEM key gives you one
button access to the MEMORY DIAL
number stored in memory location 00.
This may be a frequently dialed friend,
business, or emergency number, such
as 911.
22
dt911.p6S
22
.-3:\.
-;::0
1998/6/23.
A."f LO:OS
rF
.
.
.
-=
~
:
II
~
.Enter
the memory location (00..20)
you wish to store the number in.
.Press
REDIAL .
.Press
MEM to store the number
and exit program mode. The unit
will emit a happy tone (a series of
short beeps) to confirm successful
.If
programming.
programming is unsuccessful the
unit will generate an error tone.
imAi:1N~f
~",."",..".-",,J...,~.'.~,
.Press
.Press
.Enter
~
Ro
M;fMEMffR
~~~i:i~
~~~
TALK to get dial tone.
MEM .
a 2 digit location number
(00..20)
The number stored in that location
will be automatically
Y.'II
dialed.
To insert a pause in a phone number,
press HOLD at the appropriate point
when entering the number. This inserts
a 2 second pause. For longer pauses,
press HOLD twoormoretimes.
Each
press makes the pause 2 seconds
longer. and is treated as a stored digit.
I~
DIALING
~
FROM MEMORY
PRESS e
PRESS
e
ENTER MEMORY
LOCATION (OQ.20)
~'I
~
~
If your phone is connected to a PBX
you can store the PBX access number
and a pause before the phone number.
For example, to store 9-PAUSE-5551234 in memory location 08, do the
;:=::J)
To change or replace a stored number,
simply store a new number in the
desired memory location following the
instructions
listed in STORING
MEMORY DIAL NUMBERS. See page
21.
following:
.Press
PROG
.Press
08 (memory location)
.Press
9
.Press
HOLD (pause)
.Dial
5551234
.Press
MEM
~~~~§~
To delete a stored number from
memory do the following:
.Press
PROG to enter program
mode.
.Enter
the memory location (00..20).
.Press
MEM to exit program mode.
23
=tl
dI911.p60
199816122,p~ 06:31
2J
.c-:~-
rf