1
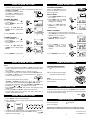
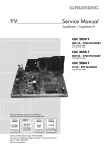
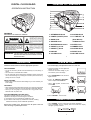
DIGITAL CLOCK RADIO
LOCATION O F CONTROLS
OPERATION INSTRUCTION
CR-308
WARNING
EXPLANATION OF GRAPHICAL SYMBOLS:
The lightning flash with an
arrowhead symbol, within the
equilateral triangle, is intended to
alert the user to the presence of
uninsulated "dangerous voltage"
within the product's enclosure that
may be of sufficient magnitude to
constitute an electric shock to
persons.
WARNING
RISK OF ELECTRIC SHOCK
DO NOT OPEN
"WARNING: TO REDUCE THE RISK
OF ELECTRIC SHOCK, DO NOT
REMOVE COVER (OR BACK). NO
USER-SERVICEABLE PARTS INSIDE.
REFER SERVICING TO QUALIFIED
SERVICE PERSONNEL."
The exclamation point within the
equilateral triangle is intended to
alert the user to the presence of
important
operating
and
maintenance (servicing) instructions
in the literature accompanying the
appliance.
WARNING: TO PREVENT FIRE OR SHOCK HAZARD,
DO NOT EXPOSE THIS APPLIANCE TO RAIN
OR MOISTURE.
1. SET/MEMORY Knob
10. ALARM2 Knob
2. POWER (ON/OFF) Knob
11. H...TIME SET...M
3. BAND Knob
(Hour/Minute)
4. SNOOZE Knob
/TUNING Control
5. BUZZER/RADIO Switch
12. SLEEP Knob
6. PRESET (+) Knob
13. DIMMER Knob
7. PRESET (-) Knob
14. ALARM1 Knob
8. DISPLAY
15. RESET Knob
9. COLORS Knob
16. VOLUME Control
3
PRECAUTION
CLOCK SETTING
Follow the advice below for safe and appropriate operation.
• The clock display and adjustment must be in radio off.
ON PLACEMENT
1. Connect AC power, the clock digital will
indicate on screen.
• Check that the rated voltage of your
unit matches your local voltage.
• Do not use the unit in places which are extremely hot, cold, dusty, or
humid.
• Place the unit on a flat and even surface.
• Do not restrict the air flow through the ventilation slots by placing the
unit on soft furnishings, by covering the unit with a piece of cloth or by
placing the unit on a carpet.
ON AC VOLTAGE
• Before using, check that the rated voltage of your unit matches your
local voltage.
ON SAFETY
2. Press “SET/MEMORY” knob, the clock
digital will flash.
3. Press “ H...TIME SET...M/TUNING ”
knob to adjust the Hour/Minute.
• When “
noontime.
” appears, it comes to set
• When connecting and disconnecting the AC cord, grip the plug instead
of the cord itself. Pulling the cord may damage it and create hazard.
• When you are not going to use the unit for a long period of time,
disconnect the AC power cord.
FCC INFORMATION (FOR USA ONLY)
This device complies with Part 15 of FCC Rules.
Operations are subject to the following two conditions:
(1) This device may not cause harmful interference, and
(2) This device must accept any interference received, including
interference that may cause undesirable operations.
4. Press “ MEMORY ” knob to store.
DIMMER FUNCTION
Should any trouble occur, disconnect the AC power cord and
refer servicing to qualified personnel.
• Press “DIMMER” knob to change the LCD display brightness.
• Press “COLORS” knob to repeatly select the multi-color display
changed cyclically as below.
2
4
DUAL ALARM SETTING
• Operation must be in radio off.
• The unit can alarm twice per day by setting different alarm time in
ALARM1 and ALARM2.
• The radio can wake up to alarm
with “Radio” or “Buzzer” sound
by putting switch in RADIO or
BUZZER position.
ALARM1 SETTING
1. Press “ALARM1” knob, “
”
icon will flash.
2. Press “ MEMORY ” knob, timer
icon will flash.
RADIO
RECEPTION
SLEEP TIMER
SETTING
VOLUME ADJUSTMENT
Adjust the VOLUME control to
obtain the desired volume level
before using the unit.
SELECT BAND
1. Press “POWER ON/OFF” knob to
turn on radio.
2. Press “BAND” knob to repeatly
select FM or AM, the band
changed shown in display.
3. Press “ H...TIME SET...M /
TUNING” knob to select the
desired station.
3. Press “ H...TIME SET...M /
TUNING” knob to adjust Hour/
Minute.
PRESET CHANNEL
• There are up to 10 preset channels in each band.
• Press PRESET knob to select preset channel stored in memory.
• Operation must be in radio on.
4. Press “ MEMORY ” knob to store.
ALARM2 SETTING
1. Press “MEMORY” knob until
“MEMORY” flashes on screen.
1. Press “ALARM2” knob, “
”
icon will flash.
2. Press “MEMORY” knob, timer
icon will flash.
3. Press “ H...TIME SET...M /
TUNING” knob to adjust Hour/
Minute.
2. Press “PRESET +” knob to
increase
channel,
press
“PRESET -” knob to decrease
channel.
4. Press “ MEMORY ” knob to store.
3. Press “MEMORY” knob to store.
5
7
DUAL ALARM SETTING
RADIO RECEPTION
NOTE:
• The clock radio will wake up to “Radio” or “Buzzer” when alarm timer
comes to the preset time. After about 10 seconds, the volume of alarm
will increase.
• To stop “Radio” or “Buzzer” sound by pressing any knob.
• The alarm will continue after 5 minutes if press the “SNOOZE” knob.
• The “Radio” or “Buzzer” sound will automatically turn off after 60
minutes if not press any knob.
• To clear the preset alarm time by pressing
” or “
” icon flashes.
“ALARM1 or “ALARM2” knob twice, until “
Alarm function will be cancelled automatically after few seconds.
• To activate the preset alarm time, press “ALARM1 or “ALARM2” knob
repeatly until “
” or “
” icon appears on the display.
• Press “ALARM1” or “ALARM2” knob to check and modify the preset
ALARM time.
• Can not set “Radio” and “Buzzer” alarms at the same time.
• The clock radio alarms only one time, if the alarm setting time of
ALARM1 and ALARM2 are same.
FOR BETTER RECEPTION
FM: Extend the FM wire antenna
fully.
AM: Turn the unit to find the position
which gives the best reception.
NOTE:
Do not connect FM wire antenna to
external antenna.
RESET FUNCTION
To delete all setting information by pressing “RESET” knob on the bottom
of unit, at the same time the system will resume the specified initial state
which set before leaving the factory.
RESET
SLEEP TIMER SETTING
1. Press “ SLEEP ” knob to set the sleep time.
2. Press “ SLEEP ” knob to repeatly select the desired time changed
cyclically as bellow.
SPECIFICATION
Power requirements
Power consumption
AC 120V/60Hz
4W
Specification and external appearance are subject to change
without advance notice due to continuous product improvement.
• The power will be off automatically once unit reaches the sleep time.
• To clear the preset sleep time by pressing “SLEEP ” knob till “
”
disappears from the display.
6
Printed in china
811-CR3891-010
8