1
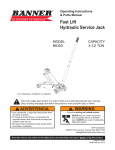
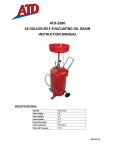
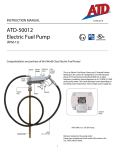
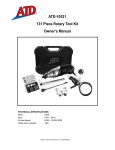
ATD-7343
3 TON LOW PROFILE ALUMINUM FLOOR JACK
USER’S MANUAL
Specifications:
Capacity:
Min Height:
Max Height:
Length:
3 Tons
3.75"
18.1"
26.4"
Chassis Width:
13"
Saddle Diameter: 4.52"
Net Weight:
55 lbs
This hydraulic jack conforms to all “ANSI / ASME” safety standards.
SAFETY WARNING AND PRECAUTIONS General Safety Warnings: WARNING: The instructions and warnings contained in this manual should be read and understood before using or operating this tool. Do not allow anyone to use or operate this tool until they have read this manual and have developed a thorough understanding of how this tool works. Failure to observe any of the following instructions could result in severe personal injury to tool user and bystanders, or cause damage to the tool and property. Keep this manual for future reference. Note: The warnings and cautions discussed in this instruction manual cannot cover all possible conditions and situations that may occur. It must be understood by the operator that common sense and caution are factors which cannot be built into this product, but must be supplied by the operator. WARNING: Use safety equipment. User and bystanders should use safety goggles or safety glasses with side shields which comply with current national standards, or when needed, a face shield. Use an ANSI approved dust mask or respirator when working around metal, wood, and chemical dusts and mists. This applies to all persons in the work area. Also use non‐skid safety shoes, hardhat, gloves, dust collection systems, and hearing protection when appropriate. WARNING: Keep bystanders and children out of the work area while operating this tool. WARNING: Always keep your work area clean, uncluttered, and well lit. Cluttered or dark areas invite accidents and injuries. DO NOT work on floor surfaces that are slippery. WARNING: Do not operate this tool if you are tired or under the influence of alcohol, drugs, or medications that could affect your ability to use the tool properly. WARNING: Dress properly. Do not wear loose clothing or jewelery as they can be caught in moving parts. Wear restrictive hair covering to contain long hair. WARNING: Do not reach over or across running machines. Keep proper footing and balance at all times. Non‐skid footwear is recommended when working. Product Specific Warnings: Non‐compliance with these warnings may result in injury or damage to the jack or the vehicle. WARNING: NEVER use hydraulic jack as a stand‐alone device. After lifting, IMMEDIATELY support the lifted vehicle with a pair of appropriately rated jack stands. NEVER place ANY portion of your body beneath the vehicle when lifting OR lowering. WARNING: Do not modify the jack in any way. WARNING: Never exceed the rated capacity of the jack. WARNING: This jack is a lifting device only and should never be used to move the vehicle. WARNING: The jack should be supported on a solid and level ground. Never use the jack in a surface where it may sink into the ground. WARNING: Ensure that there are no persons inside the vehicle to be lifted. Switch off the engine and apply the brake. Chock each unlifted tire in BOTH directions as shown below. WARNING: Position the jack under the manufacturer's recommended lifting point for the vehicle. Off centered loads can slip and accidents may result. WARNING: During raising and lowering of the load, precautions should be taken to avoid movement of the vehicle. WARNING: Traffic may cause the raised vehicle to rock during roadside use of the jack. WARNING: Never work on, under or around a raised vehicle supported only by a hydraulic jack. Always use adequately rated jack stands. WARNING: Never position any part of your body near the movable parts of the jack. WARNING: Ensure that there are no persons, tools or obstructions underneath the vehicle prior to lowering. WARNING: Do not adjust the overload bypass valve under any circumstance. PRIOR TO OPERATION: Air may become trapped in the hydraulic system during transit. To Purge Air 1. Insert the handle into the socket and secure it with the set screw provided. 2. Turn the handle counterclockwise until release valve is open; pump the jack several times to purge the accumulated air in the system. 3. Turn the handle clockwise to close the release valve. The jack is now ready to use. OPERATING INSTRUCTIONS: To Lift a Vehicle:
Turn the handle clockwise. Move the handle up and down. Use the full stroke of the piston for greater speed. Support the vehicle with appropriate jack stands. Lift the vehicle to remove the jack stands, ensuring that there are no persons or obstructions under the vehicle. Turn the handle counter‐clockwise. MAINTENANCE: Important: Both the maintenance and repair of the jack may only be performed by qualified persons, who have sufficient knowledge of the hydraulic system used in these jacks Regularly lubricate the moving parts in the wheels, arms, handle and pump roller pin. Only original replacement parts should be used. EXTREMELY IMPORTANT: NEVER use brake fluid OR transmission fluid for lubrication, or for filling the hydraulic system. Use ONLY quality hydraulic jack oil for lubrication and filling of the hydraulic system. •
•
When the jack is not in use, make sure the lifting arm is fully retracted to avoid corrosion. Replace the hydraulic fluid in the reservoir at least once a year. To check the hydraulic fluid level, lower the lifting arm completely. •
The hydraulic fluid level should be just below the filler plug. If the oil is too low, the jack will not raise to its advertised maximum height. Replenish if necessary, and reinstall the rubber filler plug. Do not overfill the jack. Excessive hydraulic oil may render the jack inoperative. •
Inspect the jack before each use. Take corrective action or remove the jack from service if any of the following problems are found: A.
B.
C.
D.
E.
Cracked or damaged frame Leaking hydraulic fluid Scored, damaged piston rod Loose hardware Modified equipment Keep warning labels and instructional decals clean and readable. You may use a mild soap solution to wash external surfaces of the jack. TROUBLESHOOTING: CAUTION: To prevent personal injury, all inspection, maintenance, and repair procedures must be performed when the jack is free of load. Trouble Jack Does Not Lift Jack lifts only partially Jack advances slowly Jack lifts load, but doesn't hold Jack leaks hydraulic fluid Jack will not retract Cause Solution 1. Release valve is open 1. Verify the release valve is closed. Release valve may need cleaning 2. Low/no hydraulic fluid in reservoir 2. Fill with approved hydraulic fluid and bleed system 3. Air trapped in hydraulic system 3. Follow the purge air procedure 4. Load is above capacity of jack 4. Use the correct equipment 5. Delivery valve and/or bypass valve not working correctly 5. Clean to remove dirt or foreign objects from the system. Replace hydraulic fluid 6. Seals worn or defective 6. Replace seals 1. Too much or not enough hydraulic fluid 1. Check hydraulic fluid level 1. Pump not working correctly 1. Rework pump 2. Seals leaking 2. Replace seals/O‐rings 1. Cylinder packing is leaking 1. Replace packing 2. Valve not working correctly. (Suction, delivery, release or bypass) 2. Inspect valves. Replace if necessary 3. Air trapped in hydraulic system 3. Follow the purge air procedure 1. Worn or damaged seals 1. Replace seals 1. Release valve is closed 1. Open the release valve by turning the handle counter‐clockwise (CCW). Maybe necessary to clean release valve NOTE: Should you need assistance with repairs, please contact the hotline at 888‐452‐2526 for specific instructions. ATD-7343
ITEM#
1
2
3
4
5
6
7
8
9
10
ORDERING PART#
PRT7343-01
PRT7343-02
PRT7343-03
PRT7343-04
PRT7343-05
PRT7343-06
PRT7343-07
PRT7343-08
PRT7343-09
PRT7343-10
PART DESCRIPTION
P01 - SADDLE PAD
P02 - SADDLE SCREW
P03 - SADDLE
P04 - SADDLE BASE
P05 - LIFT ARM ASSEMBLY
P06 - RADIUS ROD
P07 - FRONT WHEEL
P08 - CARRYING PLATE
P09 - SIDE PLATE
P10 - REAR CASTER ASSEMBLY
ITEM#
11
12
13
14
15
14,15
16
17
18
N/S
ORDERING PART#
PRT7343-11
PRT7343-12
PRT7343-13
PRT7343-14
PRT7343-15
PRT7343-HD
PRT7343-16
PRT7343-17
PRT7343-18
PRT7343-RK
PART DESCRIPTION
P11 - NUT, M12
P12 - HANDLE YOLK
P13 - HANDLE SET SCREW
P14 - HANDLE, UPPER SECTION
P15 - HANDLE, LOWER SECTION
HD - COMPLETE HANDLE ASSEMBLY
P16 - HANDLE BUMPER
P17 - TIE ROD
P18 - POWER UNIT ASSEMBLY
PRK - COMPLETE O-RING AND SEAL KIT
WARRANTY 1 YEAR REPLACEMENT WARRANTY THIS WARRANTY AND CONFIRMED RECEIPT (S) SHOULD BE RETAINED BY THE CUSTOMER AT ALL TIMES The warranty is only made available by returning the product to the point of sale. PURCHASED FROM:________________________________________________ DATE PURCHASED: ________________________________________________ INVOICE/RECIEPT NUMBER:_________________________________________ Your ATD‐7343 is warranted for a period of 12 months from the original date of. Any consumable items, such as the rubber saddle pad, are covered by a 90 day warranty. This warranty is valid for defects in workmanship or materials only, and is handled at the point of sale. The warranty given on this tool is against defects in workmanship and materials only. Any misuse, abuse or accidental and incidental damage is not covered by warranty. The following actions will also result in the warranty being void: • If the tool shows signs of damage or defects caused by or resulting from abuse, accidents or alterations. • If the tool is disassembled or tampered with in any way. [Affix receipt or invoice here for safe keeping]