1
19510317700 English, All Logos to be Ariston
{PDF Created 18/01/13 22:04:00}
Instruction booklet
TUMBLE DRYER
Contents
Important Information, 2
Installation, 3-4
Where to put your dryer
Electrical connection
Before you start using your dryer
Dryer Description, 5
The front
The back
Control Panel
The Display, 6
Start and Programmes, 7-12
Choosing a Programme
Start and Programmes
The Controls
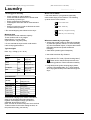
Laundry, 13-14
Sorting your laundry
Wash care labels
Special clothing items
Drying times
Warnings and Suggestions, 15
General safety
Save energy and respect the environment
Maintenance and Care, 16
Switching off the electricity
Clean the filter after each cycle
Check the drum after each cycle
Cleaning the dryer
Troubleshooting, 17
TVF 75C
Service, 18
Spare parts
Disposal
Hotpoint Guarantee, 19
Hotpoint After Sales Service , 20
! Keep this instruction booklet on hand in order to refer to it when necessary. Take it with you when you move, and,
should you sell this appliance or pass it on to another party, make sure that this booklet is supplied along with the
dryer so that the new owner may be informed about warnings and suggestions on how the dryer works.
! Read these instructions carefully; the following pages contain important information on installation and suggestions
on how the appliance works.
This symbol reminds you to read this booklet.
1
19510317700 English, All Logos to be Ariston
{PDF Created 18/01/13 22:04:00}
Important Information
TD4112FUV Issue 1
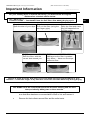
For your Venting dryer to operate efficiently, you must follow the regular
maintenance schedule shown below:
Fluff Filter – You must Clean the fluff filter after every drying cycle
Step 1
Step 2
Open the door of your dryer Pull out the filter (using the
two finger grips)
TD4112FUV_1.JPG
TD4112FUV_2.JPG
Step 4
Refit the filter, with the
curved side toward you.
Step 3
Open the filter and clean
any fluff deposits from
the filter mesh.
TD4199HC_3.JPG
Step 5
Making sure the filter is pushed
fully home- – Never run the dryer
without a filter.
TD4112FUV_3.JPG
TD4112FUV_2.JPG
Failure to clean the filter after every cycle will affect the drying performance of your
machine – It will take longer to dry and as a result will use more electricity during drying
You
must Clean the
Fluff Build Up around the filter housing and the vent
tube periodically every two or three months
•
Periodically check the vent tube and any permanent venting fixture to make
sure that there has been no accumulation of fluff or lint, and remove it.
•
Remove lint that collects around filter and the outlet vents
2
GB
19510317700 English, All Logos to be Ariston
{PDF Created 18/01/13 22:04:00}
Installation
TD4001FAUS Issu e 1
Where to put your dryer
GB
• Place your dryer at a distance from gas ranges,
stoves, heaters, or cook tops because flames can
damage the appliance.
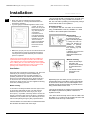
• If you are going to install the appliance under a work
counter, be sure to
leave a 10 mm space
between the top and
any other objects on
or above the
machine and a 15
mm space between
the sides and lateral
furnishings or walls.
This is to ensure
proper air circulation.
Make sure that the
back vents are not
obstructed
• Make sure you put your dryer in an environment that is
not damp and has proper air circulation throughout.
The dryer will not operate efficiently in an enclosed
space or cupboard.
! The vent tube should not exceed 2,4 m in length, and
should be kept free of any possible accumulation of
fluff, lint, and water by shaking it out frequently. Always
ensure that the tube is not squashed.
Permanent venting
In conjunction with the vent tube we recommend
using a Wall/Window Vent Kit, available at a retail
location or the nearest Spare Parts Dealer:
Wall mounting
1. Leave an opening in
the wall to the left of
dryer’s intended position.
2. Keep the tube as
short and straight as
possible to prevent
condensed moisture
from backing up into
the dryer.
3. Similarly, the duct in the
wall should slope
downwards towards the
outside.
! We do not recommend that the dryer be installed in a
cupboard because dangerous levels of heat can build
! The appliance must not be installed behind a lockable
door, a sliding door or a door with a hinge on the opposite
side to that of the tumble dryer in such a way that a full
opening of the tumble dryer door is restricted.
1.
Ventilation
2.
This Dryer dries your laundry by drawing in cool, clean and
relatively dry air, heating it, and then distributing it
through the clothes as they are gently tumbled. For
optimum performance, the moist air is then blown out
through a vent tube behind the dryer. When the dryer is
in use, there has to be adequate ventilation to avoid a
back flow of gases into the room from appliances burning
other fuels, including open fires.
Mobile venting
A vent tube must always be fitted when the dryer is used
in conjunction with Mobile venting. The tube must be
fitted securely into the back of the dryer (see Dryer
Description). If possible, it is always best to connect the
tube to a permanent vent close to the dryer. If permanent
installation is not possible, the dryer will work just as well
with the tube passing through a partly-opened window.
Window mounting
With a stacked dryer
the hole in the
window should ideally
be made below the
vent.
The tube should be
kept as short as
possible.
Depending upon how often you use your dryer, it is
essential that areas A and B are checked periodically
to remove lint or debris. The vent tube adaptor must
be fitted securely thus preventing any humid air from
being emitted back into the room.
! The Dryer should not be pushed so far back that the
tube adaptor is pulled out of position or the tube is
squashed or bent.
! The tube should be kept clear of the air intake vent
and kinks or ‘U’ bends must be avoided as these will
obstruct the tube and trap condensation.
! Ensure
that the end of the tube is not directed toward
the air intake vent at the rear of the dryer.
3
19510317700 English, All Logos to be Ariston
Open window venting
The end of the tube
should be directed
downwards to prevent
warm and moist air from
condensing in the room
or in the dryer.
{PDF Created 18/01/13 22:04:00}
! Do not use extension cords
! The power cord must not be bent or squashed.
! The power cord should be checked periodically and
replaced by a cord specially prepared for this dryer
and fitted only by authorised technicians. (see
Service). New or longer power cords are supplied at
an extra charge by authorised dealers.
! Ensure that the dryer is adequately ventilated and
that the end of the vent tube is not directed towards
the air intake duct.
! Ensure that any portable outlet or extension lead is
positioned so that it is not subjected to any splashing or
ingress of moistures
! The vent tube must always be fitted for optimum
performance.
! The manufacturer denies any responsibility should
any of these rules not be followed.
! Make sure that the vent tube and air intake vents
are not obstructed or blocked.
! If in doubt about any of the above consult a
qualified electrician
! The dryer must not recycle exhaust air.
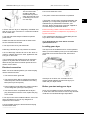
Levelling your dryer
! Misusing a tumble dryer may create a fire hazard.
The dryer must be installed level for correct operation.
When you have installed your dryer in its final location
check that it is level first side-to-side, then front to
back.
! Do not discharge exhaust air into a flue which is
used for exhaust fumes from other appliances that
burn gas or other fuels.
! Do not discharge the exhaust air into an extraction
system or any duct with an extractor fan. This will
affect the way the thermal controls operate and can
result in a fire hazard.
Electrical connection
Make sure of the following before you insert the plug
into the electrical socket:
• The socket must be grounded.
• The socket must be able to sustain the machine’s
maximum power, which is indicated on the rating
label (see Dryer Description).
If the dryer is not level, use a wooden block to
support it while adjusting the two front legs up or
down until your dryer is level.
• Power voltage must be within the values indicated
on the rating label (see Dryer Description).
Before you start using your dryer
• The socket must be compatible with the dryer’s
plug. Should this not be the case, replace the plug
or the socket.
Once you’ve installed your dryer and before you use
it, clean the inside of the drum to remove any dust that
could have accumulated during transportation.
! The dryer must not be installed outdoors, even if the
space is sheltered. It can be very dangerous if
exposed to rain or storms.
! Once installed, the dryer’s electrical wire and plug
must be within reach.
TD4002AUS Issue 2
4
GB
19510317700 English, All Logos to be Ariston
{PDF Created 18/01/13 22:04:00}
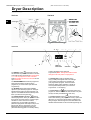
Dryer Description
TD4233FUV Issue 2
The front
The back
GB
Control Panel
to start a Programme.(see Start and
Programmes). Note :This light also flashes amber
during the Post Care phase of a programme
The ON/OFF button
, if the dryer is running
and this button is pressed and held for more than
3 seconds the dryer is turned off, its counts down
3, 2, 1 Off, the programme is then cancelled.
Press and hold for more than 3 seconds and the
dryer reactivates.
The Display Unit gives an indication of the
drying or delay time together with icons that light
to give warning information and the status of
your programmes progress. The three buttons
below the display select Automatic or timed dry
and if required a delayed start. (see Start and
Programmes or The Display)
The PROGRAMMES knob sets the programme:
rotate until the indicator is pointing to the
programme you want to select (see Start and
Programmes).
The OPTION buttons/ lights select available
options for your selected programme. The lights
indicate that the option has been selected. If an
option is not available the buzzer will beep three
times. (see Start and Programmes).
The Clean Filter Icon
gives a reminder before every
programme, that it is essential to clean the filter every time
the dryer is used (see Maintenance and Care).
The START/PAUSE button/light
starts a
selected programme. When you press this button
there will be one beep and the progress lights
will flash to confirm the action. When a
programme is running holding this button in
pauses the programme and stops the dryer. The
light is green when a programme is running,
flashing amber if the programme has been
paused and flashing green if on standby waiting
The Child Lock button/ light.
Press and hold his
button after selecting your programme and any options, the
light turns on. This prevent the programme settings from
being changed. When the light is lit, the other buttons are
disabled. Hold the button to cancel and the light will go out.
5
19510317700 English, All Logos to be Ariston
The Display
{PDF Created 18/01/13 22:04:00}
TD4158FUH Issue 2
The Display has three main functions each with its corresponding button
Dryness Sensing Levels
After selecting a programme that has a Sensing Dry Option, press and release the button until the required
dryness sensing level is displayed. If the sensing option is not available the display will flash and the buzzer
beeps three times.
! Some sensing programmes do not have all five dryness level options
Dryness levels available
Damp Dry: Dries your items ready to be ironed using a machine or rotary ironer.
Iron Dry: Dries you items ready to be ironed with a hand iron.
Hanger Dry: Dries you clothes ready to be hanged for final drying; Use this program if
you do not need the items to be fully dry as it uses less Energy.
Cupboard Dry: Dries your items ready to be put away.
Extra Dry: Dries your clothes ready to be worn.
Timed Dry
After selecting a Programme that has a Timed Dry Option, press the Timed Button and the Timed Dry Icon will
light, the display will reduce the selected time each time you press and release this button (see Start and
Programmes). Each programme that has a timed option has different times available and the selection of up
to11 drying times will also depends on the heat setting that you have selected
Each press of the button decreases the drying time.
If you change your mind, press the sensing button and sensing level options are available.
If the Timer Dry option is not available the timer icon will flash and the buzzer beeps three times.
The selected time remains displayed after the programme starts and can be changed during the programme
if you wish.
Delay Timer
After selecting a Programme that has a Delay Timer Option a delay start time can be selected.
advances the delay setting in 30 minutes increments from
Each press of the Delay button
to
and then Increments from
to
then
and then after five seconds cancels the delay.
For delays of 10 hours or more the display counts down the time in hours until 10 hours, then the display
and then counts down in minutes. For delays 9 hours or less the display shows hours and
shows
minutes and then counts down in minutes for all of the delay.
After the Start/Pause Button
is pressed the delay time can be changed or cancelled.
symbol is off and the Time to End is displayed
When the delay period finishes the
Time to End
If the delay icon
is off the time displayed is the Time to End of the programme running.
When timed programmes are selected the time displayed throughout the cycle is the actual time
remaining.
When an Automatic programme is selected the time displayed is an estimate of the time remaining.
When the programme is selected the display shows the time required to dry a full load, after around 10
minutes the controller calculates a better estimate of the cycle time and this is updated during the
programme.
The time to end is displayed in hours and minutes and counts down each minute.
The colons between the hours and minutes display flashes to show that the time is counting down.
The Display also shows if there is a problem with your dryer, if this occurs the display will show F
followed by a fault code number, the three option lights and the pause light will also flash Orange. (see
Troubleshooting).
6
19510317700 English, All Logos to be Ariston
{PDF Created 18/01/13 22:04:00}
Start and Programmes
TD4234FUV Issue 5
During the drying programme, you can check on your
laundry and take out the items that are dry while the others
continue drying. When you close the door again, press
START/PAUSE button in order to resume drying
(When the door is open the START/PAUSE light will flash
Amber and after door is closed and START/PAUSE button
pressed will stop flashing and show green. Note: during the
Post Care phase this light flashes Amber
10. At the end of the drying cycle the display shows END
and either:
The buzzer will beep 3 times to let you know that your
programme is complete. (Note: If the SOUND option
was selected the buzzer beeps 3 times every 30
seconds for 5 minutes)..
Or;
If you have selected the Crease Care option and you do
not take the clothes out immediately the clothes will tumble
occasionally for 10 hours or until you open the door, the
buzzer will then beep 3-times to confirm the programme is
completed.
11. Open the door, take your laundry out, clean the filter
and replace it. (see Maintenance).
12. Unplug the dryer.
Choosing a Programme
1. Plug the dryer into the electrical socket.
2. Sort your laundry according to fabric type (see
Laundry).
3. Open the door and make sure the filter is clean and in
place (see Maintenance).
4. Load the machine and make sure that the items are not in
the way of the door seal. Close the door.
5. If none of the lights are On, press the On/Off Button .
6. Choose a programme by checking the Programmes guide
(see Programmes) as well as the indications for each type of
fabric (see Laundry).; - select a programme by rotating the
PROGRAMME knob.
7.Choose Timed Drying or Dryness Levels option.
If Timed Drying press and release Timed button until
time required is displayed. Or
To change from default dryness setting press and
release Sensor Dry button until required level is
indicated (see The Display)
8. Set a delay time and other options if necessary.
9. The START/PAUSE light is flashing green, press the
START/PAUSE
button to begin. The green light stops
flashing.
Note: This tumble dryer, in compliance with new energy saving regulations, is fitted with an automatic standby system which is
enabled after about 30 minutes if no activity is detected. Press and hold the ON-OFF button until the dryer reactivates .
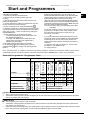
Essential Programmes - Programmes Table
Programme
Options Available
Dryness Levels Available
(default highlighted)
1 Cottons
2 Shirts
3 Bed & Bath
4 Synthetics
5 Cottons Quick Dry
High,
Medium
Low
High,
Medium
High,
Medium
Medium
Low
x
Extra Dry
Cupboard
Dry
Hanger Dry
Iron Dry
Damp Dry
Sensor Dry
Timed Dry
Heat Level
or Sound *
Crease Care
Delay Timer
/
x
x
x
x
x
x
An Automatic Programme
6 Synthetics Quick Dry
x
An Automatic Programme
*You c annot select both Creas e Care and Sound Options
•
•
•
•
•
Cottons
This is a programme for Cotton Items.
The duration of this programme will take will depend on the size of the load, the dryness setting selected and the spin speed
used in your washer.(see The Laundry)
Bed & Bath
This is a programme for Cotton Towels and sheets
The duration of this programme will depend on the size of the load, the dryness setting selected and the spin speed used in
your washer. (see The Laundry)
Loads dried using the Extra Dry setting are usually ready to use; the edges or seams may be slightly damp especially on large
items. If this is found try opening them out and running the programme again for a short period.
7
GB
19510317700 English, All Logos to be Ariston
{PDF Created 18/01/13 22:04:00}
Start and Programmes
TD4235FUV Issue 4
Essential Programmes
Shirts
High heat option
•
•
•
GB
This is a programme for Shirts made from Cotton.
It can be used for load sizes up to 3 kg (approximately 10 shirts).
The duration of this programme will depend on the size of the load the dryness setting selected and the spin speed
used in your washer
Medium heat option
•
This is a programme for Shirts made from synthetic materials or a mixture of natural and synthetics materials such as
Polyester and Cotton.
•
It can be used for load sizes up to 3 kg (approximately 14 shirts).
•
The duration of this programme will depend on the size of the load the dryness setting selected and the spin speed
used in your washer
Loads dried using the Cupboard Dry setting are usually ready to wear; the edges or seams may be slightly damp. If this is found try
turning the shirts inside out and running the programme again for a short period
•
•
Synthetics
This is a programme for items of Synthetic or Synthetic / Cotton mixtures.
The duration of this programme will depend on the size of the load, the dryness setting selected and the spin speed used in
your washer. .(see The Laundry)
Quick Dry Cottons
This programme is for small loads made from Cottons, maximum 1 kg.
Your drying time is very much reduced with a huge time saving up to 53%.
Quick Dry Synthetics
This programme is for small loads made from synthetics, maximum 1 kg.
Your drying time is very much reduced with a huge time saving up to 50%.
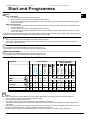
Exclusive Programmes - Programmes Table
Programme
Options Available
Dryness Levels Available
(default highlighted)
8 Wool
x
x
x
9 Silk
10 Delicates (e.g. Acrylics)
x
x
x
11 Lingerie
12 Baby Cycle
*
*
*
Extra Dry
Cupboard
Dry
Hanger Dry
x
Iron Dry
x
Damp Dry
Timed Dry
*
Sensor Dry
Heat Level
7 Jeans
Sound
*
or Sound
Crease Care
Delay Timer
/
An Automatic Programme
x
x
x
x
x
x
x
x
x
x
*Y ou cannot select both Crease Care and S ound Opt ions
Jeans
•
•
•
•
•
•
!
This is a programme for Jeans made from Denim Cotton. Before drying your Jeans turn the front pockets inside out.
It can be used for load sizes up to 3 kg (approximately 4 pairs).
Do not mix dark and light coloured items.
It can also be used on other garments made from same material such as jackets.
The duration of this programme will depend on the size of the load, the dryness setting selected and the spin speed used in
your washer.
Loads dried using the Extra dry setting are usually ready to wear; the edges or seams may be slightly damp. If this is found try
turning the jeans inside out and running the programme again for a short period.
We do not recommend that you use this programme if your jeans have elastic waist bands, studs or embroidery.
8
19510317700 English, All Logos to be Ariston
{PDF Created 18/01/13 22:04:00}
Start and Programmes
TD4236FUV Issue 2
Wool Programme
•
•
•
•
•
This is a programme for tumble dryer safe garments marked with the symbol
It can be used for load sizes up to 1 kg (approximately 3 sweaters).
We recommend that garments are turned inside out before drying.
This programme will take about 60 minutes, but may take longer depending on the size and density of the load and the
spin speed used in your washer.
Loads dried using this programme are usually ready to wear, but on some heavier garments the edges may be slightly
damp. Allow these to dry naturally as over-drying could damage garments.
! Unlike other materials, the mechanism of wool shrinkage is irreversible; i.e. it will not stretch back to original size and
shape.
! This program is not suitable for Acrylic garments
•
•
•
•
•
•
•
•
Silk
This is a programme for drying your Delicate Silk.
It can be used for load sizes up to 0.5 kg.
The duration of this programme will depend on the size of the load, the dryness setting selected and the spin speed used in
your washer
Loads dried using the Cupboard Dry setting are usually ready to use, but on some heavier garments the edges may be slightly
damp. If this is found try removing the load and open them out then run the programme again for a short period.
Delicates
This is a programme for drying your Delicate Clothes i.e. Acrylics.
It can be used for load sizes up to 2 kg.
The duration of this programme will depend on the size of the load, the dryness setting selected and the spin speed used in
your washer.
Loads dried using the Cupboard Dry setting are usually ready to use, but on some garments may be slightly damp. If this is
found try removing the load and open them out or turn inside out then run the programme again for a short period.
Lingerie
•
•
•
This is a programme for drying your very delicate lingerie including silk.
It can be used for load sizes up to 1 kg, close all hooks, buttons or zip before drying.
The duration of this programme will depend on the size of the load, the dryness setting selected and the spin speed used in
your washer.
Loads dried using the Cupboard Dry setting are usually ready to use, but on some garments may be slightly damp. If this is found
try removing the load and open them out or turn inside out then run the programme again for a short period
•
Baby Programme
This is a programme for drying your baby’s small delicate items of clothing and bedding (Cotton and Chenille) and for drying
your Delicate Clothes.
•
Do not dry items such as bibs and nappy pants with plastic coverings.
•
It can be used for load sizes up to 2 kg.
•
The duration of this programme will depend on the size of the load, the dryness setting selected and the spin speed used in
your washer.
Loads dried using the Cupboard Dry setting are usually ready to use, but on some garments may be slightly damp. If this is found
try removing the load and open them out or turn inside out then run the programme again for a short period
9
19510317700 English, All Logos to be Ariston
{PDF Created 18/01/13 22:04:00}
Start and Programmes
TD4237FUV Issue 3
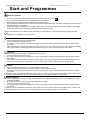
Extra Programmes - Programmes Table
x
x
15 Easy Iron
x
x
x
An Automatic Programme
16 Refresh
x
x
x
An Automatic Programme
Extra Dry
An Automatic Programme
x
Cupboard
Dry
x
Iron Dry
An Automatic Programme
Damp Dry
x
Hanger Dry
Sensor Dry
Timed Dry
Sound
x
Dryness Levels Available
Heat Level
13 Cuddly Toys
14 Heat & Envoy
Crease Care
Options Available
Delay Timer
Programme
Cuddly Toy Programme
With the cuddly toy programme you can remove dust easier and wash the cuddly toys more often because the drying time is very
much reduced compared to drying in the open air. It’s a delicate drying cycle that dries at low temperature and with soft mechanical
action to maintain at best the original look and the shine of the fur.
Note: For allergy protection, just freeze for 24hrs your cuddly toys, wash and dry. Repeat every 6 weeks. Before drying remove
accessories such as clothes, collars or sound boxes and protect plastic eyes with masking tape, after drying them with a cloth.
The programme time will vary dependant on the exact make up of the load. The maximum load should not exceed 2.5 kg and no individual
item should be greater than 600 g
Heat & Enjoy
This programme helps to heat towels & bathrobes for a warm sensation after a bath or shower. It is also useful for warming clothes
before dressing during winter. The cycle heats clothes to 37°C (Body Temperature) and runs at this temperature for a maximum of
4 hours or until you stop the cycle by opening the door. Maximum load 3 kg.
During this programme a
icon rotates in the display until the temperature target is reached at which point the dryness level icon
flashes.
Easy Iron Programme
Easy Iron is a short 10 minute programme (8 minutes of heat followed by a 2 minute cool tumble period) which fluffs the fibres of
clothing that has been left in the same position/location for an extended period of time. The cycle relaxes the fibres and makes them
easier to iron and fold. ! Easy Iron is not a drying programme and should not be used for wet articles of clothing.
For best results:
1. Do not load more than maximum capacity.
These numbers refer to dry weight
Fabric:
Max load:
Cotton and Cotton mix 2.5 kg
Synthetics
2 kg
Denim
2 kg`
2. Unload the dryer immediately after the end of the drying cycle, hang, fold or iron the articles and put them away in the
closet. Should this not be possible, repeat the programme
The Easy Iron effect varies from one fabric to the next. It works very well on traditional fabrics like Cotton or Cotton mix, and
less well on acrylic fibres and on materials such as Tencel.®
Refresh
! Airing is not a drying programme and should not be used for wet articles of clothing.
• It can be used on any load size but is more effective on smaller loads.
• Do not overload your dryer (see Laundry)
20-minute programme that airs your clothes with cool air. Use also to cool warm clothes
10
19510317700 English, All Logos to be Ariston
{PDF Created 18/01/13 22:04:00}
Start and Programmes
TD4239FUV Issue 4
The Controls
• Programmes knob
! Warning, if after pressing the start button the programme
knob position is changed, the new position will NOT change
the programme selected. To change programme press
to pause the programme, the light flashes
Start/Pause Button
Amber to indicate the programme is paused. Select the new
programme and any options required, the light will then flash green.
Press the Start/Pause Button
and the new programme will start.
•
Option Buttons/ Lights
These buttons are used to customise the selected programme
to your requirements. A programme must have been selected
on the Programmes knob before an option can be selected.
Not all options are available for all programmes (see Start and
Programmes). If an option is not available and you press the
button, the buzzer will beep three times. If the option is
available the option light in the button lights to confirm your
selection.
After the start switch has been pressed were available only the
Crease Care or Sound options (were available) can be
changed.
•
Progress (
Drying,
Cool tumble), Icons
These are part of the Display unit they indicate the progress of
the dryer each one comes on as the corresponding phase
starts.
•
Time Delay
The start of some programmes (see Start and Programmes and
The Display) can be delayed for up to 24 hours.
Crease care
The pre-care option is only available if a delayed start has
been selected. It tumbles the clothes occasionally during the
delayed period to help prevent creases developing.
The post-care option occasionally tumbles the clothes after the
end of the drying and cool tumble cycles to help prevent
creases developing, should you not be available to remove the
load immediately the programme is complete. The Display
, the Crease care and the Start/Pause Lights flash
shows
Amber. during this phase. Selecting this option enables both
the pre and post care functions if appropriate and when
selected the light in the button is on.
Note: If you have selected the Sound option this option is not
available.
DISPLAY
The display shows either the amount of time delay remaining
or an indication of the amount of time left for a drying
programme. (see The Display) The Colons between the hours
and minutes display flash to show that the time is counting
down.
When the programme finishes its cool tumble phase the
display will show
•
Opening the door (or pressing the Start/Pause Button
)
during a programme will stop the dryer and have the following
effects.. Note: The Start/Pause Light flashes Amber during
Post Care phase of a programme.
•
The Start/Pause Light flashes Amber.
•
The start button
must be pressed to resume
the programme including a delayed start. The
progress lights will then change to show the
current status and the Start/Pause light will stop
flashing and turn green
•
During a delay phase the delay will continue to
count down...
•
During the drying part of a programme, the time to
end count continues but the colons do not flash.
•
During the post care part of a drying program, the
programme will finish. Pressing the start/pause
button will re-start a new programme.
•
Changing the Programmes knob will select a new
programme and the Start/Pause Light will flash
green. You can use this to select the Refresh
•
Sound
If selected gives a signal at the end of the drying cycle to
remind you that the clothes are ready to be removed. Not
available on Heat & Enjoy programme.
Note: If you have selected the Crease care option this option is
not available.
•
.
Door Opening
Heat Level Button and Lights
Not all programmes allow you to change the heat level, and
some of these programmes do allow all three heat level
options. When the option change the heat level is available
pressing this button changes the heat level selected and the
corresponding light is lit for the three available levels, Low,
Medium and High.
11
programme
to cool the clothes if you find them
dry enough.
to begin new
Press the start button
Programme
Note
If you have a power cut, switch off the power or remove
the plug. When power is restored, press and hold the
On/Off button until the dryer reactivates, then press the
Start/Pause button.
19510317700 English, All Logos to be Ariston
{PDF Created 18/01/13 22:04:00}
Laundry
TD4003NC7 Issue 1
Wash care labels
Sorting your laundry
•
•
•
•
•
Check symbols on clothing labels to
make sure that the articles can be tumble dried
Sort laundry by fabric type.
Empty pockets and check buttons.
Close zippers and hooks and tie loose belts and
strings
Wring out each item in order to eliminate as much
excess water as possible.
Look at the labels on your garments, especially
when tumble drying for the first time. The following
symbols are the most common:
May be tumble dried.
Do not tumble dry.
! Do not load dripping wet clothes into the dryer
Tumble dry at high heat setting.
Maximum load
Do not load more than maximum capacity.
These numbers refer to dry weight:
Natural fibres: 7 kg max (15 lb)
Synthetic fibres: 3 kg max (6.6 lb)
Tumble dry at low heat setting.
! Do not overload the dryer as this could result in
reduced drying performance.
Typical weights
Note: 1kg = 1000g; (1 lb = 16 oz.)
What not to tumble dry in your dryer:
• Articles that contain rubber or rubber-like materials,
or plastic film (pillows, cushions, or PVC rainwear);
any other flammable objects, or objects that contain
flammable substances (towels soiled with
hairspray).
• Glass fibres (certain types of draperies).
• Items that have been Dry Cleaned.
Clothes
Cotton
Other
Cotton
Other
150g (5 oz)
100g (3 oz)
500g (1lb 2 oz)
350g (12 oz)
• Items with the ITLC code (“Special clothing items”)
. These can be cleaned with special at-home
dry cleaning products. Follow instructions carefully.
Jeans
700 g (1 lb 6 oz)
10 Nappies
1000 g (2 lb 6 oz)
300g (10 oz)
200g (7 oz)
• Large bulky items (quilts, sleeping bags, pillows,
cushions, large bedspreads, etc.). These expand
when drying and would prevent airflow through the
dryer.
Blouse
Dress
Cotton
Other
Shirt
T - Shirt
125 g (4 oz)
Household items
Duvet cover
(Double)
Large Tablecloth
Small Tablecloth
Cotton 1500g (3 lb 5 oz)
Other
1000g (2 lb 3 oz)
700 g (1 lb 6 oz)
250 g (9 oz)
Tea Towel
100 g (3 oz)
Bath Towel
700 g (1 lb 6 oz)
Hand Towel
350 g (12 oz)
Double Sheet
Single Sheet
500 g (1 lb 2 oz)
350 g (12 oz)
At the end of a drying cycle, cottons could still be
damp if you grouped cottons and synthetics
together. If this happens simply give them an
additional short period of drying.
Note: The last 10 minutes of any time set is the Cool
Tumble so allow for this when setting the time, as
this period will not dry your laundry.
12
19510317700 English, All Logos to be Ariston
GB
{PDF Created 18/01/13 22:04:00}
Special clothing items
Blankets and bedspreads: acrylic items (Acilan,
Courtelle, Orion, Dralon) must be dried with special
care on a low heat setting. Avoid drying for a long
period of time.
Pleated or creased garments: read manufacturers
drying instructions on the garment.
Starched articles: do not dry these items with nonstarched items. Make sure that as much of the starch
solution is removed from the load as possible before
placing it in the dryer. Do not over-dry: the starch will
become powdery and leave your clothing limp, which
defeats the purpose of starch.
Drying times
Cottons
Drying times 800-1000 rpm in washing machine
3 kg
20-30 35-45 45-60
Synthetics
4 kg
5 kg
6 kg
60-70
70-80 80-100
7kg
90-120
Drying times on reduced spin in washing machine
2 kg
3 kg
20-40
30-50
40-70
Delicates (e.g. Acrylics)
Gentle (Low) Heat
Drying times on reduced spin in washing machine
1 kg
2 kg
50-70
90-130
• Quantity of laundry: single items or small loads
may take longer to dry.
• Dryness: if you are going to iron some of your
clothes, they can be taken out while still a bit
damp. Others can be left longer if you need them
to be completely dry.
• Bulk: some bulky items can be tumble dried with
care. We suggest that you remove these items
several times, shake them out, and return them to
the dryer until finished.
! Do not over-dry your clothes.
All fabrics contain a little natural moisture, which
keeps them soft and fluffy.
High (Full) Heat
1 kg
• Fabrics: items that have the same type of fabric but
different textures and thicknesses may not have
the same drying times.
• Room temperature: if the room where the dryer is
located is cold, it will take longer for the dryer to dry
your clothes.
High (Full) Heat
2 kg
• Amount of water retained in clothes after spin cycle:
towels and delicates retain a lot of water.
• Heat setting.
The table below presents APPROXIMATE drying
times in minutes. Weights refer to dry garments:
1 kg
Times are approximate and can vary depending
upon:
TD4020K7 issue 2
13
19510317700 English, All Logos to be Ariston
{PDF Created 18/01/13 22:04:00}
Warnings and Suggestions TD4218 Issue 1
! This appliance has been designed and built according
international safety standards. These warnings are
given for safety reasons and must be followed carefully.
• Do not tumble dry items that have been spotted or soaked
vegetable or cooking oil this constitute a fire hazard.
Oil-affected items can ignite spontaneously, especially wh
exposed to heat sources such as a tumble dryer. The item
become warm, causing an oxidisation reaction with the oil
Oxidisation creates heat. If the heat cannot escape, then i
can become hot enough to catch fire. Piling, stacking or st
oil-effected items can prevent heat from escaping and so c
a fire hazard.
If it is unavoidable that fabrics that contain vegetable or co
oil or have been contaminated by hair care products be pl
in a tumble dryer they should first be washed with extra
detergent – this will reduce, but not eliminate, the hazard.
cool tumble phase should be used to reduce to reduce the
temperature of the items. They should not be removed fro
dryer or piled or stacked while hot
• Do not tumble dry items that have previously been
cleaned in or washed in, soaked in or soiled with
petrol/gasoline, dry-cleaning solvents or other
flammable or explosive substances. Highly flammable
substances commonly used in domestic environments
included cooking oil, acetone, denatured alcohol,
kerosene, spot removers, turpentine, waxes and wax
removers. Ensure these items have been washed in hot
water with an extra amount of detergent before being
dried in the tumble dryer.
• Do not tumble dry items containing foam rubber (also
known as latex foam) or similarly textured rubber like
materials. Foam rubber materials can, when heated
produce fire by spontaneous combustion.
• Fabric softeners or similar products should not be used in
a tumble dryer to eliminate the effects of static electricity
unless the practice is specifically recommend by the
manufacturer of the fabric softener or product.
• Do not tumble dry undergarments that contain metal
reinforcements e.g. bras with metal reinforcing wires.
Damage to the tumble dryer can result if the metal
reinforcements come loose during drying.
• Do not tumble dry rubber, plastic articles such as shower
caps or babies’ waterproof covers, polythene, or paper
• Do not tumble dry rubber-backed articles, clothes fitted
with foam rubber pads, pillows, galoshes and rubbercoated tennis shoes.
• Remove all objects from pockets, especially lighters (risk
of explosion)
! WARNING: Never stop the dryer before the end of the
drying cycle unless all items are quickly removed and spread
out so that the heat is dissipated.
General safety
• This tumble dryer is not intended for use by persons
(including children) with reduced physical, sensory or
mental capabilities, or lack of experience and knowledge,
unless they have been given supervision or instruction
concerning use of the appliance by a person responsible
for there safety.
• This tumble dryer has been designed for home, and not
professional, use.
• Do not touch the appliance while barefoot or with wet
hands or feet.
• Unplug the machine by pulling on the plug, not the cord.
• Children must not be in proximity of the dryer when in use.
After using the dryer, turn it off and unplug it. Keep the
door closed to make sure that children do not use it as a
toy.
• Children should be supervised to ensure that they do not
play with the dryer.
• The appliance must be installed correctly and have
proper ventilation. The air intake vents behind the
machine, the outlet vents, and the vent tube should
never be obstructed. (see Installation).
• Never direct the vent tube outlet towards the air intake
at the back of the machine
• Never allow the tumble dryer to recycle exhaust air.
• Never use the dryer on carpeting where the pile height
would prevent air from entering the dryer from the base.
• Check to see if the dryer is empty before loading it.
The back of the dryer could become very hot.
Never touch it while in use.
•
• Do not use the dryer unless the filter is securely in place (see
Maintenance
• Do not overload the dryer (see Laundry for maximum
loads).
• Do not load items that are dripping wet.
• Carefully check all instructions on clothing labels (see
Laundry).
• Do not tumble dry large, very bulky items.
• Do not tumble dry acrylic fibres at high temperatures.
• Complete each programme with its cool tumble phase.
• Do not turn off the dryer when there are still warm
items inside.
• Clean the filter after each use (see Maintenance).
• Do not allow lint to collect around the dryer.
• Never climb on top of the dryer. It could result in
damage.
• Always follow electrical standards and requirements. (see
Installation).
• Always buy original spare parts and accessories
(see Service).
To minimize the risk of fire in your tumble dryer, the
following should be observed
• Tumble dry items only if they have been washed with
detergent and water, rinsed, and been through the spin
cycle. It is a fire hazard to dry items that HAVE NOT been
washed with water.
• Do not dry garments that have been treated with chemical
products
Save energy and respect the environment
• Wring out all items to eliminate excess water before
tumble drying (if you use a washing machine first, select
a high spin cycle). Doing this will save time and energy
during drying.
• Always dry full loads - you save energy: single items or
small loads take longer to dry
• Clean the filter after each use to contain energy
consumption costs (see Maintenance).
14
19510317700 English, All Logos to be Ariston
{PDF Created 18/01/13 22:04:00}
Maintenance and Care
GB
Switching off the electricity
Unplug the dryer when not using it, when cleaning it,
and during maintenance activities.
TD4217FUT Issue 2
3.
Replace the filter ensuring it is fully located flush
into the tumble dryer trim.
4.
Remove any lint that has built up on the inside of the
door and around the door seal.
! Do not use dryer without replacing the filter.
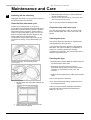
Clean the filter after each cycle
The filter is an important part of your dryer: it
accumulates lint and fluff that is formed while drying.
Small items could also become trapped in the filter.
When finished drying, therefore, clean the filter by
rinsing it under running water or with your vacuum
cleaner. Should the filter become clogged up, the
airflow inside the dryer will be seriously
compromised: drying times lengthen and you will
consume more energy. It may also damage your
dryer.
Check the drum after each cycle
Turn the drum manually in order to remove small
items (handkerchiefs) that could have been left
behind.
Cleaning the drum
! Do not use abrasives, steel wool or stainless steel
cleaning agents to clean the drum
A coloured film may start to appear on the stainless
steel drum, this may be caused by a combination of
water and, or cleaning agents such as fabric
conditioner from the wash. This coloured film will not
affect the dryer performance.
Cleaning the dryer
The filter is found in front of the dryer trim
• External parts in metal or plastic and rubber parts can
be cleaned with a damp cloth.
(s ee diagram).
• Periodically check the vent tube and any
permanent venting fixture to make sure that there
has been no accumulation of fluff or lint, and
remove it.
• Remove lint that collects around filter and the outlet
vents.
! Do not use solvents or abrasives.
Removing the filter:
1. Pull the plastic grip of the filter upwards (see
! Your dryer uses special bearing components which
do not need lubrication.
diagram).
! Have your dryer checked regularly by authorized
technicians to ensure electrical and mechanical
safety (see Service).
2. Open up the filter, clean the lint from the
inside surface of the filter.
15
19510317700 English, All Logos to be Ariston
{PDF Created 18/01/13 22:04:00}
Troubleshooting
One day your dryer seems not to be working. Before you call your Service Centre (see Service), go through the
following troubleshooting suggestions.
GB
Problem:
Possible causes / Solutions:
•
•
•
•
The dryer won’t start
The plug is not plugged into the socket, or not making contact.
There has been a power failure.
The fuse has blown. Try to plug another appliance into the socket.
You are using an extension cord. Try to plug the dryer’s power cord
directly into the socket.
• The door is not closed securely.
• The PROGRAMMES knob has not been set properly (see Start and
Programmes).
• The START/PAUSE button has not been pressed (see Start and
Programmes).
Drying cycle will not begin.
• You have set a delay time (see Start and Programmes).
It is taking a long time to dry.
• The filter has not been cleaned (see Maintenance).
• The correct program has not been selected for the type of fabric you
are drying (see Start and Programmes).
• The flexible vent tube is obstructed (see Installation).
• The air intake vent is obstructed (see Installation).
• The permanent Ventilation flap on the storm cover is obstructed
(see Installation).
• The items are too wet (see Laundry).
• The dryer is overloaded (see Laundry).
Programme finishes and clothes
damper than expected
! For safety the dryer has a maximum programme time of 4 hours. If an
automatic programme has not sensed the required final moisture in this
time the dryer will complete the programme and stop. Check the above
points and run the programme again, if the results are still to damp,
contact the service centre (see Service).
The option lights flash and the
Display shows a fault code F
followed by one or two numbers
• If the display shows a fault, Turn off and remove plug, Clean the Filter
(see Maintenance). Then replace plug turn on and start another
program. If a fault is then displayed. Note down the number and
contact the service centre (see Service)
• The dryer is in ‘Demo’ mode. Press and hold both the On/Off and
Start/Pause buttons for 3 seconds. The display will show
for 3
seconds and then the dryer will resume normal operation.
The display briefly shows
every 6 seconds.
TD4241FUV Issue 1
16
19510317700 English, All Logos to be Ariston
Service
GB
{PDF Created 18/01/13 22:04:00}
TD4303AS70 Issue 1
Spare Parts
Before calling the Service Centre:
• Use the troubleshooting guide to
see if you can solve the problem
yourself (see Troubleshooting).
• If not, turn off the dryer and call
the Service Centre closest to you.
What to tell the Service Centre:
• Name, address, and post code;
• telephone number;
• the type of problem;
• the date of purchase;
• the appliance model (Mod.);
• the dryer serial number (S/N);
This information can be found on the
data label inside the door of the
machine.
This dryer is a complex machine.
Repairing it yourself or having a nonauthorised person try to repair it
could cause harm to one or more
persons and to the machine, and
could invalidate the spare parts
warranty.
Call an authorised technician if you
experience problems while using the
machine.
.
Comparative Programmes
•
Programmes recommended for comparative test to AS/NZ 2442.2
Programme to select
Load
Size
Heat Setting
Cottons
7 kg
High
Dryness Option
Extra Dry.
! Note: For full list of programme options (see Start and Programmes)
ARISTON PRIORITY SERVICE
If you are not completely satisfied with your
appliance or require service call:
Australia Phone: 1300 815 589
New Zealand –
Phone: (09) 306 1020
GENUINE ACCESSORIES & SPARE
PARTS
A wide range of genuine accessories are
available for your appliance call:
Australia –
Phone: 03 9768 0888
New Zealand
– Phone: (09) 306 1020
NEW ZEALAND
ARISIT PTY LIMITED
AUSTRALIA
ARISIT PTY LIMITED
40-44 Mark Antony Drive, Dandenong South
VIC 3175, Australia
Fax: Service & Sales (03) 9768 0838
Email: [email protected]
PO Box 68-140 Newton, Auckland 1145
New Zealand
Fax: (09) 302 0077
Email: [email protected]
This appliance conforms to the following EC Directives:
2006/95/EC (Low Voltage Equipment);
- 89/336/EEC, 92/31/EEC, 93/68/EEC (Electromagnetic Compatibility).
17
19510317700 English, All Logos to be Ariston
{PDF Created 18/01/13 22:04:00}
18