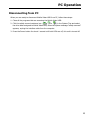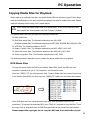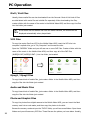
1
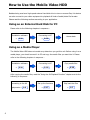
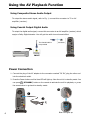
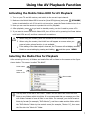
Mobile Video HDD User Manual Contents Introduction 1 About the Remote Controller 2 Parts Name and Functions 3 How to Use the Mobile Video HDD 4 Using the AV Playback Function 5 Connecting to AV Equipment 5 Power Connection 6 Activating the Mobile Video HDD for AV Playback 7 Selecting the Media Files for Playback 7 Introduction and Playback of the Media Files 10 Operations while Playing Back 12 Function Setup 17 PC Operation 21 Software Installation 21 Connecting to PC 22 Disconnecting from PC 23 About the File System of the Hard Disk 24 Copying Media Files for Playback 25 Using the Utility Program 28 How to Partition the Hard Disk 30 Appendix 32 Specifications 32 Troubleshooting 33 Error Code 35 Introduction Features The Mobile Video HDD was specially designed as a dual-use hard disk drive. When attached to a PC, it operates as a Hi-speed USB 2.0 (or IEEE 1394 external hard disk drive), with a large capacity of disk storage. When attached to an AV device, the Mobile Video HDD lets you browse and playback your entire media library directly to your TV or Home Theater! The Mobile Video HDD can play back Mpeg1 (VCD), Mpeg2 (DVD) movie files, MP3 music files, Jpeg photo and graphic files, DivX/Xvid (AVI) and movie files. (GMC and Q-PEL pertaining to DivX and Xvid are not supported.) The Mobile Video HDD can play back the media files stored in NTFS and FAT32 hard disk drive formats. Supports both NTSC and PAL systems. Supports component video output: The Mobile Video HDD incorporates component video jacks (Y/Pb/Pr jacks) which provides higher picture quality. Supports progressive scan output. Supports Dolby Digital audio output: Provides a COAXIAL jack to output Dolby Digital audio to a Dolby Digital receiver. This unit is not for in car entertainment use. Unstable power or vibration may damage the unit. TV screen does not display normally: Press and hold correctly. then press MENU several times until the screen displays System Requirements Desktop or Notebook PC with USB 2.0 port for USB 2.0 connection. Desktop or Notebook PC with IEEE 1394 port for IEEE 1394 connection. Supports Windows XP, Windows 2000, Windows Me, Windows 98SE operating systems. USB 2.0 supports up to 480Mbps data transfer rate, USB 1.1 supports up to 12Mbps data transfer rate. Please check your system configuration and use USB 2.0 connection whenever possible. 1 About the Remote Controller How to take and store the remote controller This device is designed with a remote control storage compartment on the bottom. If not in use, have the remote control stored to the compartment to avoid misplacing. Take out the Remote Cntroller Store the Remote Controller n: Push the bottom of remote forward. p: With the buttons toward up, insert the o: The remote will be released from the top of remote and push it forward. stand. q: Push the bottom of remote to fix it. p o q n Using the Remote for the First Time For the first time using the remote, see the figure shown alongside and pull out the tab to enable the battery power of remote Changing the Battery of Remote If the battery runs out, change the battery by the following: Pull out the tab 1. Looking at the back of the remote controller, press the tab on the left side with your fingernailn. Hold and pull the indentation with your fingero to take out the old battery. 2. The type of the battery required is [CR2025]. Refer to the illustration below to accurately insert the battery with the positive side facing up – see attached diagram. 3. Place the new battery and make sure it is inserted and seated securely. n o Load the new battery 2 Take out the battery holder (+ towards up) Insert the battery holder Parts Name and Functions c d e f g ⑪ l h i j k c Remote receiver : When using the remote, point the remote here. d Remote indicator (Red) : Blinks 1 time: Received the remote signal. Blinks 3 times: Cannot use media player function, check and make sure the unit is not connected to a PC. No reaction after pressing remote: See [Appendix] – [Troubleshooting] e Power and access indicator (Blue) : f Power button : Lights up: The power is on. Blinking: Accessing the data through PC connection. Press this button to power on. Press this button for about 1 second to power off. g Power connector : Connects to AC adapter. h IEEE 1394 connector (dual When using IEEE 1394 connection, connect the cable here. interface model only) : i USB 2.0 connector : When using USB 2.0 connection, connect the cable here. j Composite AV output Output composite video and audio. A special cable is connector : k Component video output connector : provided, the colors of the jacks are yellow, red and white. Output component video. A special cable is provided, the colors of the jacks are green, blue and red. l Coaxial digital audio output connector ⑪ SCART video output connector 3 How to Use the Mobile Video HDD Besides being used as a high-speed external hard disk drive to store or access files, this device can also connect to your video equipment to playback all kinds of audio/video file formats. Please read the following sections according to your application. Using as an External Hard Disk for PC Please refer to the following chapters in sequence : Installation software Connecting to PC Ö P-21 Access data Ö P-22 Using as a Media Player The Mobile Video HDD does not contain any data when you get this unit. Before using it as a media player, you should connect it to PC and copy the media files you want into it. Please refer to the following chapters in sequence : Installation software Ö P-21 Connecting to PC Ö P-22 Copy media files Ö P-25 After copying the media files, read the “Using the AV Playback Function” chapter and do the following in sequence : Connecting to the AV equipments Ö P-5 4 Set up the functions Ö P-17 Play back the files Ö P-7 Using the AV Playback Function Connecting to AV Equipment Using Composite Video Output The composite video is the most popular video output method. Most TV sets and AV receivers support this kind of connection. White Fig. 1 Yellow Red INPUT Using Component Video Output (Y/Pb/Pr) Component video output provides higher picture quality. If your TV supports Progressive Scan (Y/Pb/Pr), you can enable it by selecting “Video Output” on the “Image Setup” menu and then selecting “Component” output and then selecting “Progressive”. You will get the higher picture quality when played back. Blue Green Red INPUT Using SCART Video Output If your TV equipped with SCART input, connect this connector to output the video signal. 5 Using the AV Playback Function Using Composite Stereo Audio Output To output the stereo audio signal, refer to Fig. 1, connect this connector to TV or AV amplifier (receiver). Using Coaxial Output Digital Audio To output the digital audio signal, connect this connector to an AV amplifier (receiver) which equips a Dolby Digital decoder. You will get the multi-channel sound effect. The Coaxial cable is not provided INPUT Power Connection 1. Connect the plug of the AC adapter to the connector marked “DC IN”, plug the other end into the electrical outlet. 2. Press the Power button and the blue LED will light up. Now the unit is in standby mode. You can press (STANDBY) button on the remote to activate the unit for playback, or, press the same button to go back to standby mode. p n o 6 Blue LED lights up Using the AV Playback Function Activating the Mobile Video HDD for AV Playback 1. Turn on your TV and AV receiver, and switch to the correct input channel. 2. Make sure the Mobile Video HDD is turned on (blue LED lights up) and press (STANDBY) button to activate this unit. If this unit is not turned on, press the Power button to turn it on. 3. Now you can use the remote to operate this unit for playback. 4. After playback, press to go back to standby mode; you don’t need to power off it. 5. If you want to move the Mobile Video HDD, turn off this unit by pressing the Power button until both LEDs are off, and then remove all connections. y y When using the remote, point the remote at this unit’s Remote receiver. When using the remote, the inhibit icon will appear on screen when you press a button whose function is not available. y If the setting of the video output is incorrect, the TV screen will not display normally. Switch to correct setting by pressing and holding and then press MENU. Selecting the Media Files for Playback After activating this unit, all folders and media files will be listed on the screen as the figure shown below. This screen is called “File NAVI”. Folder name Selected folder or file Item number The top level of the disk is the “ROOT” folder. You can save files under the Root folder or any folders within this folder. It is recommended that you manage your files with folders instead of save all files in one folder. For example, you should create a folder by format (for example, “DVD-Movies”), and then create another folder within the “DVD-Movies” folder by the movie’s name (for example, “Movie-01”), then save the files into the “Movie-01” folder. 7 Using the AV Playback Function Operation of “File NAVI” List the folders and media files for selection and playback Selection y y Press button to select a folder or file. You can also press 0~9 buttons to select the number of the target file. If the selected file is playable, it will be play back. (The files in the “ROOT” folder cannot be selected by pressing 0~9 buttons) Playback y Press the PLAY button when a folder is selected. If this folder doesn’t contain any playable AV files, the folder will be entered. Press PLAY y Press the PLAY button when a folder is selected. If this folder contains playable media files, the files will be played back in sequence. Press PLAY y Enter folder Press button to enter the selected folder. Previous folder Press button, go back to the previous layer of folder. Back to ROOT Press TITLE button, go back to the “ROOT” folder directly. Information 8 Press PLAY when a file is selected. This file start to play back. Press DISPLAY button to see the information of the selected file. Using the AV Playback Function Icon Descriptions : : Indicates this is a folder Indicates this file is the “VIDEO_TS.IFO” of the DVD movie. To play back a full function of a DVD movie, you must play this file. ? : Indicates this is the Mpeg1 (VCD) file. The filename extensions are dat, mpeg. : Indicates this is the DivX /XviD movie file. : Indicates this is the DivX /XviD subtitle file. : Indicates this is the Mpeg2 file. The filename extensions are mpg, vob, m2p. : Indicates this is the MP3 music file. The filename extension is mp3. : Indicates this is the WAV music file. The filename extension is wav. : Indicates this is the graphic file. The filename extensions are jpg, jpeg. : Indicates this file has problem for playback. Private Folders Private folders allow users to keep their private files a secret. Users may install the Utility program (in the Installation CD) on their PC to setup this function. The private folders are invisible on screen until the correct password is entered. Displaying Private Folders 1. On “File NAVI” screen, press the TITLE button to go back to “ROOT” folder. 2. Use 0~9 buttons to enter 4 digit password. (After each digit is entered, the icon will appear on the screen.) 3. If the password is correct, the hidden private folders will be displayed immediately. Input password Private folders 9 Using the AV Playback Function Hiding Private Folders 1. On “File NAVI” screen, press the TITLE button to go back to “ROOT” folder. 2. Use 0~9 buttons to enter 4 digits of an incorrect password. 3. If the password is incorrect, the private folders will disappear immediately. 4. You can also press button to go back to standby mode. The private folders will be hidden when activating this unit next time. Introduction and Playback of the Media Files DVD on HDD Movie1 Movie1 Ö Ö IFO files VOB files “DVD on HDD” means a folder contains complete DVD movie files. Mobile Video HDD can directly play back this folder just like playing back a DVD disc. To build the folder that meets the “DVD on HDD”, copy the “VIDEO_TS” folder from the DVD disc to the Mobile Video HDD, or rip the movie files group from the disc to the hard drive by using the “DVD Rip” program. To play the “DVD on HDD” folder, select the folder and press the PLAY button. Or, you can enter the folder and select “ y VIDEO_TS ”, and then press PLAY button. If the screen prompts “DVD CORRUPTED – ##”, please refer to [Appendix – Troubleshooting]. (## is the error code) y If the DVD folder is incomplete, you can play back the VOB file directly, but, you will loose some functions such as the selection of subtitles, chapter and angle. DivX Files Movie2 Movie2 Ö Ö DivX movie files DivX subtitle files (the filename must same as the movie file) This kind of media file includes DivX and Xvid files. Most of these kind of files are distributed with movie files (the filename extensions are avi, divx, xvid) and the subtitle file separately. To playback, select a movie file or a folder that contains the files, and then press PLAY button. The subtitle (which has the same filename as the movie file) will be displayed automatically. About the notice of subtitle, please see [Operations while Playing Back] – [Change Subtitle]. 10 Using the AV Playback Function VCD and Mpeg1 Files Movie3 Ö The files that meet the Mpeg1 format This kind of media file includes all files that meet the Mpeg1 format (the filename extensions are dat, mpe, mpeg). To play, select a file or a folder which contains the files, and then press PLAY. Mpeg2 Files Movie4 Ö The files that meet the Mpeg2 format This kind of media file includes all files that meet the Mpeg2 format (the filename extensions are mpg, vob, m2p). To play, select a file or a folder that contains the files, and then press PLAY. If the VOB file is in a complete DVD movie folder, you can follow the instructions of “DVD on HDD” to play back the movie. Playing back a single VOB file directly will cause the loss of some functions such as the selection of subtitles, chapter and angle. Music Files Music1 Music2 Ö Ö MP3 music files WAV music files The Mobile Video HDD can play MP3 and WAV music files. To play this kind of file, select a file or a folder that contains the files, and then press PLAY. While the music is playing, the playback status will be displayed on the top of the screen. Photo and Graphic Files Photo1 Ö The files that meet the Jpeg format This kind of media file includes all files that meet the Jpeg format (the filename extensions are jpg, jpeg). Most of all digital camera store photos with this format. To watch the photo, select a photo or a folder that contains the photos, and then press PLAY. The photos will be changed on screen sequentially every 3 seconds (slide-show). If you don’t want to display the photos with the slide-show mode, you can press the REPEAT button to change the mode to “REPEAT ONE” and the photos will stay on screen. Changing the mode to “NORMAL” will go back to slide-show mode. 11 Using the AV Playback Function Operations while Playing Back While playing back, you can take enable following operations : [ The icons on the top of table indicate the available media files ] Stop Playback Stops the playback and goes back to “File NAVI” Stop Press button, stops the playback and goes back to “File NAVI”. After stop the playback of Resume and , you can do the following: After stopping, if you never play another file and the current file is still selected, press PLAY to continue to play the current file. Complete Stop After stopping the playback, press button again, a message “Resume Off” will display on the screen. The resume function is canceled. Pause Pause the playback Pause Press button. Resume Press or PLAY button to continue to play the file. Play the Next Play back the next chapter (movie), music, or picture Next Press button. Replay the Current Play the Previous Play the current chapter (movie) or music from the beginning. Play the previous chapter (movie) or file (music, graphic). Re-play Previous 12 Press button. Quickly press button 2 times Using the AV Playback Function Fast Forward Fast rewind Fast forward: quickly plays the file forward (the speed can be changed). Rewind: quickly plays the file backward (the speed can be changed). Fast forward Press button to change the speed. Rewind Press button to change the speed. Resume Press PLAY button goes back to normal speed. : Change the speed in sequence: [2X Ö 4X Ö 6X Ö 8X Ö Normal]. : Change the speed in sequence: [2X Ö 4X Ö 8X Ö 16X Ö Normal]. y During the fast forward or rewind playback, the image may appear discontinuous and sound may become mute. y y When fast forward playing to the next chapter, it will go back to normal speed. When rewinding to the beginning of the current chapter, it will go back to normal speed. Slow Motion Plays the file at a slower speed (the speed can be changed). Slow motion Resume Press SLOW button to change the speed. Press PLAY button to return to normal playback. : Change the speed in sequence: [1/2X Ö 1/4X Ö 1/8X Ö Normal]. y During the slow motion, the sound may become mute. Step Playback Plays the movie frame by frame. Step playback Press button to pause the playback. Press SLOW button to play each single frame. Resume Press or PLAY button to resume normal playback. 13 Using the AV Playback Function Skip Playback Skip forward or backward for a segment, and then play. Skip forward Press button. Skip backward Press button. Repeat Playback Shuffle Playback Repeat Playback: repeat plays the current file. Shuffle Repeat: randomly play all files in the current folder. Change mode Press REPEAT button to change the mode in sequence : “REPEAT ONE” (repeat the current) Ö “REPEAT ALL” (repeat all files in the folder) Ö “SHUFFLE REPEAT” (randomly plays all files in the folder and repeats if all files are played) Ö “SHUFFLE” (randomly plays all files in the folder until all files are played) Ö “NORMAL”. Repeat from A to B Repeats a selected segment while playing Starting Point Ending Point While playing to the desired start point, press AB button. While playing to the desired end point, press AB button. The repeat playback is started immediately. Normal Play Press AB button again to cancel this repeat playback. Title and Chapter Searching Enter the value, to play the movie from the indicated title or chapter. Display Input Play y Press SEARCH, the screen displays “TITLE: _ _ Press to select “Title” or “Chapter”, press 0~9 or to input. Press PLAY, the movie will be played from the indicated title or chapter. The entered value must be within the total amount of the title or chapter, or the 14 CHAPTER: _ _”. will appear to indicates it has an error. Using the AV Playback Function Time Searching Enter the time desired to play the movie. Display Input Play y Press SEARCH 2 times, the screen displays _ _ : _ _ : _ _ (hh:mm:ss). Press 0~9 or buttons to input the desired value. Press PLAY, the movie will be played at the indicated time. The entered value must be within the length of the movie, or the will appear to indicates it has an error. Change Subtitle Change the subtitle, or disable the subtitle. Change subtitle Press the SUBTITLE button to change. Please read the following notice concerning the DivX subtitle : y If the movie file and subtitle file have the same filename, the subtitle will be displayed automatically when played back. y If the subtitle does not appear or it is incorrect, you can indicate the subtitle file. Press button to stop the playback and go back to “File NAVI”, select the subtitle file and press SUBTITLE button, a message “DIVX SUBTITLE SELECTED” will appear. Then replay the movie and the correct subtitle will be displayed. y The Mobile Video HDD will display the subtitle with the selected language in “Setup Menu” – “OSD Language”. If the subtitle is not displayed with your desired language, please check the setting. y After pressing the SUBTITLE button, if the appears, it means there is no subtitle file or the selected subtitle file is not supported. Change Audio While playing a movie that contains multi audio channels, you can change it. Change audio Press AUDIO button. 15 Using the AV Playback Function Change View Angle While playing a movie which contains multi view angles, you can change it. Change angle Press ANGLE button. Zoom In Enlarge the image. Zoom in Move Resume Press ZOOM button to enlarge the image. If the image is larger than the screen, press to move it. Press ZOOM again will resume back to normal size. After enlarging a photo, a “Zoom ON” message appears, you can: (DivX is not available for this function) y y Press button to shrink. Press button to enlarge. Rotate the Image Rotate the direction of image. Rotate Press buttons to rotate the direction you desire. Display Information Display the information of the file playing. Display Press DISPLAY button, the following information will be displayed in sequence: [Elapsed Time Ö Remaining Time Ö OFF]。 Volume Adjustment Increase or decrease the volume output level. Volume up Volume down 16 Press VOL+ button. Press VOL- button. Using the AV Playback Function Function Setup Press SETUP to display the “Setup Menu”. See the following to set up the functions: Operation of “Setup Menu” 1. Press to select the sub-menu. 2. Press PLAY to enter the sub-menu. 3. Select “Exit Setup” and press PLAY to exit. 4. You can also press SETUP to exit directly. Operation of the Sub-menu 1. Press to select the function. 2. Press to move to “Options”. 3. Press to select the setting. 4. Press PLAY to confirm. 5. Press to move to “Functions”. 6. Select “Main Page” and press PLAY to exit. Functions Options General Setup OSD Language Select the language to display the “Setup Menu”, information and DivX subtitle. DVD Audio Select the language for the default audio when playing a DVD movie. 17 Using the AV Playback Function DVD Subtitle Select the language for the default subtitle when playing a DVD movie. If “OFF” is selected, the subtitle will not be displayed when play back. Audio Setup This sub-menu can be set only after the playback is stopped. DOWNMIX Set this function when output audio signal via Composite connector: LT/RT : Outputs the left or right channel to both channels. Stereo : Outputs stereo audio. SPDIF Output Outputs the Dolby digital sound via the Coaxial connector. After enabling this function, the Composite connector will not output the audio signal. OFF : Outputs audio via Composite, and disables the digital audio output. SPDIF/RAW : Outputs the digital audio without decoding. SPDIF/PCM : Converts the multi-channel digital sound to stereo and then output. PRO LOGIC This function only works if you have selected “SPDIF/RAW”. If the movie contains PCM stereo sound, after enabling this function and connected to an AV amplifier (receiver) which is equipped with a Dolby decoder, the output sound will be simulated as the multi channels sound. There are 3 options: “OFF”, “ON” and “AUTO”. LPCM Output This function only works if you have selected “SPDIF/PCM”. LPCM 48K : The sampling rate of the digital audio output will be limited at 48KHz. LPCM 96K : The sampling rate of the digital audio output will be limited at 96KHz. 18 Using the AV Playback Function Video Setup This sub-menu can be set only after the playback is stopped. TV Standard MULTI : According to the TV, outputs the corresponding signal. NTSC : Outputs NTSC signal to TV. PAL : Outputs PAL signal to TV. If the setting is incorrect, the TV screen will not display normally. Switch to the correct setting by pressing and holding button and then press MENU. TV Display 4:3 PS : 4:3 screen TV is connected. Displays the 16:9 images with “Pan Scan”. 4:3 LB : 4:3 screen TV is connected. Displays the 16:9 images with “Letter Box”. 16:9 : Connects to a 16:9 wide screen TV. Picture Mode If your TV is equipped with Progressive Scan function, setting this function may get better picture quality output. If you have a traditional TV, leave it as “SUPER SMART”. AUTO : Follows the contents to output the picture mode. FILM : Always output progressive scan. VIDEO : Always output interlaced scan. SMART : Same as “AUTO”, and tries to enhance the picture quality. SUPER SMART : Same as “SMART”, and the picture quality may better than “SMART”. Video Output CVBS : Outputs video signal via the composite connector. Component : Outputs video signal via the component connector. SCART : Outputs video signal via the SCART connector. Component Output Interlace Scan: When connecting to the TV equipped with Y/Cb/Cr video input. Progressive Scan: When connecting to the TV equipped with Y/Pb/Pr video input. 19 Using the AV Playback Function Preferences Setup Screen Saver ON : When the player stops for 5 minutes, the screen saver will start automatically. OFF : Disables the screen saver. Angle Mark When playing a multi angle DVD movie, a mark will be displayed on screen. ON: The angle mark will remain on the screen until the end of the title or chapter. OFF: The angle mark will be displayed on the screen for 3 seconds. Closed Captions If the movie contains “Closed Captions”, it will have “Closed Captions” or CC mark printed on the package box. Set this function to “ON” to display the Closed Captions on screen. Defaults When this function is activated, all settings will be reset to factory defaults. DIVX(R) Registration Selecting this option will display the DivX registration code. After using this code to register as a member on the DivX website, you can use VOD (Video on Demand) system on the internet to pay and download DivX format movies. Please follow the instruction on Divx official website http://www.divx.com for registering. 20 PC Operation The installation CD contains the device driver, utility program and the user’s manual. The utility program allows you to set the folders in Mobile Video HDD as “Private” or “Public”. When using this unit as a Media Player, the “Public Folder” will be displayed on TV, but the “Private folder” will not be displayed. You can use this function to hide the folders that you don’t want other people to playback. According to your requirements, read the following information: Windows XP/2000//Me already support the Mobile Video HDD with their native driver, you can directly connect this unit to PC, and access it like a regular hard disk drive in “My Computer”. If you want to use the utility program, follow the instructions in “Software Installation” to install it. Windows 98SE user must install the driver from the installation CD before using the Mobile Video HDD with USB 2.0 connection. When using IEEE1394 interface under Win98SE, the Windows system must be patched from “Windows Update” website. You can also download the patch file at : http://www.microsoft.com/windows98/downloads/contents/wurecommended/s_wufeatur ed/1394/Default.asp y Some USB 2.0 Host Controllers may require updated device driver files to operate properly. If you are having problems with your USB connection, visit the Windows Update web site to make sure you have all the latest Service Packs and device drivers installed on your computer before contacting technical support. y Windows Me and Windows 98SE do not support the NTFS file system. If this unit is pre-formatted as a NTFS disk, you will not see this drive in “My Computer” under Windows Me and Windows 98SE. You will need to delete the existing NTFS partition and reformat this unit using the FAT32 file system. See “How to Partition the Hard Disk”. Software Installation 1. Do not connect the Mobile Video HDD to computer yet. 2. Insert the installation CD into computer’s optical drive, the installation window should automatically appear on the screen. If the installation window doesn’t show up, go to “My Computer” and browse the CD, execute “autorun.exe,” the installation window will appear. 3. Select “Install Driver and Utility”, follow the on screen instructions to the installation. 4. After the software is successfully installed, see “Connecting to PC” for cable connection. 21 PC Operation Connecting to PC Connecting with USB 2.0 Interface 1. Connect the plug of AC adapter to the connector marked “DC IN”, plug the other end into the electrical outlet. 2. Connect the USB plug to the USB connector. Then connect the other plug to computer’s USB 2.0 port. 3. Press the Power button and the blue LED will light up. 4. The computer will recognize the Mobile Video HDD and you can start accessing the drive. o n p r q Blue LED lights up Connecting with IEEE 1394 Interface 1. Connect the plug of AC adapter to the connector marked “DC IN”, plug the other end into the electrical outlet. 2. Connect the IEEE 1394 plug to the IEEE 1394 connector. Then connect the other plug to computer’s IEEE 1394 port. 3. Press the Power button and the blue LED will light up. 4. The computer will recognize the Mobile Video HDD and you can start accessing the drive. o n r p q 22 Blue LED lights up PC Operation Disconnecting from PC When you are ready to disconnect Mobile Video HDD from PC, follow these steps: 1. Close all the programs that are accessing the Mobile Video HDD. 2. Click the safely remove hardware icon ( , or ) in the System Tray and select the drive letter assigned to Mobile Video HDD, when the system message “safely removed” appears, unplug the interface cable from the computer. 3. Press the Power button for about 1 second until both LEDs are off, this unit is turned off. 23 PC Operation About the File System of Hard Disk The Mobile Video HDD is pre-formatted as a NTFS or FAT32 disk, you can directly access this drive after connected to PC. If you want to re-partition the disk, please note: Although your operating system may support several different file systems, FAT32 or NTFS partitions are strongly recommended. When using the Mobile Video HDD as a media player, it can only read NTFS and FAT32 partition. Although you can create multiple partitions on the hard disk, when using the Mobile Video HDD as a media player, it can only browse and play the media files located in the first “Primary” partition. See “How to Partition the Hard Disk” to create or change the partition. The following information should help you decide which file system is the best for you. NTFS File System The NTFS file system can support very large files (no 4GB size limitation for single file). The NTFS file system is compatible with the most newer versions of the Windows OS. If your PC or laptop computer uses either Windows XP or Windows 2000, partition and format the Mobile Video HDD as an NTFS file system is recommended. FAT32 File System The FAT32 file system is required if your computer uses Windows 98SE, Windows ME or the Mac OS X operating system. These operating systems do not support the NTFS file system (Windows XP and Windows 2000 support both FAT32 and NTFS drives). The FAT32 file system has some size limitations, but it is also supported by many different operating systems. Even if your computer does support NTFS partitions, a FAT32 partition might still be a better choice if you expect to be moving files between many different computers. Hard disk drives formatted as FAT32 volumes have the following limitations: • This drive cannot store any file that is larger than 4GB. • The Windows XP and Windows 2000 “New Partition Wizard” cannot create FAT32 partition larger than 32GB. This limitation is due to the Windows XP/2000 operating system, not the FAT32 file system. FDISK and other disk-partitioning utilities can create FAT32 partitions much larger than 32GB. Despite these limits when partitioning new FAT32 drives, Windows XP/2000 can still read and write to drives that already have FAT32 partitions larger than 32GB. 24 PC Operation Copying Media Files for Playback When used as an external hard disk, the Mobile Video HDD can store any type of files. When used as a media player, it can only browse and playback the specific media file formats. Please read the following before using it as a media player. When using the Mobile Video HDD as a media player, it can only browse and play back media files that located in the first “Primary” partition. The Mobile Video HDD can play back the following media files : DVD movie files DivX/Xvid movie files: The filename extensions are AVI, XVID DivX/Xvid subtitle files: The filename extensions are SRT, SUB, IDX/SUB, SMI, PSB, ASS, SSA VCD files: The filename extension is DAT Mpeg1 / Mpeg2 files: The filename extensions are MPG, MPEG, M2P, VOB Audio and music files: The filename extensions are WAV, MP3, MP2, MPA Photo and graphic files: The filename extensions are JPG, JPEG The following sections describe how to prepare the above media files for playback. DVD Movie Files To copy the movie files from DVD to the Mobile Video HDD, insert the DVD disc into computer’s optical drive, go to “My Computer” and browse the disc. Open the “VIDEO_TS”, you will see many files. Create a folder with the name of the movie in the Mobile Video HDD, and then copy the “VIDEO_TS” folder into the folder just created. Some DVD discs can’t be copied because they have been protected (with the CSS protection). To backup the protected DVD, use a “DVD rip” program to copy the files. There are many free rip programs such as DVD Decrypter that can be found from the Internet. Please respect the copyright, do not copy the DVD and share with other people. 25 PC Operation DivX / Xvid Files Usually, these media files can be downloaded from the Internet. Most of this kind of files are distributed with movie file and subtitle file separately. After downloading the files, create a folder with the name of the movie in the Mobile Video HDD, and then copy the files into the folder just created. If the movie file and subtitle file have the same filename, the subtitle will be displayed automatically when played back. VCD Files To copy the movie files from VCD to the Mobile Video HDD, insert the VCD disc into computer’s optical drive, go to “My Computer” and browse the disc. Open the “MPEGAV” folder and you will see one or more DAT files. Create a folder with the name of the movie in the Mobile Video HDD, and then copy all of the DAT files (AVSEQ01.DAT, AVSEQ02.DAT...) into the folder just created. Mpeg1 / Mpeg2 Files To copy these kinds of media files, just create a folder in the Mobile Video HDD, and then copy the files into the folder just created. Audio and Music Files To copy these kinds of media files, just create a folder in the Mobile Video HDD, and then copy the files into the folder just created. Photo and Graphic Files To copy the photos from digital camera to the Mobile Video HDD, you can insert the flash memory card into a card reader, and then copy the photos to the disk. Browse the memory card and open the “DCIM” folder, you will see some folders. Open these folders and you will see many JPG files. These files are the photos you have taken. Usually, 26 PC Operation the digital camera stores the photo in JPG file format. Create a folder in the Mobile Video HDD, and then copy the JPG files into the folder just created. The Video Recorded by Capture Card If you use a capture card or TV card to record TV programs or others, usually, the recorded file will be converted to Mpeg1 or Mpeg2 file format (the filename extensions are MPG, MPEG, M2P) directly. To copy these media files, just create a folder in the Mobile Video HDD, and then copy the files into the folder just created. If your hard disk uses NTFS file system, the recorded file is probably larger than 4GB, so please partition the Mobile Video HDD as NTFS to store the large file. The Video Recorded by DV To play back the video that recorded in the tape of DV. First, transfer the DV file to computer and convert it to Mpeg1, Mpeg2 or DivX file format, and then copy the converted files into the folder in Mobile Video HDD. To transfer the DV file to computer, you can: • Usually, the DV has bundled software for user to transfer the DV file to computer, and convert it to other file format. Please use this software. • If your computer has a capture card, connect DV’s AV-Out to the capture card’s AV-In, and capture the video from DV. To convert the DV file that already stored in computer, you can use a convert program such as CyberLink PowerDirector, Ulead Media Studio Pro, and Ulead VideoStudio. The Other Media Files The other media files such as WMV, ASF and MOV files, can’t be played back on Mobile Video HDD. Please use a convert program such as Ulead Video ToolBox, WinAVI Videoconverter, to convert these files to Mpeg1, Mpeg2, or DivX file format, and then copy the converted files into the folder in Mobile Video HDD. 27 PC Operation Using the Utility Program The name of the utility program is “Private Folder Setup”, it allows you to set the specific folders in Mobile Video HDD as “Private Folders”, and these folders will not be displayed on TV when using the AV playback function. You can use this program to hide the folders that you don’t want others to play back. Up to 16 folders can be set as “Private Folders” under the “Root” folder in the disk. Execute the Utility 1. Connect the Mobile Video HDD to computer. Click on “Start” Ö “All Programs” Ö “Private Folder Setup” to start up the utility. 2. Choose the drive you want to setup from the “Drive” selection list at the bottom of the utility window. 3. The folders under “Root” folder will be listed as the following window. Set the Folder as “Private Folder” The “Private Folder” will not be displayed on TV when using this unit as a media player. 1. Referring to Fig. 2. Choose the drive (as c indicated) , move the mouse to highlight the folder (as d indicated), and click “Mark as Private” button (as e indicated), this will add a lock icon next to the folder name. 28 PC Operation 2. Input 4 digits number in the “Password” field (as f indicated), you will need these numbers to display the “Private Folders” on TV when using the AV playback function. 3. After making the settings, click “Save” button to activate the change (as g indicated). Fig. 2 Set the Folder as “Public Folder” 1. Referring to Fig. 3. Choose the drive (as c indicated), move the mouse to highlight the “Private Folder” (as d indicated), and click “Mark as Public” button (as e indicated) and the lock icon will disappear. 2. After making the settings, click “Save” button to activate the change (as f indicated). Fig. 3 After making the settings, click “Exit” button to close the utility. Do not delete the “MPlay.sys” file in the “Root” folder in Mobile Video HDD, or you will loose the “Private Folder” function when using the AV Playback function. 29 PC Operation How to Partition the Hard Disk Partitioning the Hard Disk under Windows XP/2000 The Mobile Video HDD will not work when initialized as a “Dynamic” disk type. Always use it with the “Basic” disk type. 1. Click “Start” Ö “Settings” Ö “Control Panel” Ö “Administrative Tools” Ö “Computer Management”. This opens the Computer Management Window. 2. Click on “Disk Management”, all disk drives currently connected to the system will be listed on the right side. Find out the Disk # that indicates the Mobile Video HDD. If the hard disk drive is a new, un-partitioned disk, a “Stop” mark next to the disk will indicate this drive is an “Unknown” type of disk. In this situation, Windows will not allow you to create a partition on this disk. y In Windows XP: right-click on the “Stop” mark, then select “Initialize Disk” to initialize the disk. Initialize the disk as a “Basic” disk type, and then follow the steps to create a new partition. y In Windows 2000: Windows will start up the “Write Signature and Upgrade Disk Wizard” immediately. Use this wizard to initialize the hard disk to “Basic” disk type, and then follow the steps to create a new partition. 3. To delete an existing partition, right-click on the drive and select “Delete Partition”. Delete partition will also erase all everything in the partition!! 4. To create a new partition, right-click on the drive and select “New Partition”. This will open the New Partition Wizard. Click "Next" to start the wizard. 5. Select “Primary Partition” and click “Next”. 6. Set the partition size : • If you are creating a FAT32 partition, set the partition size to 32000MB or less and click “Next” (“Disk Management” cannot create FAT32 partitions larger than this). • If you are creating a NTFS partition, select any size. 7. Assign a drive letter and click “Next”. 8. Set the file system to FAT32 or NTFS and click “Next”. (If you want a FAT32 partition but it is not listed as an option, go back to step 6 and reduce the size to 32000MB or less.) 9. Click “Next” to confirm settings. 10.Click “Finish” to close the wizard and start the partition and format process. 30 PC Operation Partitioning the Hard Disk under Windows Me/98SE FDISK is a program to create one or more partitions on the hard disk drive. (Data can only be written to the drive after the drive is partitioned and formatted). To partition the Mobile Video HDD, you must execute FDISK under the MS-DOS mode. Please follow these steps: 1. Install the Mobile Video HDD under Windows, and confirm that it is properly recognized by the operating system. 2. Go into the MS-DOS mode by clicking on “Start” Ö “Programs” Ö “MS-DOS Prompt”. 3. At the DOS prompt, type “FDISK” and press Enter key. 4. In the first screen, answer “Y” to enable large disk support. 5. The next screen is “FDISK OPTIONS”. You must type “5” on this screen to change the current fixed disk drive; the default fixed drive set by FDISK is the internal hard disk drive. If you do not change it to the Mobile Video HDD, the data of internal hard disk drive will be destroyed. If the option 5 does not appear on this screen, it means the Mobile Video HDD is not installed properly, please check the installation. 6. In “Change Current Fixed Disk Drive” screen, type the disk drive number that is assigned to the Mobile Video HDD (usually, it is assigned to number 2). 7. Go back to “FDISK OPTIONS” screen, now you can create (type “1”) or delete (type “3”) the partition of the disk. Delete partition will also erase all everything in the partition!! 8. Follow the instructions in FDISK to create a new “Primary” partition. Accepting the default values will create the largest FAT32 partition possible on the disk. 9. After you finish FDISK, reboot computer to activate the change. 31 Appendix Specifications Playable Media Format: MPEG1, MPEG2, DivX / Xvid, JPEG, MP3, WAV (GMC and Q-PEL pertaining to DivX and Xvid are not supported) Playable Filename Extension: dat, mpg, mpe, mpeg, vob, avi, divx, xvid, jpg, jpeg, mp3, mp2, wav TV Standard: NTSC / PAL Composite AV Output: 3.5Φ connector Component Video Output: 3.5Φ connector Coaxial Audio Output: RCA connector PC Interface: USB model: USB 2.0 interface File System: FAT32 / NTFS Dual interface model: USB 2.0 and IEEE 1394 dual interfaces Dimension (W x D x H): 196 x 58 x 126 mm Weight: Approx. 1040g (when including the hard disk inside) Power Supply: Input: AC 100V-240V 50/60Hz, Battery of Remote: CR2025 Working Environment: 5 oC ~ 35 oC, Humidity 8% ~ 80% Storage Environment: 0 oC ~ 40 oC, Humidity 5% ~ 95% DC3V Specifications are subject to change without notice. 32 Output: DC 12V Appendix Troubleshooting Problem Possible Cause TV screen does not display normally ◎Video setting is not correct. No power ◎The plug is not properly (Blue LED is off) the remote controller ◎Press and hold then press MENU until screen displays correctly. connected ◎This unit is not be turned on Can’t operate with Solution ◎Check the power connection and plug it properly ◎Press Power button to turn on ◎If this unit can’t be turned on by ◎Refer to “No power” problem for pressing the remote, it is the solution probably the power is not on ◎Remote is not pointed at the Remote receiver. ◎The tab of battery is not removed ◎Point at the Remote receiver when pressing the button ◎Pull out the tab of the battery on the side of remote controller ◎Battery is not assembled properly ◎Check and reload the battery. ◎Battery runs out. ◎Change the battery “HDD FATAL ERROR” ◎The hard drive is malfunctioning ◎See [Error Code] – [Error Code of message appears on or the setting is incorrect Hard Disk Drive] for the solution the screen Some folders can’t be ◎The folders are “Hidden”, listed in “File NAVI” “Encrypted”, “Compressed” or ◎Change the attribute of folders, or create another folder “System Folder” File can’t be played ◎The file is compressed back ◎The format of the file is not be ◎Convert the file to the supported supported ◎The file is damaged Unable to play DivX movie Un-recognizable ◎Check the file and don’t compress it format ◎Repair or re-copy the file ◎The Player is unable to decode ◎Encode this movie with another the DivX movie supported format ◎The setting of “OSD Language” ◎Change the setting of “OSD subtitle occurs when is different from the DivX playing DivX movies movie’s subtitle file ◎Subtitle problem Language” to match the DivX subtitle file ◎See [Operations while Playing Back] – [Change Subtitle] for the solution 33 Appendix Problem Possible Cause The “Setup Menu” is ◎Incorrect “OSD Language” not the language you setting Solution ◎Check the “OSD Language” setting in “Setup Menu” have selected No sound ◎Play fast forward or rewind or slow motion ◎Check the audio connection ◎Volume is too low ◎Increase the volume ◎Incorrect audio setting ◎Check the setting in “Setup Menu” ◎Incorrect audio channel, the ◎Press AUDIO button to select the Dolby audio channel ◎Video is not connected ◎Check the video connection ◎Incorrect video setting ◎Check the setting in “Setup Menu” Can’t change audio or ◎This movie provides only one subtitle language pressing PLAY button ◎Audio is not connected DTS is not supported No image ◎Resume normal playback speed by ◎Check the contents language The audio or subtitle ◎This movie does not provide the ◎Press AUDIO or SUBTITLE to is not the language selected language select another language you have selected Can’t fast forward, rewind, slow motion, step play, or search 34 ◎Some movies prohibit these functions ◎No solution Appendix Error Code Error Code of Hard Disk Drive On the top left corner of the screen, when “HDD FATAL ERROR – ##” (## represents the error code) appears, please check the following chart for the solution : Code 01 ~ 02 : Solution These occur when the hard drive inside the player is not a certified disk by the manufacturing company. 03 : The hard drive is malfunctioning or has the incorrect jumper setting. Check the hard drive and do not set it as “Slave”. 04 : The partition of the hard drive is wrong. Please format the first “Primary” partition with NTFS or FAT32 file system. 10 ~ 15 : Please reformat the hard drive when these occur. Error Code of “DVD on HDD” Playback On the top left corner of the screen, when “DVD CORRUPTED – ##” (## represents the error code) appears, please check the following chart for the description: Code Description 1 File group error, the correct range of the group is VTS_01 ~ VTS_99 2 VTS_##_0.IFO is not found 3 VIDEO_TS.IFO is error 4 The file size is error 5 The amount of title is error 6 The amount of chapter is error 7 The amount of cell is error 8 The address of the movie is error 9 The information of audio or subtitle is error 10 The hard disk drive needs to be defragmented 11 The amount of title does not match the record 12 The amount of file is error 13 The amount of angle is error 35 NOTE NOTE 7450996-51