1
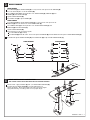
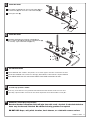
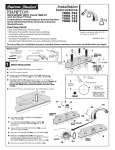
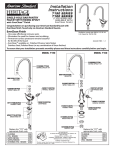
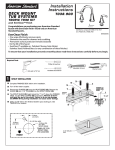
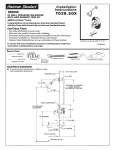
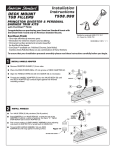
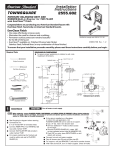
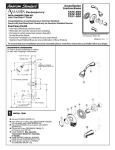
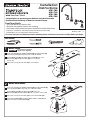
Installation
Instructions
4751.702
4751.712
KITCHEN FAUCETS
4751.722
with EverClean™ Finish
4751.732
Congratulations on purchasing your American Standard faucet with
EverClean finish found only on American Standard faucets.
EverClean Finish
• One wipe effortlessly removes spots
• Eliminates the need for cleaners and scrubbing
• Permanent surface protectant remains beautiful for the life of the faucet
• EverClean™ available on: Polished Chrome, Satin Nickel, Stainless Steel,
Polished Brass (or any combination of these finishes)
Certified to comply with ASME A112.18.1M
.3&7
To ensure that your installation proceeds smoothly-please read these instructions carefully before you begin.
TOOLS REQUIRED
Flat Blade Screwdriver
Adjustable Wrench
Plumbers' Putty or Caulking
Phillips Screwdriver
Channel Locks
INSTALL FAUCET
CAUTION
Turn off hot and cold water
supplies before beginning.
Install LOCK NUT (1) and RUBBER WASHER (2) onto SPOUT BODY (3).
Insert SPOUT BODY (1) through hole from underside of SINK.
5
4
Place RUBBER RING (4) into SPOUT ESCUTCHEON (5) and screw
ESCUTCHEON (5) onto SPOUT BODY (3) until snug against
internal stop.
From under sink tighten LOCK NUT (1) to secure SPOUT.
3
2
1
INSTALL VALVE BODIES
Install LOCK NUT (1) and RUBBER WASHER (2) onto VALVE BODIES (3).
Insert VALVE BODY (3) through hole from underside of SINK.
Place RUBBER RING (4) into ESCUTCHEON (5) and screw
ESCUTCHEON (5) onto VALVE BODY (3) until snug against internal stop.
5
4
From under sink tighten LOCK NUT (1) to secure VALVE BODY (3).
Insert SEAL WASHERS (6) into SPOUT BODY SUPPLY HOSES (7) and
tighten connection to VALVE BODIES (3).
2
7
3
1
6
INSTALL HANDLES
CROSS HANDLE
Push ADAPTER (2) into HANDLE BASE (3) in a way that the male square on the ADAPTER (2)
fits in the female 8 point star of the HANDLE (4).
Turn HANDLE STEM (1) to the off position. Push HANDLE BASE (3), ADAPTER (2) and
HANDLE (4) onto VALVE STEM (1).
Tighten HANDLE SCREW (5).
Push INDEX CAP (6) in top of HANDLE (4).
LEVER HANDLE
Push ADAPTER (2) into LEVER HANDLE BASE (7) in a way that the male square on the
ADAPTER (2) fits in the female star of the HANDLE BASE (7).
Turn HANDLE STEM (1) to the off position. Push LEVER HANDLE BASE (7) and
ADAPTER (2) onto VALVE STEM (1).
Tighten HANDLE SCREW (6).
Check alignment, if not satisfactory aligned;
Push out ADAPTER (2) carefully.
Turn ADAPTER (2) either 45˚ or 90˚ so that male square on ADAPTER (2) catches different female square in LEVER HANDLE BASE (7).
Assemble and tighten HANDLE SCREW (6). Push INDEX CAP (8) in top of LEVER HANDLE BASE (7).
CROSS HANDLES
LEVER HANDLES
8
6
6
5
6
4
4
5
3
7
2
2
1
MAKE WATER SUPPLY CONNECTIONS
NOTE: FLEXIBLE SUPPLIES OR BULL-NOSE RISERS MUST BE PURCHASED SEPARATELY.
Connect water supply to FAUCET (1) with 1/2" IPS FLEXIBLE SUPPLIES (3)
or 3/8"O.D. BULL-NOSE RISERS (4). Use adjustable wrench to
tighten connections. Do not over tighten. Be careful not to kink copper
supply when bending. Use tubing cutter to cut to proper length.
1
COUPLING NUT
4
3
FERRULE
.3&7
FITTING WITH SPRAY
Place SPRAY HOLDER (1) into separate hole of SINK (2) and
assemble NUT (3) onto shank from underside of SINK (2).
1
Hand tighten NUT (3).
2
3
FITTING WITH SPRAY
Feed SPRAY HOSE (1) through SPRAY HOLDER (2) and
attach COUPLING NUT (3) of HOSE (1) to HOSE ADAPTOR (4)
on valve body. Tighten COUPLING NUT (3) firmly.
1
4
2
3
TEST INSTALLED FAUCET
Remove AERATOR. With handles in OFF position, turn on water supplies and check all connections for leaks.
Operate both HANDLES to flush water lines thoroughly. Rotate SPOUT in both directions. Replace AERATOR.
Direct SPRAY HEAD into sink and activate SPRAY. Check HOSE connections for leaks.
If faucet drips proceed as follows:
Aerator may accumulate dirt causing distorted and reduced water flow. Remove aerator and rinse clean.
If spout drips, operate handles several times from OFF to ON position. Do not force-handles turn only 90˚.
EverClean™ Finish Care Instructions
American Standard’s EverClean finish will wipe clean with a soft, dry cloth. A soft cloth with clean
water may also be used, if desired. No additional cleaning products are required.
DO NOT USE: Soaps, acid, polish, abrasives, harsh cleaners, or a cloth with a coarse surface.
.3&7